A subscription refers to the ongoing service provision under the terms and conditions of an agreement. Subscriptions are mapped to agreements and each agreement can contain one or multiple subscriptions.
You can order new subscriptions through the platform and also manage your existing licenses through the interface, including purchasing additional licenses and canceling the previously purchased ones. The Subscriptions page in the platform is your entry point to accessing your subscriptions.
You can access the Subscriptions page by selecting Marketplace > Subscriptions from the main menu.
The Subscriptions page displays key subscription properties. It also contains a Buy more option, which gives you quick access to the Products page for ordering new subscriptions.
For each subscription, you can view the following:
Subscription - Displays the name and ID of the subscription.
Agreement - Displays the name and ID of the agreement associated with the subscription.
Licensee - Displays the name of the individual or legal entity to whom the subscription license is issued.
Buyer - Displays the buyer associated with the subscription.
Seller - Displays the SoftwareOne legal entity that fulfilled the order and issued the invoice.
Renewal date - Displays the renewal date of your subscription.
SPx - Displays the estimated subscription sales price.
Split billing - Indicates if split billing is enabled for the subscription. This column is displayed only for certain products in the platform. To learn more, see Split Billing.
Created - Indicates the date when the subscription was created.
Status - Displays the current status of the subscription. For details on the possible states, see Subscription States.
The details page of a subscription gives you in-depth information for a subscription. You can open the details page by clicking the subscription on the Subscriptions page.
The subscription details page displays all information for a subscription, such as name, renewal date, price, and more. The details page contains the following tabs:
Items - Displays the details of the ordered items, which include the name, quantity, and pricing.
Parameters - Displays the fulfillment parameters linked to the subscription. The parameter information varies depending on the parameters enabled by the vendor.
Entities - Displays the entities linked to the subscription and their details. Entities include licensees, buyers, and sellers.
Split billing - Displays the split billing information for the subscription. This tab is displayed only if split billing has been enabled for the agreement. You can view the split billing buyers and the allocation for each buyer. To update the buyer allocation details, use the Edit option. For details, see Edit Split Billing.
Orders - Displays the different types of orders associated with the subscription, including purchase orders, change orders, and termination orders. For each order, you can see the order detail and status. Clicking an order opens the order details page.
Details - Displays the additional IDs for the subscription, including the client and vendor IDs, and the timestamps of all changes made to the subscription. You can update the client ID using Edit. For instructions, see Edit Subscription ID.
Audit trail - Displays all events that have taken place within the subscription. For each record, you can view the audit log details and summary. To learn more, see Audit Trail.
The Marketplace Platform automatically assigns a default ID to each subscription when it's created. You can modify the default ID and assign a new ID of your choice.
IDs can only be changed for the Active, Updating, Terminated, and Terminating subscriptions. For a description of these states, see Subscription States.
Follow these steps to update a subscription's ID:
On the Subscriptions page (Marketplace > Subscriptions), click the subscription you want to update. The subscription details page opens.
Select the Details tab and then click Edit.
In the Edit ID dialog, enter the new subscription ID in the Additional ID field.
Click Save. The ID is updated and displayed as Client ID under Additional IDs.
In the Marketplace Platform, you can order subscriptions by creating an order through the purchase wizard. The purchase wizard starts automatically when you select a product from the Products page.
The wizard is designed to guide you through the ordering process smoothly. It contains navigation buttons, a vertical progress bar with step numbers and title, and a data grid.
The progress bar shows how far you have progressed and how many steps remain before the order can be placed. The steps are defined by vendors, so they might vary depending on the product. Additionally, the wizard might skip some steps automatically depending on the options you select.
The data grid is where the main content is displayed. This is where you can select different purchasing options, choose items, apply filters and sorting conditions, input your details, and so on.
The navigation buttons, such as Close, Back, and Next allow you to close the wizard and navigate between different pages respectively, although some buttons could be unavailable depending on your current step in the wizard.
Each step of the purchase wizard provides you with different options you can use to order subscriptions. The steps include some common steps that apply to each vendor and product and some dynamic steps that are vendor-specific. Note that you cannot use step numbers to navigate between different pages of the wizard. Navigation is possible using the Close, Back, and Next options only.
During the ordering process, you are prompted to choose whether to use an existing agreement or create a new one. Agreements are essential for placing orders on the platform. Without an agreement, you will not be able to complete your order. Therefore, you must make a selection in the Select agreement step, which will determine the subsequent steps in the wizard.
You can set up a new agreement if you are new to SoftwareOne or if your procurement needs differ from your existing contracts. Existing agreements can be used if you wish to add new items, adjust the quantity of licenses, and add new products to the same agreement.
If you select an existing agreement instead of creating a new one, you'll straightway see the Select items section, where you can choose the items you wish to order.
If you opt to create a new agreement, you'll need to select a licensee for the agreement. You can select an existing licensee or create a new one, and then provide the agreement's type and address information.
The purchase wizard also lets you enter additional IDs associated with your purchase. For example, in the Details step, you can enter a purchase order number in the Agreement Additional ID field. This number will then be displayed on your invoice. Additionally, you have the option to save your order as a draft order and complete it later.
The Review order step requires you to read and understand various terms and conditions associated with your order and confirm the order details. Clicking Place order creates a new purchase order, which is sent to the vendor for processing.
Once the confirmation is displayed, you can either Close the wizard or view your order details by clicking View details.
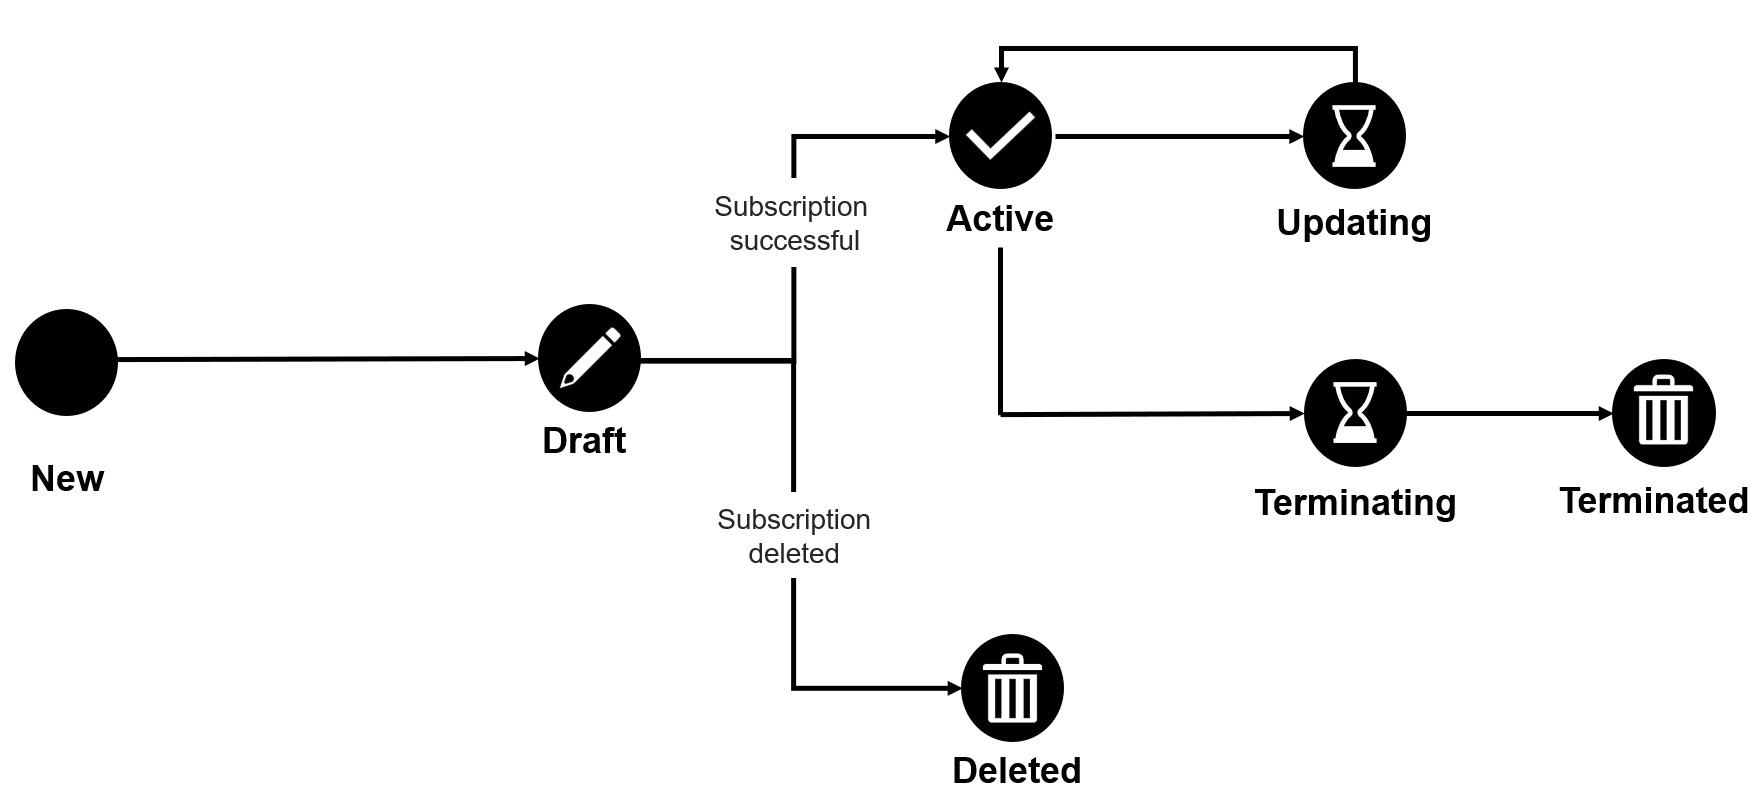
The following diagram shows the possible states of a subscription and the transition between these states:
Draft
The vendor has created the subscription, but the order has not been completed yet.
Active
The subscription is active and in use.
Updating
A business transaction is in progress for the subscription.
This status applies to change orders submitted for the subscription.
Terminating
A termination order has been created for the subscription through the Client Portal.
Terminated
The vendor has completed the termination order and the
subscription is now terminated.
Deleted
The draft subscription has been deleted by the vendor.
In some cases, you might need to rename your subscription so you can find it easily in your list of subscriptions.
The Marketplace Platform lets you rename your subscriptions in the Active and Updating states. Subscriptions can be renamed using the Rename option on the subscription details page.
Changing the subscription name only affects its display in the Client Portal. The updated subscription name will not be reflected in the vendor's system.
Follow these steps to rename your subscription:
On the Subscriptions page (Marketplace > Subscriptions), click the subscription you want to rename. The details page of the subscription opens.
Click the down arrow in the upper right and select Rename.
In the Rename dialog, enter the new name and click Save.
The subscription is renamed and the new name is visible across all pages that feature the subscription within the platform.


Subscriptions can be terminated if you no longer need them or you don't want to renew it.
As subscriptions are linked to agreements, the process for canceling your subscription varies depending on the number of active subscriptions in the agreement.
If your agreement contains several active subscriptions and you wish to cancel some, but not all, subscriptions in that agreement, you must place a termination order for the required subscription. The Terminate subscription section describes the steps.
If your agreement contains several subscriptions and you want to cancel all subscriptions, you must terminate the agreement altogether. You can do this by placing a termination order for the agreement. For instructions, see Terminate Agreement.
Before terminating subscriptions, note the following points:
You can only terminate subscriptions in the Active state. Subscriptions in any other state cannot be terminated.
Creating a termination order through the platform doesn't guarantee the cancellation of your subscription. All termination orders are sent to the vendors for approval. Subscriptions are terminated only after they are approved by the vendor.
Follow these steps to terminate an active subscription:
On the Subscriptions page (Marketplace > Subscriptions), click the subscription to terminate. The details page of your selected subscription opens.
Click the down arrow in the upper right and select Terminate. The Terminate Subscription wizard opens.
In the Terminate Subscription wizard, do the following:
In the Items step, review the item quantities and click Next. The license quantity will be displayed as zero.
In the Order details step, enter the reference details and your order notes, and click Next to continue.
In the Review order step, click Place order. The subscription termination order is placed and the agreement status changes from Active to Updating.
Click View order to go to the order details page. Otherwise, click Close to close the page.