Loading...
Loading...
Loading...
Loading...
Loading...
Loading...
Loading...
Loading...
Loading...
Loading...
Loading...
Loading...
Loading...
Loading...
Loading...
Loading...
Loading...
Loading...
Loading...
Loading...
Loading...
Loading...
Loading...
Loading...
Loading...
Loading...
Loading...
Loading...
Loading...
A perpetual license is a type of software license that requires a one-time upfront payment. Perpetual license purchases are also called one-time purchases in the Marketplace Platform.
Unlike a subscription plan, which requires ongoing payments to keep the license active, a perpetual license remains valid indefinitely and doesn't require recurring payments. See Perpetual Software to learn more about this licensing model.
The Marketplace Platform supports ordering perpetual licenses for the following products:
Microsoft Perpetual Software - Commercial
Microsoft Perpetual Software - Education
Microsoft Perpetual Software - Charity
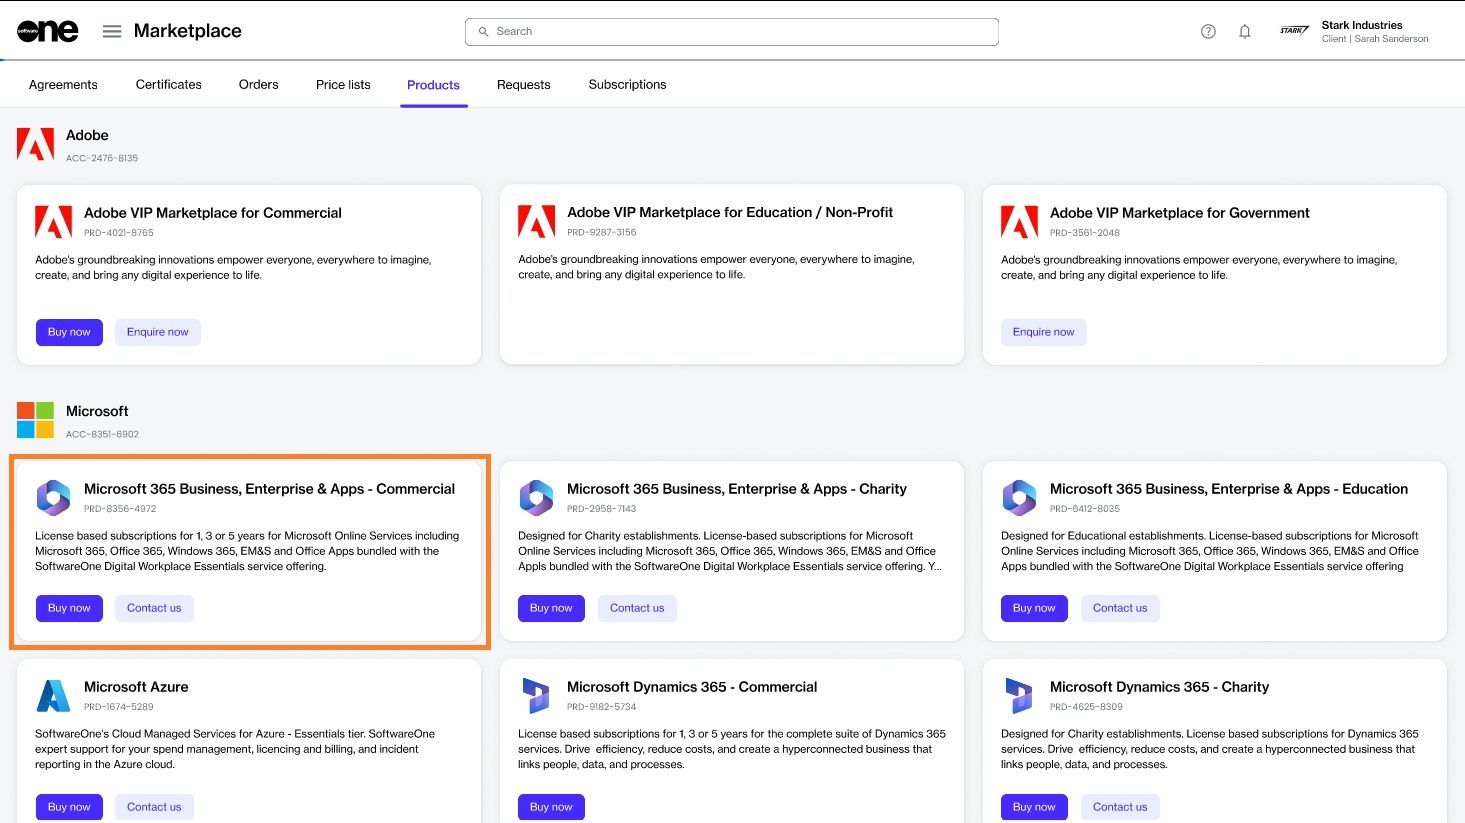
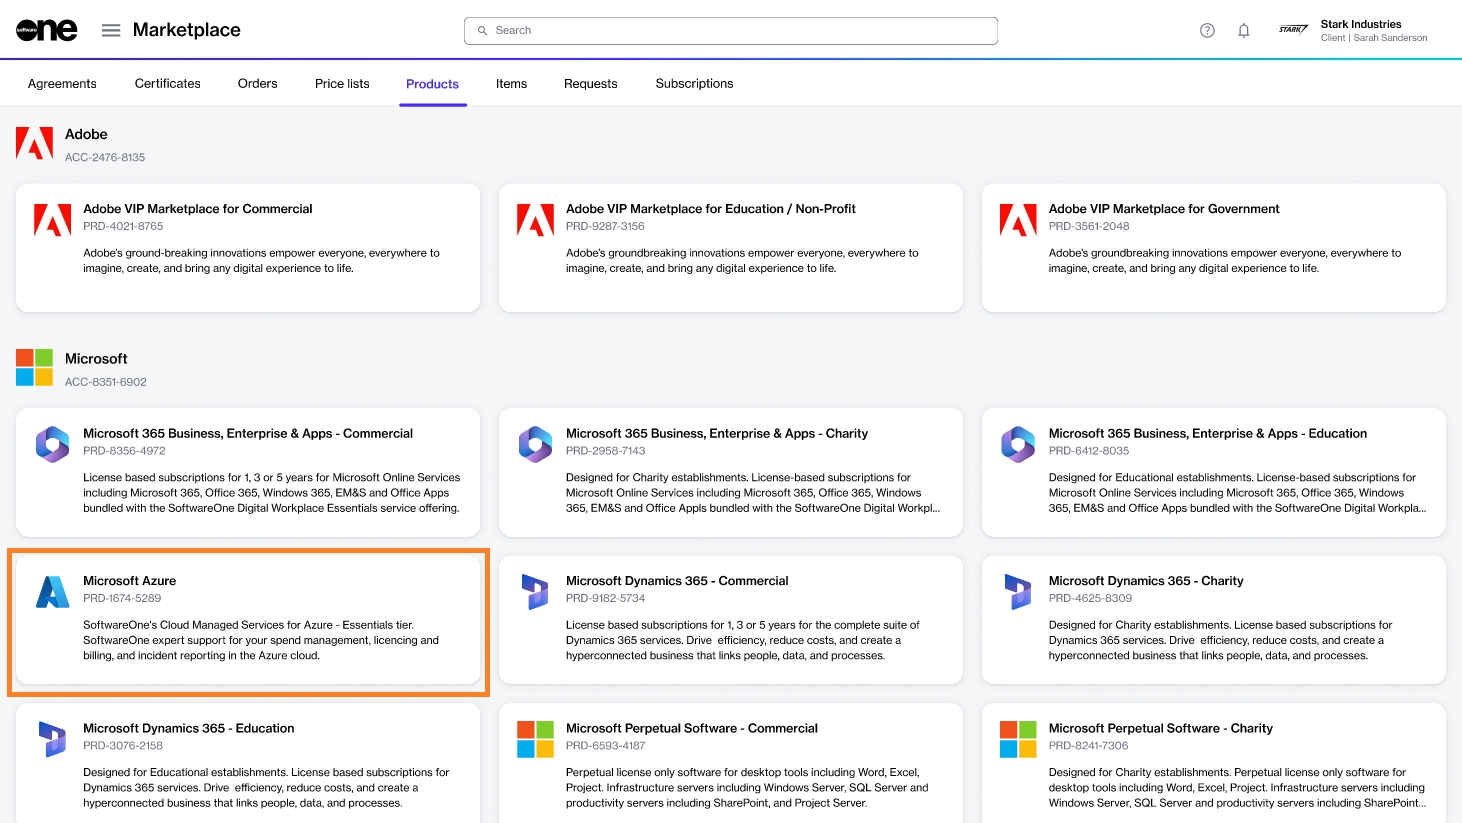
These products are available for ordering through the Products page in the platform:
You can order perpetual licenses for the supported Microsoft products by creating a purchase order. Purchase orders are created when you buy a product under a new agreement.
The steps to order perpetual software are like any other Microsoft product in the Marketplace Platform. For a general description of the ordering process, see How to Buy Products in the Marketplace. For detailed instructions, see Buy Perpetual Software Licenses.
The following specifics apply to perpetual software purchases:
Perpetual licenses require a one-time upfront payment, therefore, you can't increase or decrease the number of licenses. To buy more licenses of the same perpetual software, you must place a change order. For instructions, see Order Additional Perpetual Software Licenses.
Once your order has been completed and your license has been successfully set up, you can download your license keys from the Microsoft admin portal. You'll need the key to activate the software. For download instructions, see Microsoft's documentation: Download software and product license keys.
Cancellations are permitted within 30 days of the purchase date. For details, see Manage Perpetual Software Orders.
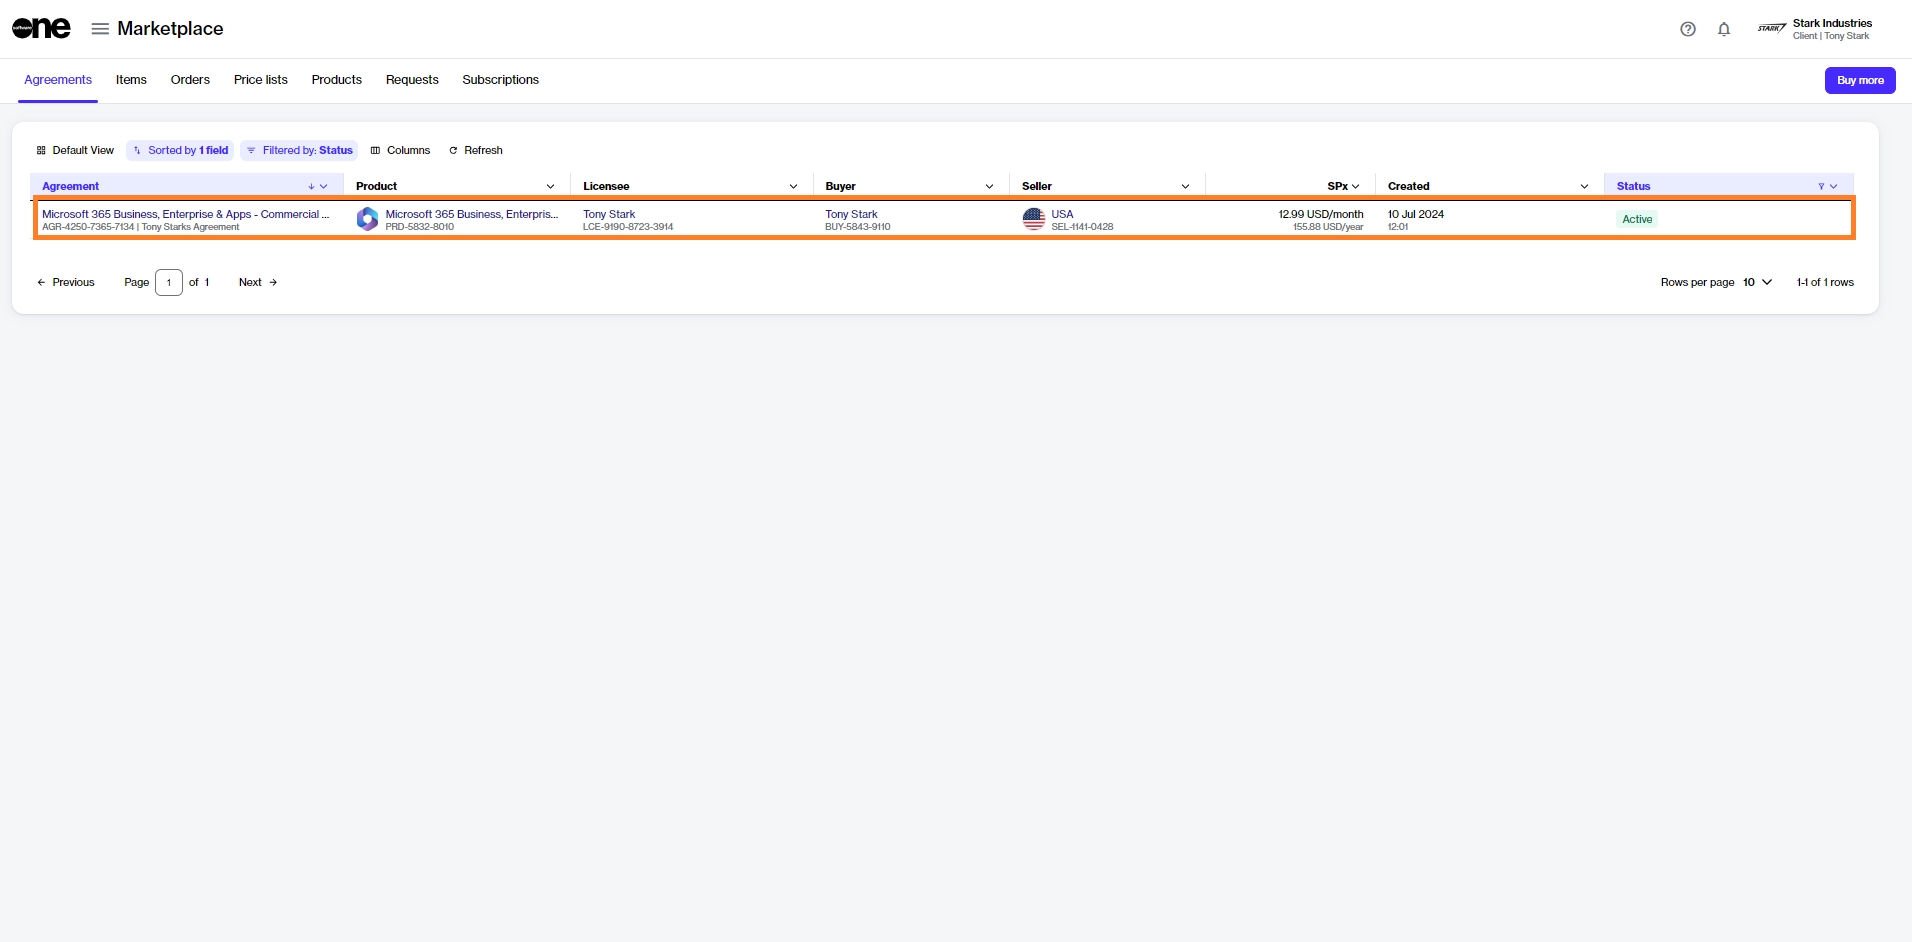
Perpetual license orders appear as one-time purchase on the agreement details page, as shown in the following image:
As your trusted Microsoft Cloud Solution Provider (CSP), we are excited to introduce you to a modern, flexible approach to traditional software licensing that combines the best of both worlds - the permanence of perpetual licenses with the convenience of cloud-based procurement through Marketplace Platform.
A perpetual license grants indefinite use of the software with a one-time payment. It means that once you have purchased a license, you can continue to use the software for as long as you want without any additional payments.
Perpetual licenses differ from subscription-based licenses where access to software is granted through recurring payments.
There are several reasons to choose perpetual software products, including:
Cost-effective, long-term ownership - With perpetual licenses, you make a one-time investment in industry-leading Microsoft software that grants lifetime usage rights. This is ideal for organizations focused on budget predictability, as it avoids ongoing subscription fees.
Robust, comprehensive software suite - Microsoft offers a suite of trusted applications, like Office, Windows Server, SQL Server, and more that are foundational to productivity, collaboration, and data management across industries. Once purchased, these tools provide long-term access to critical features without requiring a continuous internet connection.
Enhanced control & security - A perpetual license means your organization retains control over software deployment, updates, and overall security. This can be especially valuable in highly regulated industries where stability and compliance are essential.
No ongoing renewal requirements - Avoid renewal deadlines or license expiration worries. Perpetual software licensing provides peace of mind with indefinite access to essential programs, perfect for organizations looking to avoid disruption in their workflow.
This licensing model is perfectly suited for organizations that:
Have strict data sovereignty requirements necessitating on-premises software deployment
Operate in regulated industries where cloud adoption faces compliance challenges
Prefer predictable, one-time investments over recurring subscription costs
Need specific version control for application compatibility
Want to maintain complete control over their update and upgrade cycle
When it comes to procuring perpetual licenses, SoftwareOne is your trusted partner.
With deep Microsoft expertise, SoftwareOne ensures seamless license acquisition, deployment, and management through the Marketplace Platform, all backed by exceptional customer support and industry knowledge. Here’s why businesses choose SoftwareOne:
Expert guidance - Our licensing specialists help you choose the right Microsoft solutions tailored to your specific needs, budget, and operational goals.
Seamless procurement & deployment - Through our Marketplace, we simplify the purchasing process and offer smooth digital delivery, ensuring quick and easy access to your perpetual licenses.
Long-term support & compliance - With SoftwareOne, you’re not just purchasing software, you are gaining a partner in your software lifecycle management. We provide long-term support, help ensure compliance, and empower you to maximize your software investment.
Completing the Azure Lighthouse onboarding enables SoftwareOne to fulfill your Microsoft transactions, helping you streamline procurement and support.
To complete the onboarding successfully, you'll need the Microsoft Azure Subscription Owner role. For details, see Assign Subscription Owner Role.
Follow these steps to complete the onboarding process:
Sign to the Client Portal and navigate to the Orders page.
Open the details page of the required purchase order. You can open the details page by clicking the order ID.
On the General tab, select the Lighthouse activation link.
On the Azure Lighthouse Onboarding page, click Start Activation.
On the Microsoft Sign-In page, use the Azure Subscription Owner credentials to sign in.
On the Permissions requested page, review the permissions and click Accept.
In the Azure Lighthouse onboarding wizard, do the following:
Review the onboarding details and click Next. You'll see a list of Azure subscriptions under the logged-in tenant.
Select the checkbox for the subscription you wish to onboard. Any subscription that has already been onboarded in Azure Lighthouse will be considered ineligible and ignored in the next step.
Review the summary and click Confirm. The onboarding process begins and the progress is displayed.
When all tasks are completed, click Finish.
A confirmation message is displayed stating that the onboarding is complete.
After completing the activation, return to the order's details page in the platform and click Process to change the order status from Querying to Processing. To learn more, see Change Your Order's Status to Processing.
To , you must have the subscription owner role in Azure.
Global administrators can assign the subscription owner role to the user who will complete the Azure Lighthouse onboarding.
Sign in to the as a Global Administrator.
Verify that you have permission to add role assignments. To verify:
In the Search bar, type Microsoft Entra ID.
Go to the Properties tab.
Under Access management for Azure resources, set the toggle to Yes. Your global admin username should be visible.
Click Save.
In the Search bar, type Subscriptions, and then on the Subscriptions page, click the required subscription.
In the left pane, select Access control (IAM).
Select the Role assignments tab to view the role assignments at this scope.
Click Add > Add role assignment.
On the Privileged administrator roles tab, select the Owner role and click Next.
On the Members tab, select the user to assign the Owner role to and click Next. You must select the user you want to use for the Azure Lighthouse onboarding.
On the Conditions tab, select Allow user to assign all roles (highly privileged) and click Next.
On the Review + assign tab, click Review + assign.
The Owner role is assigned to the user and displayed on the Role assignments tab in Azure:
After assigning the role in Azure, navigate to the Orders page in the Marketplace Platform to complete the onboarding steps. For step-by-step guidance, see .
If you wish to cancel a one-time or perpetual software purchase, you can do so within 30 days of the purchase date without incurring an early termination fee. Cancellations are not permitted after 30 days.
If your cancellation is within the 30-day window:
All associated software keys and download links are revoked, preventing further use.
You are responsible for discontinuing use, uninstalling the software, and removing any downloads or links.
The canceled item will remain visible on the software details page in the Microsoft Admin Center, but the activation key will be disabled.
To cancel your perpetual software subscription, contact Marketplace Platform Support.
When contacting us, include your Marketplace order ID (available on the Orders page) in the request and a clear message stating that you wish to cancel your order. It's best if this request is made by someone within your organization who has the appropriate rights to request a cancellation.
License renewals are not supported for Microsoft Perpetual Software, as the license is provided for indefinite use following a one-time upfront payment.
If you wish to add more one-time items to your existing agreement, you can create a change order for the agreement. For instructions, see Order Additional Perpetual Software Licenses.
In the Marketplace Platform, renewal notifications are sent when your Microsoft CSP subscriptions are nearing expiration. We send these email notifications to inform you of your expiring subscriptions and to facilitate automatic renewal.
Renewal notifications are sent 1, 7, and 30 days before your subscription ends. If your subscription is currently active, you have the option to enable auto-renewal, which will allow your subscription to renew automatically.
Follow these steps to manage your subscription:
Open your renewal notification and click Manage Subscription.
In the Subscription Auto-Renewal form, turn on Auto Renewal to let your subscription renew automatically. If you don't enable auto-renewal, your subscription will expire on the renewal date.
Click Save to submit your request.
You'll receive a confirmation email once your subscription status is updated. Note that processing your request might take up to 24 hours.
If you want to stop receiving emails about your upcoming renewals and subscription status, use the Manage your notification settings link in the renewal email to adjust your preferences.
This tutorial walks you through the steps required to order a Microsoft 365 subscription by setting up a new agreement.
In this scenario, you'll be setting up a new Microsoft tenant.
Before starting this tutorial, make sure you have the following:
Your company details, like the company name, registration ID, and address. These details are required for creating a new Microsoft tenant.
The contact details of the person who will manage your Microsoft account.
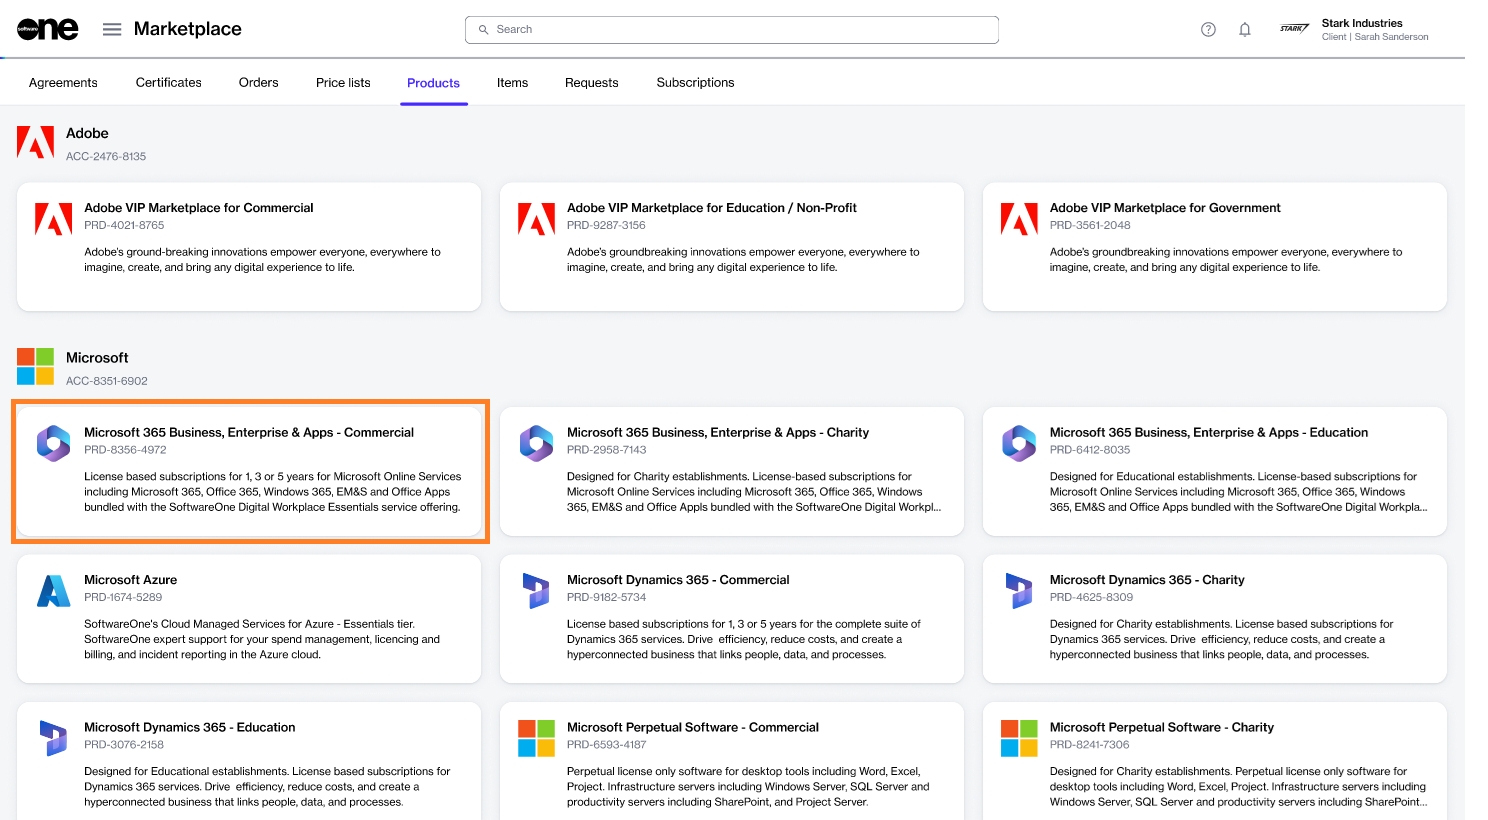
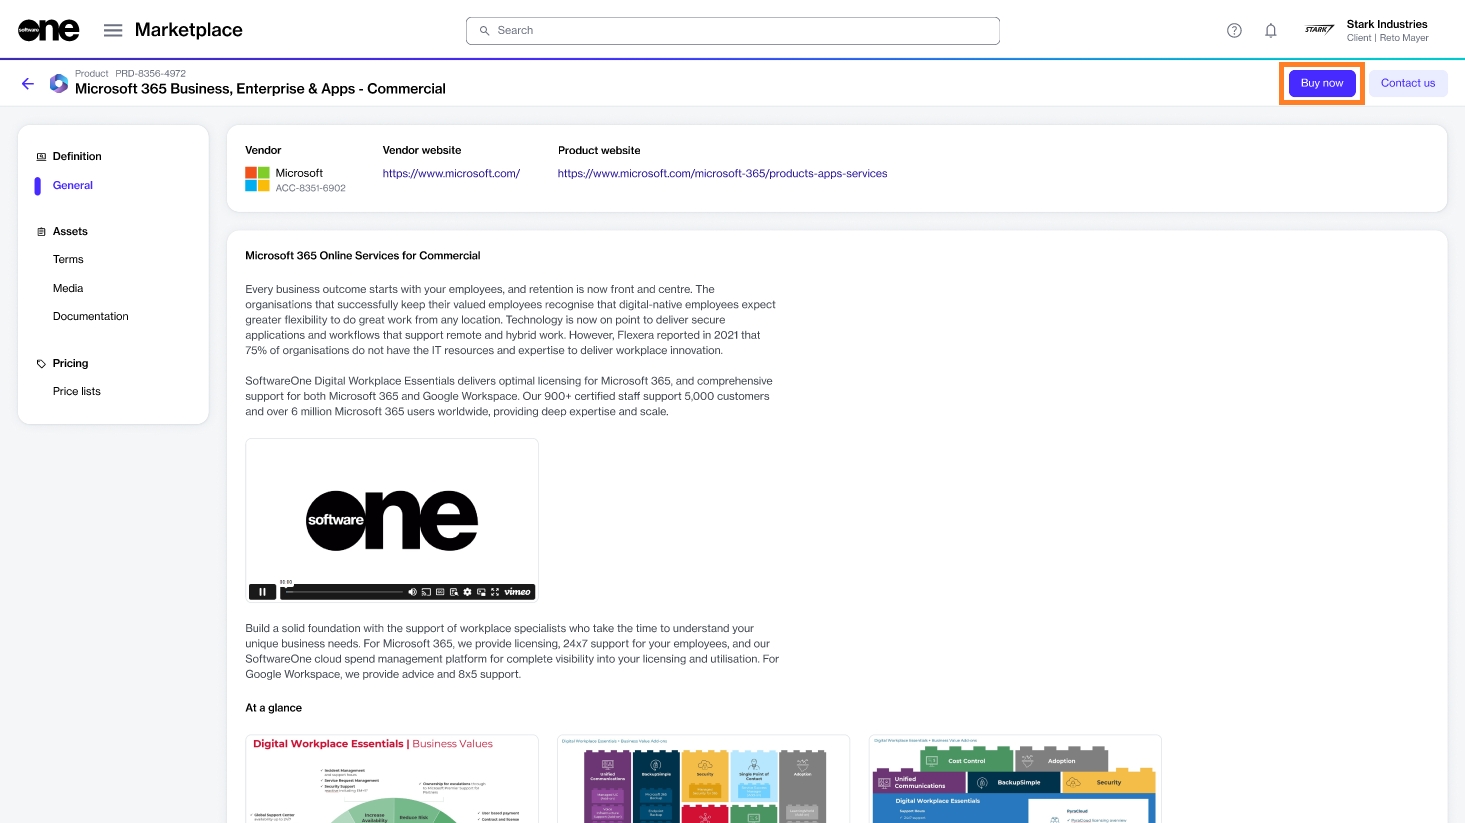
On the Products page (Marketplace > Products), select Microsoft 365 Business, Enterprise & Apps - Commercial.
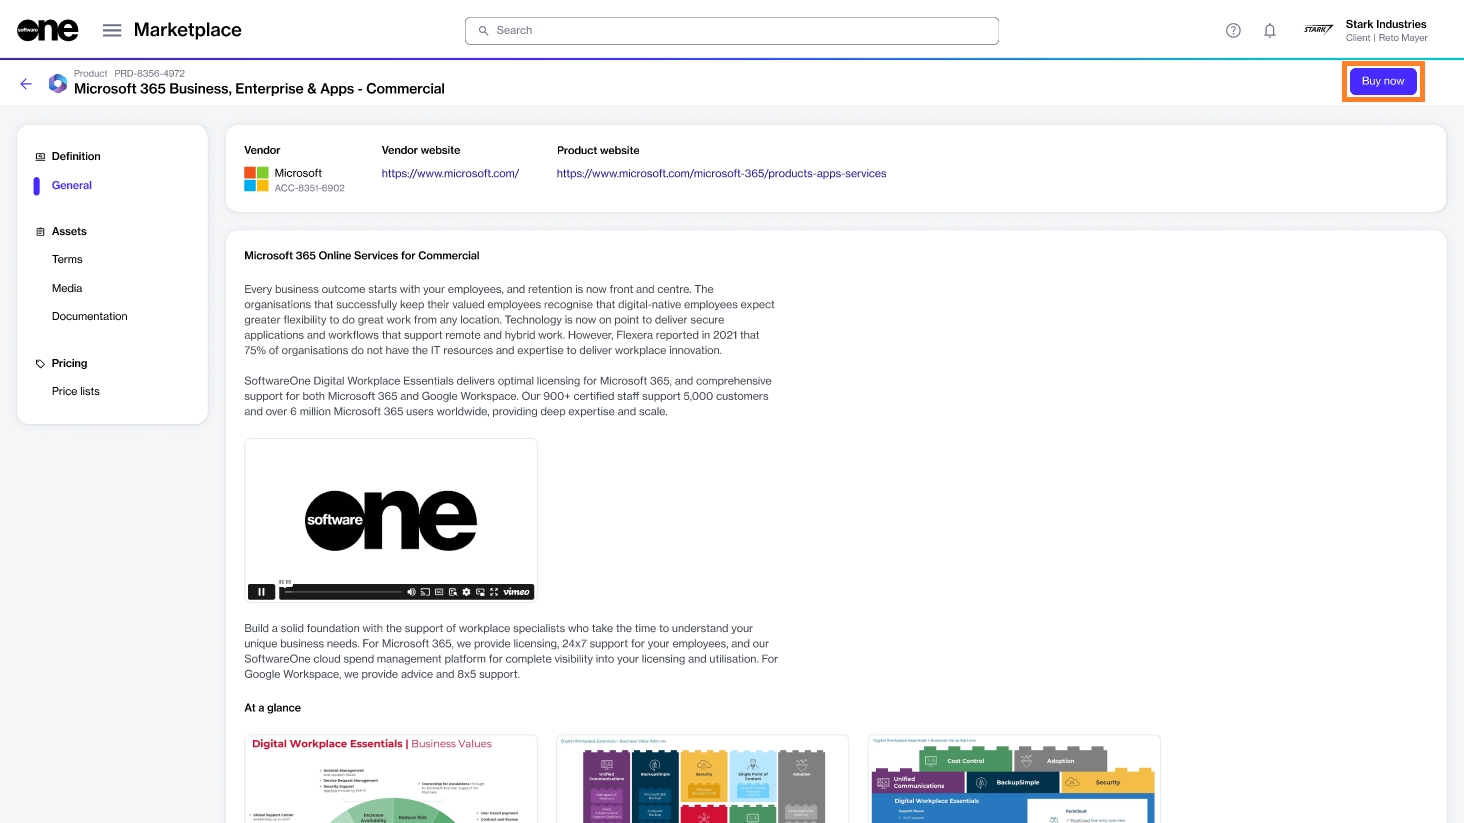
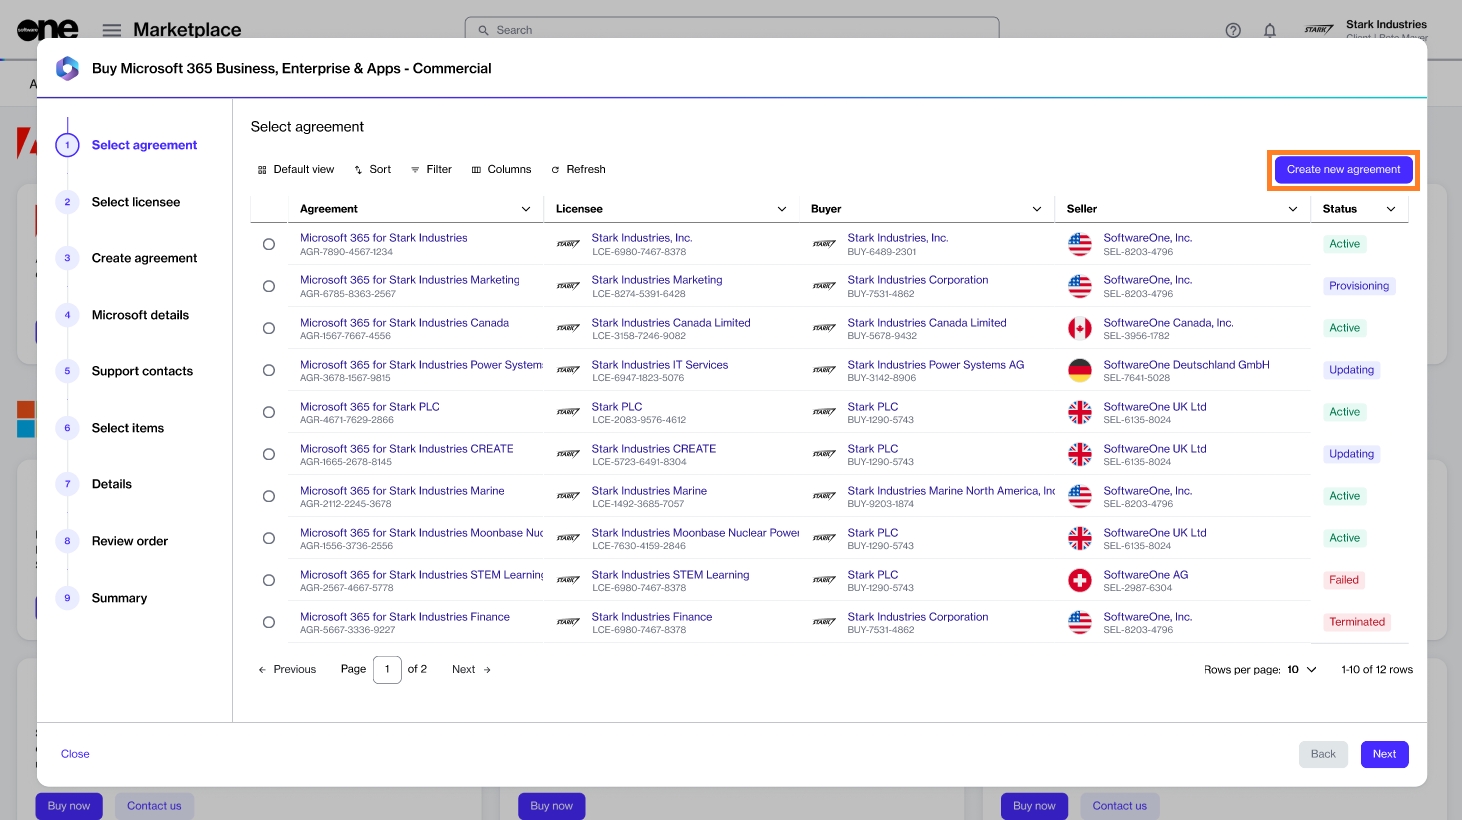
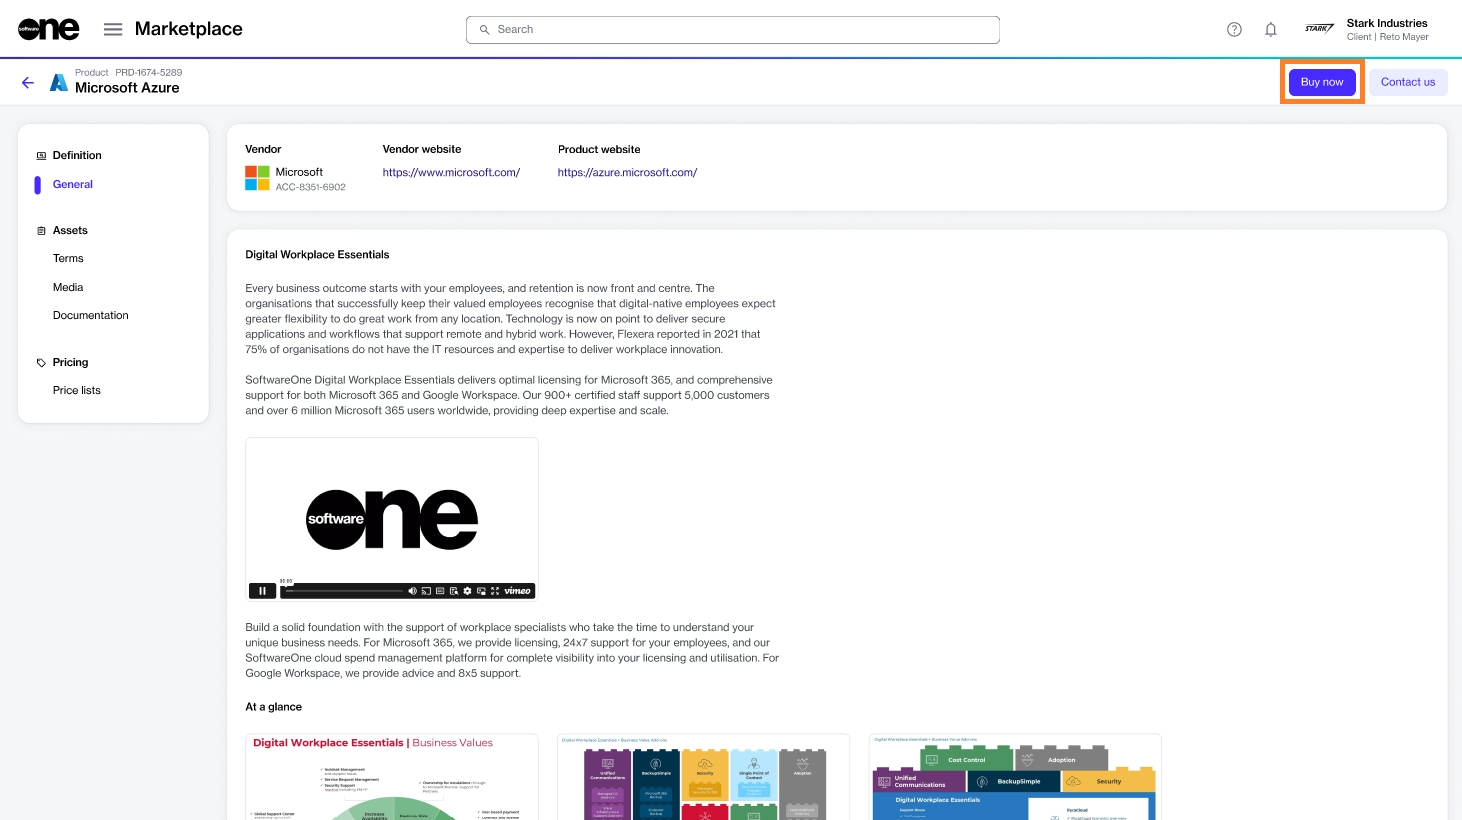
Click Buy now in the upper right on the details page. The purchase wizard starts and the Select agreement step of the wizard is displayed.
Click Create agreement to set up your new agreement in the platform.
Click Next.
Select Create new cloud account to create a new organisation tenant with Microsoft and establish a relationship with SoftwareOne.
Click Next.
(Optional) Click Access tenant name availability tool to check if the name you want to provide for the new Microsoft cloud account is available.
Enter the tenant name you want to use on the onmicrosoft.com domain. Make sure that the name doesn't include punctuation marks or spaces.
Click Next. The platform validates the details you entered.
Fill out the contact form and click Next. You'll need to provide the following details:
Company name.
Company registration ID or tax number.
Company address, including city and zip/postal code.
Contact details of the person who will manage your account.
These fields are enabled only after the platform validates your Microsoft tenant details.
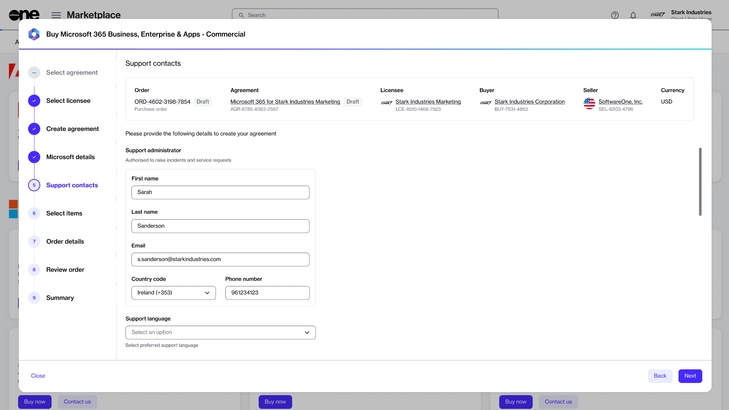
Enter the contact details of your support administrator and choose your preferred support language.
Click Next.
Choose the items you want to order and then click Add items. You can select multiple items. When the items are added, the Select items section is displayed.
Review and adjust the license quantity as required and click Next to continue.
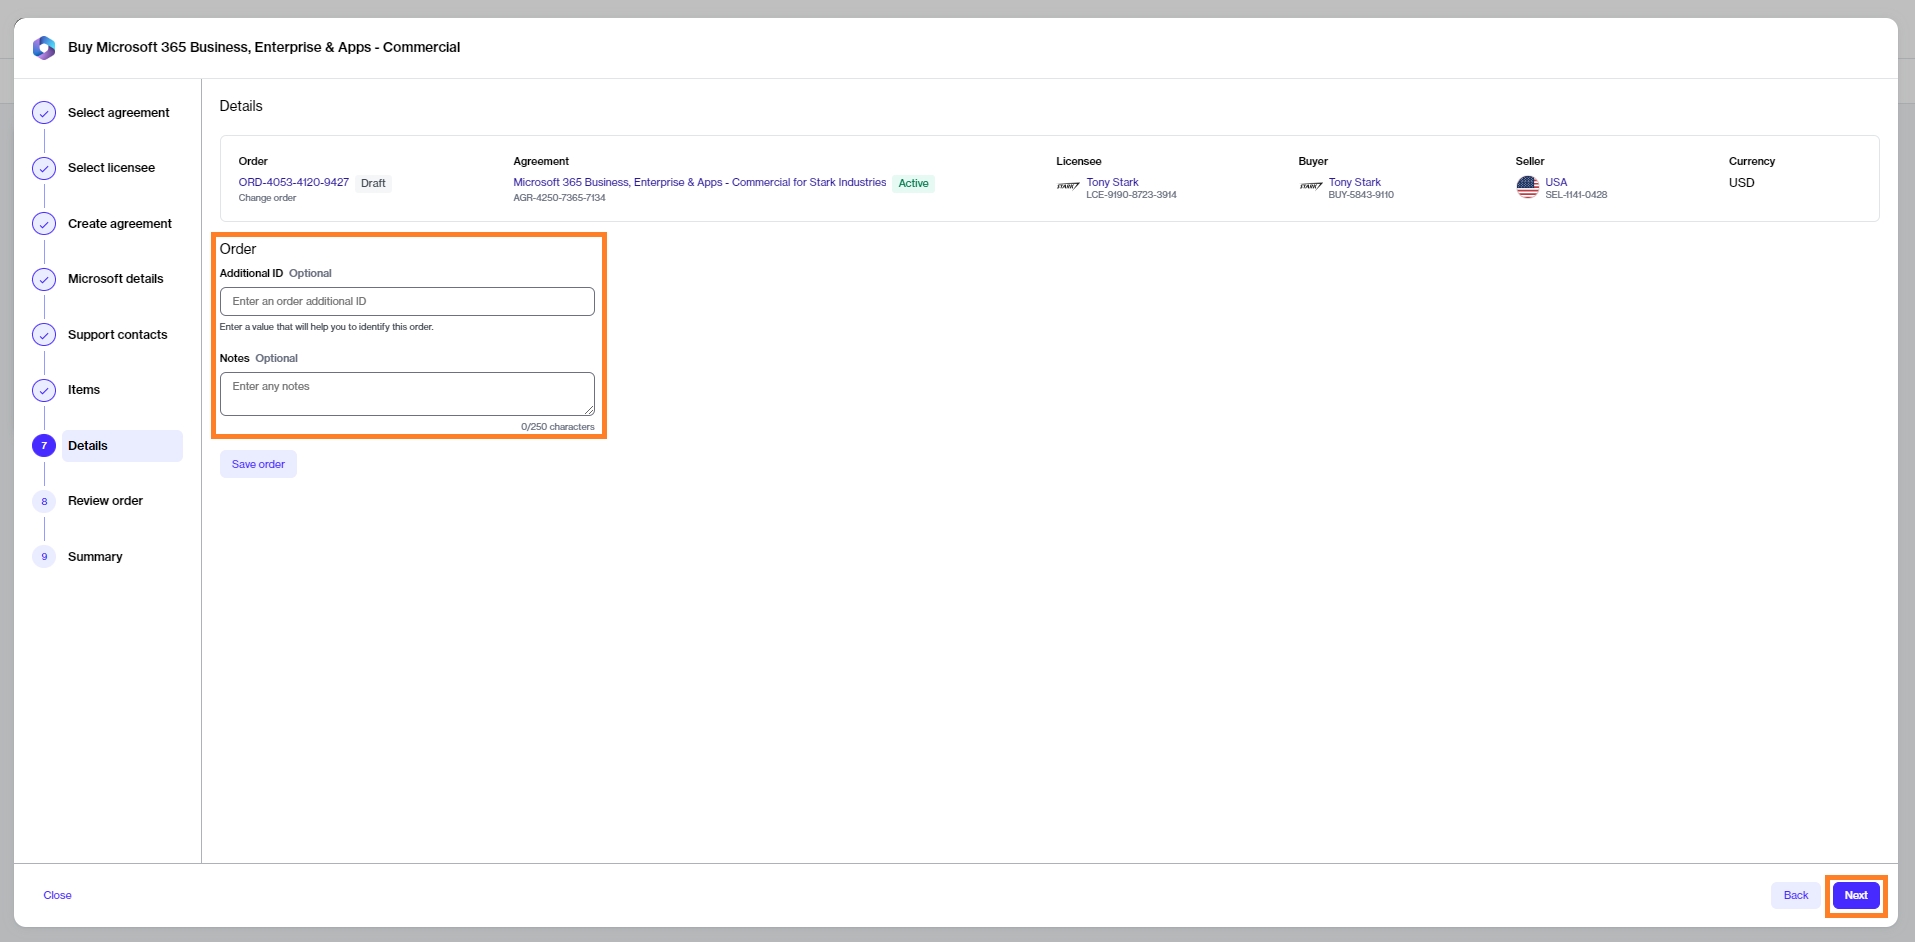
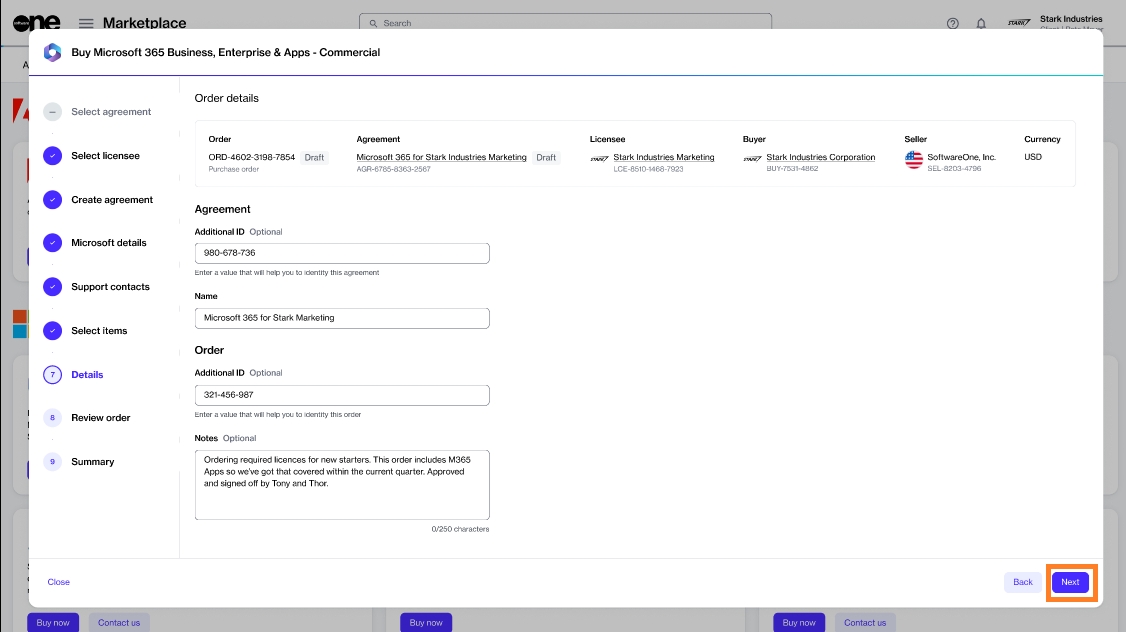
Add the additional IDs and notes associated with this purchase, and click Next.
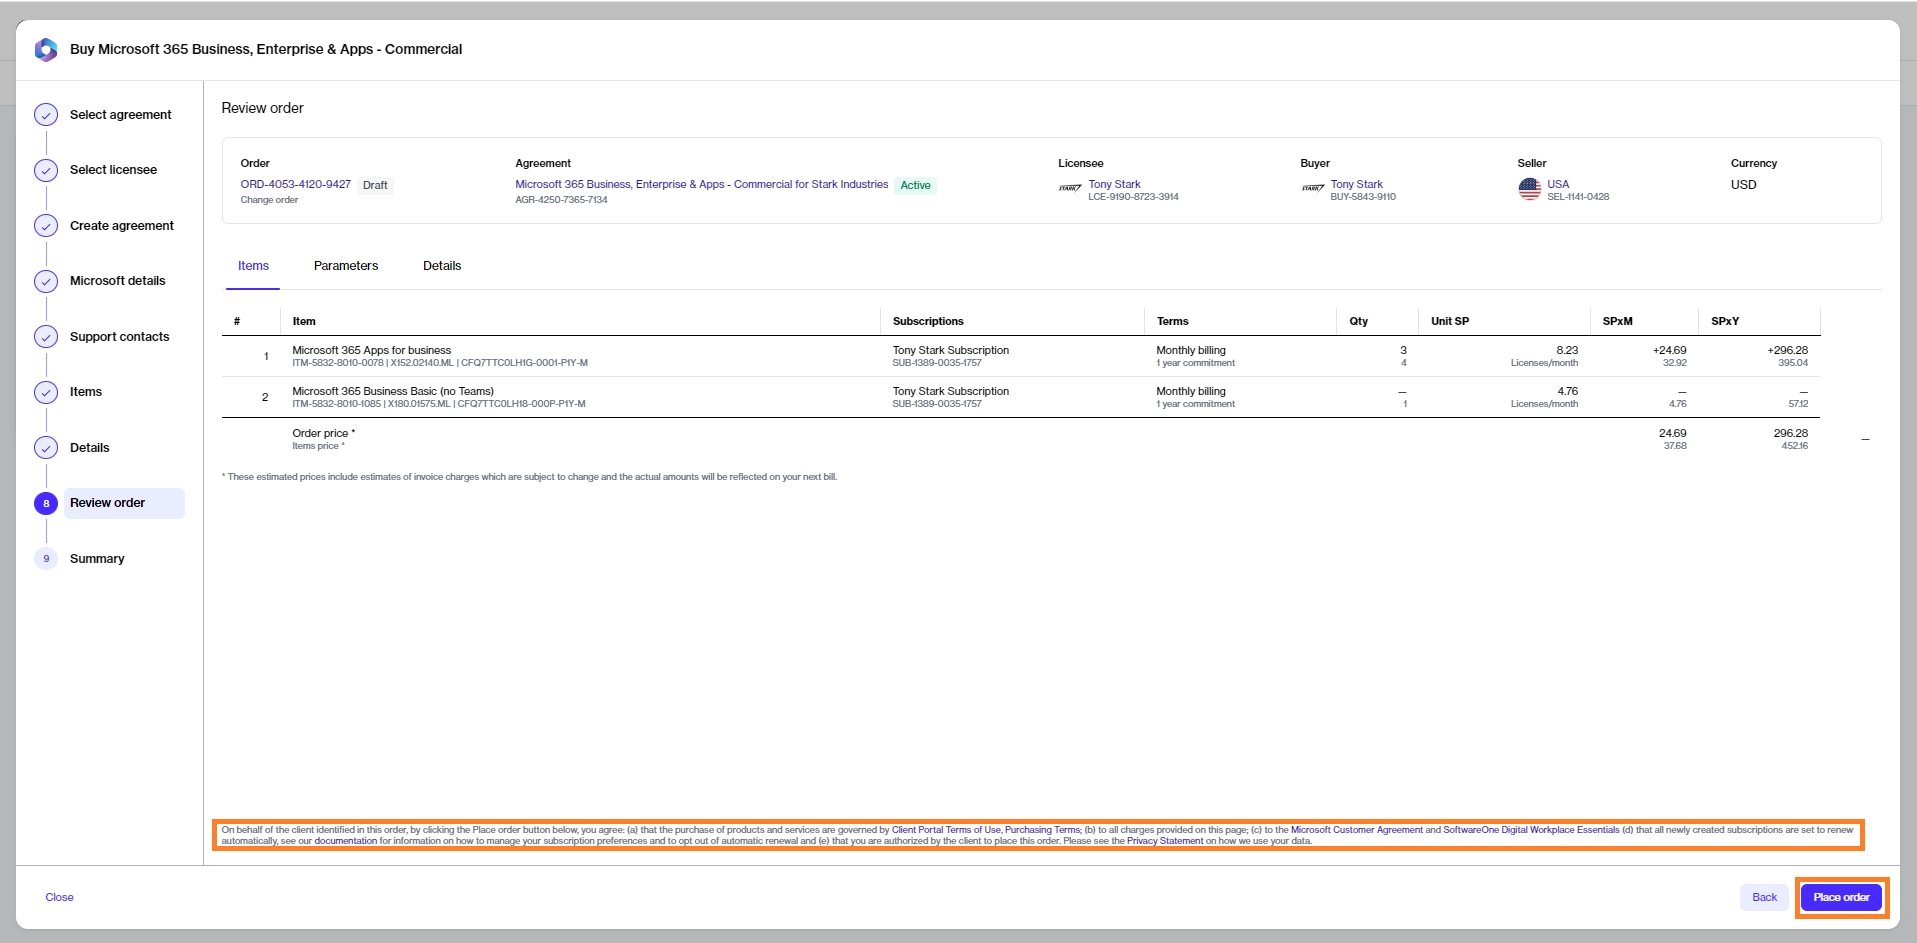
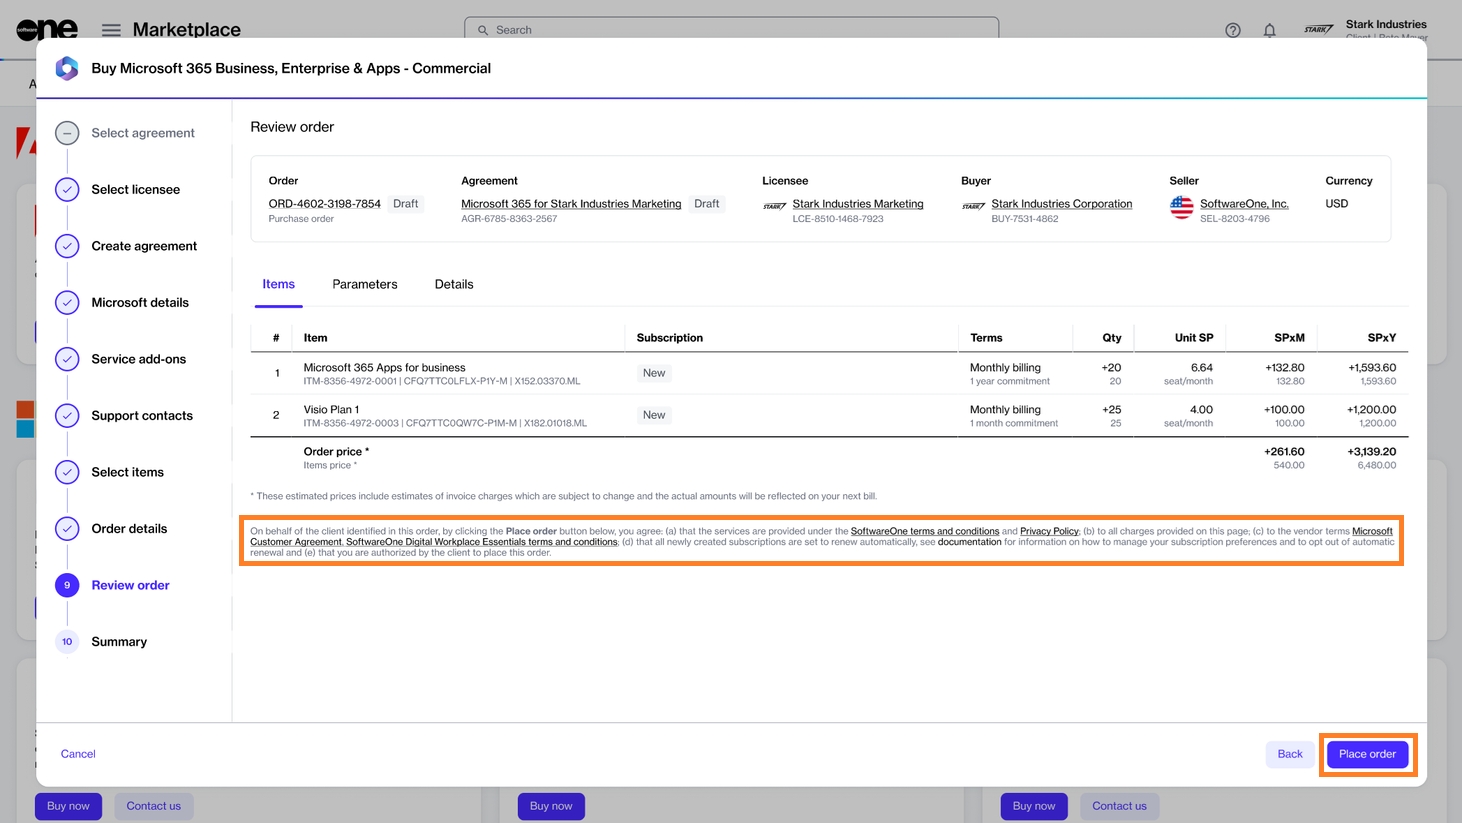
Review the details of your order. Make sure to read the terms and conditions associated with this purchase, including the privacy statement. By placing the order, you accept all terms.
Click Place order to complete your purchase.
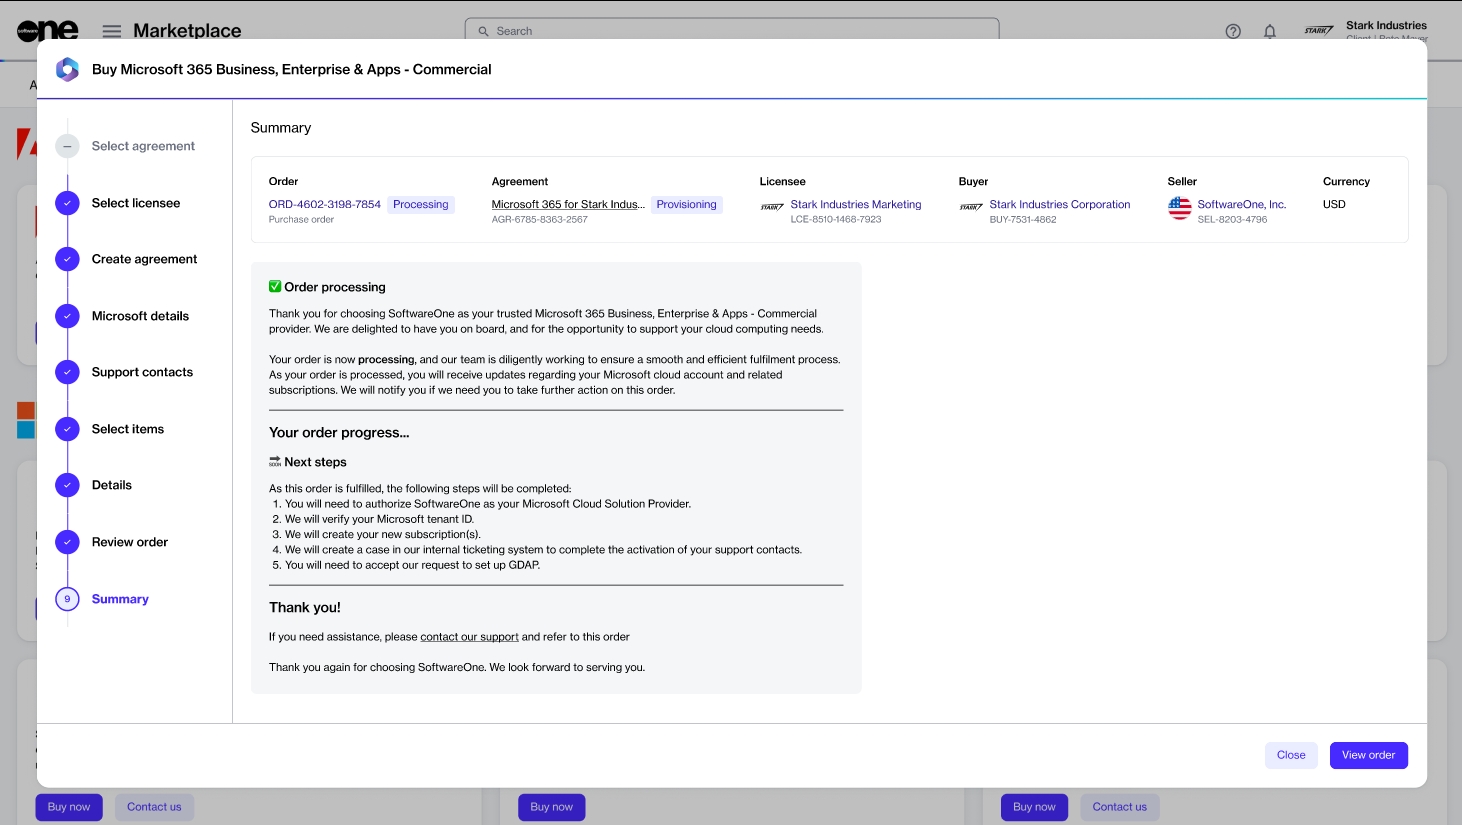
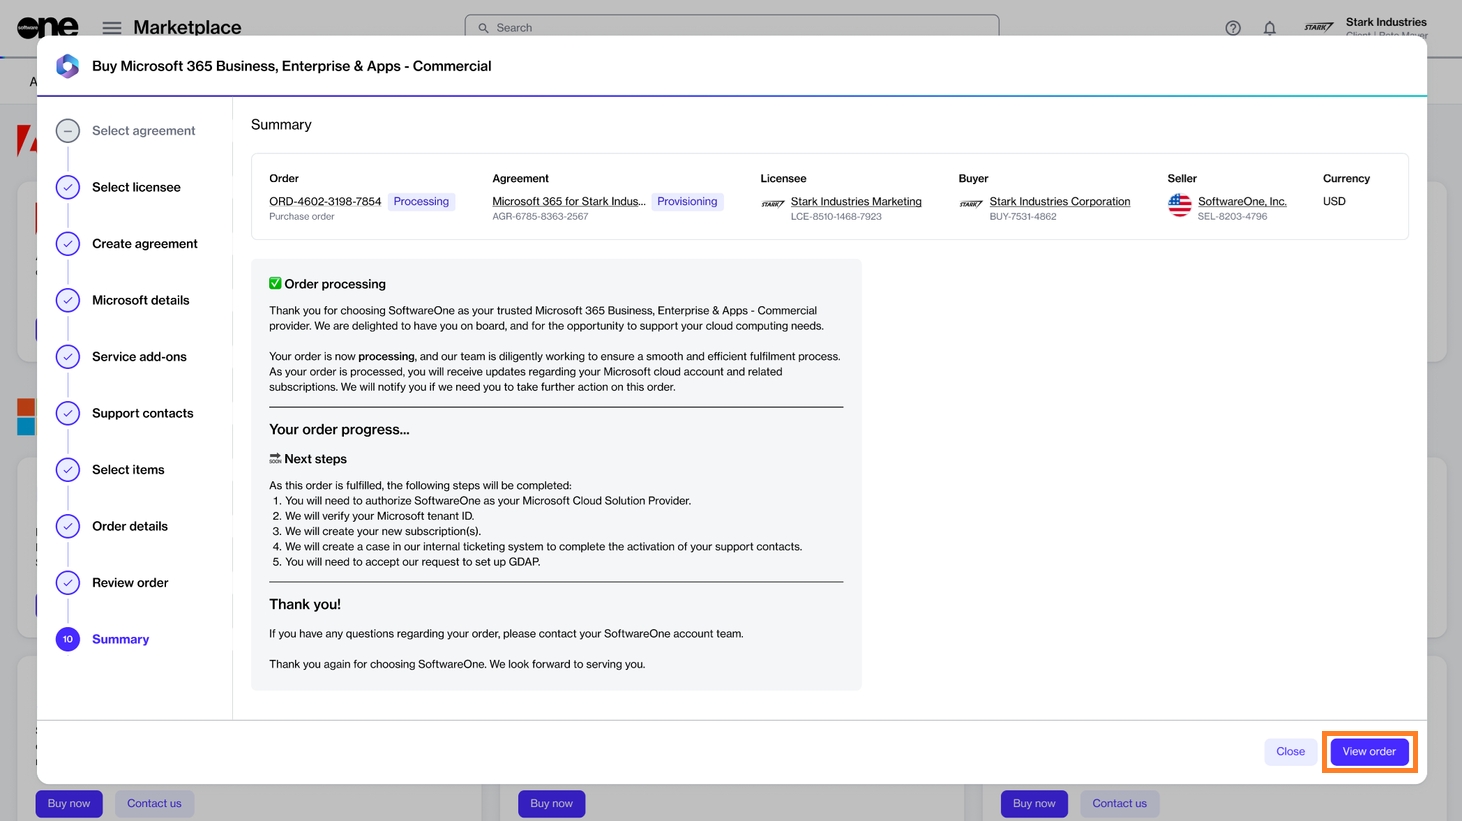
View your order summary and the latest status message. Click View Order to navigate to the order details page. Otherwise, click Close to close the Summary page.
After your order is submitted for processing, we'll confirm your Microsoft tenant and create your new subscription.
Microsoft 365 is a software product that gives you access to different apps and cloud-based services. With Marketplace Platform, you can easily order new Microsoft Office 365 subscriptions and manage the existing ones.
Browse the following topics to learn about Microsoft Office 365 subscriptions.
A licensee in the active state or permission to if you don't want to use an existing active licensee. Licensee selection is required when setting up a new agreement.
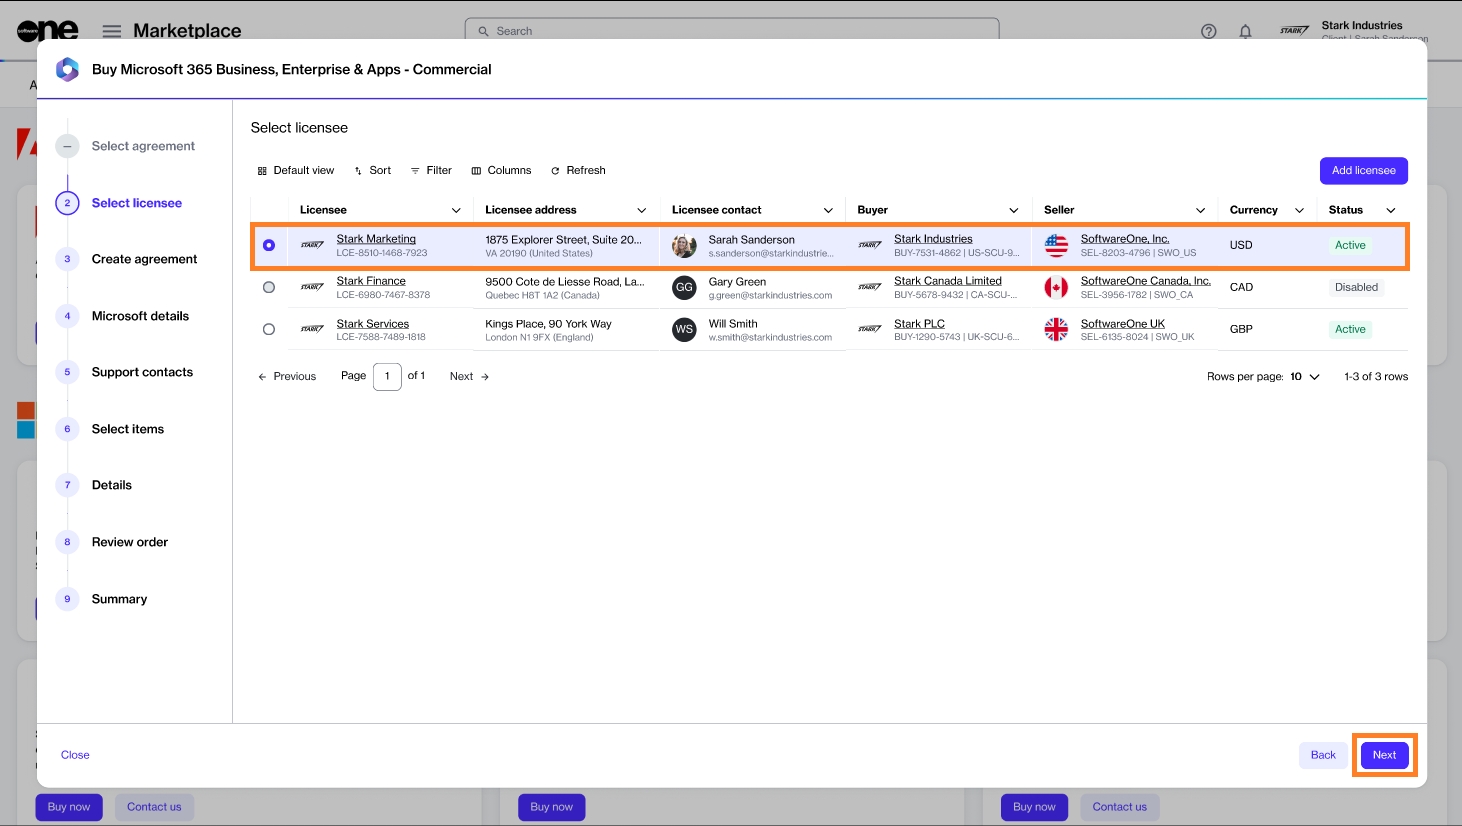
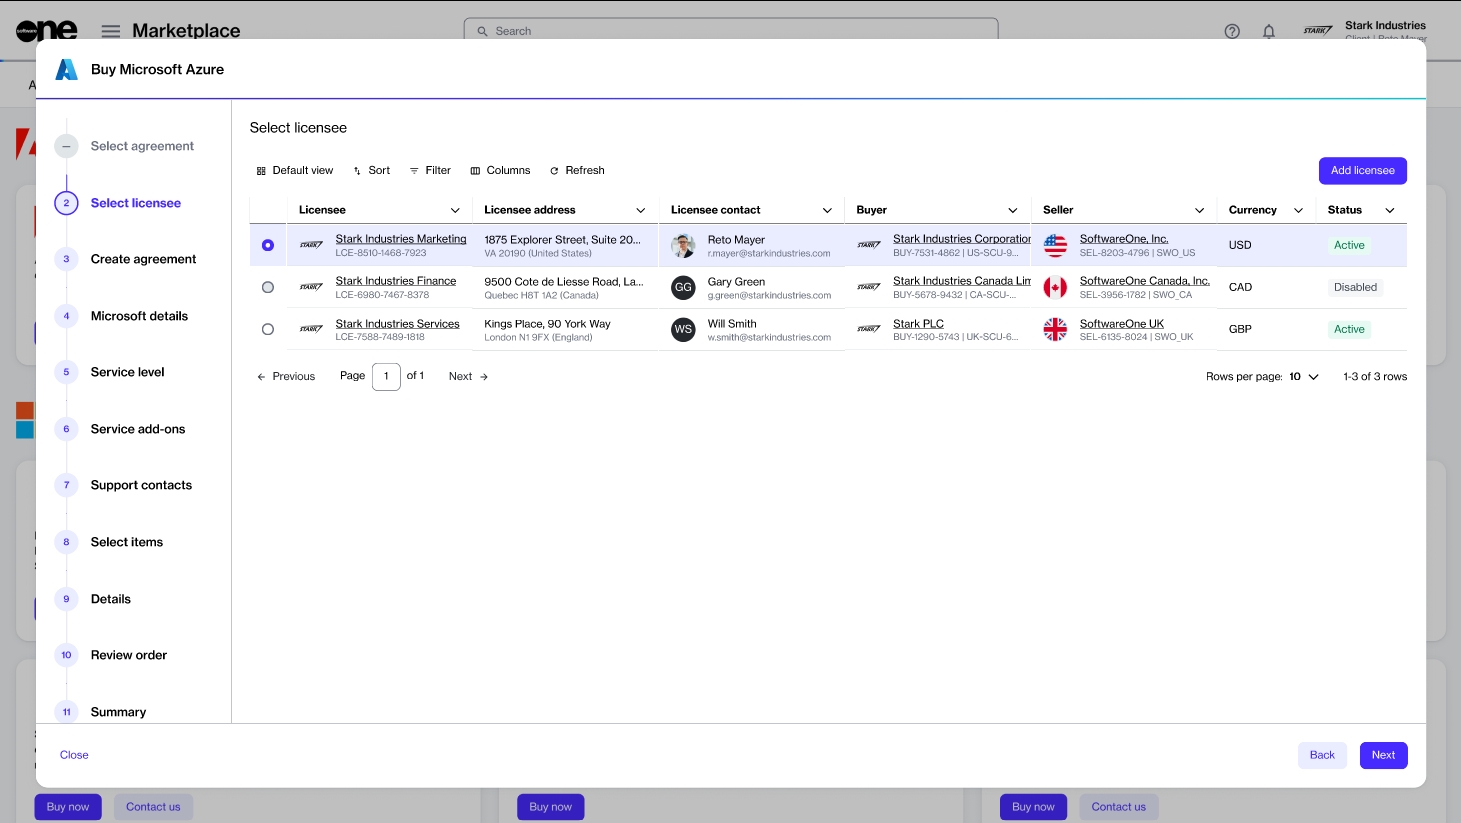
Choose the licensee you want to use for this agreement. In this tutorial, we'll select an existing licensee, but you can add a new licensee by clicking Add licensee. For more information, see .
Microsoft 365
Order Microsoft 365 subscriptions for a new Microsoft tenant.
Microsoft Azure
Order and manage your Microsoft Azure subscriptions.
Perpetual Software
Order new Microsoft perpetual software subscriptions.
The Microsoft CSP program is designed to provide businesses with easy access to Microsoft's cloud services, such as Microsoft 365, Dynamics 365, and Azure, through certified partners.
Working with a CSP provider like SoftwareOne offers numerous benefits and ensures a smooth onboarding process. These benefits include:
Tailored solutions - SoftwareOne can bundle Microsoft cloud services with additional offerings and services, creating customized solutions that meet specific business needs.
Expert support - Gain access to dedicated support from SoftwareOne's experts, who can help with everything from initial setup to ongoing management and technical issues.
Simplified billing - Enjoy the convenience of monthly billing and invoicing, making it easier to manage budgets and expenses.
Strategic guidance - SoftwareOne provides strategic guidance to help businesses optimize their use of Microsoft cloud services, ensuring they get the most value from their investment.
Scalability and flexibility - Easily scale services up or down based on business needs, with the flexibility to adapt to changing requirements.
The Marketplace Platform enables you to manage your onboarding process for Microsoft cloud services, from creating a Microsoft organization tenant to accepting the Microsoft Customer Agreement, and more.
You can track your Microsoft subscription purchases and manage the entire subscription lifecycle through the Marketplace Platform.
In the CSP program, various product types (or service types) are available, each with unique benefits and constraints.
Licenses for products such as Office 365 E3 are User Subscription Licenses; you need one license for each user. These products are also known as seat-based offers or license-based services and include all the Office 365, Microsoft 365, Dynamics 365, and Windows 365 products.
When an order for a seat/license-based service is placed, a subscription is created. This is essentially a container that holds the licenses that have been ordered.
A subscription may only contain a single license type (for example, Office 365 E3) associated with a single commitment term (for example, 1 year) and a single billing frequency (for example, annual).
Software Subscriptions are available for Windows Server and SQL Server and for a fixed subscription term of either 1 or 3 years.
They give access to the Azure Hybrid Benefit, which means that you may install the products on-premises or use them to license the products within an Azure virtual machine.
Consider the Server Subscription as the best friend of Azure Reserved Instances since they now offer the most cost-effective way to license predictable Windows and SQL Server workloads in Azure through the CSP program.
Perpetual software licenses are licenses for on-premises Microsoft products that you acquire in perpetuity. In the CSP program, the software is license-only (L-only) and does not include the option to add Software Assurance (SA).
Software licenses available in CSP include desktop tools such as Word, Excel, Project, and Visio; infrastructure servers that include Windows Server, SQL Server, Biztalk Server; and productivity servers that include Exchange, SharePoint, Skype for Business, and Project Server.
The Azure Plan new commerce experience gives CSP providers access to Azure services at pay-as-you-go (PAYG) rates for CSP clients under the Microsoft Customer Agreement. This plan simplifies the purchase experience.
You can have multiple Azure subscriptions in an Azure plan. In this new commerce experience for Azure, Microsoft has aligned to a single global pricing principle enabling CSP providers to offer Azure at the published prices.
You can execute each step of the onboarding process through the Marketplace Platform.
Consultation - SoftwareOne begins with a consultation to understand your business needs and goals.
Setup - SoftwareOne creates a Microsoft organization tenant for your business. This tenant acts as a dedicated instance within Microsoft's cloud, housing all users, resources, and data.
Configuration - SoftwareOne configures the tenant to align with your business requirements, ensuring optimal setup for security, compliance, and performance.
Understanding Terms - SoftwareOne guides you through the Microsoft Customer Agreement, explaining the terms and conditions for using Microsoft’s cloud services.
Agreement Acceptance - SoftwareOne assists you in accepting the agreement, which simplifies the purchasing process and provides clear terms regarding service usage, data privacy, and compliance.
Service Activation - Once the tenant is set up and the agreement is accepted, SoftwareOne provisions the required Microsoft cloud services for your business.
Integration - SoftwareOne integrates these services with your existing systems, ensuring seamless operation and minimal disruption to your business activities.
Customization - SoftwareOne can further customize the services to meet specific needs, such as setting up user roles, permissions, and additional configurations.
Training - SoftwareOne provides training to ensure your team can effectively use the new services.
Continuous Support - SoftwareOne offers ongoing support to address any issues and provide updates, helping your business adapt and grow with the evolving cloud landscape.
Optimization - Regular reviews and optimization services are provided to ensure you continue to get the most out of your Microsoft cloud investment.
For SoftwareOne to provide support to our customers, we require access to your workloads.
Granular delegated admin permissions (GDAP) is a security feature that provides CSP providers with least-privileged access following the Zero Trust cybersecurity protocol. It lets SoftwareOne configure granular and time-bound access to our customers' workloads in production and sandbox environments. This least-privileged access needs to be explicitly granted to SoftwareOne by our clients.
With GDAP, SoftwareOne can provide services to clients who might be uncomfortable with the high levels of partner access. GDAP also helps customers who have regulatory requirements to provide only the least-privileged access to partners.
New Commerce Experience (NCE) is a specific update within the CSP program that introduces changes to the pricing, licensing, and billing of Microsoft’s cloud services.
Overall, the NCE is a more flexible and predictable option for clients looking for a longer-term commitment to Microsoft cloud services.
NCE’s primary objectives are to simplify transactions, enhance customer purchasing experiences, and offer flexible pricing options. It aims to provide greater transparency and predictability in costs. This enables organizations to scale their services seamlessly based on their evolving needs.
The move to NCE for seat-based offers took place in 2022 following the move to NCE for Azure (Azure Plan), Azure Reserved Instances, and Server-based Software Subscriptions in October 2019 and the launch of Perpetual Software in CSP in 2020/21.
Starting 1 March 2024, the new commerce system launched education and non-profit offers.
Existing Commercial legacy seat-based offers can still be managed (quantity changes) and will continue to renew as legacy offers (until further notice).
When a subscription is created, it can have several states throughout its lifecycle.
NCE subscriptions can be in one of these states: Active, Cancelled, Suspended, Expired, Disabled, or Deleted.
Legacy subscriptions can be in one of these states: Active, Suspended, or Deleted.
The following table shows how the Microsoft subscription states are represented in the Marketplace Platform:
License-based New Commerce
(example: Microsoft 365 / Dynamics 365)
Active
Cancelled
Suspended
Expired
Disabled
Deleted
Active
Active
Terminated
Terminated
Terminated
Terminated
License-based Legacy
(example: Microsoft 365 / Dynamics 365)
Active
Suspended
Deleted
Active
Terminated
Terminated
Usage-based
(example: Microsoft Azure)
Active/Enabled
Deleted
Disabled
Expired
Active
Terminated
Terminated
Terminated
Perpetual
(example: Perpetual Excel license)
Active
Cancelled
Active
Terminated
Software subscription
(example: Windows Server CAL 1yr)
Active
Cancelled
Active
Terminated
For further information on CSP, contact your account team.
Azure Lighthouse is the ultimate solution for seamless multi-tenant management.
At SoftwareOne, we use this service to deliver top-tier management across your Azure environments with unmatched scalability, automation, and governance. Here’s why it’s a game-changer:
Cross-tenant management - Manage multiple environments in one place without switching between accounts, saving time and effort.
Scalability - With automation and standard processes, we handle an unlimited number of clients efficiently, no matter how large your Azure footprint is.
Enhanced governance - We operate with full transparency, giving you peace of mind as all activities are logged and visible to you and SoftwareOne.
Azure Lighthouse gives you full control and complete transparency while offering expert management and support from SoftwareOne.
Full access control - You decide who can access your environment, which resources they can manage, and what actions are permitted. You are always in control, even when working with service providers like us.
Complete transparency - Every action taken by SoftwareOne is logged in the Azure Activity Log, giving you full visibility into what changes are made, when, and by whom.
Top-notch security and governance - Our support engineers only have read-only access unless you grant explicit permission for higher-level actions, keeping your environment secure.
With Azure Lighthouse, SoftwareOne delivers a streamlined and secure management experience, optimized for performance at every scale.
Efficient service delivery - We provide top-tier managed services without the complexity of managing each tenant separately. Our focus is on delivering the best service, faster.
Scalable management - Thanks to automation, SoftwareOne manages multiple customers effortlessly, reducing operational costs and improving service consistency.
Security first - We follow strict role-based access protocols, ensuring that our team only gets elevated access with your explicit approval, minimizing any potential risks.
Not activating Azure Lighthouse may result in significant drawbacks for you and SoftwareOne:
For You
Limited visibility and control - You'll have less granular control over which service providers can access your environment and the actions they can perform.
Higher costs - Removing Azure Lighthouse access leads to increased Azure charges due to the lack of optimized management capabilities.
For SoftwareOne
Inefficient management - Without Azure Lighthouse, SoftwareOne faces increased complexity when managing multiple customers, reducing the efficiency of service delivery.
Security risks - Without built-in governance and role-based access controls, there's a higher risk of unauthorized actions within customer environments.
If you have any technical questions or concerns about the Azure Lighthouse activation process, contact our Services Support team. For details, see Contacting SoftwareOne Support.
This tutorial walks you through the steps required to add a new Microsoft product to your CSP agreement.
In this scenario, we’ll be adding Microsoft Power BI, but you can follow these instructions to add any Microsoft product to your existing agreement.
Before starting this tutorial, make sure that the CSP agreement you want to add the product to is Active. You can check the agreement status on the Agreements page as well as its details page.
You should also know how to navigate the platform to access your agreements & orders and apply filters.
Sign in to your account and navigate to the Agreements page.
On the Agreements page, select the required CSP agreement.
On the agreement details page, click Buy more.
The purchase wizard starts and the Items step of the wizard is displayed.
In the Items step, click Add items. A new window (also called Select items) will open displaying the available products that are available for you to order under this agreement.
Use filters to find the product you need. In this example, we'll search for Power BI using the following steps:
Click Add another condition and then use the dropdown to make the following selections:
Select Product Item Name.
Set the filter to Contains.
Type the name of the required product (in this case, Power BI).
Close the filter box.
Select all the individual items from the list. You can select multiple checkboxes.
When selecting items, be sure to verify the billing terms and the duration of the subscription.
Click Add items. Your selected items are added to the agreement, and the Select items step is displayed again.
Set the quantity of your newly added items in the New qty field and click Next.
In this step, you can also increase the quantities of your existing subscriptions.
Complete the remaining steps in the purchase wizard as follows:
In the Details step, add the additional ID and notes for your order and click Next. Note that it's optional to provide these details.
In the Review order step, verify the information and click Place order to finalize placing your order.
Click View details to go to the order details page or click Close to close the page.
You can check the status of your new order on the Orders page or in the Orders tab on the agreement details page.
Note that once you place the order, the agreement status changes from Active to Updating. You will not be able to place any additional orders under this agreement until your current order has been processed and the agreement status is changed back to Active.
This tutorial shows how to cancel a Microsoft subscription by placing a termination order for the specific subscription. In this tutorial, we'll terminate a Microsoft 365 subscription, but you can follow these steps for any product.
Before starting this tutorial, make sure that the subscription you want to terminate is active. You can check the subscription status on the Subscriptions page.
You must also be familiar with how to navigate the platform to view and manage your subscriptions.
Open the details page of the subscription you wish to terminate.
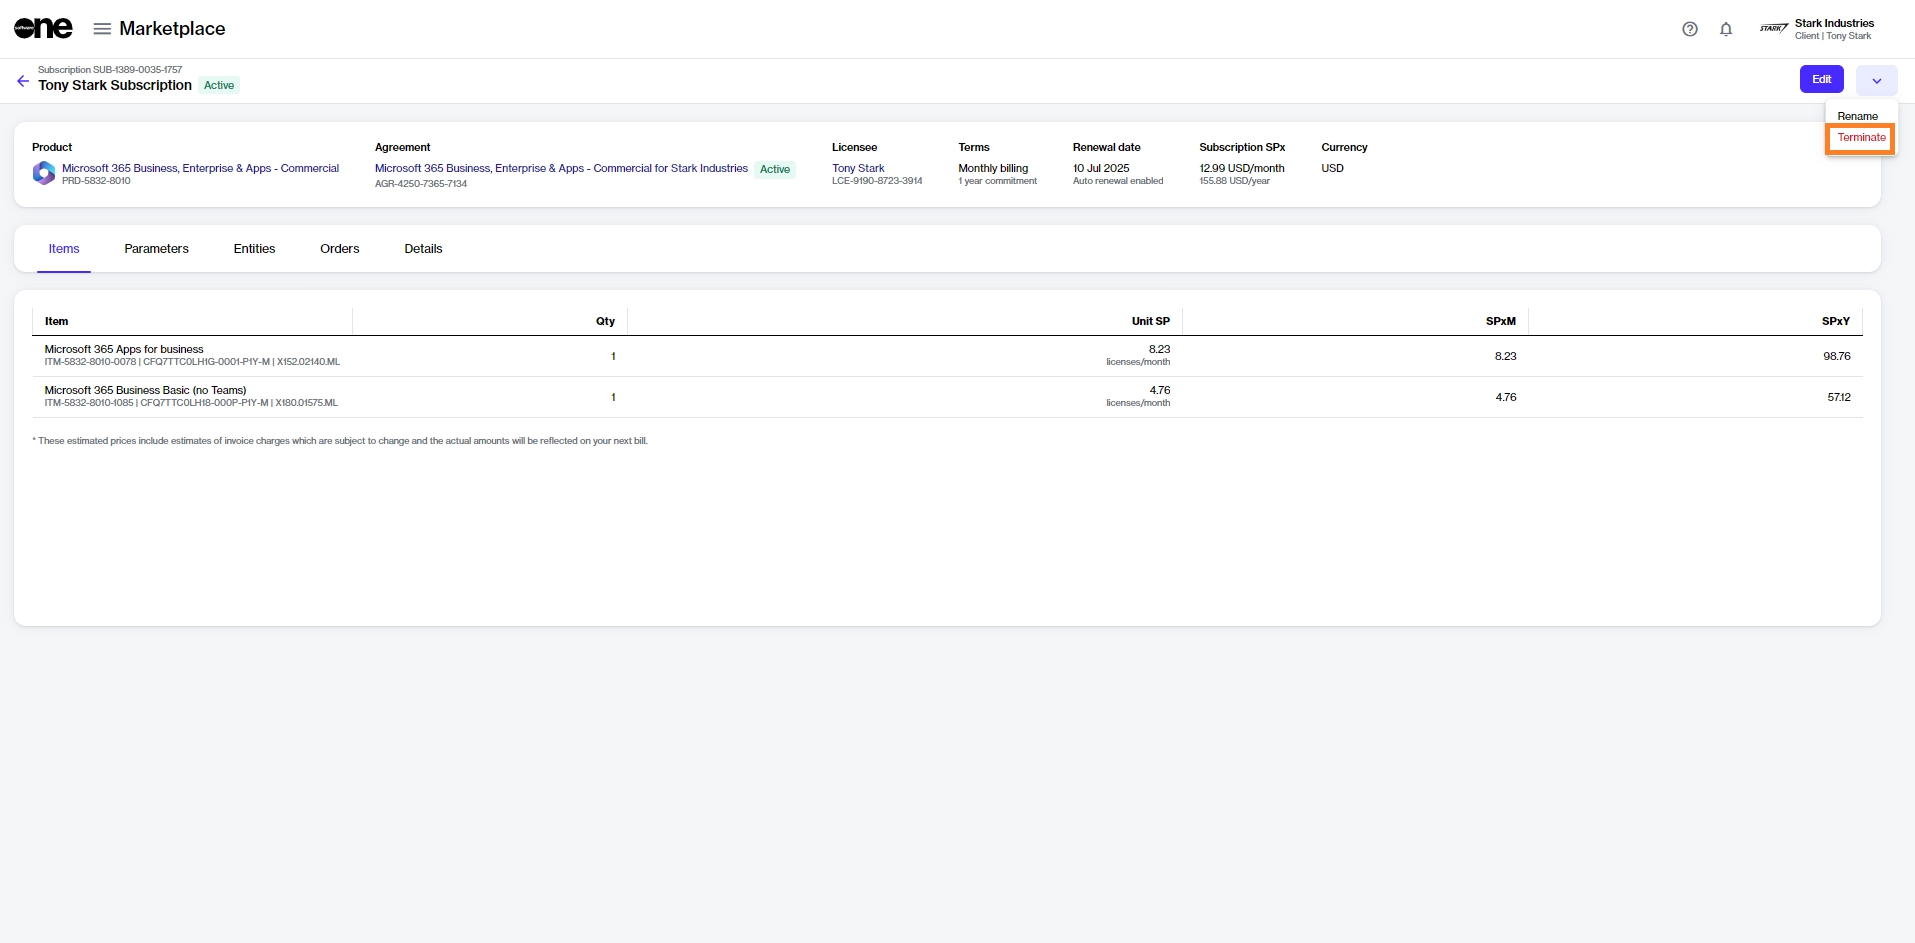
Click the chevron in the upper right and select Terminate.
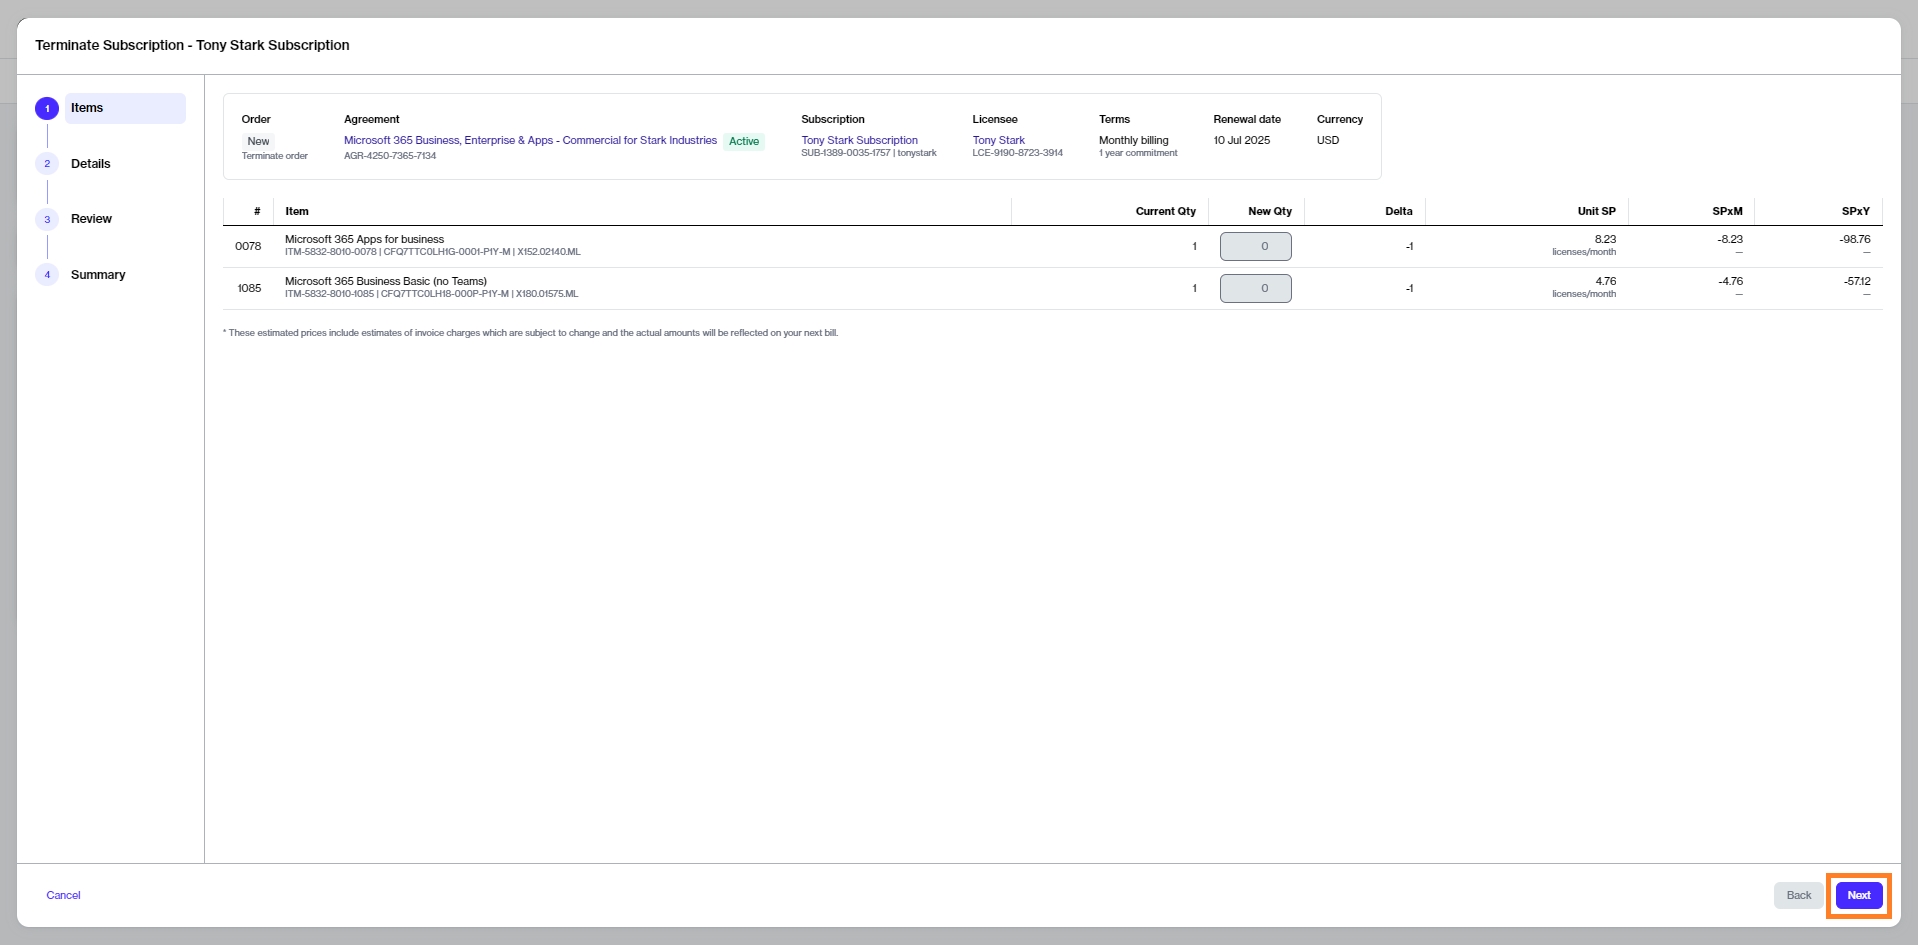
The Terminate subscription wizard starts and the Items step of the wizard is displayed.
Review the details in the Items step to ensure that the quantity of the subscription you want to terminate is zero. Click Next.
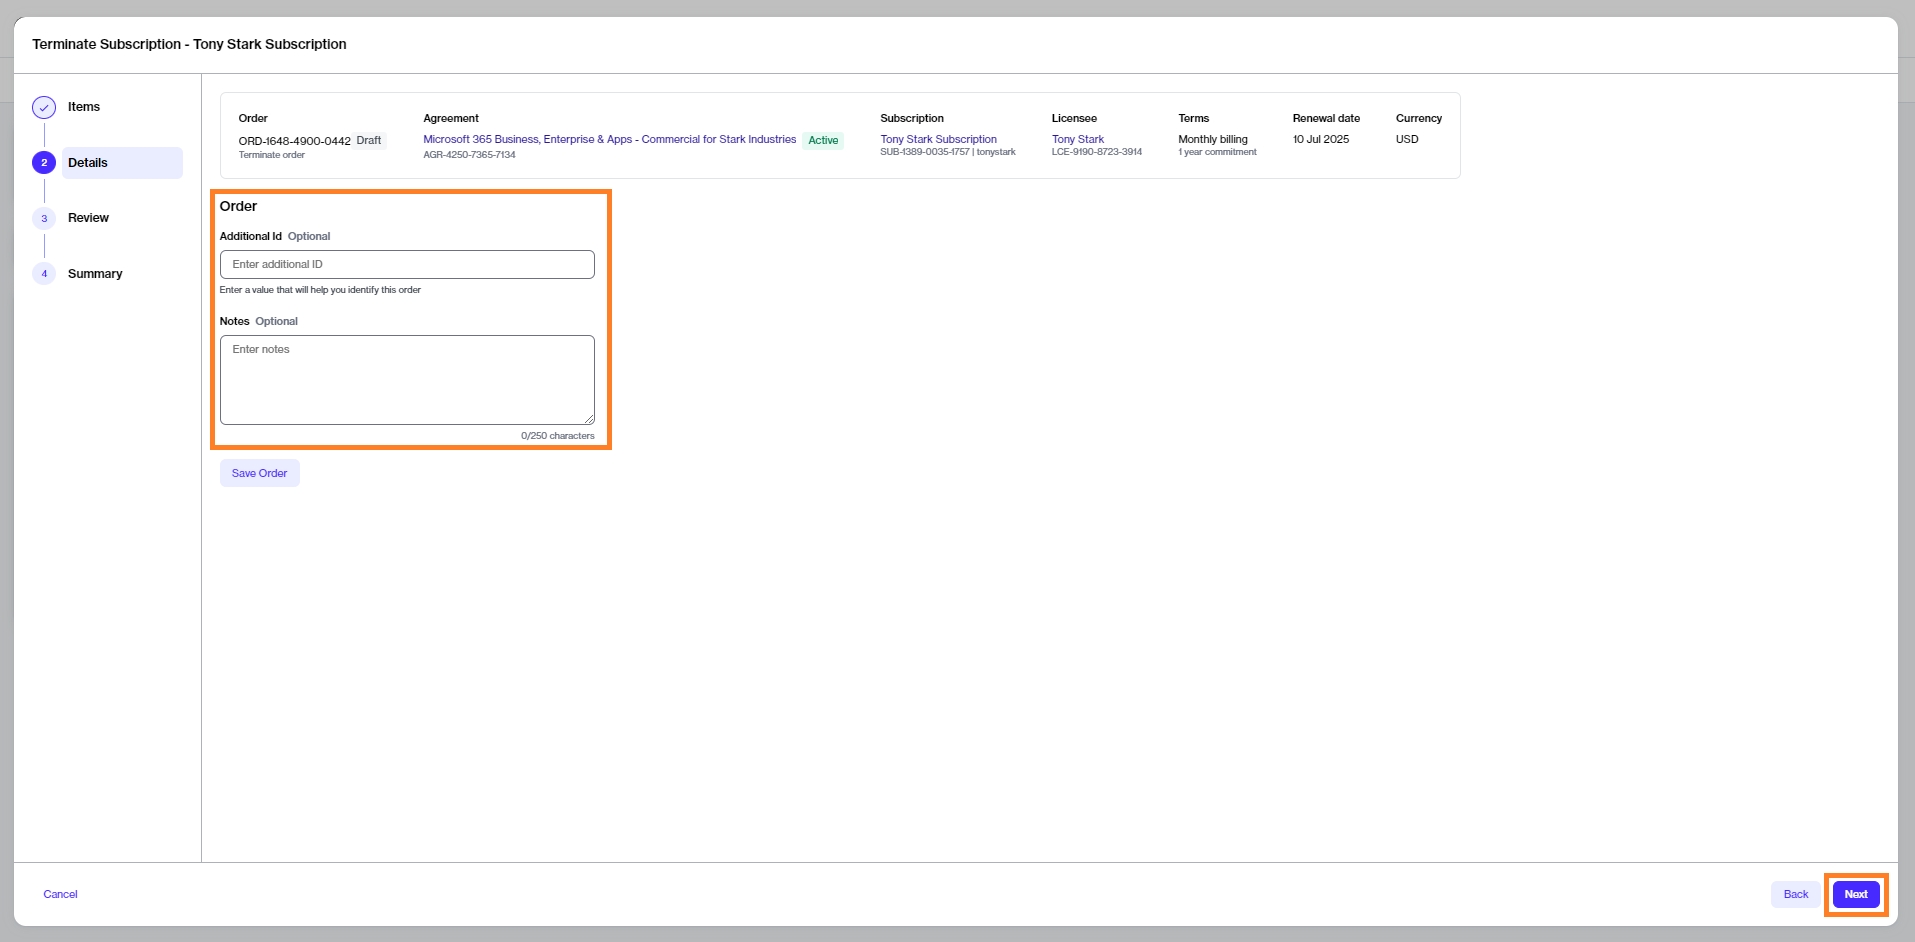
In the Details step, enter the reference information as needed and then click Next.
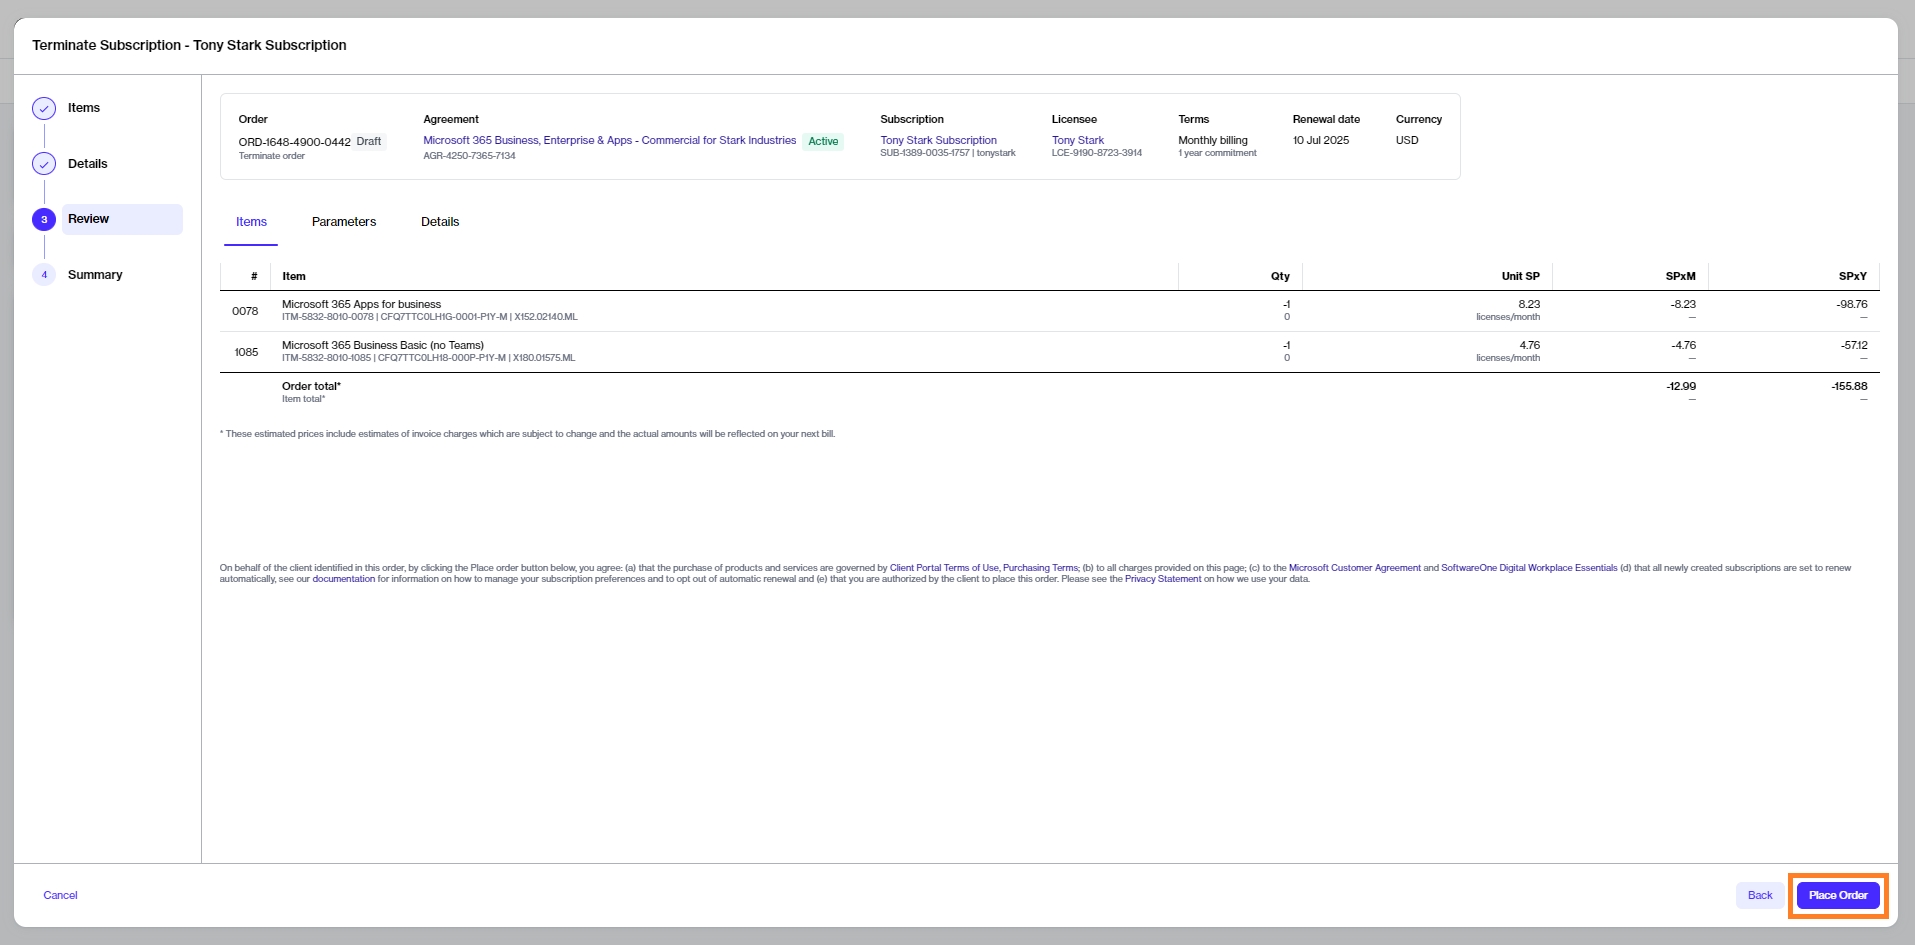
In the Review step, click Place Order to place your termination order for the subscription.
Click View Order to navigate to the order details page. Otherwise, click Close to close the Summary page.
The termination order is submitted to the vendor for processing. You can view the latest status message on the details page of the termination order.
This tutorial shows how to order additional Microsoft 365 subscriptions by placing a change order through the platform.
In this scenario, we'll use an existing agreement to order more licenses.
Before starting this tutorial, make sure that the agreement you want to use is in the Active state.
Navigate to the Products page (Marketplace > Products) and select Microsoft 365 Business, Enterprise & Apps - Commercial.
Click Buy now on the details page.
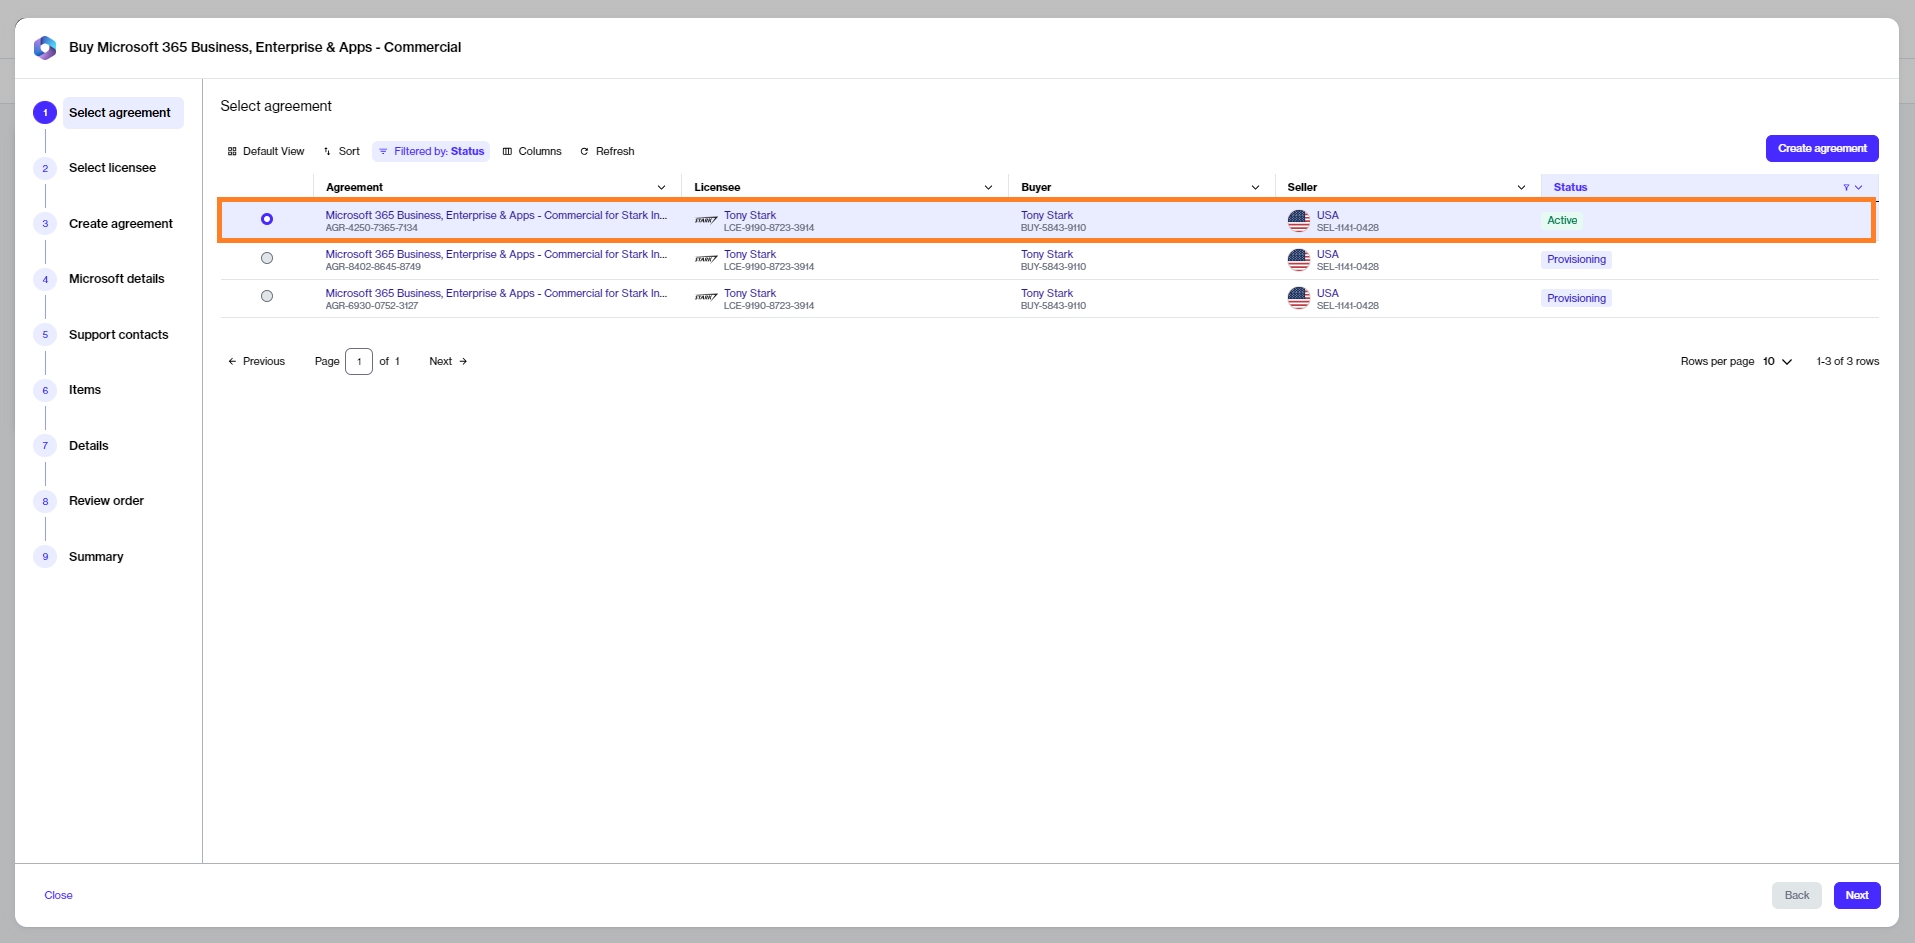
Select an active agreement from the list of your agreements and click Next.
You'll be directed to the Items step in the purchase wizard.
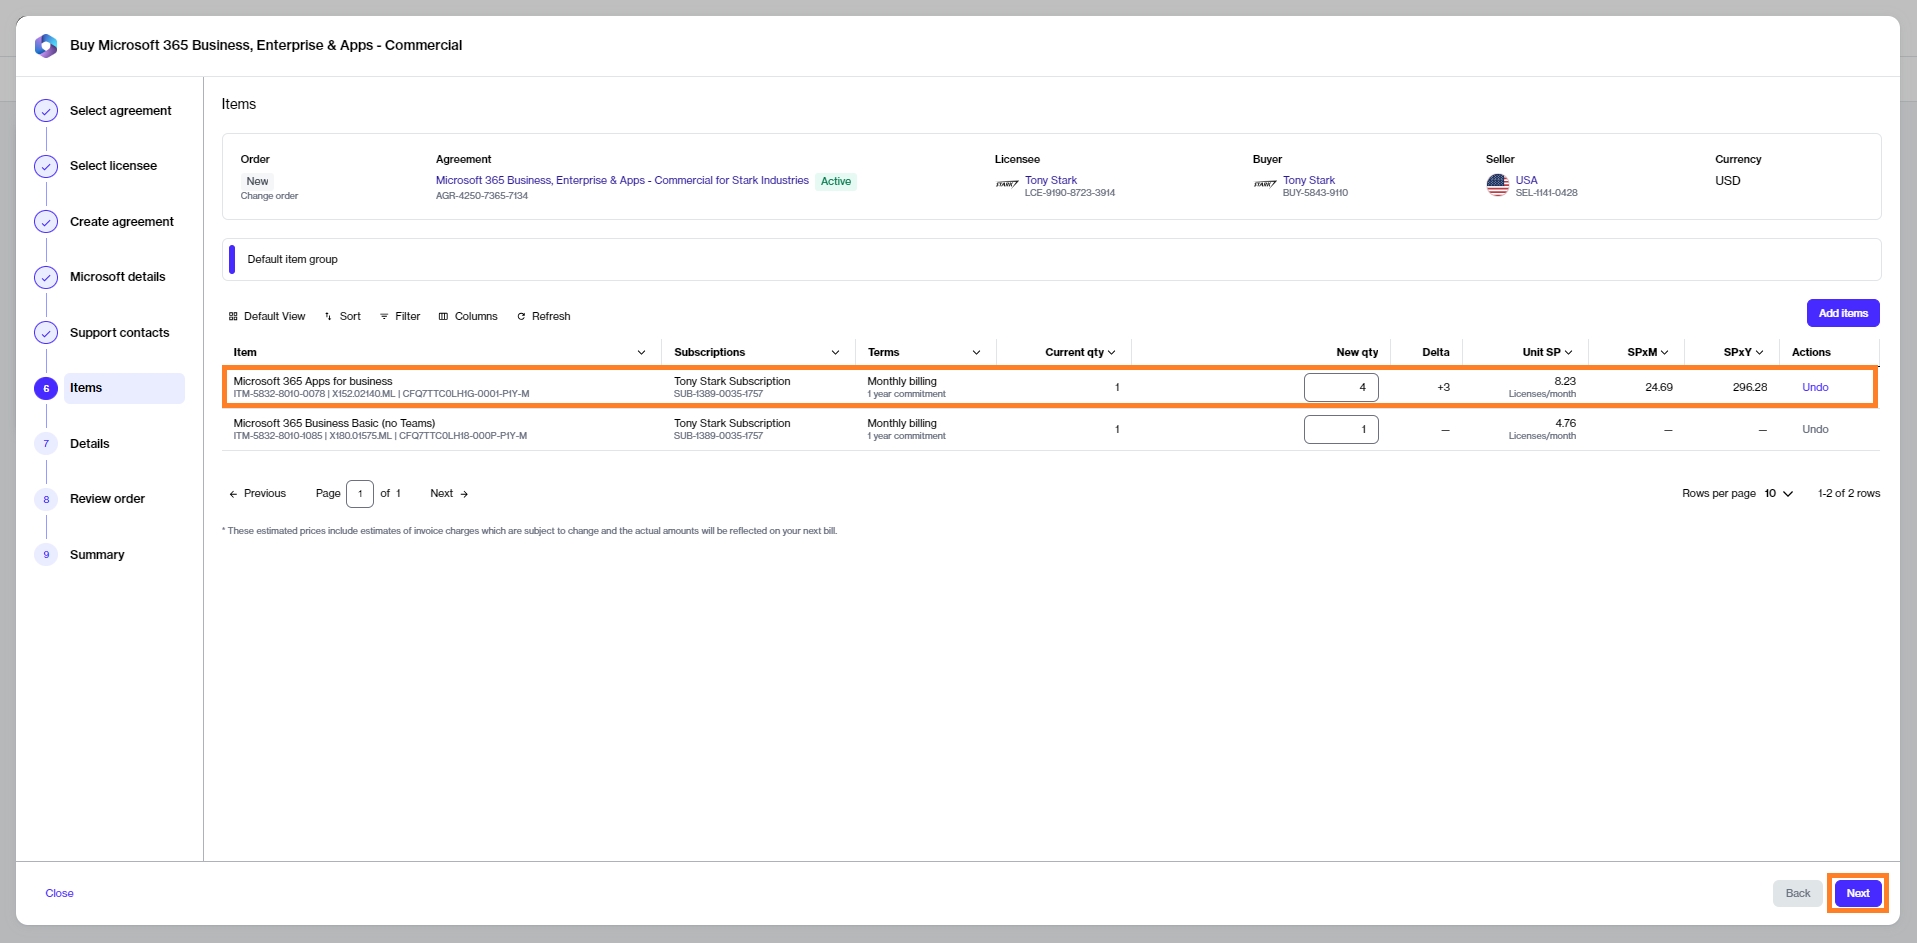
To change the number of licenses, under New qty, enter the total number of licenses you want. For example, if you have 1 license and you want to add 3 more, enter the new quantity as 4.
Click Next to continue.
Enter the additional ID and notes for your order and click Next.
Review the order details and click Place order to finlaize the purchase.
Review your order summary and the latest status message.
Click View Order to navigate to the order details page. Otherwise, click Close to close the Summary page.
This tutorial shows how to order a Microsoft 365 subscription for an existing tenant.
In this scenario, you'll set up a new Marketplace agreement and then connect your existing Microsoft tenant.
Before starting this tutorial, make sure you have the following:
Your Microsoft tenant name.
A Marketplace licensee in the active state or permission to create a new licensee (if you don't want to use an existing licensee). You'll need to select the licensee when you are creating the agreement.
Navigate to the Products page (Marketplace > Products) and select Microsoft 365 Business, Enterprise & Apps - Commercial.
Click Buy now on the details page.
The purchase wizard starts and the Select agreement section displays.
Click Create new agreement to set up your new agreement.
Choose the licensee you want to use. In this tutorial, we'll select an existing licensee, as shown in the following image. However, you can add a new licensee by clicking Add licensee and following the instructions in Create Licensees.
Click Next.
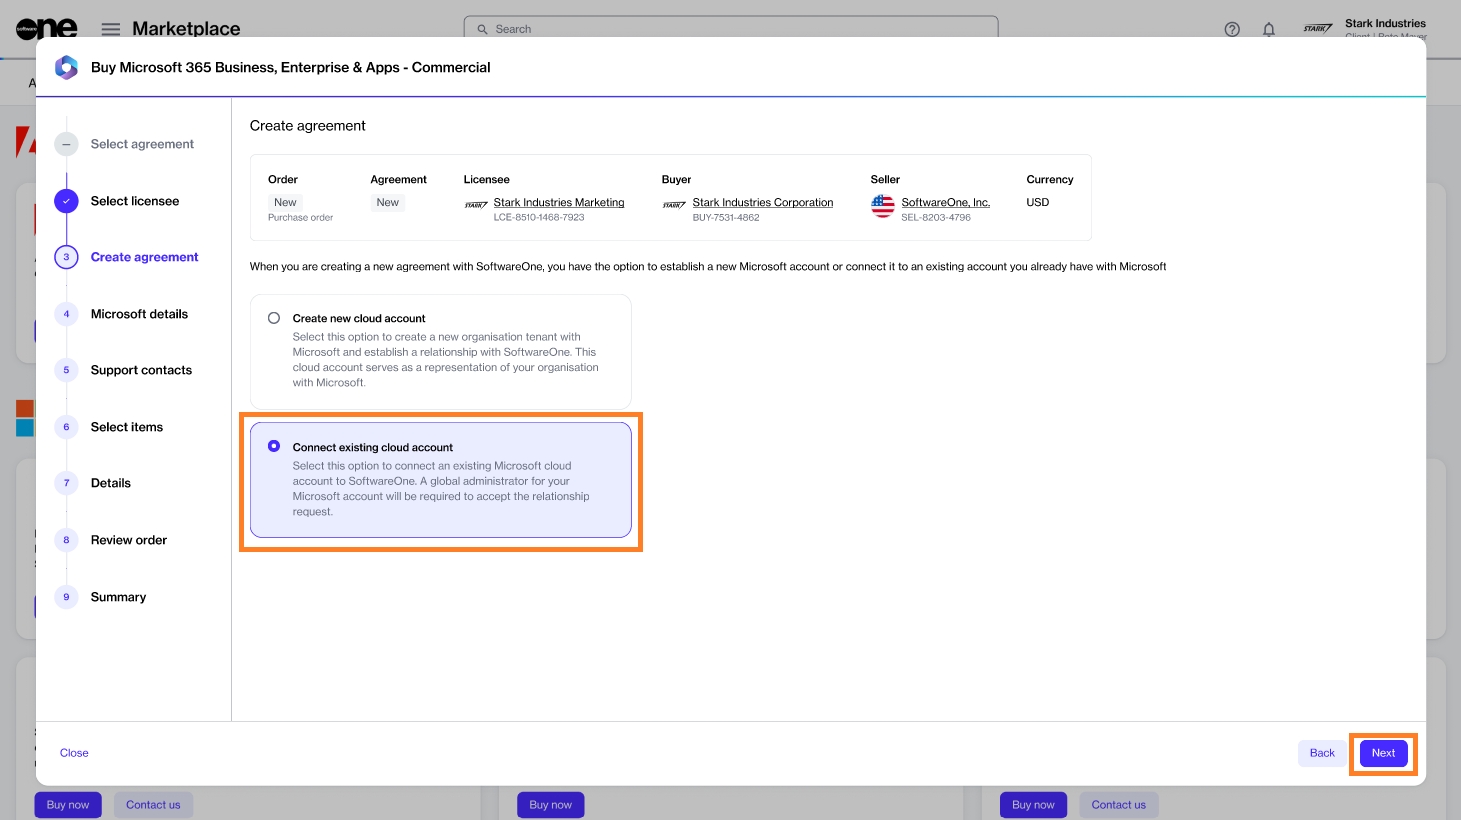
Select Connect existing cloud account and click Next.
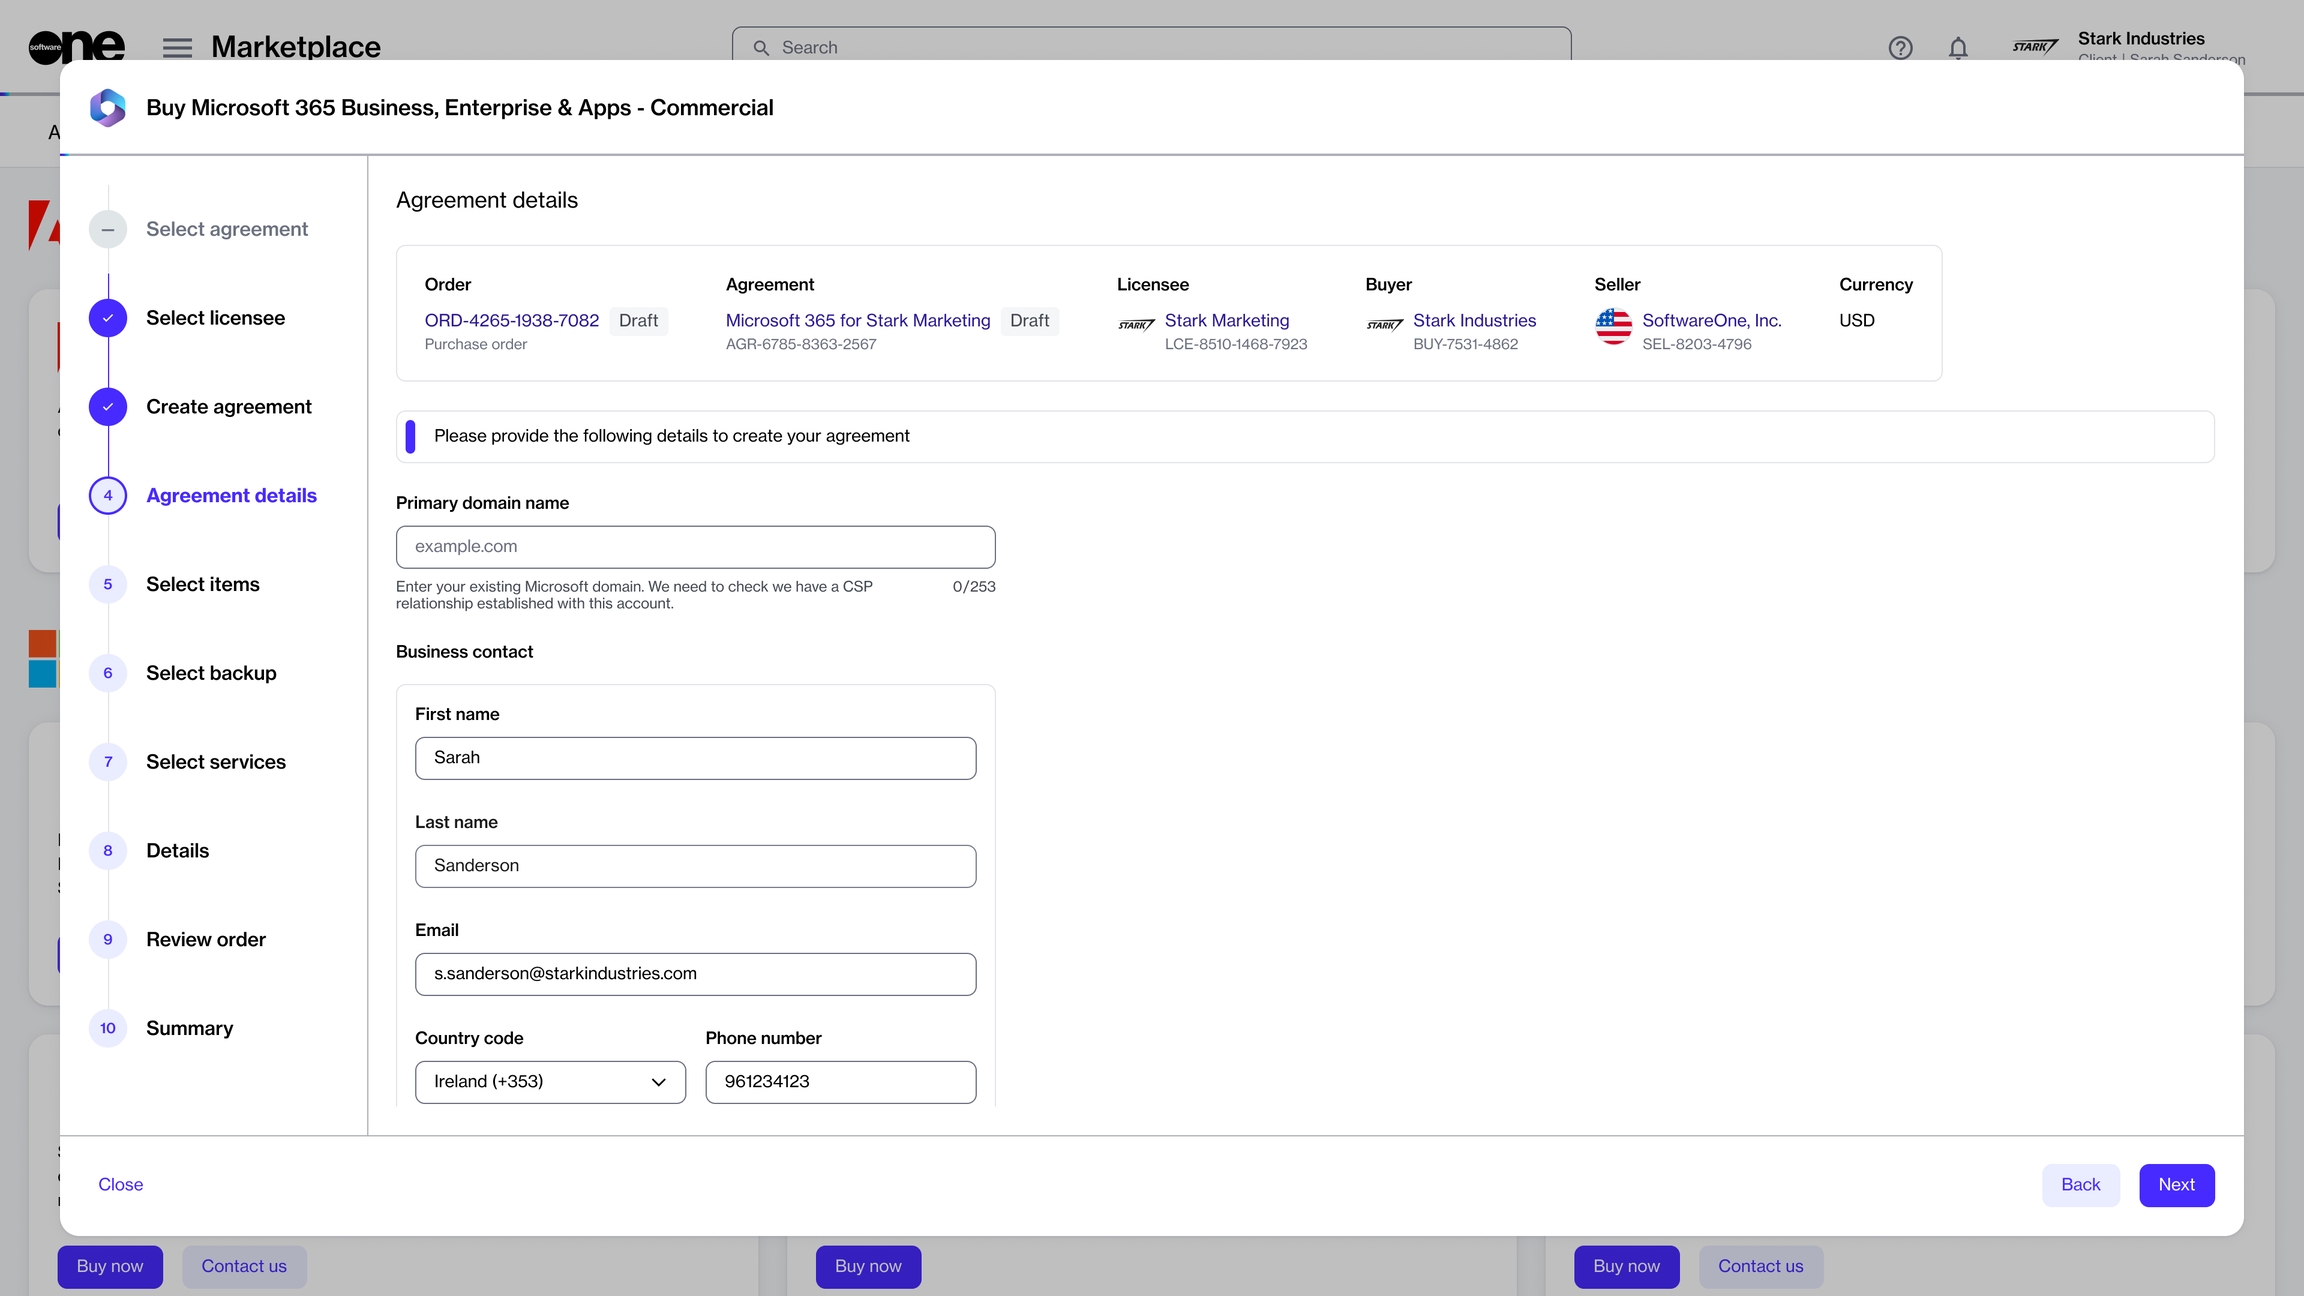
Enter your existing Microsoft domain and the details of your contact person who will receive updates about this order. Click Next.
Enter the contact you want to use for support and your preferred support language. The contact details are populated from the Licensee information, but you can change the details if required.
Click Next.
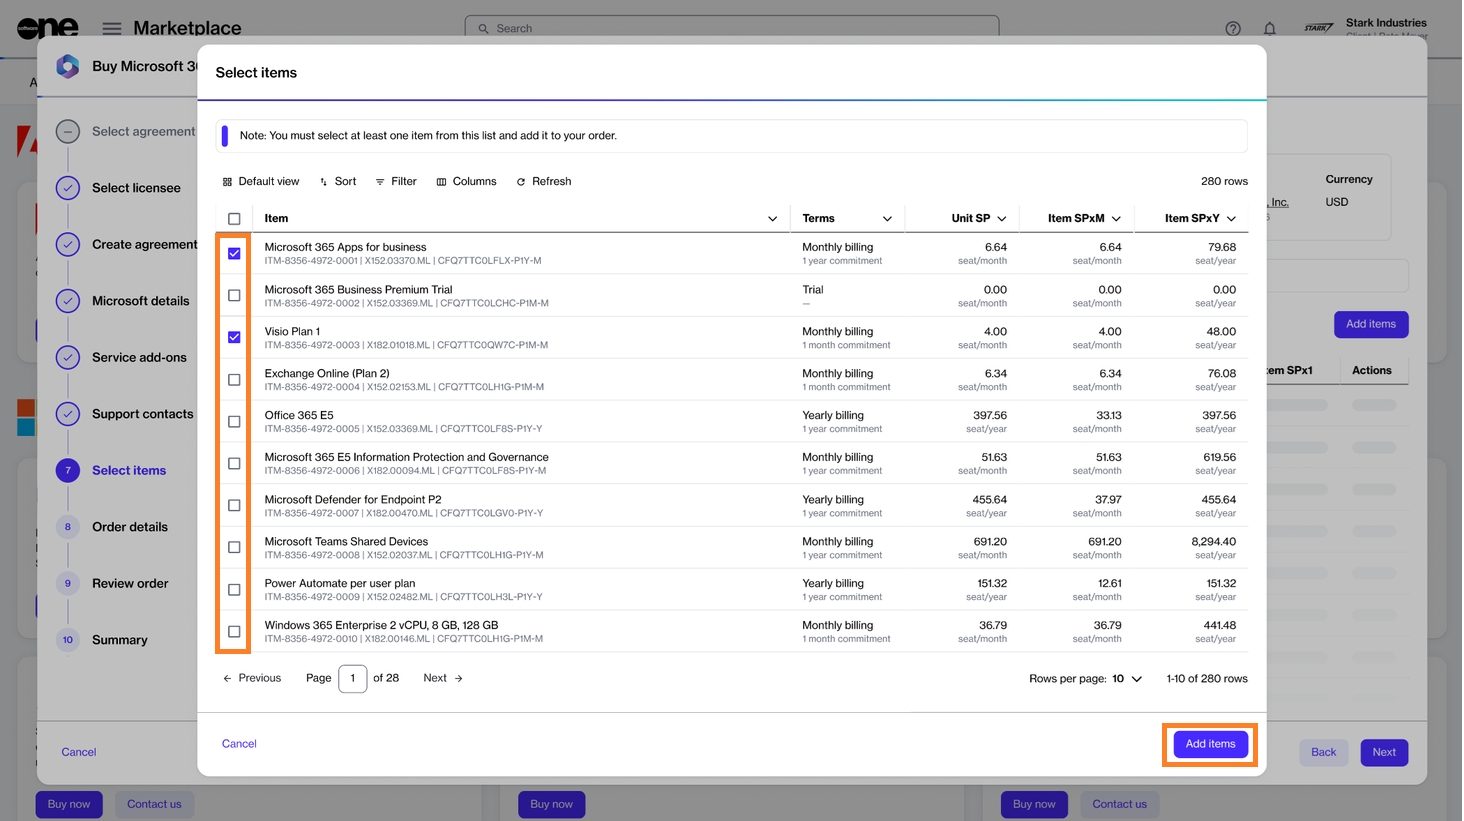
Choose the required items and click Add items to add those items to your order. You can select multiple items as shown in the following image.
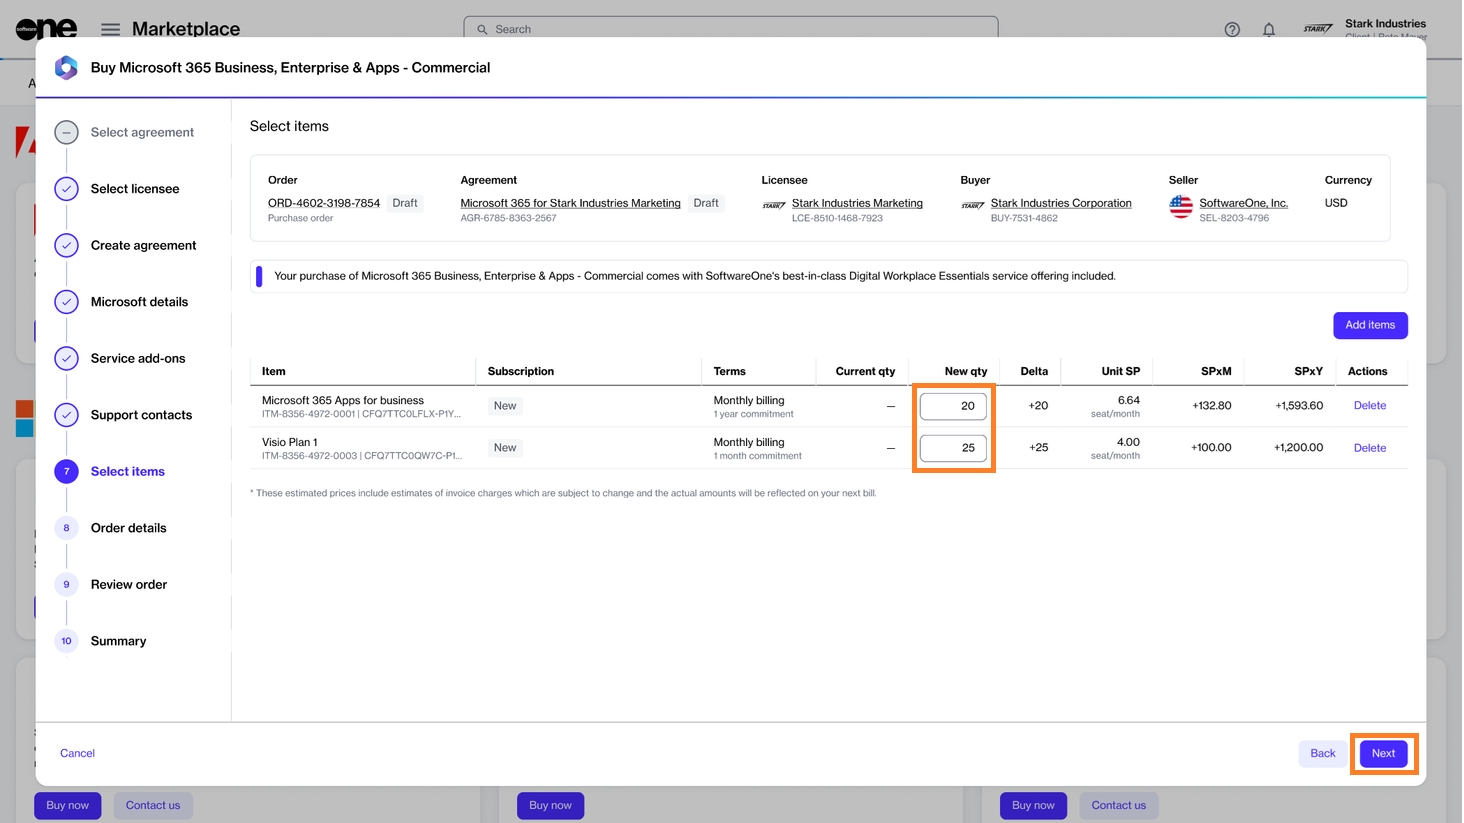
Update the quantity as needed and then click Next.
(Optional) Add your order and agreement details as necessary so you can identify them easily.
Click Next.
Review the details of your order and make sure to read all terms and conditions, including the privacy statement. By placing the order, you accept all terms.
Click Place order to complete your purchase.
Review your order summary and the latest status message.
Click View Order to navigate to the order details page. Otherwise, click Close to close the Summary page.
After your order is submitted for processing, we'll create your new subscription under your existing tenant.
In this tutorial, you will learn how to terminate all of your Microsoft subscriptions that are associated with a specific agreement.
As subscriptions are tied to agreements, the only way you can cancel all the subscriptions is by placing a termination order for that agreement.
Before starting this tutorial, make sure that the agreement you wish to terminate is active. Agreements in any other state cannot be terminated.
You must also be familiar with how to navigate the platform to find and access the required agreement.
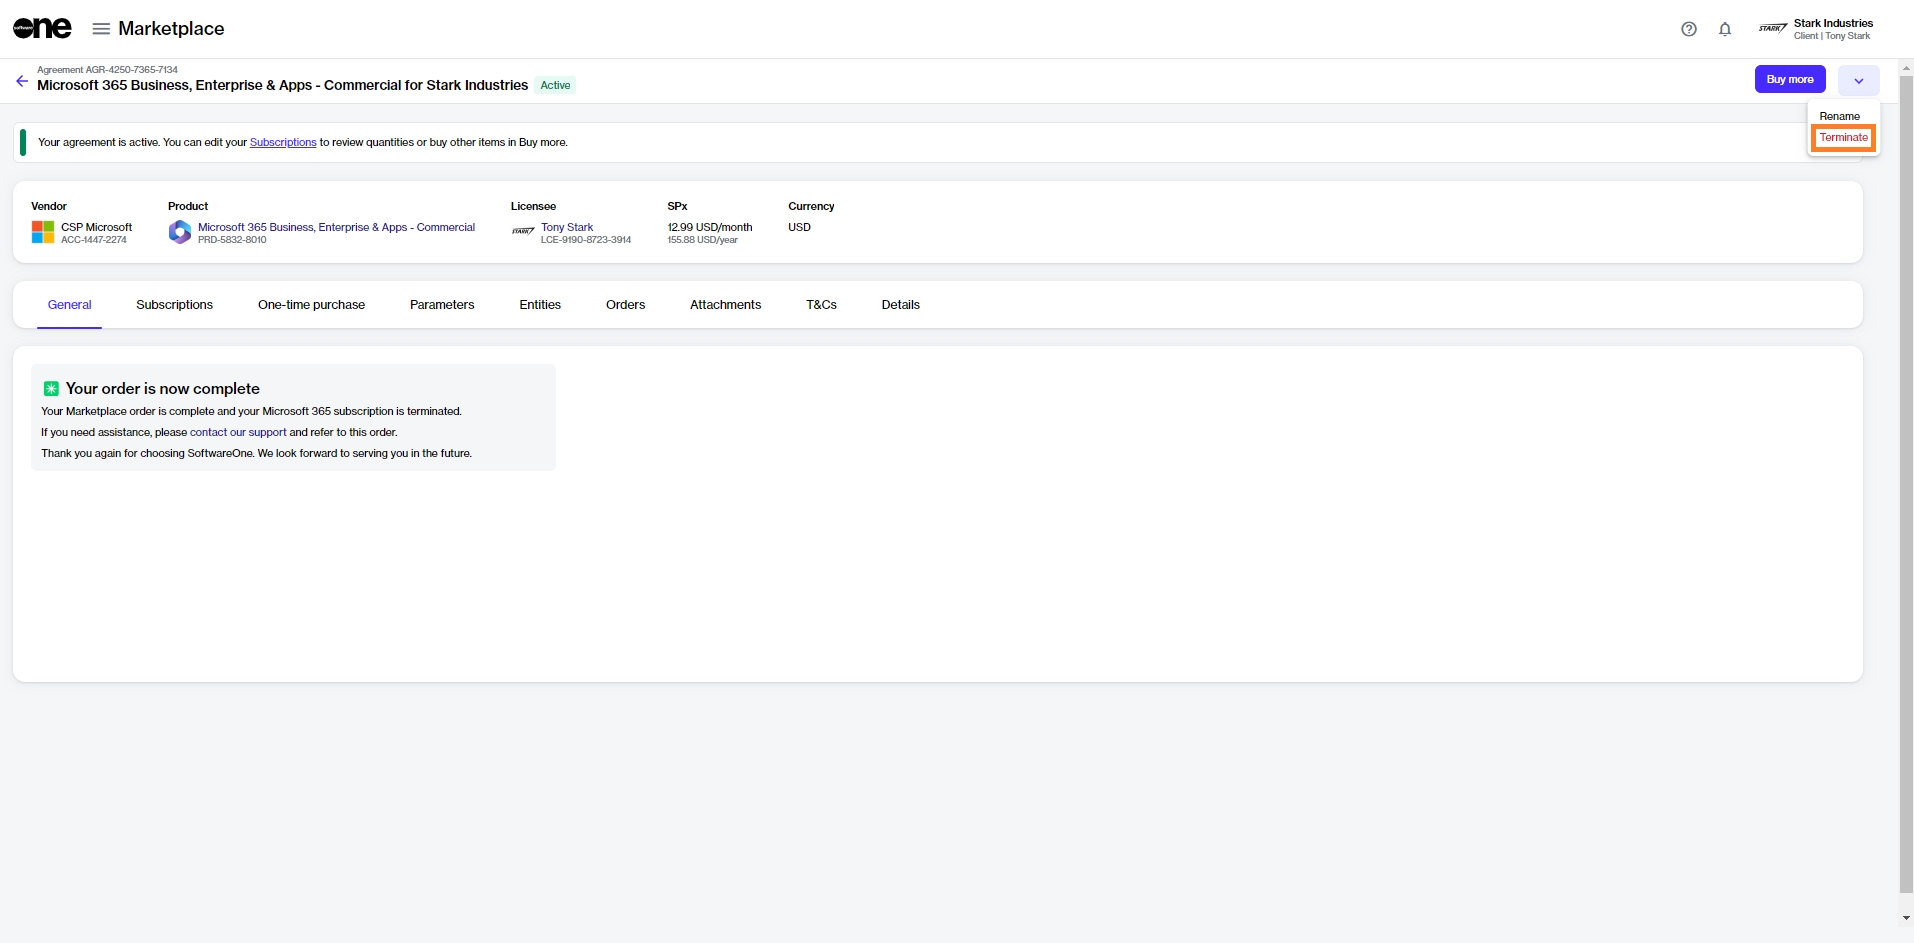
On the agreements page, locate the agreement containing the subscriptions you want to terminate.
Click the agreement name. The following image shows an example agreement:
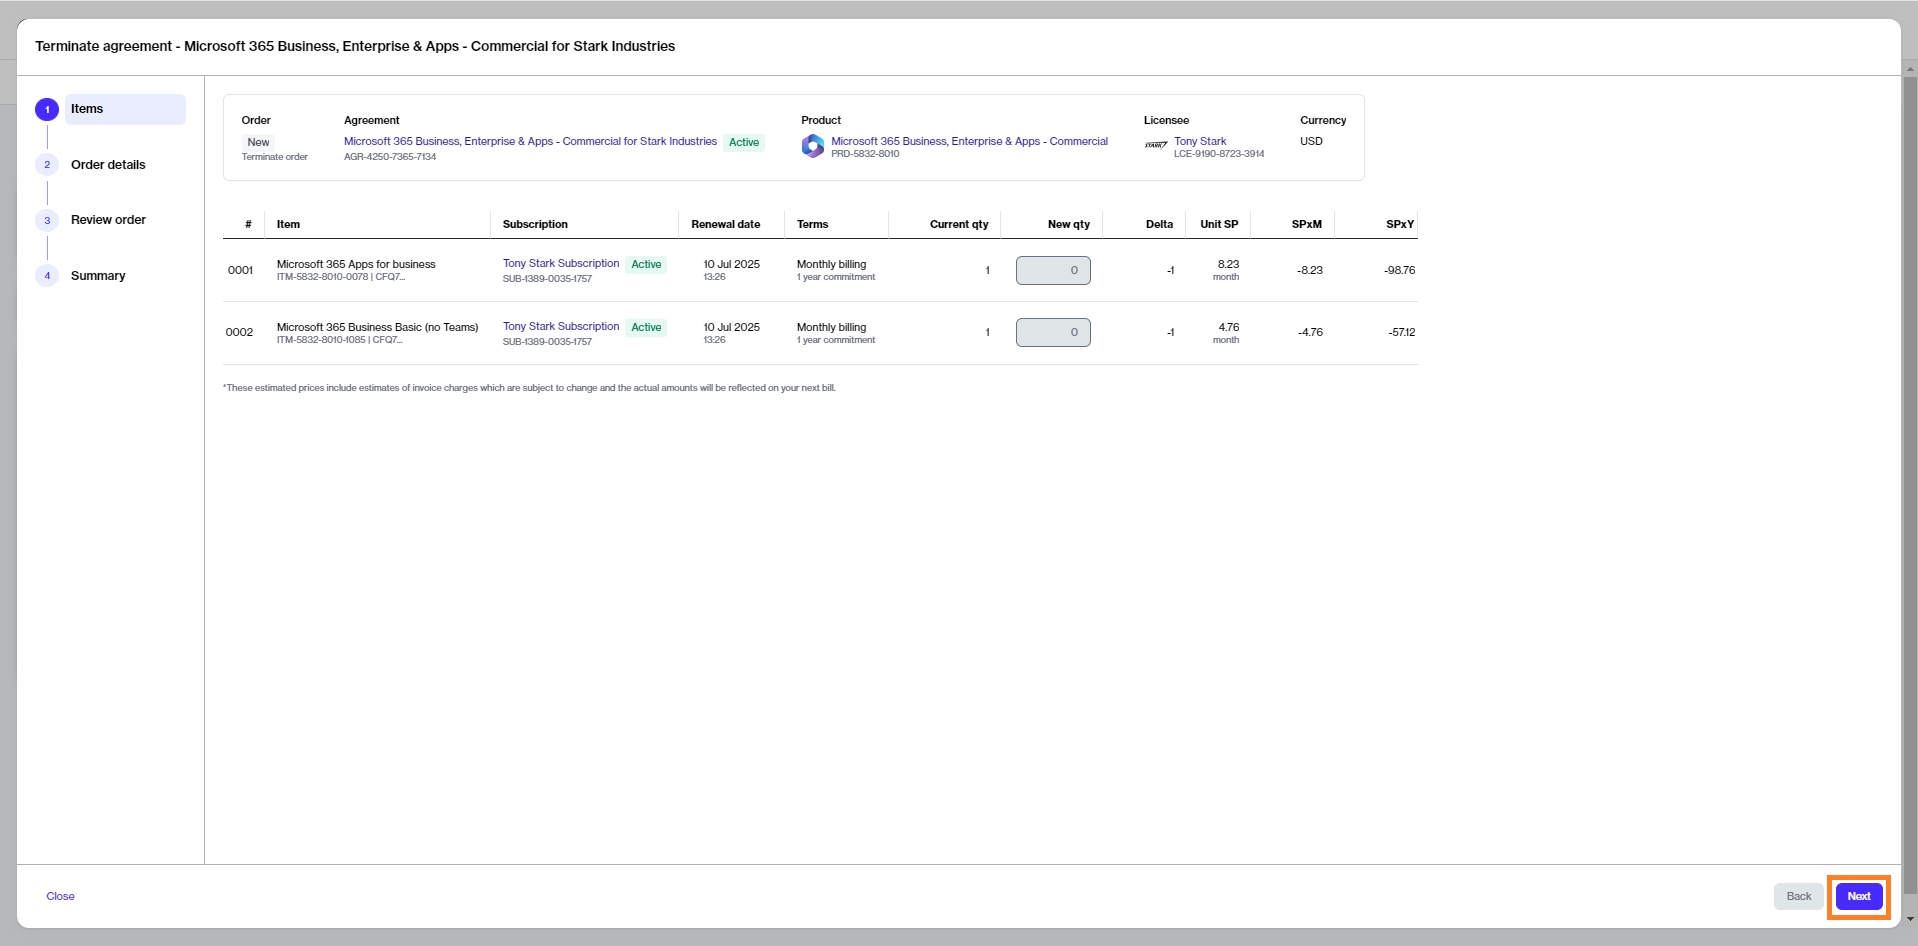
The Terminate agreement wizard launches and the Items step of the wizard is displayed.
In the Items step, review the details to make sure that all subscriptions have zero quantity. Click Next.
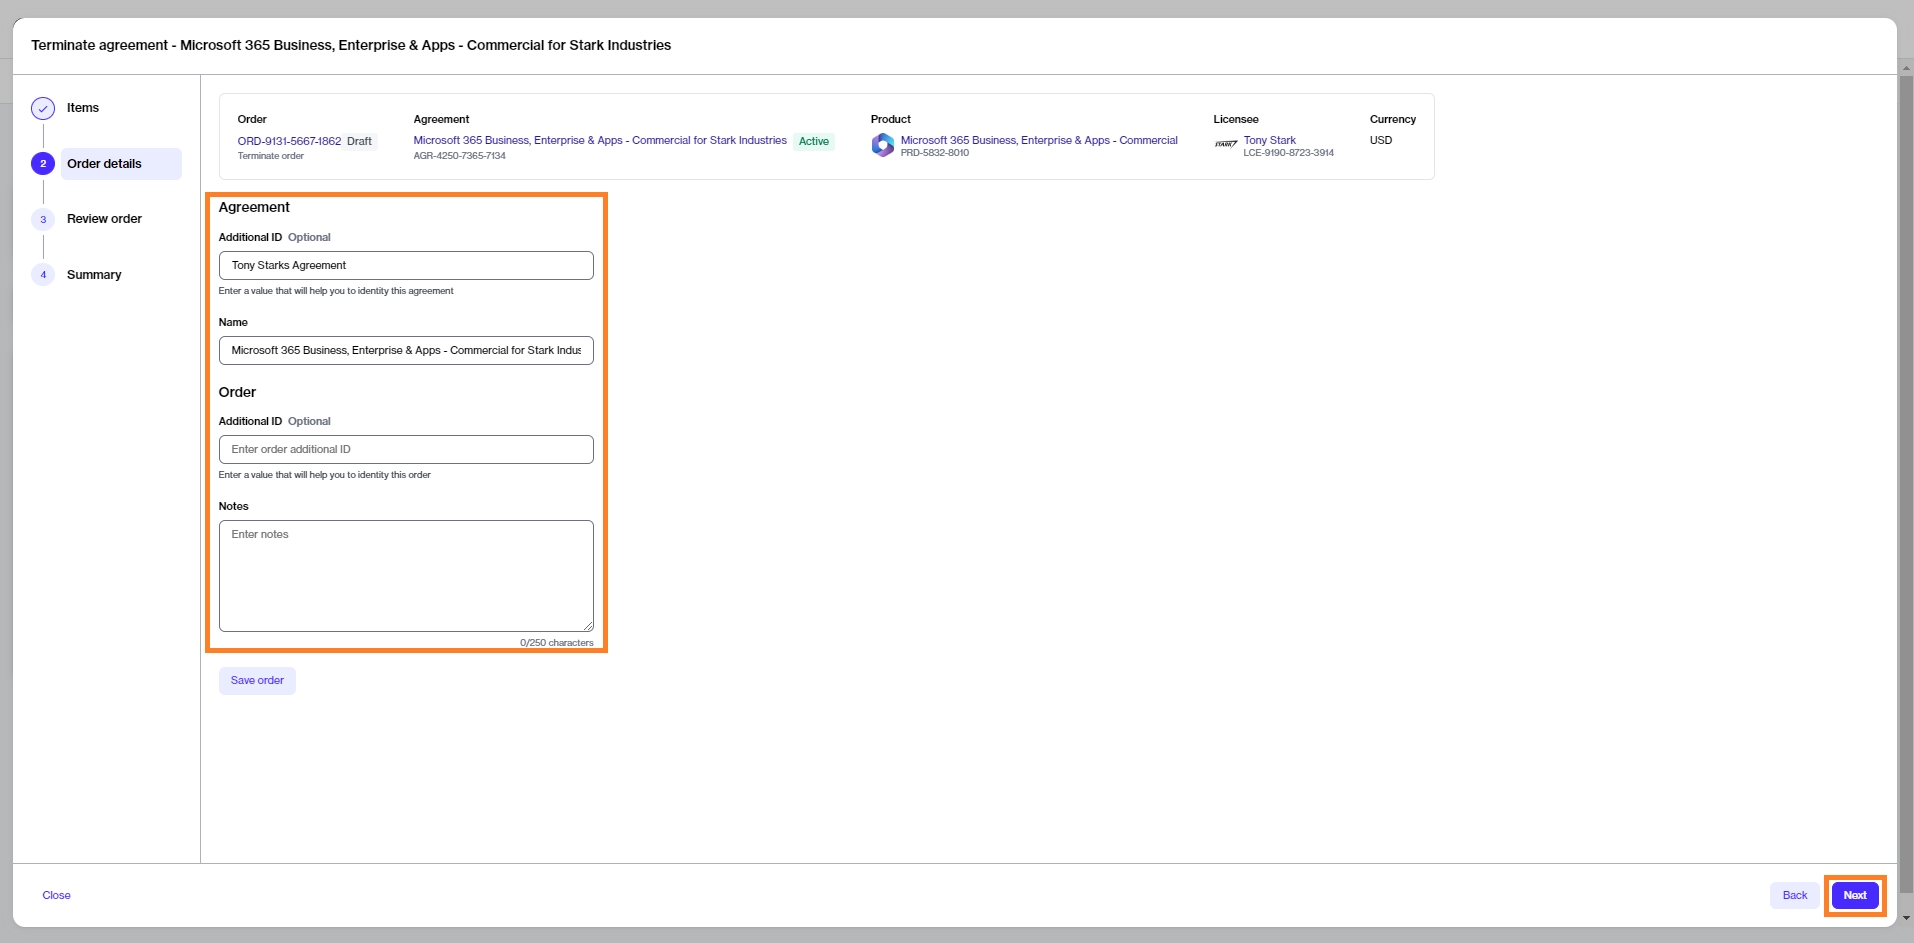
Enter the optional reference information and click Next.
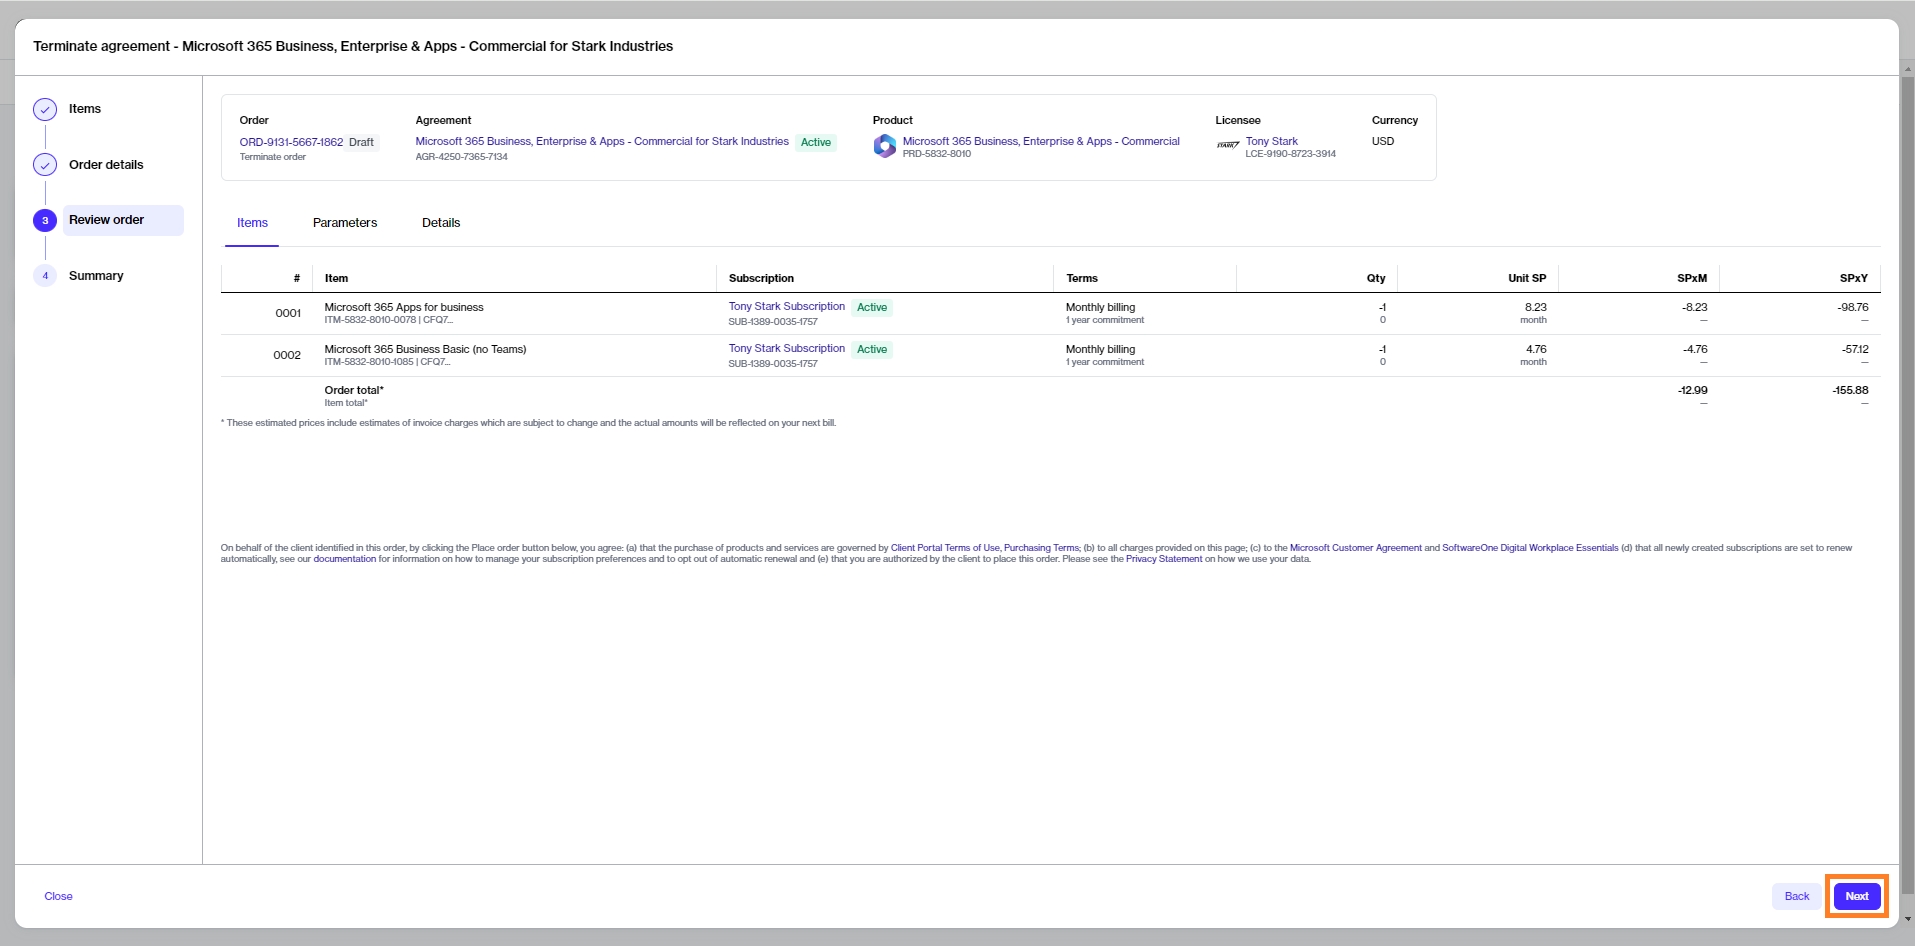
In the Review order step, click Next to place the termination order for the agreement.
Click View order to navigate to the order details page. Otherwise, click Close to close the Summary page.
A termination order is created for the agreement and submitted to the vendor for processing.
After you place the order, the agreement status changes from Active to Updating. You will not be able to place any additional orders under this agreement.
Once the termination order is processed, the status of the agreement and all subscriptions within the agreement will change to Terminated.
The Marketplace Platform lets you purchase to Microsoft software, such as Skype for Business and SQL Server, within the Cloud Solution Provider (CSP) program.
Browse the following topics to learn about ordering new perpetual software subscriptions by creating an agreement, or adding more one-time items to an existing agreement.
Order additional Microsoft Azure subscriptions using an existing agreement.
If you already have an active agreement and want to order additional Azure subscriptions under the same agreement, you can place a change order.
Before starting this tutorial, make sure that the agreement you want to use is in the Active state.
Navigate to the Products page (Marketplace > Products) and click Microsoft Azure.
Click Buy now on the details page.
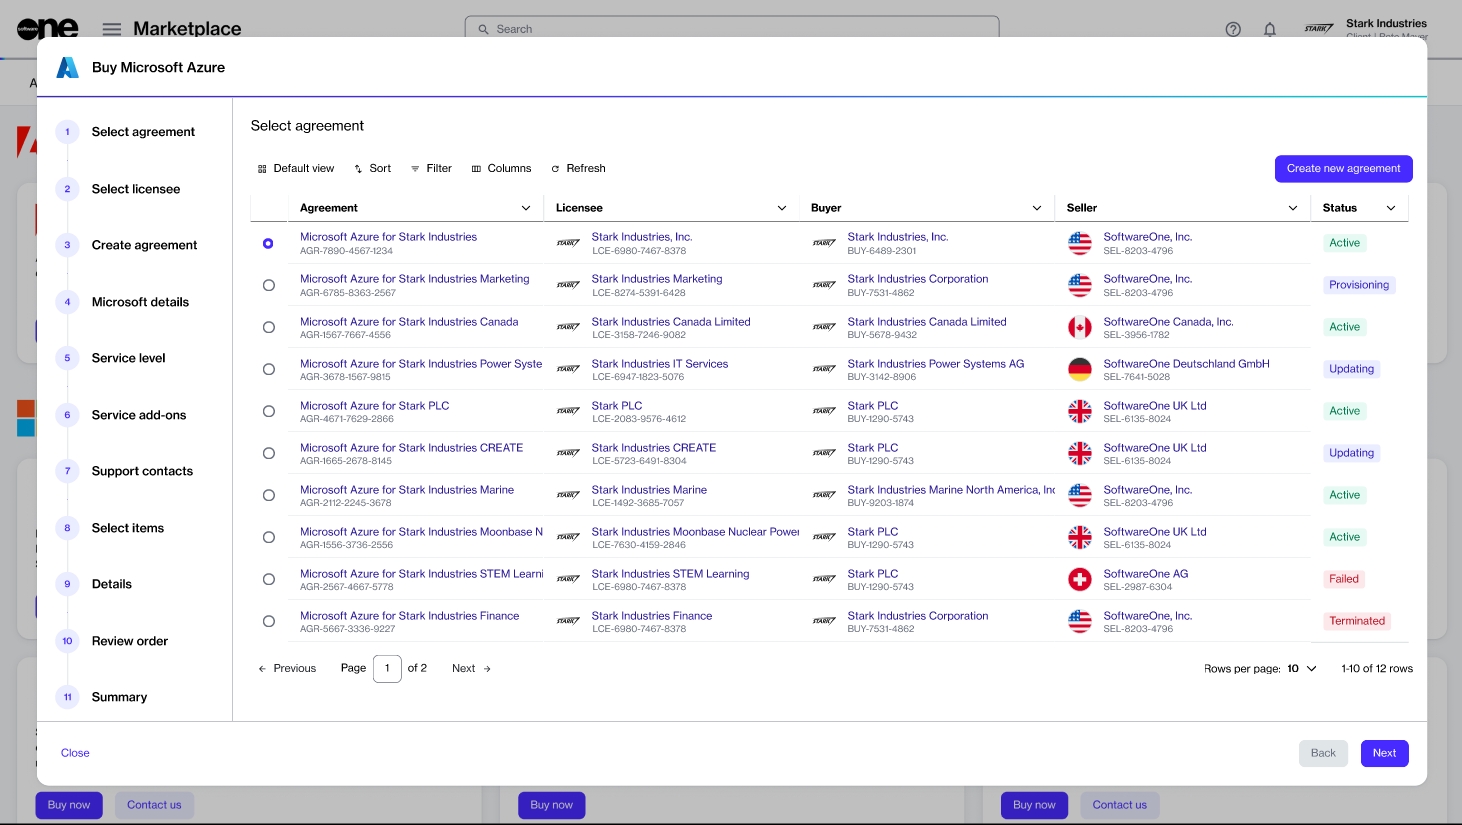
The purchase wizard starts and the Select agreement section of the wizard is displayed.
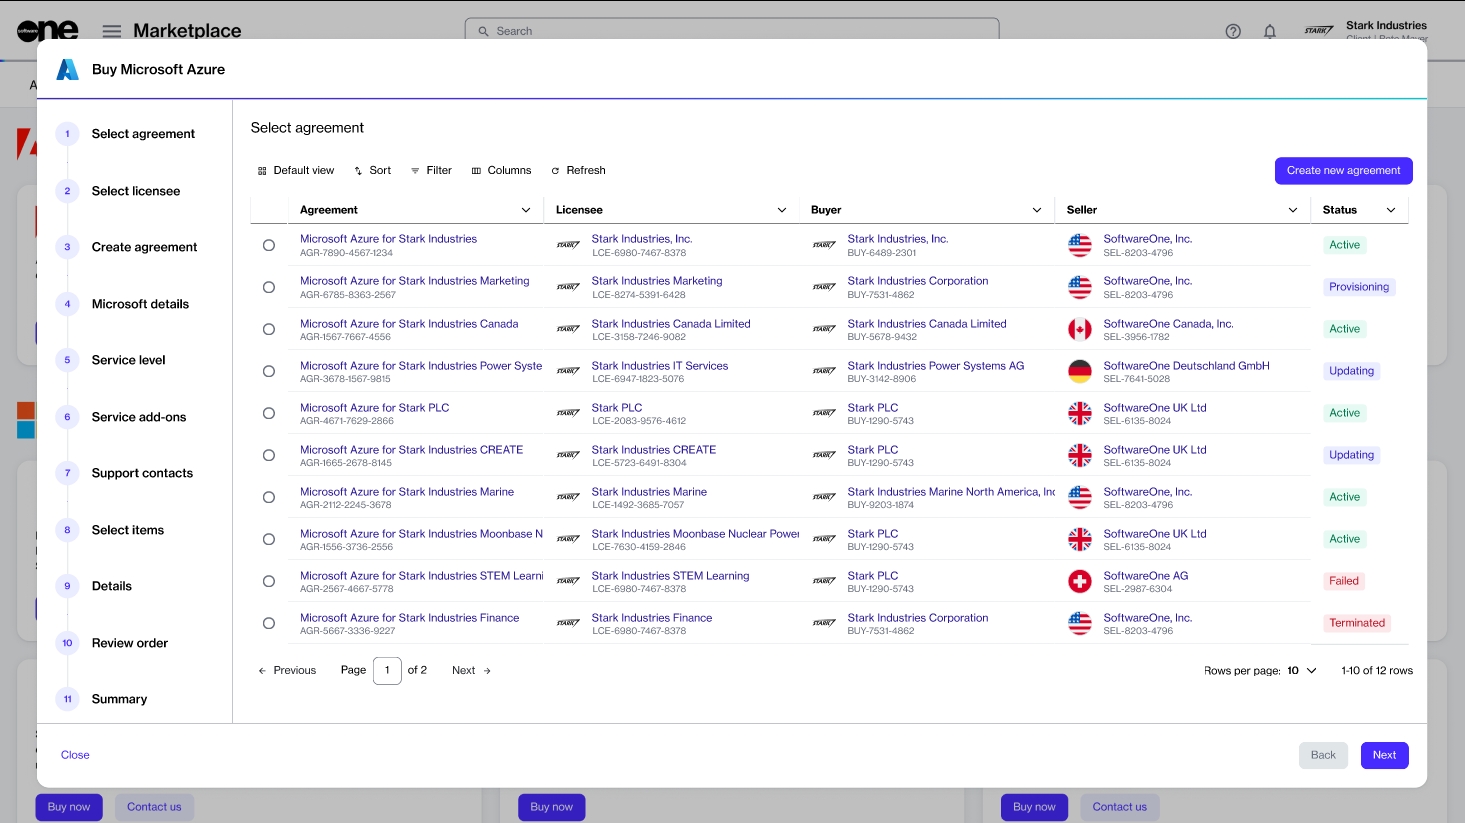
Select an active agreement from the list of your agreements and click Next.
You'll be directed to the Select Items section of the purchase wizard.
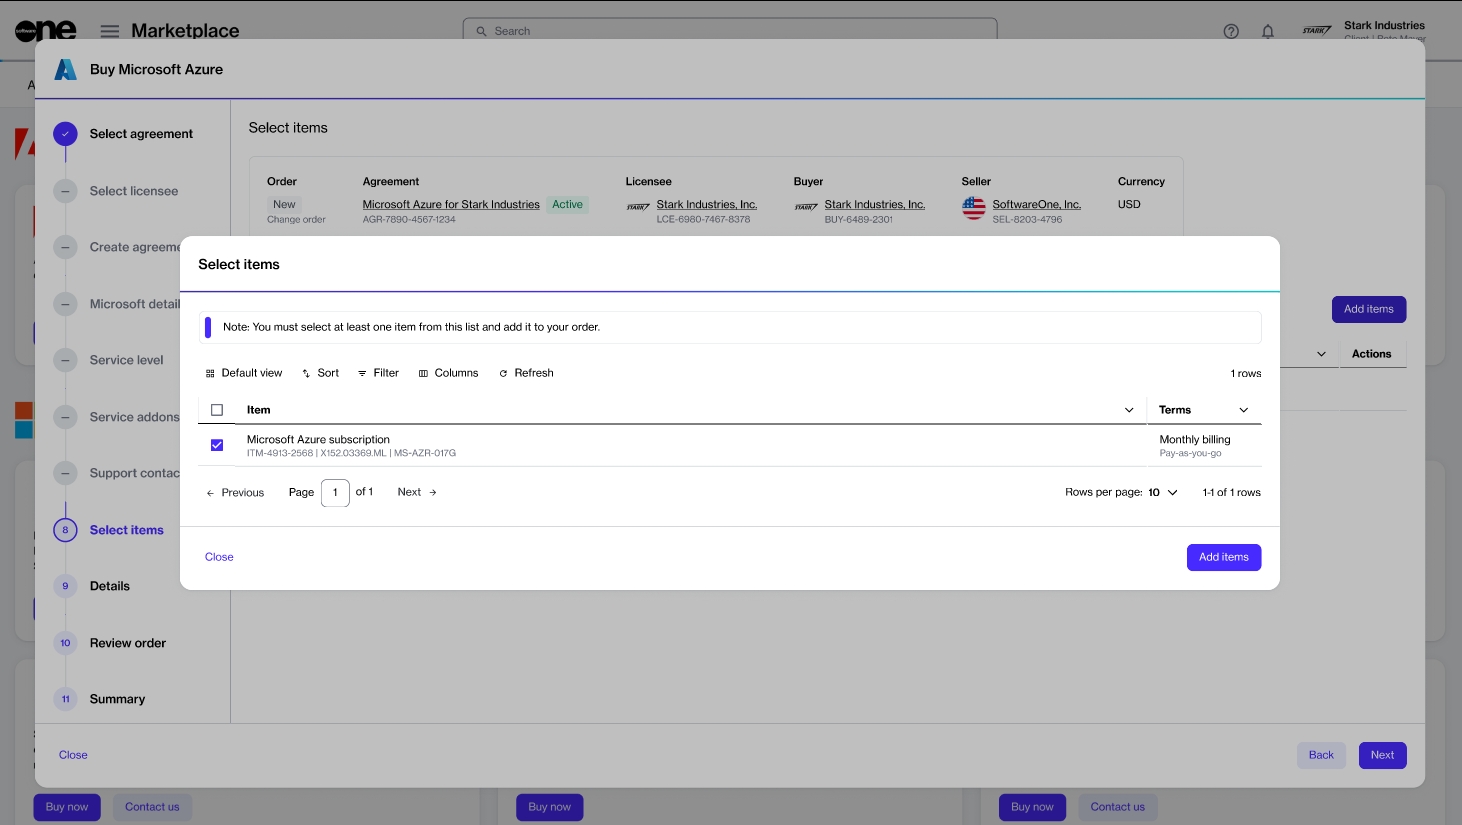
Click Add items to add the new Azure subscription to your order. Click Next.
For Microsoft Azure, there is only one item, with no associated cost. When using Azure services, pay-as-you-go charges are generated against the subscription.
Enter the reference information as needed and click Next.
Review the details of your change order and click Place order to complete your purchase.
Review your order summary and the latest status message.
Click View Order to navigate to the order details page. Otherwise, click Close to close the Summary page.
This tutorial shows how to order a Microsoft license. Perpetual licenses are licenses requiring a one-time payment. They are the licenses for which you pay upfront and then use the software indefinitely.
To order a perpetual license, you'll need to create a purchase order. Purchase orders are orders placed under a new agreement.
In this tutorial, we will assume that you are using an existing licensee and setting up a new Microsoft tenant.
Before starting this tutorial, make sure you are familiar with the . You will also need:
A licensee in the active state. Licensees are required for setting up a new agreement.
Your company details, like the company name, registration ID, and address. These details are required when setting up a new Microsoft tenant.
The contact details of the person who will manage your Microsoft account.
In this step, start the purchase wizard to begin the ordering process.
and navigate to the Products page. The page is located under Marketplace in the main menu.
On the Products page, select the required perpetual software product. In this tutorial, we'll select Microsoft Perpetual Software for Education.
On the product details page, click Buy now in the upper right. The purchase wizard starts.
In this step, choose the required licensee and then click Next.
If you don't wish to use an existing licensee, you can add a new licensee by clicking . Note that if you choose to add a new licensee, you'll be directed to the Licensees page. As a result, the purchase wizard will close and you'll need to start it again.
In this step, do the following:
Enter the tenant name you want to use on the onmicrosoft.com domain and click Next. Make sure that the name doesn't include punctuation marks or spaces. To check whether your tenant name is still available, use .
Fill out the contact form and click Next. You'll need to provide the following details:
Company name.
Company registration ID or tax number.
Company address, including city and zip/postal code.
Contact details of the person who will manage your account.
Once you have placed your order, we will verify the order details, including the Microsoft tenant ID. If there are issues with your order, the page will provide information about the problem and any actions you may need to take.
After your order is complete and your license has been successfully set up, you'll be able to download your license keys from the . For download instructions, see Microsoft's documentation: .
Order a Microsoft Azure subscription through the Marketplace Platform.
This tutorial shows how to order a Microsoft Azure subscription by setting up a new agreement and a new Microsoft tenant.
Before starting this tutorial, make sure you have the following:
Details, such as your company name, registration ID, and address. You'll need to provide these details when creating the new Microsoft tenant.
Contact details of the person who will manage your account.
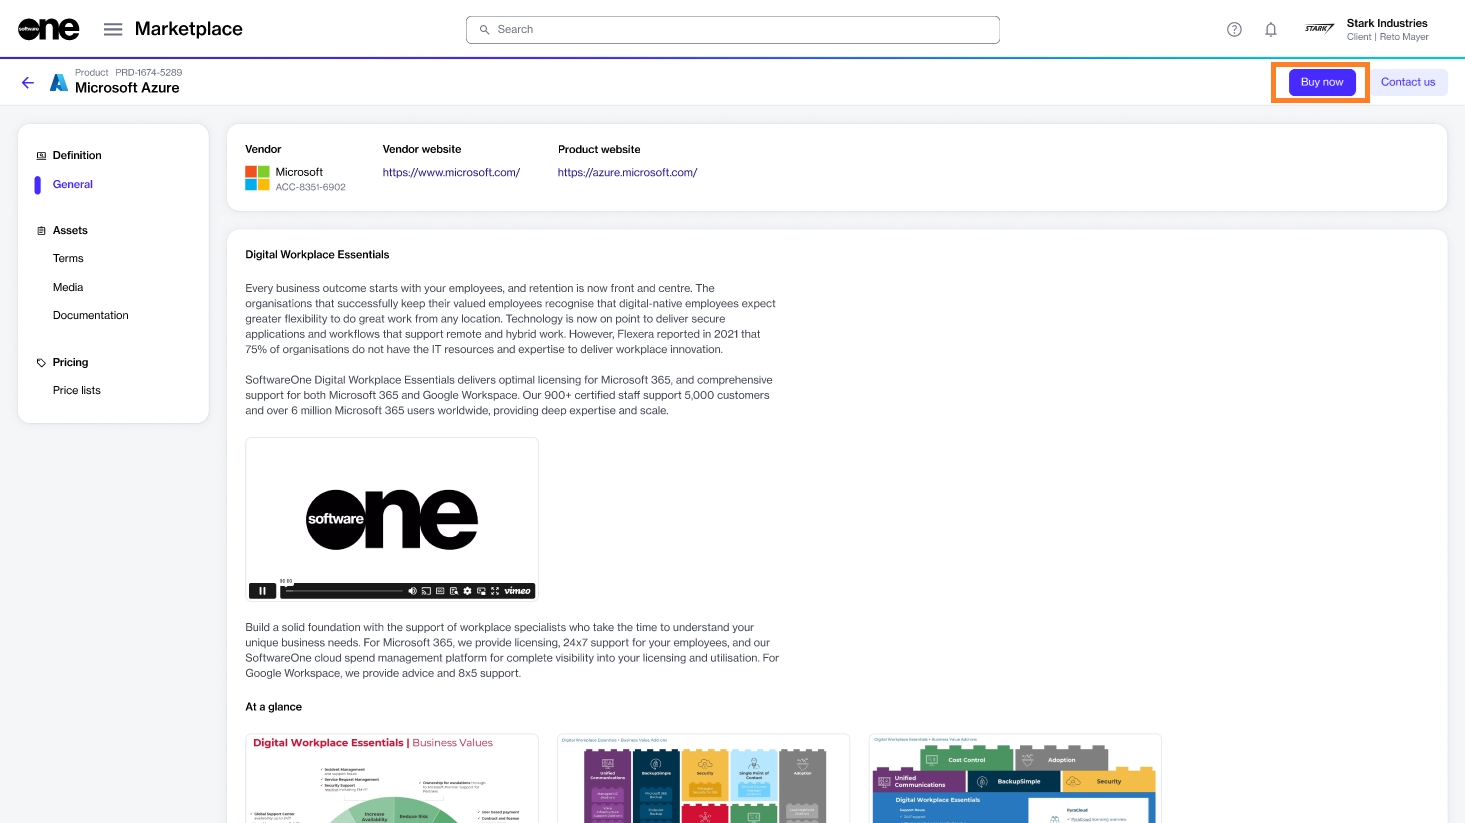
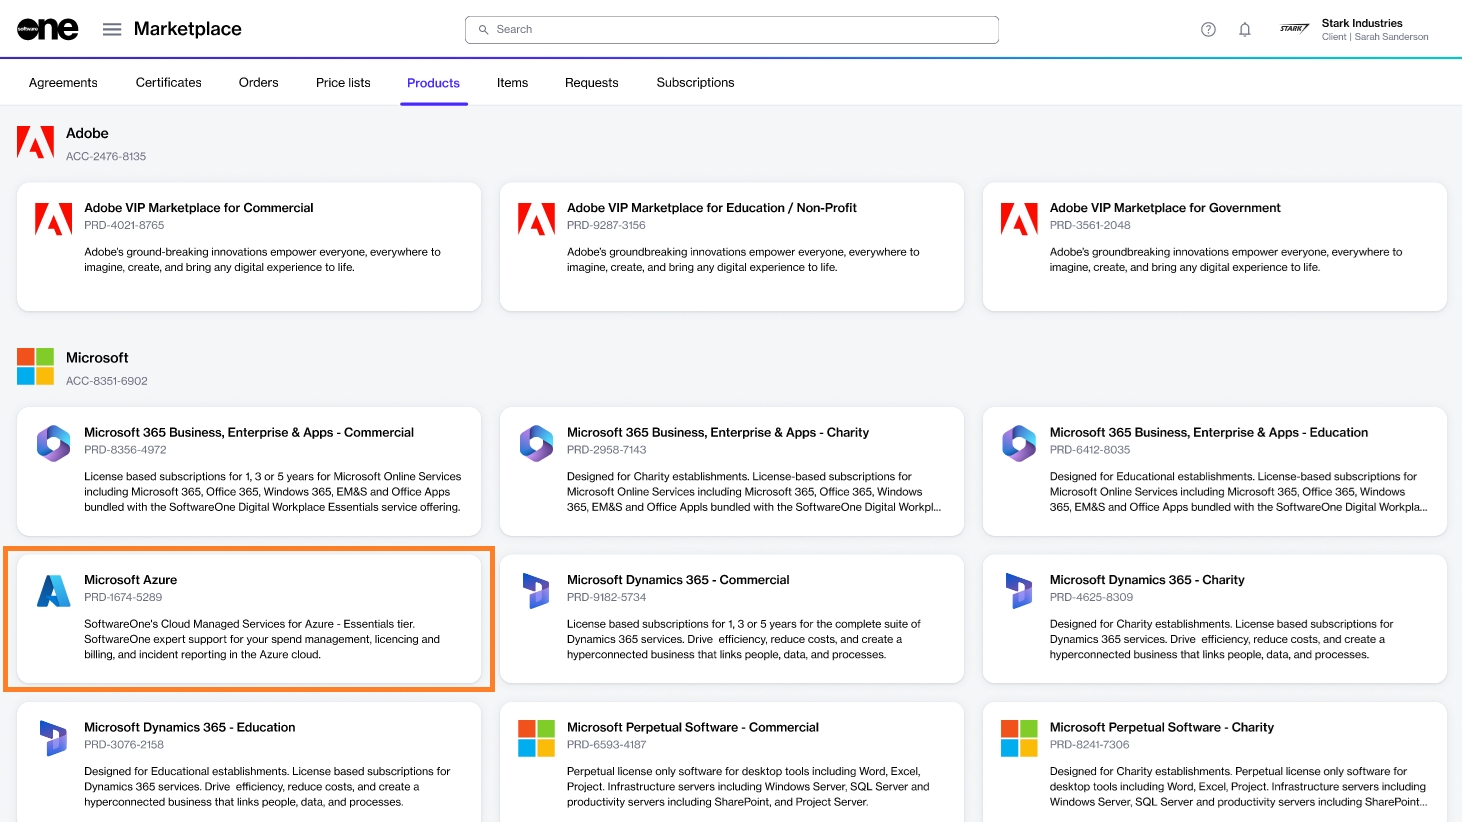
Navigate to the Products page and click Microsoft Azure.
Click Buy now on the details page.
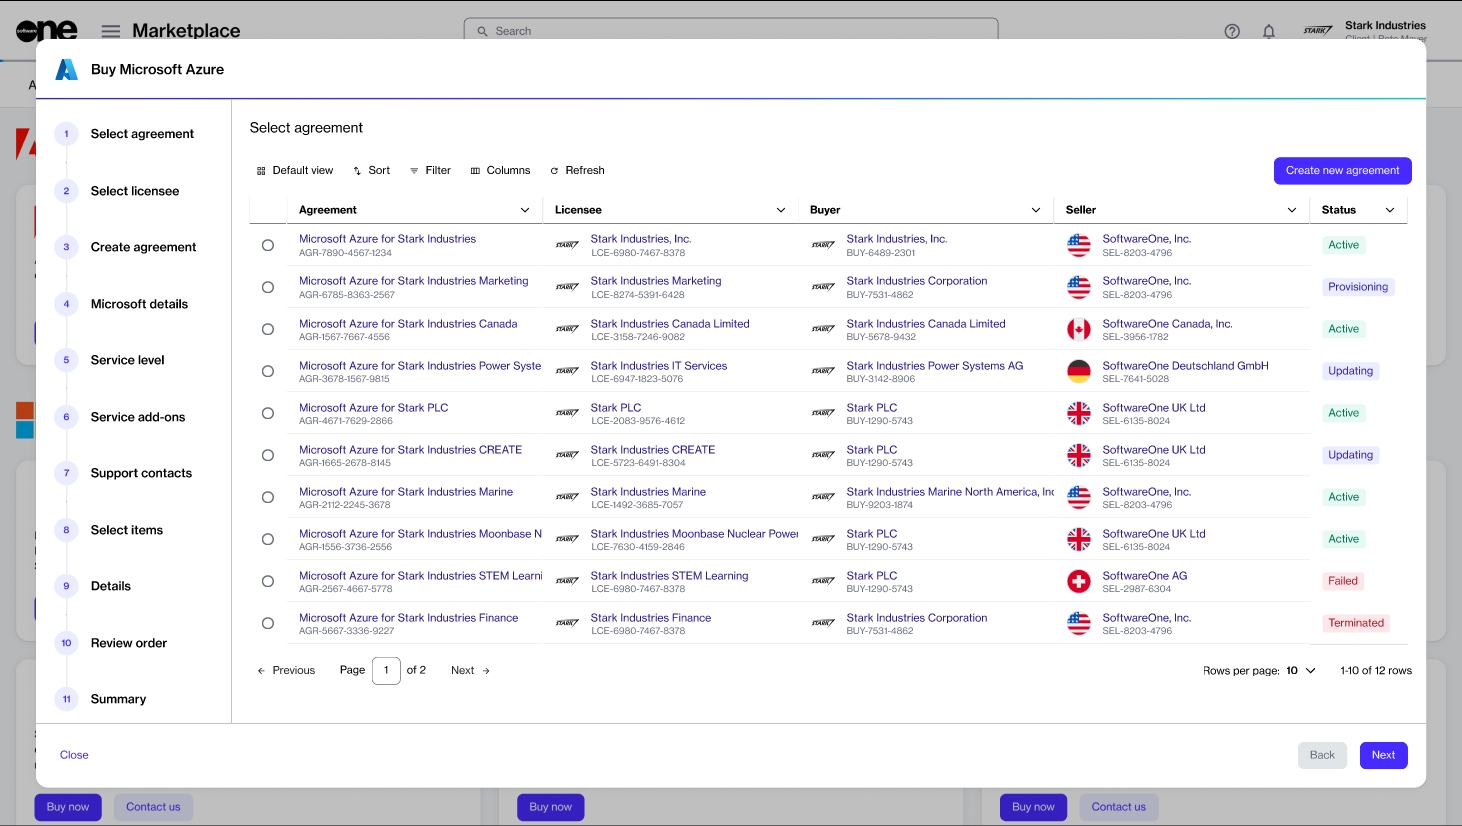
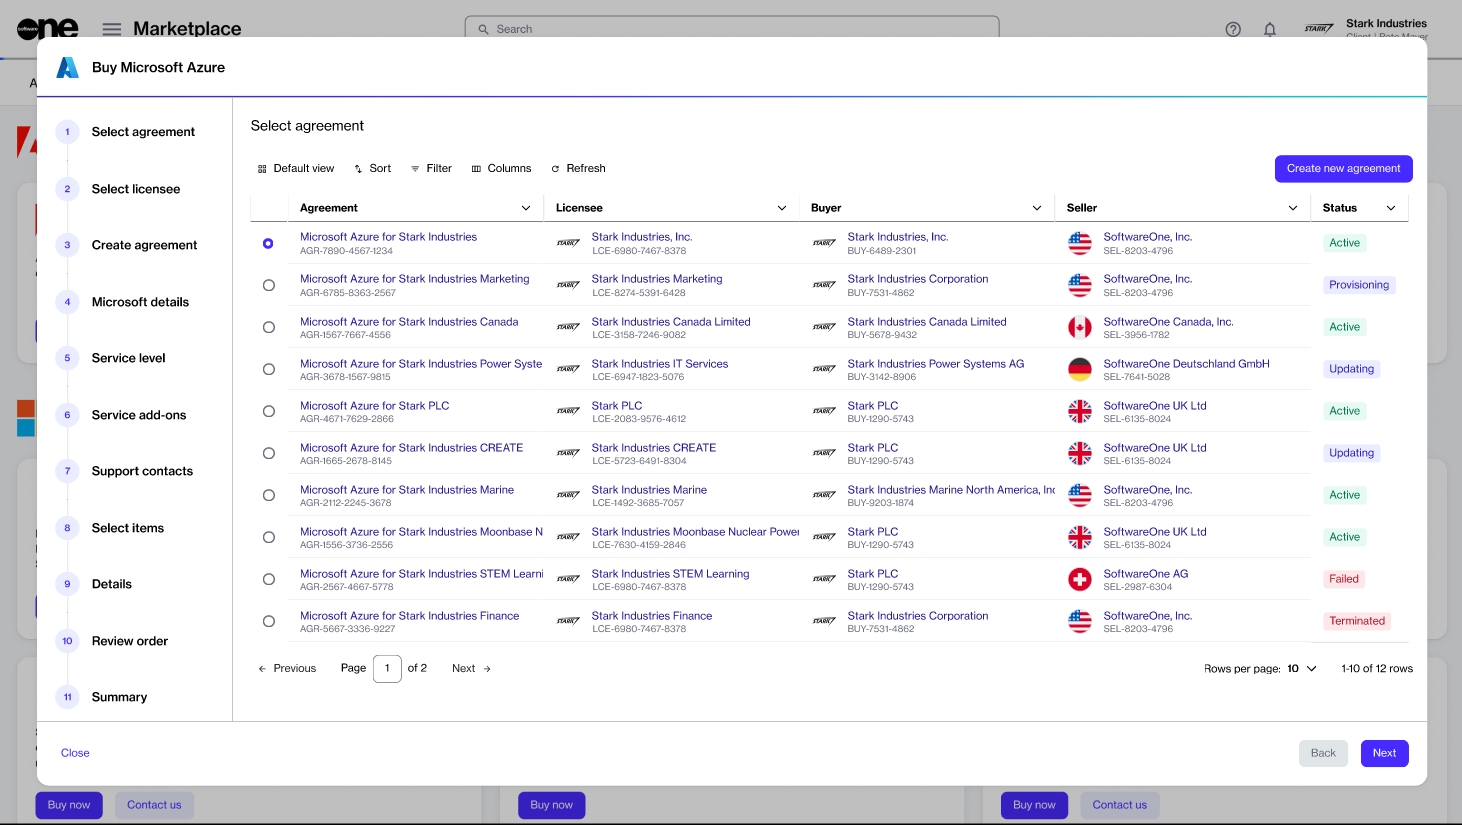
The purchase wizard starts and the Select agreement section of the wizard is displayed.
Click Create new agreement to set up your new agreement.
Click Next.
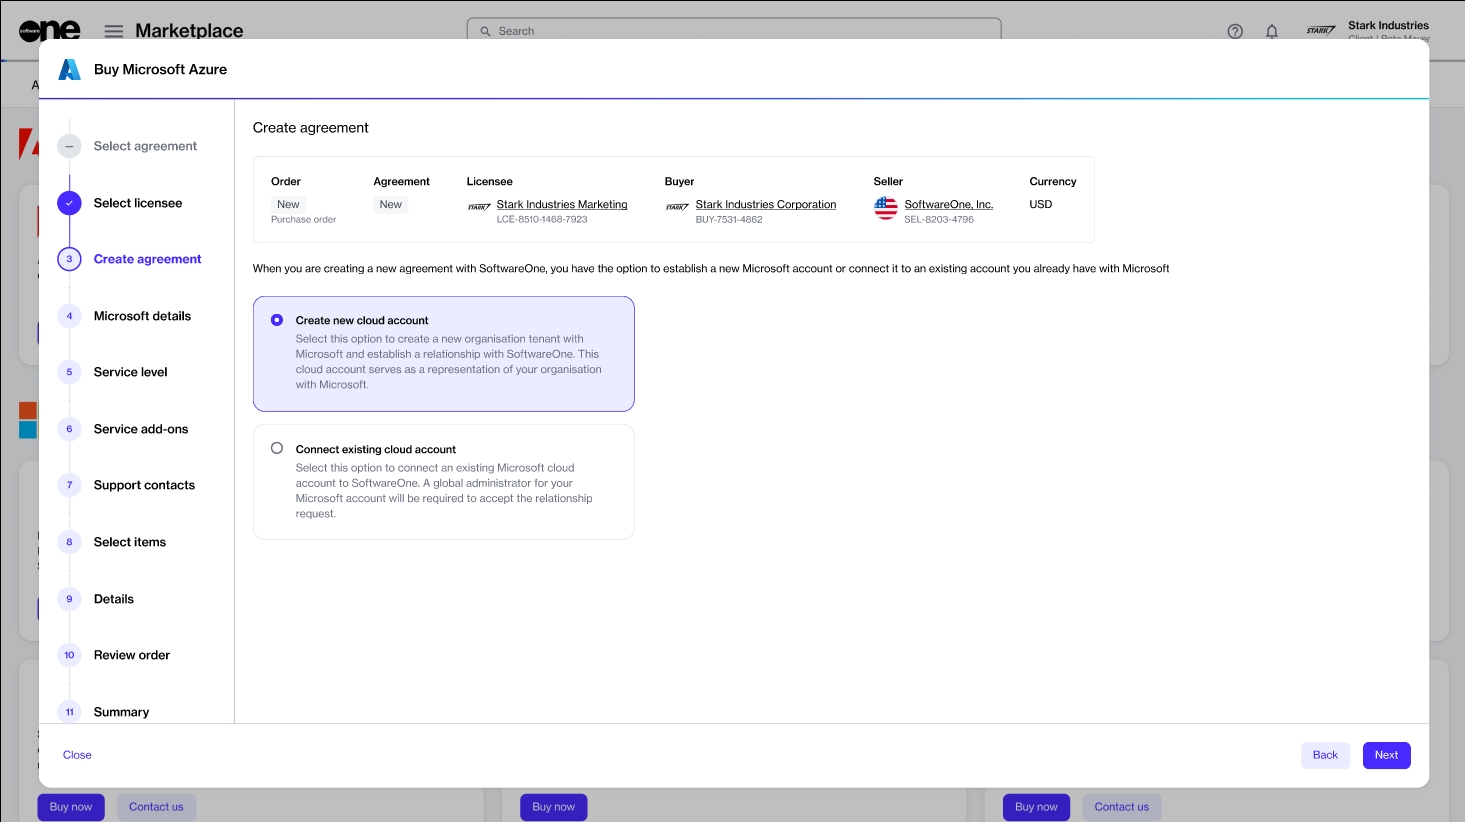
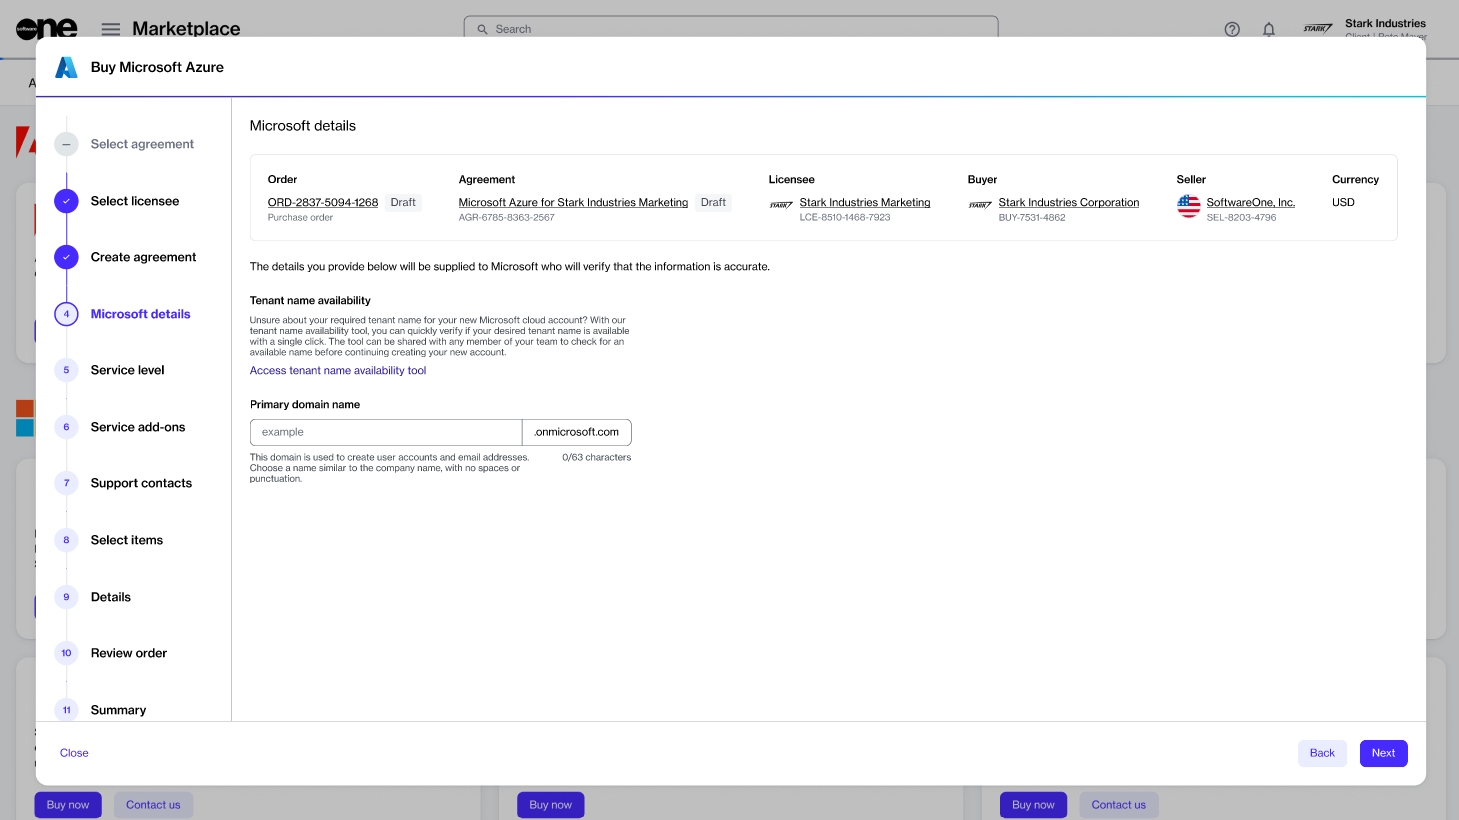
Choose whether you want to create a new Microsoft account or use your existing account. In this tutorial, we'll create a new cloud account by selecting Create new cloud account, as shown in the following image.
Click Next.
(Optional) Click Access tenant name availability tool to check the availability of tenant names from Microsoft.
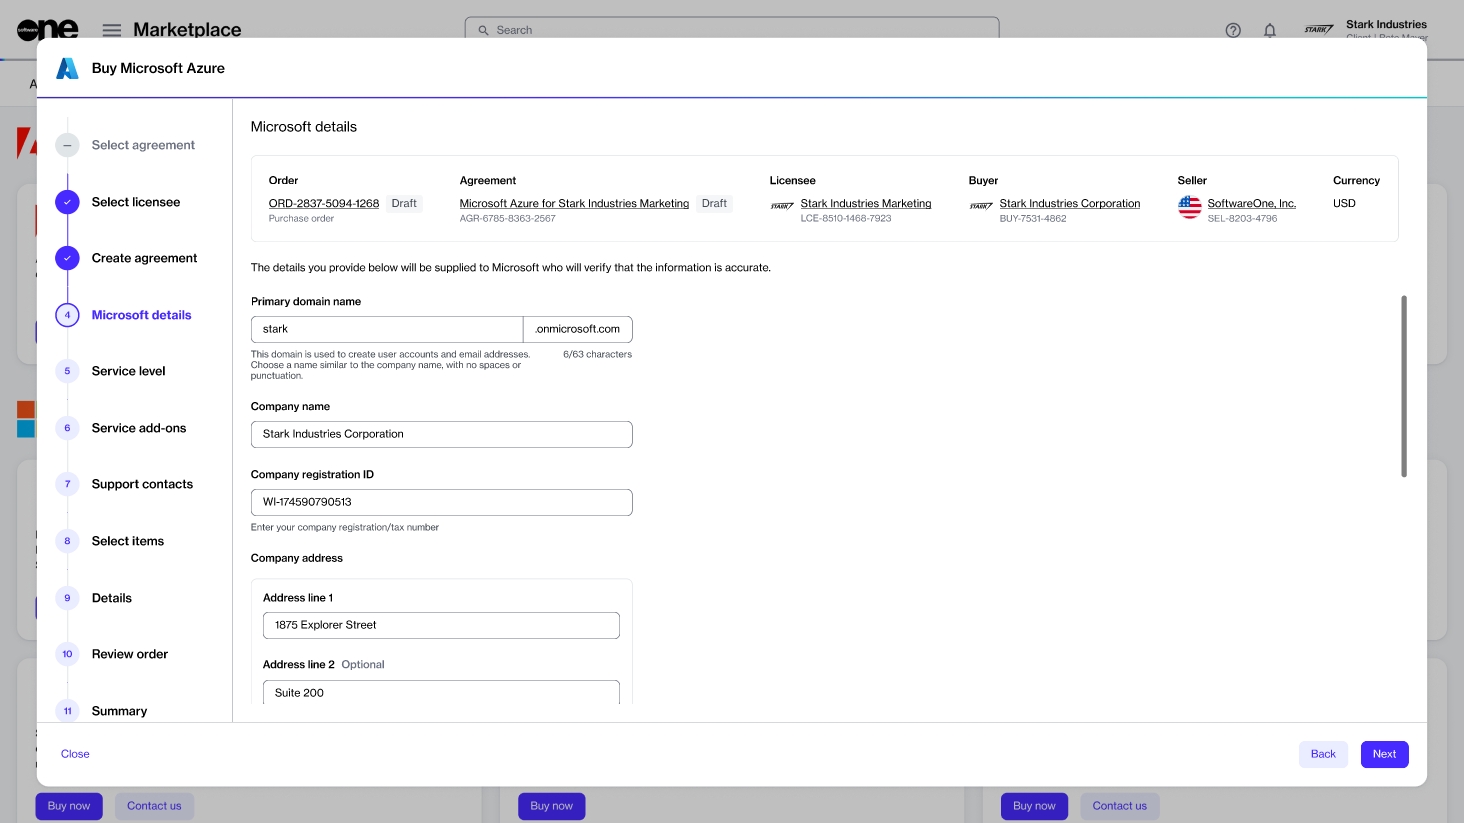
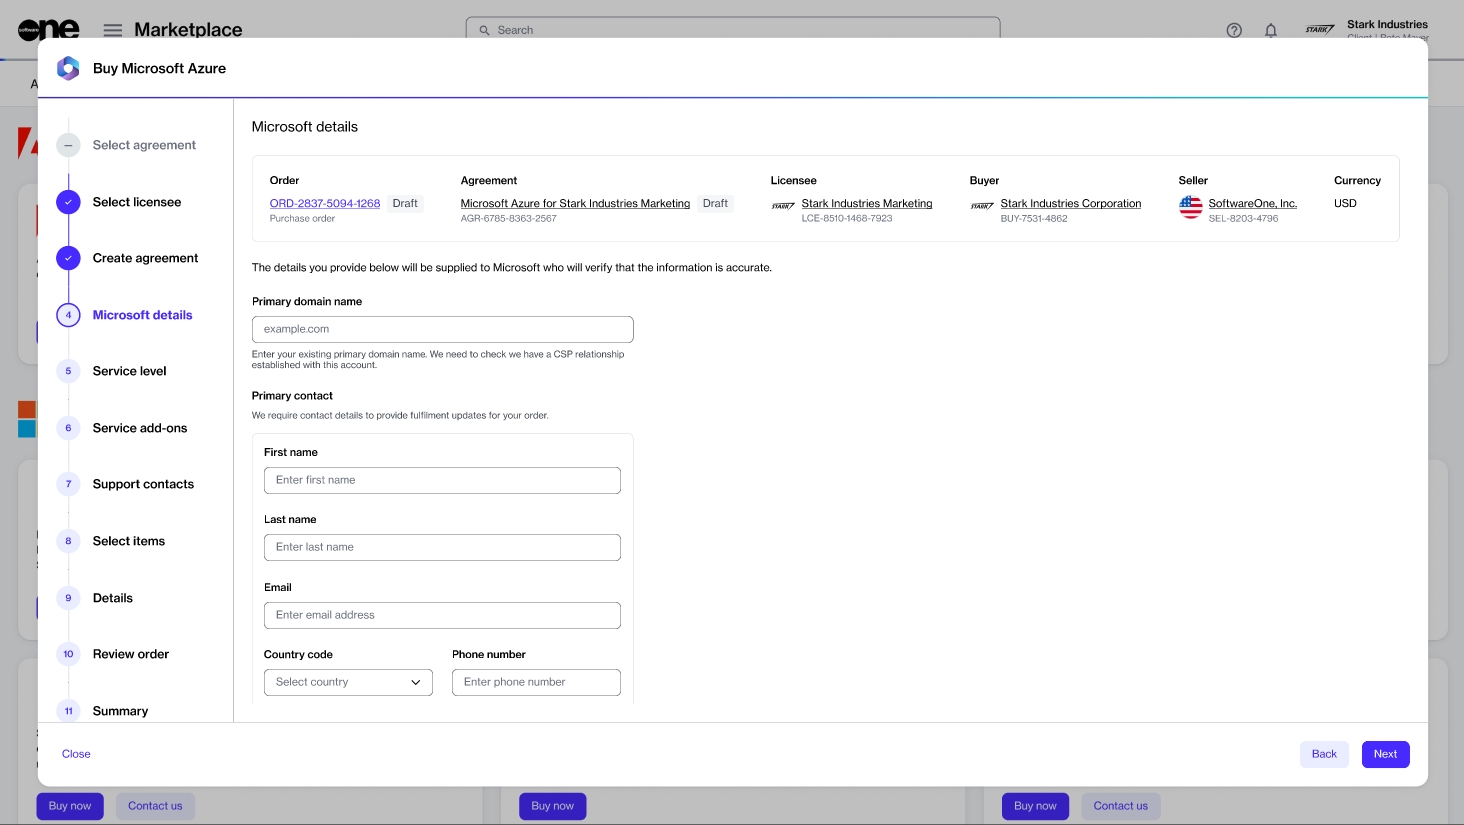
Enter your preferred domain name (also known as tenant name) in Primary domain name.
Fill out the required fields and click Next.
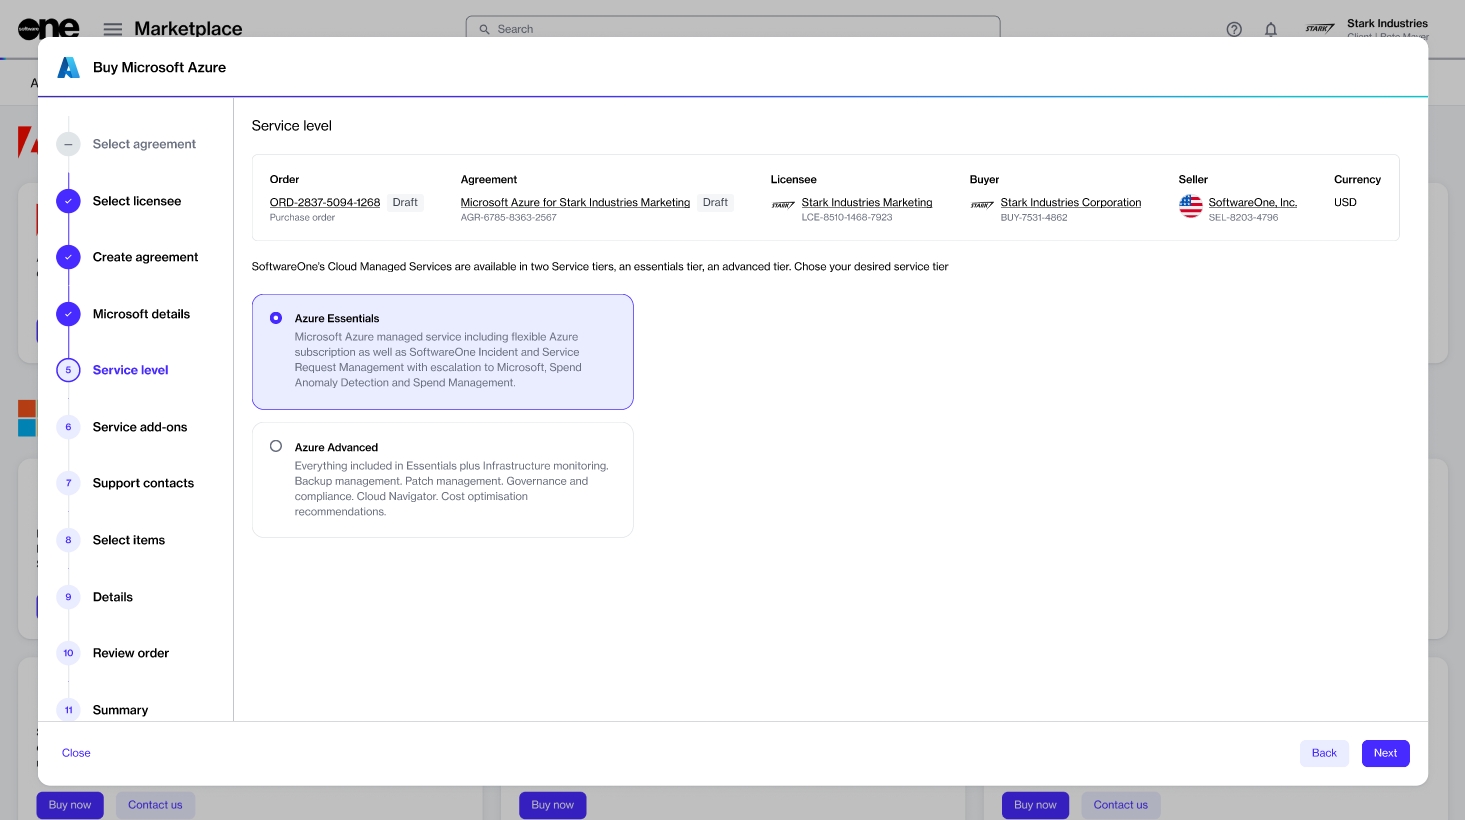
Select Azure Essentials or Azure Advanced, depending on the level of service you require for Microsoft Azure.
Click Next.
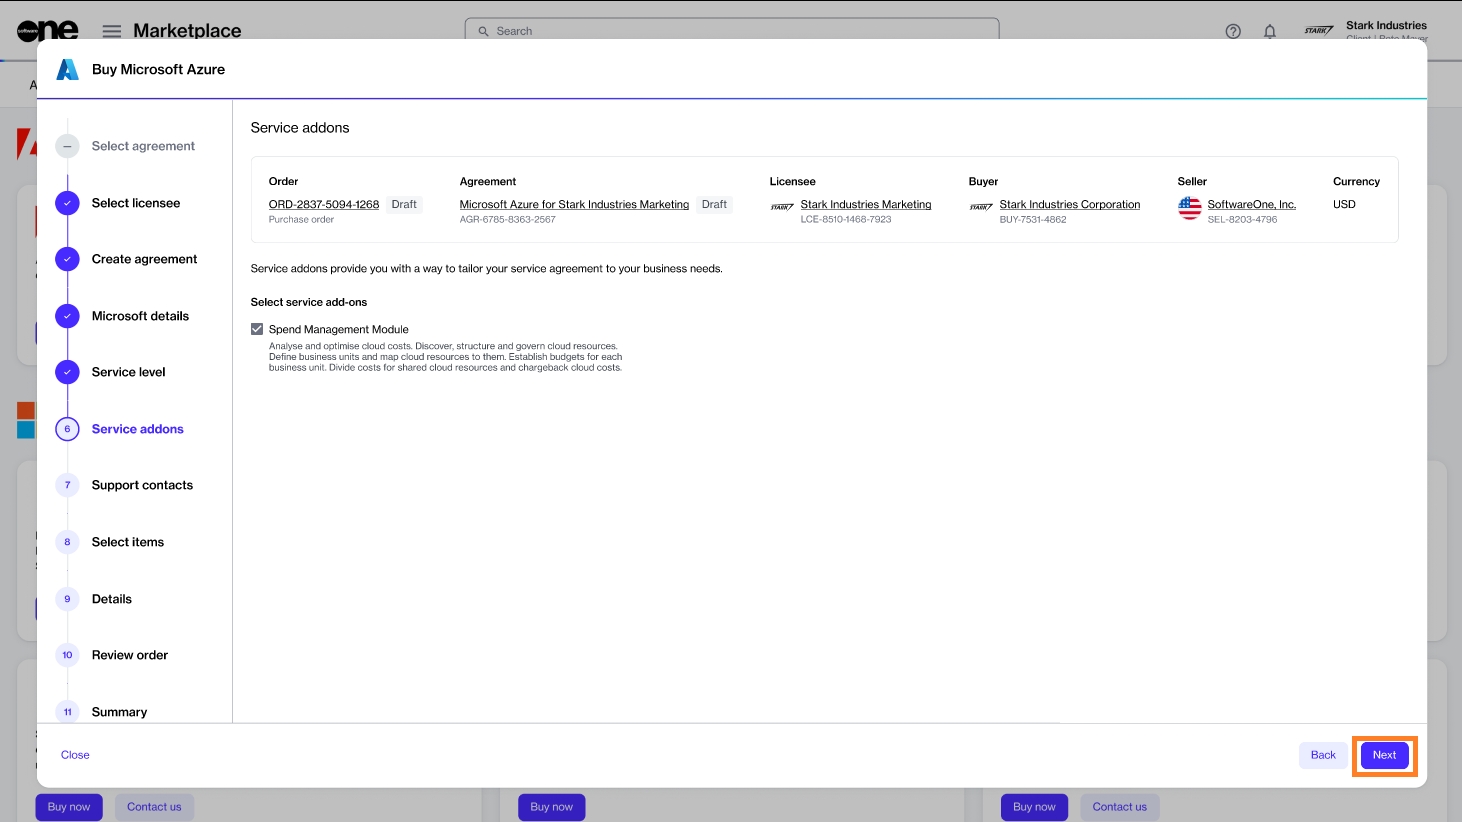
When you select Azure Essentials or Azure Advanced, all add-ons offered as part of the Azure services are displayed. All service add-ons are selected by default and you cannot change them.
Click Next.
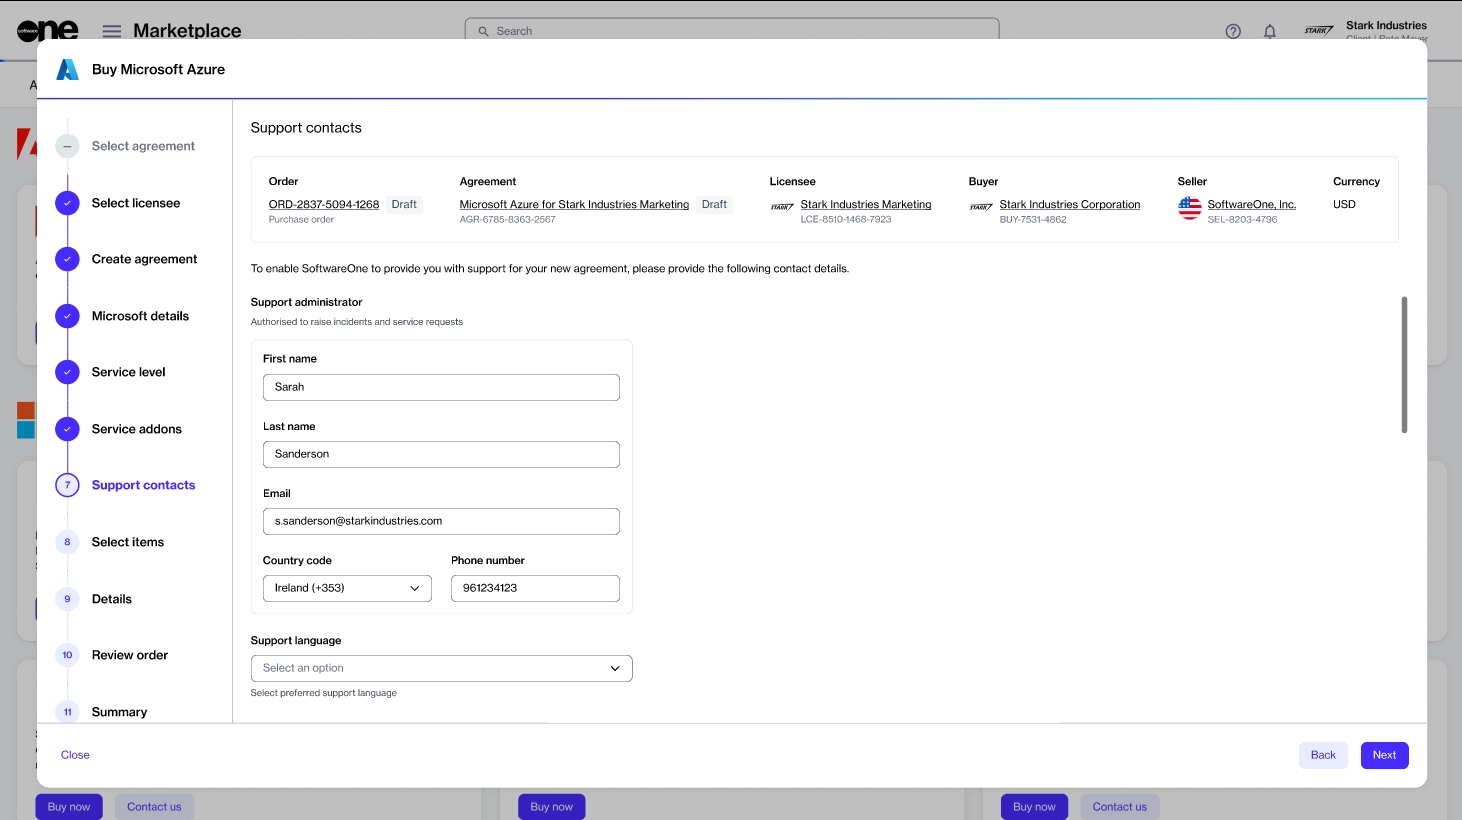
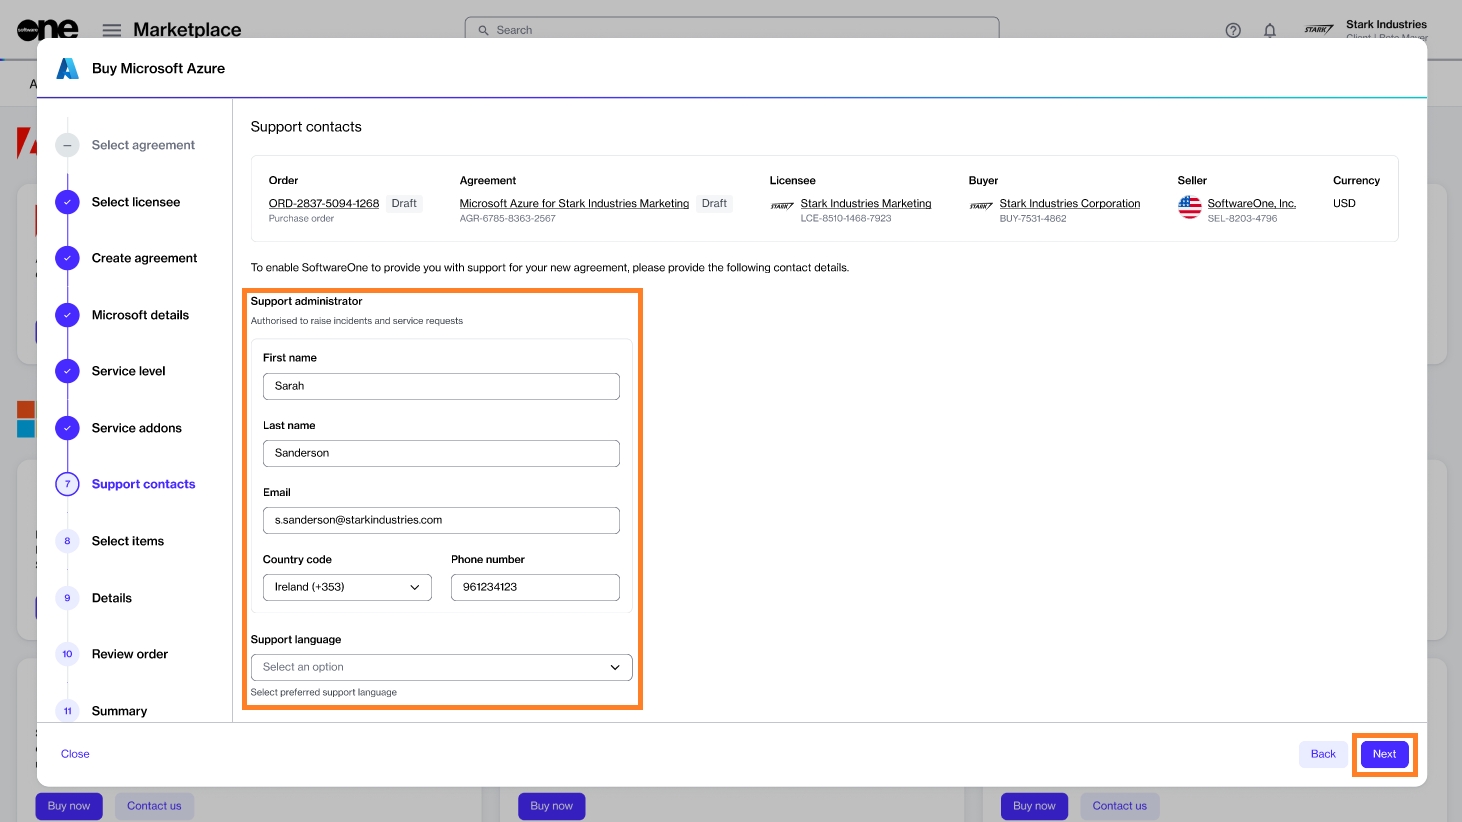
Enter the contact you want to use for support and your preferred support language.
Click Next.
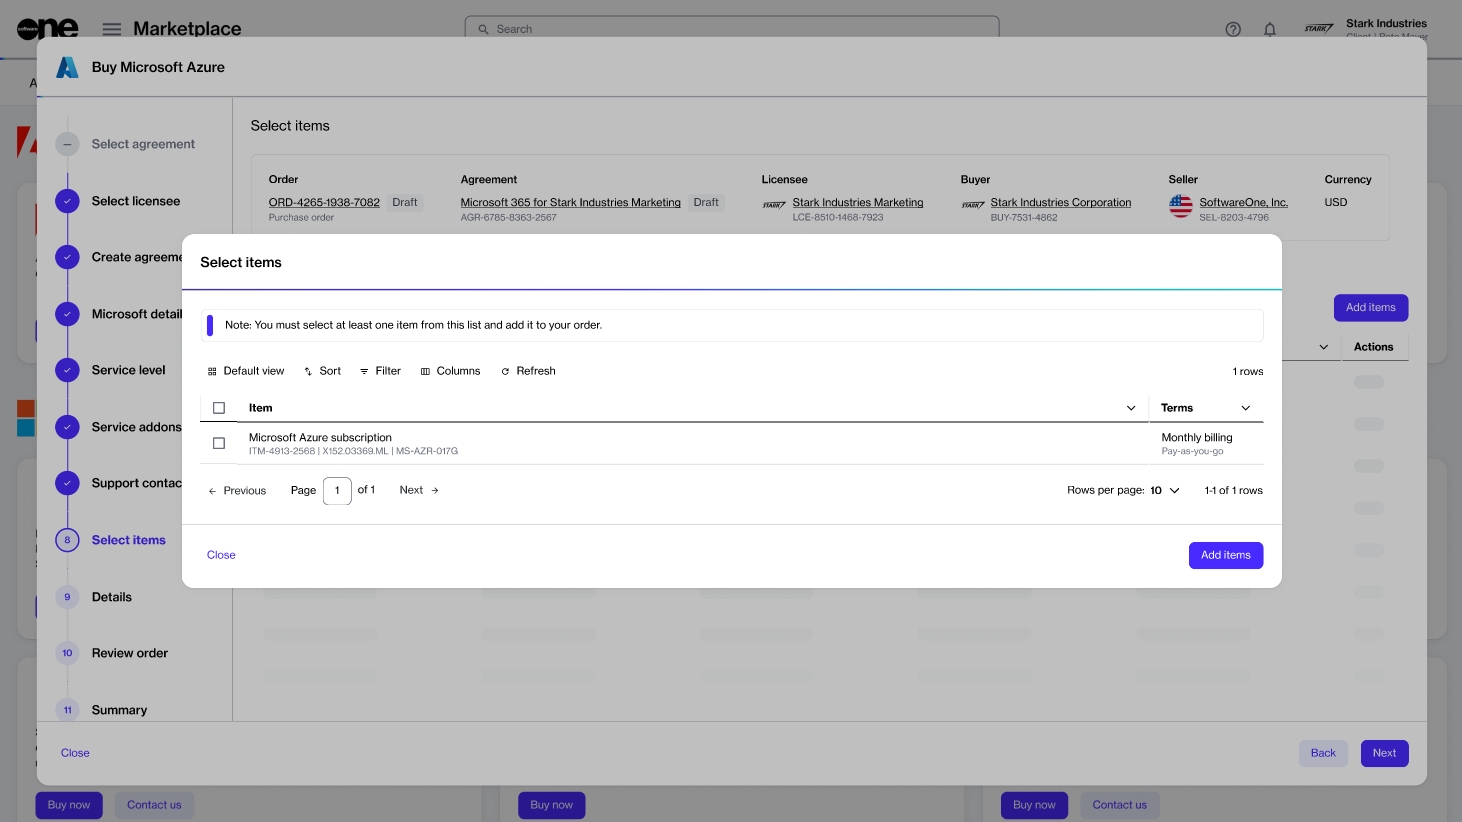
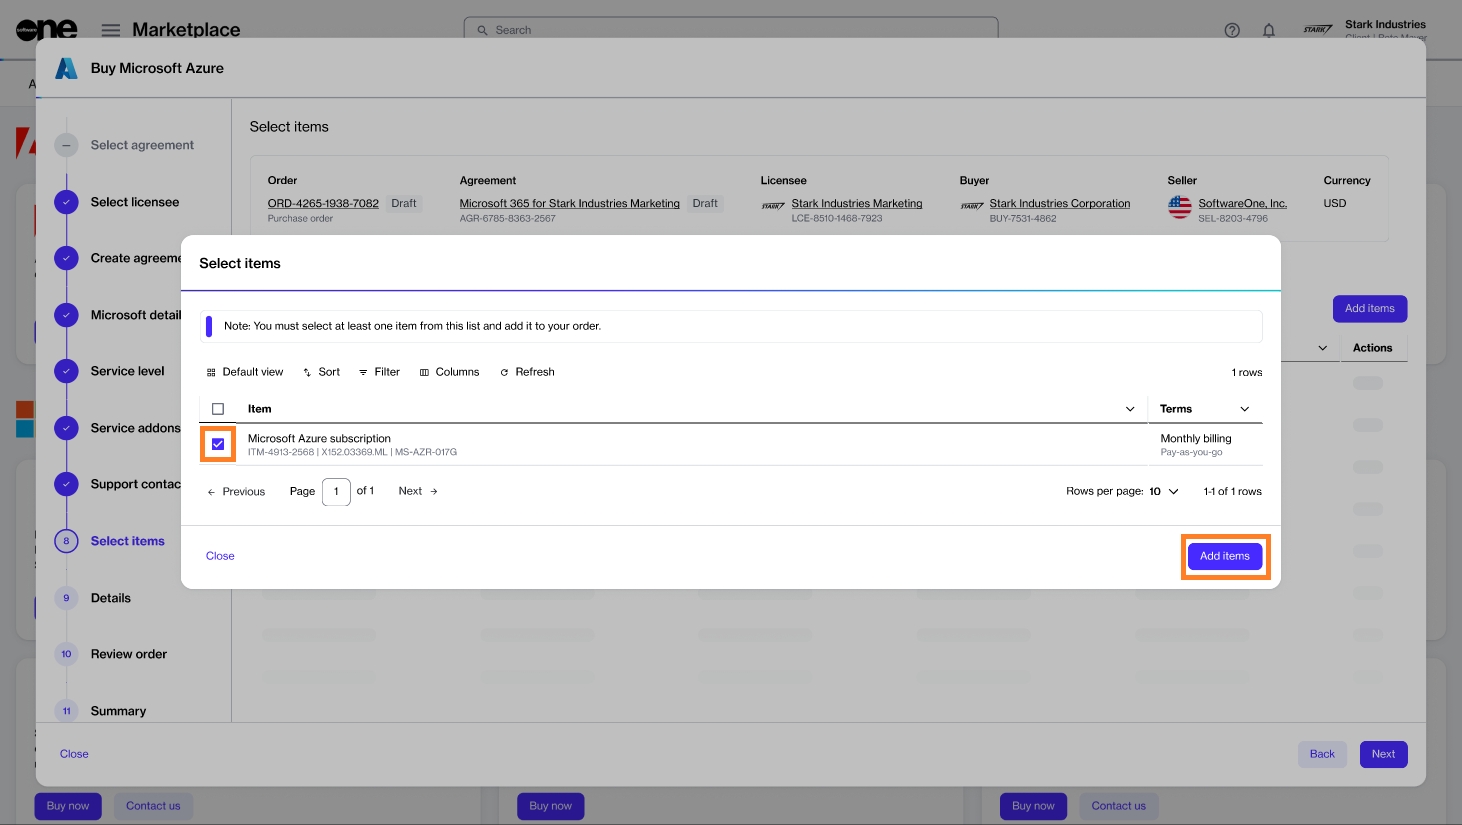
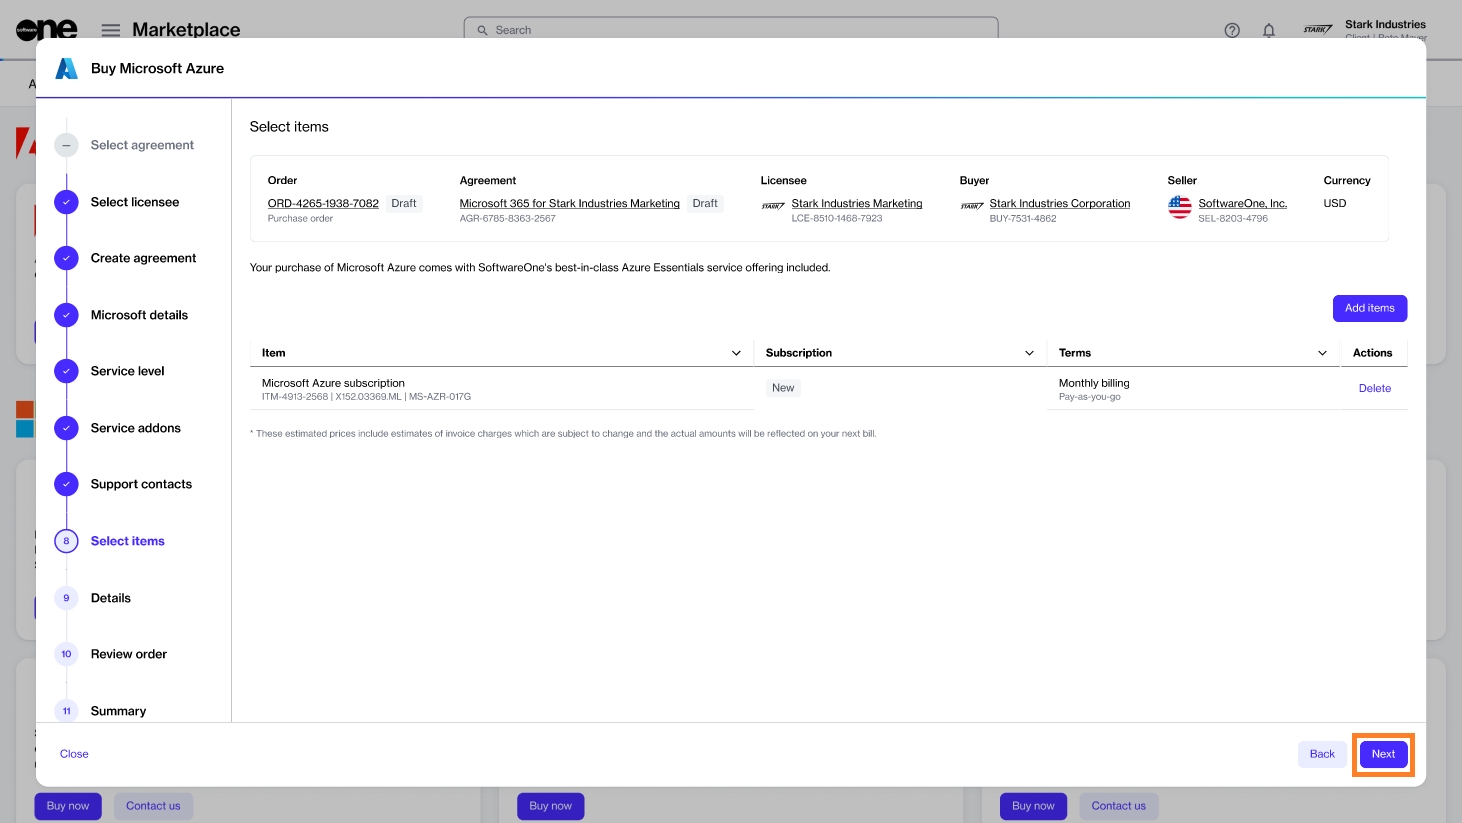
Choose the Azure subscription and click Add items to add it to your order. For Microsoft Azure, there is only one item, with no associated cost. When using Azure services, pay-as-you-go charges are generated against the subscription.
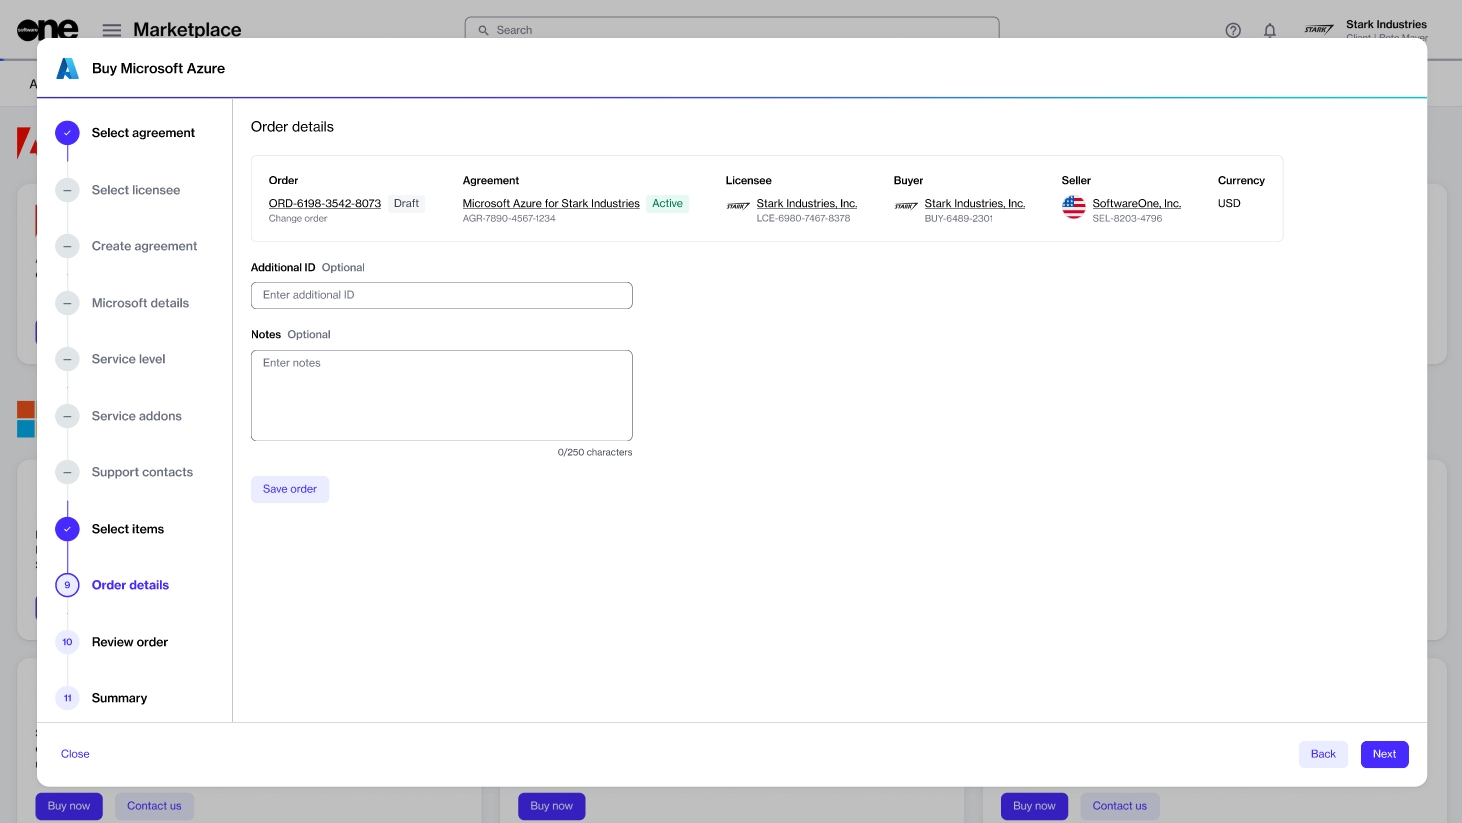
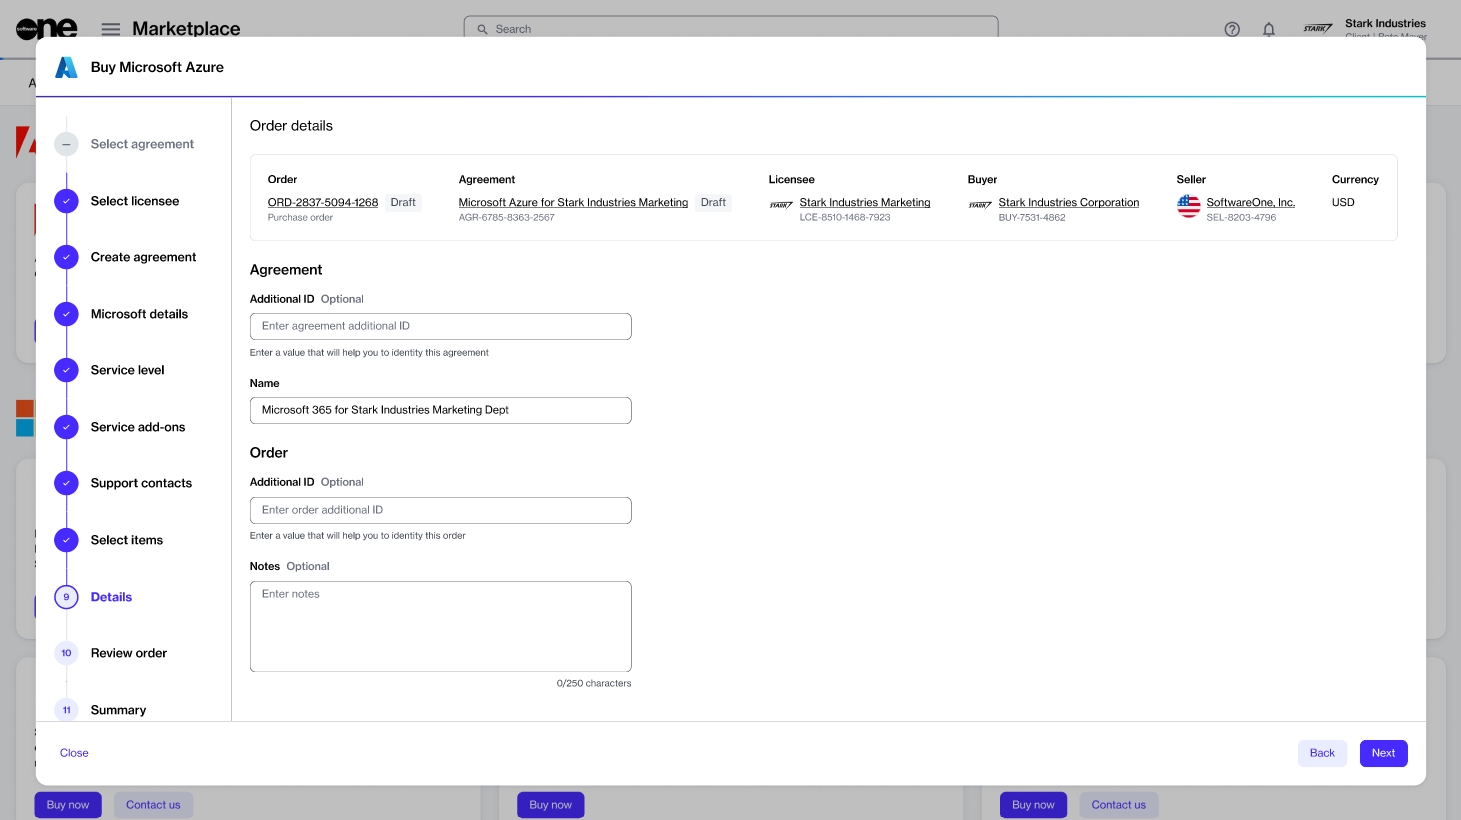
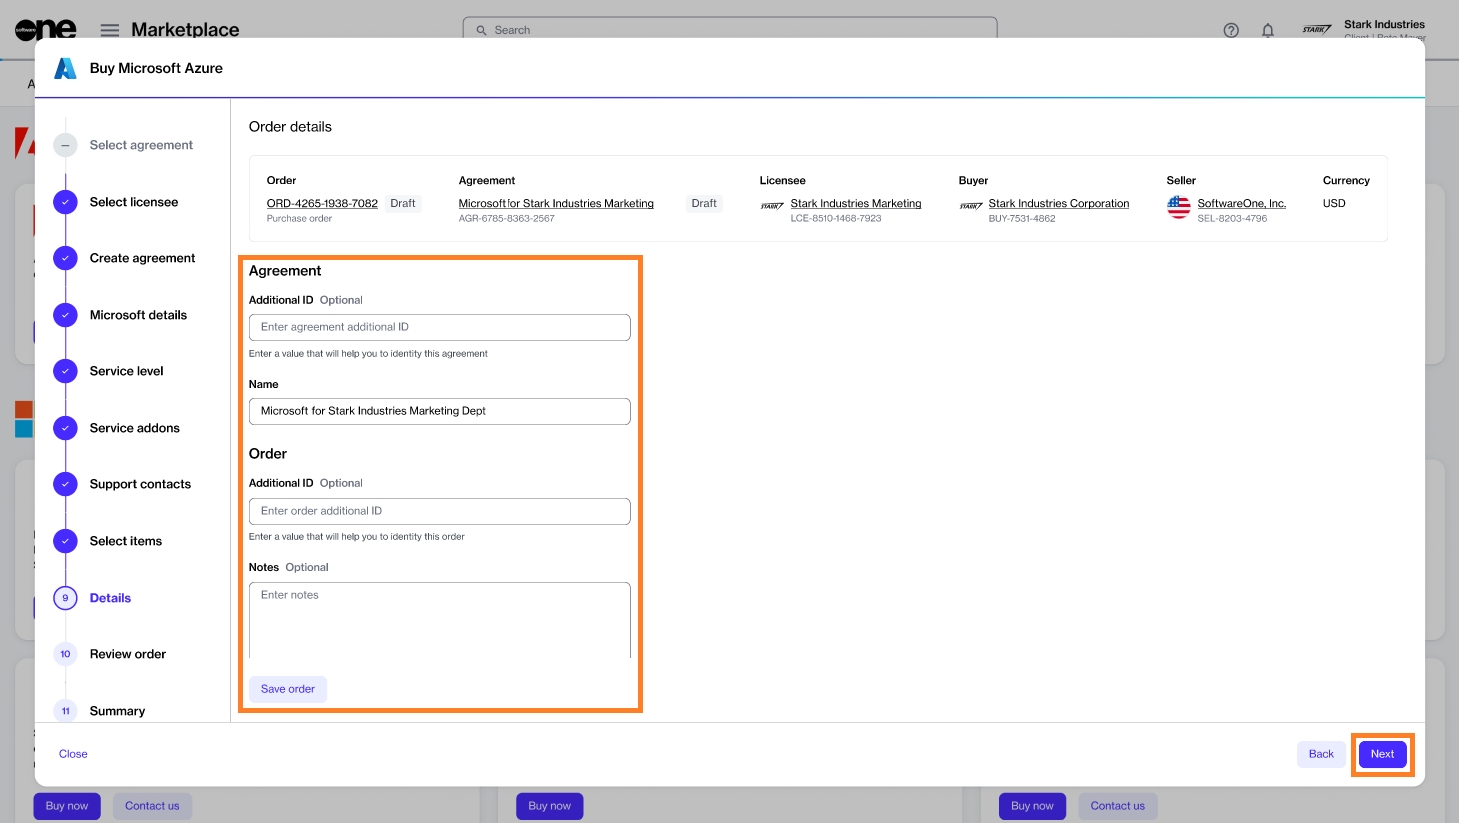
Enter the reference information as needed and click Next.
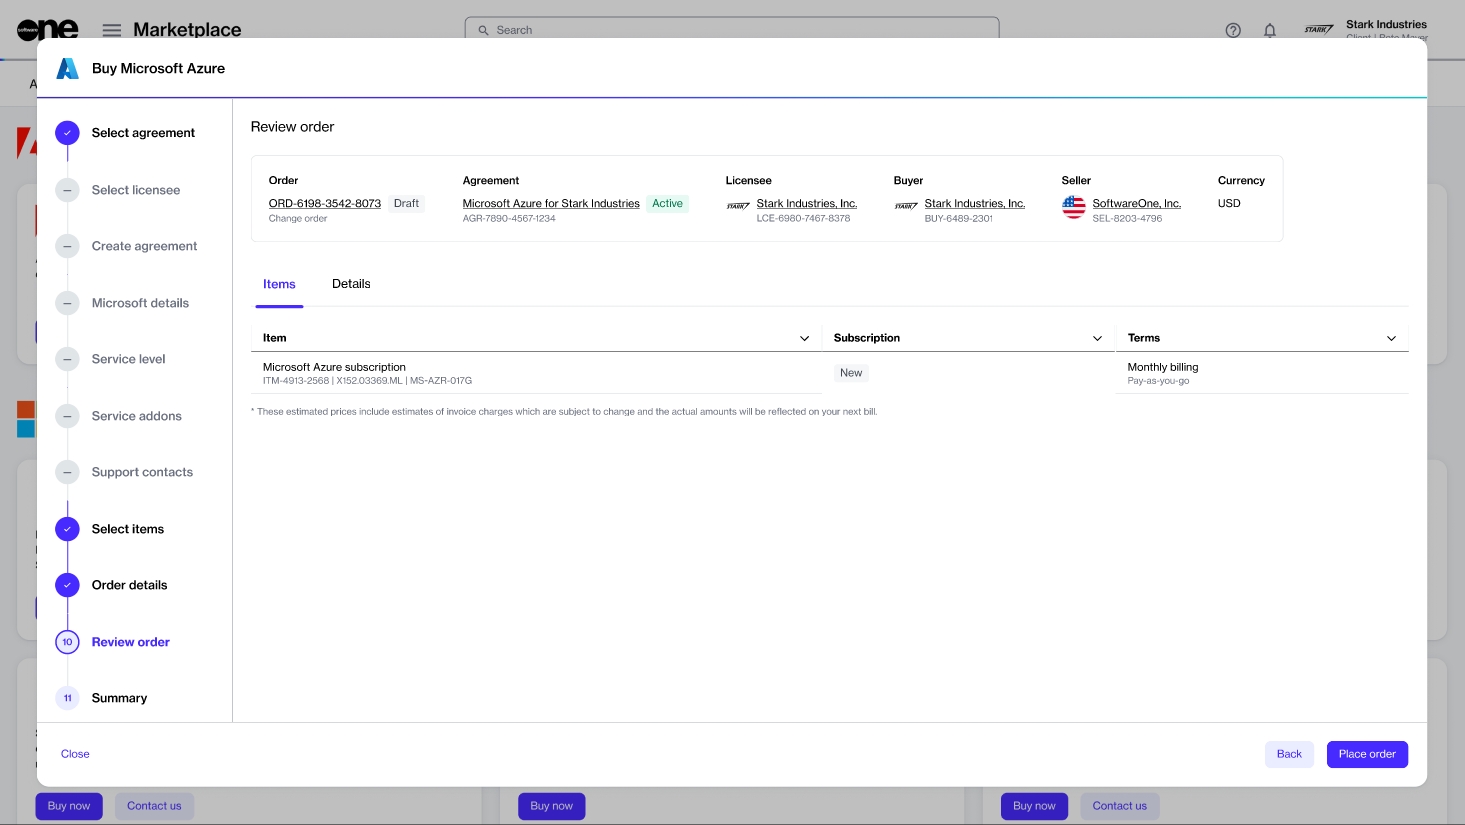
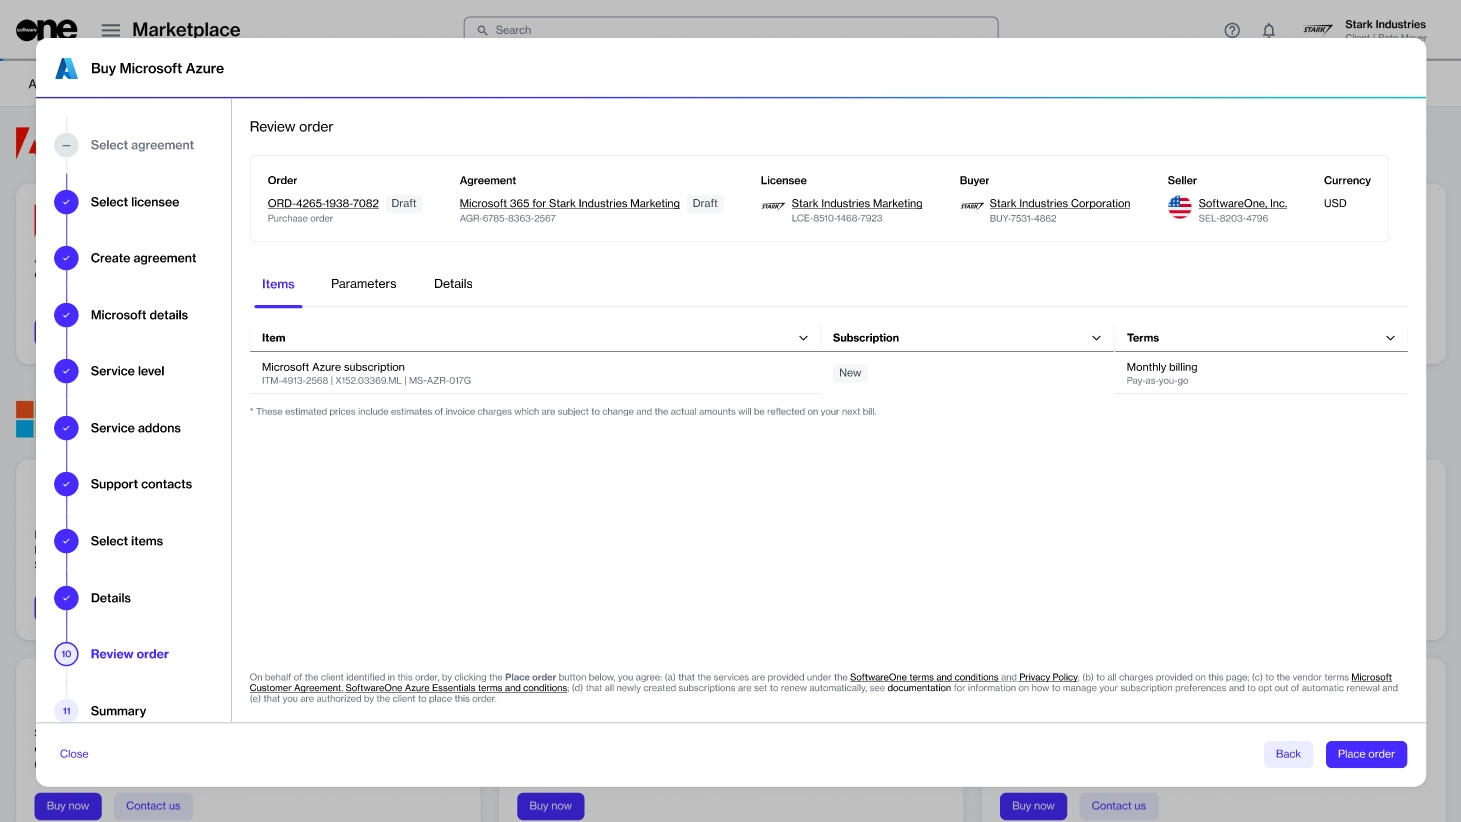
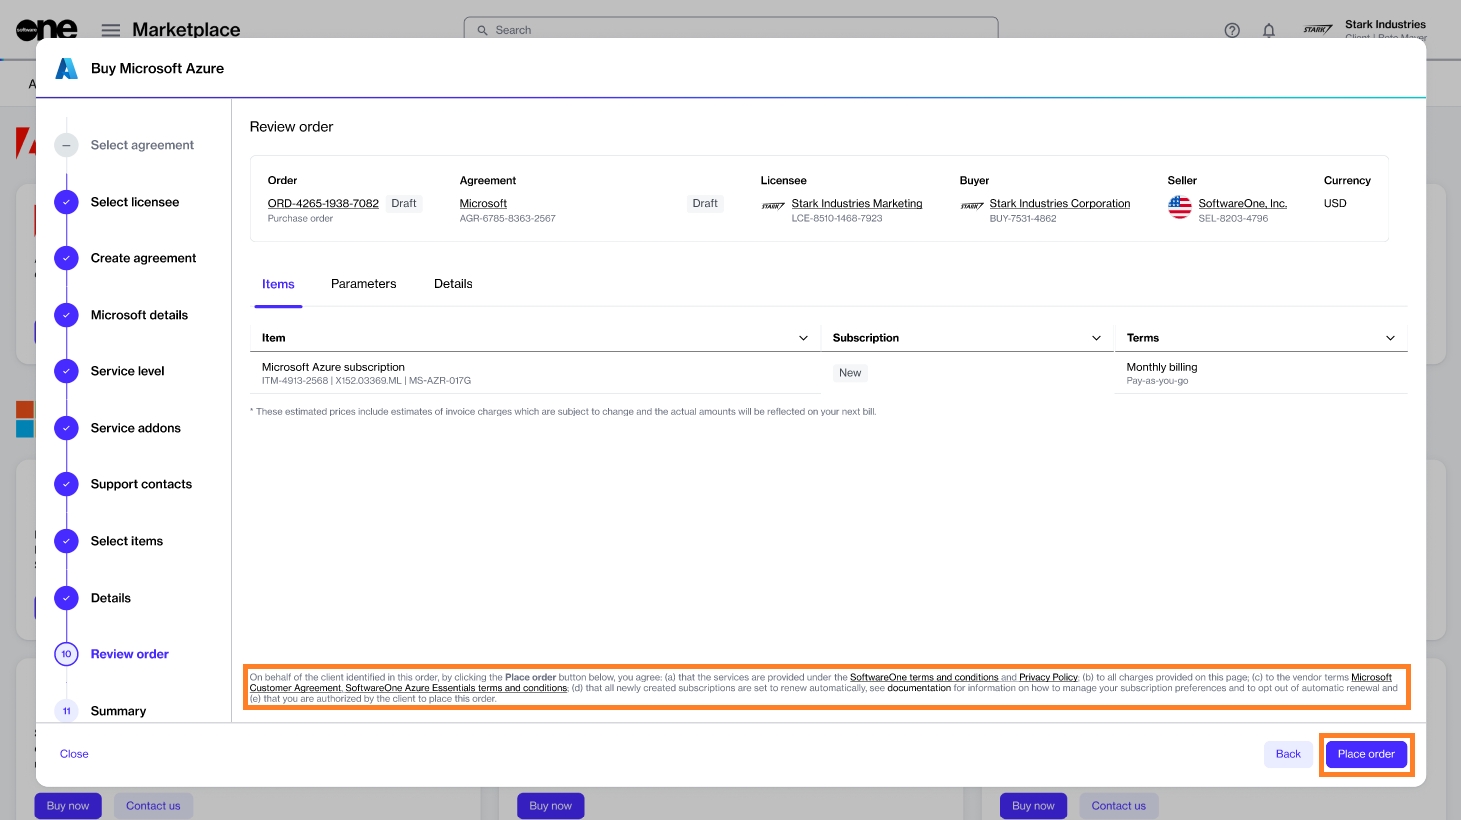
Review the details of your order. Make sure to read all terms and conditions, including the privacy statement. By placing the order, you accept all terms.
Click Place order to complete your purchase.
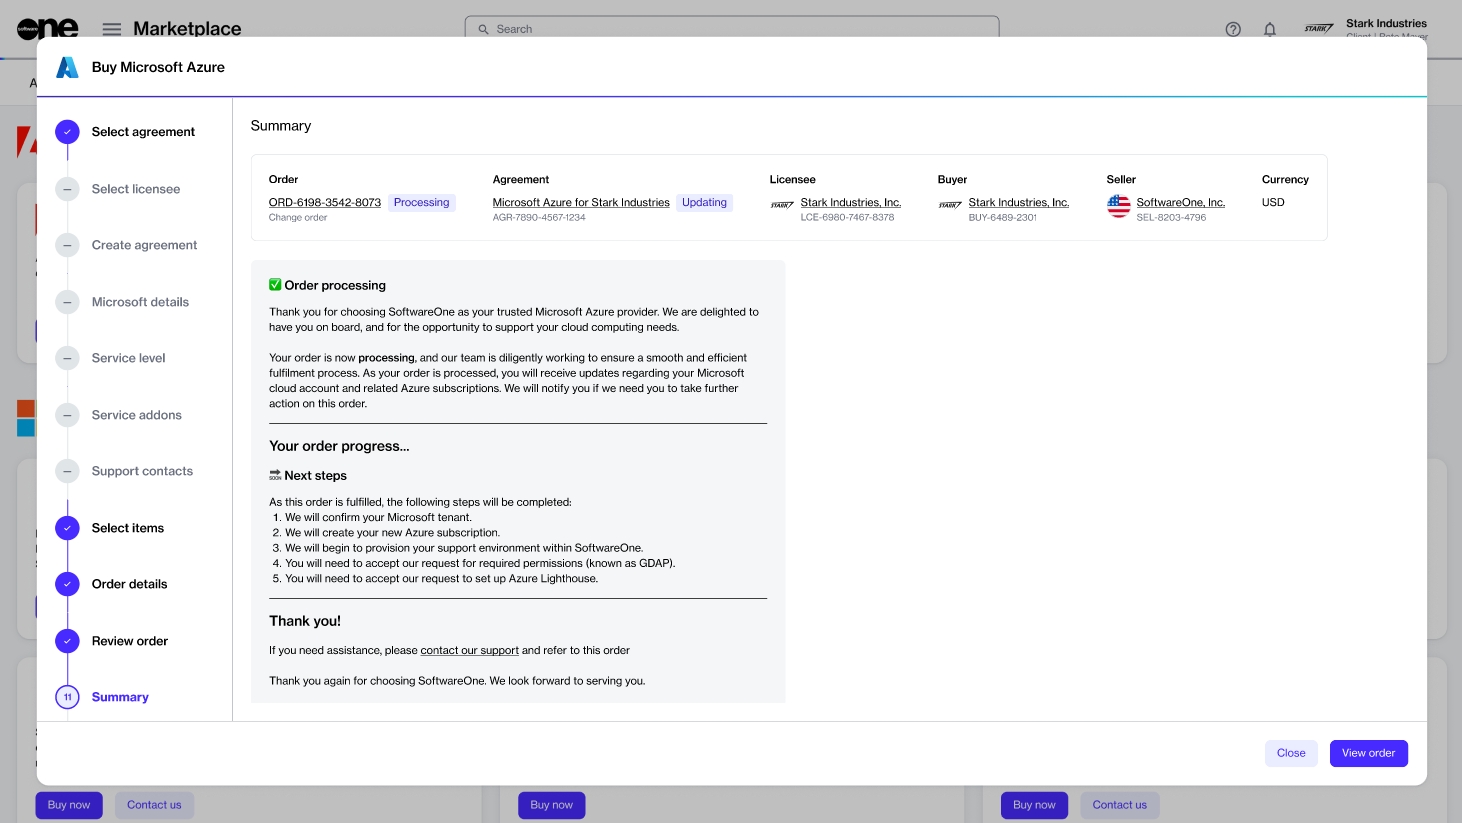
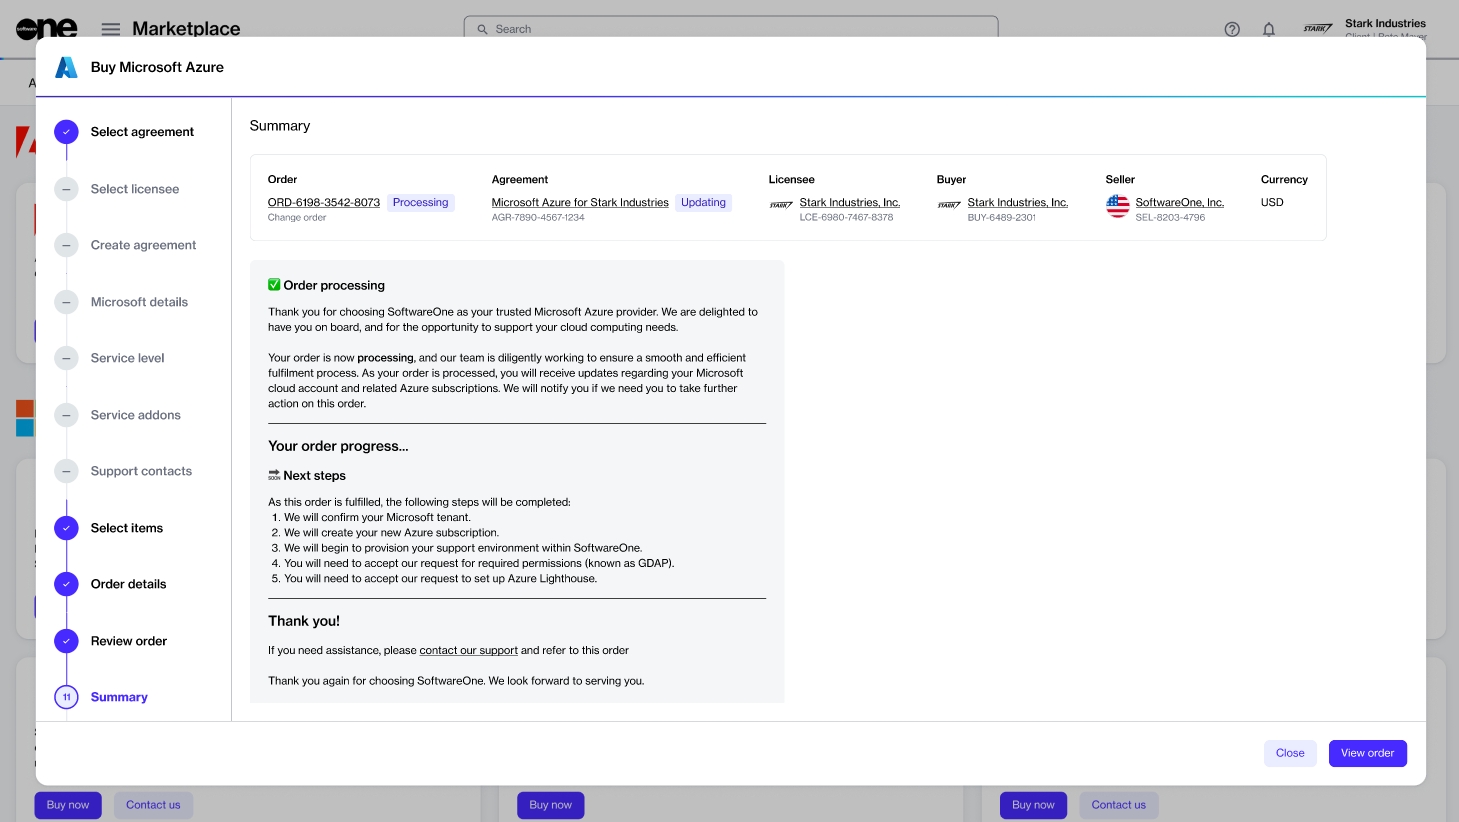
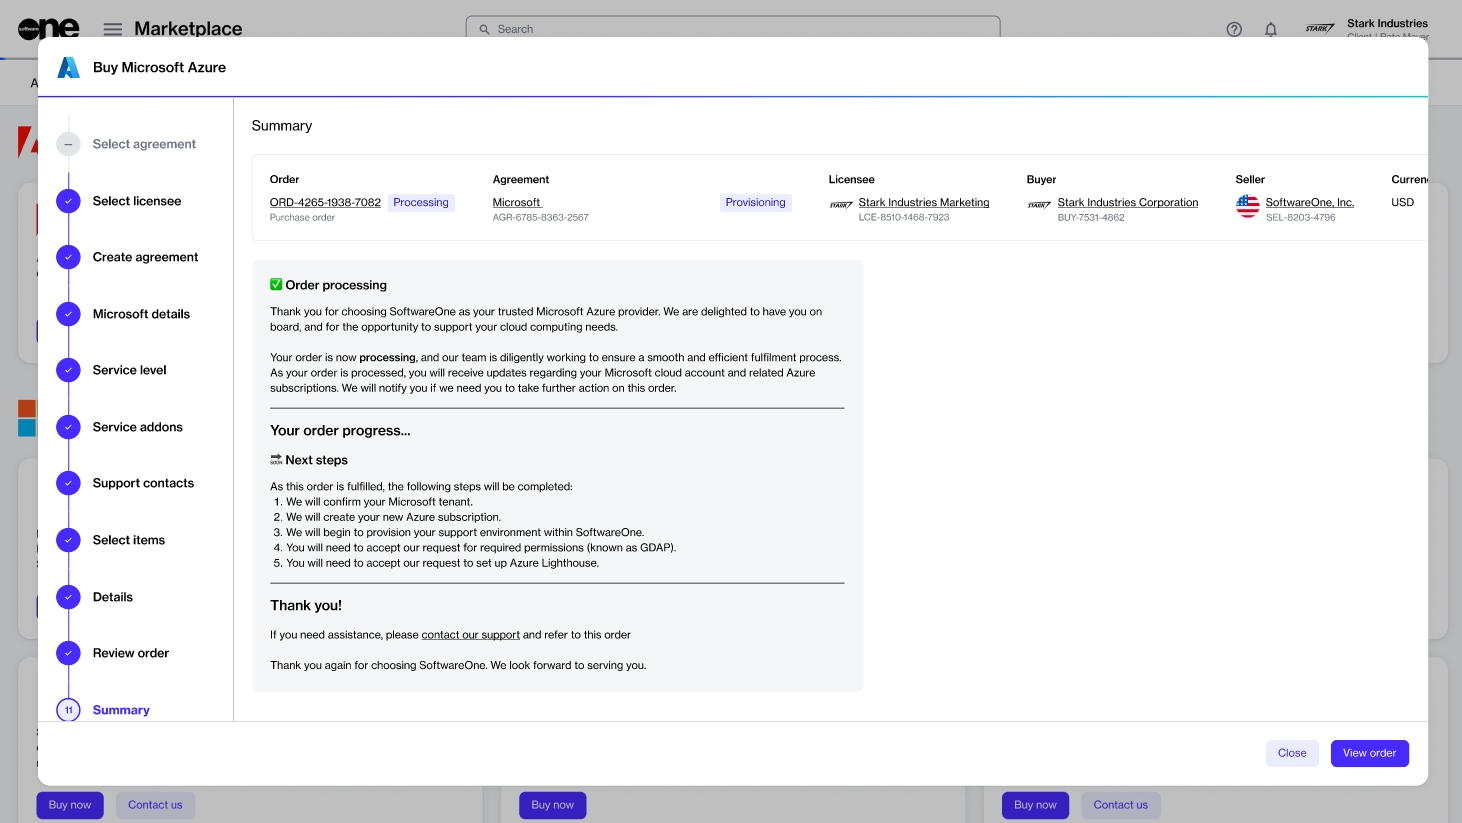
Review your order summary and the latest status message.
Click View Order to navigate to the order details page. Otherwise, click Close to close the Summary page.
Order a Microsoft Azure subscription by connecting your existing Microsoft account.
This tutorial shows how to order a Microsoft Azure subscription by setting up a new agreement and connecting your existing Microsoft tenant.
Before starting this tutorial, make sure you have the following:
Your Microsoft tenant name.
The contact details of the person who will manage your account.
Navigate to the Products page and click Microsoft Azure.
Click Buy now on the details page.
The purchase wizard starts and the Select agreement section of the wizard is displayed.
Click Create new agreement to set up your new agreement.
Click Next.
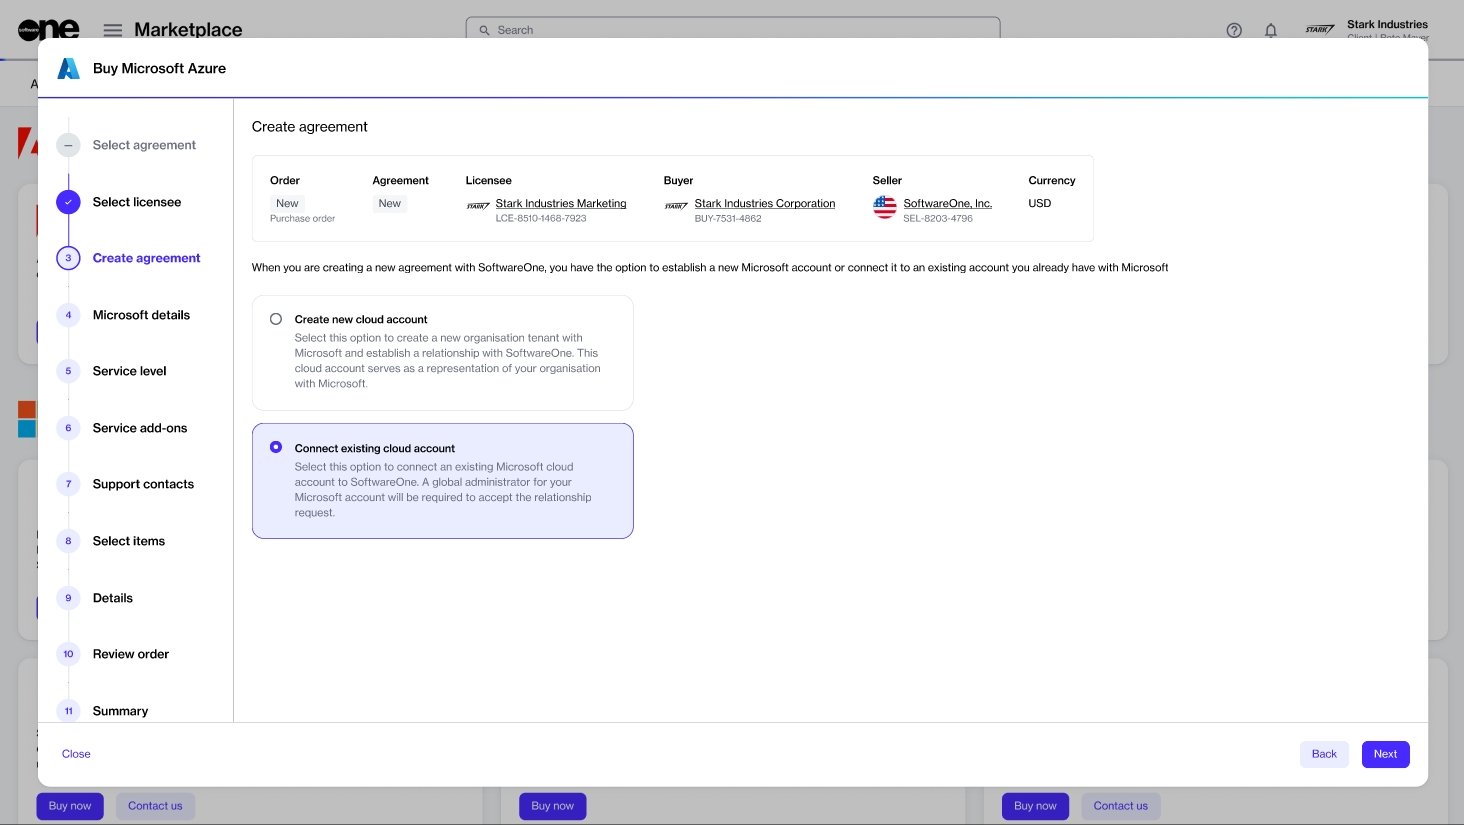
Choose whether you want to create a new Microsoft account or use your existing account. In this tutorial, we'll select Connect existing cloud account, as shown in the following image.
Click Next.
(Optional) Click Access tenant name availability tool to check the availability of tenant names from Microsoft.
Enter your preferred domain name (also known as tenant name) in the Primary domain name field.
Fill out the required fields and click Next.
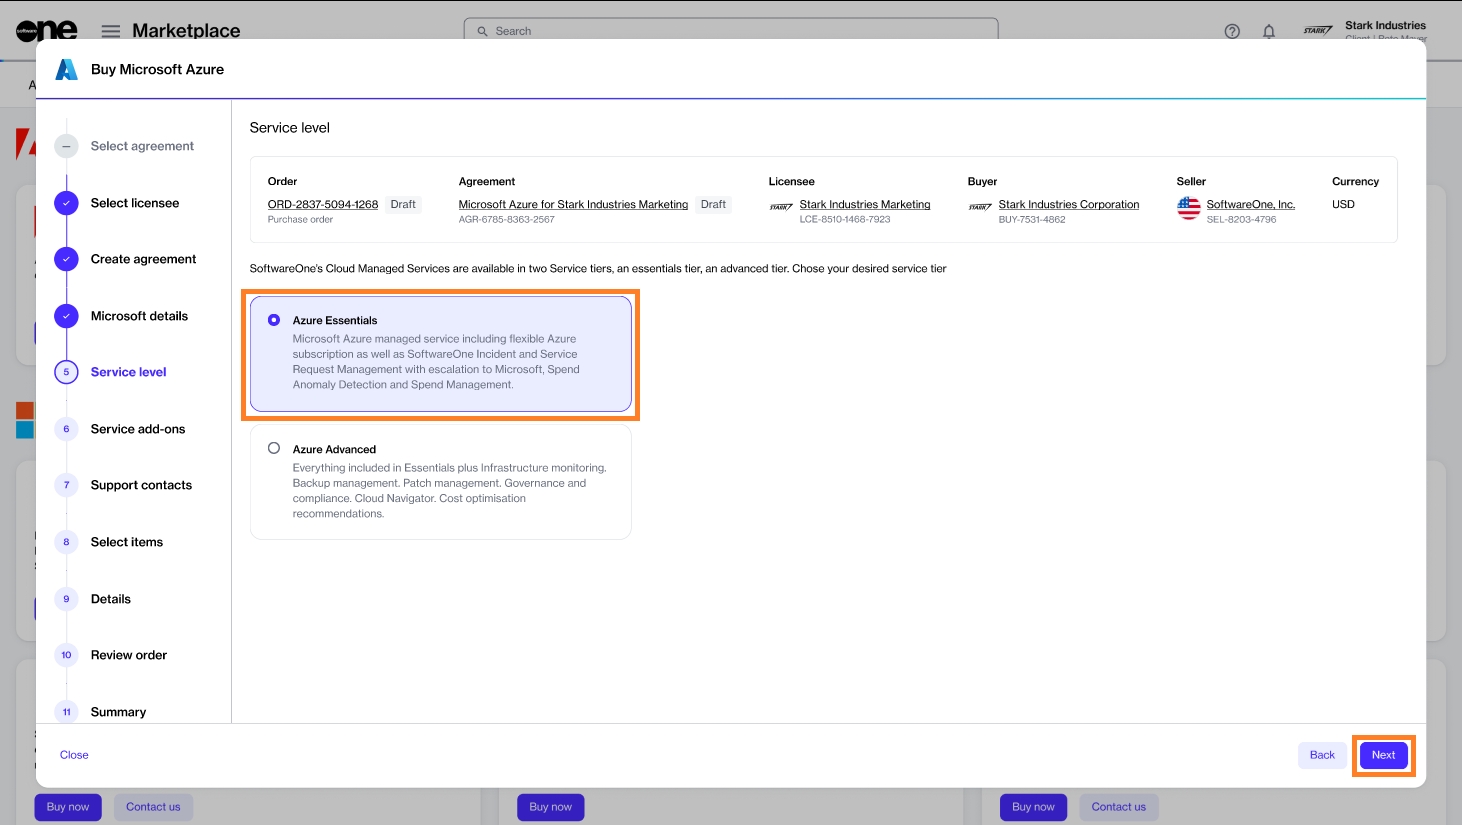
Select Azure Essentials or Azure Advanced, depending on the level of service you require for Azure. In this tutorial, we'll select Azure Essentials, as shown in the following image.
Click Next to continue.
When you select Azure Essentials or Azure Advanced, all add-ons offered as part of the Azure services are displayed. All service add-ons are selected by default and you cannot change them.
Click Next.
Enter the contact you want to use for support and your preferred support language.
Click Next to continue.
Select the Azure subscription item and click Add items to add it to your order. Note that for Microsoft Azure, there is only one item, with no associated cost. When using Azure services, pay-as-you-go charges are generated against the subscription.
Click Next to continue.
Enter the reference information as needed and click Next.
Review the details of your order and make sure to read the terms using the links in the footer.
Click Place order to complete your purchase.
Review your order summary and the latest status message.
Click View Order to navigate to the order details page. Otherwise, click Close to close the Summary page.
Click the Filter option in the grid.
Click the down arrow in the upper right and select Terminate.
A licensee in the active state or permission to (if you don't want to use an existing licensee). You'll need to select the licensee when setting up the new agreement.
Choose the licensee you want to use. In this tutorial, we'll select an existing licensee, as shown in the following image. However, you can add a new licensee by clicking Add licensee and following the instructions in .
Microsoft subscriptions can be canceled by placing a termination order through the Marketplace Platform.
A termination order suspends the subscription until it reaches the end date when it'll be terminated. A suspended subscription cannot be used, but it's still billed until the end date.
The following cancelation specifics apply to Microsoft subscriptions:
For Microsoft Azure, you can cancel a single subscription or the entire agreement containing subscriptions. Note that for Microsoft Azure, the usage is billed in arrears. It means you'll be billed as per your usage in the previous month.
For all other Microsoft products, such as Microsoft Dynamics and Microsoft 365, you can terminate or reduce the quantity within 7 days from your date of purchase. Subscriptions terminated or reduced in quantity within 7 days of purchase are eligible for a prorated refund. To learn more, see New Commerce Experience Cancellation Policy.
Although Microsoft supports co-terming, the Marketplace Platform doesn't support co-terming for Microsoft products.
For instructions on canceling your subscription, see Terminate Microsoft Subscriptions and Terminate All Microsoft Subscriptions.
We are pleased to announce the release of three new products in the Marketplace Platform: Microsoft Perpetual Software for Commercial, Microsoft Perpetual Software for Education, and Microsoft Perpetual Software for Education for Charity.
With this release, you can effortlessly create agreements and purchase the full suite of Microsoft Perpetual Software directly through the CSP program in the Marketplace Platform. You can also place change orders to add more perpetual software products to your existing agreements.
This release further expands our product offerings, reinforcing our commitment to delivering comprehensive software solutions through the Marketplace. To learn more, see Perpetual Software and Buy Perpetual Software Licenses.
Microsoft Azure Lighthouse allows authorized SoftwareOne associates to access your Azure resources seamlessly and securely.
As a client, you can authorize SoftwareOne to manage your Azure environment by accepting our Lighthouse access request and completing the necessary onboarding steps. Requests can be accepted by navigating to the General tab of a purchase order and following the onboarding instructions. For details, see Complete the Azure Lighthouse Activation.
Note that until the onboarding process is complete, any purchase orders for newly provisioned Azure subscriptions will display a Querying status on the platform. After completing the Lighthouse access request, be sure to update your order's status to Processing. For instructions, see Change Your Order's Status to Processing.
Global regulatory oversight is increasing, and companies may be required to demonstrate that they have robust policies and processes in place to mitigate the risks of corruption and bribery. A critical first step in this process is the accurate identification of government entities, government-affiliated organizations, and their employees.
To streamline this, Marketplace clients will now have the option to specify whether a company is state-owned in new agreements. A company qualifies as state-owned if it's either directly controlled by the government or performs functions that are considered to be inherently governmental.
To learn about the eligibility criteria for state-owned entities, see Microsoft's State Owned Entity Criteria.
We've updated the provisioning flow for Microsoft product purchase orders. Previously, the process was delayed by Granular Delegated Admin Privileges (GDAP) management, which could take up to 21 days. Now, the provisioning process will no longer wait for GDAP approval to complete the order. A time limit has been set, counting from the order creation in the Microsoft Partner Center, after which the order will be completed regardless of GDAP status.
Note that this does not remove the need for GDAP approval. For cases where approval is delayed or pending, services dependent on GDAP will remain inactive until approval is obtained. The sync process will be updated to handle such cases accordingly.
To enhance the efficiency and accuracy of purchase and change order fulfillment, updates have been made to the key validation processes. These improvements are designed to streamline the purchasing experience by reducing unnecessary delays and simplifying the workflow for existing users and accounts. The updates include:
Cart validation for existing users - Ensuring that the items in the cart meet the requirements for processing, providing a smoother purchasing and fulfillment experience.
Billing profile validation for existing accounts - Verifying that the Microsoft account billing profile is complete, reducing the risk of fulfillment delays.
Microsoft client agreement (MCA) validation - Ensuring compliance with the Microsoft client Agreement, allowing for a more efficient order-handling process.
Removal of validation on ordering parameters for existing agreements - This change eliminates redundant checks on established agreements, speeding up order processing for returning clients.
These updates aim to improve the fulfillment process by minimizing manual interventions and enhancing the overall client journey for CSP orders in the Marketplace.
We have introduced an enhancement for existing CSP clients creating new agreements. Clients can now use their vanity domain (like, <http://mybusiness.com>) as the principal domain, instead of the default mybusiness.onmicrosoft.com.
This enhancement allows the SoftwareOne Marketplace to support Microsoft’s effort to create a more customized and professional experience by enabling businesses to represent themselves using their branded domain throughout the agreement creation process. This enhances brand consistency but also simplifies domain management for clients with established vanity domains.
We are introducing new parameters to enhance the subscription fulfillment process, improving tracking, accuracy, and transparency in subscription management. The new parameters are as follows:
Last successful sync - This parameter stores the timestamp of the most recent successful synchronization, making it easier to monitor and resolve any sync-related issues.
Current seat quantities - This parameter tracks the current number of active seats in a subscription, providing real-time visibility into the active usage.
Scheduled seat quantities - This parameter stores the number of seats scheduled for future changes, ensuring that planned adjustments are properly documented and aligned with client expectations.
These updates will streamline subscription management, offering better control and oversight of active and scheduled seat quantities during the fulfillment process.
The CSP program allows you to purchase Microsoft subscriptions through the Marketplace Platform and self-manage those subscriptions.
To learn about the CSP program, see Microsoft Cloud Solution Provider.
If you already have an agreement for a perpetual software product and you wish to add more one-time software items to the same agreement, you can do so by creating a change order.
This tutorial will guide you through the process of creating a change order by adding a one-time item called Windows Server 2025.
Before starting this tutorial, make sure that your agreement is in the Active state. You can check the agreement status on the Agreements page and the agreement details page.
In this step, open the required agreement:
Sign in to your account and go to the Agreements page, which is located under Marketplace in the main menu.
Select the agreement and then click Buy more in the upper right.
After clicking Buy more, the Select Items page of the purchase wizard opens. This page displays all one-time software items that you can order under this agreement.
In this step, select the items you need and add them to your order.
Locate the item (for example, Windows Server 2025). If needed, use the following filters:
Click the Filter option.
Click Add another condition and then use the dropdown to make the following selections:
Select Product Item Name.
Set the filter to Contains.
Type the name of the required item (in this case, Windows Server 2025).
Close the filter box.
Select the individual items from the list and click Add items. Note that you must select at least one item.
Verify the item quantity and make adjustments as necessary in the New qty field. Click Next.
Complete the remaining ordering steps as follows:
In the Details step, add any additional IDs or notes for your order and click Next. Note that it's optional to provide these details.
In the Review order step, verify the information and click Place order to finalize placing your order.
Click View details to go to the order details page or Close the page.
Your change order is submitted for processing. You can check the order status on the Orders page or in the Orders tab on the agreement details page.
Once the order is placed, the agreement status changes from Active to Updating. You will not be able to place any additional orders under this agreement until your current order has been processed and the agreement status is changed back to Active.
You can reduce the quantity of your subscription by editing the subscription directly. For information on how to remove licenses, see How to Change License Quantity.
If the seat reduction is done within 7 days of ordering, the changes are applied in the Marketplace Platform and Microsoft.
However, if the reduction occurs outside of the 7-day window, the changes will be scheduled on the Microsoft side and will subsequently be applied in the Marketplace.
To view your currently available licenses and the licenses scheduled for renewal, see the Parameters tab on the subscription details page.
To ensure seamless management of your Microsoft 365, Dynamics 365, and Azure subscriptions, you'll need to establish a partner relationship with SoftwareOne.
This allows SoftwareOne to fulfill your Microsoft transactions and manage products and services on behalf of your organization. To review and accept a partner relationship request:
On the Orders page, select the required purchase order.
Do one of the following:
If the order is Querying, navigate to the General tab, where you will find the partner relationship request URL.
If the order is in Draft, click Edit in the upper right. Then, on the Select Items page, click Next and you'll see the relationship request URL.
Select the URL. You'll be redirected to the Microsoft 365 Admin Center login page.
Use the Global Administrator credentials for the primary domain or tenant name listed in your purchase order.
Review the SoftwareOne partner information and click Next.
Select the link for the Microsoft Customer Agreement and read the agreement.
Select the checkbox to acknowledge that you read the agreement and then click Accept.
Return to your purchase order in the Marketplace Platform and click Process in the upper right to resume order processing.
If you face an error during Lighthouse activation, it could be because of your role in Azure.
Make sure that you are the owner of the subscription for which you are activating Lighthouse. Subscription owners have the Azure Subscription Owner role.
You can verify the role on the Role assignments tab in Azure.
To complete the Lighthouse onboarding, you must also meet the following requirements for your primary domain/tenant or Azure subscription:
Role - Any
User type - Member
User principal name - Must have no reference to 'external'
Identity - Must match the tenant’s name for the partnership


