Loading...
Loading...
Loading...
Loading...
Loading...
Loading...
Loading...
Loading...
Loading...
Loading...
Loading...
Loading...
Loading...
Loading...
Loading...
Loading...
Loading...
Loading...
Loading...
Loading...
Loading...
Loading...
Loading...
Loading...
Loading...
Loading...
Loading...
Loading...
Loading...
Loading...
Loading...
Loading...
Loading...
Loading...
Loading...
In the Marketplace Platform, change orders are created when you add more licenses to your subscription and place an order through the platform.
If split billing is active for your agreement, you can select buyers and assign billing to those buyers when placing the order.
Note that this method of split billing only works for certain products in our platform.
Follow these steps to split billing when ordering additional licenses:
Open the details page of the subscription and click Edit in the upper right. Make sure that split billing is activated for the agreement and buyers are configured.
Increase the quantity as needed in the New Qty field and click Next. In the following image, the quantity is updated from 30 to 40 for one of the items in the subscription.
Select the buyer you want to allocate the billing to.
Choosing None allocates the billing based on configured split percentages for this subscription.
Choosing a buyer allocates the billing according to the percentage set for this buyer.
Enter the reference information for this order and click Next to continue.
Review the information on each tab and click Place order to finalize.
Click View Order to navigate to the order details page. Otherwise, click Close.
After you've placed a change order, you might need to review your billing allocations. For instructions, see Review Split Billing Configuration.
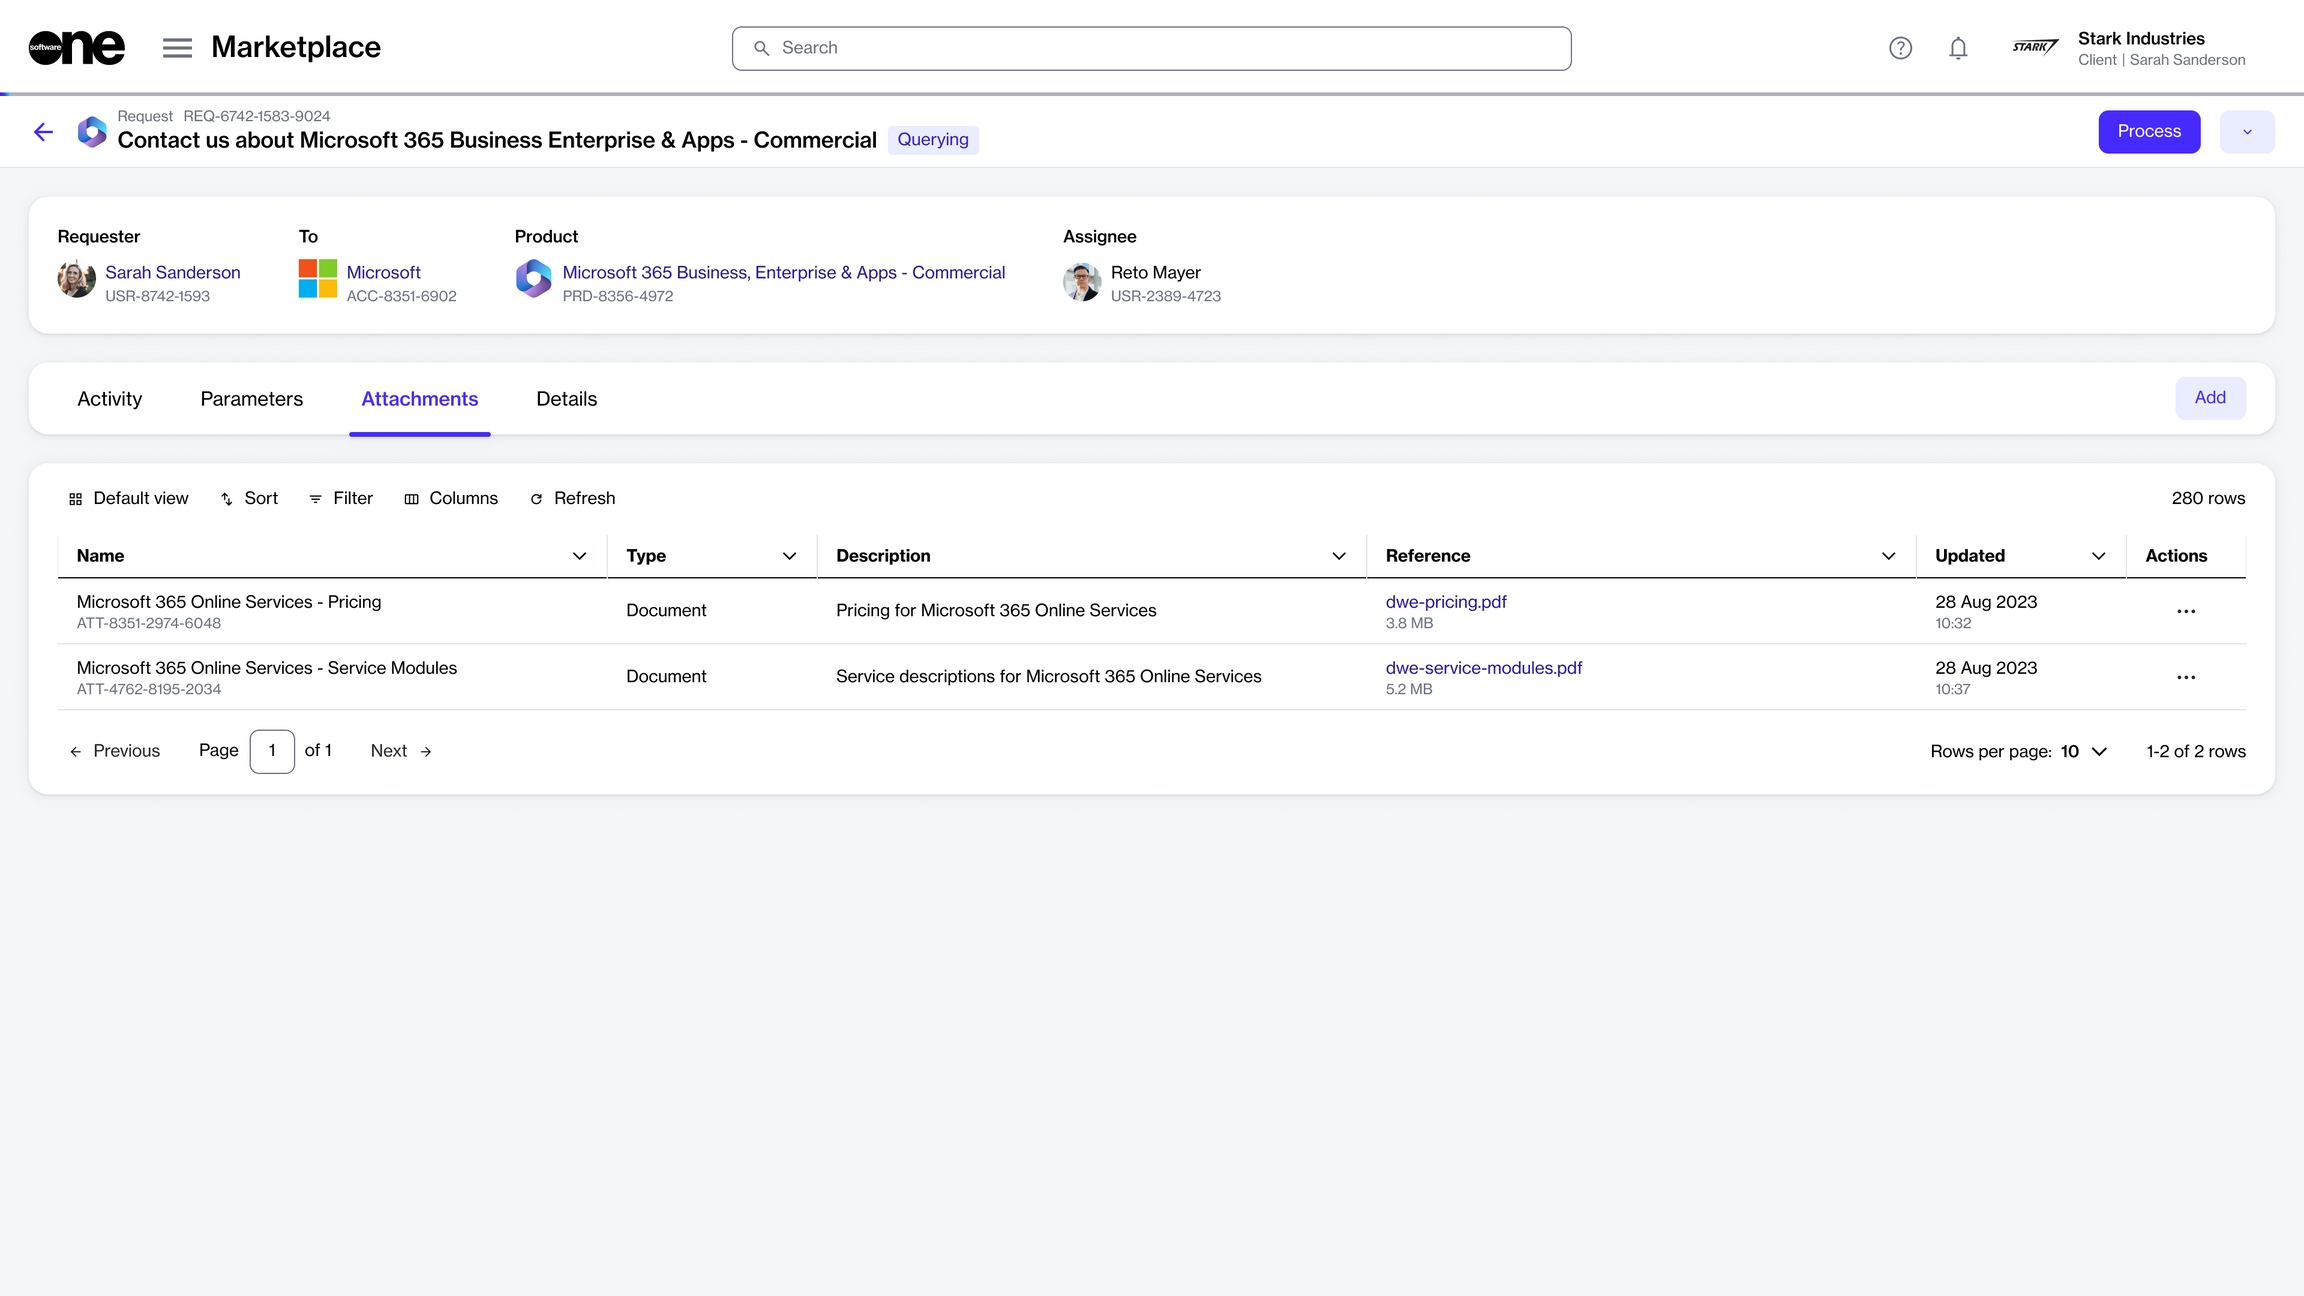
The Attachments tab on the agreement details page displays all files that have been added to your agreement by the vendor or SoftwareOne.
Attachments can include PDFs as well as your license keys. The same attachments are also visible within the Attachments tab on the order details page.
Follow these steps to view and download attachments:
Open the required agreement.
Select the Attachments tab. All files relevant to the agreement are displayed.
Click the filename in the Reference column to download it.
License keys can only be viewed and copied, not downloaded.
An agreement is a record that establishes the terms and conditions of a transaction in the Marketplace.
It defines the relationship between different objects, such as buyers, sellers, and licensees, and serves as the foundation for placing orders and creating subscriptions on the platform.
You can access your agreements and manage them through the Agreements page. Managing implies renaming an agreement as well as changing an agreement's client ID. If you wish to terminate an agreement, you can do this by terminating all subscriptions in the agreement.
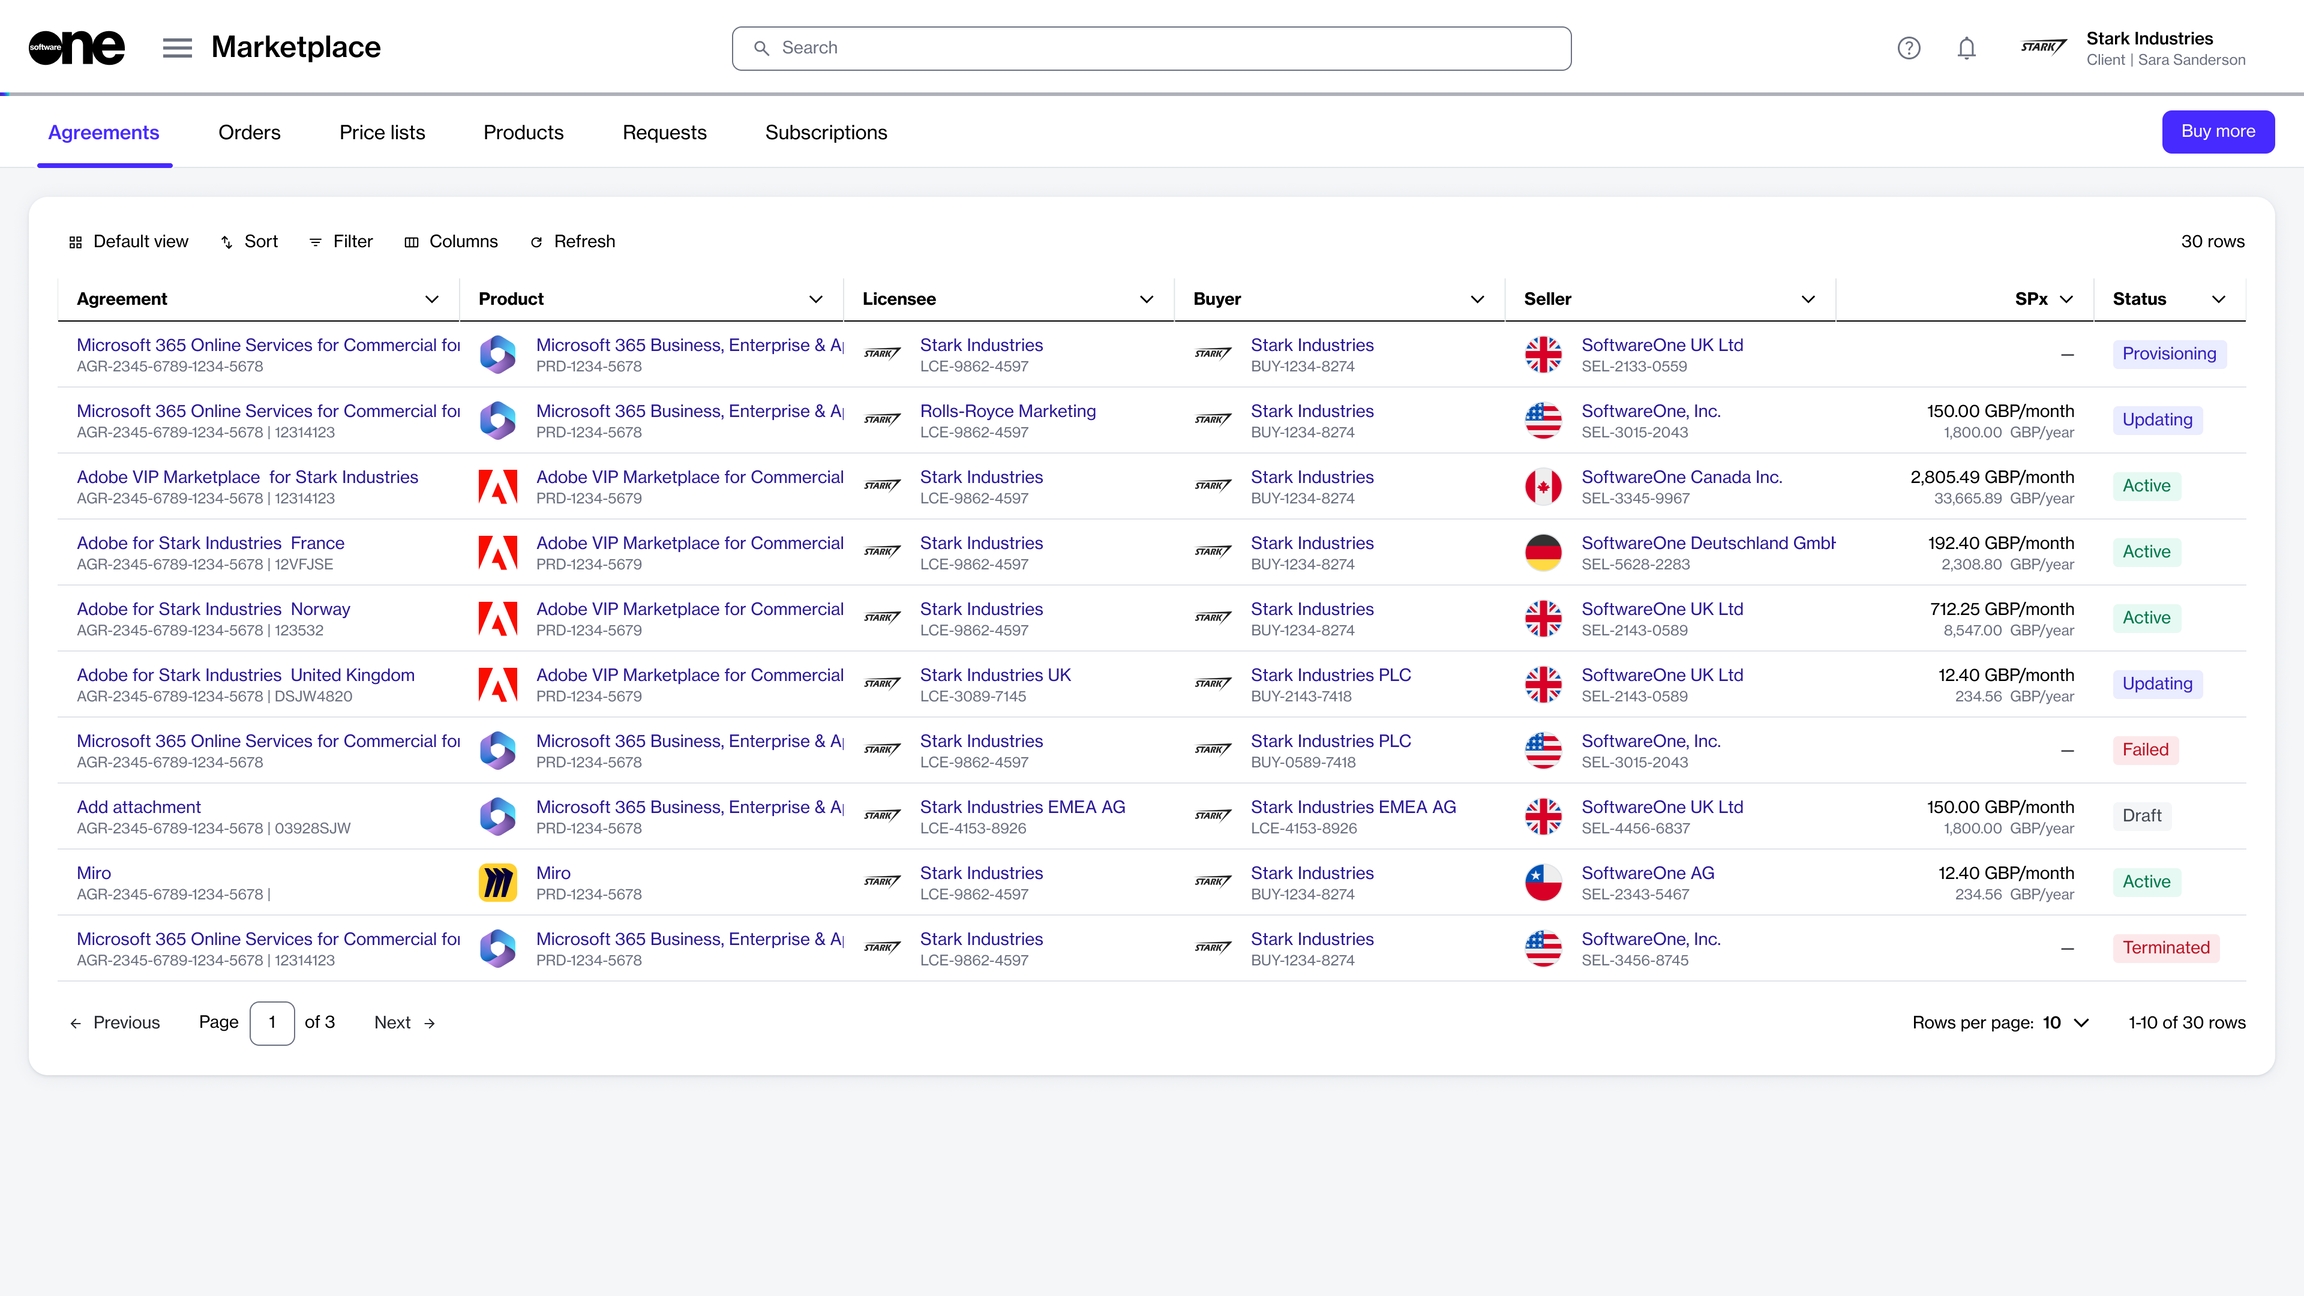
You can access the Agreements page by selecting Marketplace > Agreements from the main menu.
For each agreement, you can view the following details:
Agreement - Displays the name and ID of the agreement.
Product - Displays the details of the product you've ordered under the agreement.
Licensee - Displays the name and ID of the licensee to whom the license is issued.
Buyer - Displays the buyer linked to the agreement.
Seller - Displays the SoftwareOne entity linked to the agreement.
SPx - Displays the estimated sales price of the product.
Created - Displays the date and time when the agreement was created in the platform.
Currency - Displays the currency of the price list.
Updated - Displays the date and time when the agreement was updated.
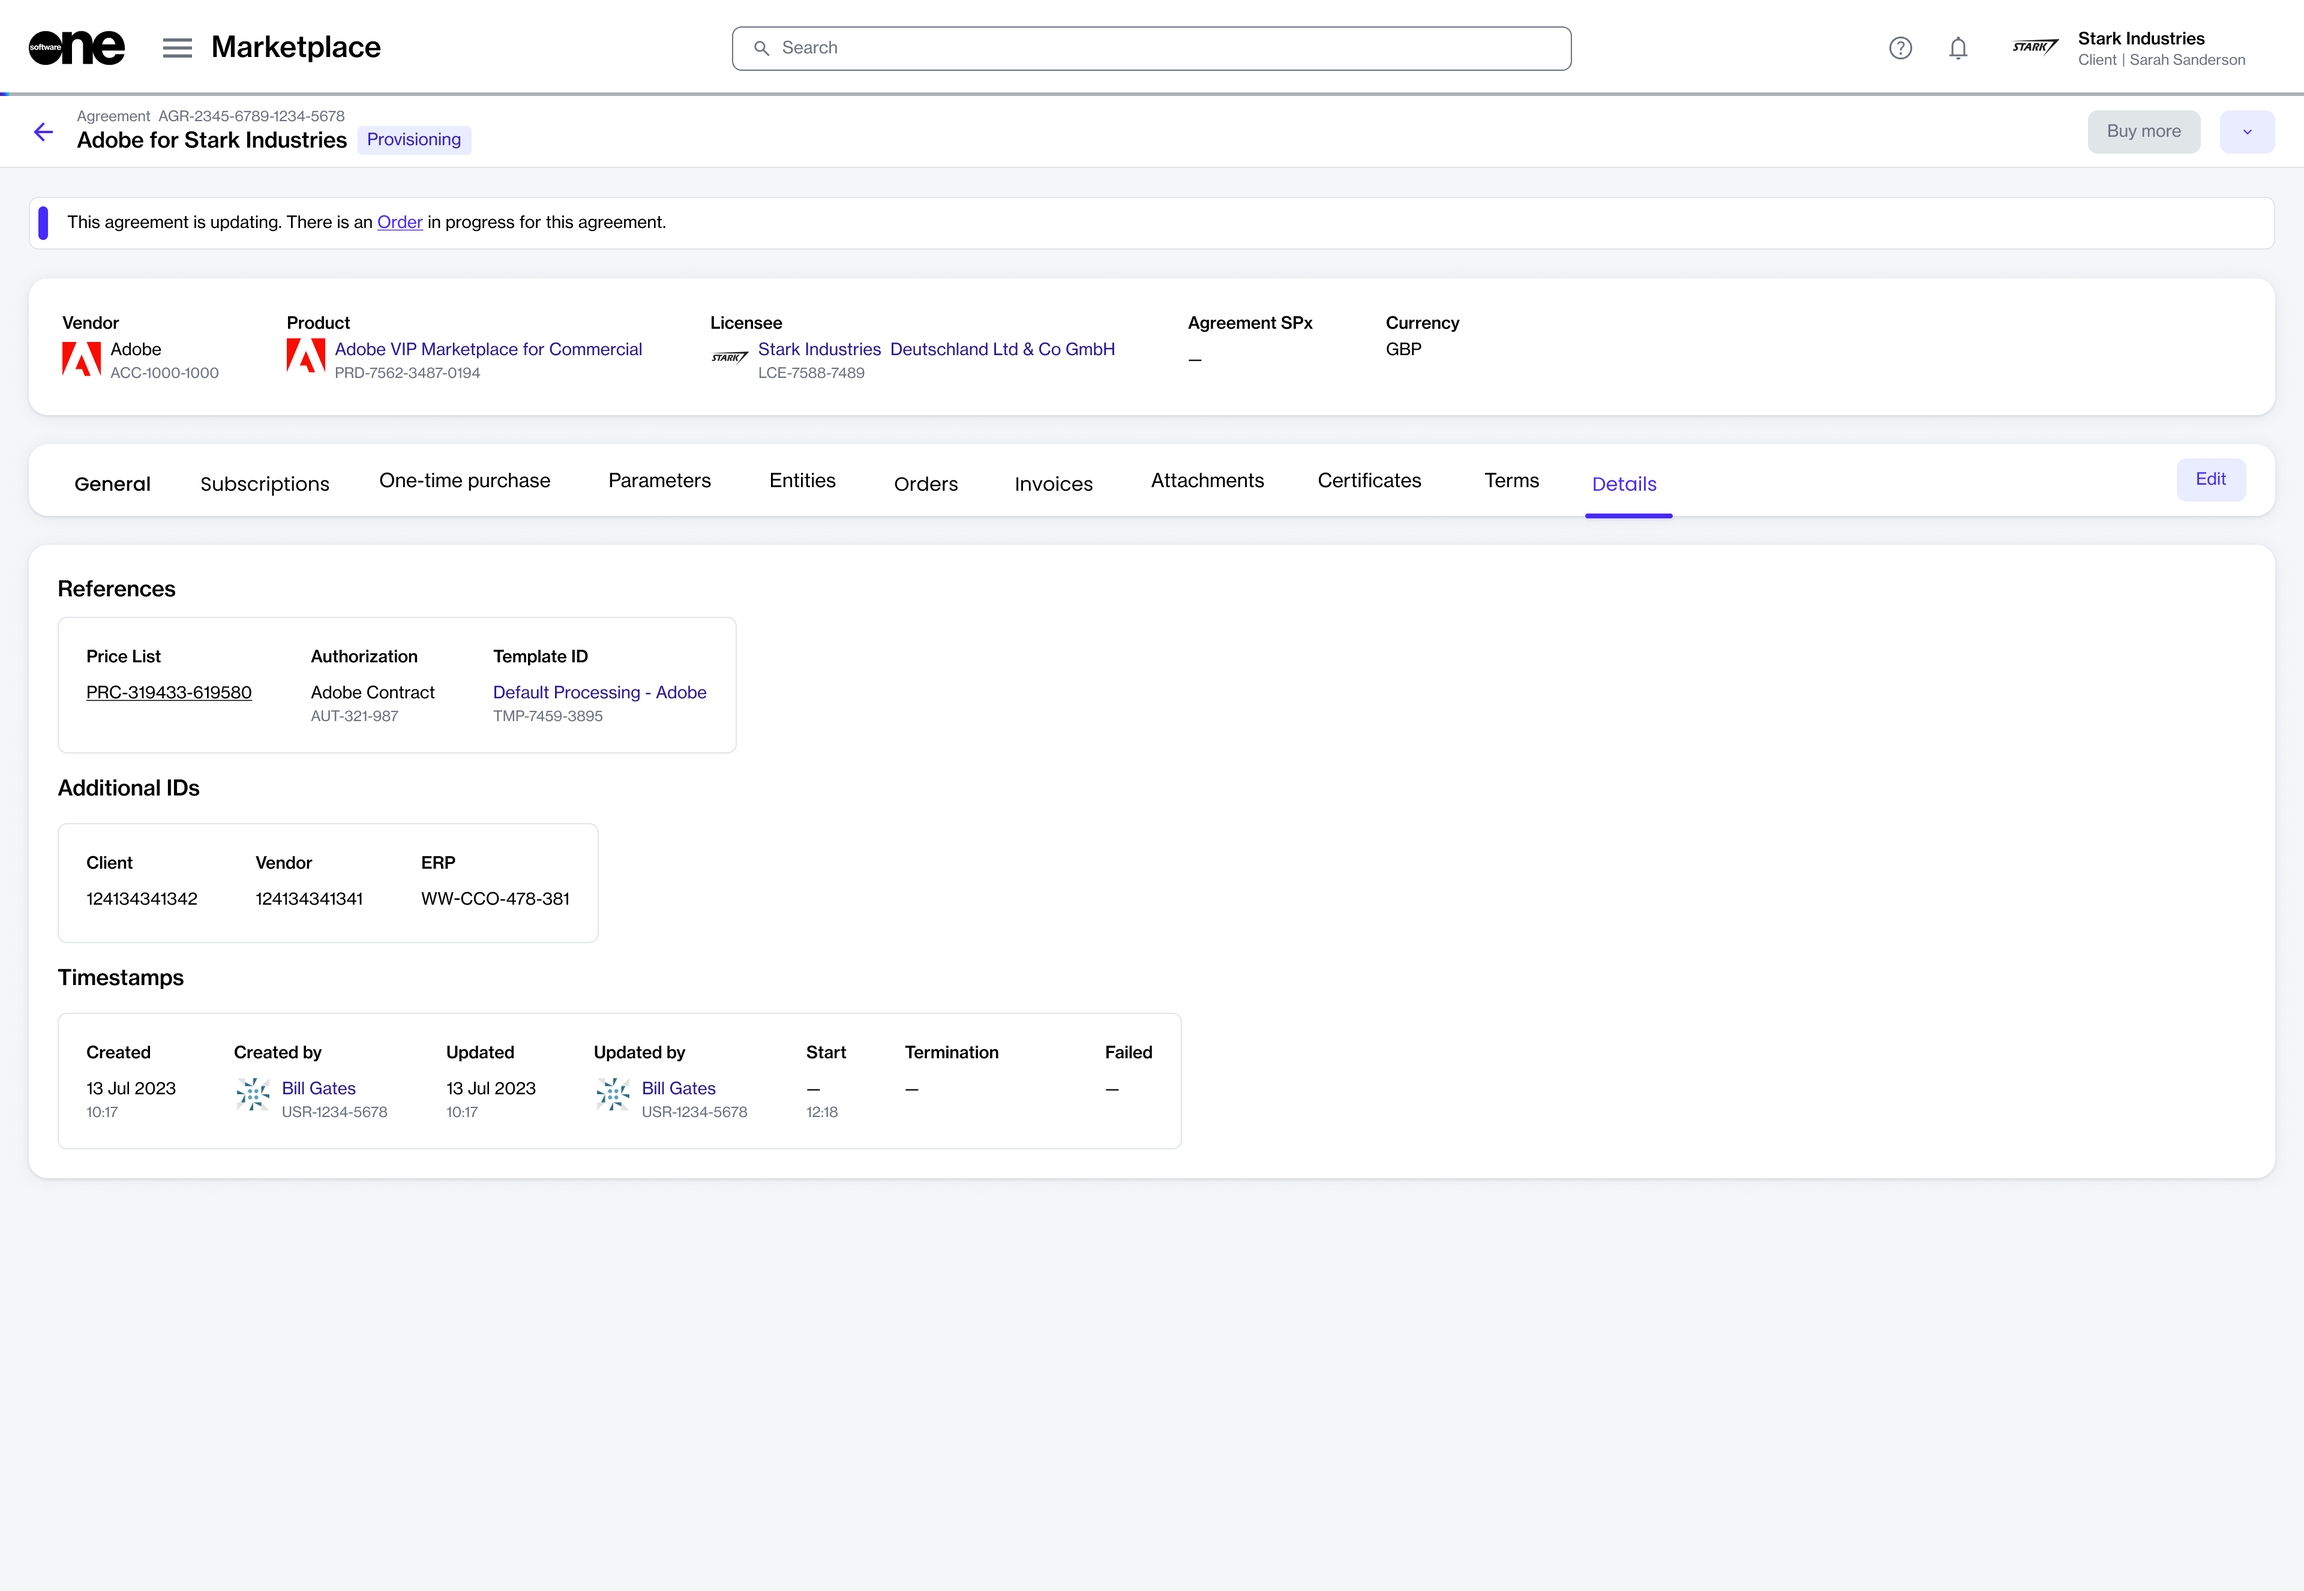
The details page of an agreement provides all information related to the agreement. You can open the details page by clicking the agreement name.
The details page is divided into the following tabs:
General - Displays the general information for the agreement.
Subscriptions - Displays the subscriptions within the agreement. You can view the details of each subscription, like the name and ID, commitment term, start date, renewal date, and termination date. The estimated sales price per month and year, along with the subscription status is also displayed.
One-time purchase - Shows the items you've ordered as one-time purchases and the item details. One-time purchase items are non-subscription items where you own the license indefinitely.
Parameters - Displays the different ordering and fulfillment parameters.
Entities - Displays details of the entities linked to the agreement. Entities include licensees, buyers, and sellers.
Orders - Displays all orders placed under the agreement, including purchase orders, change orders, and termination orders. Clicking an order opens up the details page of that order.
Terms - Displays the terms associated with the agreement and shows when they were accepted, and by whom.
When you create a new agreement, the Marketplace Platform assigns a default ID to the agreement. You can change the default ID and assign a new ID so you can identify and manage the agreement easily.
Updating an agreement's ID is optional. If you choose not to update the ID, the platform will use the default ID.
Follow these steps to update the agreement ID:
On the Agreements page (Marketplace > Agreements), select the agreement to edit. The details page of your selected agreement opens.
Select the Details tab and then click Edit.
In the Edit ID dialog, enter the new ID and click Save. The agreement ID is updated and displayed on the details page of the agreement.
The Marketplace module is an entry point for you to browse through our catalog of software products. You can also view the details and descriptions for each product and make purchases.
The module also contains your agreements, orders, requests, and subscriptions all in one place, streamlining your procurement and management processes.
To learn more, see any of the following links:
The Agreements page displays all agreements that exist in your account. It also contains a Buy more option, which gives you quick access to the page.
Status - Displays the status of the agreement. For a description of the possible statuses, see .
The agreement details page shows the agreement's name, ID, and status. Active agreements also contain a Buy more option, which starts the purchase wizard and lets you add more items to the agreement. For instructions, see .
Split billing - Displays the buyers for split billing. This tab is displayed only if split billing has been enabled for the agreement. You can configure buyers by adding buyers or removing existing ones. For details, see .
Attachments - Displays all files attached to the agreement. Attachments are added by the vendor or SoftwareOne, and they can include PDFs as well as your license keys. See to learn more.
Details - Displays the additional IDs for the agreement, including the client and vendor IDs, and the timestamps of all changes made to the agreement. You can update the client ID using Edit. For instructions, see .
Audit trail - Displays all events that have taken place within the agreement. For each audit record, you can view the log details and summary. To learn more, see .
Split billing is a feature that allows you to divide the billing for your subscriptions among different buyers in your account.
Designed for organizations with multiple legal entities, split billing lets you select buyers and allocate billing for your subscriptions to different buyers. This enables cost-sharing and accurate tracking of consumption. It also ensures that each buyer is accountable for a share of the subscription cost based on usage.
You can divide the subscription costs easily by specifying percentages or estimated license count (ELC) for each buyer. Once defined, these details are used during invoicing to generate separate invoices for each entity. In cases where split billing is enabled but the split hasn't been defined, 100% of the billing is allocated to the default buyer in your agreement, also known as the Owner buyer.
The platform also lets you allocate billing when ordering additional subscription licenses. It means when creating a change order for an increase in subscription quantity, you can select buyers and allocate billing to those buyers.
In the Marketplace Platform, the following rules apply to split billing:
Split billing must be activated at the agreement level. Once activated, this feature cannot be deactivated.
After activating split billing, new purchases under the agreement are invoiced based on the allocation percentage or the specific buyer you've allocated the subscription billing to.
The ELC is indicative only. The Split billing feature is designed around allocation percentages, which means the platform always considers percentages during billing.
You can modify the allocation for your active subscriptions at any time. However, the changes will only take effect in your next billing cycle.
Buyers can only be removed from split billing if they have no configured allocation percentage. The platform doesn't allow you to remove buyers if an allocation percentage exists for those buyers.
Currently, only Adobe VIP Marketplace supports split billing.
You can activate split billing using the Split Billing option on the details page of your agreement. For instructions, see Activate split billing.
Once activated, the Split billing tab appears on the agreement’s details page.
By default, the buyer associated with the agreement is set as the Owner buyer, and 100% billing is allocated to the owner buyer. You can configure additional buyers using the Edit option. For more information, see Configure Buyers for Split Billing.
If you have configured buyers, but have not defined the split breakdown yet, 100% of the subscription billing is allocated to the Owner buyer in your agreement.
You can update the split to include additional buyers and allocate billing to those buyers. There are two ways to configure the split.
Method 1 - Using the Edit option on the subscription details page
Method 2 - Using the Details option on the Split billing tab within your agreement details
The Split billing tab on the subscription details page displays the allocation for all buyers and allows you to divide the billing across different buyers in your account.
Follow these steps to set up allocations:
On the Split billing tab, select Edit. The Edit split billing dialog opens.
Enter the allocation percentage or estimated license count for the required buyers and click Save. Make sure that 100% of the cost is allocated.
The updated split details are displayed on the Split billing tab of your subscription.
The Split billing tab within the agreement details page displays the allocation for your assigned buyers. Use the Details option for each buyer to adjust the billing percentage or the estimated license count.
Follow these steps to split the billing:
On the Agreements page, select the required agreement. Make sure that split billing is activated and buyers are configured.
Select the Split billing tab. Your selected buyers are displayed.
Click the Details option for the buyer for which you want to update the allocation.
In the Split billing details dialog, click the Edit option for the required subscription.
In Edit split details, choose whether you want to update the allocation % or the estimated license count. The allocation % option is selected by default, but you select ELC if required.
Allocation % - Select this option to split the subscription billing based on the percentage. For example, you can split the total allocation percentage of 100% between two buyers as 30% and 70% respectively.
ELC - Select this option to split the billing based on the license count. For example, if you have 12 subscription licenses you can split these between two buyers as 8 and 4 licenses respectively.
Enter a value based on the split percentage or license count and click Save. Make sure that 100% of billing or all licenses are allocated. Otherwise, the platform displays a message.
The allocation is updated for your selected buyer. Use the Buyer menu in the highlights panel to view the allocation details for the other buyers.
Click Close to return to the Split billing tab.
Do you want to make modifications to the split allocation?
Allocation percentages can be modified using the Edit split billing dialog. For instructions, see Edit split billing.
When split billing is activated, the platform assigns 100% of the billing to the default buyer in your agreement, known as the Owner buyer.
You can configure additional buyers and distribute subscription costs across those buyers using the Edit option on the agreement details page.
When selecting buyers, there's no limit to the number of buyers you can select, meaning you can choose as many buyers as necessary to divide costs effectively. Follow these steps to configure buyers:
Open the details page of your agreement. Make sure that split billing has been activated for the agreement.
On the Split billing tab, click Edit.
In the Split billing dialog, select the buyers you wish to add. You can only select buyers that are linked to the seller of this agreement. Additionally, the Owner buyer is selected by default and you can't change it.
Click Save. Your newly added buyers will be displayed on the Split billing tab in your agreement.
Need to add more buyers or remove a buyer?
Use the Edit option on the Split billing tab to manage buyers as necessary. For instructions, see Edit split billing.
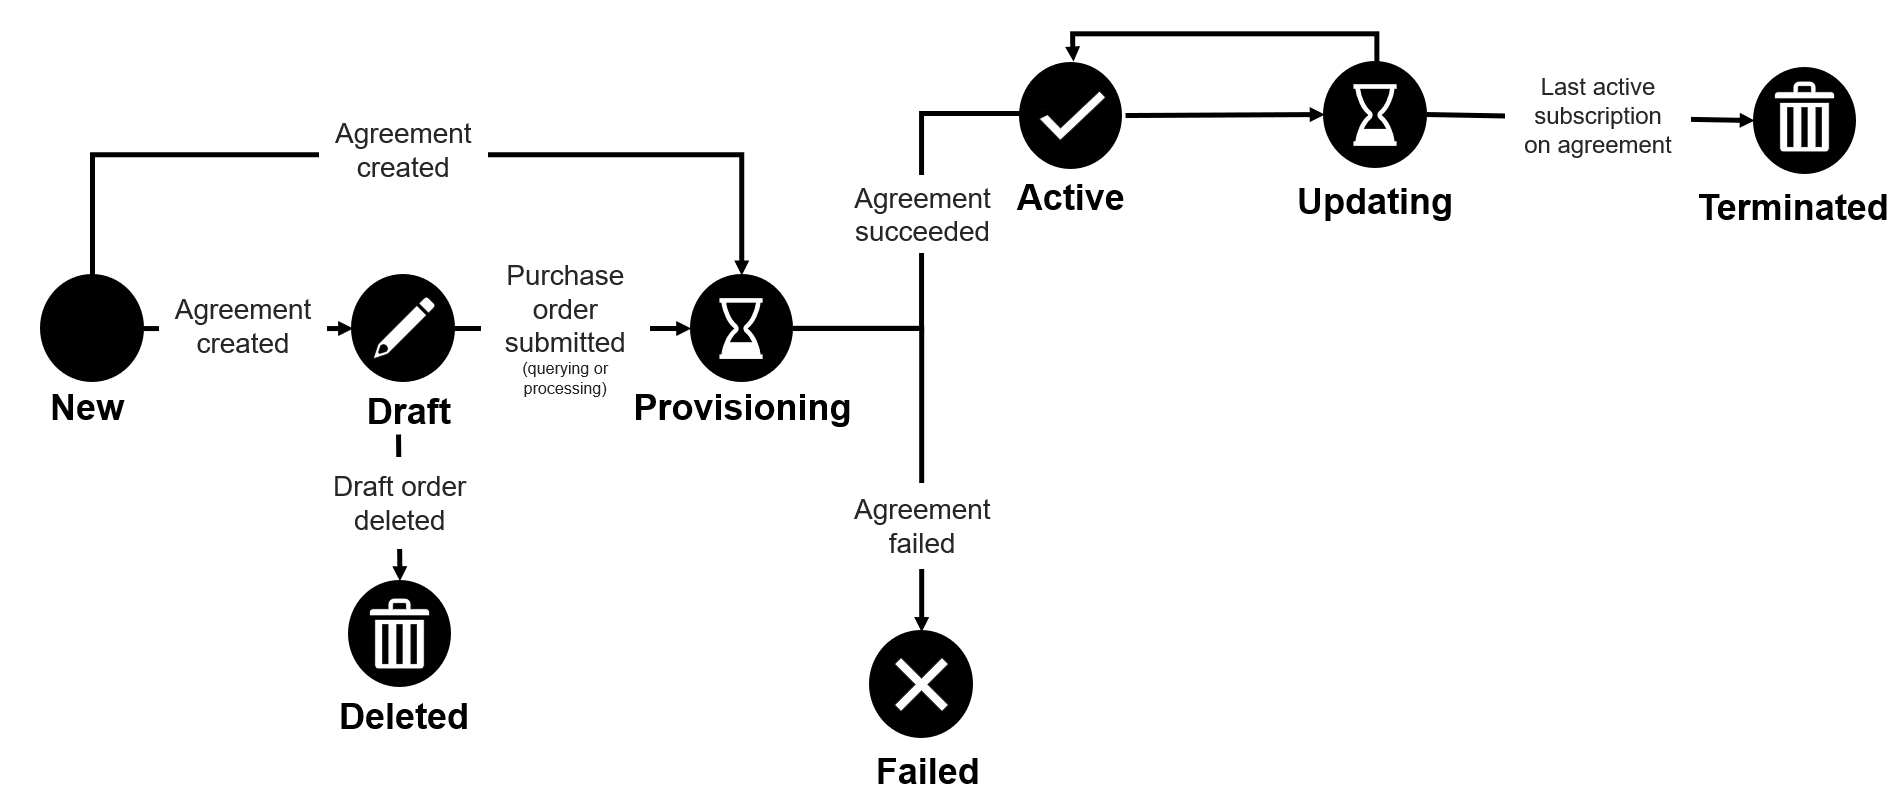
In the Marketplace Platform, an agreement can have several states (also known as status).
The following diagram shows the possible states and the transition between these states:
These states are displayed as Status within the platform. They are also shown beside the agreement name and ID on the details page.
Draft
The agreement is saved as a draft because the purchase order is saved for later during the ordering process.
Deleted
The draft agreement has been deleted because the draft purchase order associated with the agreement was deleted.
Provisioning
The agreement has been sent to the vendor and it is pending fulfilment.
Failed
The agreement has failed because the vendor or SoftwareOne canceled the purchase order.
Active
The vendor has completed the purchase order and the agreement is now active.
Active agreements have at least one active subscription and no open orders.
Updating
A business transaction or a change order is in progress for at least one subscription in the agreement.
Terminated
The agreement has been terminated.
It no longer contains active subscriptions.
If you need to modify the list of buyers or adjust their allocation percentages after setting up split billing, you can easily do so through the interface.
After you've set up split billing, you can add new buyers and remove existing buyers as needed using the Edit option on the Split billing tab of your agreement.
When removing buyers, only those without an allocation percentage can be removed. This means you'll need to assign the allocation percentage to another buyer before removing them from split billing.
If an allocation exists for the buyers you wish to remove, the buyer checkbox will be unavailable, as shown in the following image:
This section describes how to update the allocation percentage using the subscription details page. You can also update the allocation via the agreement details page.
If you need to make any modifications to the allocation percentage for any of the buyers, you can edit the split billing details at any time.
Follow these steps to edit the allocation percentage for a buyer:
Open the details page of the required subscription.
On the Split billing tab, click Edit.
In the Edit split billing dialog, make the necessary changes to the allocation percentage or license count. Make sure that 100% is allocated across buyers.
Save your changes. The Split billing tab will display the updated allocation details. Note that the changes will only take effect in your next billing cycle.
The Review status on the Details tab of a change order indicates that a change has been made to the subscription.
When you see this status, it means that you need to review the split billing configuration for the subscription, as it may need adjustment.
You can review the allocation by clicking Edit. When the Edit dialog opens, review the details. If any changes are needed, you can update the split as necessary and then save your changes.
In the Marketplace Platform, you can enter additional IDs or purchase order (PO) numbers when ordering a new subscription or adjusting license quantities. Once you've provided the number, it appears on your invoice. For information, see .
Within the marketplace, the PO number is also displayed as Client ID on the Details tab of the agreement:
When split billing is activated for the agreement and more buyers are added, the platform assigns the specified client ID to the Owner buyer. By default, no ID is assigned to the additional split billing buyers.
If you want to assign IDs to additional buyers in your agreement, follow these steps:
On the agreement details page, select the Split billing tab. The buyers you've configured for the agreement are displayed.
Click the actions icon (•••) for the desired buyer and select Client ID.
In the Edit dialog, enter the new ID or purchase order number and click Save.
The value is then updated and displayed as Client ID on the Split billing tab. This same value is also included on the buyer's invoice in your next billing cycle.
If you are specifying a client ID for more buyers in the agreement, repeat the same steps for each buyer. You can also use the same steps to update the ID, including the client ID for the Owner buyer.
Open the required agreement. Make sure that and .
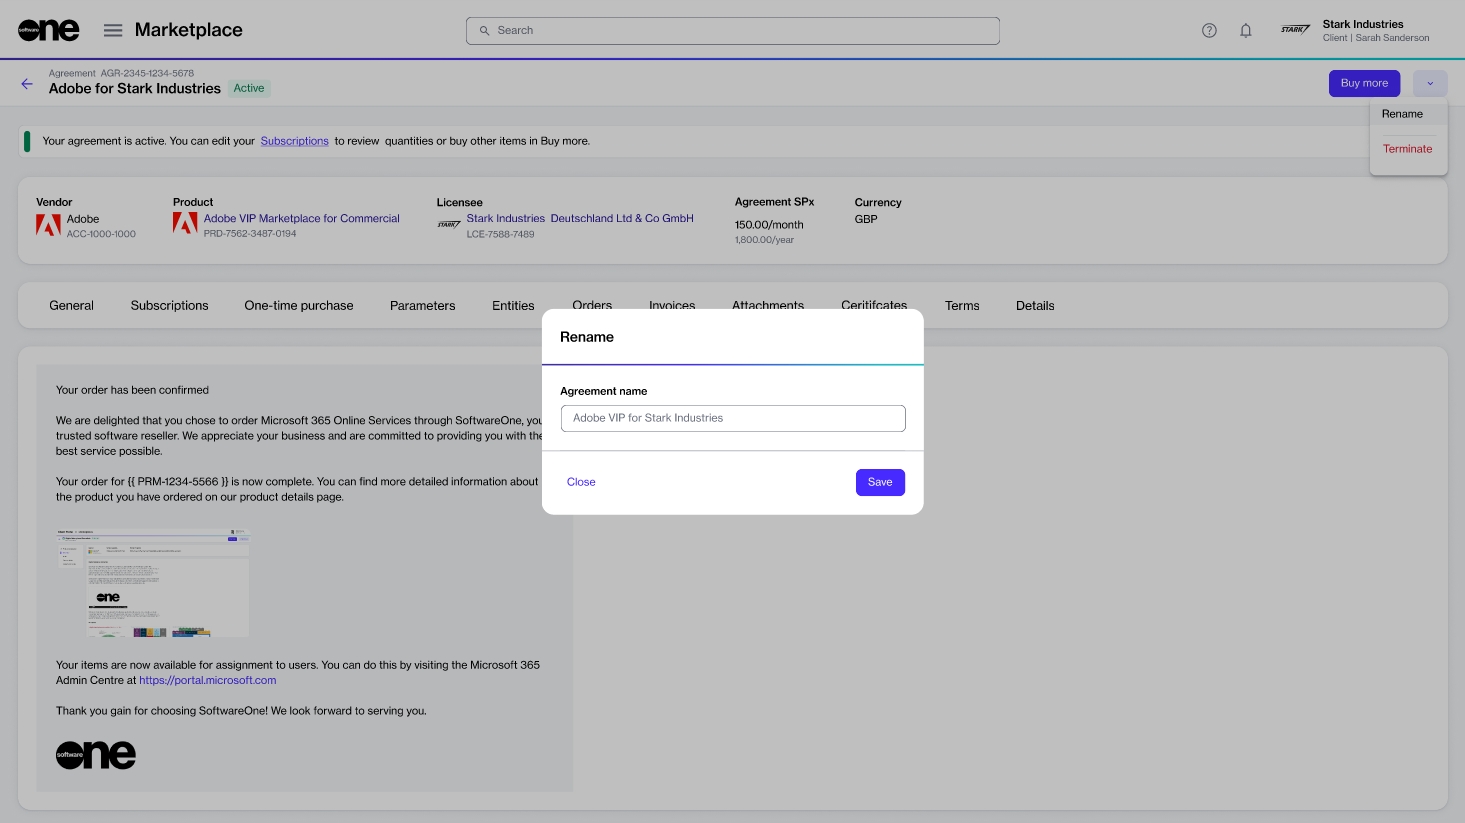
If your account contains multiple agreements, you can rename those agreements.
Agreements can be renamed as long as they are active. When choosing a new agreement name, we recommend that you enter a name that will help you easily search for or locate the agreement in your list of agreements.
When renaming an agreement, ensure that the new name is not blank. Otherwise, the platform will display an error message.
Follow these steps to update the agreement name:
On the Agreements page (Marketplace > Agreements), locate the required agreement.
Select the agreement you wish to rename. The details page of your selected agreement opens.
Click the down arrowin the upper right and select Rename.
In the Rename dialog, enter the new name and click Save. The agreement's name is updated instantly and displayed across all pages featuring the agreement in the platform.
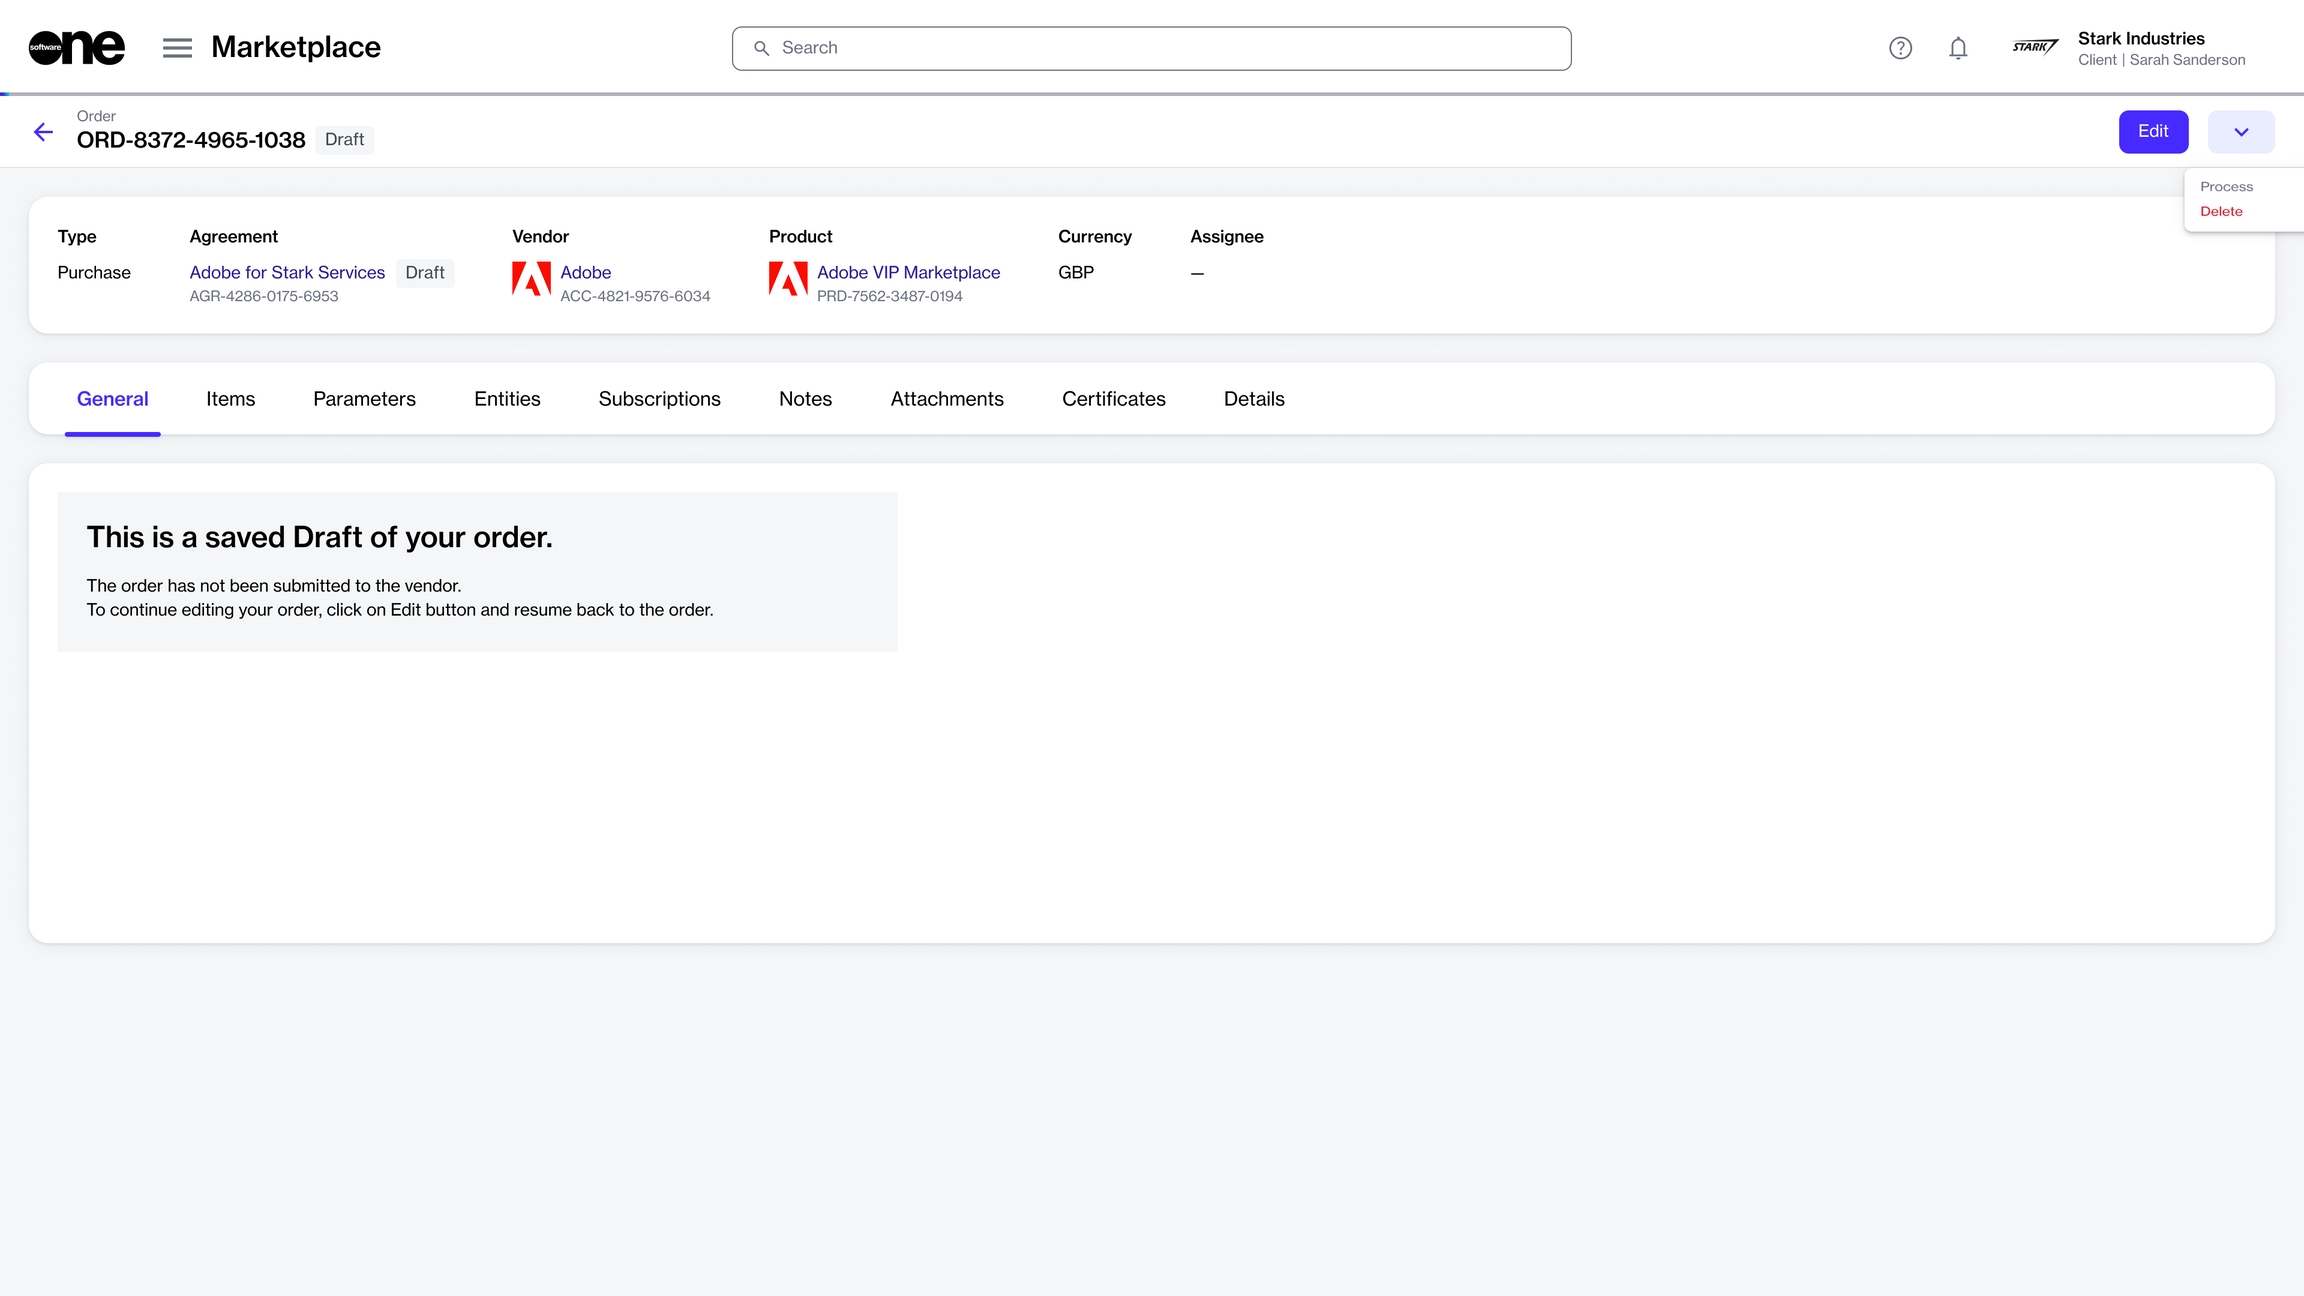
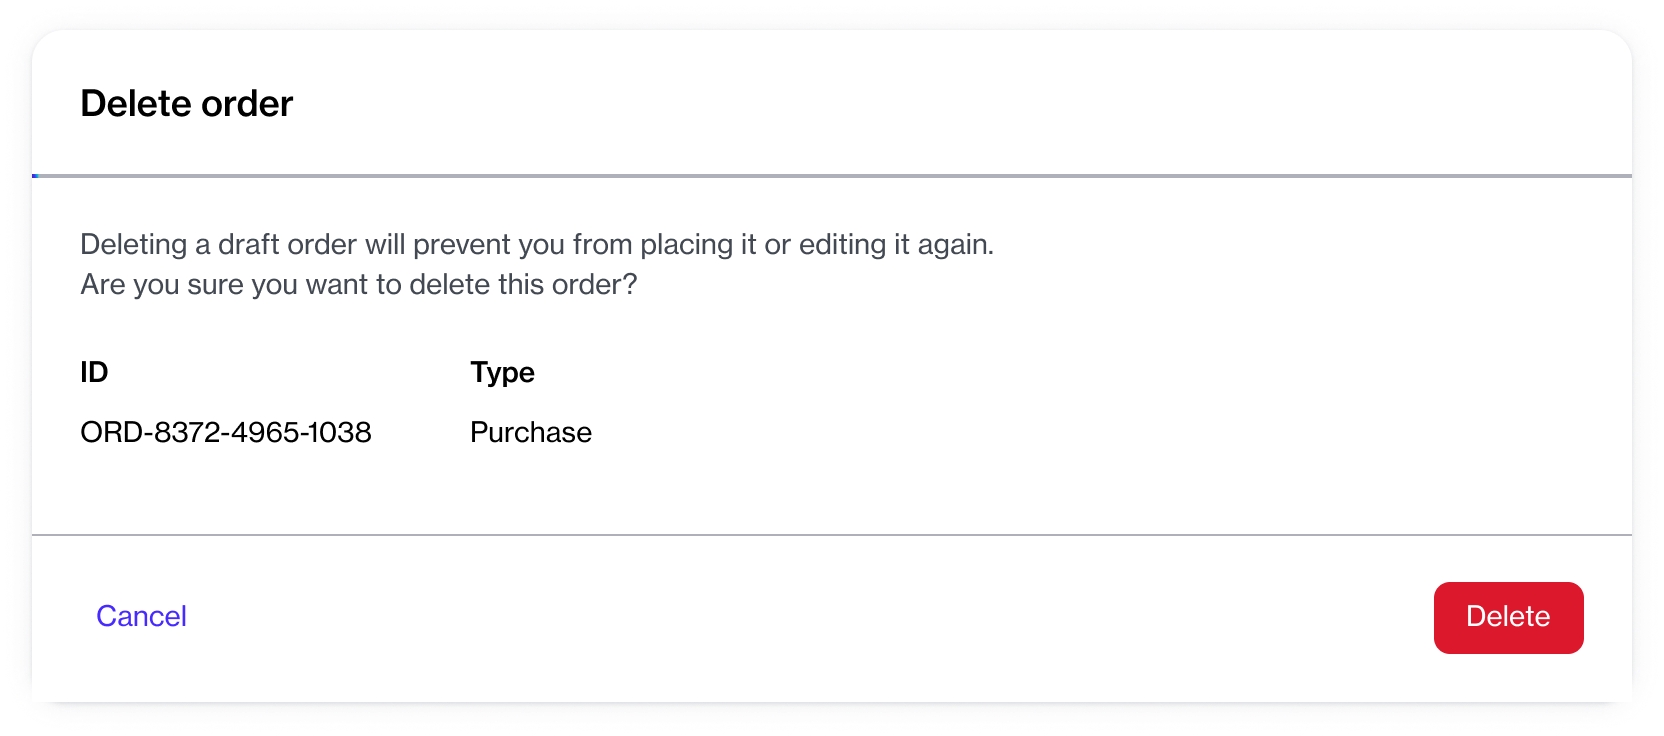
If you saved an order as a draft during the ordering process and no longer wish to submit the order, you can delete it.
Deleted draft orders cannot be recovered but will still be displayed in your list of orders. When you delete a draft purchase order, the agreement linked to the draft is also deleted.
Follow these steps to delete a draft order:
On the Orders page (Marketplace > Orders), click the draft order to delete. You can use to find your draft orders.
On the details page of the order, click the down arrow in the upper right and select Delete.
In the Delete order confirmation, click Delete to confirm the action. The draft order is deleted and the status of the order changes from Draft to Deleted on the Orders page.
In some cases, you may need to provide additional information if there are errors in the details you submitted when placing your order or if you need to complete specific steps before we can process your order.
When an order requires your attention, its status is displayed as Querying. When you open a querying order, the details page shows a message indicating what needs to be corrected and how to fix it.
After completing the required steps, click Process to update the order status to Processing. Changing the status informs the vendor that the order is ready for their review.
Follow these steps to move your order from Querying to Processing:
Open the purchase order in the Querying state. If you have several orders, use the search bar or filters to find the required order.
Review the information on the General tab. The following example shows that there's an issue with the parameters and they must be updated through the Parameters tab.
Complete the steps as needed and then click Process in the upper right. Note that this button becomes available only after you have completed the necessary steps.
Your order's status will then change to Processing and the Process button will become unavailable again.
If certain issues require completion outside the Marketplace Platform, such as accepting a SoftwareOne relationship request for CSP orders, you must complete the request and then return to the order details page to change the order status to Processing.
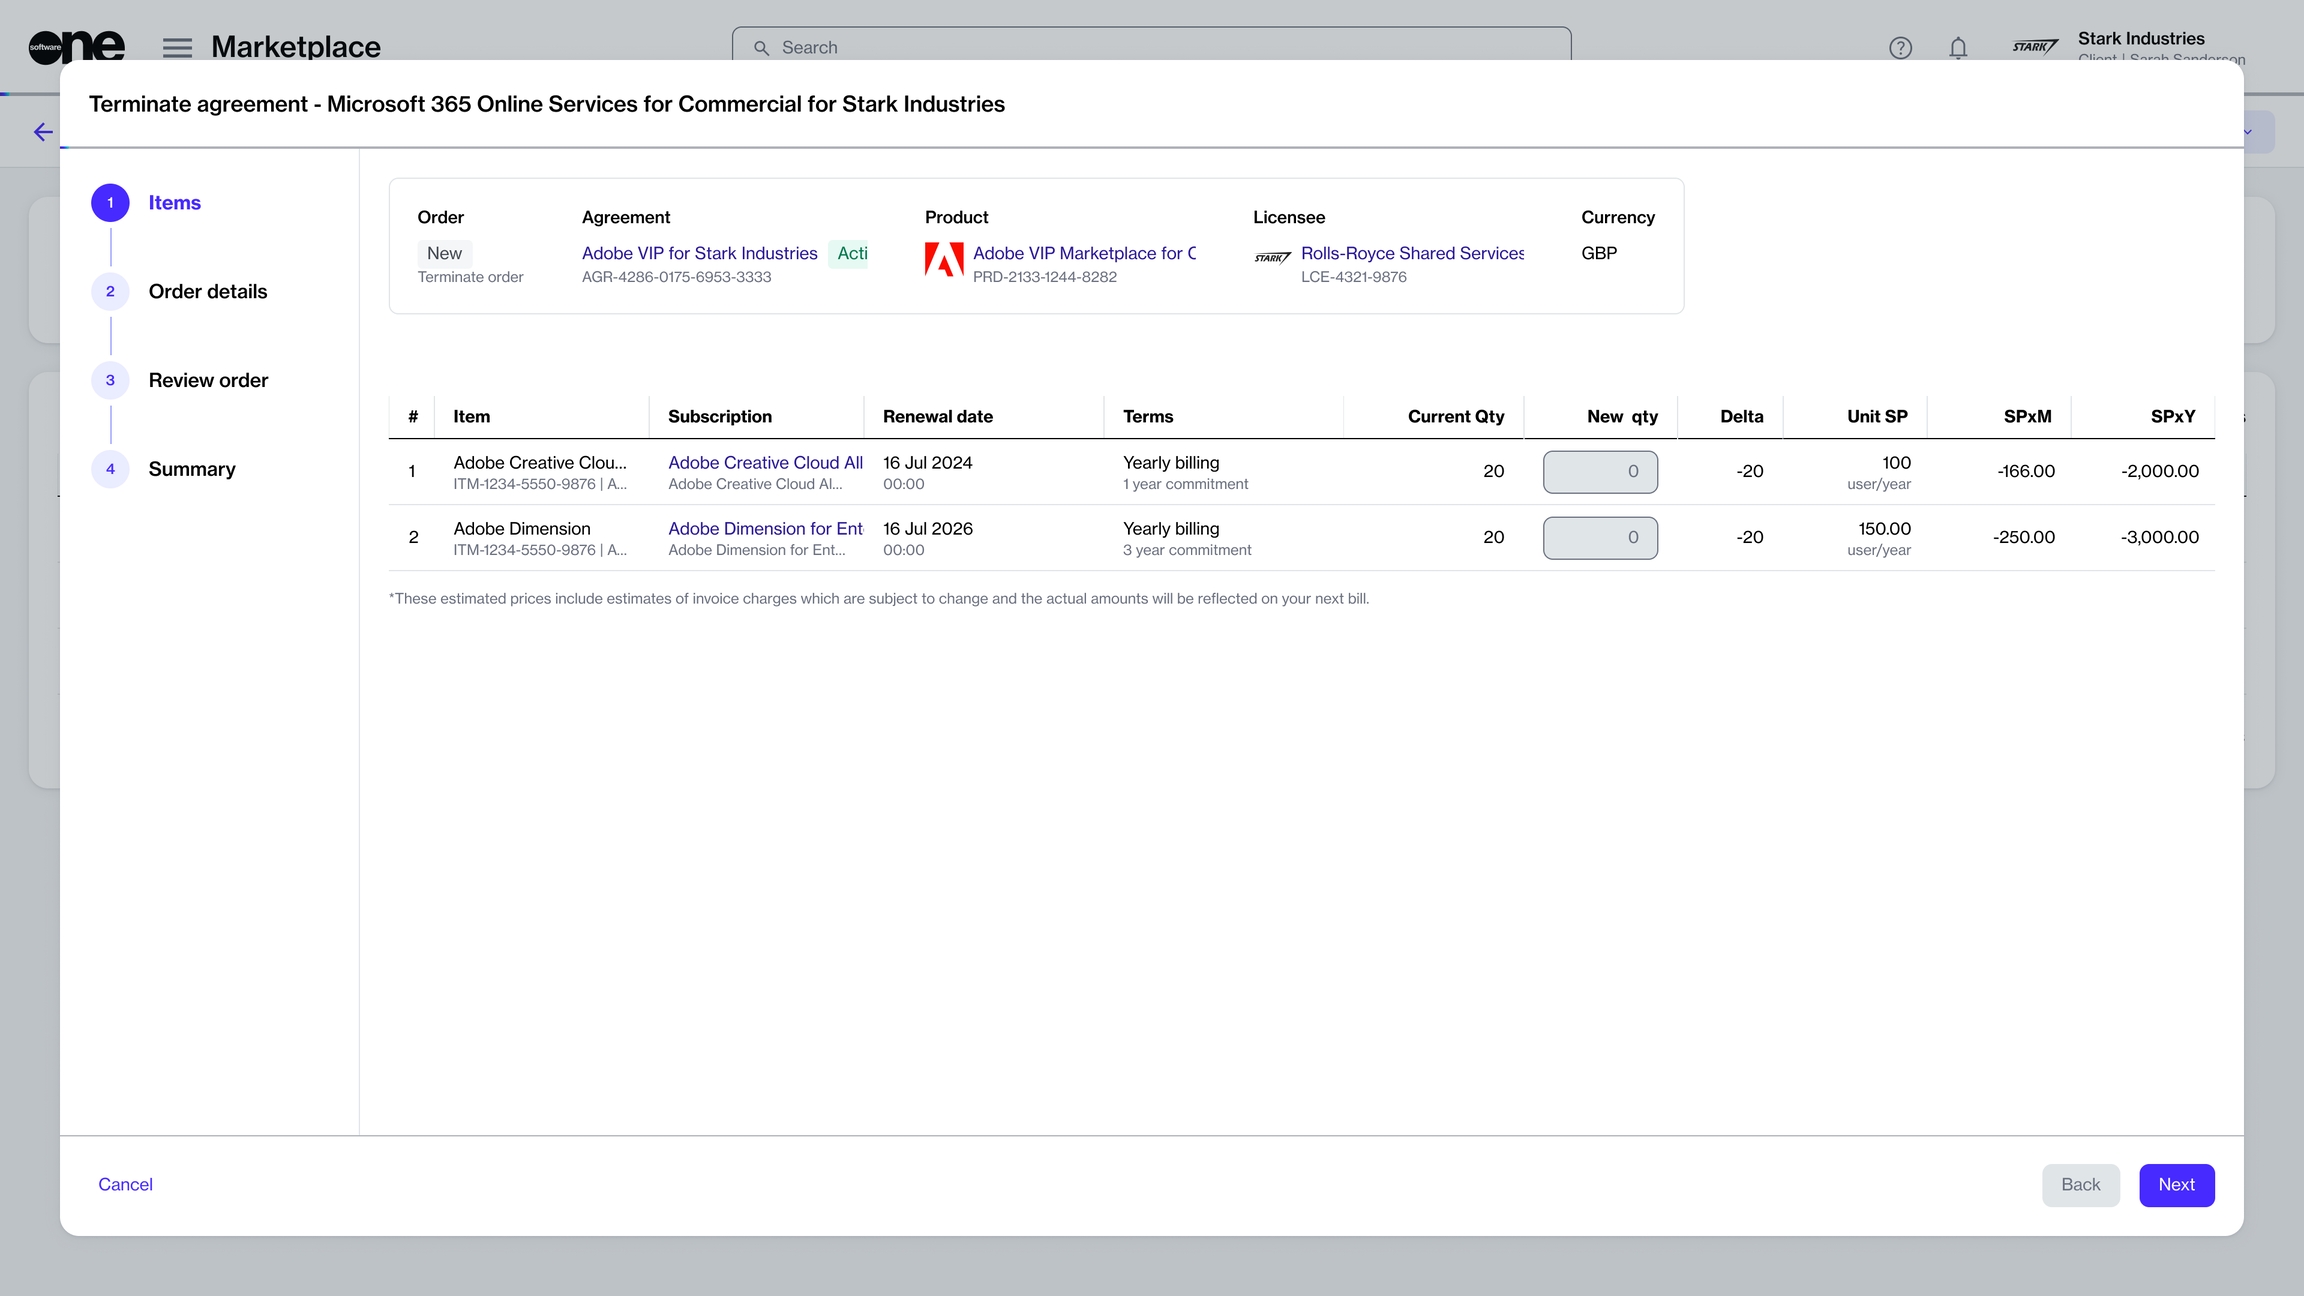
You can terminate an agreement by creating a termination order for the agreement.
When you terminate an agreement, all subscriptions with the agreement are terminated. Once terminated, the agreement can't be restored or used when ordering new subscriptions. However, you can still access and view the terminated agreement.
Before terminating an agreement, note the following points:
You can only terminate agreements in the Active state. Agreements in any other state (such as Processing or Updating) can't be terminated. For a description of these states, see Agreement States.
Creating a termination order doesn't immediately cancel your agreement. An agreement is terminated only after the vendor approves it for termination.
Follow these steps to terminate an agreement:
On the Agreements page (Marketplace > Agreements), locate the agreement to terminate.
Click the agreement name. The details page of your selected agreement opens.
Click the down arrow in the upper right and select Terminate. The Terminate agreement wizard opens.
In the Terminate agreement wizard, do the following:
In Items, review the quantity details and click Next. All items will have the new quantity of 0.
In Order details, add or update the additional ID and notes for the agreement and termination order. Click Next.
In Review order, click Place order to finalize the termination order.
Click View order to open the details page of the termination order. Otherwise, click Close to close the page.
When the order is placed, the agreement status changes from Active to Updating. After the termination order is processed and all subscriptions within the agreement are canceled, the status changes to Terminated.


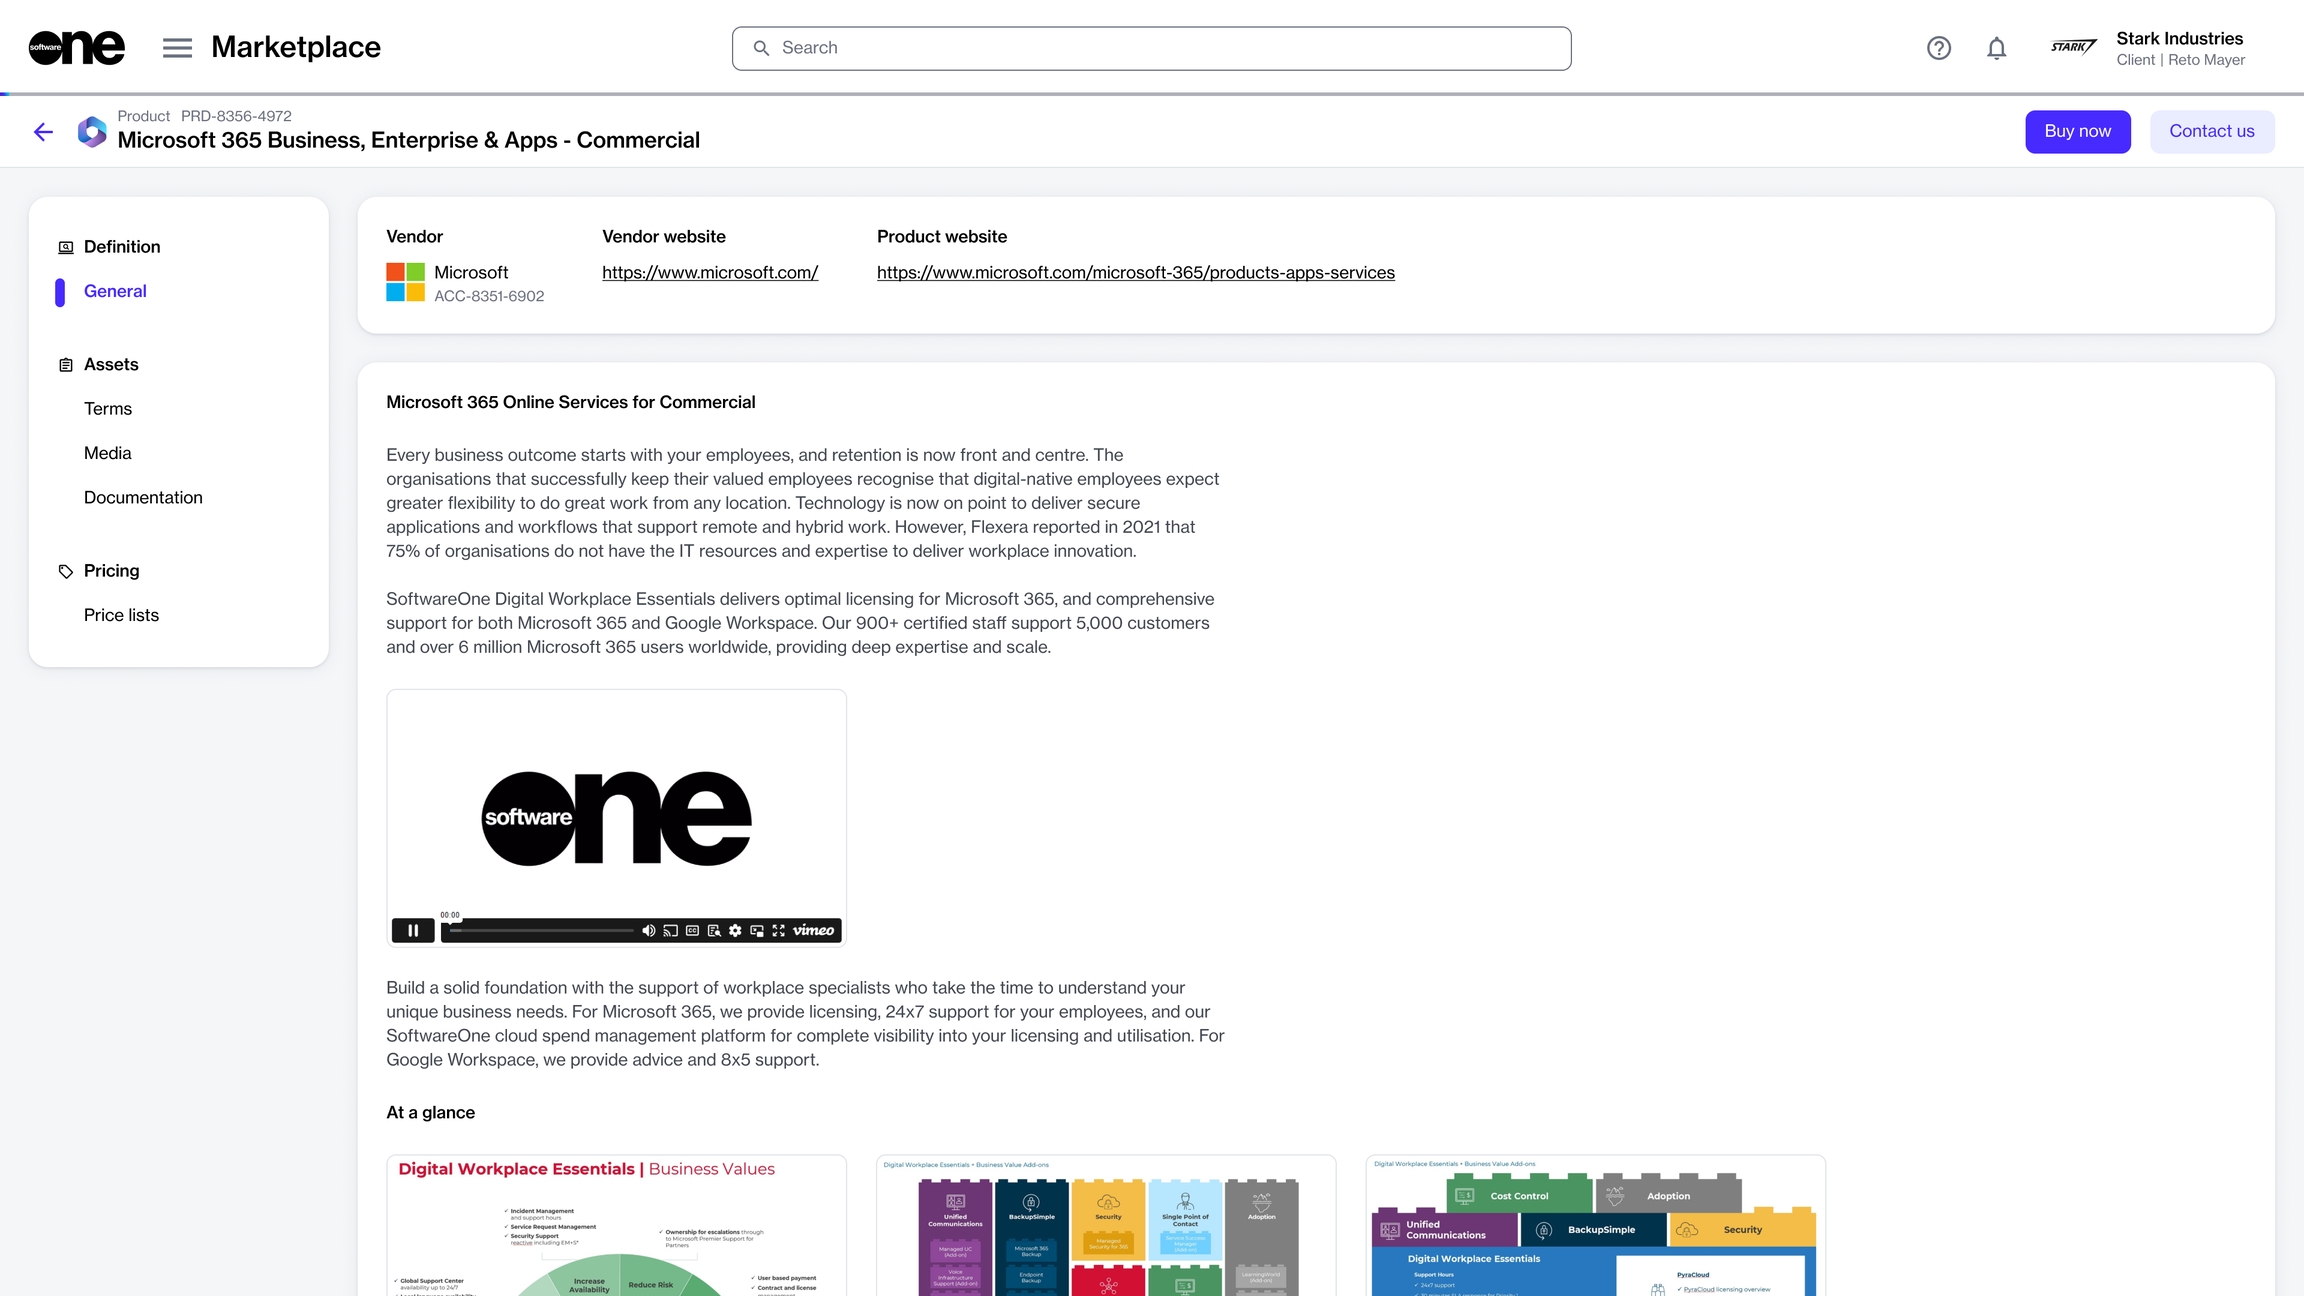
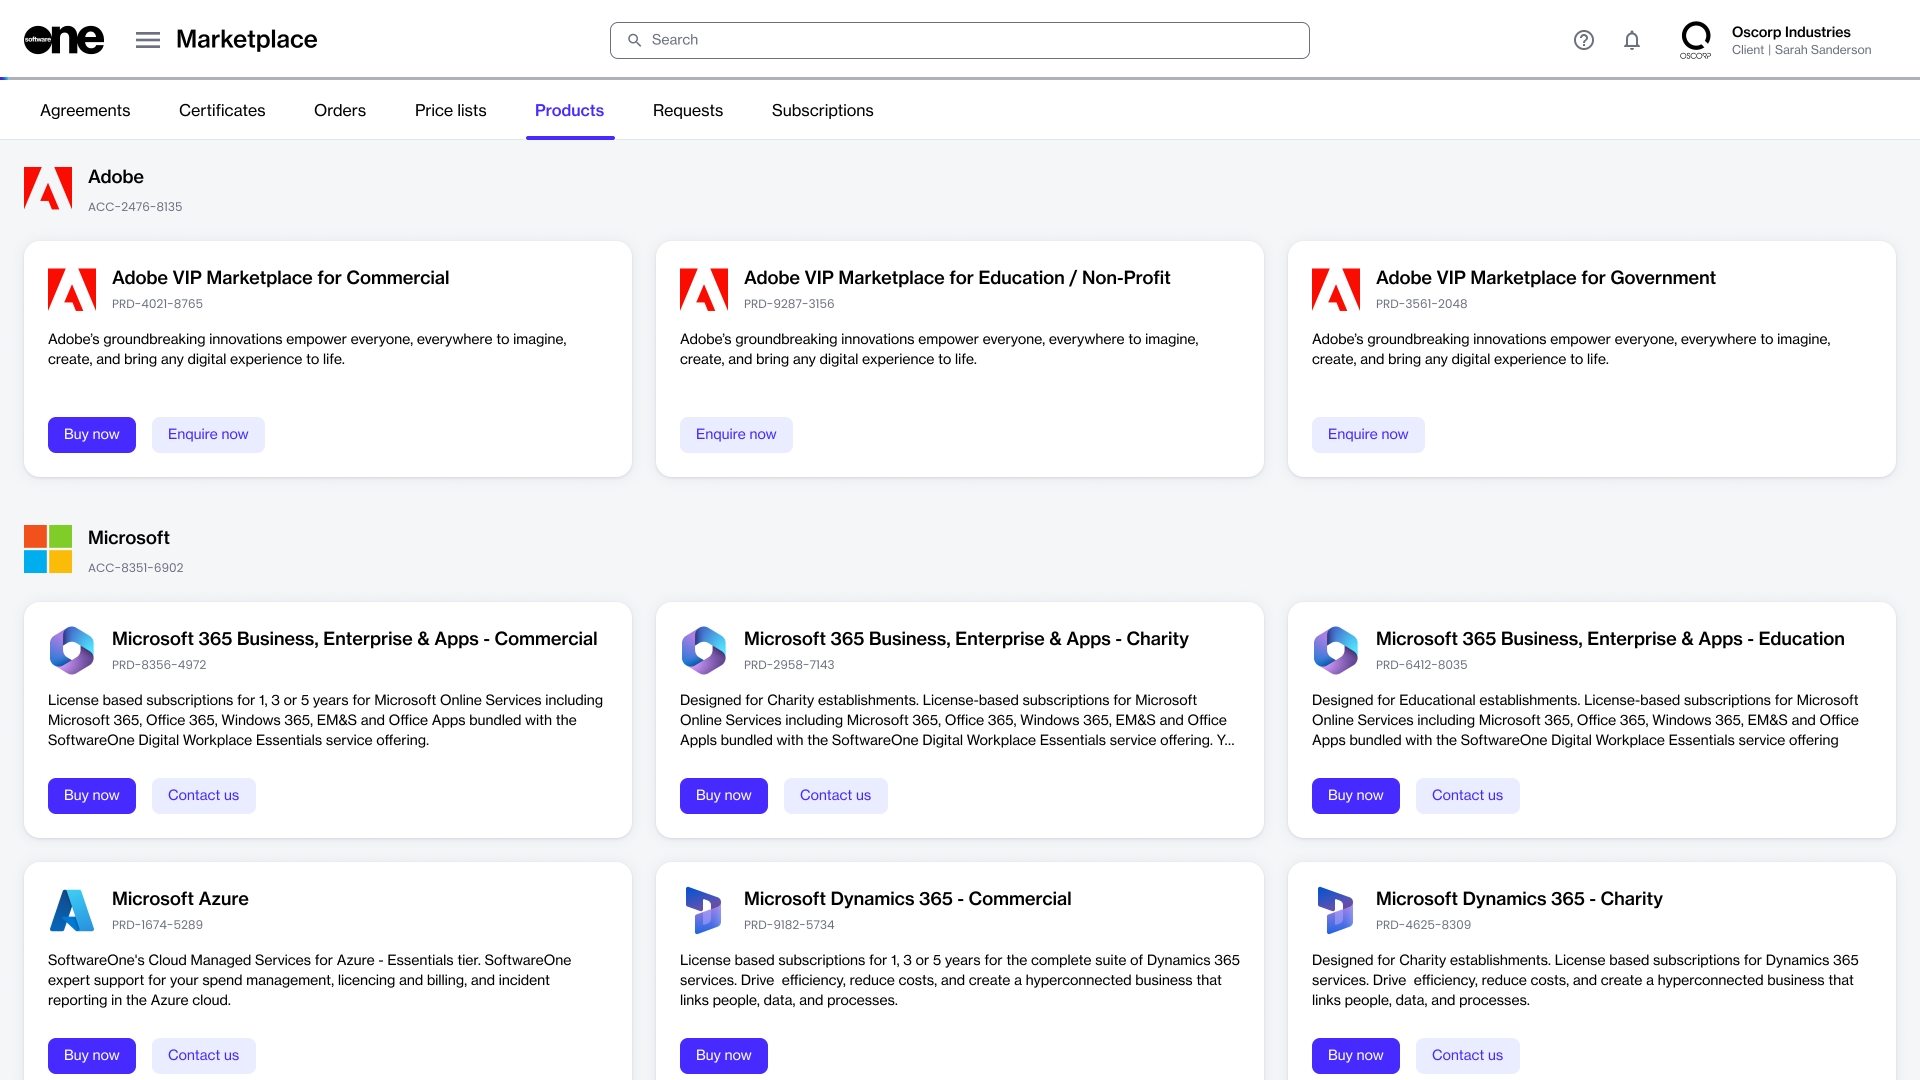
The Products page in the platform lists all products that are available for you to order from our catalog. You can access the page by selecting Marketplace > Products from the main menu of the Client Portal.
The Products page displays all products in the form of cards, making it easier for you to browse through the list of products. Additionally, all products are organized by vendor name and ID, and each card contains the following information:
Product logo.
Product name.
Product ID.
Short description of the product.
If enabled, the Buy Now option to start the purchase process.
If enabled, an option to contact the vendor or SoftwareOne before placing the order (for example, a Contact Us or Enquire Now button).
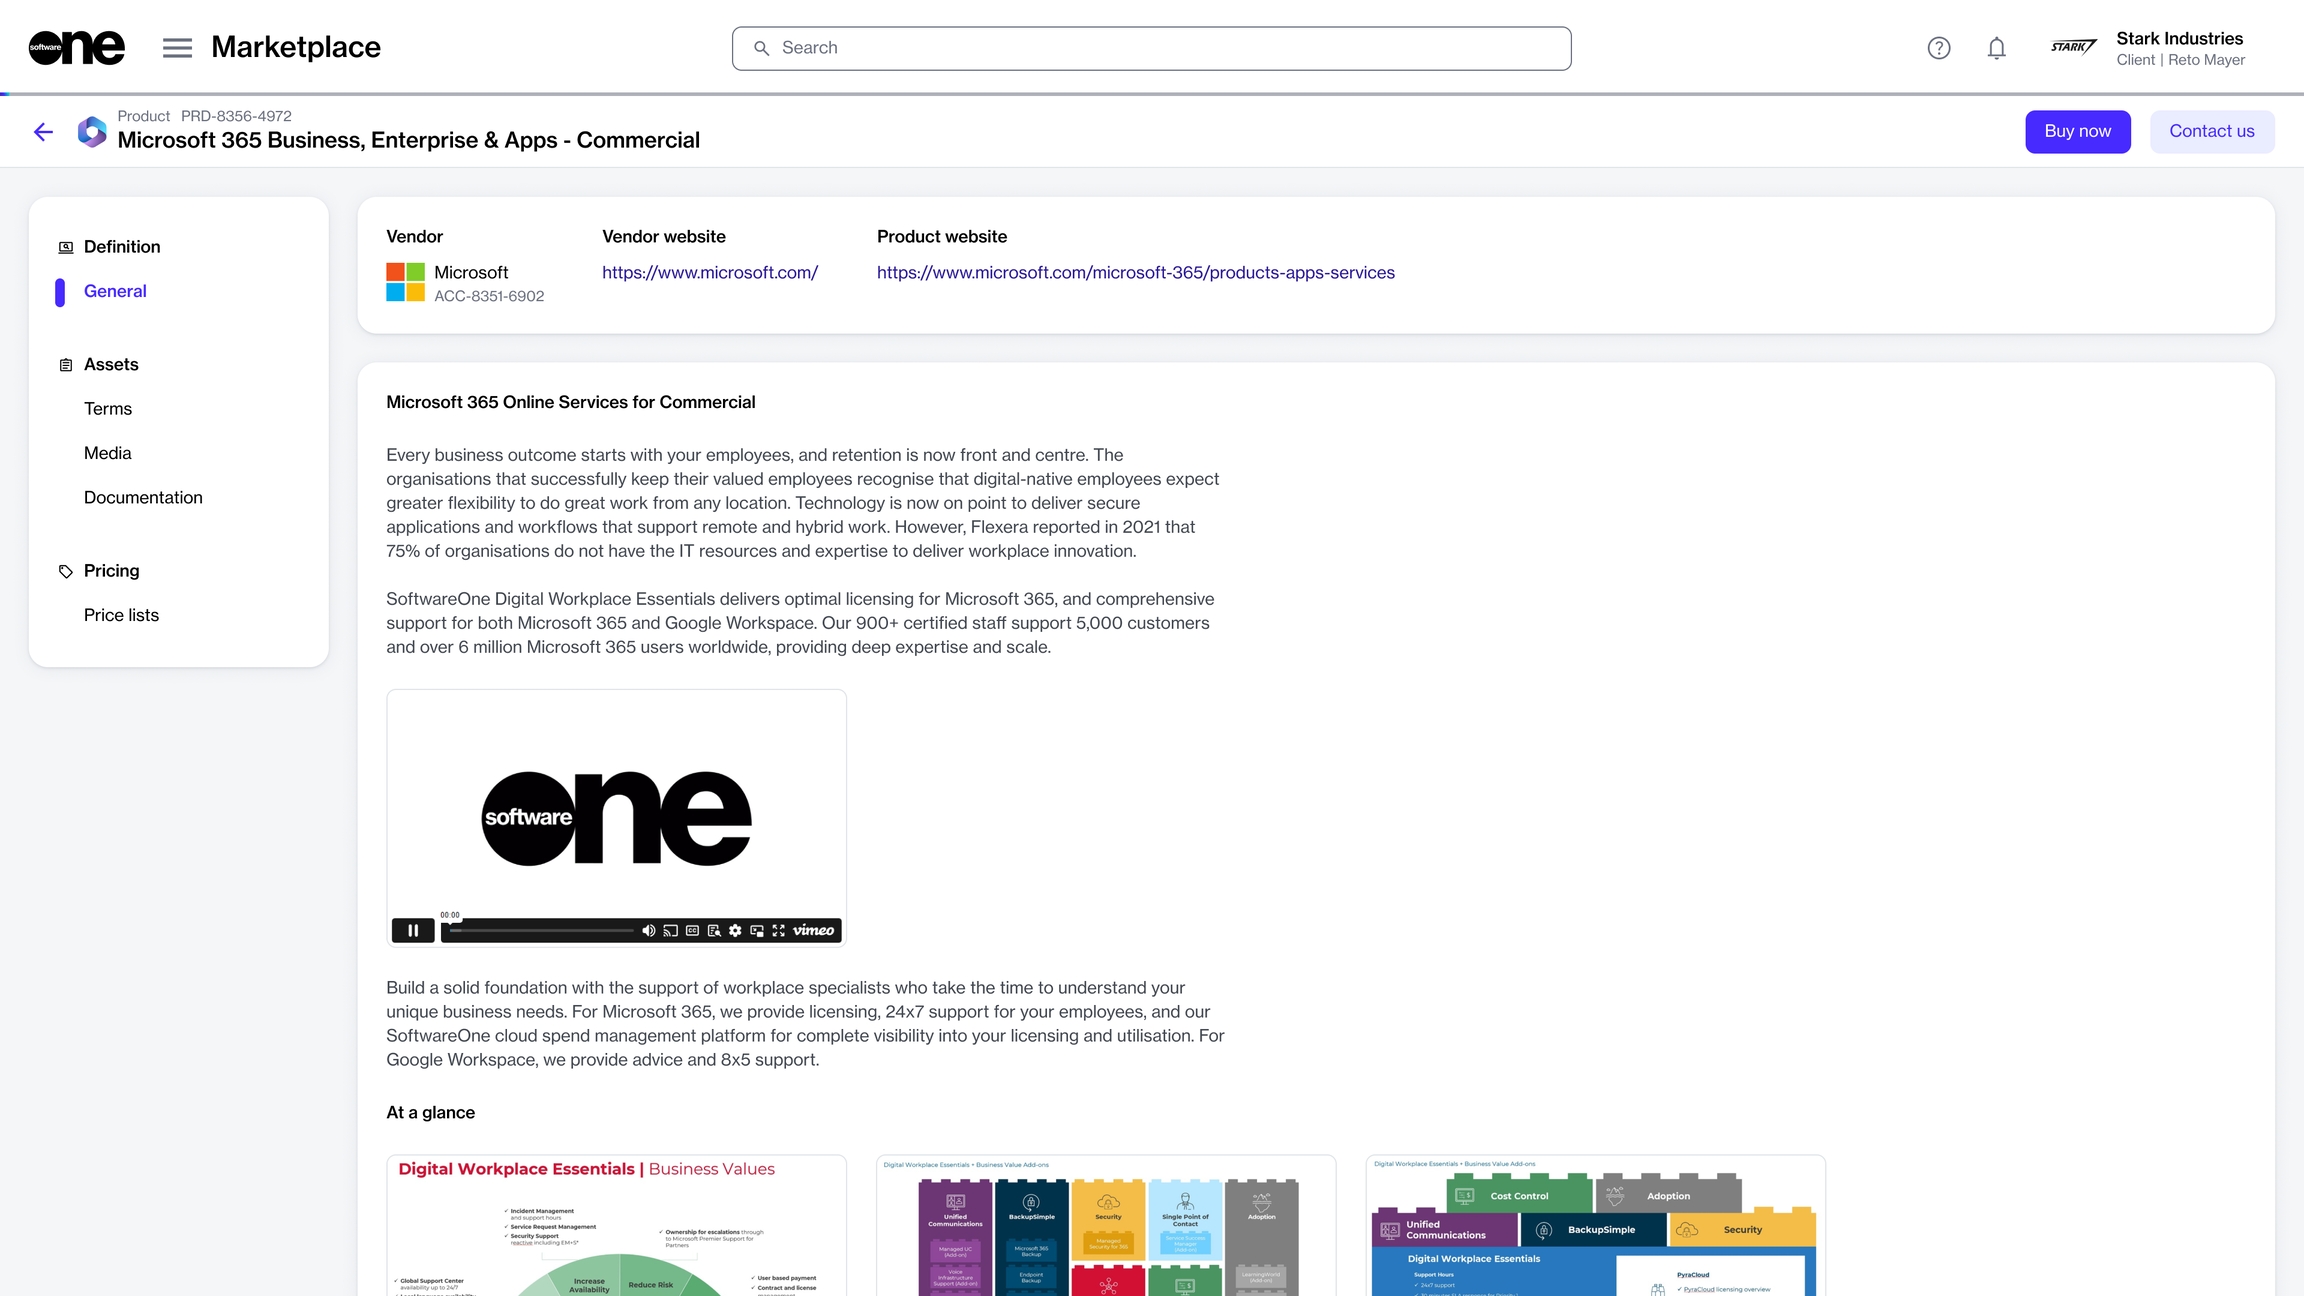
When you click a card, the details page of the product opens. The details page displays information specific to the product, such as the vendor's name, logo, and website along with the key features and benefits. The Items section displays the individual items within the product and the billing period and commitment term that applies to each item.
You can also access various assets, including terms, media files, related documentation, and product price lists.
In the Marketplace Platform, draft orders allow you to save the order configuration when you are creating an order. You can save different types of orders as a draft when creating the order.
Once you save an order as a draft, you can return to it anytime to complete the ordering process. Saved draft orders are displayed on the Orders page with a Draft status.
The Purchase wizard allows you to save a purchase order as a draft. To do this, follow these steps:
Go to the Products page (Marketplace > Products) and select the product you wish to buy.
On the product details page, click Buy now. The ordering process begins.
In the purchase wizard, complete the steps as needed until you reach the Details section.
In the Details section, click Save order to save the order. Your draft order is saved and you can close the purchase wizard.
A change order represents an order to change subscription quantities. Change orders are placed when you adjust the number of your licenses. This includes ordering more licenses or reducing the number of existing licenses.
When creating a change order for quantity adjustments, you can save the change order as a draft and submit it later. To do this, follow these steps:
Open the Edit subscription wizard. You can launch the wizard by clicking Edit on the subscription details page.
In the Edit subscription wizard, change the license count as needed and click Next.
In the Details section, click Save order to save the change order as a draft. Your draft order is saved and you can close the wizard.
When you are ready to finalize the draft order, open the order from the Orders page and click Edit in the upper right to continue where you left off.
You can either save the same order as a draft again or proceed to place the order. Draft orders can be updated and saved as many times as needed.
If a draft order is no longer required, you can also delete it. Once a draft order is placed, it's no longer listed as a draft.
In the Marketplace Platform, an order is an object signifying a business transaction based on an agreement.
An order represents a request to buy a new product, change the quantity of licenses, terminate a subscription, or terminate an agreement. Therefore, different types of orders exist in the Marketplace Platform, including:
Purchase orders - These orders represent an order to buy a new product or service under a new agreement.
Change orders - These orders represent an order to change the subscription quantity, such as downsizing the license quantity or ordering additional licenses.
Terminate order - These orders represent an order to terminate a subscription or agreement.
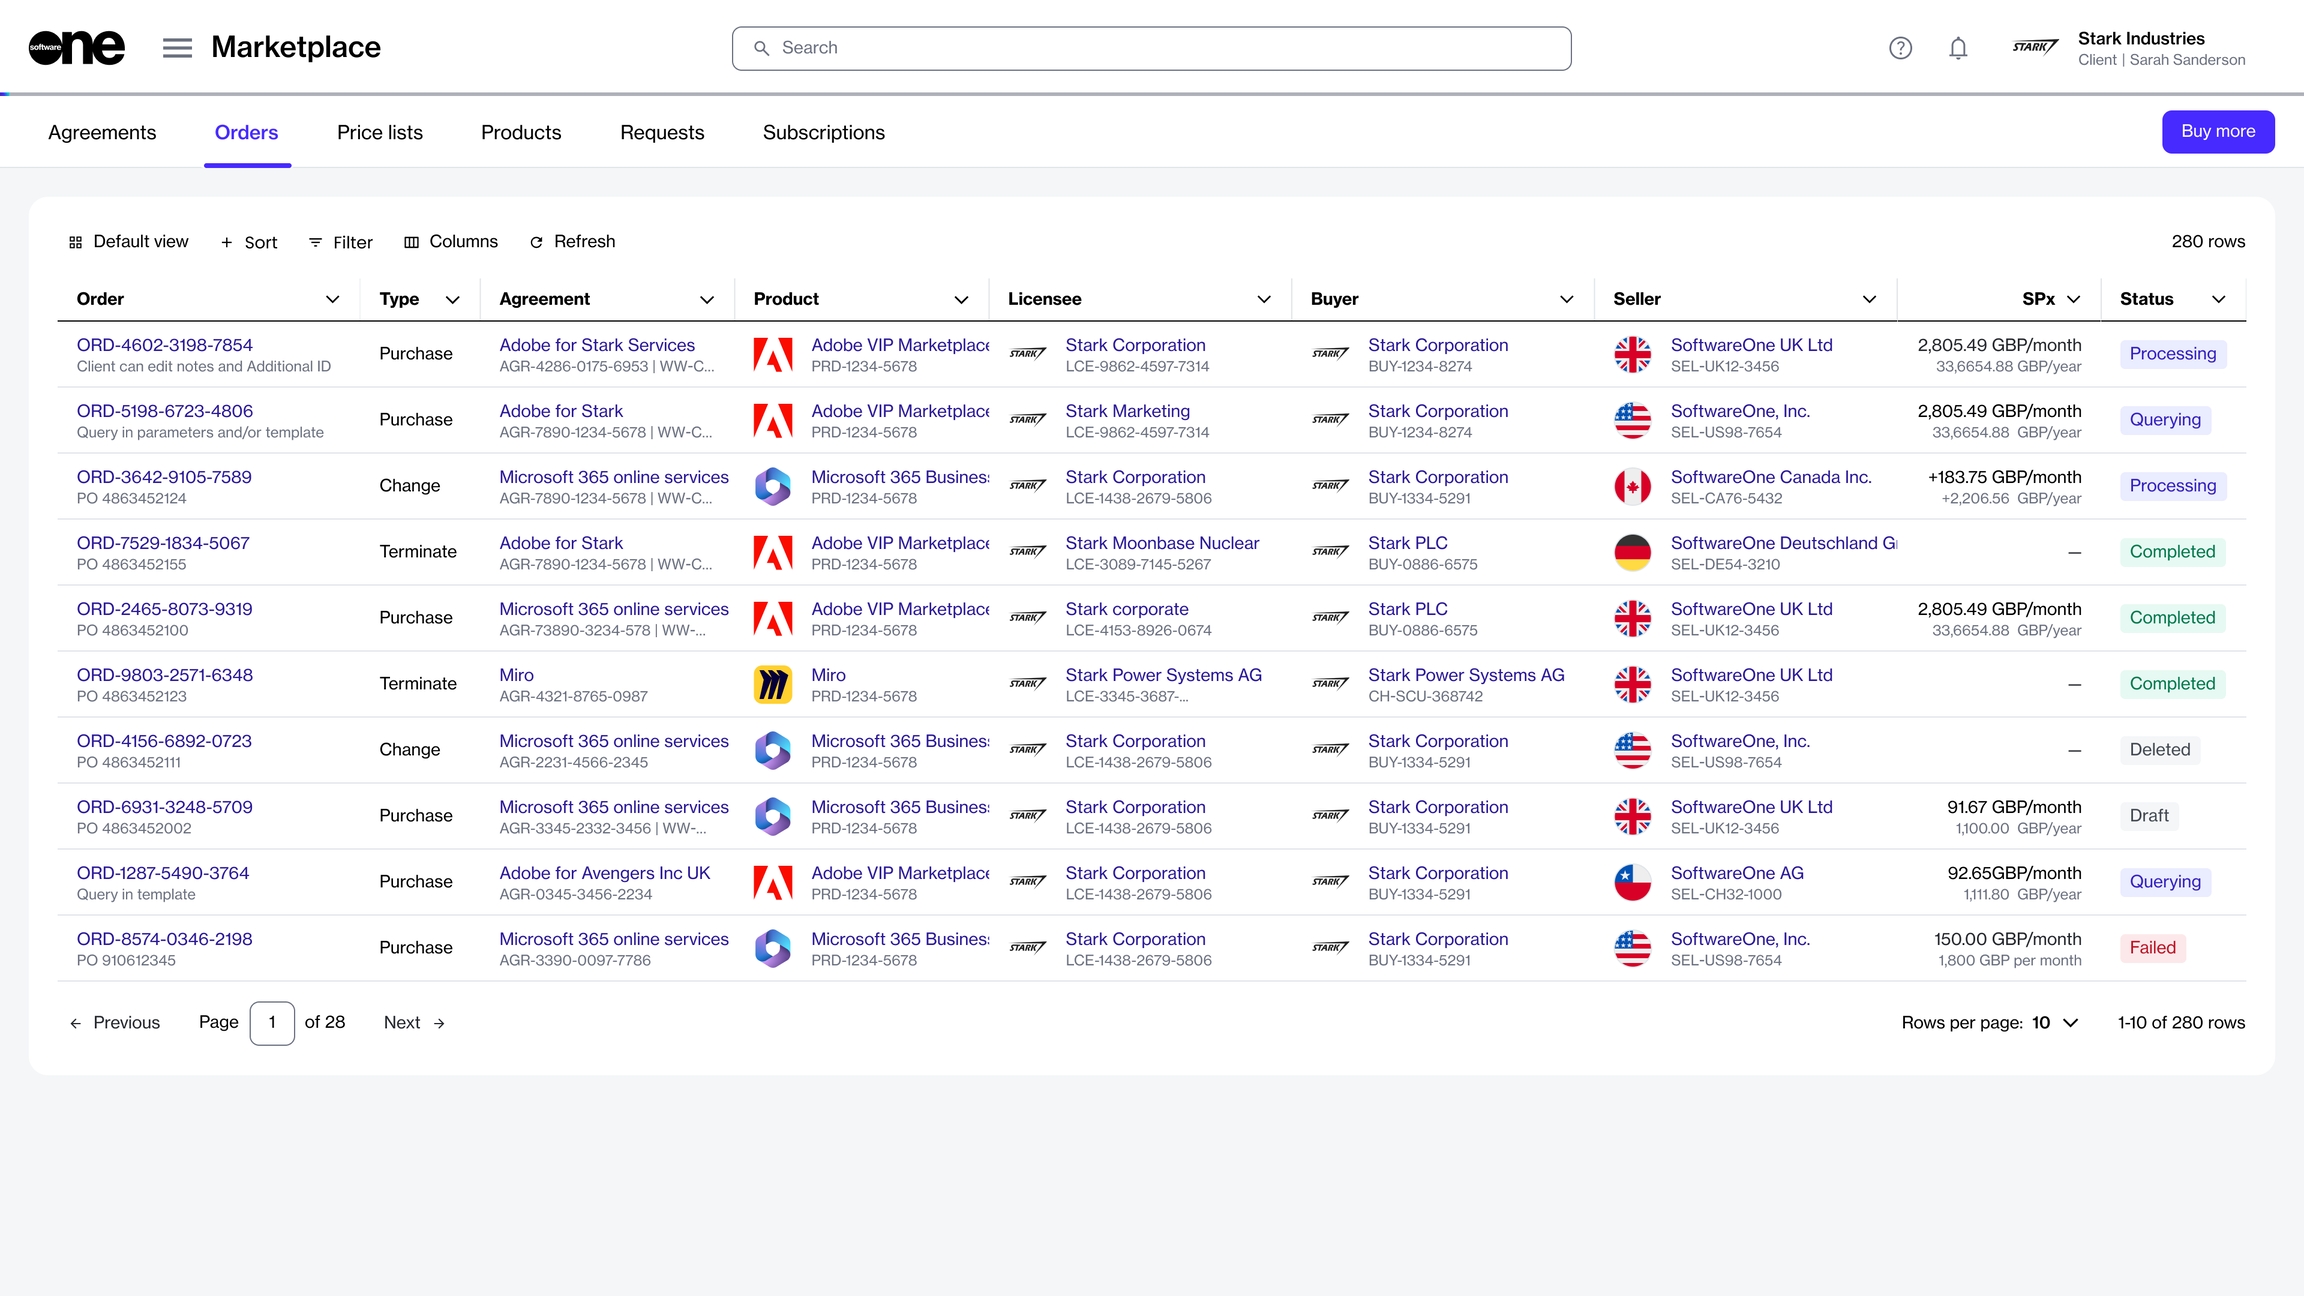
You can access the Orders page by selecting Marketplace > Orders from the main menu.
The Orders page shows a complete list of your orders, including purchase, change, and termination orders. It also contains a Buy more option, which gives you quick access to the Products page for ordering new subscriptions.
For each order, you can view the following details:
Order - Displays the order number and ID.
Type - Displays the order type. The possible values are Purchase, Change, and Terminate.
Agreement - Displays the agreement associated with the order.
Product - Displays the product you've ordered.
Licensee - Displays the licensee associated with the order.
Buyer - Displays the buyer associated with this order.
Seller - Displays the SoftwareOne entity that fulfilled the order and issued the invoice.
SPx - Displays the estimated sales price of the order.
Created - Displays the date when the order was created in the platform.
Status - Displays the order status. To learn about the possible statuses, see Order States.
Updated - Displays the date when the order was updated.
Currency - Displays the order currency.
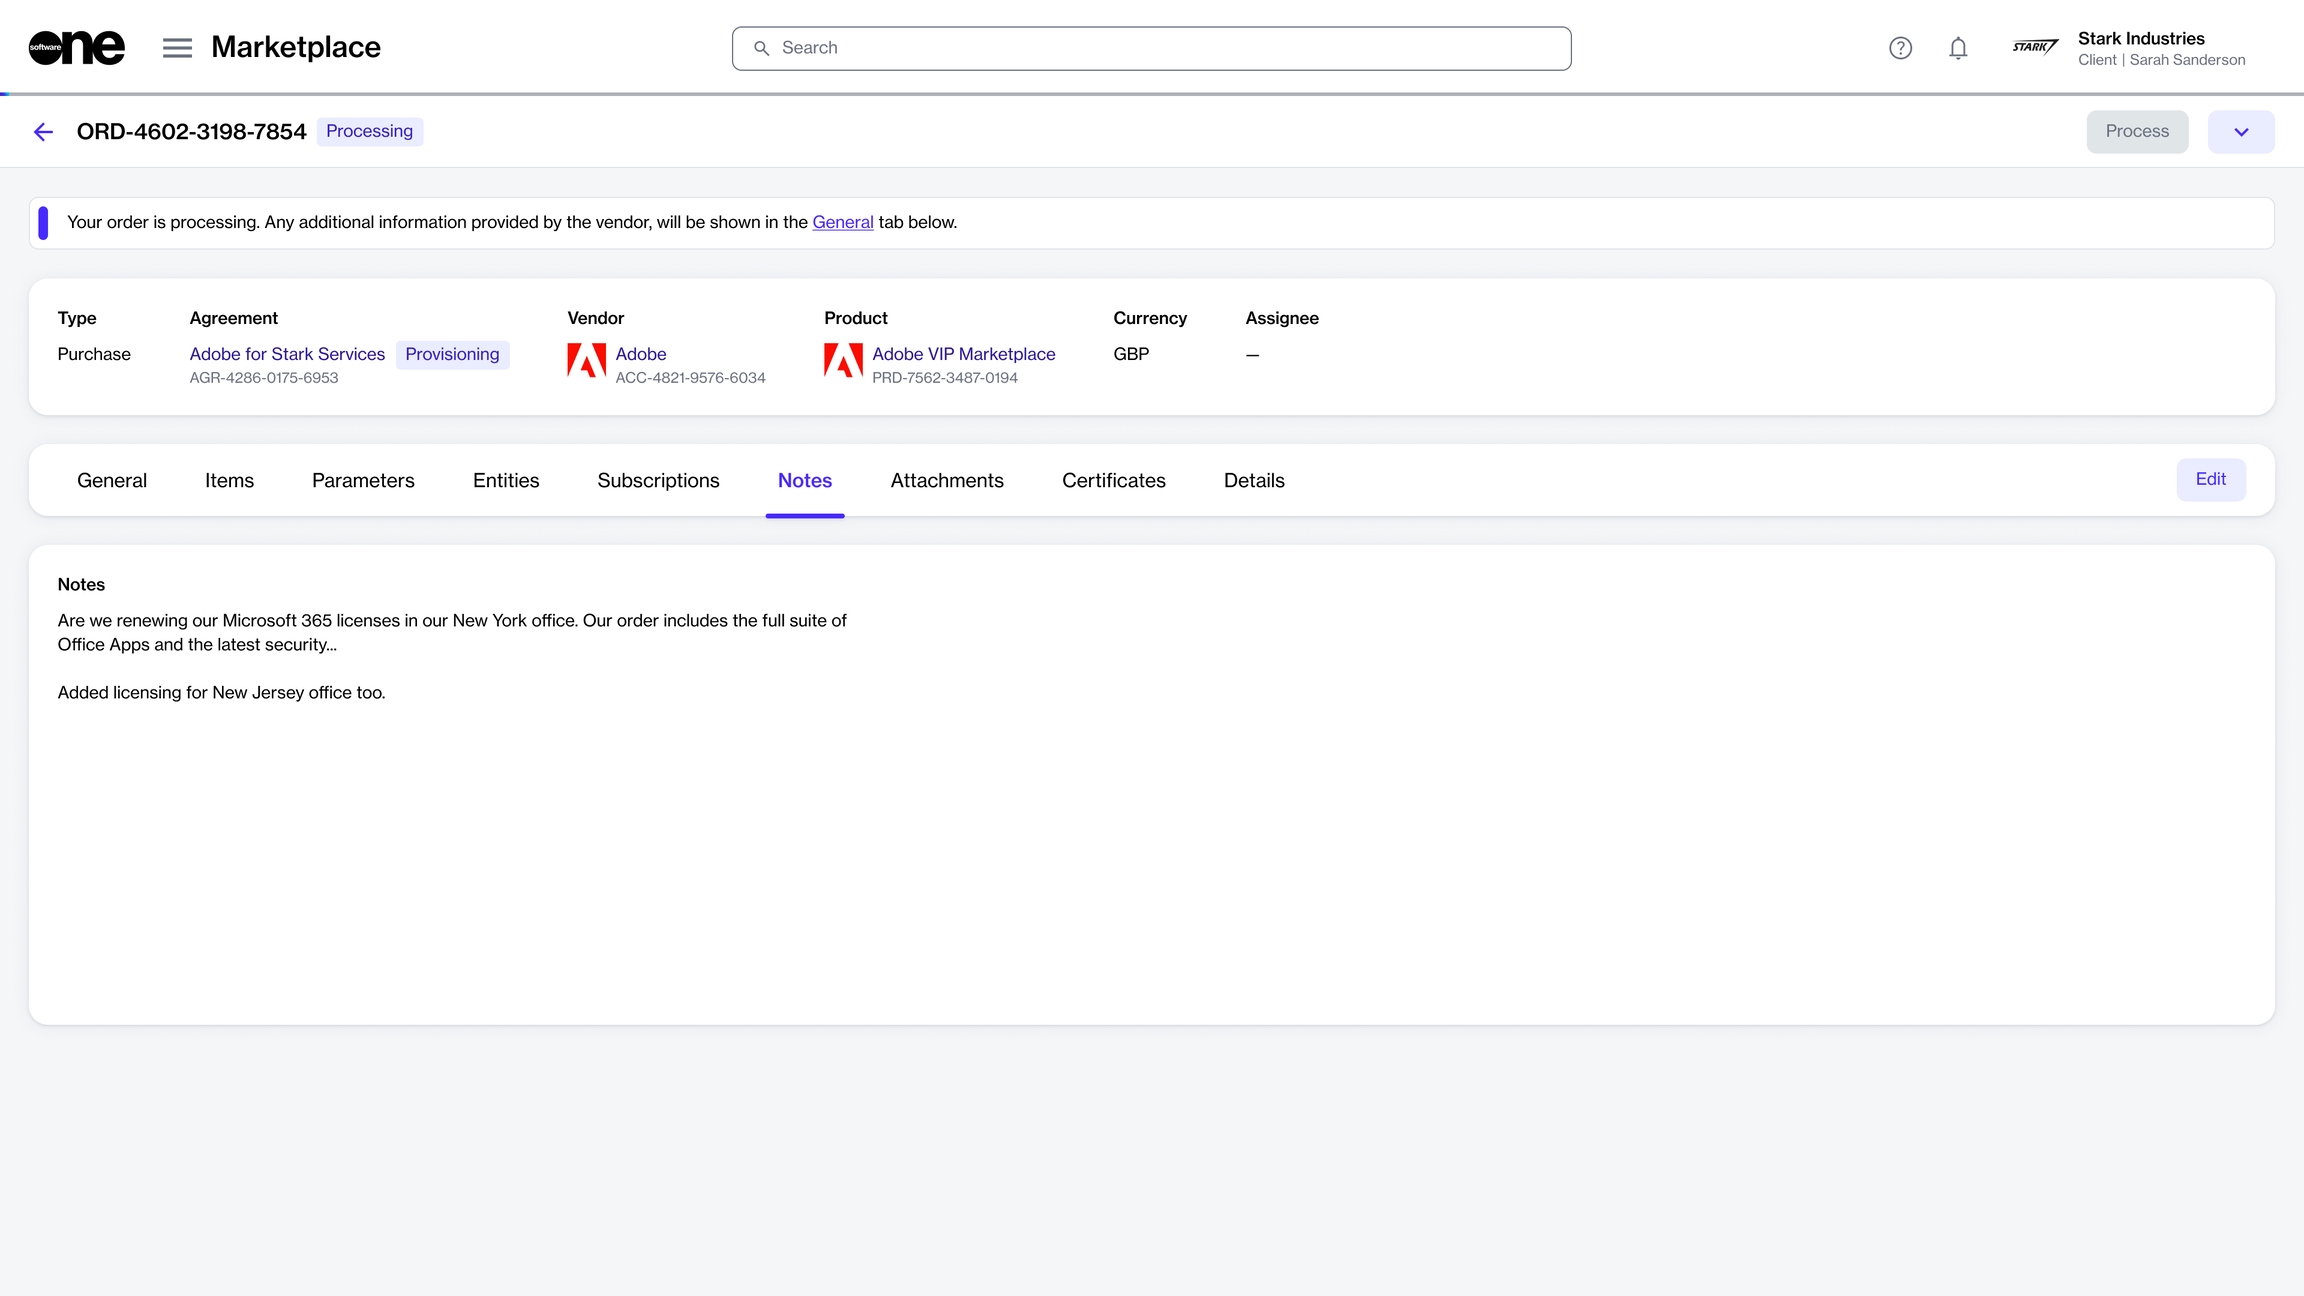
The details page of an order provides detailed information about the order. You can open the details page by clicking the order on the Orders page.
The details page of an order contains the Process button that lets you move your order from Querying to Processing. It also contains several tabs that display the corresponding order information:
General - Displays the latest information about your order.
Items - Displays the items you've ordered and the pricing information for each item.
Parameters - Displays the ordering and fulfillment parameters associated with the order.
Entities - Displays details of the different entities associated with the order, like the licensee, buyer, and seller.
Subscriptions - Displays the subscriptions associated with the order. Subscriptions are only displayed after they have been activated. Once activated, you can view subscription details, like the term, the start and the renewal date, the estimated prices, and more.
Notes - Displays the notes entered during the ordering process. Use the Edit option to edit the notes.
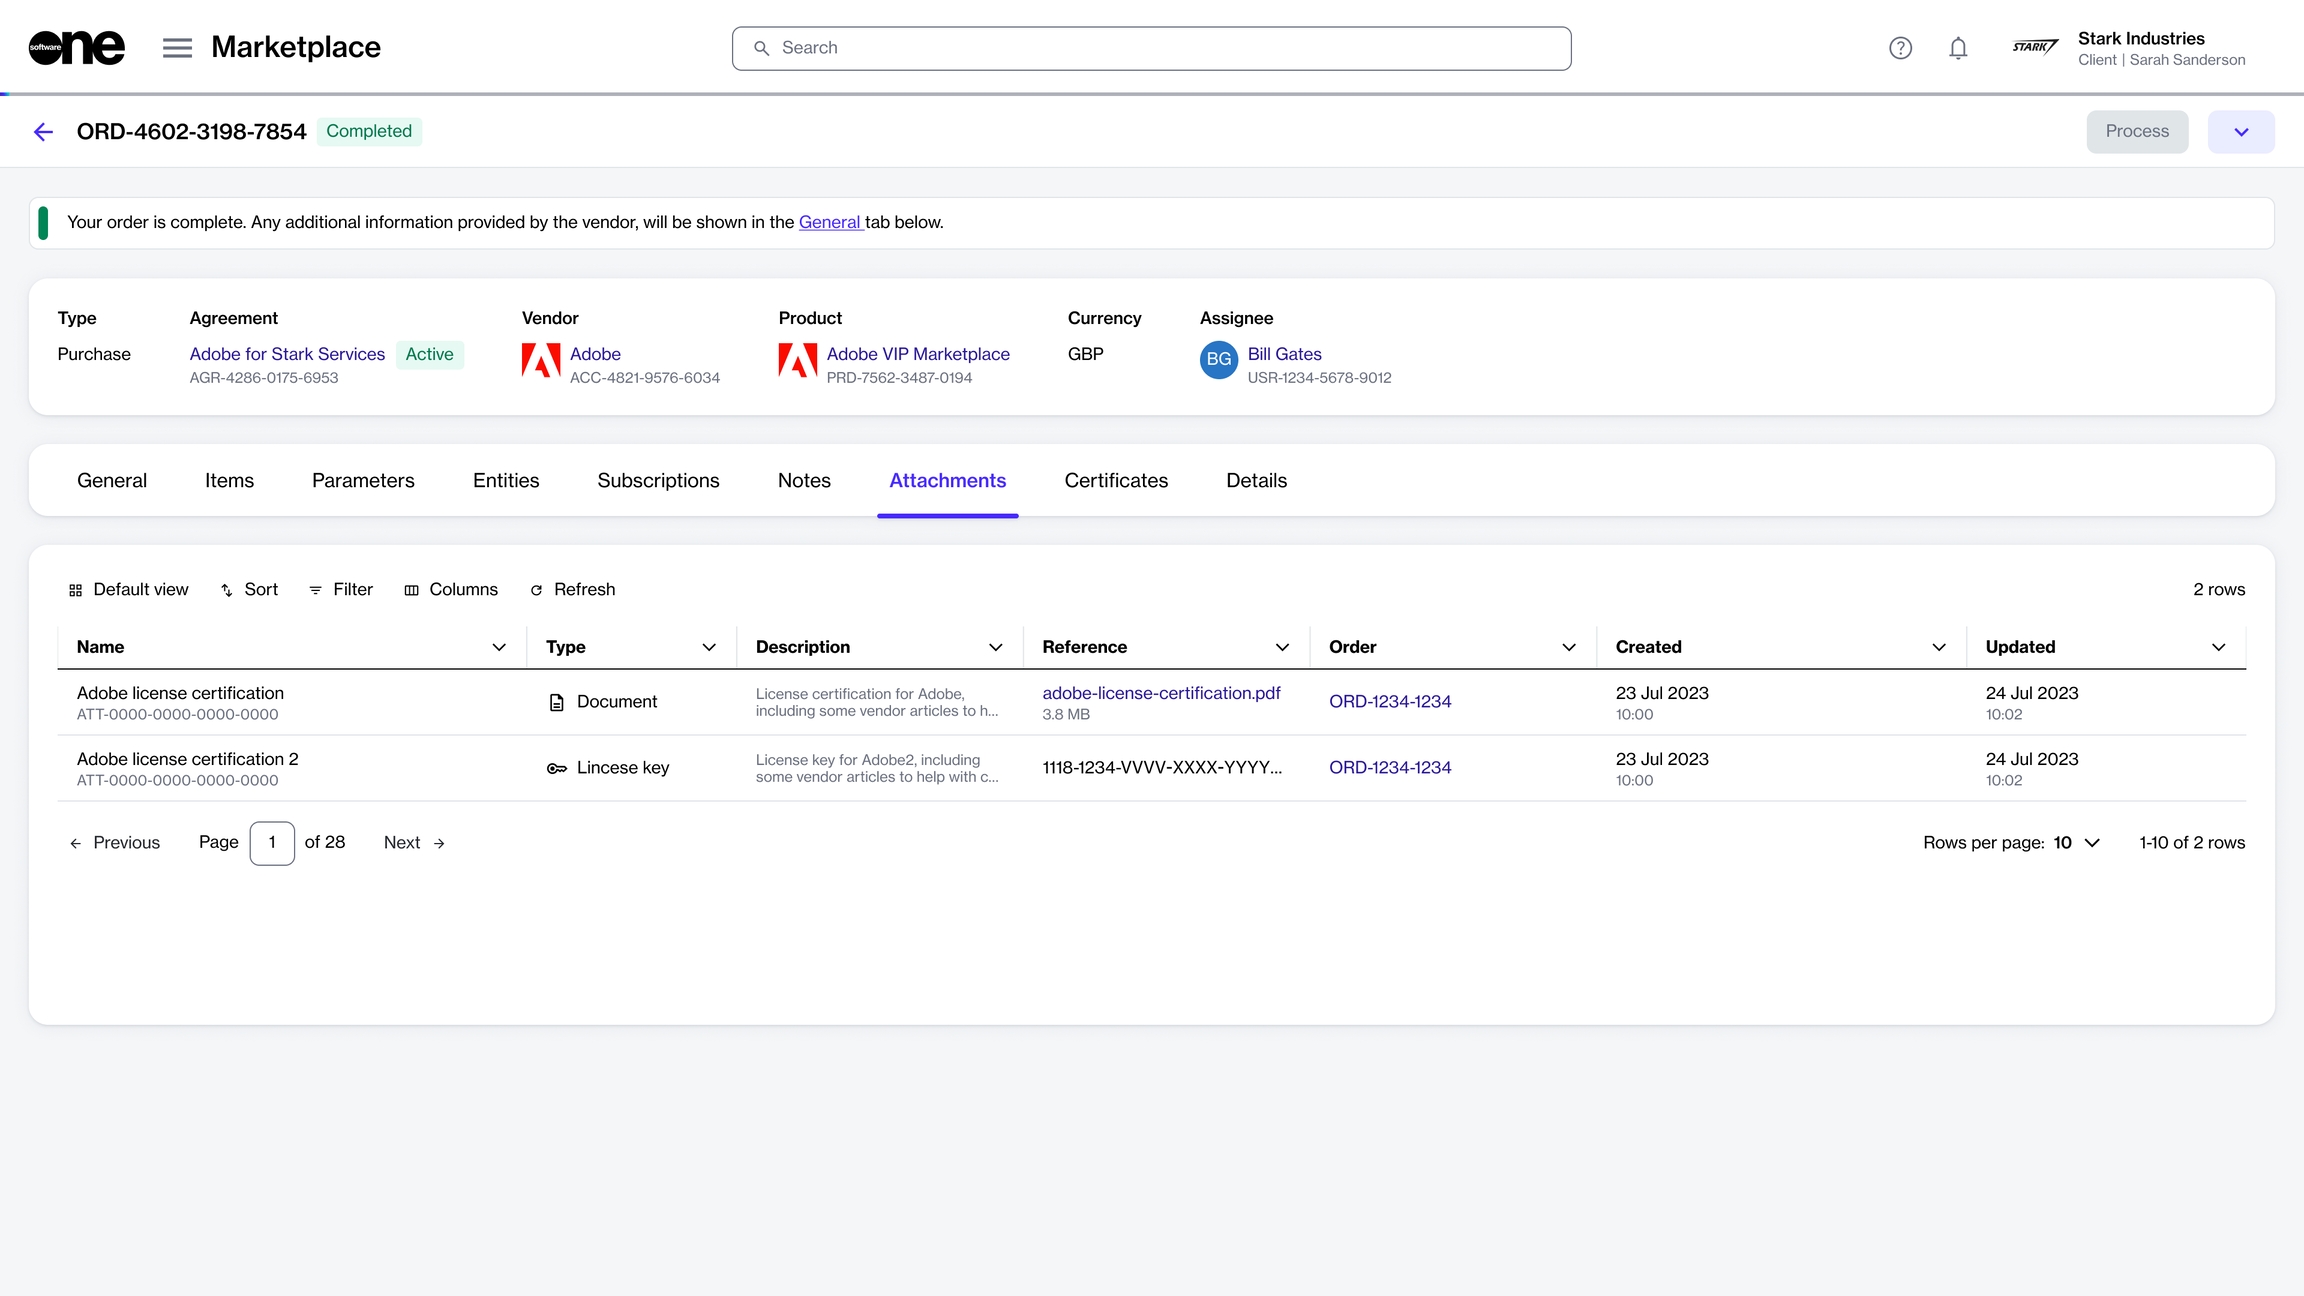
Attachments - Displays the files attached to the agreement and allows you to download those files. See View and Download Attachments to learn more.
Details - Displays the additional IDs, including the client and vendor IDs, and the timestamps of all changes made to the order. You can update the client ID using the Edit option.
Audit trail - Displays all events that have taken place within the order. For each audit record, you can view the log details and summary. To learn more, see Audit Trail.
The Notes tab on the order details page shows the notes you may have entered during the ordering process.
Once the order is created, you can update the notes as needed and add new ones if they weren't included when you placed the order.
Notes can be updated for orders in the Processing, Querying, and Draft states only. For a description of these states, see Order States.
Follow these steps to manage the order notes:
On the Orders page (Marketplace > Orders), select the required order. The details page of your selected order opens.
Select the Notes tab and click Edit.
In the Edit Notes dialog, add or update your notes. A maximum of 300 characters is allowed.
Click Save. The notes are updated and displayed immediately on the Notes tab.
A request in the Marketplace Platform represents a pre-sale inquiry. This can include queries about products, subscriptions, pricing, billing, product availability, and more.
As a client, you can create new queries through the Products page and track your existing queries through the Requests page. The page displays all requests, including requests that are raised by other members of your account.
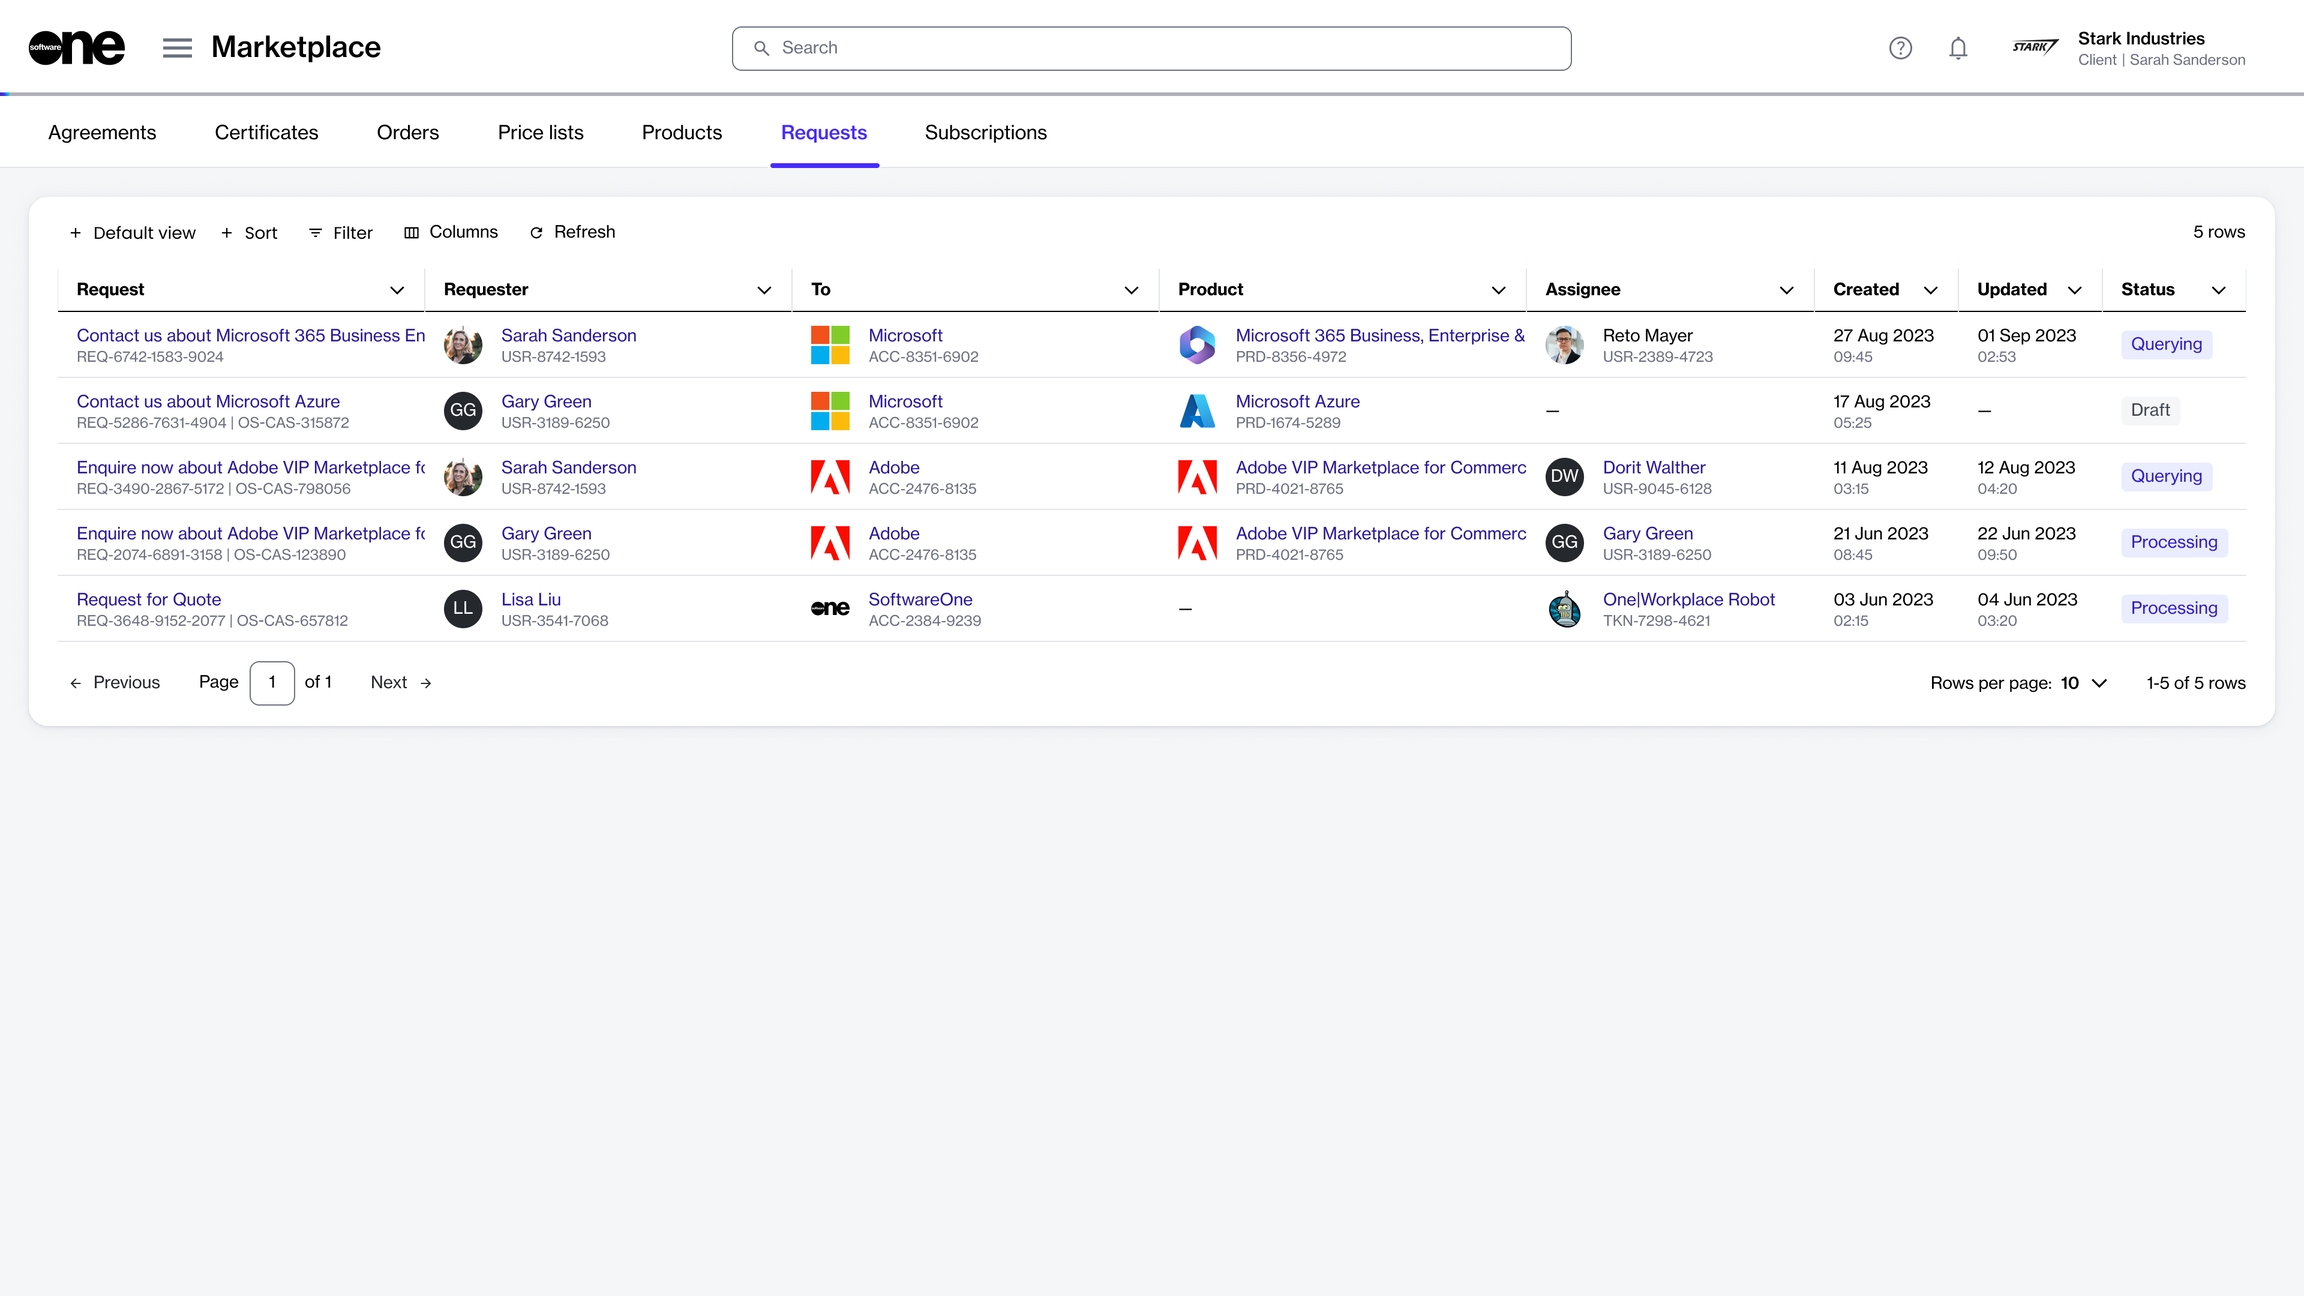
You can access the Requests page by selecting Marketplace > Requests from the main menu.
The Requests page displays a list of your requests. For each request, you can view the following details:
Request - Displays the title of your request.
Requester - Displays the name of the person who created the request.
To - Displays the name of the vendor.
Product - Displays the product name for which the request is created.
Assignee - Displays the contact person assigned to the request.
Created - Displays the date and time when the request was created.
Updated - Displays the date and time when the request was updated.
Status - Displays the status of your request. See Request States for information on the possible statuses.
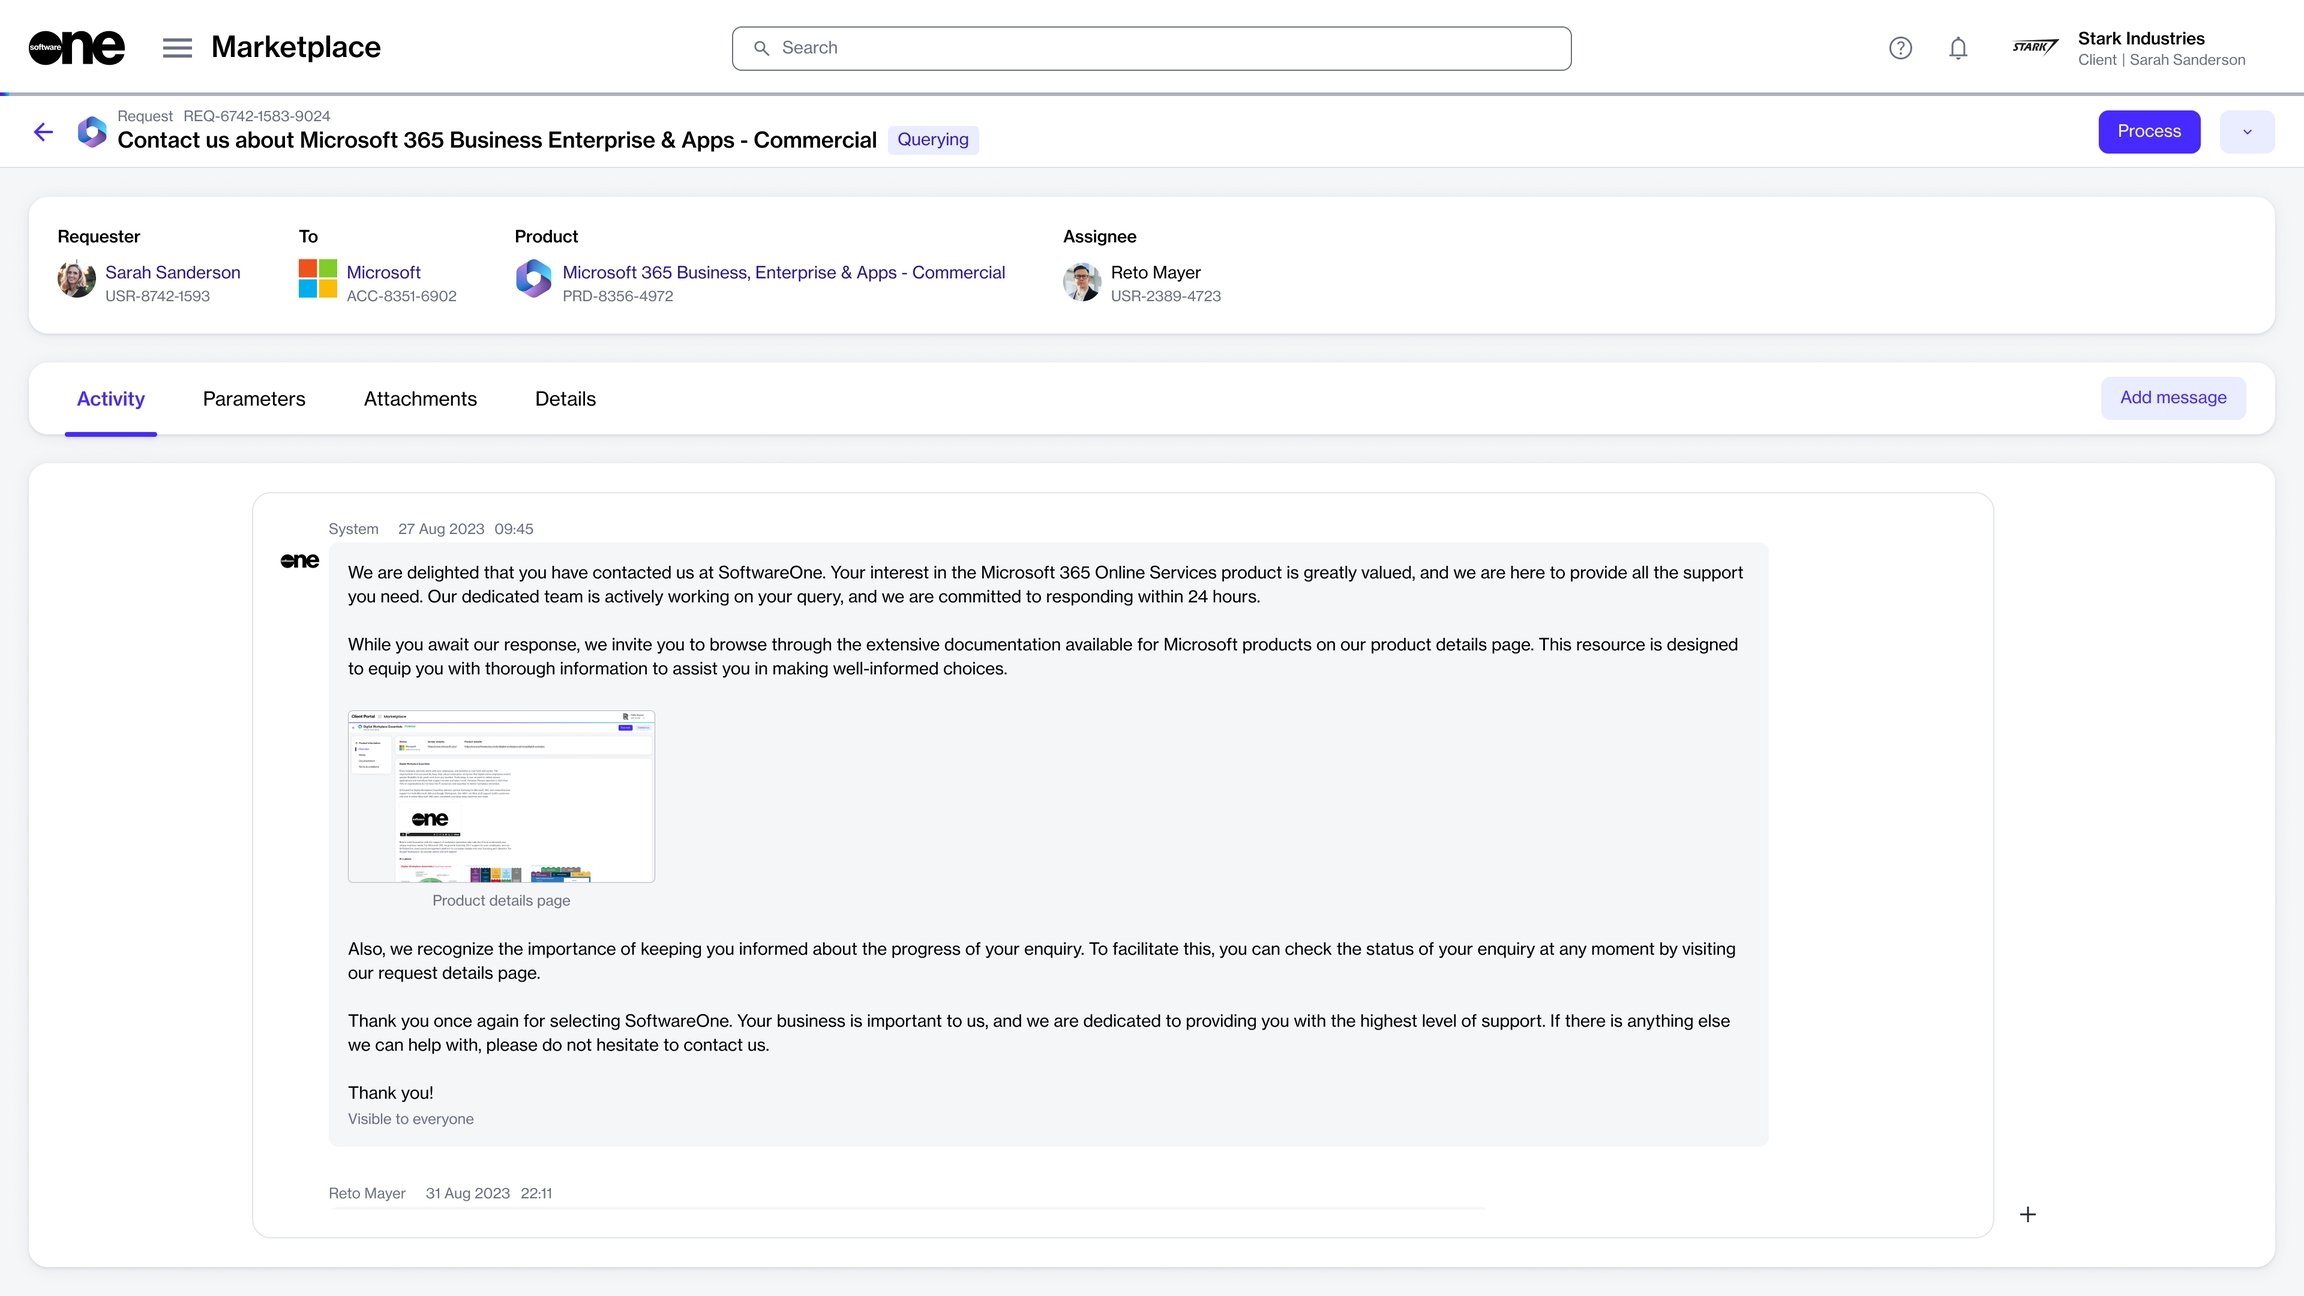
The details page of a request gives you in-depth information about the request. You can open the details page by clicking the request on the Requests page.
The request details page displays the product against which the request has been raised and the request status. You can also view general information about the request, such as the requester's name, vendor, and assignee.
The request details page is organized into several tabs, each providing specific information. The following tabs are available:
Activity - Displays the activity information, including the message history for the request. Clicking Add message allows you to add a new message to the conversation.
Parameters - Displays the request parameters. Parameters are for viewing only and can't be edited.
Attachments - Displays the files attached to the request. You can also add and manage attachments.
Details - Displays the additional IDs and the timestamps of all changes made to the request.
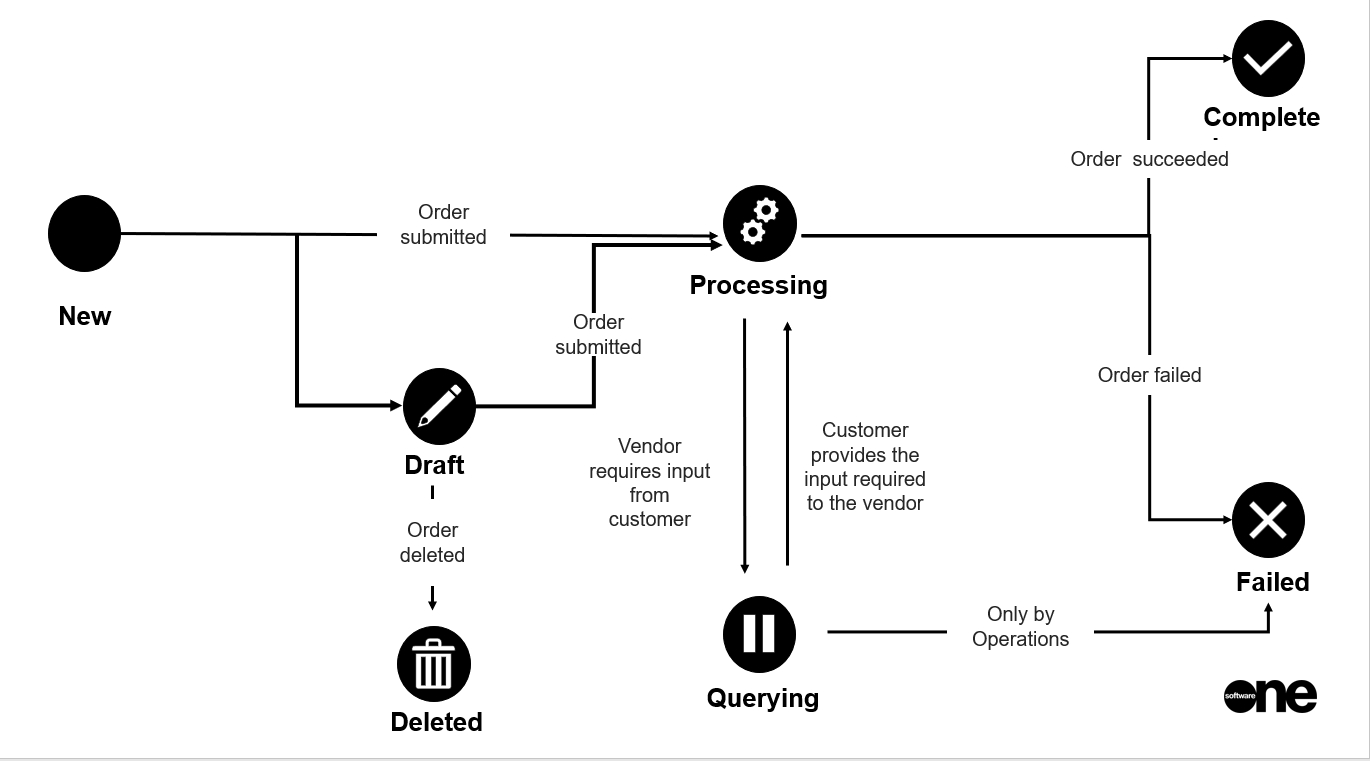
An order can have several states from the time it is created in the Marketplace Platform until its completion.
The following diagram shows how an order's state can change during its lifecycle:
These states are displayed as Status on the Orders page. They are also displayed beside the order number on the details page.
Note that the Marketplace Platform supports various account types, including vendor and client, so depending on your account type, only some states might be visible to you.
Draft
The order has been saved as a draft during the ordering process.
Draft purchase orders can be accessed through the Orders page.
Processing
The order has been created and is currently awaiting processing by the vendor.
Querying
The ordering parameters have been updated by the vendor.
The order now requires an action to be taken by the client account user.
Completed
The order has been processed by the vendor.
Failed
The order has been failed by the vendor or SoftwareOne.
The failure reason is shown on the General tab of the order.
Deleted
The draft purchase order has been deleted by a client account user.
If you saved an order as a draft during order creation and wish to finalize it and submit it for processing, you can do this through self-service.
When you submit a draft order, it will no longer remain as a draft and will move to the Processing state.
Follow these steps to submit a draft order for processing:
Navigate to the Orders page and find the required draft order. If you have multiple orders, use one of the following methods to find draft orders.
If you know the order number, use the Search bar to locate the order.
If you don't know the order number, use the following filters:
Click the Filter option in the grid.
Click Add another condition and then use the dropdown to make the following selections:
In the first field, choose Status.
In the second field, set the filter to Equal.
In the third field, select Draft from the list and then close the filter box.
Click the order number to open the details page of the draft order.
On the order details page, click Edit.
The purchase wizard starts and the Select Items step is displayed.
If your draft order includes items that you may have added before saving it as a draft, those items are displayed in the Items section. Verify the item details and then click Next.
If no items were added, the Select Items window opens, allowing you to choose individual items to add to your order. After you have selected and added the items, click Next.
In the Details step, add the additional ID and notes for your order, and then click Next. Providing these details is optional.
In the Review order step, verify the information and click Place order to submit the order.
Click View details to go to the order details page or click Close to close the page.
Your draft order is submitted to the vendor for processing, and the order status changes from Draft to Processing on the Orders page and order details page.
If you require personalized assistance or have queries regarding a product, you can contact the vendor or SoftwareOne directly through the marketplace.
You can contact a vendor only if the vendor has enabled the option. If the option is available, you'll see an Enquire Now, Contact Us, or a similar button on the Products page.
Follow these steps to create a new request:
Navigate to the Products page (Marketplace > Products) and find the product you have queries about.
Click the option to contact the vendor. Alternatively, click the name of the product. When the details page of your selected product opens, click the contact option in the upper right.
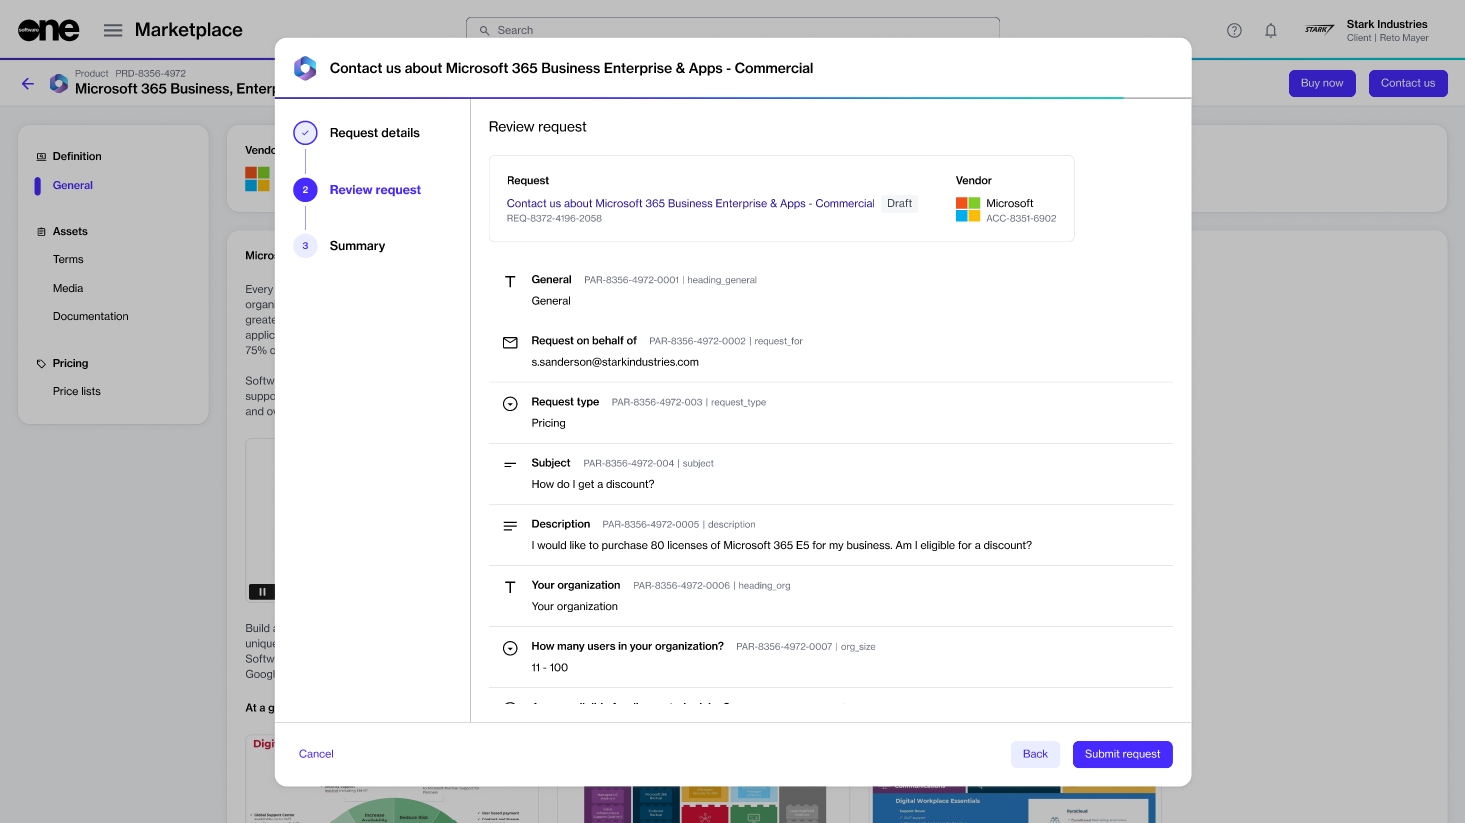
In the Request details step, provide the details of your request and click Next.
In the Review Request step, review the information and click Submit Request.
Your request is submitted and a Processing status is assigned to it. Click View request to view the request details page. Otherwise, click Close.
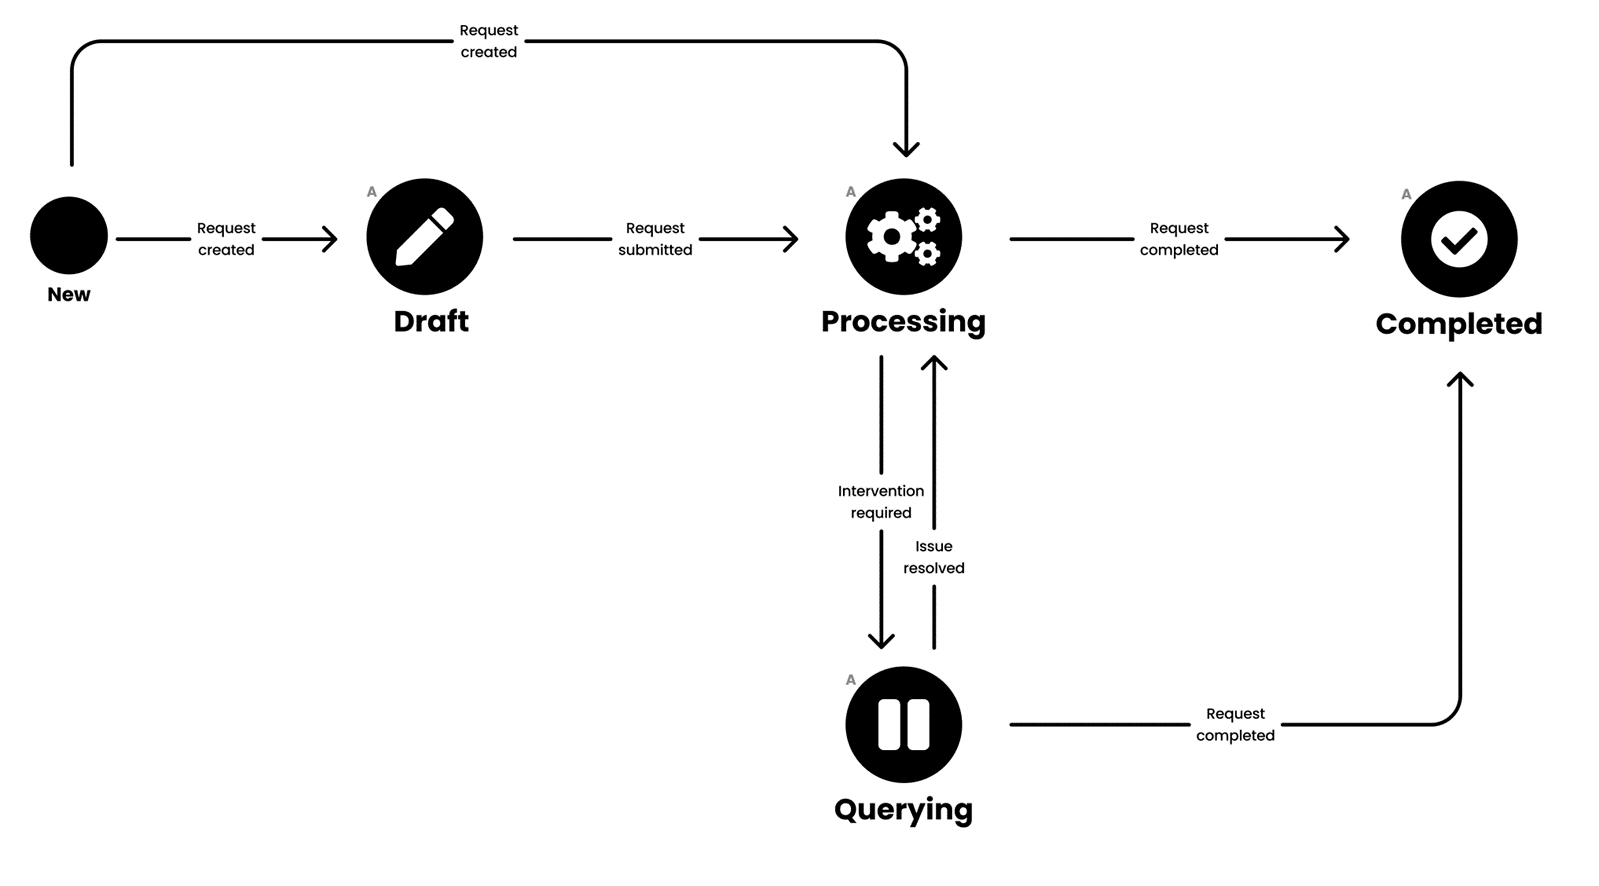
The following diagram shows the possible states of a request created through the platform and the transition between various states:
These states are displayed as Status within the platform. They are also displayed beside the request name and ID on the details page.
Draft
The request is being created.
Processing
The request is pending a response from the vendor or SoftwareOne.
Querying
The vendor or SoftwareOne has updated the request.
It now requires an action to be taken by a client account user.
Complete
The request has been completed.
When you update your request, for example, by attaching documents, it's important to change the request status to Processing and send the request back to the vendor. This action informs the vendor that you've replied to their query and the request is now ready for their review.
Before changing the status of your request, note the following points:
You can change the status of your request to Processing only if the current status is Querying. If the request is already in Processing or Completed state, the option to change the status is unavailable.
Only change the status of your request to Processing once you've provided all the information and the request is ready for the vendor's review.
Follow these steps to change the status of your request:
On the Requests page (Marketplace > Requests), select the required request. The request details page is displayed.
Make changes as necessary and then click Process.
In the Process request dialog, add details if you want to, and then click Process.
The status of your request changes from Querying to Processing. If you added comments in the Process request dialog, your comments are displayed and visible to everyone on the Activity tab.
If you created a request through the platform and wish to add a message to your interaction with the vendor or SoftwareOne, you can do this through the Add Message option on the request details page.
When adding a new message, note the following points:
The new message you add to the conversation will be visible to all members of your account.
You can add a message regardless of the request's status.
Follow these steps to add a new message:
On the Requests page (Marketplace > Requests), select the required request. The request details page is displayed.
On the Activity tab, click Add message. The Add message dialog box is displayed.
After the vendor or SoftwareOne has addressed your request, you may close it. Closed requests cannot be edited or reopened.
Follow these steps to close your request:
On the Requests page (Marketplace > Requests), select the required request. The request details page is displayed.
Click the down arrow next to Process and select Complete.
In the Complete request dialog, add details if you want to and click Complete. Your request is completed and the Status column on the Requests page displays the updated request status.
In the Marketplace Platform, you can order subscriptions by creating an order through the purchase wizard. The purchase wizard starts automatically when you select a product from the Products page.
The wizard is designed to guide you through the ordering process smoothly. It contains navigation buttons, a vertical progress bar with step numbers and title, and a data grid.
The progress bar shows how far you have progressed and how many steps remain before the order can be placed. The steps are defined by vendors, so they might vary depending on the product. Additionally, the wizard might skip some steps automatically depending on the options you select.
The is where the main content is displayed. This is where you can select different purchasing options, choose items, apply filters and sorting conditions, input your details, and so on.
The navigation buttons, such as Close, Back, and Next allow you to close the wizard and navigate between different pages respectively, although some buttons could be unavailable depending on your current step in the wizard.
Each step of the purchase wizard provides you with different options you can use to order subscriptions. The steps include some common steps that apply to each vendor and product and some dynamic steps that are vendor-specific. Note that you cannot use step numbers to navigate between different pages of the wizard. Navigation is possible using the Close, Back, and Next options only.
During the ordering process, you are prompted to choose whether to use an existing agreement or create a new one. Agreements are essential for placing orders on the platform. Without an agreement, you will not be able to complete your order. Therefore, you must make a selection in the Select agreement step, which will determine the subsequent steps in the wizard.
You can set up a new agreement if you are new to SoftwareOne or if your procurement needs differ from your existing contracts. Existing agreements can be used if you wish to add new items, adjust the quantity of licenses, and add new products to the same agreement.
If you select an existing agreement instead of creating a new one, you'll straightway see the Select items section, where you can choose the items you wish to order.
If you opt to create a new agreement, you'll need to select a licensee for the agreement. You can select an existing licensee or create a new one, and then provide the agreement's type and address information.
The Review order step requires you to read and understand various terms and conditions associated with your order and confirm the order details. Clicking Place order creates a new purchase order, which is sent to the vendor for processing.
Once the confirmation is displayed, you can either Close the wizard or view your order details by clicking View details.
In some cases, you might need to rename your subscription so you can find it easily in your list of subscriptions.
The Marketplace Platform lets you rename your subscriptions in the Active and Updating states. Subscriptions can be renamed using the Rename option on the subscription details page.
Changing the subscription name only affects its display in the Client Portal. The updated subscription name will not be reflected in the vendor's system.
Follow these steps to rename your subscription:
On the Subscriptions page (Marketplace > Subscriptions), click the subscription you want to rename. The details page of the subscription opens.
Click the down arrow in the upper right and select Rename.
In the Rename dialog, enter the new name and click Save.
The subscription is renamed and the new name is visible across all pages that feature the subscription within the platform.
The Marketplace Platform automatically assigns a default ID to each subscription when it's created. You can modify the default ID and assign a new ID of your choice.
IDs can only be changed for the Active, Updating, Terminated, and Terminating subscriptions. For a description of these states, see .
Follow these steps to update a subscription's ID:
On the Subscriptions page (Marketplace > Subscriptions), click the subscription you want to update. The subscription details page opens.
Select the Details tab and then click Edit.
In the Edit ID dialog, enter the new subscription ID in the Additional ID field.
Click Save. The ID is updated and displayed as Client ID under Additional IDs.
A subscription refers to the ongoing service provision under the terms and conditions of an agreement. Subscriptions are mapped to agreements and each agreement can contain one or multiple subscriptions.
You can and also manage your existing licenses through the interface, including purchasing additional licenses and canceling the previously purchased ones. The Subscriptions page in the platform is your entry point to accessing your subscriptions.
You can access the Subscriptions page by selecting Marketplace > Subscriptions from the main menu.
For each subscription, you can view the following:
Subscription - Displays the name and ID of the subscription.
Agreement - Displays the name and ID of the agreement associated with the subscription.
Licensee - Displays the name of the individual or legal entity to whom the subscription license is issued.
Buyer - Displays the buyer associated with the subscription.
Seller - Displays the SoftwareOne legal entity that fulfilled the order and issued the invoice.
Renewal date - Displays the renewal date of your subscription.
SPx - Displays the estimated subscription sales price.
Created - Indicates the date when the subscription was created.
The details page of a subscription gives you in-depth information for a subscription. You can open the details page by clicking the subscription on the Subscriptions page.
The subscription details page displays all information for a subscription, such as name, renewal date, price, and more. The details page contains the following tabs:
Items - Displays the details of the ordered items, which include the name, quantity, and pricing.
Parameters - Displays the fulfillment parameters linked to the subscription. The parameter information varies depending on the parameters enabled by the vendor.
Entities - Displays the entities linked to the subscription and their details. Entities include licensees, buyers, and sellers.
Orders - Displays the different types of orders associated with the subscription, including purchase orders, change orders, and termination orders. For each order, you can see the order detail and status. Clicking an order opens the order details page.
Upload a new file as an attachment or remove the existing file.
You can attach a file to your request at any time, regardless of the request's status. You can also delete any files you have previously added.
Make sure that the file you want to upload is in one of these formats: .pdf, .pptx, .doc, or .xlsx.
Follow these steps to add a file to your request:
On the Requests page (Marketplace > Requests), click the required request. The request details page is displayed.
Select the Attachments tab and click Add.
In the Add attachments dialog, do the following:
In the Name field, provide a file name.
In the Description field, add a brief description of the file you are adding.
In the Upload files area, upload the file from your system or drag the file to the selection area.
Click Add. The file is added to the request and displayed on the Attachments tab.
To edit or delete an attachment, go to the same Attachment tab where you originally added the file. Click the actions icon (•••) next to the file, and then select either Edit or Delete as needed.
If you choose Edit, upload the new attachment in the Edit Attachment section, and save your changes.
If you choose Delete, a confirmation message will appear. Click Delete in this message to confirm the action.
A deleted file cannot be recovered.
Type your message and then click Add. You can format the text, and add links, and insert images by clicking . Your message will be added and displayed on the Activity tab.
The purchase wizard also lets you enter additional IDs associated with your purchase. For example, in the Details step, you can enter a purchase order number in the Agreement Additional ID field. This number will then be displayed on your invoice. Additionally, you have the option to and complete it later.
The Subscriptions page displays key subscription properties. It also contains a Buy more option, which gives you quick access to the page for ordering new subscriptions.
Split billing - Indicates if split billing is enabled for the subscription. This column is displayed only for certain products in the platform. To learn more, see .
Status - Displays the current status of the subscription. For details on the possible states, see .
(only if split billing is enabled)
Split billing - Displays the split billing information for the subscription. This tab is displayed only if split billing has been enabled for the agreement. You can view the split billing buyers and the allocation for each buyer. To update the buyer allocation details, use the Edit option. For details, see .
Details - Displays the additional IDs for the subscription, including the client and vendor IDs, and the timestamps of all changes made to the subscription. You can update the client ID using Edit. For instructions, see .
Audit trail - Displays all events that have taken place within the subscription. For each record, you can view the audit log details and summary. To learn more, see .


Draft
The vendor has created the subscription, but the order has not been completed yet.
Active
The subscription is active and in use.
Updating
A business transaction is in progress for the subscription.
This status applies to change orders submitted for the subscription.
Terminating
A termination order has been created for the subscription through the Client Portal.
Terminated
The vendor has completed the termination order and the
subscription is now terminated.
Deleted
The draft subscription has been deleted by the vendor.

Subscriptions can be terminated if you no longer need them or you don't want to renew it.
As subscriptions are linked to agreements, the process for canceling your subscription varies depending on the number of active subscriptions in the agreement.
If your agreement contains several active subscriptions and you wish to cancel some, but not all, subscriptions in that agreement, you must place a termination order for the required subscription. The Terminate subscription section describes the steps.
If your agreement contains several subscriptions and you want to cancel all subscriptions, you must terminate the agreement altogether. You can do this by placing a termination order for the agreement. For instructions, see Terminate Agreement.
Before terminating subscriptions, note the following points:
You can only terminate subscriptions in the Active state. Subscriptions in any other state cannot be terminated.
Creating a termination order through the platform doesn't guarantee the cancellation of your subscription. All termination orders are sent to the vendors for approval. Subscriptions are terminated only after they are approved by the vendor.
Follow these steps to terminate an active subscription:
On the Subscriptions page (Marketplace > Subscriptions), click the subscription to terminate. The details page of your selected subscription opens.
Click the down arrow in the upper right and select Terminate. The Terminate Subscription wizard opens.
In the Terminate Subscription wizard, do the following:
In the Items step, review the item quantities and click Next. The license quantity will be displayed as zero.
In the Order details step, enter the reference details and your order notes, and click Next to continue.
In the Review order step, click Place order. The subscription termination order is placed and the agreement status changes from Active to Updating.
Click View order to go to the order details page. Otherwise, click Close to close the page.