Loading...
Loading...
Loading...
Loading...
Loading...
Loading...
Loading...
Loading...
Loading...
Loading...
Loading...
Loading...
Loading...
Loading...
Loading...
Loading...
Loading...
Loading...
The Marketplace Platform gives you the flexibility to add or remove licenses at any time.
If you need more licenses, you can alter the subscription to add additional licenses. You can also lower the number of licenses if you no longer require all of your ordered licenses.
When reducing the number of licenses, the following rules apply:
If your subscription contains only one item, you can't lower the quantity of this item to zero. In this case, you must terminate the subscription.
If your subscription contains multiple items, at least one item must have a quantity greater than zero. You can't change the quantity of all items to zero.
Follow these steps to add or remove licenses from a subscription:
On the Subscriptions page (Marketplace > Subscriptions), select the required subscription.
On the subscription details page, click Edit in the upper right.
In the Edit subscription wizard, set the quantity in the New qty field. The sales price of the subscription changes as you adjust the quantity. Click Next.
Update the reference ID and add your comments in the Notes field. Click Next.
Preview the changes and click Place Order to finalize the quantity adjustment.
A change order is created in the system and sent to the vendor for processing. The order is also displayed on the Orders page.
When the change order is being processed, the status of the subscription and the agreement changes to Updating. This indicates that the agreement is temporarily locked, and no further orders can be placed under this agreement until the change order is completed.
The Marketplace Platform is a SaaS application with three user interfaces, each catering to specific user types. These interfaces ensure that all actors can interact with the platform according to their specific requirements.
The platform provides three distinct user interfaces namely, the Client Portal, Vendor Portal, and Operations Portal.
Client Portal - Accessed by our clients and partners for software procurement.
Vendor Portal - Used by vendors for setting up and configuring products.
Operations Portal - Used by internal SoftwareOne associates for administration-related activities.
You can access the platform from an up-to-date desktop or mobile browser. For a list of supported browsers, see Which browsers do you support?.
Follow these steps to access the Marketplace Platform user interface (UI):
Navigate to the sign-in page: https://portal.platform.softwareone.com/.
Enter the email address associated with your account and click Continue.
Enter your password and click Continue. If the sign-in is successful, the Home page is displayed.
If you provide inaccurate credentials, an error message is displayed.
If you can’t remember your password, select the Forgot password? link on the Sign-in page and then follow the instructions. For more information, see Update password.
The platform provides a seamless and intuitive interface, allowing access to the different modules and features within those modules. This section describes how to navigate the platform.
The Search bar lets you search for various objects in the platform, such as your orders, agreements, subscriptions, and more. You can also search for specific products and items in our catalog.
When performing a search, start by choosing the category you want to search across and then enter the search term. Our platform supports free text, which means you can enter all or part of the object's ID or name. For example, when searching for an order using its ID, select the Orders category and then enter the full order ID (such as ‘ORD-8981-7039-6781’) or part of it (such as 6781). The platform will then display results matching your specified search term.
You can also use search to find user documentation. For example, you can search for "manage subscriptions" to read documentation about how to manage your subscriptions.
You can switch accounts and manage your profile through the profile menu in the upper right. You can also sign out of your account using the Sign out option in the menu.
The Home menu in the top left is where you can access the modules enabled for your account. Click the menu to view the modules and get started with the platform.
The Help icon contains links to various content resources, such as the SoftwareOne blog, product documentation, news and updates, and our legal pages. You can also Contact Marketplace Platform Support by selecting Support.
The Notifications iconopens up the Notifications page where you can view your read and unread notifications, and update your notification preferences.
The Marketplace Platform allows an individual to be linked to several accounts and switch between those accounts, without signing out of the platform. Switching can be done through your profile menu.
The option to switch accounts is only available for members of multiple accounts.
Follow these steps to switch between your accounts:
Sign in to your account and click your profile menu in the upper right. All accounts that you belong to are displayed under Switch account.
Select the account you want to switch to. If you belong to several accounts, use the Search field to find the required account easily. You can search by the account name or its identifier.
Your account will be switched and you'll be able to access the platform modules and settings linked to your profile.
The Marketplace Platform uses data grids to display data.
A data grid is a table with rows and columns and it contains several operations that allow you to customize the display of information.
You can sort and filter data, show or hide columns, adjust the column width, change the default rows per page, and more. This topic describes each of these tasks.
Sorting enables you to reorganize your data in ascending or descending order so you can understand and visualize it better. There are two ways to use the sort function in the grid.
Sort a single column
You can sort the data for a column by clicking the column header. When you click the header, the preconfigured sort options are displayed. You can choose any option from the list.
Sort multiple columns
In the Sort box, click Add another sort.
Choose the required property and select the display order (Ascending or Descending). To add another sorting rule, click Add another sort. You can add multiple rules.
Click Close. All columns that have sort conditions applied will be highlighted in the grid.
Filters help you to narrow down data based on specific attributes. Depending on the type of data you are searching for, you can use a single filter or create multiple filters using different conditions and AND/OR operators.
For instance, when ordering new items, you could create a filter to show only the items with a specific name. Similarly, if you have multiple subscriptions, you could use the AND/OR operators to view subscriptions that are active AND have auto-renewal enabled.
Follow these steps to create filters:
In the Filters box, click Add another condition and then define the conditions:
Choose the required property.
Select the condition, such as, equal, contains, starts with, and so on.
Choose a value from the list of preconfigured values or type the keyword.
If needed, click Add another condition to add another condition and combine those conditions using the AND or OR operators.
AND - If you select this operator, the results are displayed only if both conditions are met.
OR - If you select this operator, only one of the conditions needs to be met for the results to be displayed.
As you define filters, the data in the grid refreshes automatically. If the platform doesn't find any data matching the filters, it displays a message.
Show or hide columns
You can use the checkbox next to each column name to hide or display a column. If you've hidden a column, you can make it visible again by selecting the same checkbox. Note that some columns are shown by default and you cannot hide them.
Adjust column widths
The Columns selector also contains options to adjust the column width. These options include:
Default size - This option resets each column in the table to its default size. You can use this option if you've made adjustments and want to return all columns to their original state.
Fit to content - This option resizes each column in the table to fit its specific content. It means that the width is adjusted to the content within the column.
Fit to screen - This option resizes each column to make the entire table fit your screen.
By default, the Marketplace Platform displays 10 rows of data on a page.
You can change the default value by selecting another value from the Rows per page option in the lower-right side of the grid. You can choose to show 5, 10, 25, 50, or 100 rows per page.
If the grid contains several rows, the rows are split into pages, and page numbers are displayed on the lower-left side of the table.
You can view the page number you are currently on and navigate between pages using the Next and Previous options. You can also go to a page directly by entering the number in the Page field and pressing Enter.
Information cards are small, interactive cards that display the key properties of an object within the platform.
These cards appear when you hover over an object's name. For instance, if you hover over an agreement, you'll notice that an information card appears and it shows you more information about that agreement.
Information cards make it easy to access information quickly. They display all the key attributes in one place, allowing you to learn more about the object without navigating to its details page.
The information displayed within a card might vary depending on the object, but each card contains general details, such as the object's name and ID, as well as the created and updated dates.
Information cards also contain quick links to the related objects. Clicking these links redirects you to the details page of the related object. For instance, if you click the licensee name, the details page of the licensee opens.
You can close a card by clicking Close in the upper right or by clicking anywhere outside the card. Alternatively, pressing the Esc key also closes the card.
Your profile page contains basic information about your account, including your account name, first and last name, profile photo, and email address. It also shows your language and date preferences.
You can access your profile and make changes as necessary through the My profile option. To access the option click your profile menu in the upper right and select My profile. This will open your profile overview page.
Your profile settings are organized by tabs:
General - Displays your general details, such as name and phone number, and account preferences.
Accounts - Displays the accounts and groups you belong to. Your account type is also displayed.
Details - Displays all events that have taken place within your account.
You can use the Edit option on your profile page to update your account settings and preferences, including:
Your profile picture.
Your first name and last name.
Your phone number.
The language of your account.
The date format.
Click to see the supported languages.
Follow these steps to update your profile:
On your profile overview page, click Edit in the upper right. The Edit user page opens.
Change the General settings as necessary:
Profile picture - Add or update your profile picture. You can add a photo of yourself, a logo, or anything that represents you and helps others identify you easily on the platform. Your image must be in PNG or JPG format. The maximum file size is 5 MB.
First name - Update your first name.
Last name - Update your last name.
Country code - Select the country code for your phone number.
Phone number - Enter your phone number.
Update your Preferences as necessary:
Language - Choose your language preference.
Regional settings - Select the date format you want to use.
Click Save. A message is displayed stating your profile has been updated successfully.
If you want to apply multiple sorts, clickSort in the grid and then follow these steps:
Click the Filter option in the grid.
The Columns selector in the data grid lets you show or hide a column. Using this option, you can view only the information you need and hide other columns from the page.
If the data in the grid has changed, you can refresh the data to make sure you are working with the latest data at all times. Use the Refresh option to fetch the latest data from the system.
Audit trail - Displays a detailed record of each event in your account. To learn more, see .


The Marketplace Platform is a centralized hub designed to streamline the discovery and ordering of subscription-based software products.
The platform simplifies the complex process of software licensing and procurement, making it easier for you to find and compare products from multiple software vendors in one place. Each product on our marketplace undergoes a process, where vendors define the product including its terms of use, and submit it to SoftwareOne. Products become available for ordering only after they have been accepted by SoftwareOne.
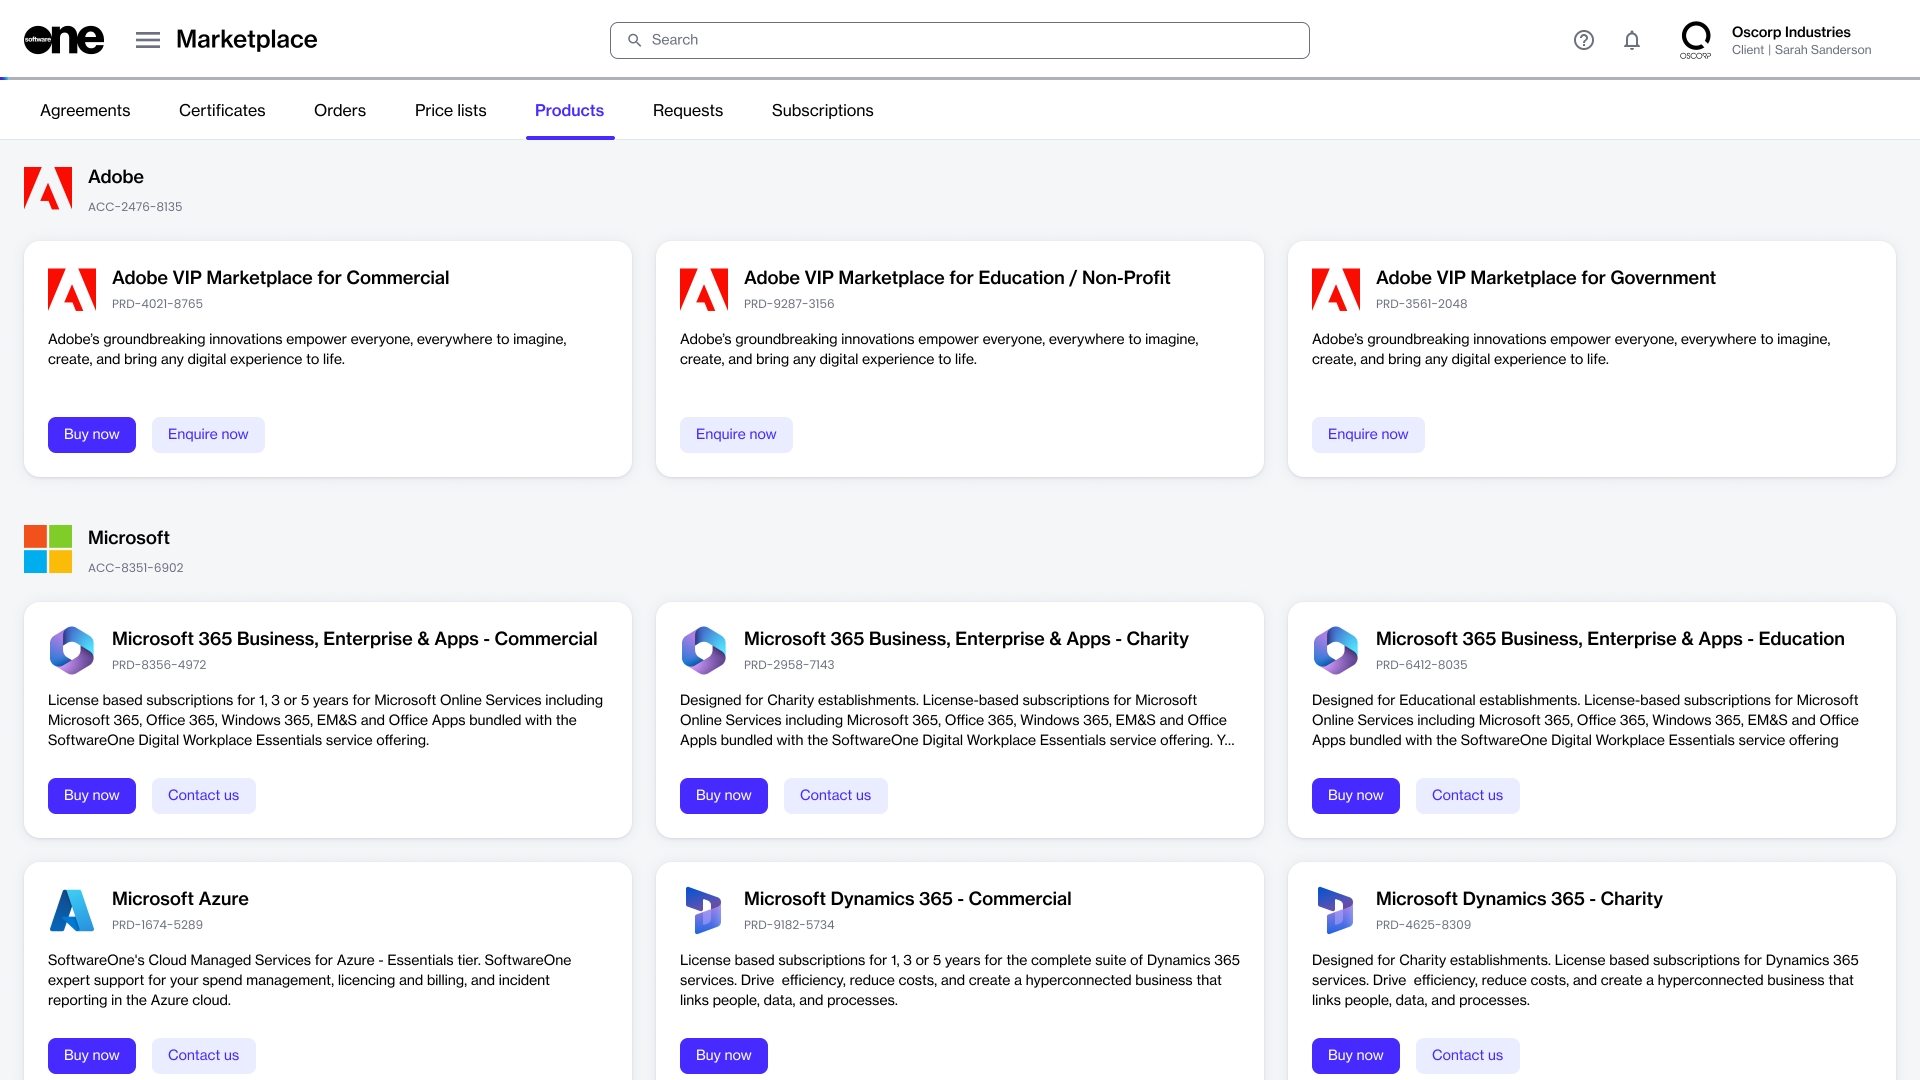
You can access the SoftwareOne Marketplace by signing in to your account and selecting Marketplace > Products from the main menu.
The Products page shows different products that are available for you to order. The products are categorized by the vendor name and displayed in the form of cards.
You can view detailed information about a product by clicking the product name. To learn more, see Products.
When you are ready to start the ordering process, click Buy now in the upper right on the details page.
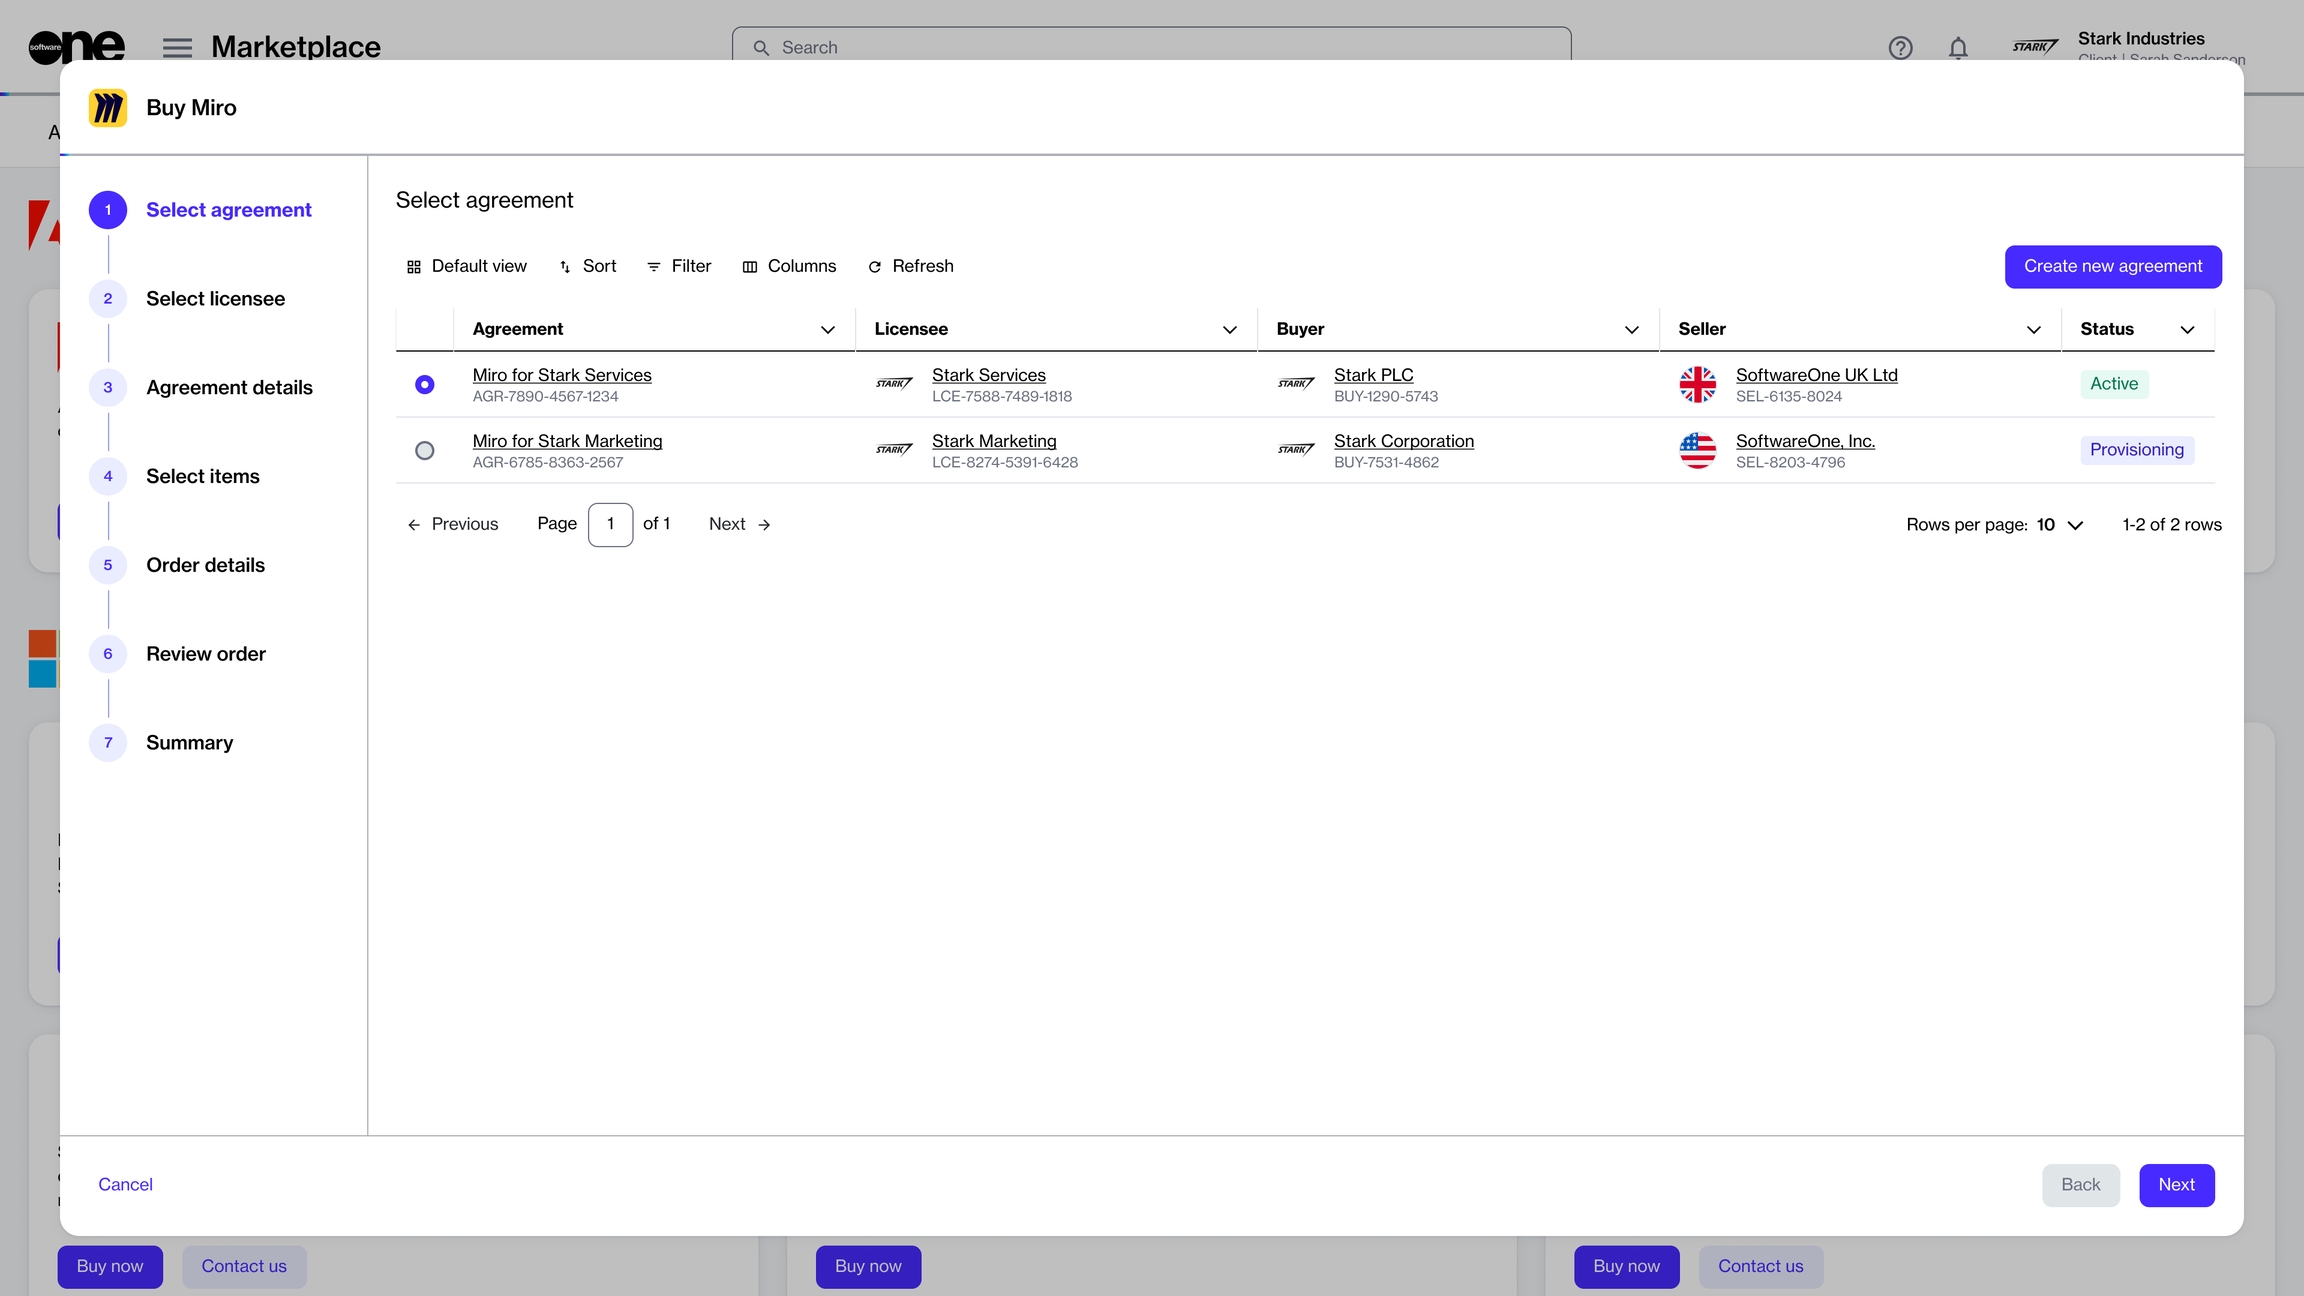
When you click the Buy now button, the Purchase Wizard starts. The wizard is designed to guide you through all the necessary steps in placing your order.
The steps within the wizard will vary depending on the product and the vendor. At a high level, you'll need to complete the following steps:
Select an agreement - You have the option to use an existing agreement or create a new one. The option you select in this step determines the next step in the wizard. For instance, if you create a new agreement, the Select licensee step is displayed. If you use an existing agreement, the Select items step is displayed.
Select a licensee - Choose a licensee from the list of your licensees or create a new one.
Provide agreement details - Fill out the contact form.
Select items - Choose the items you want to order and the quantity of those items.
Additional information - Add the additional IDs for the order and agreement.
Review order - Preview the order details and place your order.
Review summary - See your order summary and the latest status message.
For products, like Adobe and Microsoft, you'll need to complete additional steps when placing the order. For step-by-step guidance on these products, see Adobe Tutorials and Microsoft Tutorials.
If you use certain pages very often, you can mark those pages as your favorites. This way, you can find your most-used pages easily. Once added, favorites appear in the Favorites section of the main menu.
To add a page to your favorites:
Click the main menu and navigate to the required page.
Hover over the page and select the star icon. The star icon changes from empty to filled, and the page is displayed under Favorites.
You can remove a page from your favorites by clicking the star that you used to mark the favorite.
When the star icon changes from filled to empty, it implies that the page has been removed from your favorites.
Once you've placed an order through the Marketplace Platform, it's displayed on the Orders page. You can access the Orders page from the main menu by selecting Marketplace > Orders.
The platform supports various types of orders including change orders, purchase orders, and terminate orders, all of which are visible on the Orders page.
If you need to find a specific order, you can use the filter option to search for an order and view the order information. We provide several filter options you can use to narrow down your list of orders.
You can use a single filter or create a combination of filters by selecting different fields, operators, and values. The following steps describe how to find an order using its status.
On the Orders page, click the Filter option.
When the filter box displays, click Add another condition to open a menu of conditions.
Define the conditions:
In the first field, choose the property. For example, to filter your orders by their status, select Status.
In the second field, choose the search operator. Different operators are displayed depending on the condition you selected in the first field. For this example, leave the value set to Equal.
In the third field, type or select a value from the list of preconfigured values. The values displayed in this field are determined by your selection in the first field. To see your draft orders, select Draft.
If needed, click Add another condition to specify additional conditions as needed.
Your list of orders will be refreshed based on the filters. To reset the filters and revert to the default view, select Reset filters in the filter box.
To view all details of an order, click the order ID in the Order column.
The order details page will open, allowing you to view the basic order information, and associated items, subscriptions, ordering and fulfilment parameters, and entities.
From the order details page, you can also complete the following tasks:
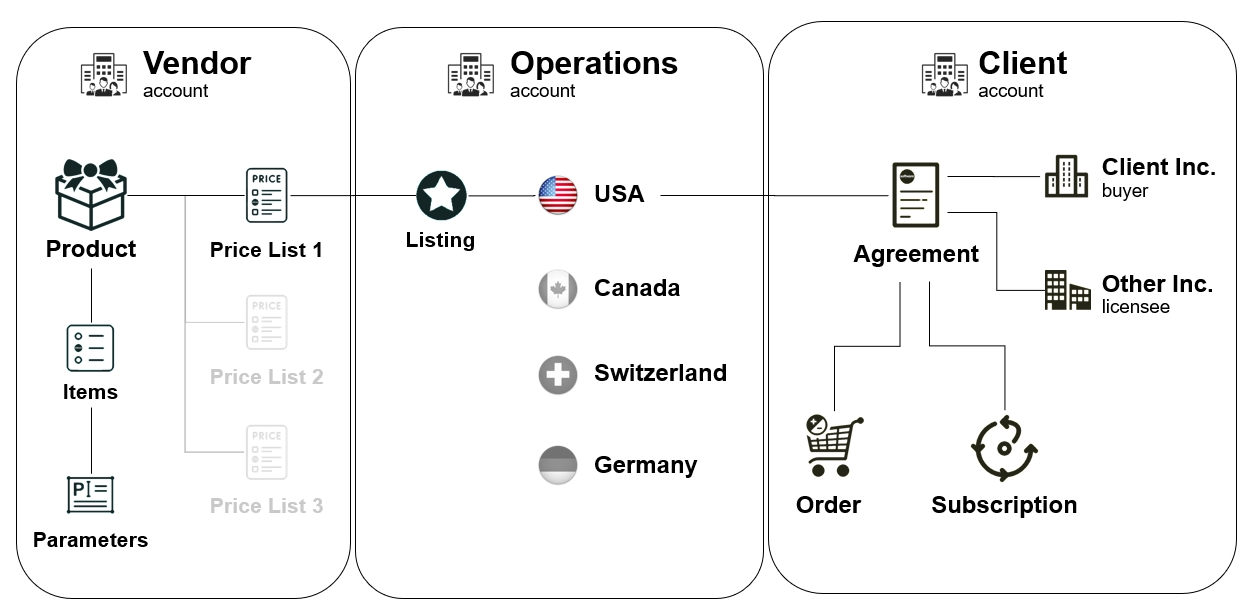
Certain concepts and terms are central to the functionality and design of the Marketplace Platform. We recommend that you understand the terminology because it's often referred to in our platform and documentation. Understanding the terminology will make it easier for you to interact with the platform and maximize its use.
You can watch our Getting Started Guide video on YouTube to understand the concepts listed on this page. The video also describes what makes our platform unique for your enterprise software procurement.
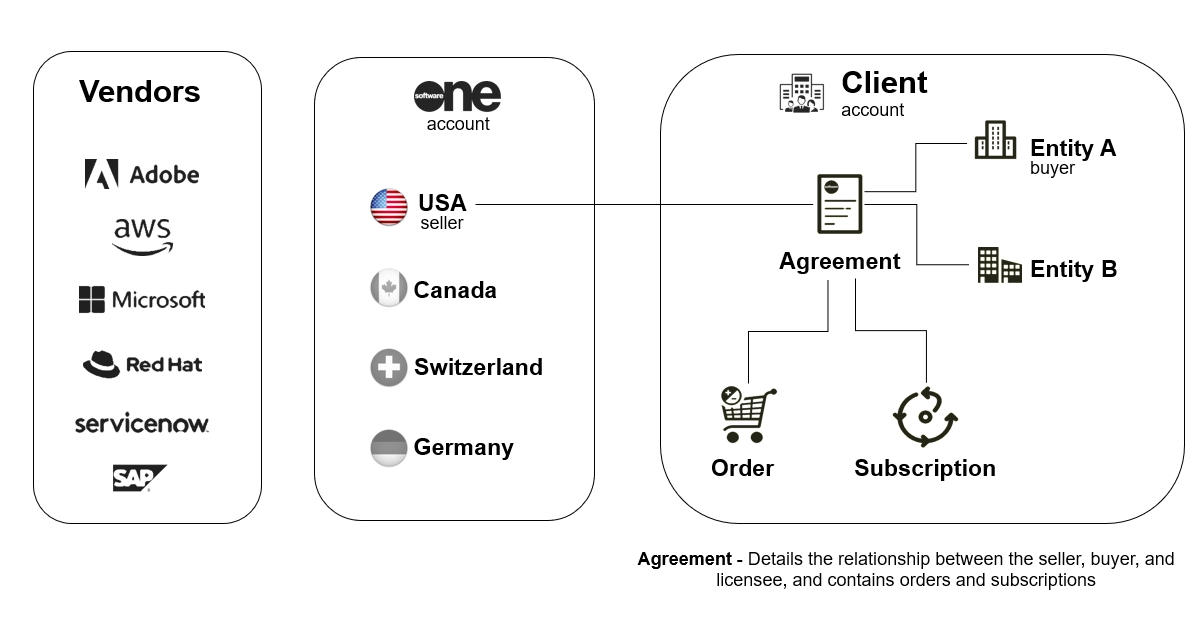
The Marketplace Platform seamlessly brings together various actors to facilitate the buying, selling, provisioning, and billing of software products.
Actors represent different entities that interact with the platform for procurement and fulfillment-related activities as well as other operations specific to the platform.
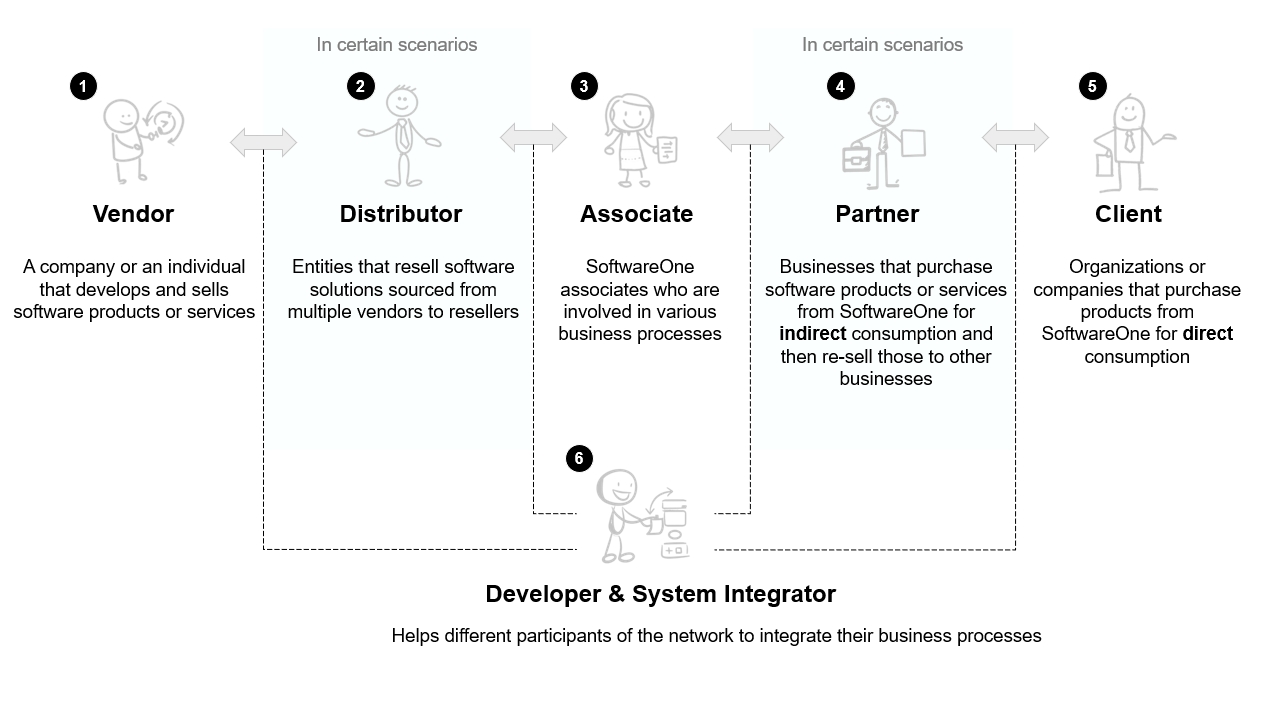
The following are the key actors in our platform:
Vendors - A vendor is a company or a person from whom SoftwareOne buys software solutions. Vendors develop and sell their products and services. Examples include Microsoft, Dropbox, and more.
Distributors - A distributor is an entity that resells software solutions sourced from multiple vendors to resellers. Distributors facilitate software procurement in cases where direct relationships with vendors are not feasible.
Associates - Associates are the internal SoftwareOne associates who administer the business network. Our associates are involved in various processes throughout your journey with both SoftwareOne and the Marketplace Platform.
Partners - Partners represent entities or businesses that buy products or services from SoftwareOne for resale to other businesses. Partners assist us in serving specific clients better.
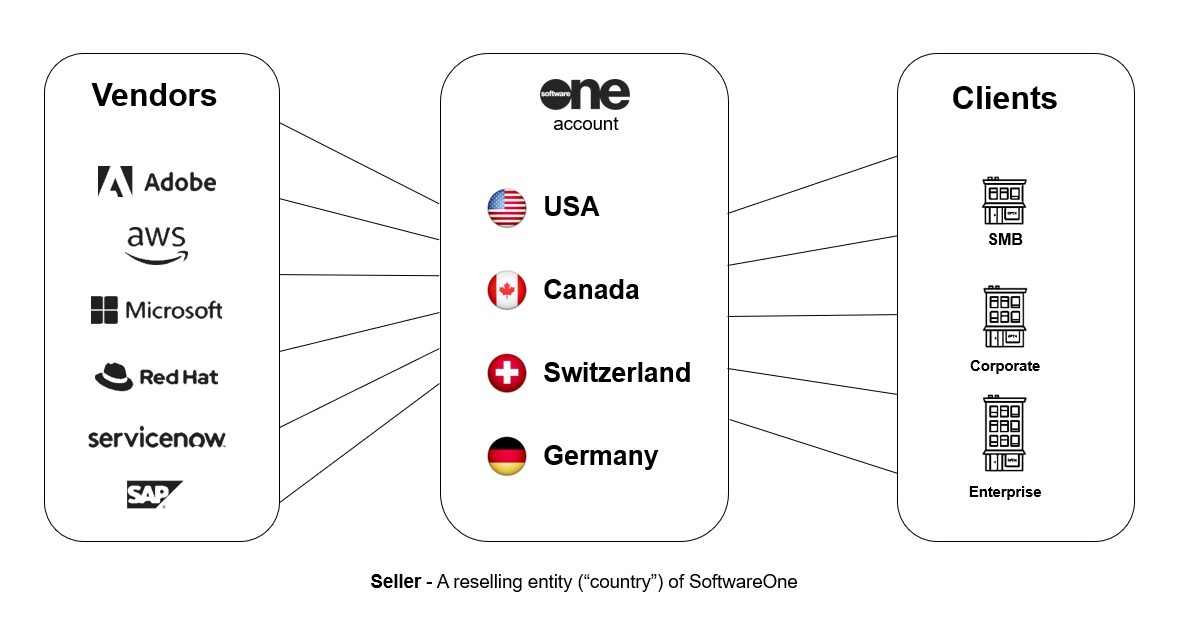
Clients - A client is a company or organization that utilizes our platform to buy software products for their own use or direct consumption.
Developers and System Integrators - Developers and system integrators represent entities involved in building integrations within the business network.
Users - Users represent individuals or persons who can sign in to the platform using their credentials and perform all operations associated with their permissions. To learn more, see Users.
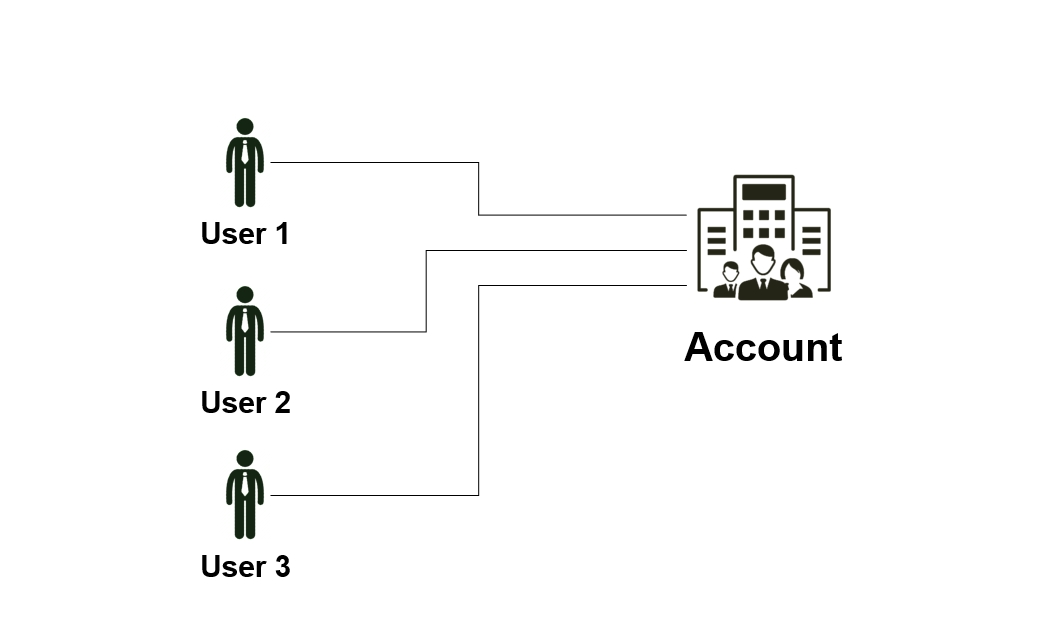
Account - An account is an object that represents a company or an organization utilizing the Marketplace Platform. Three types of accounts exist in the platform: Client account, Vendor account, and Operations account.
Client account - A client account is used by our clients and partners to establish agreements and procure software solutions for their enterprises.
Vendor account - A vendor account is used by vendors to define the product structure and make those products available for ordering through the marketplace.
Operations account - An operations account is used by SoftwareOne associates.
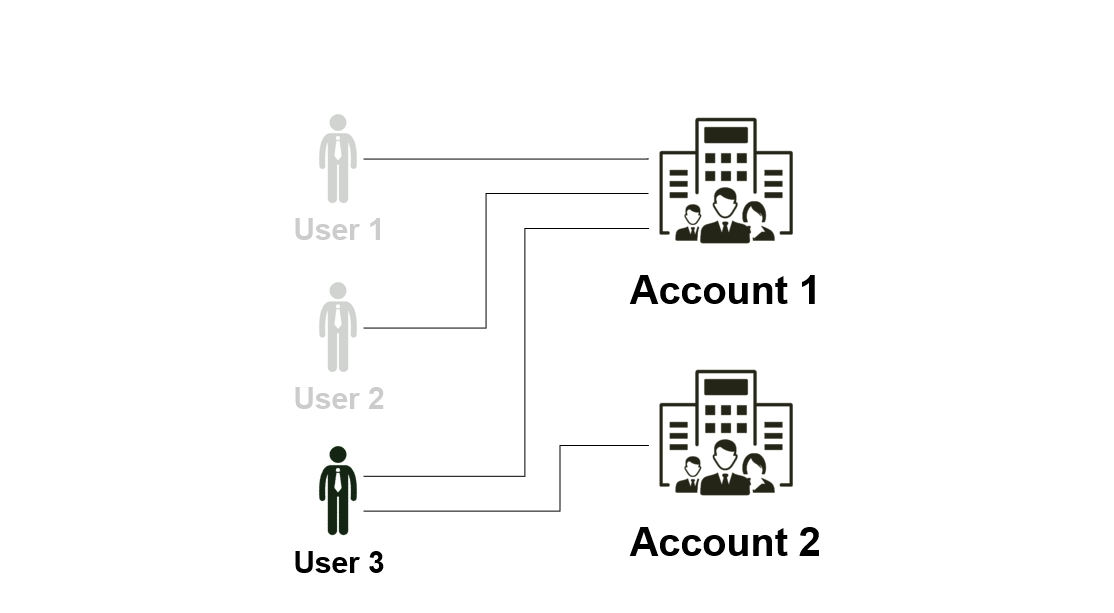
In the Marketplace Platform, an account can contain one or multiple users:
Additionally, users are not restricted to a single account. They can belong to multiple accounts and switch between those accounts through the interface, without signing out of the platform.
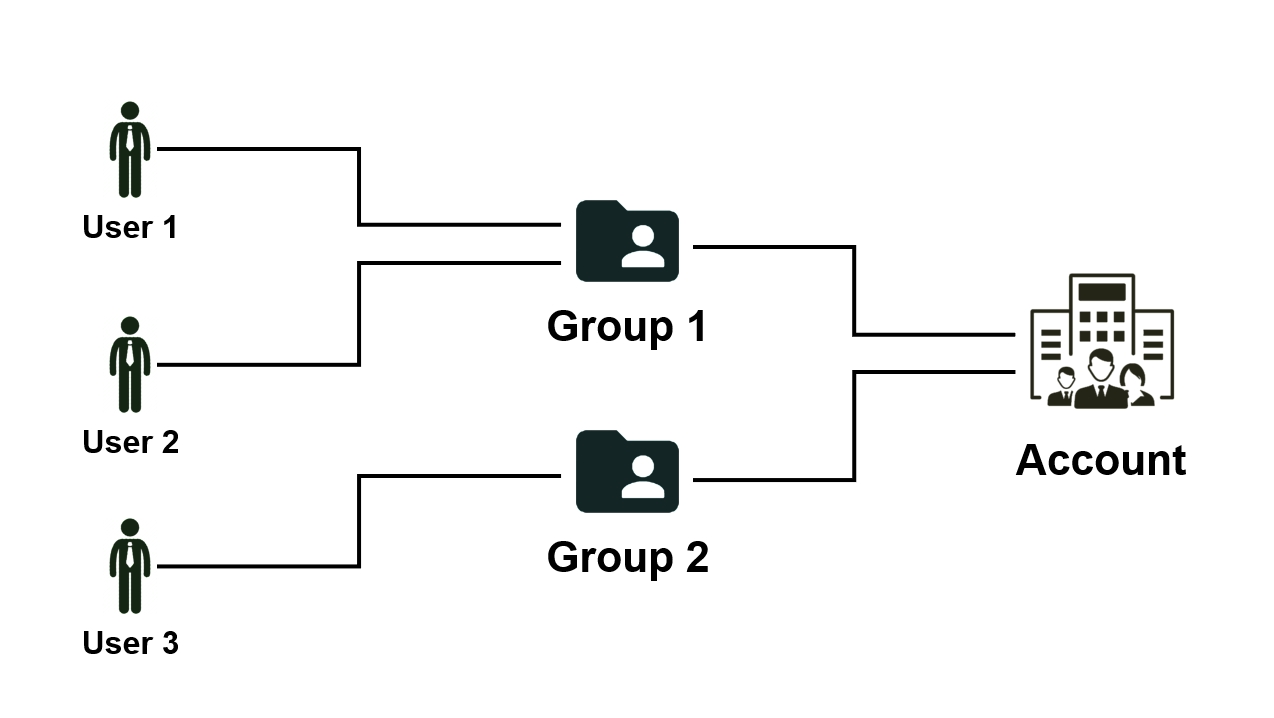
Group - A group is an object facilitating permissions in the scope of an account. Groups contain users and all users in the group have the same permissions. Note that in our platform, permissions are assigned at the group level, rather than the individual user level.
Additionally, users can be a part of multiple groups, much like users can belong to multiple accounts.
To learn about creating and managing groups, see Groups.
Seller - A seller is a SoftwareOne entity (for example, SoftwareOne Canada) that buys software solutions from vendors (like Microsoft) and sells those solutions to clients.
In the Marketplace Platform, sellers are responsible for generating and issuing invoices to the buyer entities of clients, acting as the intermediary in the transaction process.
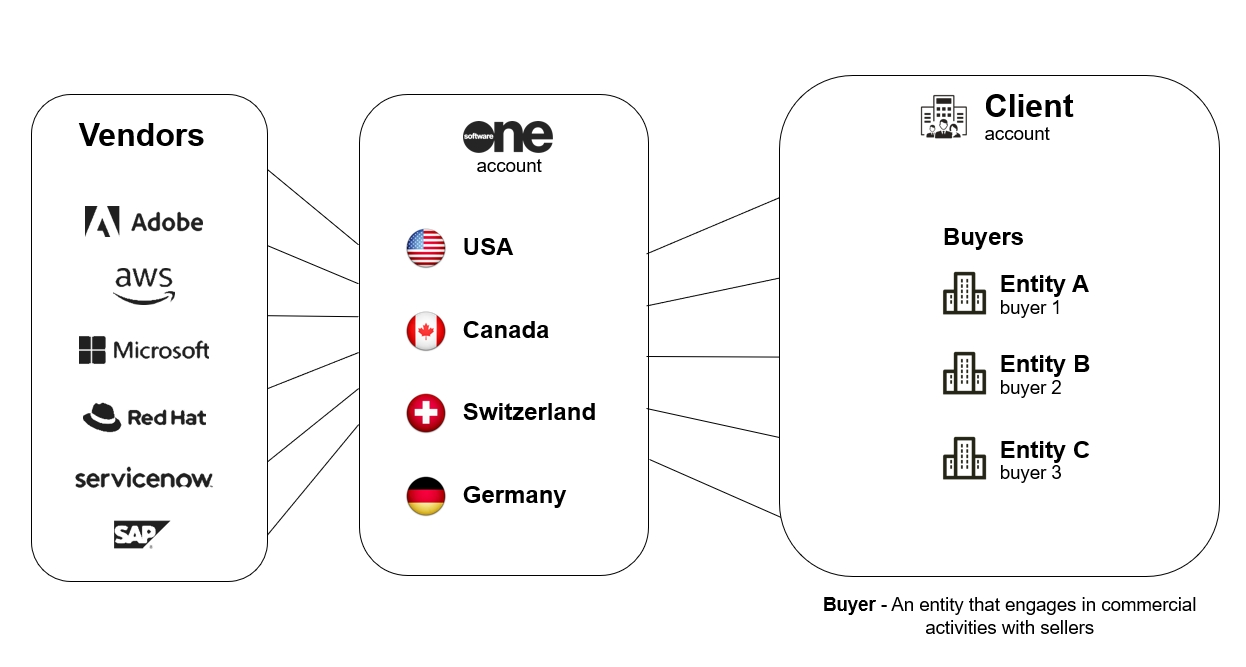
Buyers - Buyers represent an entity that engages in commercial activities with the SoftwareOne reselling entity (known as Sellers).
Buyers are the recipients of invoices issued by SoftwareOne, and they are central to the creation and context of orders, agreements, and subscriptions in the platform. To learn more, see Buyers.
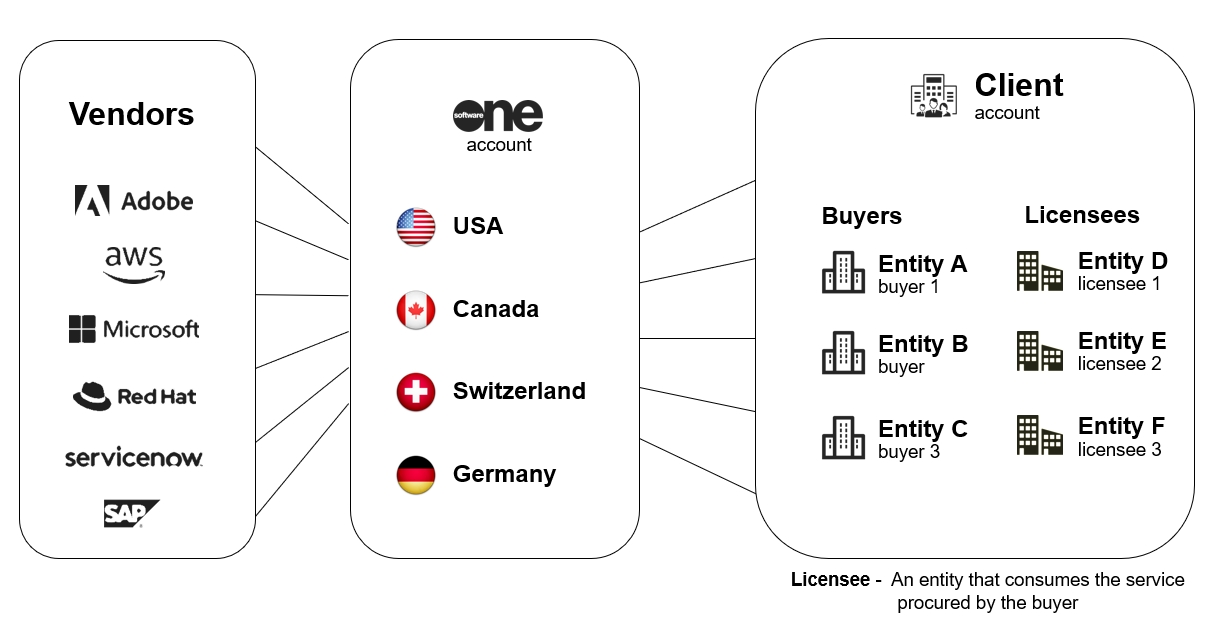
Licensees - Licensees are the entities that consume the software products or services procured by the buyer. In our platform, licensees are critical in establishing agreements alongside buyers and sellers.
As a client, you can view licensees and manage them directly through the platform. To learn more, see Licensees.
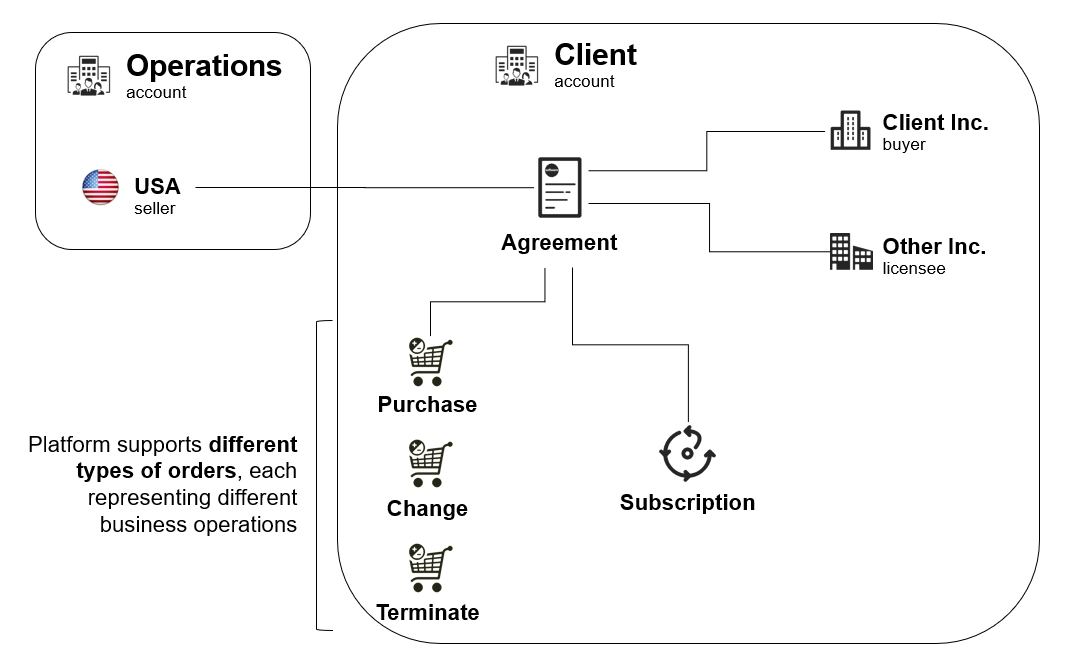
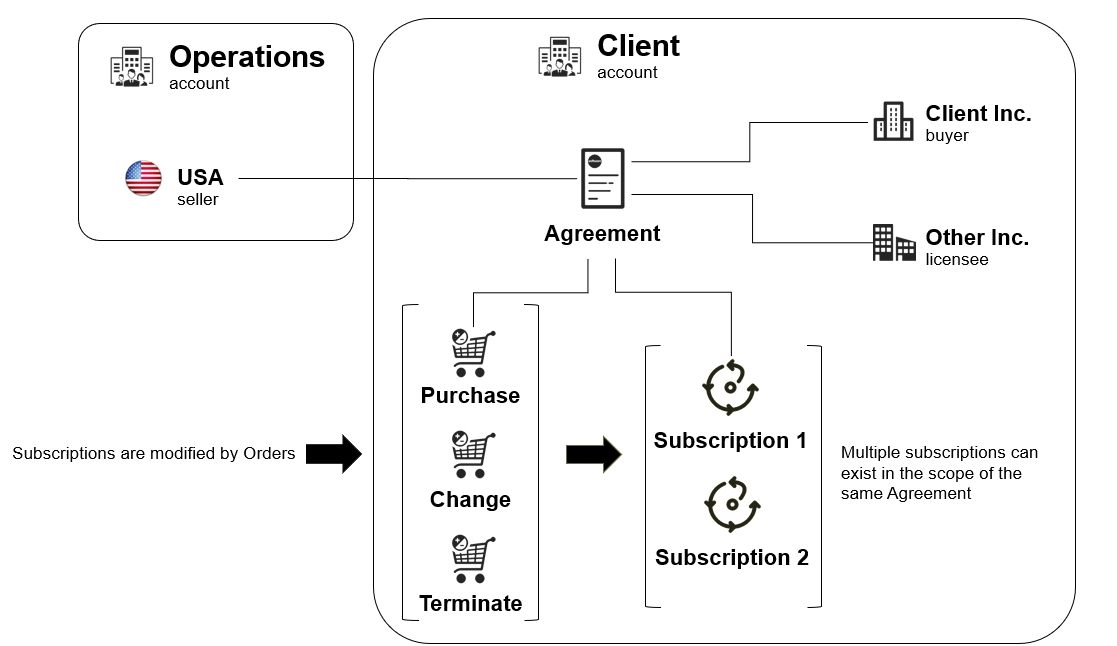
An agreement is an object outlining the relationship between the seller, buyer, and licensee.
Agreements establish the terms and conditions under which transactions occur. They are also the foundation for placing orders and creating subscriptions on the platform.
Without an agreement, orders cannot be placed through the marketplace. To learn more about agreements and how to manage them, see Agreements.
Orders - An order is an object that signifies a business transaction under the framework of an established agreement.
The Marketplace Platform accommodates a variety of order types, distinguishing between new purchases, change orders, and termination orders to support different operations and client needs. The following types of orders exist on our platform:
Purchase order - Purchase orders are created when you buy a new product or service by creating a new agreement.
Change order - Change orders are created when you modify your agreement or change the subscription quantity, such as downsizing the license quantity or buying additional resources.
Terminate order - Terminate orders are created when you terminate your agreement or subscription with SoftwareOne.
For information on how to manage your orders, see Orders.
Subscriptions - Subscriptions are linked to an agreement and represent service provision over a set period. One agreement can contain one or more subscriptions.
If you need to change subscriptions, you can only do so through orders. For example, to terminate a subscription, you must place a termination order. Similarly, to add more licenses, a change order must be placed. It’s not possible to modify a subscription directly without placing an order.
For information on subscription management, see Subscriptions.
Products - Products are the solutions or services offered by vendors through the marketplace. They contain various items and parameters, which are also defined by vendors.
Items - Represent the individual stock-keeping units (SKUs). In our platform, a product can contain one or more items, each with its specific name and price.
Parameters - Parameters represent structured data used by vendors to collect information from clients during the ordering process. Examples of this information might include contact details, address information, domain name, and more. Parameters can also be used by vendors to pass information to clients during provisioning.
A Price List is an object that holds key pricing details of each item within the product.
Our platform allows vendors to define price lists for different regions. These price lists are linked to specific sellers and are organized through an object called Listing.
The Listing object is established by SoftwareOne associates after reviewing products. It links the product price list with the seller, ultimately making the product available for our clients in the SoftwareOne Marketplace.
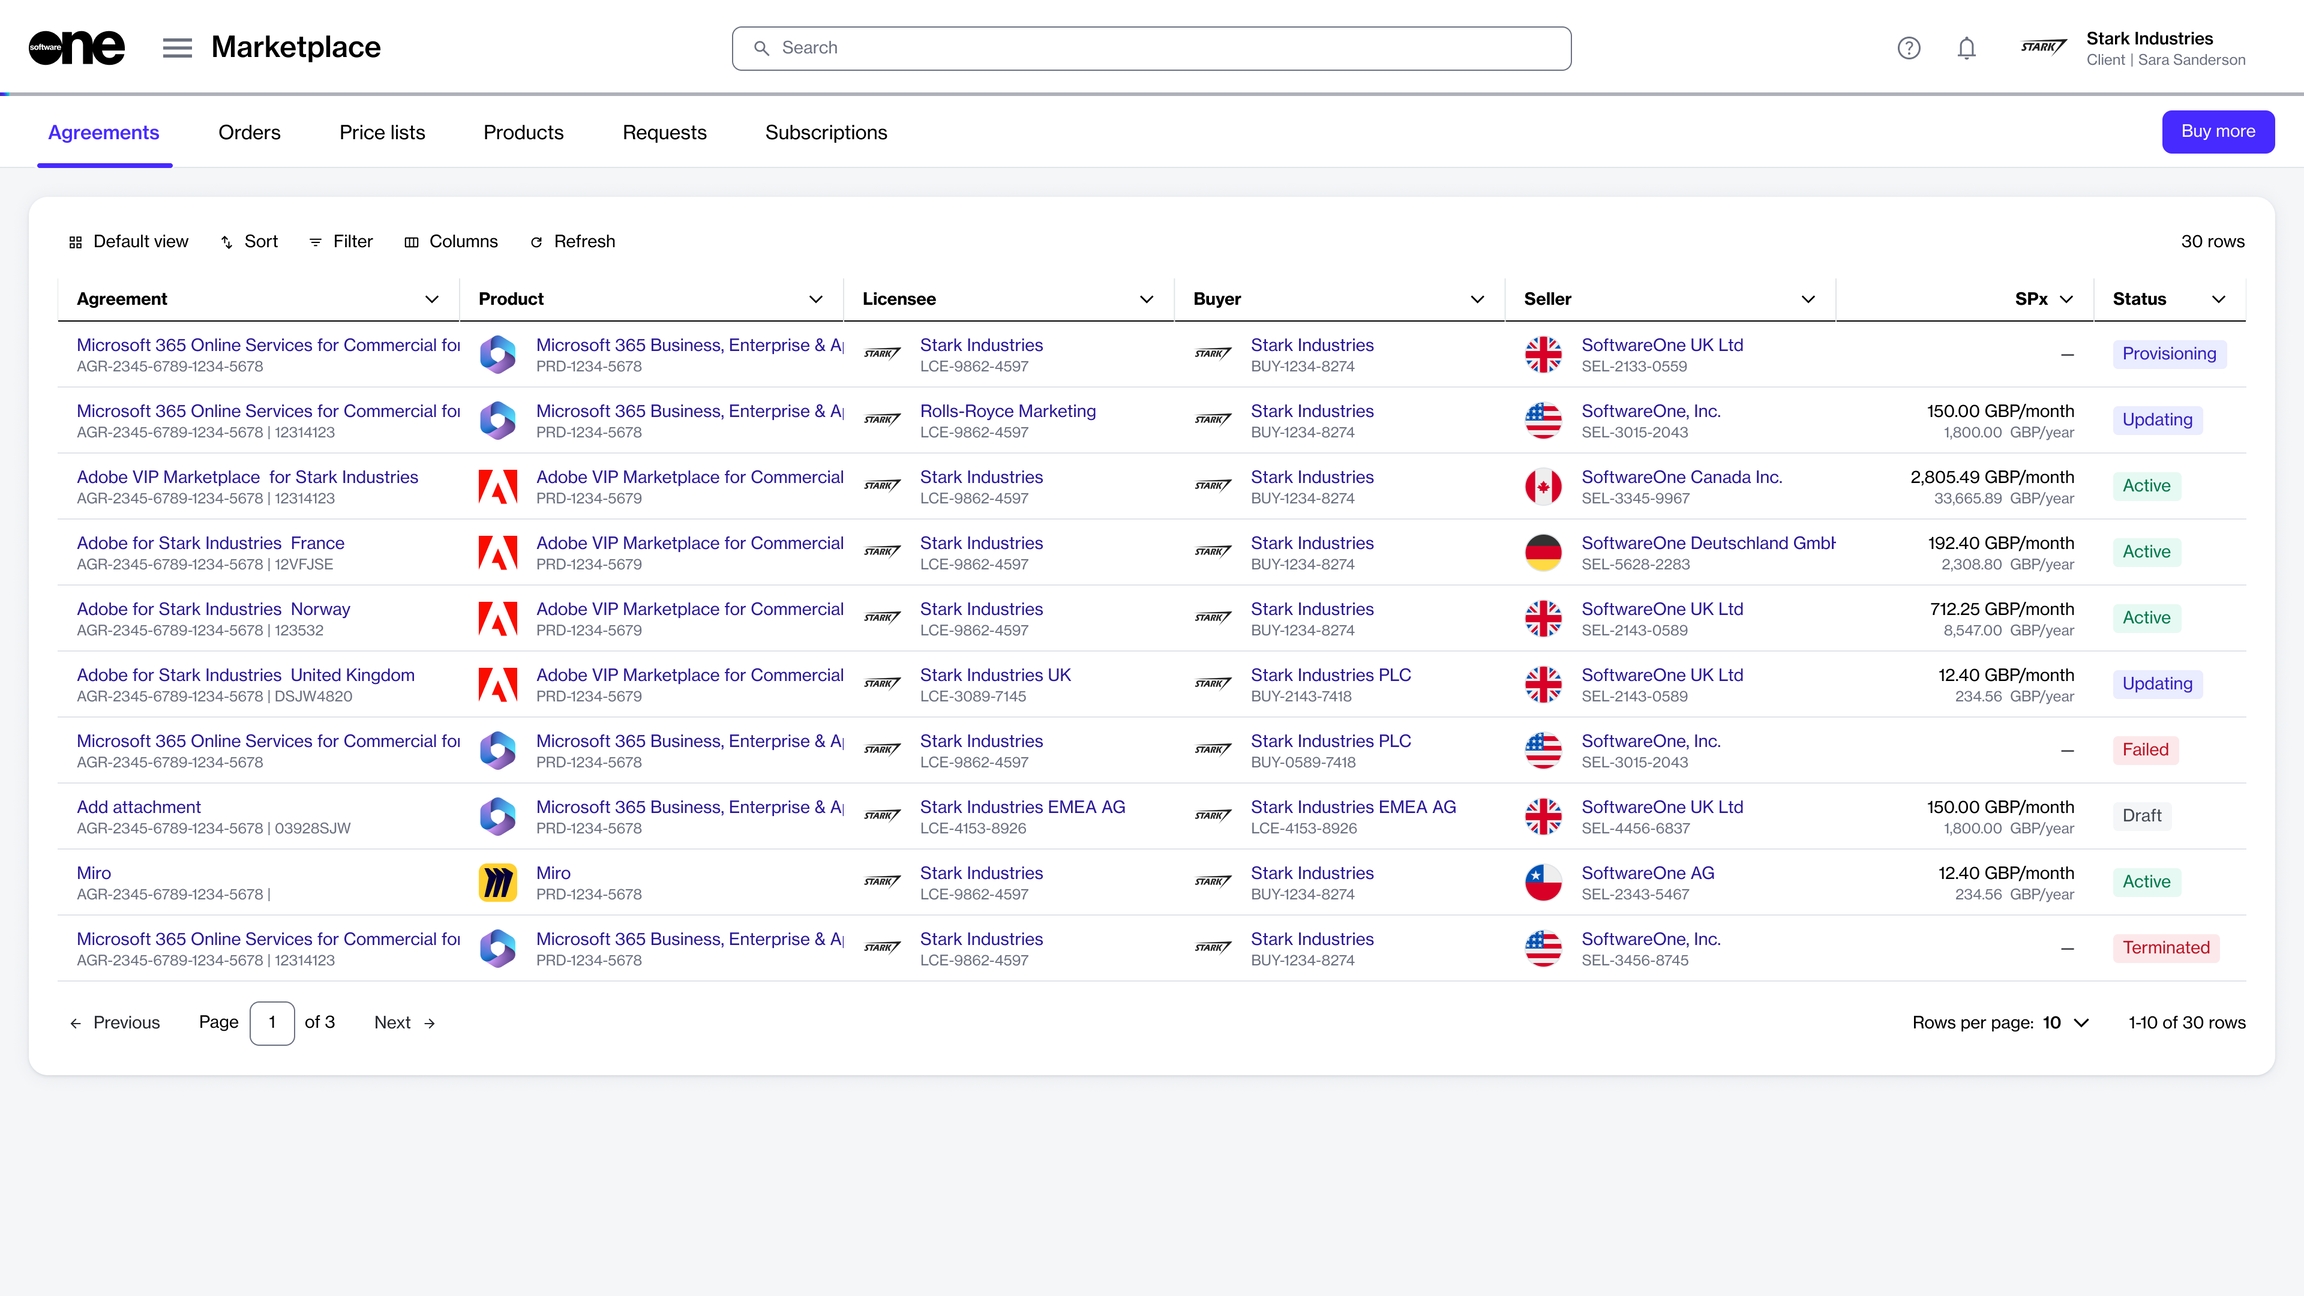
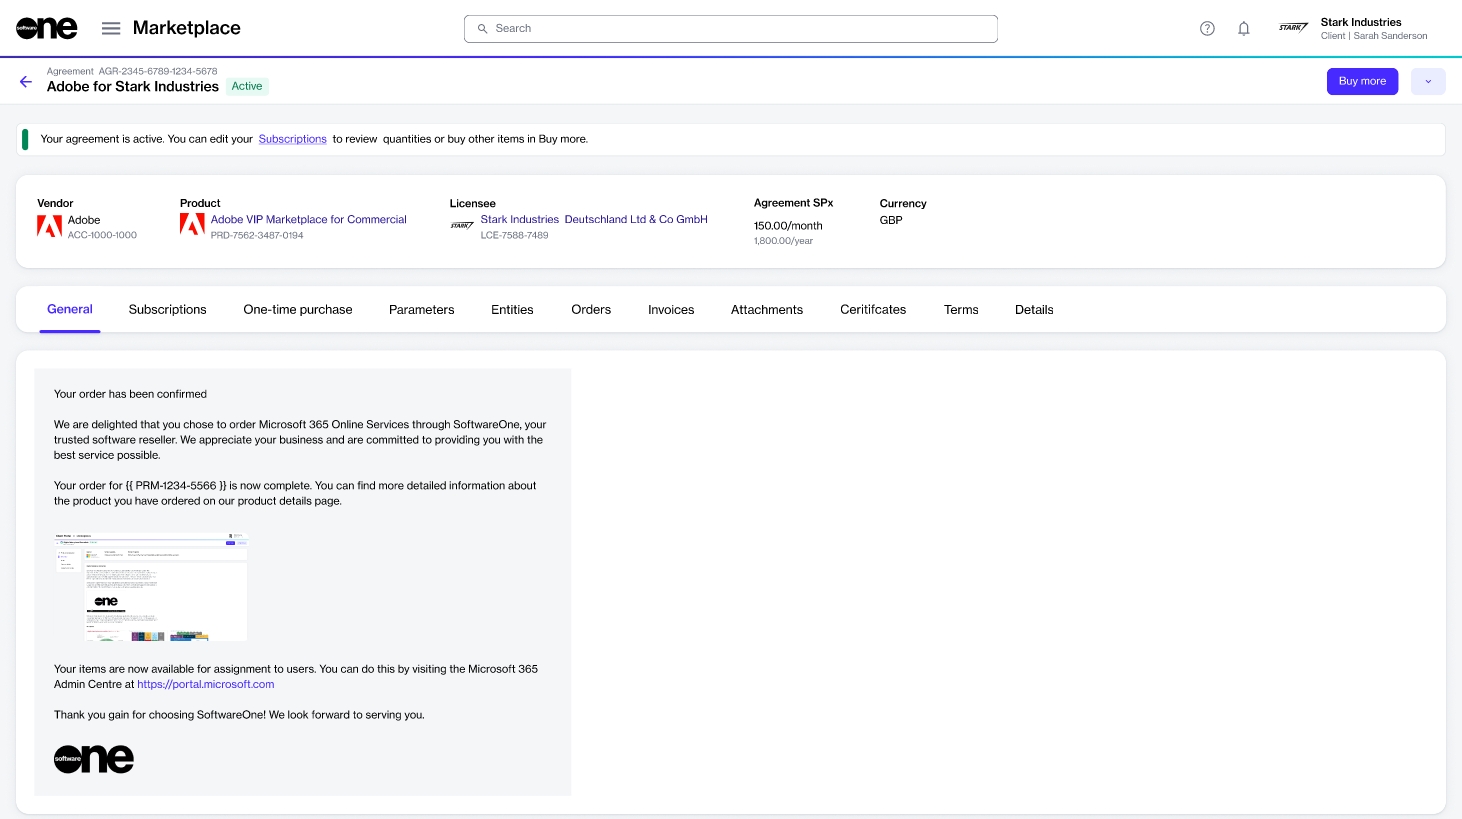
The Agreements page is where you can access all your agreements in one place.
As agreements contain subscriptions, having access to your agreements in one place makes it easier to manage and keep track of subscriptions. Agreements also store important documents that are relevant to the agreement, such as PDF files, terms and conditions, and more.
To view a list of your agreements, select the main menu of the Client Portal and then choose Marketplace > Agreements.
From here, you can view your agreement name, the product you ordered, agreement status, and other details. To learn more, see Agreements Interface.
If you want to get detailed information about an agreement, click the agreement.
You'll then be able to view details like the subscriptions linked to the agreement, ordering and fulfilment parameters, the buyer, seller, and licensee entities for the agreement, more.
From the details page, you can also self-manage your agreement and do the following:
To get up and running with the Marketplace Platform and make the most of its functionality, it's essential to understand how the platform works and be familiar with certain key concepts and terminology.
Our Getting Started video provides the foundation for you to quickly get started with the platform. It offers a brief overview of the platform and its interface, followed by in-depth information about some of the core concepts.
We highly recommend watching the following video to effectively interact with our platform.
You can add new items to your agreement using the Buy more option on the agreement details page.
Items can only be added to the agreements in the active state. If the agreement is not active, the Buy more option will be unavailable.
When you click Buy more, the platform automatically detects the agreement and takes you directly to the Items section of the purchase wizard, where you can select the items and complete the ordering process.
Follow these steps to add new items to your agreement:
On the Agreements page (Marketplace > Agreements), select the required agreement. Make sure that the agreement is active.
On the details page of your selected agreement, click Buy more. The purchase wizard starts and the Items step is displayed.
In the Items step, do the following:
Click Add items. A new window (also called Select items) will open displaying the available products that are available for you to order under this agreement.
Select the checkboxes for the items you want to order. You can use filters to find the items easily. When selecting items, be sure to verify the billing terms and the duration of the subscription.
Click Add items. Your selected items are added to the agreement, and the Select items step is displayed again.
Set the quantity of your newly added items in the New qty field and click Next.
In the Details step, add the additional ID and notes for your order and click Next. Note that it's optional to provide these details.
In the Review order step, verify the information and click Place order to finalize placing your order.
Click View details to go to the order details page or click Close to close the page.
A change order is created for the agreement and sent to the vendor for fulfillment. You can check the status of your new order on the Orders page or in the Orders tab on the agreement details page.
Note that once you place the order, the agreement status changes from Active to Updating. It means that the agreement is temporarily locked, and no further orders can be placed under this agreement until the current change order is completed.
The Settings module gives you easy access to your account information and lets you manage the settings for your Marketplace account at any time.
Account administrators can access the module by navigating to the main menu in the Client Portal and then selecting Settings.
In your account settings, you'll find various options enabling you to review your basic account details and manage your users, licensees, groups, and other properties.
Use the following links to learn about these options and how to use them:
- Update the account information for your organization, such as your account name and logo, company contact information, and address.
- Create API tokens to access the modules programmatically and manage your existing tokens as needed.
- Track all activity within your account and view the audit records.
- View a list of buyers mapped to your account and enable, disable, or edit buyer details.
- View a list of groups in your account. Add or remove groups and edit groups as needed to easily manage the access permissions for each group of users.
- Create new licensees and manage your licensees by updating the licensee information, and enabling or disabling licensees.
- View a list of SoftwareOne entities linked to your account.
- Add or remove users from the account, resend invitation links, and edit groups to which the user has access.
Need to update your profile or personal settings?
See to learn about updating your profile picture, profile name, preferred language, and more.
Subscription management through self-service is one of the key features of our platform, providing you with the flexibility to manage your subscriptions.
it means you can easily order new subscriptions, increase or decrease your licenses, and cancel subscriptions. You also have the option to edit the name of your subscription and modify subscription IDs, if needed.
You can view your subscriptions by selecting the main menu of the Client Portal and selecting Marketplace > Subscriptions.
The page displays important information regarding your subscriptions. To view the details of an individual subscription, click the subscription name. For information on the columns that are displayed on this page, see Subscriptions.
You can change the license quantity by creating a change order through the platform.
Change orders are required if you wish to order additional licenses or lower the number of licenses. For information, see How to change license quantity.
You can cancel a single or all subscriptions in an agreement by placing a termination order. Subscriptions cannot be canceled without a termination order.
To cancel a single subscription, use the Terminate option on the subscription details page. For instructions, see Terminate Subscription.
To cancel all subscriptions in an agreement, place a termination order for the agreement. For instructions, see Terminate Agreement.
Account administrators can invite new users to the account from the Users page under Settings in the main menu.
They can invite existing platform users and individuals who don't yet have an account.
When an administrator adds someone to the account, an invitation to join is emailed. It's important to take action once you receive the invitation, as account invitations are valid for only 7 days from the send date. After 7 days, invitations expire and will need to be resent.
Administrators can invite users through the Add option, which is located in the upper right on the Users page.
In Add user, complete the required sections. You'll need to enter user details, such as the user's full name and email address, and select the groups you want to assign to the user.
Split billing is a feature that allows you to divide the cost of a subscription across different buyers in your account. If your organization has multiple legal entities, split billing can be used to distribute costs effectively. To learn more, see .
In the Marketplace Platform, the split billing process begins by activating the feature from the user interface (UI), selecting buyers for allocation, and then specifying each buyer's allocation percentage or license count. This tutorial describes how to complete all of these steps.
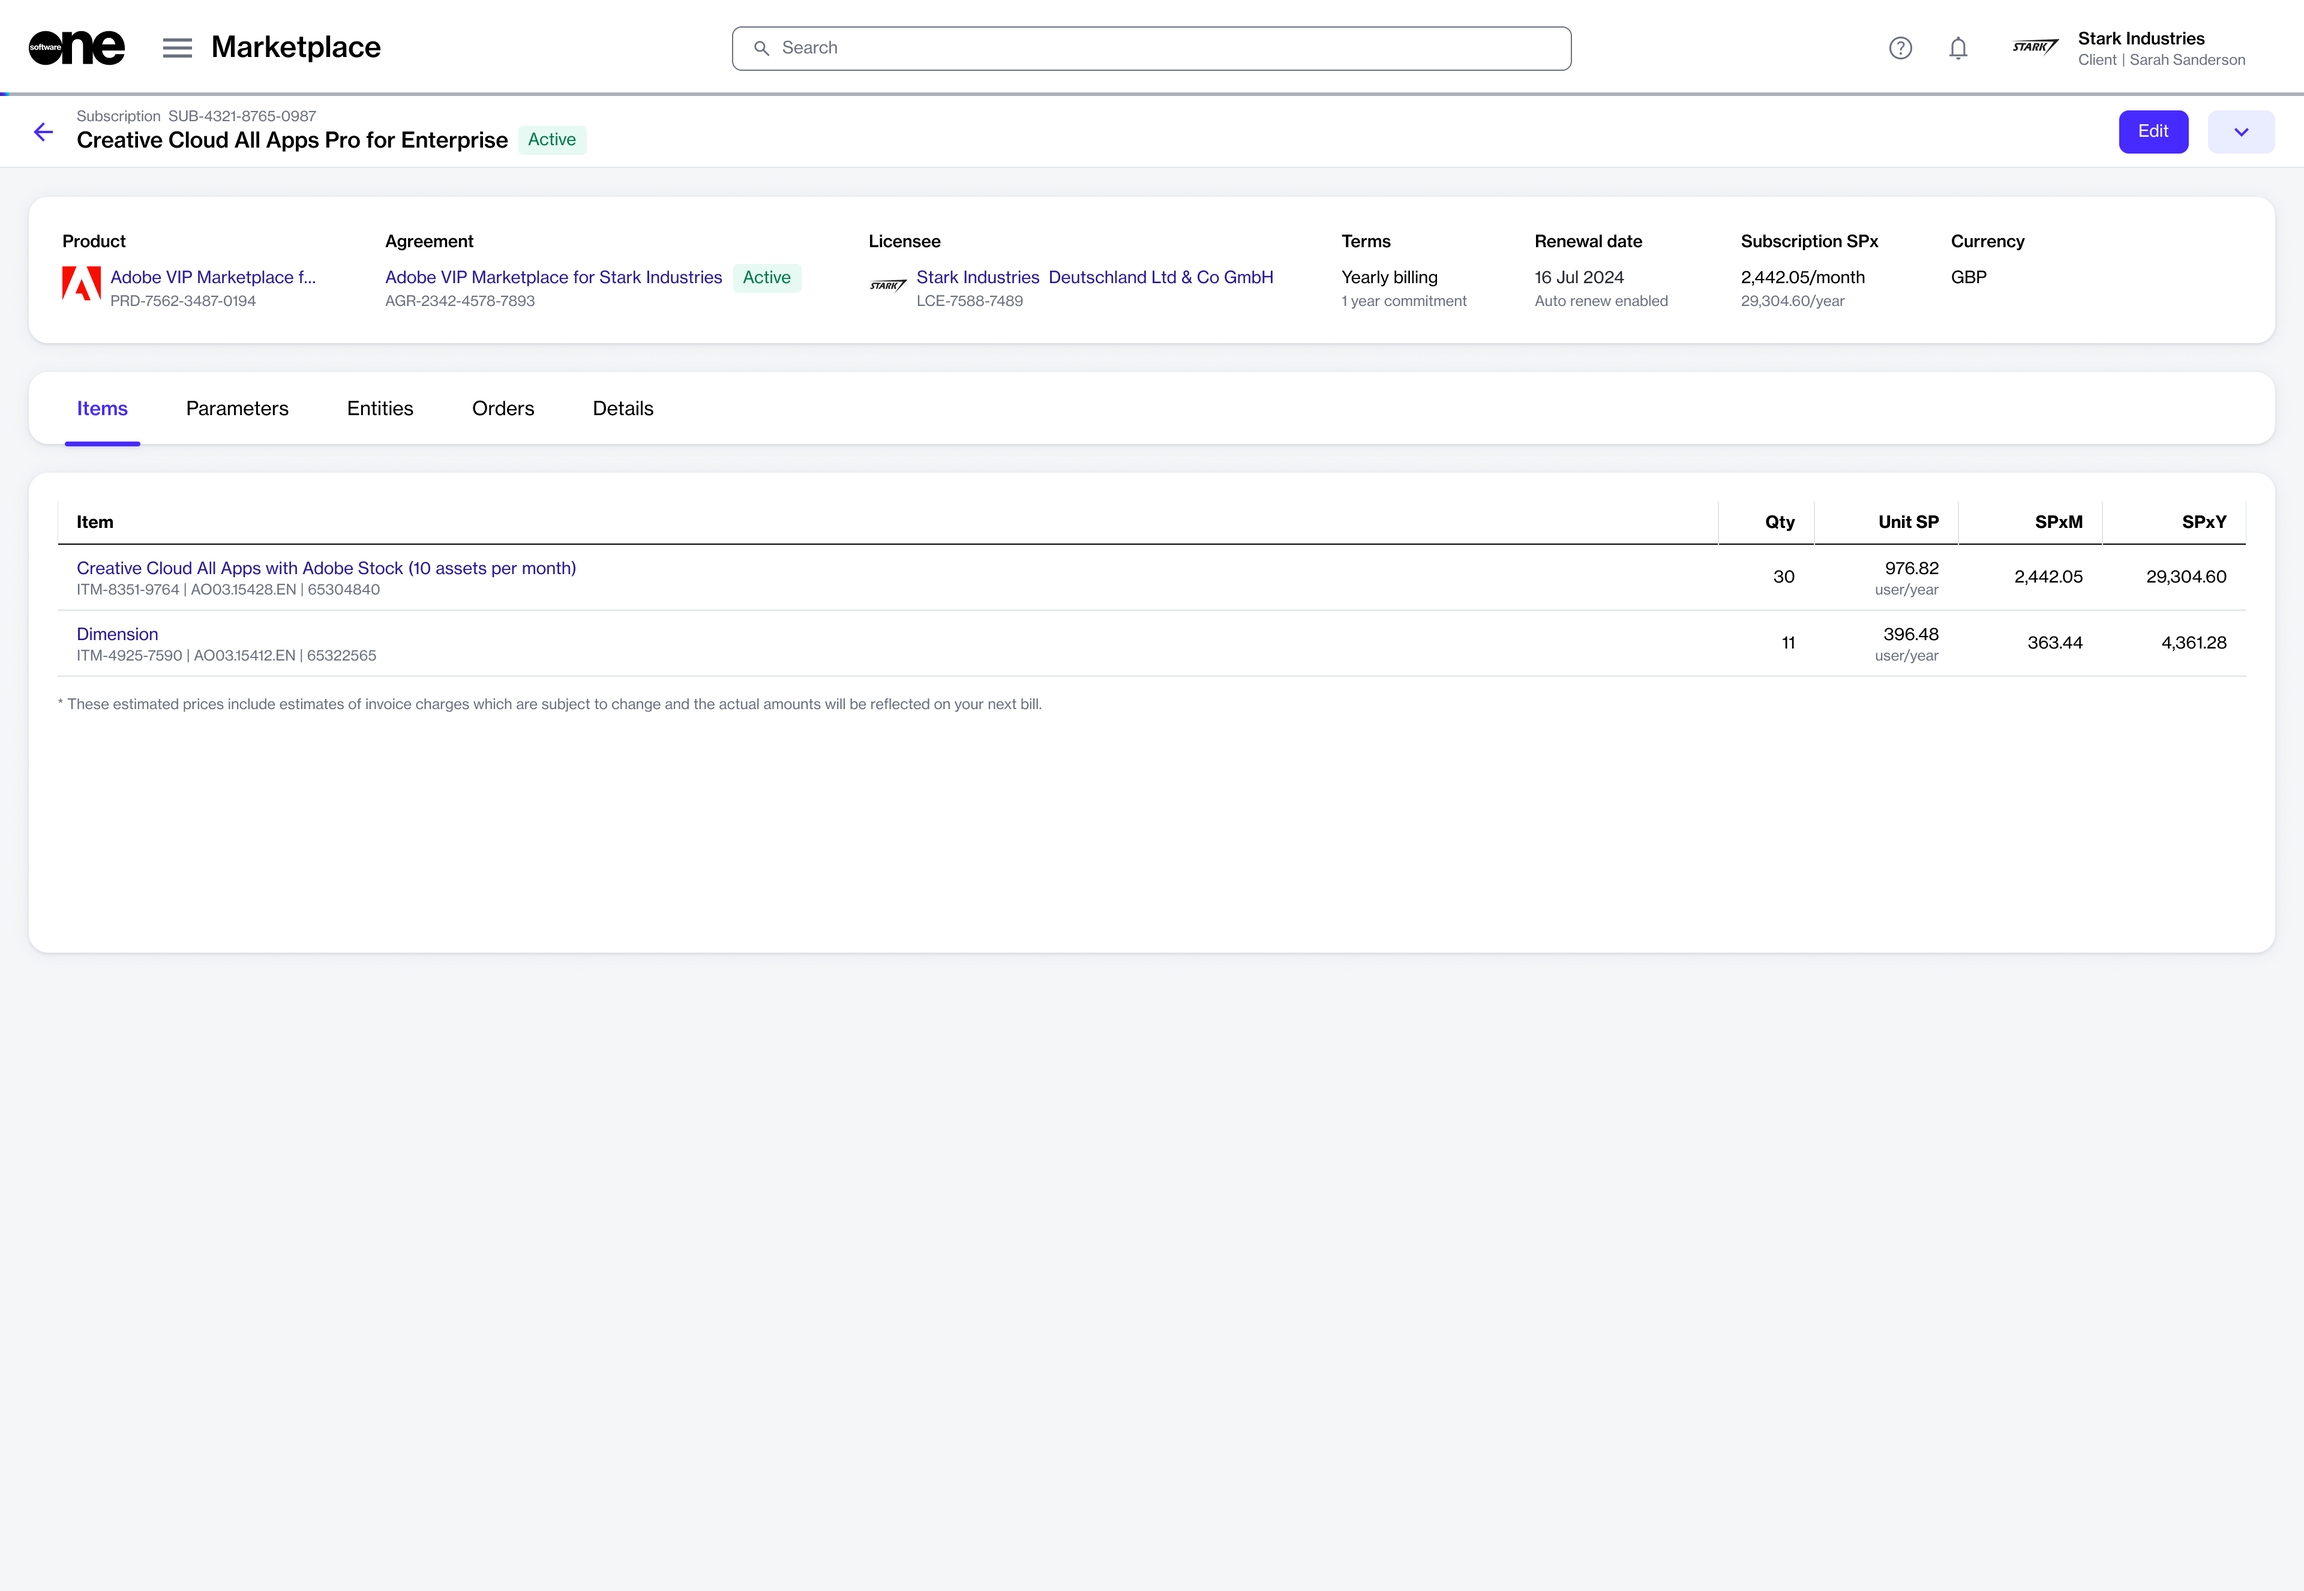
In this tutorial, an agreement named Adobe VIP Marketplace for Stark Industries contains three subscriptions. Currently, 100% of the billing for these subscriptions is assigned to a single buyer named Stark Industries. We'll activate split billing, add two new buyers named Stark Industries II and Stark Industries III, and then specify the allocation percentage for these buyers.
Before getting started with the tutorial, it's essential to have an understanding of the platform's . You must also be familiar with the platform's interface and know how to navigate it.
Split billing can only be activated at the agreement level. To activate split billing:
Navigate to the Agreements page and select the required agreement.
In the Split billing dialog, select the checkbox and then click Save.
Split billing is activated and the Split billing tab appears on the agreement’s details page. You are now ready to configure buyers to allocate billing to.
In this tutorial, Stark Industries is the Owner buyer who has been allocated 100% of the billing.
We'll configure Stark Industries II and Stark Industries III as additional buyers and then divide the costs across buyers. To start configuring buyers:
On the Split billing tab, click Edit.
In the Split billing dialog, use the checkboxes to select the buyers from the list of your active buyers and then click Save.
Stark Industries II and Stark Industries III are added as buyers and displayed on the Split billing tab. You are now ready to allocate billing to these buyers.
To start configuring the split for each buyer:
In the Actions column for the Owner buyer, click Details.
For the required subscription, click Edit.
This example agreement contains three subscriptions, but we'll only configure allocation for the first subscription called Creative Cloud All Apps with Adobe Stock.
In Allocation %, enter the allocation percentage for each buyer and click Save.
In this example, 50% of billing is allocated to Stark Industries (owner buyer) and the remaining 50% to Stark Industries II. No percentage is assigned to Stark Industries III.
The allocation is updated and displayed on the Split billing details page. By default, the allocation for the owner buyer is displayed:
Use the Buyer menu at the top to view the allocation for the other buyers (Stark Industries II in this example):
Click Close. You'll be returned to the Split billing details tab.
Next, confirm the information displayed on the Overview page, and then click Add. For detailed instructions, see .
The individual will receive an email invitation, which they must accept within 7 days to join the account. To learn about accepting invites and account registration, see .
On the details page of the agreement, click the down arrow in the upper right and select Split billing.
Billing can be allocated by specifying percentages for each buyer. You can also specify the estimated license count. Both of these options are linked, meaning changing one updates the other automatically, although only the allocation % is used during billing (see to learn more).
If you have additional subscriptions and want to split the billing, you can repeat the same steps for those subscriptions. You can also edit the split at any time. For instructions, see .