Track and manage your software renewals, set alerts and reminders and manage agreements.
Renewal Manager lets you collect, track, and manage contractual and software maintenance renewals independent of the software license supplier or distribution channel.
When you log into Renewal Manager for the first time, the application will set up a session for you. It will retrieve all the information from your agreements purchased through SoftwareOne. This may take several seconds, depending on the data volume.
The Renewal Manager Summary Page shows:
Navigation tabs – Agreements, Costs, Savings Analysis and Products Overview
Tiles with aggregated data – Ended Period, Today’s Tasks and Ending Period
Advanced search
The main navigation allows you to easily navigate to different areas in Renewal Manager such as Summary, Agreements, Costs, Saving Analysis, and Products Overview.
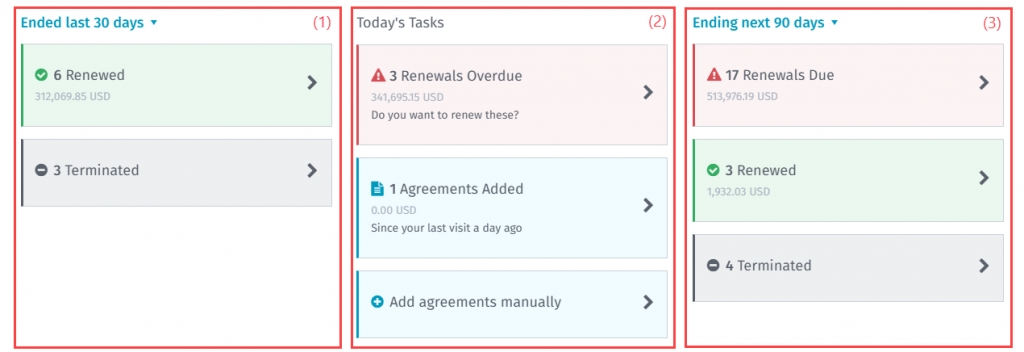
There are 3 columns that show tiles with aggregated data:
Past Period – shows information relating to agreements that have ended within the selected period. By selecting the preferred period from the dropdown you are able to customize the summary page.
Today’s Tasks – highlights tasks that should be addressed quickly.
Renewals Overdue: Agreements that have past their renewal date and the renewal process is not yet completed.
Agreements Added: Newly added Agreements
Add Agreements Manually
Future Period – shows aggregated data from future periods you select from the dropdown.
The links in the tiles will take you to the list of agreements with filters applied. This allows you to see the full list of agreements that have been aggregated into the tiles.
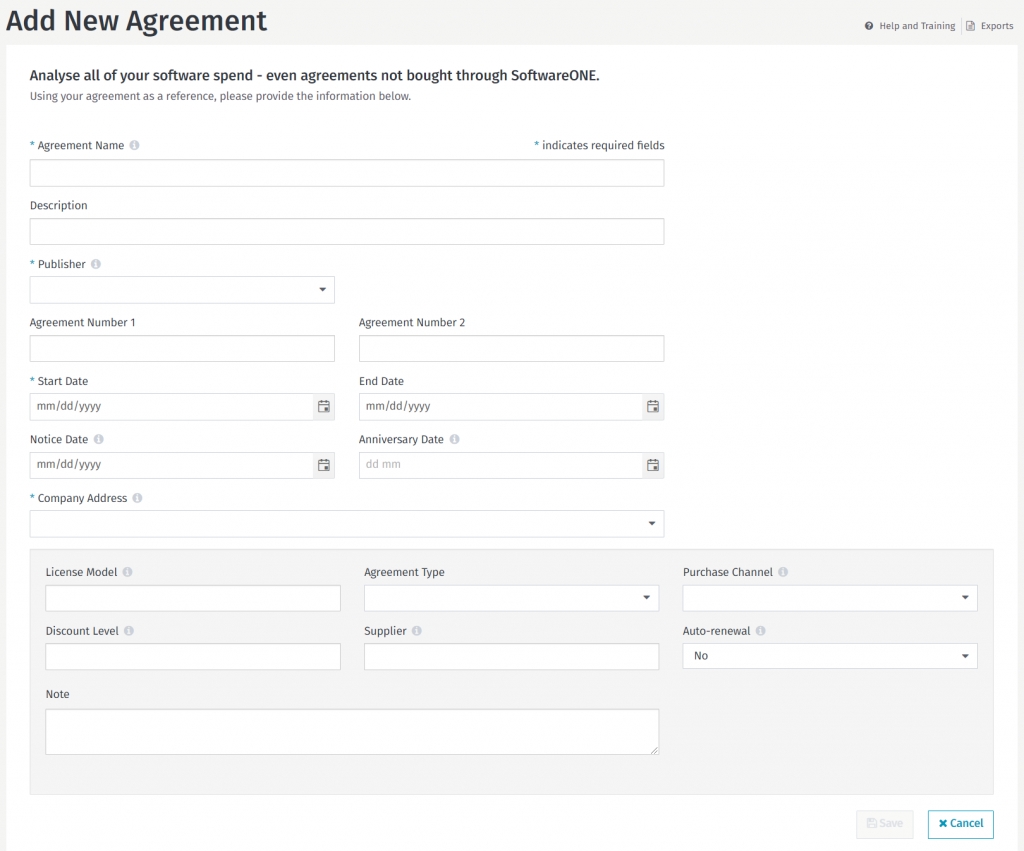
Renewal Manager is not limited to agreements and software purchased through SoftwareONE. The “Add Agreements Manually” option – lets you add agreements to Renewal Manager that have not been purchased through SoftwareONE.
After entering the data (at least the mandatory fields) click “Save”. You will then see the Agreement Details Page for the agreement you have just created. After you have registered an agreement you may want to add product and cost information to this agreement as a second step.
Advanced search gives you the option to narrow down the agreements that are aggregated into tiles. Search filters make it possible to present the aggregated data that is of interest to you.
On the Agreements tab, you can:
Define filters for advanced search
See a list of all agreements including customization functions
Select multiple bulk actions to be carried out
The Agreements list shows all agreements either purchased through SoftwareONE, imported from Entitlement Manager, or registered manually. All agreements are divided into 4 groups (sub-tabs are visible above the agreements list).
Sub Tab – Agreements
This list shows agreements with a defined end date. This means that for those agreements, it is necessary to define a certain date in the future when the agreement must be renewed or terminated.
Sub Tab – Evergreen Agreements
This list shows agreements which do not have an end date. For example, Transactional License Agreements for perpetual licenses without any maintenance will be listed in this sub-tab. Also, Master Agreements like Microsoft MPSA or Adobe VIP Agreements can be found in here.
Sub Tab – Archive
This list shows the agreements that have been archived. You can archive agreements if they have been set to ‘Renewed’ or ‘Terminated’. If the renewal process for an agreement is currently “in progress”, you will not be able to archive it.
You can archive single agreements by using the “action” available in the grid view. If you want to archive multiple agreements in one go, use the bulk action option.
Sub Tab – Under Maintenance
This list shows new agreements purchased through SoftwareONE, as well as agreements imported from Entitlement Manager which have missing data and therefore cannot be managed by Renewal Manager. If there are no incomplete agreements existing, this sub-tab won’t be visible.
You can request for the data to be completed by clicking on the “Update” button in the Actions column of a specific agreement. There is also a notes section to add further information before submitting the request.
Once submitted, the agreement for which the update has been requested will be marked as “Updating” and the “Update” button will no longer be available. After the agreements have been updated, it will be listed in the sub-tab ‘Agreements’ or ‘Evergreen Agreements’.
Advanced search gives you the option to narrow down the list of agreements. The various filter options allow you to display the agreements that are of interest to you.
Save Search
In case you are using the same filter combination on a regular base, you can save them as favorites with ‘Save Search’.
Bulk actions allow you to simplify administration tasks by modifying multiple agreements in one action.
If you select one or multiple checkboxes on the agreements list (1) then the “Actions” button (2) becomes enabled and you can choose one of the following actions:
Archive
Change currency
Add & Remove Tag
Add Responsible People
Remove Responsible People
Edit Notes
Add New Activity Note
Request Co-Termination
Archive
You can archive selected agreements and they will be moved to the sub-tab “Archive”.
Note: Only agreements with the Renewal Progress status “Renewed” or “Terminated” can get moved to the Archive. As long as the renewal process for an agreement is not completed yet (still in progress), it is not possible to move to the archive.
Change Currency
You can change the currency for all selected agreements. By changing the currency, the total costs of the agreement get exchanged into the selected currency using the current exchange rates from today. Selecting the same currency for all agreements makes it easier for you to compare and run an analysis.
View of selected agreements with the set currency
Field to choose the new currency
Add Tags
You can add specific tags for all selected agreements. See more details relating to tags in “Tags and Cost Split“.
Preview of selected agreements
Fields to add tags
Remove Tags
You can remove specific tags from all selected agreements. This is only available when you select agreements with tags.
Preview selected agreements
Field to choose one tag which will be removed, tag must be available on at least one of the selected agreements to appear in this list
Add Responsible People
You can add the person that is responsible for the selected agreement.
Preview of selected agreements
Autocomplete field for choosing the responsible person
Remove Responsible People
You can remove the responsible person from the selected agreement.
Preview of selected agreement
The dropdown field for choosing which person should be removed from “Responsible People” of the selected agreement
The Agreement Details page shows all data stored for specific agreements. From this view, you can use the various tabs to manage agreement data.
Independent of what tab you are staying inside on the agreement details page, the upper section of the page remains the same.
With the Navigation Tile you always have the option to switch back to one of the main tabs, like the list of agreements.
The Summary Tile provides you with the total cost of the agreement.
Paid Cost: Total Cost of all transactions placed on this agreement from day into the past.
Estimated Renewal Cost: automatically calculated renewal cost based on the paid cost and considering the license type and license period.
With the Renewal Progress Tile, you have the latest status. (You can also see the Renewal History Tab for more details about the renewal progress)
In the Renewal Progress ‘toaster message‘ you get the link to the latest documents (Quote, Order, Invoice).
Switch between the different Tabs to see all of the data. Depending on your permissions you may not see all tabs available.
The Estimated Renewal Costs are calculated by considering the following parameters:
The formula of the Renewal Cost Calculation:
‘Current Cost’ x ‘Renewal Factor’ / ‘Current Period’ x ‘Renewal Period’
Current Cost: Paid costs of the initial transaction
Renewal Factor depending on the License Type
License & Maintenance = 20%
Maintenance = 100%
Subscription = 100%
Support = 100%
Services = 0%
License = 0%
Current Period: License Period of the initial transaction
Renewal Period: License Period of the Renewal
Calculation Example:
License Type: License & Maintenance
Renewal Factor: 20%
Current Cost: 5.000,00
Current Period: 01 Jan 2019 – 31 Dec 2019
Renewal Period: 01 Jan 2020 – 31 Dec 2020
Calculation: 5.000,00 x 20% / 365 days x 365 days = 1.000.00
The Agreement Details Tab provides you with agreement descriptions, categorizations, and dates. For example, Contract Numbers, Agreement Owner, publisher, End Date, Anniversary Date, and much more.
Edit Agreement
Clicking the “Edit” button on the Agreement Details Tab will take you to the Edit view.
When you edit an agreement you have:
Registered manually – you can update all fields related to the Agreement
Imported from the SoftwareONE ERP System or imported from Entitlement Manager – you can only update fields that have not been imported from those systems. (fields that are disabled can’t be updated). But you can request an update by choosing the option “Request an Update”
Request an Update
If you would like to change an uneditable field of the agreement that was purchased through SoftwareONE, or imported from Entitlement Manager, then you can “Request an Update”.
When agreements have related products, a list with all related products will be displayed on the “Products” tab.
Agreements purchased through SoftwareONE, or agreements imported automatically from Entitlement Manager, the related products will be displayed automatically.
To see more details for a specific product in the list, click on the row with the product or click “View” in the Actions column.
In the “Details” view you can see all data relating to the product. From this view you can also:
Edit product data
Delete products – applies only to products added manually
The edit feature distinguishes between imported and manually created products.
For imported products, not all fields can be edited.
When you try to change dates (Start Date, End Date) on the Product – Details View you will see a notification that this operation may remove some data that you’ve written into the payments table.
The payment table will change according to the new payment number.
Note: If you do not click Save, the changes will not be saved.
Changing the “Start Date” and “End Date” for an Agreement (Edit Agreement) can also trigger changes to the payment plans for products that are related to the agreement being edited.
Within each agreement, you can allocate products (in addition) manually.
Adding products manually is a 2-steps process. On the first page, you need to fill in the “Product Details” data, and on the second page you need to complete “Payments Details”.
Fields marked with an asterisk (*) are mandatory. You will need to fill in all of the mandatory fields before you can move on to the Payment Details page.
Agreement Period dates are inherited from the Agreement unless you manually set a different value.
Payment Plan Type (Upfront, Monthly, Annual) – Choosing one of these will recalculate the “Number of Payments” according to the “Agreement Period dates”. This option will show you a table with a row for each payment and you can fill in the “quantity” and “cost” for each payment. When a custom renewal period is set, the number of renewal payments will change.
The Renewal History Tab shows Renewal Activity (1) of the currently selected Agreement and the connections to other agreements (2) if they exist. The Renewal Progress Tile (3) and the Toaster message (4) visible in the upper section of the Agreement Details Page give you the latest Renewal Activity Status.
This section shows the list of all renewal activities for the currently selected agreement. It starts from “Quote in Progress” until the renewal has been renewed.
If the agreement was transacted through SoftwareONE, the Renewal Progress Status is linked with SoftwareONE’s internal Renewal Process and is updated automatically. The related Sales Documents (e.g. Quotes, Orders) can be accessed directly from this view.
For Agreements not purchased through SoftwareONE, you can update the status manually.
For manually registered agreements or agreements imported from Entitlement Manager, you can select a Renewal Progress Status and add optional notes.
This section shows the history of agreements. If agreements co-terminate or renew into another agreement, those agreements are collated and are displayed in the Agreement Renewal History section.
On the Savings tab, you can add savings relating to a specific agreement. The “Total Savings” tile shows you the savings sum for the agreement.
In the “Date of savings” field, you can enter the date you would like for your Savings Analysis. By default, this is set to the agreement start date.
This feature lets you select or create tags relating to the agreement and allocate the cost split percentage.
All tags added to the agreement are visible in the list on the “Tags and Cost Split” tab.
The tag list can also be found on the Agreements Tab. If you don’t see the tags column, you can customize grids in Renewal Manager.
Once you move the mouse pointer over a specific tag, a tooltip with more details will appear.
In this section, you can add people responsible for an Agreement by clicking on “Add Contact”. Contacts from agreements that have the same agreement owner can be shared between multiple agreements.
For agreements purchased through SoftwareONE, a contact is created automatically which is for the salesperson responsible for that agreement. This contact cannot be edited or deleted.
In this section you will see:
A list of documents relating to the agreement
Documents that are synchronized with an external system cannot be deleted, they only can be edited
Documents that are added manually can be edited and deleted
The “Add New Document” Button
Add New Document
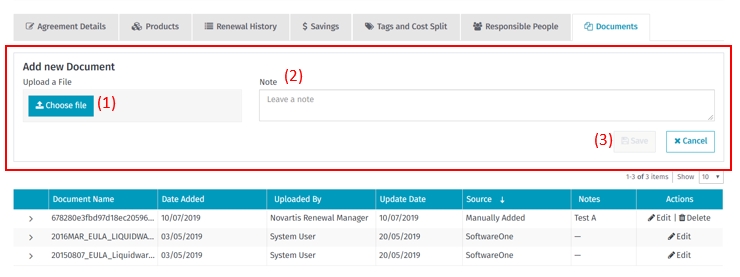
When you click on the “Add New Document” Button the below form will open.
From here you can upload a file (1) and describe it with a note (2).
When you click on “Save” (3) the file is saved in the documents section.
Within the Costs tab, you can use two diagrams to analyze the costs on a timeline – a Bar Chart and a Gant Chart.
The Bar Chart shows you the costs on a timeline with the option to switch between different views – per Month, Quarter or Year. You can as well navigate back and forth within the chart.
You can use the “Cost By” drop-down to switch to a stacked bar chart. You can choose between Cost By:
Agreements
Publisher
Cost Type (Paid/Still to Pay/Renewal Costs)
Tag
If you click on one of the stacked bars in the chart you are going to drill down into this bar. If you click on one of the drilled-down bars you will see a list open beneath the chart e.g. list of agreements.
The Gantt Chart will show you a list of your agreements with a visual representation of the time frame for each agreement, split into the active period and renewal period.
If you hover your mouse cursor over one of the bars, you can see more details about that specific agreement as shown above.
If you click on one of the bars, it will take you to the Agreement Details page for the corresponding agreement.
Filter options are also available above the chart.
Savings Analysis shows you a summary of your savings for all agreements. The savings data displayed will be for the “Start – End” date period defined.
You can reference the Savings tab to learn more.
Products Overview shows you the list of all products available in Renewal Manager, no matter which agreements they come from.
Within this list of products you can:
Use advanced search to narrow down the number of products displayed
Customize the list by sorting and grouping displayed elements
View more product details by clicking on the product name
You have the option to assign “Read Only” user access.
Read-only access will let the user see a list of all agreements and related data, but they won’t be able to make any modifications.
They won’t be able to do any of the following:
Add/Edit Agreements
Add/Edit Products
Execute bulk actions
Modify any data
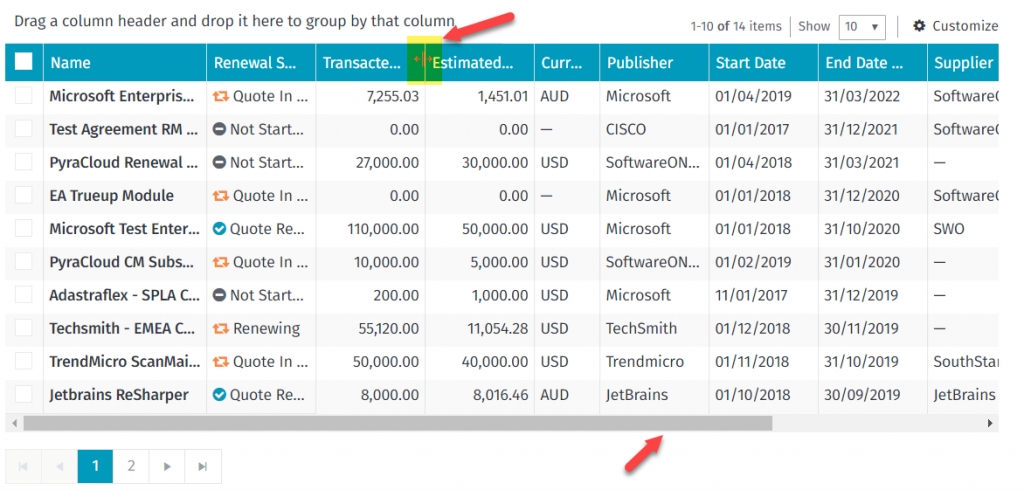
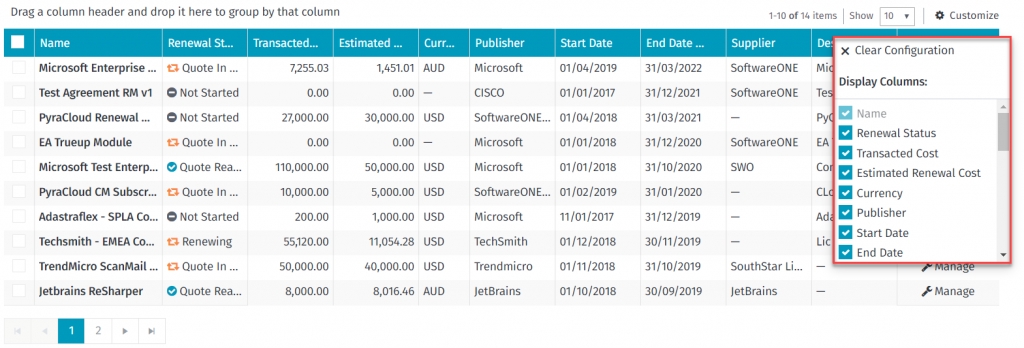
Each grid available in Renewal Manager can be personalized. Once you click on “Customize” you will see the list of columns that can be added to the grid. Simply click on the check boxes next to the information you would like to view.
If you select multiple columns to display and the view is not wide enough to show all information, you can resize the specific column widths by moving your mouse cursor over the column border and then “click and drag” the column to your required width.
Use the horizontal scroll bar to navigate across.
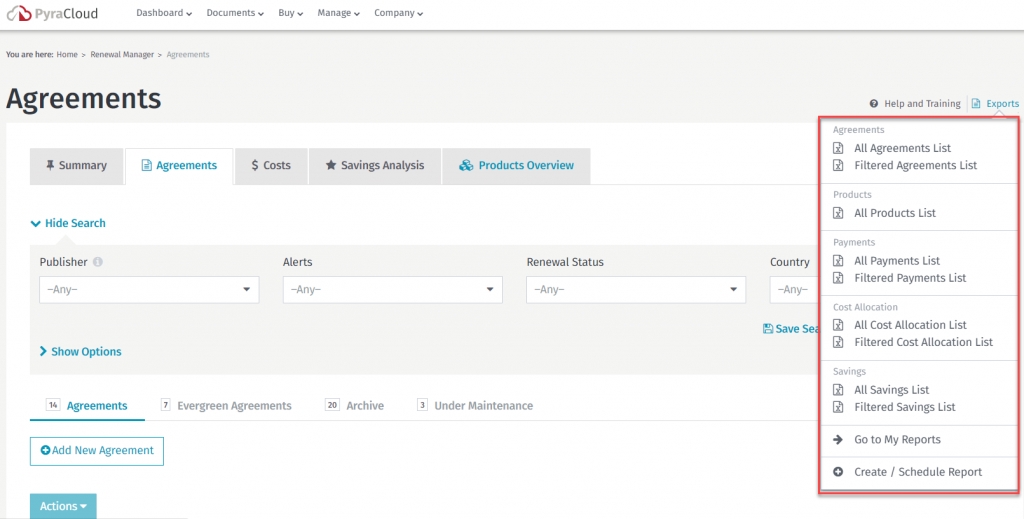
You can generate reports from Agreements, Products, and Payments. To do this you need to click on the “Export” button and select the relevant export list you would like.
To view generated reports click Go to My Reports
The Alert icon on the top right of the page shows the number of recent notifications. Once clicked, a list of notifications will open which shows the notification details.
To manage Renewal Manager Notifications click “Manage”. This will open up the Notification Hub Manager where you can manage your notifications.

