Loading...
Loading...
Loading...
Loading...
Loading...
Loading...
Loading...
Loading...
Loading...
Loading...
Loading...
Loading...
Loading...
Loading...
Loading...
Loading...
Loading...
Loading...
Loading...
Loading...
Loading...
Loading...
Loading...
Loading...
Loading...
Loading...
Loading...
Loading...
Loading...
Loading...
Loading...
Loading...
Loading...
Loading...
Loading...
Loading...
Loading...
Loading...
Loading...
Loading...
Loading...
Loading...
Loading...
Loading...
Loading...
Loading...
Loading...
Loading...
Loading...
Loading...
Loading...
Loading...
Loading...
Loading...
Loading...
Loading...
Loading...
Loading...
Loading...
Loading...
Loading...
Loading...
Loading...
Loading...
Loading...
Loading...
Loading...
Loading...
Loading...
Loading...
Loading...
Loading...
Loading...
Loading...
Loading...
Loading...
Loading...
Loading...
Loading...
Loading...
Loading...
Loading...
Loading...
Loading...
Loading...
Loading...
Loading...
Loading...
Loading...
Loading...
Loading...
Loading...
Loading...
Loading...
Loading...
Loading...
Loading...
Loading...
The Marketplace Platform is a solution designed for software procurement. It includes a comprehensive set of modules and features that streamline purchasing processes for businesses of all sizes.
The platform simplifies the complexity of managing relationships by creating a digital business network that connects clients and SoftwareOne partners with vendors. Key features of the platform include standardized billing management, streamlined procurement, and robust vendor management.
The platform’s functionality is further enhanced by public APIs and SDKs that enable automation, providing developers and system integrators with programmatic access to the platform's functionalities.
The Marketplace Platform operates as a two-sided platform, offering distinct advantages for clients, partners, and vendors alike.
The platform redefines the procurement experience for clients and partners through its user-friendly Client Portal. This portal digitizes workflows and significantly enhances the efficiency of the purchasing process. Key features for clients include:
Access to product catalog - Discover a wide range of products from the world's leading software vendors and find everything you need in one centralized location.
Order management - View, track, and manage your orders while getting extended information about each order on the order detail page.
Subscription management - Take control of your subscriptions with self-management features. Easily handle terminations and renewals, and buy more licenses or reduce the number of licenses for your subscription.
SoftwareOne partners have access to all features and functionalities designed for clients, as well as additional tools to enhance their experience. Key features for partners include:
Software purchasing capabilities - Explore the full range of products available for resale to your clients.
Visibility into customer subscriptions - Gain clear visibility into all your customer subscriptions. Easily filter and sort subscriptions by renewal dates to ensure you never miss an expiration.
Centralized order tracking - View all your customer orders in one centralized location.
The Marketplace Platform offers several benefits to vendors looking to enhance their reach and streamline operations. Key features for vendors include:
Product definition and configuration - Configure products manually or use integrations to set up product parameters. Easily sell your products globally to over 65,000 SoftwareOne clients and partners across various industries.
Catalog management - Maintain product data in one place, and enhance your product listings and messaging templates to attract potential clients.
Product and price management - Update product pricing directly within the platform, ensuring that clients always have access to the most accurate and current pricing.
The Marketplace Platform allows an individual to be linked to several accounts and switch between those accounts without signing out of the platform. Switching can be done through your profile menu.
To switch between your accounts:
Sign in to your account, then select your profile menu in the upper right. All accounts you belong to are displayed under Switch account.
Select the account you want to switch to. Use the Search field to find the required account easily. You can search by the account name or its identifier.
Your account is switched, giving you access to the modules and settings linked to your profile.
Your profile contains the information associated with your account, including your name, email address, and preferences. You can edit your profile to keep your information accurate and up to date.
To update your profile:
Select your profile menu in the upper right, then choose My profile.
To get up and running with the Marketplace Platform and make the most of its functionality, it's essential to understand how the platform works and be familiar with certain key concepts and terminology.
Our Getting Started video provides the foundation for you to quickly get started with the platform. It offers a brief overview of the platform and its interface, followed by in-depth information about some of the core concepts.
Agreement management - Access all of your agreements in one place and self-manage them through the Agreements page in the platform.
Account settings - Switch between your accounts, invite new members to your account, and manage user invitations. Enhance your account management by creating groups to handle user permissions.
Your profile - Manage your profile through password resets, profile updates, and more.
Order fulfillment - Efficiently manage and fulfill orders.
On your profile overview page, select Edit. The Edit user page opens.
Change the General settings as necessary:
Profile picture - Add or update your profile picture. You can add a photo of yourself, a logo, or anything that represents you and helps others identify you easily on the platform. Your image must be in PNG or JPG format. The maximum file size is 5 MB.
First name - Update your first name.
Last name - Update your last name.
Country code - Select the country code for your phone number.
Phone number - Enter your phone number.
Update your Preferences as necessary:
Language - Choose your language preference.
Regional settings - Select the date format you want to use.
Select Save. A message is displayed stating your profile has been updated successfully.
The SoftwareOne Marketplace Platform is a comprehensive digital marketplace that connects a diverse range of vendors, clients, and partners. It's designed to offer a variety of software solutions while ensuring that the needs of our clients and partners align effectively with the capabilities of vendors using our platform.
Marketplace Platform is a catalyst for accelerating digital transformation and enhancing operational efficiency. It empowers clients and partners to easily discover, compare, and buy software licenses from multiple vendors in one convenient location, and allows vendors to extend their global reach.
Explore our documentation to learn more about the platform and how you can use it for software procurement, subscription management, license renewals, order fulfillment, and more.
The Billing module within the Marketplace Platform is your primary entry point for accessing billing documents for your account.
The module simplifies financial management by allowing you to view and download your invoices. You can also access your financial statements, containing a detailed list of charges and your orders. Additionally, you can use the Billing module to access and manage your credit memos.
Before starting, we recommend reading Understand Your Billing Documents. This page provides an overview of billing documents and explains how your Marketplace invoices and statements are structured and how to interpret them correctly.
To get started, see the following links:
InvoicesSales OrdersStatementsSplit BillingTo view your active software subscriptions, current spending, or your entire spending, including subscriptions:
Navigate to the Inventory > Software Assets page.
Use the search options to view your software asset inventory list. You can either enter your PO number or reference number in the Reference field or use the filters to narrow down the search results.
Review the details on the Software Assets and Financial Transactions tabs.
The Software Assets tab displays your active software subscriptions and current spending only. It doesn't display your past payments.
The Financial Transactions tab displays your entire spending across all software, including subscriptions and your past transactions.
The Marketplace is your entry point for accessing and managing your organization's purchases. It gives you end-to-end visibility and control over your transactions within the platform.
It provides access to several key features, including agreements, entitlements, orders, subscriptions, and more.
To get started, see the following links:
AgreementsOrdersRequestsSubscriptionsOur entitlement services allow you to import your software assets into the Client Portal, even those not purchased through SoftwareOne.
For information on entitlement services and how to import your assets to the Client Portal, contact us.
The Marketplace Platform is a SaaS application with three user interfaces, each catering to specific user types. These interfaces ensure that all actors can interact with the platform according to their specific business requirements.
The platform provides three distinct user interfaces, namely the Client Portal, Vendor Portal, and Operations Portal.
Client Portal - Accessed by our clients and partners for software procurement.
Vendor Portal - Used by vendors for setting up and configuring products.
Operations Portal - Used by internal SoftwareOne associates for administration-related activities.
You can access the platform from an up-to-date desktop or mobile browser. For a list of supported browsers, see .
To access the Marketplace Platform user interface (UI):
Navigate to the sign-in page: .
Enter the email address associated with your account and select Continue.
Enter your password and select Continue. If the sign-in is successful, the Home page is displayed.
If you provide inaccurate credentials, an error message is displayed.
If you can’t remember your password, select the Forgot password? link on the Sign-in page and then follow the instructions. For more information, see .
The platform provides a seamless and intuitive interface, allowing access to the different modules and features within those modules. This section describes how to navigate the platform.
The Home menu at the top left opens the main navigation menu, provides access to all modules enabled for your account.
The Search bar lets you search for various objects in the platform, such as your orders, agreements, subscriptions, and more. You can also search for specific products and items in our catalog.
You can also use search to find user documentation. For example, you can search for "manage subscriptions" to read documentation about how to manage your subscriptions.
When performing a search, start by choosing the category you want to search across and then enter the search term. Our platform supports free text, which means you can enter all or part of the object's ID or name. For example, when searching for an agreement using its ID, select the Agreements category and then enter the full order ID (such as ‘AGR-8981-7039-6781’) or part of it (such as 6781). The platform will then display results matching your specified search term.
The Help icon contains links to various resources, including the , product documentation, , and our legal pages.
It also contains a Support option, allowing you to easily .
The Spotlight icon opens the Spotlight widget, containing all tasks requiring your attention. To learn more about this feature, see .
The profile menu lets you and . It also contains the Sign out option.
The Spotlight widget on the Home page is designed to highlight key platform objects that may require your attention.
These objects include your agreements, orders, subscriptions, invoices, and more. For example, if you have any overdue invoices, they will be spotlighted so you can take the necessary action. Similarly, expiring subscriptions are also included, so you can manage the renewal on time.
The widget is displayed on the Home page by default, but you can also access it by selecting the spotlight icon in the status bar.
Within the widget, the information is organized by object type; for example, renewing and expiring subscriptions are displayed under Subscriptions, orders that may be querying for additional information are shown under Orders, and so on.
The widget also provides a total count of items for each category, so you always know how many items need your attention. By default, a maximum of five items is displayed. If there are more items in a category, you can select the view all link to view those items on the object's main page.
All object details within the section are synced periodically to ensure you stay informed and always have the latest information. You can also refresh the list manually by selecting the sync icon .
The Marketplace Platform sends notification emails based on specific events in your account. These alerts are triggered according to the notification categories enabled for your profile.
If you want to opt out of these alerts, you can update your preferences. There are two ways to do this:
By signing in to your account and using the My profile option.
By selecting the Manage notifications link in the footer of your notification email. This option allows you to update preferences without signing in to the platform.
You can add new items to your agreement using the Buy more option on the agreement details page.
Items can only be added to the agreements in the active state. If the agreement is not active, the Buy more option is unavailable.
When you select Buy more, the platform automatically detects the agreement and takes you directly to the Items step of the purchase wizard, where you can choose the items you want to order and place an order.
To add new items to your agreement:
There are three ways to verify whether your account is configured as a partner account in the Marketplace Platform.
You can check this through the following pages, available under Settings in the main navigation menu:
Accounts - The page displays general information about your account. If you are set up as a SoftwareOne partner, you'll see a field labeled Partner program with the value Yes in the Additional Data section on the General tab. This field does not appear for client accounts.
Buyers
If you use certain pages very often, you can mark those pages as your favorites. This way, you can find your most-used pages easily. Once added, favorites appear in the Favorites section of the main menu.
To add a page to your favorites:
In the main navigation menu, navigate to the required page, for example, Agreements.
The Sales Orders page allows you to access your perpetual license orders. You can access this page from the main navigation menu by selecting Billing > Sales Orders.
The Marketplace Platform provides the following options for accessing your invoices:
You can view all invoices on the Invoices page, located under Billing in the main navigation menu.
To view detailed information about a specific invoice, select the ID on the Invoices page. You can then view the invoice summary on the details page.
Additionally, you can download an invoice PDF from the invoice details page.
A statement is a billing document you receive at the end of your billing period, along with your invoice PDF.
Statements are provided in the XLSX format and contain a detailed view of your invoice data, including individual charges, subscriptions, and orders for the billing period.
You can view your billing statements on the Statements page in the platform.
The page shows all statements generated for your account and properties, such as statement ID, the total amount due, status, and more.
For each statement, you can also view the type. A Debit type means that the total amount is positive or zero, and a Credit type means that the total amount is negative.
The Marketplace Platform is designed to simplify the complex process of software licensing and procurement. It aims to simplify your buying journey by making it easier for you to find and compare products from multiple software vendors in one place.
Ordering products from the SoftwareOne Marketplace involves a series of steps, depending on the product's vendor. This topic describes these steps at a high level.
The Marketplace Platform provides the following options for accessing your statements:
You can view all statements on the Statements page, located under Billing in the main navigation menu.
You can view detailed information about a specific statement by selecting the statement ID on the Invoices page.
To view all statements for an agreement, select the Statements tab within the agreement's details page.
The Marketplace Platform gives you the flexibility to upsize or downsize your licenses at any time.
If you need more licenses, you can alter the subscription to add additional licenses. You can also lower the number of licenses if you no longer require all of your ordered licenses.
When reducing the number of licenses, the following rules apply:
If your subscription contains only one item, you can't lower its quantity to zero. In this case, you must terminate the subscription.
If your subscription contains multiple items, at least one item must have a quantity greater than zero. You can't change the quantity of all items to zero.
The Attachments tab on the agreement details page displays all files that have been added to your agreement by the vendor or SoftwareOne.
Attachments can include PDFs and license keys. The same attachments are also available on the Attachments tab within the order details page.
To view and download attachments:
Information cards are small, interactive cards that display the key properties of an object within the platform.
These cards appear when you hover over an object's name. For instance, if you hover over an agreement, you'll notice that an information card appears and it shows you more information about that agreement.
Information cards make it easy to access information quickly. They display all the key attributes in one place, allowing you to learn more about the object without navigating to its details page.
The information displayed within a card might vary depending on the object, but each card contains general details, such as the object's name and ID, as well as the created and updated dates.
Information cards also contain quick links to the related objects. Selecting these links redirects you to the details page of the related object. For instance, if you select the licensee name, the details page of the licensee opens.
You can close a card by selecting Close in the upper right or by selecting anywhere outside the card. Alternatively, pressing the Esc key also closes the card.
With Software Asset Spend Management, you can efficiently oversee and manage your software asset spending across your organization. You can export your software assets to other Software Asset Management (SAM) tools and import software assets, including those not procured through SoftwareOne.
The Software Assets module, offered as part of Cloud Managed Services, allows you to manage your software assets and inventory for software purchased through SoftwareOne. To access this module, navigate to the main menu and select Inventory > Software Assets.
The Catalog module within the Marketplace Platform centralizes all features related to catalog management, making it easier to make purchasing decisions by consolidating product data, prices, and items.
You can access a catalog of software products, view a list of purchasable items available to your organization, and explore detailed pricing structures based on your organization's buying entities and the authorized SoftwareOne sellers.
To get started, see the following link:
To update your preferences using the My profile option:
Sign in to your account, then select the profile menu in the upper right.
Select My profile.
Go to the Notifications preferences tab. All notification categories are displayed.
Select the Edit option, then in Edit notification preferences, use the checkboxes to enable or disable the category.
Select Save to save your preferences.
To update your preferences from your notification email:
Open the notification email you received.
Scroll down to the footer and select the Manage notifications link. The Manage notifications form opens in your browser.
In the Manage notifications form, use the checkboxes to enable or disable the category.
Select Save to save your preferences.
Additionally, you can download your statements in the XLSX format from the statement details page.
To download your statement:
Navigate to the Statements page.
(Optional) Refine your list of statements. You can filter statements using criteria, such as status, type, ID, and more. For details, see Filter Billing Statements.
Locate the statement you want to download. Then, select the statement ID.
On the statement details page, select the Attachments tab, and do one of the following:
Select the link in the Reference column.
Select the actions icon (•••) and choose Download.
The selected statement is downloaded to your system. For details on how to read and understand your statement, see Understand Your Billing Documents.
To add or remove licenses from a subscription:
Navigate to the Subscriptions page.
Select the required subscription.
On the subscription details page, select Edit.
In the Edit subscription wizard, complete the following steps:
Items - Update the quantity in the New qty field. You'll notice that the sales price of the subscription changes as you adjust the quantity. When done, select Next.
Details - Add or update the reference ID and your comments. Then, select Next.
Review - Check the details and select Place Order.
A change order is created in the system and sent to the vendor for processing. The new change order is also displayed in your list of orders on the Orders page.
When the change order is being processed, the status of the subscription and the agreement change to Updating. This indicates that the agreement is temporarily locked, and no further orders can be placed under this agreement until the change order is completed.


Licensees - On the Licensees page, partners can view their own organizations as well as third-party organizations. The Resale column indicates whether a licensee is procuring for self-consumption or reselling. If the value in the Resale column is Yes, it means the licensee will order products and services for resale purposes.
Navigate to the Agreements page.
Select the required agreement. Make sure that the agreement is active.
On the agreement details page, select Buy more to start the purchase wizard.
In the Items step, do the following:
Select Add items. A new window (also called Select items) opens, displaying the products you can order under this agreement.
Select the items you want to order. You can use filters to find the items easily. When selecting items, be sure to verify the billing terms and the duration of the subscription.
Select Add items. Your selected items are added to the agreement, and the Select items step is displayed again.
Set the quantity of your newly added items in the New qty field. Then, select Next.
In the Details step, add or update the reference ID and your comments. Then, select Next.
In the Review order step, verify the information and select Place order.
A change order is created for the agreement and sent to the vendor for fulfillment. Select View details to go to the order details page or select Close.
When your order has been placed, the agreement's status changes from Active to Updating. It means that the agreement is temporarily locked, and no further orders can be placed under this agreement until the current change order is completed. You can check the status of the order on the Orders page or within the Orders tab on the agreement details page.
Hover over the page and select the star icon. The star icon changes from empty to filled, and the page is added to your Favorites.
You can remove a page from your favorites by selecting the same star you used to mark it as a favorite.
When the star icon changes from filled to empty, it implies that the page is removed from your favorites.
If you are looking for an order, you can use the search options to find the order easily.
Different search options are available; for instance, you can search for an order based on its purchase order or reference number, address, and more.
When searching, you can also increase the Search Result Limit by choosing the required number of results to be returned. If you want to reset the search criteria, you can do this by selecting Reset.
You can add new columns and remove non-essential ones by selecting Customize.
Selecting Customize opens a new menu, allowing you to choose the required columns as necessary. You can also resize the columns by clicking between them.
Use the filter icon in the column header to apply filters.
To sort the data for a column, select the column header, or select the filter icon and then select Sort Ascending or Sort Descending.
For each order, the Actions column lets you open the order details page by selecting View.
The details page displays in-depth information for your selected order, including item details, pricing, tax information, and more.
You can also export the order information by selecting the actions icon (•••) and choosing one of these options: Export to PDF, Export to Excel (CSV), or Export to Excel (XLSX).
You can also view all invoices for an agreement by selecting the Invoices tab on the agreement's details page.
To download an invoice from the invoice details page:
Navigate to the Invoices page.
(Optional) Refine your list of invoices. You can apply various filters to find invoices quickly. For details, see Find Specific Invoices Using Filters.
Locate the invoice you want to download. Then, select the link in the ID field.
On the invoice details page, select the Attachments tab.
Under Actions, select Download. The selected invoice is downloaded as a PDF.
For details on how to read and understand your invoice, see Understand Your Billing Documents.
To view the detailed information for a statement, select the statement ID on the Statements page.
The details page of a statement contains links to the related business objects and general statement details. You can also view the following tabs:
Charges
Displays a list of charges and subscriptions for the billing period.
Attachments
Allows you to view and download the statement. For details, see .
Details
Displays reference information, like the additional IDs and timestamps.
Audit trail
Displays an audit trail of events. For details, see .

The Products page contains all products available for you to order.
You can access this page by signing in to your account and selecting the main navigation menu. All products are categorized by the vendor name and displayed as cards.
To view detailed information for a product, select the product name.
Starting the ordering process
When you are ready to order, select Buy now on the details page. The ordering process begins, containing a series of steps that must be completed to place the order.
Placing the order
The ordering steps might vary slightly depending on the product you are ordering and the information you need to provide. At a high level, the following steps are involved:
Select agreement - Select an existing agreement or create a new one. The option you select in this step determines the next step. For instance, when you create a new agreement, the Select licensee page is displayed. However, if you use an existing agreement, the Select items page opens.
Select licensee - Choose an existing licensee or create a new one.
Agreement details - Fill out the contact form.
Select items - Choose the items you want to order and adjust the quantity of the selected items.
Additional information - Add the additional IDs for the order and agreement.
Review order - Review the order details, read the terms and conditions, and place your order.
Summary - Review your order summary.
After the order is placed, we verify the details and process the order. The General tab on the order details page displays the order's status. If there are any issues, the same details page provides information about the problem and the actions you must take so your order can be processed.
Select the link for the agreement in the Agreement column.
Select the Attachments tab. All files related to the agreement are displayed.
Select the filename in the Reference column to download it to your system.


Certain concepts and terms are central to the functionality and design of the Marketplace Platform. We recommend that you understand the terminology because it's often referred to in our platform and documentation. Understanding the terminology will make it easier for you to interact with the platform and maximize its use.
The Marketplace Platform seamlessly brings together various actors to facilitate the buying, selling, provisioning, and billing of software products.
Actors represent different entities that interact with the platform for procurement and fulfillment-related activities, as well as other operations specific to the platform.
The following are the key actors in our platform:
Vendors - A vendor is a company or person from whom SoftwareOne buys software solutions. Vendors develop and sell their products and services. Examples include Microsoft, Dropbox, and more.
Distributors - A distributor is an entity that resells software solutions sourced from multiple vendors to resellers. Distributors facilitate software procurement in cases where direct relationships with vendors are not feasible.
Associates - Associates are internal SoftwareOne associates who administer the business network. Our associates are involved in various processes throughout your journey with both SoftwareOne and the Marketplace Platform.
Partners - Partners represent entities or businesses that buy products or services from SoftwareOne for resale to other businesses.
Clients - A client is a company or organization that uses our platform to buy software products for their own use or direct consumption.
Developers and system integrators - Developers and system integrators represent entities involved in building integrations within the business network.
Users - Users represent individuals or persons who can sign in to the platform using their credentials and perform all operations associated with their permissions. To learn more, see .
Account - An account is an object that represents a company or an organization utilizing the Marketplace Platform. Three types of accounts exist in the platform: Client account, Vendor account, and Operations account.
Client account - A client account is used by our clients and partners to establish agreements and procure software solutions for their enterprises.
Vendor account - A vendor account is used by vendors to define the product structure and make those products available for ordering through the marketplace.
Operations account - An operations account is used by SoftwareOne associates.
In the Marketplace Platform, an account can contain one or multiple users:
Additionally, users are not restricted to a single account. They can belong to multiple accounts and without signing out of the platform.
Group - A group is an object that facilitates permissions in the scope of an account. Groups contain users, and all users in the group have the same permissions. Permissions are assigned at the group level, rather than at the individual user level.
Users can also be a part of multiple groups, much like users can belong to multiple accounts. For details on how to manage groups, see .
Seller - A seller is a SoftwareOne entity (for example, SoftwareOne Canada) that buys software solutions from vendors (like Microsoft) and sells those solutions to clients.
Sellers are responsible for generating issues and issuing them to the buyer entities of clients. They act as an intermediary in the transaction process.
Buyers - Buyers represent an entity that engages in commercial activities with the SoftwareOne reselling entity (known as Sellers).
Buyers are the recipients of invoices issued by SoftwareOne, and they are essential for creating orders, agreements, and subscriptions. For details on how to manage buyers, see .
Licensees - Licensees are the entities that consume the software products or services procured by the buyer. Licensees are critical in establishing agreements alongside buyers and sellers.
Client account users can view licensees and manage them through the platform. To learn more, see .
An agreement is an object outlining the relationship between the seller, buyer, and licensee. They are the foundation for placing orders and creating subscriptions in the platform.
They also establish the terms and conditions under which transactions occur. Without an agreement, orders cannot be placed through the marketplace.
For more details on agreements and how to manage them, see .
Orders - An order is an object that signifies a business transaction under the framework of an established agreement.
The Marketplace Platform supports various types of orders to support different scenarios and the requirements of our clients and partners. The following order types exist in the platform:
Purchase order - Purchase orders are created when you buy a new product or service by creating a new Marketplace agreement.
Change order - Change orders are created when you modify your agreement or change the subscription quantity, such as downsizing the license quantity or buying additional resources.
Terminate order - Terminate orders are created when you terminate your agreement or subscription with SoftwareOne.
For details on how to manage your orders, see .
Subscriptions - Subscriptions are linked to an agreement and represent service provisioned over a set period. An agreement can contain one or more subscriptions.
Subscriptions can be changed only through the order. For example, to terminate a subscription, you must place a termination order. Similarly, to add more licenses, a change order must be placed. It’s not possible to modify a subscription directly without placing an order.
For details on subscription management, see .
Products - Products are the solutions or services offered by vendors through the marketplace. They contain various items and parameters, which are also defined by vendors.
Items - Represent the individual stock-keeping units (SKUs). A product can contain one or more items, each with its specific name and price.
Parameters - Parameters represent structured data used by vendors to collect information from clients during the ordering process. Examples of this information might include contact details, address information, domain name, and more. Parameters can also be used by vendors to pass information to clients during provisioning.
A Price List is an object that holds key pricing details of each item within the product.
Vendors can define the price lists for different regions. These price lists are linked to specific sellers and are organized through an object called Listing.
The Listing object is established by SoftwareOne associates after reviewing products. It links the product price list with the seller, ultimately making the product available for our clients in the SoftwareOne Marketplace.
The Settings module includes functionalities that administrators can use to manage various aspects of the account. Admins can access the module from the main menu.
In your account settings, you'll find various options enabling you to review your basic account details and manage users, licensees, groups, and other properties.
Use the following links to learn about these options and how to use them:
- Update the account information for your organization, such as your account name and logo, company contact information, and address.
- Create API tokens to access the modules programmatically and manage your existing tokens as needed.
- Track all activity within your account and view the audit records.
- View a list of buyers mapped to your account and enable, disable, or edit buyer details.
- View a list of groups in your account. Add or remove groups and edit groups as needed to easily manage the access permissions for each group of users.
- Create new licensees and manage your licensees by updating the licensee information and enabling or disabling licensees.
- Configure recipients and manage notifications and categories for your account.
- View a list of SoftwareOne entities linked to your account.
- Add or remove users from the account, resend invitation links, and edit groups to which the user has access.
The Statements page in the platform shows all statements that have been created for your account.
If you are looking for a specific statement, you can use filters to locate it easily. You can find a statement using criteria, such as statement ID, type (debit or credit), the date it was created, and status. You can also use other filters, such as agreement name, total sales price, and more.
This topic describes how to apply the two commonly used filters, including Type and Status.
To view statements based on their type:
On the Statements page, select the Filter option in the table.
In the Filters box, select Add another condition, then define the conditions as follows:
Select Type.
Set the condition to Equal.
Choose the type of statement: Debit or
Close the filter box. All statements matching your specified status are displayed in the table.
To view statements based on their status:
On the Invoices page, select the Filter option in the grid.
In the Filters box, select Add another condition, then define the conditions as follows:
Select Status.
Close the filter box. All statements matching your specified status are displayed in the table.
In the Marketplace Platform, change orders are created when you add more licenses to your subscription and place an order through the platform.
If split billing is active for your agreement, you can select buyers and assign billing to those buyers when placing the order.
To split billing when ordering additional licenses:
Open the details page of the subscription and select Edit in the upper right. Make sure that for the agreement and .
Increase the quantity as needed in the New Qty field and select Next. In the following image, the quantity is updated from 30 to 40 for one of the items in the subscription.
Select the buyer you want to allocate the billing to.
Choosing None allocates the billing based on the configured split percentages for this subscription.
Choosing a buyer allocates the billing according to the percentage set for this buyer.
Enter the reference information for this order, then select Next.
Review the information on each tab and select Place order to finalize.
Select View Order to navigate to the order details page. Otherwise, select Close.
When split billing is activated, the platform assigns 100% of the billing to the default buyer in your agreement, known as the Owner buyer.
You can configure additional buyers and distribute subscription costs across those buyers using the Edit option on the agreement details page.
When selecting buyers, there's no limit to the number of buyers you can select, meaning you can choose as many buyers as necessary to divide costs effectively.
To configure buyers:
Open the details page of your agreement. Make sure that for the agreement.
On the Split billing tab, select Edit.
In the Split billing dialog, select the buyers you wish to add. You can only select buyers who are linked to the seller of this agreement. Additionally, the Owner buyer is selected by default, and you can't change it.
Select Save. Your newly added buyers will be displayed on the Split billing tab in your agreement.
You can access your invoices by navigating to Billing > Invoices in the main navigation menu.
The Invoices page displays all invoices generated for your Marketplace account, allowing you to manage and track them easily. The page also contains filters to help you locate the invoice you want to view. You can find an invoice using criteria, such as invoice status, dates, balance due, and more.
This topic describes how to apply the two commonly used invoice filters: Status and Due date.
To view invoices based on their status:
On the Invoices page, select the Filter option in the table.
In the Filters box, select Add another condition, then define the conditions as follows:
Select Status.
Close the filter box. All invoices matching your specified status are displayed in the table.
To view invoices based on their due date:
On the Invoices page, select the Filter option in the grid.
In the Filters box, select Add another condition, then define the conditions as follows:
Select Due date.
Close the filter box. All invoices matching your specified criteria are displayed in the table.
To get started as a partner, you must have an account on the Marketplace Platform. This account must be set up as a partner account.
While partner accounts have the same features and functionalities as client accounts, they also provide additional features to help you procure for your end customers and transact successfully on the Marketplace.
Once you've signed in to your account, there are various ways to get started, depending on the actions you want to take. Use the following table as a guide to access the most important topics:
Use these additional resources to learn more about the platform:
This tutorial describes how SoftwareOne partners can set up resale licensees within the platform.
Licensees are the entities that use the software products or services procured by the buyer. Partners who wish to order products from the Marketplace and resell them to other organizations must configure these licensees as resale licensees.
A resale licensee is defined as a licensee that engages in resale activities, specifically ordering products for resale rather than for their self consumption.
Make sure you have permissions to create new licensees. Only account administrators can create and manage licensees in the platform.
Start the Add Licensee wizard
To start the wizard:
Navigate to the Licensees page.
On the Licensees page, select Add to start the Add Licensee wizard.
After you have configured the licensee, you can order products for resale through the Products page in the platform. See for details on how to start the ordering process.
Split billing is a feature that allows you to divide the billing for your subscriptions among different buyers in your account.
Designed for organizations with multiple legal entities, split billing lets you select buyers and allocate billing for your subscriptions to different buyers. This enables cost-sharing and accurate tracking of consumption. It also ensures that each buyer is accountable for a share of the subscription cost based on usage.
You can divide the subscription costs easily by specifying percentages or estimated license count (ELC) for each buyer. Once defined, these details are used during invoicing to generate separate invoices for each entity. In cases where split billing is enabled but the split hasn't been defined, 100% of the billing is allocated to the default buyer in your agreement, also known as the Owner buyer.
The platform also lets you allocate billing when ordering additional subscription licenses. It means when creating a change order for an increase in subscription quantity, you can select buyers and allocate billing to those buyers.
In the Marketplace Platform, the following rules apply to split billing:
Split billing must be activated at the agreement level. Once activated, this feature cannot be deactivated.
After activating split billing, new purchases under the agreement are invoiced based on the allocation percentage or the specific buyer you've allocated the subscription billing to.
The ELC is indicative only. The Split billing feature is designed around allocation percentages, which means the platform always considers percentages during billing.
You can modify the allocation for your active subscriptions at any time. However, the changes will only take effect in your next billing cycle.
Currently, only Adobe VIP Marketplace supports split billing.
You can activate split billing using the Split Billing option on the details page of your agreement. For instructions, see .
Once activated, the Split billing tab appears on the agreement’s details page.
By default, the buyer associated with the agreement is set as the Owner buyer, and 100% billing is allocated to the Owner buyer. You can configure additional buyers using the Edit option. For more information, see .
SoftwareOne is a global provider of software and cloud technology solutions. Our Partner Program helps companies that sell cloud-based products and services expand their businesses by accessing new markets around the world.
The program supports partners such as Value-Added Resellers (VARs), System Integrators (SIs), and Managed Service Providers (MSPs), and other businesses like Cloud Solutions Providers (CSPs), Direct Marketing Resellers (DMRs), and Retailers to grow their revenue and scale their market presence. Our program equips partners with the tools, training, and support to accelerate growth, reach new clients, and build long-term relationships while minimizing the risks associated with competitive solutions.
Marketplace Platform and Partners Management
The Marketplace Platform includes a Partner Management feature, which allows partners to access features designed to support resale activities.
Unlike clients, who procure software or services for self-use, partners can procure SaaS products for their own use and resale to their end customers.
This is managed at the licensee level within the platform. Licensees are the end-users or consumers of a license, and they are linked to agreements in the platform. Partners can create new licensees through self-service and configure them as resale licensees. When a licensee is marked for resale, it becomes available during the ordering process, indicating that the purchase is intended for resale.
Partner enrollments and certificates
Through Partners Management, partners can also enroll in various programs, complete certifications, and apply those certificates when ordering products to access the benefits associated with those programs.
To learn more, see the following links:
An order can have several states from the time it's created until its completion.
The following diagram shows how an order's state can change during its lifecycle:
Draft
The platform has created the order as a draft. This status applies to orders created by the system for validation purposes. It doesn't apply to orders saved for later during the ordering process.
Quoted
The order was intentionally saved for later using the Save Order option, available when creating purchase or change orders.
Processing
The order has been created, and it's currently awaiting processing by the vendor.
Your Marketplace billing statements include all the charges used to generate an invoice for the specified billing period.
Each charge on your statement corresponds to a transaction related to the subscriptions in your agreement. You can use the list of charges to understand the composition of your invoice and verify each charge.
You can view the charges in two ways:
On the Charges tab in your Excel statement. To download or view a sample Excel statement that shows how the charges appear, see the section.
On the statement details page in the platform.
To view the charges in the platform:
Navigate to the Statements page.
(Optional) Refine your list of statements by applying filters. For details, see .
Find the statement you want, then select the link in the ID column. The statement details page opens, and all individual charges are displayed on the Charges tab.
To view the extended information for a specific charge, select
In some cases, you may need to provide additional information if your order information is incorrect or incomplete, or if specific steps must be completed before we can process your order.
Orders that require your attention are marked as Querying in the platform. When you open a querying order, the General tab on the details page shows what needs to be corrected and how to address the issue.
Once you have completed the necessary steps, you must update the order's status from Querying to Processing. Changing the status informs SoftwareOne and the vendor that the order is ready for their review and further processing.
To move an order from Querying to Processing:
Navigate to the Orders page.
Select the desired purchase order in the Querying state. If you have several orders, use the or to quickly locate your order.
On the General tab, review the action required message. The following example message indicates that there's an issue with the parameters, and they must be updated using the Parameters tab.
Take the action as necessary, then select Process. Note that this button becomes available only after you have addressed the issue.
Your order's status changes to Processing, and the Process option becomes unavailable again.
Account administrators can invite new users to the account from the Users page in the platform. The page is available under Settings in the main menu.
Admins can invite individuals who may already have an account, as well as individuals who don't yet have an account. When an administrator invites someone, an invitation email is sent. It's important to take action once the invitation has been emailed. Account invitations are valid for only 7 days from the send date. After 7 days, invitations expire and will need to be resent.
Administrators can invite users through the Add option on the Users page. See for instructions.
When creating the invitation, you must provide details, such as name, email address, and contact information of the individual. You'll also need to select all the groups that the individual should belong to.
When ordering a product, the Marketplace Platform provides an option to add comments or instructions, allowing you to include information that you may want to link to the order.
After the order is submitted, any notes you entered are displayed on the Notes tab within the order details page. If you need to update these notes, you can use the Edit option on the Notes tab. You can also use the same option to add new notes if you didn't add them when the order was originally placed.
Notes can be added or updated at any time, regardless of the order's status.
To add or update the notes for an order:
Navigate to the Orders page, then select the desired order.
On the order details page, select the Notes tab.
Select Edit.
In the Edit notes dialog, add or update the notes as necessary. A maximum of 300 characters is allowed.
Select Save to save the information. The details are updated and displayed immediately on the Notes tab.
The SoftwareOne (SWO) CSP Partner Program is designed for SoftwareOne partners to ensure compliance with our established terms and conditions.
All SoftwareOne partners must enroll in this program to obtain a compliance certificate. This must be done before ordering products for resale. To learn more about this program, see Partner Programs.
You can enroll in the SWO CSP Partner Program if your account has been set up as a partner account. For details on how to check this, see How to Verify If Your Account Has Partner Capabilities.
Open the SWO CSP Partner Program details page
To open the details page:
Navigate to the Programs page.
Select SWO CSP Partner Program. The program's details page opens.
Upon successful enrollment, a certificate will be created. You'll need to select this certificate when ordering CSP products and services through the platform.
When you update your request, for example, by attaching documents, it's important to change the request status to Processing and send the request back to the vendor. This action informs the vendor that you've replied to their query and the request is now ready for their review.
Before changing the status of your request, note the following points:
You can change the status of your request to Processing only if the current status is Querying. If the request is already in Processing or Completed state, the option to change the status is unavailable.
Only change the status of your request to Processing once you've provided all the information and the request is ready for the vendor's review.
To change the status of your request:
On the Requests page, select the required request. The request details page is displayed.
Make changes as necessary and then click Process.
In the Process request dialog, add your comments, and then select Process.
The status of your request changes from Querying to Processing. If you added comments in the Process request dialog, your comments are displayed and visible to everyone on the Activity tab.
The Export option on the Software Assets page enables you to download your software asset inventory in various formats.
Additionally, through the Exports option, you can also create quick reports and export your data in the commonly configured format (column names/order) for several Software Asset Management (SAM) tools, such as:
Aspera
Miss Marple
Snow
Flexera
ServiceNow
The Review status on the Details tab of a change order indicates that a change has been made to the subscription.
When you see this status, it means that you need to review the split billing configuration for the subscription, as it may need adjustment.
You can review the allocation by clicking Edit. When the Edit dialog opens, review the details. If any changes are needed, you can update the split as necessary and then save your changes.
To enable the Software Assets module:
Sign in to your account as an account administrator.
From the main navigation menu, navigate to Cloud Tenant Setup.
On the Cloud Tenant Setup page, select Activate in the Actions column.
Once the module is activated, your account will be visible in the other Cloud modules (such as Budgets, Resources, Chargebacks, and Consumption) within 24 hours.
To deactivate the module:
Navigate to the Cloud Tenant Setup page.
In the Actions column, select Manage.
Select Disable Software Assets. Your software assets are removed from all the Cloud modules.
Note that the Remove duplicate transactions option is enabled by default. It means that transactions relating to Azure or Office 365 won't be visible in the Resources, Budgets, and Consumption modules. If you disable the option, the changes take effect after 24 hours.
The Additional Client ID field on the agreement details page lets you enter a purchase order number that will be displayed on your invoice.
When you create an agreement, the Additional Client ID field is initially empty. You can update this field with a value for billing and invoicing purposes.
To update the Additional Client ID field:
Navigate to the Agreements page.
Select the link for the agreement in the Agreement column.
On the agreement details page, select the Details tab. Then, select Edit.
In the Edit ID dialog, enter the new client ID and select Save.
The updated ID is displayed as a Client ID within the Additional IDs section on the page. This same ID is also displayed on your invoice as the PO number.
Note that if the value you enter exceeds 20 characters, only the first 16 characters are shown on the invoice, followed by 3 dots (...). For more information, see
If you require personalized assistance or have queries regarding a product, you can contact the vendor or SoftwareOne directly through the marketplace.
You can contact a vendor only if the vendor has enabled the option. If the option is available, you'll see an Enquire Now, Contact Us, or a similar button on the Products page.
To create a new request:
Navigate to the Products page.
Select the product you wish to inquire about.
On the product details page, select the option to contact the vendor.
In the Request details step, provide the details of your request, then select Next.
In the Review Request step, review the information. When done, select Submit Request.
Your request is submitted, and a Processing status is assigned to it. Select View request to view the request details page. Otherwise, select Close.
In the Marketplace Platform, a product refers to a software solution or services offered by a vendor. Each product may contain one or more items (SKUs) available for purchase.
Products also contain parameters that are used to gather essential information during the ordering process. These parameters may include details about the agreement, contact person details, item quantity, and more.
To view products in the Marketplace:
In the main navigation menu, select Catalog > Products.
On the Products page, browse the list of available products. The list is organised by vendor name and vendor ID.
Select a product to open its detail page, where you can view the full description, associated assets, items (SKUs), and pricing or licensing details.
To order a product:
On the product details page, select the Buy now button. The purchase wizard then launches and guides you through the steps to place your order.
These steps may vary depending on the product. At a high level, you’ll go through the following process:
Select agreement - Choose an existing agreement or create a new one. The option you select determines the next step. For example, if you choose “Create new agreement”, the Select licensee page appears; if you choose an existing agreement, the Select items page appears.
Select licensee - Choose an existing licensee or create a new one.
Agreement details - Complete the contact information form.
The following diagram shows the possible states of a subscription and the transition between these states:
Draft
The vendor has created the subscription, but the order has not been completed yet.
Active
The subscription is active and in use.
Updating
A business transaction is in progress for the subscription.
This status applies to change orders submitted for the subscription.
Terminating
You can attach a file to your request at any time, regardless of the request's status. You can also delete any files you have previously added.
Make sure that the file you want to upload is in one of these formats: .pdf, .pptx, .doc, or .xlsx.
To add a file to your request:
Navigate to the Requests page and select the required request.
On the details page, select the Attachments tab. Then, select Add.
In the Add attachments dialog, do the following:
In the Name field, provide a file name.
In the Description field, add a brief description of the file you are adding.
In
To edit or delete an attachment, go to the same Attachment tab where you originally added the file. Select the actions icon (•••) next to the file, and then select Edit or Delete as needed.
If you choose Edit, upload the new attachment in the Edit Attachment section and save your changes.
If you choose Delete, a confirmation message will appear. Select Delete in this message to confirm the action.
In the Marketplace Platform, you can enter additional IDs or purchase order (PO) numbers when ordering a new subscription or adjusting license quantities. Once you've provided the number, it appears on your invoice. For information, see How can I enter a purchase order number.
Within the marketplace, the PO number is also displayed as Client ID on the Details tab of the agreement:
When split billing is activated for the agreement and more buyers are added, the platform assigns the specified client ID to the Owner buyer. By default, no ID is assigned to the additional split billing buyers.
If you want to assign IDs to additional buyers in your agreement, follow these steps:
Open the required agreement. Make sure that split billing is activated and buyers are configured.
On the agreement details page, select the Split billing tab. The buyers you've configured for the agreement are displayed.
Select the actions icon (•••) for the desired buyer and select Client ID.
In the Edit dialog, enter the new ID or purchase order number and click Save.
The value is then updated and displayed as Client ID on the Split billing tab. This same value is also included on the buyer's invoice in your next billing cycle.
If you are specifying a client ID for more buyers in the agreement, repeat the same steps for each buyer. You can also use the same steps to update the ID, including the client ID for the Owner buyer.
In the Marketplace Platform, an agreement goes through multiple states (also known as statuses).
The following diagram shows the possible states and the transitions between these states:
New
This is the default state of a newly created agreement.
Draft
The agreement has been saved as a draft because the purchase order has been saved for later during the ordering process.
Deleted
The Marketplace Platform supports various types of orders, including change, purchase, configuration, and termination orders. All orders are displayed on the Orders page.
If you need to find a specific order, you can use the filter option to search for it. There are several filter options to help you narrow down the list. You can apply a single filter or create a combination of filters by selecting different fields, operators, and values. This topic describes how to use these filters.
To find an order using a filter, such as status:
Navigate to the Orders page, then select the Filter option.
Select Add another condition to open a menu of conditions.
Define the conditions:
In the first field, choose the property. For example, to filter your orders by their status, select Status.
In the second field, choose the search operator. Different operators are displayed depending on the condition you selected in the first field. For this example, leave the value set to
Your list of orders is refreshed according to the filters. To reset the filters and revert to the default view, select Reset filters in the filter box.
To view detailed information for an order, select the ID in the Order column. You can then view basic order information and specific order details such as items, subscriptions, and more.
From the order details page, you can complete these additional tasks:
.
.
.
An invoice is a billing document you receive at the end of your billing period.
Invoices contain a summary of charges and other details associated with your account. Invoice PDFs also include subscription details and the consolidated charges for all items within the subscription. See Understand Your Billing Documents to learn more.
In the Marketplace Platform, you can view your invoices on the Invoices page. The page is available under Billing in the main navigation menu.
The main Invoices page displays a list of invoices and properties associated with each invoice, such as invoice ID, the total amount due, the date of issue, and the due date. The page also displays invoice status, including:
Paid - Indicates that the invoice has been paid in full. No further action is required.
Overdue - Indicates that the invoice is past due. Invoices in this state require immediate action to prevent service disruptions. Note that overdue invoices may attract penalties, interest, or both, depending on your terms and conditions.
Issued - Indicates that the invoice has been issued, but it hasn't been settled yet.
You can view detailed information for an invoice by selecting the invoice ID on the Invoices page.
The top of the details page contains links to the business objects associated with the invoice.
You can also view details, such as the due date, the currency you have been invoiced in, and the invoice amount. The details page also contains the following tabs, providing additional information:
A request in the Marketplace Platform represents a pre-sale inquiry. This can include queries about products, subscriptions, pricing, billing, product availability, and more.
Client account users can create new requests through the Products page and track existing queries through the Requests page. The page displays all requests, including requests that are raised by other members in your account.
You can view and manage your requests from the Requests page in the platform.
The details page of a request gives you in-depth information about the request. To open the details page, select the request on the Requests page.
On the request details page, you can view the request's general information, including the product for which you raised the request and the request status.
The details page also contains these tabs:
From the details page, you can complete the following tasks:
In some cases, you might need to change the display name of a subscription so you can find it easily in your list of subscriptions.
Subscriptions can be renamed using the Rename option on the subscription details page. You can rename only the subscriptions in the Active and Updating states.
To rename a subscription:
Navigate to the Subscriptions page.
Select the subscription you want to rename.
On the subscription details page, select the arrow and choose Rename.
In the Rename dialog, enter the new name and select Save.
The subscription is renamed, and the new name is visible across all pages that feature the subscription within the platform.
If your account contains multiple agreements, you can rename those agreements.
Agreements can be renamed as long as they are active. When choosing a new agreement name, we recommend that you enter a name that will help you easily search for or locate the agreement in your list of agreements.
Additionally, when renaming an agreement, make sure that the new name is not blank. Otherwise, the platform will display an error message.
To update an agreement's name:
Navigate to the Agreements page.
Find the agreement you want to rename.
On the agreement details page, select the arrowand choose Rename.
In the Rename dialog, enter the new name and select Save. The agreement's name is updated and displayed across all pages featuring the agreement within the platform.
If you want to assign a client ID to a subscription, you can do this from the subscription's details page.
Client IDs can only be added or updated for the subscriptions in the Active, Updating, Terminated, and Terminating states. For a description of these states, see Subscription States.
To update a subscription's client ID:
Navigate to the Subscriptions page.
Select the subscription you want to update.
On the subscription details page, select the Details tab. Then, select Edit.
In the Edit ID dialog, enter the new ID in the Additional ID field.
Select Save. The ID is updated and displayed as Client ID under Additional IDs.
If you need to modify the list of buyers or adjust their allocation percentages after setting up split billing, you can easily do so through the interface.
After you've set up split billing, you can add new buyers and remove existing buyers as needed using the Edit option on the Split billing tab of your agreement.
When removing buyers, only those without an allocation percentage can be removed. This means you'll need to assign the allocation percentage to another buyer before removing them from split billing.
If an allocation exists for the buyers you wish to remove, the buyer checkbox will be unavailable, as shown in the following image:
If you need to make any modifications to the allocation percentage for any of the buyers, you can edit the split billing details at any time.
Follow these steps to edit the allocation percentage for a buyer:
Open the details page of the required subscription.
On the Split billing tab, click Edit.
In the Edit split billing dialog, make the necessary changes to the allocation percentage or license count. Make sure that 100% is allocated across buyers.
Save your changes. The Split billing tab will display the updated allocation details. Note that the changes will only take effect in your next billing cycle.
SoftwareOne's legacy Partner Portal is being transitioned to the Marketplace Platform.
The Marketplace Platform offers the same self-service capabilities as the Partner Portal, but also includes several additional features that enable you (our partners) to expand your service offerings. The platform provides a more unified and streamlined experience, allowing you to take advantage of features that are specifically designed for you.
This topic outlines what you can expect during the transition and details the steps you must take to continue transacting with us.
Before we begin the migration process, you'll see a message in the Partner Portal indicating that your account will be migrated.
At this stage of the process, you don't need to take any action. However, we recommend that you become familiar with the terminology and experience of the new Marketplace:
- This page describes the key concepts and the terminology used within the Marketplace Platform.
- This page describes how to navigate and use the platform.
We plan and execute the entire migration process. It means you don't need to take any action.
When your account has been migrated, we'll send you an email.
You'll also see a message within the Partner Portal confirming that your account has been migrated.
When the migration has completed, the Partner Portal will switch to Archive mode. You'll still have access to your historical orders and invoices, but you won't be able to make new transactions.
Additionally, you'll receive an invitation to join the new Marketplace account. For details on how to accept the invitation and complete account registration, see .
After accepting the invitation, you can sign in and access your , , and customers (known as ).
After joining the account, you must enroll in the SoftwareOne Cloud Solution Provider Partner Program (SWO CSP Partner Program).
This enrollment is required to transact with all CSP products in the platform. For enrollment instructions, see .
Once you are enrolled and have your certificate, you can start transacting. If you need assistance, .
The Marketplace Platform uses data grids to display data.
A data grid is a table with rows and columns, and it contains several operations that allow you to customize the display of information.
You can sort and filter data, show or hide columns, adjust the column width, change the default rows per page, and more. This topic describes each of these tasks.
Sorting enables you to reorganize your data in ascending or descending order so you can understand and visualize it better. There are two ways to use the sort function in the grid.
Your Marketplace invoice includes various details that are pulled from the platform and displayed on the invoice.
This topic provides information on all such fields, helping you understand where the information comes from and how it corresponds to your invoice PDF. If you want to learn about the structure of your Marketplace invoices and statements, see the and sections, respectively.
Subscription management through self-service is a key feature of the Marketplace Platform, giving you the flexibility to order new subscriptions and manage the existing ones.
You can order new subscriptions through self-service, increase or decrease the number of licenses, and cancel your subscription. You can also edit the subscription name and manage renewals.
All subscriptions are listed on the Subscriptions page. The page displays all subscriptions, regardless of their status.
To open the details page for a subscription, select the subscription name.
The following diagram shows the possible states of a request created through the platform and the transition between various states:
These states are displayed as Status within the platform. They are also displayed beside the request name and ID on the details page.
Subscriptions can be terminated if you no longer need them or if you don't want to renew them.
As subscriptions are linked to agreements, the process for canceling a subscription varies depending on the number of active subscriptions in your agreement.
If your agreement contains several active subscriptions and you want to cancel some, but not all, subscriptions within that agreement, you must place a termination order for the subscription. For instructions on how to place a termination order, see .
If your agreement contains several subscriptions and you want to cancel all subscriptions, you must terminate the agreement altogether. You can terminate an agreement by placing a termination order. For instructions on how to terminate an agreement, see .
You can terminate an agreement by creating a termination order for the agreement.
When you terminate an agreement, all subscriptions with the agreement are terminated. Once terminated, the agreement can't be restored or used when ordering new subscriptions. However, you can still access and view the terminated agreement.
Before terminating an agreement, note the following points:
In the Marketplace Platform, an item is an individual stock-keeping unit (SKU) in a product. Items are part of a product, and they can have their own specific name, term, and commitment.
Additionally, there can be one or more items in a product. For example, the Microsoft 365 Business, Enterprise & Apps - Commercial product can include different items, such as Microsoft 365 Business Premium (1-year commitment, annual billing), Microsoft 365 Business Basic (no Teams, 3-year commitment, yearly billing), Microsoft Teams Enterprise (1-month commitment, monthly billing), and more.
SoftwareOne clients and partners can view the list of items in the platform and purchase them when placing an order.
To view a list of items:
If you have an order in your account that has been created but not placed yet, and you want to remind an individual about this order, you can send them an order reminder email.
The Send reminder feature triggers an email to remind the individual to take action on the order.
With this feature, you can share the order link with individuals in your account, as well as with those who have accounts on the platform but are not added to your account. Note that reminders can be sent for orders only in the Quoted status.
To send an order reminder email:
In the Marketplace Platform, you can order subscriptions by creating an order through the purchase wizard. The purchase wizard starts automatically when you select a product from the Products page.
The wizard is designed to guide you through the ordering process smoothly. It contains navigation buttons, a vertical progress bar with step numbers and title, and a data grid.
The progress bar shows how far you have progressed and how many steps remain before the order can be placed. The steps are defined by vendors, so they might vary depending on the product. Additionally, the wizard might skip some steps automatically depending on the options you select.
The is where the main content is displayed. This is where you can select different purchasing options, choose items, apply filters and sorting conditions, input your details, and so on.
When ordering a product, the Marketplace Platform provides an option to save an order and return to it later to submit it. Saved orders are displayed on the Orders page with a Quoted status.
This topic describes how you can save an order for purchasing later.
To save a purchase order for later:
If you saved an order during the ordering process and no longer wish to continue with it, you can delete the order. Deleted orders can't be recovered, but will still be displayed in your list of orders.
You can delete orders in the Draft and Quoted statuses only. Orders in any other state can't be deleted. Additionally, when a draft purchase order is deleted, the agreement linked to the draft is also deleted.
To delete an order:
To use the Marketplace Platform effectively as a Partner and make the most of its functionality, it's important to understand how the platform works and be familiar with its concepts.
Partner accounts include all the features and functionalities of client accounts, along with additional features to facilitate transactions and procurement within the Marketplace.
Watch the video guide for details on using the Marketplace Platform as a SoftwareOne partner, or see .
In the Marketplace Platform, we automatically renew subscriptions for your convenience and to prevent any service interruptions.
If you don't want your subscription to renew automatically, you can disable auto-renewal if it's supported for your specific product. By doing so, your subscription will expire at the end of the commitment period or renewal date, and you will not be billed after that.
In cases where you previously disabled auto-renewal for a subscription but want to re-enable it, you can do so before the subscription expires.
Disabling or enabling automatic renewal can be done by placing a configuration order.
Before disabling or enabling automatic renewal, make sure that both the agreement and subscription are active.


Querying
The ordering parameters have been updated by the vendor. The order requires an action to be taken by the client.
Completed
The order has been processed by the vendor.
Failed
The order has been marked as failed by the vendor or SoftwareOne. The failure reason is displayed on the order details page.
Deleted
The order has been deleted. This status applies to orders that are deleted intentionally and the ones removed by the platform. See My draft or quoted order has been deleted to learn more.

A termination order has been created for the subscription through the Client Portal.
Terminated
The vendor has completed the termination order and the
subscription is now terminated.
Deleted
The draft subscription has been deleted by the vendor.

The draft agreement has been deleted because the draft purchase order associated with the agreement was deleted.
Provisioning
The agreement has been sent to the vendor and it's pending fulfilment.
Failed
The agreement has failed because the vendor or SoftwareOne canceled the purchase order.
Active
The vendor has completed the purchase order, and the agreement is active. Active agreements have at least one active subscription and no open orders.
Updating
A business transaction or a change order is in progress for at least one subscription within the agreement.
Terminated
The agreement has been terminated. It no longer contains an active subscription.

Overview
Displays a summary of the invoice.
Entities
Displays the extended information for the entities linked to the invoice.
Attachments
Allows you to download the invoice as a PDF. For details, see View or Download Invoices.
Details
Displays reference information, such as additional IDs and timestamps.
Audit trail
Displays an audit trail of events related to the invoice. For details, see Audit Trail.


Complete
The request has been completed.
Draft
The request is being created.
Processing
The request is pending a response from the vendor or SoftwareOne.
Querying

The vendor or SoftwareOne has updated the request.
It now requires an action to be taken by a client account user.
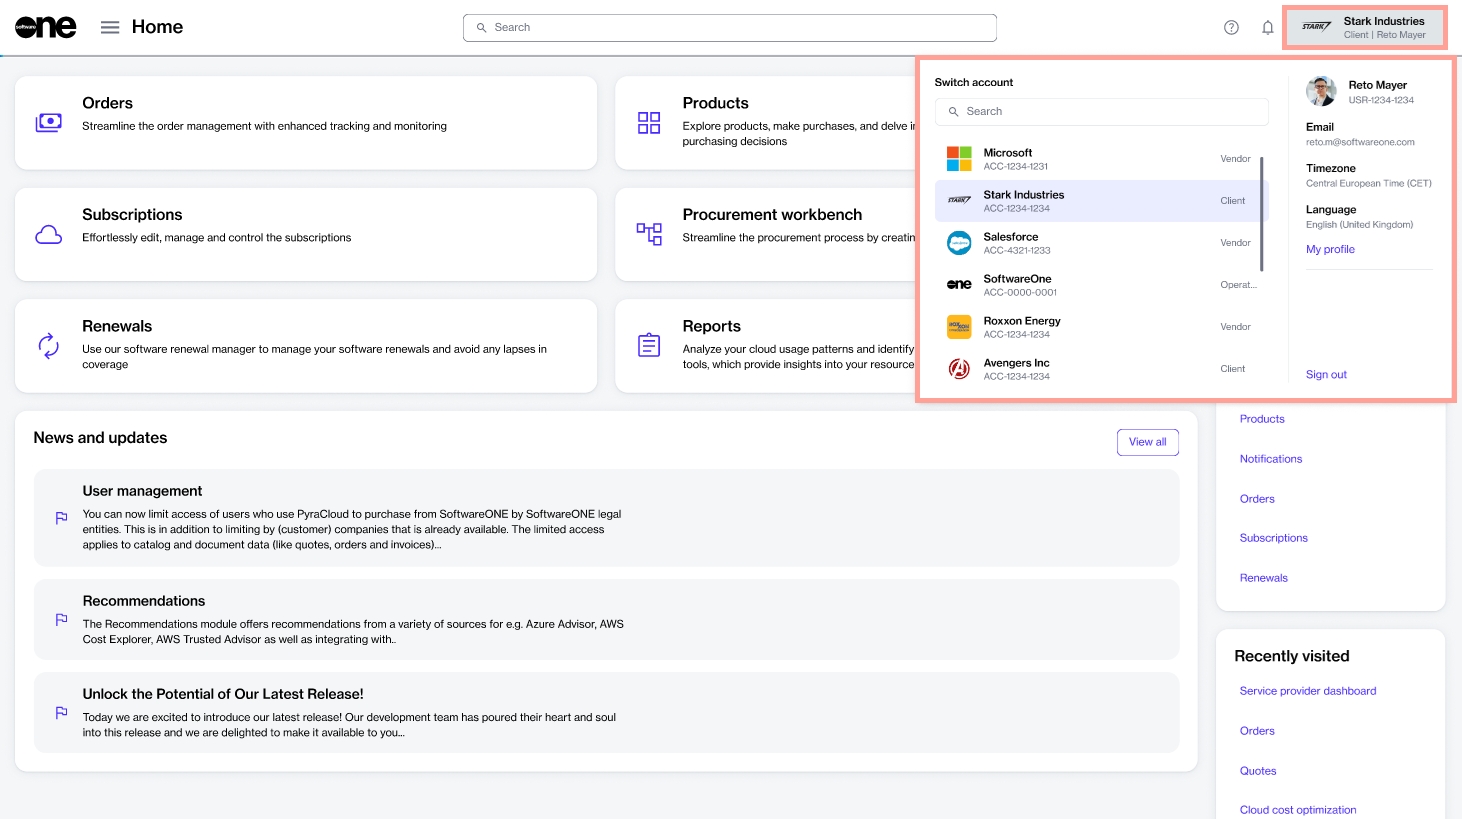
Choose the required status from the list. Options include Error, Generated, Generating, Issued, Pending, or Queued.


Choose one of these conditions as needed: Overdue, Issued, or Paid.
Use Greater to include invoices with a due date after the specified date.
Use Lesser to include invoices with a due date before the specified date.
Enter the date in the DD/MM/YYYY format, or select the calendar icon to choose a date.


Manage your account settings, including user groups, licensees, notifications, and more.
Find answers to commonly asked questions.
Familiarize yourself with the key concepts and terminology.
Learn how to navigate the platform and use features like data grids, object spotlight, account switcher, and more.
Understand the key points to establish a GDAP or a partner relationship request with SoftwareOne.
Enroll in the SoftwareOne CSP Partner Program (mandatory for ordering products for resale).
Order products for resale to your end customers by creating a new agreement.
Order additional items using an existing agreement.
View subscriptions, add or remove licenses, and terminate subscriptions.
Add new users to your account.
Set up your new licensee
General - Provide the following details and select Next:
Logo - (Optional) Add a logo for the licensee. You can upload an image or drag the image into the field.
Licensee name - (Required) Provide a name for the licensee, which could be your company name, department name, or username.
Resale licensee - (Optional) Select this checkbox to configure the license as a resale licensee, so they can order software products and services for resale.
External reference - (Optional) Enter a reference number or identifier for the licensee.
Licensee description - (Optional) Provide a brief description of the licensee.
Buyers - Choose the buying entity you want to link with the license, then select Next.
Sellers - Choose the SoftwareOne entity you want to order from. Only the sellers that are mapped to the buyer you've selected in the previous step are displayed. When done, select Next.
Contact person - Choose if you want to assign a contact person to the licensee, then select Next:
None (leave unassigned) - Choose this if you don't want to assign a contact person.
Select an account user - Choose this to assign an existing user within your account as the contact person.
Add contact details manually
Address - Enter the address for the new licensee and select Next. Note that the Create a new licensee address option is selected by default.
Overview - Review all the details you've entered and select Add. The licensee is configured as a resale licensee in the platform.
Summary - Select View details to open the licensee details page. Otherwise, select Close.
Buyers can only be removed from split billing if they have no configured allocation percentage. The platform doesn't allow you to remove buyers if an allocation percentage exists for those buyers.
Start the Add Certificate wizard
To start the wizard:
On the details page, select the Certificates tab.
Select Add.
Follow the wizard to complete the enrollment
Certificant - Choose the buyer you want to enroll in the program, then select Next.
Details - Provide a name for the certificate and select Next.
Overview - Review the details and then select Add.
Summary - Select View details to open the enrollment details page. Otherwise, select Close.

Additional information - Add any additional IDs for the order and the agreement.
Review order - Review the order details, read the terms and conditions, and place your order.
Summary - View your order summary.
Select Add. The file is added to the request and displayed on the Attachments tab.
In the third field, type or select a value from the list of preconfigured values. The values displayed in this field are determined by your selection in the first field. To see your draft orders, select Draft.
If needed, select Add another condition to specify additional conditions as needed.
You can sort the data for a column by selecting the column header. When you select the header, the preconfigured sort options are displayed. You can choose any option from the list.
Sort multiple columns
If you want to apply multiple sorts, selectSort in the grid and then follow these steps:
In the Sort box, select Add another sort.
Choose the required property and select the display order (Ascending or Descending). To add another sorting rule, select Add another sort. You can add multiple rules.
Select Close. All columns that have sort conditions applied will be highlighted in the grid.
Filters help you narrow down data based on specific attributes. Depending on the type of data you are searching for, you can use a single filter or create multiple filters using different conditions and AND/OR operators.
For instance, when ordering new items, you could create a filter to show only the items with a specific name. Similarly, if you have multiple subscriptions, you could use the AND/OR operators to view subscriptions that are active AND have auto-renewal enabled.
You can also use the Search Query filter in the grid to enter a search term to find matching records within other filter conditions, such as orders, agreements, and more.
To create filters:
Select the Filter option in the grid.
In the Filters box, select Add another condition, then define the conditions:
Choose the required property.
Select the condition, such as equal, contains, starts with, and so on.
Choose a value from the list of preconfigured values or type the keyword.
If needed, select Add another condition to add another condition and combine those conditions using the AND or OR operators.
AND - If you select this operator, the results are displayed only if both conditions are met.
OR - If you select this operator, only one of the conditions needs to be met for the results to be displayed.
As you define filters, the data in the grid refreshes automatically. If the platform doesn't find any data matching the filters, it displays a message.
Show or hide columns
The Columns selector in the data grid lets you show or hide a column. Using this option, you can view only the information you need and hide other columns from the page.
You can use the checkbox next to each column name to hide or display a column. If you have hidden a column, you can make it visible again by selecting the same checkbox. Note that some columns are shown by default, and you cannot hide them.
Adjust column widths
The Columns selector also contains options to adjust the column width. These options include:
Default size - This option resets each column in the table to its default size. You can use this option if you've made adjustments and want to return all columns to their original state.
Fit to content - This option resizes each column in the table to fit its specific content. It means that the width is adjusted to the content within the column.
Fit to screen - This option resizes each column to make the entire table fit your screen.
If the data in the grid has changed, you can refresh the data to make sure you are working with the latest data at all times. Use the Refresh option to fetch the latest data from the system.
By default, the Marketplace Platform displays 10 rows of data on a page.
You can change the default value by selecting another value from the Rows per page option on the lower-right side of the grid. You can choose to show 5, 10, 25, 50, or 100 rows per page.
If the grid contains several rows, the rows are split into pages, and page numbers are displayed on the lower-left side of the table.
You can view the page number you are currently on and navigate between pages using the Next and Previous options. You can also go to a page directly by entering the number in the Page field and pressing Enter.

PO No.
Mapped from the Additional Client ID in your agreement details.
External Document No.
Mapped from the agreement ID.
Your Reference
Mapped from the statement ID.
Agreement
Mapped from the agreement details page.
Product
Mapped from the agreement details page.
Licensee
In the Actions column, select View to see detailed information for the quote.
To renew an expired quote:
Navigate to the Quotes page, then select the quote to renew.
Select Renew Expired Quote.
Select Yes to confirm that you want to renew the quote. Your renewal request is submitted to SoftwareOne for action.
To remove a quote:
Navigate to the Quotes page, then select the quote you wish to delete.
On the Quote Detail page, select Delete Quote.
Select Yes to confirm that you want to delete the quote.
On the Products page, search for the product to buy and select it from the list.
On the Product Detail page, review the product information. If needed, change the Buying for information, then select Add to Cart. A confirmation message is displayed.
Select Go to Shopping Cart in the confirmation message or navigate directly to your shopping cart (Procurement > Cart).
On the Shopping Cart page, select Create Quote.
Verify and edit your address information, then provide your contact details, including your email address. Select Create Quote again. A new quote is created.
Verify the quote details, including the number and product information. Select Convert to Order.
On the Convert to Order page, provide the PO numbers (mandatory). Optionally, you can add internal comments and reference information. Select Convert to Order.
A confirmation message is displayed, and your order is created. You can download your order information as a PDF.
(Optional) Use the following filters to find the required order:
Select the Filter option in the table.
Select Add another condition and then use the dropdown to make the following selections:
In the first field, choose Status.
In the second field, set the filter to Equal.
In the third field, select Draft and then close the filter box.
Select the link for the order in the Order column.
On the order details page, select Edit to start the purchase process.
Complete the following steps:
Select items - Do one of the following:
If your order includes items that were added before it was saved for later, those items are displayed in the Items section. Verify the items, then select Next.
If no items were added previously, the Select items window opens. Add the items you want to order, then select Next.
Details - Provide reference details, like additional IDs or notes, and select Next.
Review order - Check all the details, and select Place order to submit the order.
Summary - Select View details to go to the order details page. Otherwise, select Close.
You can change the quantity of licenses by creating a change order through the platform.
Change orders are required if you want to order additional licenses or lower the number of your existing licenses. For instructions, see How to change license quantity.
You can cancel a single subscription in an agreement or all subscriptions by placing a termination order. Subscriptions can't be canceled without a termination order.
To cancel a single subscription, use the Terminate option on the subscription details page. For instructions, see Terminate Subscriptions.
To cancel all subscriptions in an agreement, terminate the agreement. For instructions, see Terminate Agreement.
Before terminating your subscriptions, note the following points:
You can only terminate subscriptions in the Active state. Subscriptions in any other state cannot be terminated.
Creating a termination order through the platform doesn't guarantee the cancellation of your subscription. All termination orders are sent to the vendors for approval. Subscriptions are terminated only after they are approved by the vendor.
To terminate a subscription:
Navigate to the Subscriptions page.
Select the subscription you want to terminate.
On the subscription details page, select the arrow and choose Terminate to start the Terminate Subscription wizard.
In the Items step, select Next. Note that the quantity is displayed as zero.
In the Order details step, enter the reference details and your order notes. Then, select Next.
In the Review order step, verify the details. When done, select Place order.
A termination order is created on the platform and submitted to the vendor for processing. Select View order to go to the order details page. Otherwise, select Close.
Creating a termination order doesn't immediately cancel your agreement. An agreement is terminated only after the vendor approves it for termination.
To terminate an agreement:
Navigate to the Agreements page.
(Optional) Use filters to find the agreement you want to terminate.
Select the link for the agreement in the Agreement column.
On the agreement details page, select the arrow and choose Terminate to start the Terminate agreement wizard.
In the Terminate agreement wizard, do the following:
Items - Make sure the new item quantity is displayed as 0. Then, select Next.
Order details - Add or update the additional ID and notes as needed. When done, select Next.
Review order - Select Place order.
After the order has been placed, select View order to open the details page of the termination order. Otherwise, select Close.
Once the order has been placed, the agreement status changes from Active to Updating. When the order has been processed and all subscriptions within the agreement are canceled, the status changes to Terminated.
In the main navigation menu, select Catalog > Items.
On the Items page, browse the available items. You can customize columns and apply filters according to the item name, product name, vendor, billing model, billing period, and commitment term.
To view detailed item information, select the item name. You can then view the full item description and associated price lists.
Items can only be ordered while creating a purchase order or submitting a change order for an existing agreement. During the item selection step, all available items are displayed, so you can choose and add them to your order as needed.
Navigate to the Orders page.
Select the order ID to open the details page. Make sure the order's status is Quoted.
On the order details page, select the arrow and choose Send reminder.
In the Send order to user wizard, do the following:
In the Email address step, enter the email address of the person to whom you want to send the order notification email. Then, select Next.
In the Order details step, enter the reference information and select Next.
In the Overview step, select the Send a copy of this email to me checkbox if you want to receive a copy of the email. Otherwise, leave it clear.
Select Send.
The individual will receive an email with a link to the order. After selecting the link, they can review the order and complete the ordering process.
The navigation buttons, such as Close, Back, and Next, allow you to close the wizard and navigate between different pages, respectively, although some buttons could be unavailable depending on your current step in the wizard.
Each step of the purchase wizard provides you with different options you can use to order subscriptions. The steps include some common steps that apply to each vendor and product, and some dynamic steps that are vendor-specific. Note that you cannot use step numbers to navigate between different pages of the wizard. Navigation is possible using the Close, Back, and Next options only.
During the ordering process, you are prompted to choose whether to use an existing agreement or create a new one. Agreements are essential for placing orders on the platform. Without an agreement, you will not be able to complete your order. Therefore, you must make a selection in the Select agreement step, which will determine the subsequent steps in the wizard.
You can set up a new agreement if you are new to SoftwareOne or if your procurement needs differ from your existing contracts. Existing agreements can be used if you wish to add new items, adjust the quantity of licenses, or add new products to the same agreement.
If you select an existing agreement instead of creating a new one, you'll immediately see the Select items section, where you can choose the items you wish to order.
If you opt to create a new agreement, you'll need to select a licensee for the agreement. You can select an existing licensee or create a new one, and then provide the agreement's type and address information.
The purchase wizard also lets you enter additional IDs associated with your purchase. For example, in the Details step, you can enter a purchase order number in the Agreement Additional ID field. This number will then be displayed on your invoice. Additionally, you have the option to save your order as a draft order and complete it later.
The Review order step requires you to read and understand various terms and conditions associated with your order and confirm the order details. Clicking Place order creates a new purchase order, which is sent to the vendor for processing.
Once the confirmation is displayed, you can either close the wizard or view your order details by clicking View details.
On the product details page, select Buy now to start the ordering process.
Complete all the steps until you reach the Details step.
In the Details step, enter details as necessary, then select Save order. The order is saved for later.
A change order represents an order to change subscription quantities. Change orders are created when you adjust the quantity of your subscription licenses. This includes upsizing as well as downsizing subscriptions.
To save a change order for later:
Navigate to the Subscriptions page, then select the required subscription.
On the subscription details page, select Edit to start the Edit subscription wizard.
In the Items step, adjust the quantity as needed and select Next.
In the Details step, enter details as necessary, then select Save order. The order is saved for later.
When you are ready to finalize the order, select the order on the Orders page and select Review on the order details page to continue the process. For more information, see Submit Your Saved Orders.
From the list of orders, select the order you want to delete. If there are several orders in the list, use filters to locate the order easily.
On the order details page, select the arrow , then select Delete.
In the Delete order dialog, select Delete to confirm the action. The order is deleted, and its status changes to Deleted.
To manage automatic renewal:
Navigate to the Subscriptions page, then select the relevant subscription.
On the subscription details page, select the arrow and choose Configure to start the configuration order wizard.
In the Auto-renewal step, choose the required auto-renewal status, and select Next.
In the Order details step, provide a reference ID for the configuration order and enter notes for your order as necessary. Then, select Next.
Review the details. When done, select Place order.
The configuration order is placed, and the order summary is displayed. Select View order to go to the order details page. Otherwise, select Close.
When the configuration order has been placed, your agreement's status changes from Active to Updating. After your order has been completed, the agreement's status changes back to Active, and the new auto-renewal status is reflected on the subscription's details page.
Activity
Displays the activity information, including the message history for the request. Clicking Add message allows you to add a new message to the conversation.
Parameters
Displays the request parameters. Parameters are for viewing only and can't be edited.
Attachments
Displays all the files attached to the request. You can also add and manage attachments.
Details
Displays the additional IDs and the timestamps of all changes made to the request

The tutorial describes how you can order products for resale through the Marketplace Platform.
When ordering products, there are two options for agreements:
If you have an existing agreement, you can use that agreement. However, you'll need to make sure that the agreement is mapped to a licensee configured as a resale licensee.
If you don't have an agreement, you can create one during the ordering process and select an existing licensee configured as a resale licensee.
Before starting this tutorial, make sure you have the following:
A resale licensee in the active state, or permission to if you don't want to use the existing one. Licensee selection is required when setting up a new agreement.
Company details of your client, like the company name, registration ID, and address. These details are required for creating a new Microsoft tenant.
The contact details of your client who will manage the Microsoft account.
To start the process:
Navigate to the Products page.
Select the required product, for example, Microsoft 365 Business, Enterprise & Apps - Commercial.
On the product details page, select
When your order has been placed, we verify the order details.
If there are issues with your order, the General tab on the will provide information about the problem and the actions you must take before your order can be processed.
If you have configured buyers, but have not defined the split breakdown yet, 100% of the subscription billing is allocated to the Owner buyer in your agreement.
You can update the split to include additional buyers and allocate billing to those buyers. There are two ways to configure the split.
Method 1 - Using the Edit option on the subscription details page
Method 2 - Using the Details option on the Split billing tab within your agreement details
The Split billing tab on the subscription details page displays the allocation for all buyers and allows you to divide the billing across different buyers in your account.
Follow these steps to set up allocations:
On the Split billing tab, select Edit. The Edit split billing dialog opens.
Enter the allocation percentage or estimated license count for the required buyers and click Save. Make sure that 100% of the cost is allocated.
The updated split details are displayed on the Split billing tab of your subscription.
The Split billing tab within the agreement details page displays the allocation for your assigned buyers. Use the Details option for each buyer to adjust the billing percentage or the estimated license count.
Follow these steps to split the billing:
On the Agreements page, select the required agreement. Make sure that and .
Select the Split billing tab. Your selected buyers are displayed.
Click the Details option for the buyer for which you want to update the allocation.
In the Split billing details dialog, click the Edit option for the required subscription.
In Edit split details, choose whether you want to update the allocation % or the estimated license count. The allocation % option is selected by default, but you select ELC if required.
Allocation % - Select this option to split the subscription billing based on the percentage. For example, you can split the total allocation percentage of 100% between two buyers as 30% and 70% respectively.
ELC - Select this option to split the billing based on the license count. For example, if you have 12 subscription licenses you can split these between two buyers as 8 and 4 licenses respectively.
The allocation is updated for your selected buyer. Use the Buyer menu in the highlights panel to view the allocation details for the other buyers.
Click Close to return to the Split billing tab.
The Cloud Solution Provider Partner Program allows you to partner with SoftwareOne as your indirect CSP provider. To learn more about this program, see Partner Programs.
You can enroll in this program if you meet these conditions:
You have a Marketplace account with partner capabilities. For details, see How to Verify If Your Account Has Partner Capabilities.
You are signed up for the Microsoft Cloud Solutions Provider (CSP) program as an indirect reseller. For details on how to enroll, see .
You are signed up for the SWO CSP Partner Program. For details, see .
You have the Microsoft Partner Network (MPN) ID and email address for your Microsoft partner account. To find the ID in the Microsoft Partner Center, select the Settings (gear) icon > Account settings > Organization Profile > Identifiers. Then, find the PartnerID with the Type Location that matches the country/region of this CSP account.
Open the CSP Partner Program details page
To open the details page:
Navigate to the Program page.
Select Cloud Solution Provider Partner Program. The program's details page opens.
The enrollment takes a few minutes to complete as we verify the details. Once the enrollment is complete, a certificate is created.
When your certificate becomes active, you can use it during the ordering process. This means that when you create a new agreement using a , the certificate will be displayed. You'll need to select the certificate to associate it with your agreement.
In the Marketplace Platform, an order represents a request to buy a new product, change the number of licenses, terminate a subscription, or terminate an agreement.
There are different types of orders in the Marketplace Platform:
Purchase orders - An order to buy a new product or service by establishing a new agreement.
Change orders - An order to change the quantity, such as downsizing the quantity of licenses or ordering additional licenses.
Terminate order - An order to terminate an active subscription or an agreement.
Configuration order - An order to enable or disable the auto-renewal of a subscription.
You can view and manage your orders from the Orders page in the platform. The page is available under Marketplace in the main menu.
To view the order details page, select the order on the Orders page.
At the top of the details page, you can view properties, such as the order ID and status. Other details, such as the type of order, linked agreement, and the order's currency, are also displayed.
The details page also contains tabs that display additional details. The following table lists these tabs:
You can perform various actions on the details page. The available actions depend on the status of the order:
Split billing is a feature that allows you to divide the cost of a subscription across different buyers in your account. If your organization has multiple legal entities, split billing can be used to distribute costs effectively. To learn more, see .
In the Marketplace Platform, the split billing process begins by activating the feature from the user interface (UI), selecting buyers for allocation, and then specifying each buyer's allocation percentage or license count. This tutorial describes how to complete all of these steps.
In this tutorial, an agreement named Adobe VIP Marketplace for Stark Industries contains three subscriptions. Currently, 100% of the billing for these subscriptions is assigned to a single buyer named Stark Industries. We'll activate split billing, add two new buyers named Stark Industries II and Stark Industries III, and then specify the allocation percentage for these buyers.
View predefined dashboards or customize your dashboard to show data that is of interest to you.
The Client Portal contains predefined dashboards that you can use to view the data. You can also create your custom dashboards.
The dashboards mainly consist of tiles displaying different information, such as the data about your preferred statistic, such as the number of invoices, orders, quotes, and more.
Each tile can have multiple functionalities; for example, they can display data and act as a shortcut. You can also configure the size of a tile and define how data is displayed in certain tiles. If there is no data for a specific tile, a message is displayed in the tile.
To access the predefined dashboards:
SoftwareOne is uniquely positioned to help businesses on their cloud journey, and with our xSimple customers in mind, we have built a complementary report for our “Simple” views.
The Cloud Journey Report gives our Simple customers a unique insight into market competitors' share of cloud services, which paints a picture of their own position compared to those competitors. By analyzing this information, you can take full advantage of improving your operations, maximizing cloud features, and optimizing your cloud cost. Market Competitors are companies of a similar size and from the same industry.
The Cloud Journey Report is divided into 4 sections:
A subscription refers to the ongoing service provision under the terms and conditions of an agreement. In the Marketplace Platform, subscriptions are mapped to agreements, and each agreement can contain one or multiple subscriptions.
You can and also manage your existing licenses. This includes ordering additional licenses and canceling the previously purchased ones.
Your subscriptions are available on the Subscriptions page. The page is available under Marketplace in the main menu.
On the Subscriptions page, you can view the key properties for each of the subscriptions, including the renewal date and status. The page also contains a Buy more option, giving you quick access to the page for ordering subscriptions.
If you created a request through the platform and wish to add a message to your interaction with the vendor or SoftwareOne, you can do this through the Add Message option on the request details page.
When adding a new message, note the following points:
The new message you add to the conversation will be visible to all members of your account.
You can add a message regardless of the request's status.
From the main menu, navigate to Other tools > Dashboard. The Dashboard page opens.
From Choose a template, choose the dashboard you want to view. The following dashboards are available:
Finance
Available to all users.
Procurement
Available to all users.
Software Asset Management (SAM)
Available only if you've purchased SAMSimple.
Cloud
Available only if you've purchased Cloud Spend Management.
You can create new dashboards, customize your dashboards, or remove a dashboard. Customized dashboards are displayed under Choose a template.
To create a new dashboard:
On the Dashboard page, click Create New.
On the Create New Dashboard page, click New.
Provide a name for your custom dashboard and then in Add a tile, choose the tile that you want to add.
Click Save.
To customize a dashboard:
On the Dashboard page, select Edit this dashboard. The dashboard opens in edit mode.
Make changes as necessary.
To remove a tile from your dashboard, select Remove. If the tile is too small to accommodate the full button, you'll only see the trash can icon.
To configure a tile, select Configure or the cogwheel icon and then choose the configuration options.
Save your customized dashboard to make it available under Choose a template.
To remove a dashboard permanently
On the Dashboard page, click Edit this dashboard.
Click Delete.
Select the checkbox to grant consent.
Click Delete to confirm the deletion.
After you've added a tile to the dashboard, you can move or resize it. Most of the tiles can be resized from their default size.
You can resize a tile by dragging the tile border. To move a tile, drag the whole tile.


Select agreements - Select Create agreement to start creating your new agreement.
Select licensee - Choose an existing licensee from the list. Ensure that the value in the Resale column is Yes, then select Next.
Select certificate - Select a certificate. If the certificate you want to use isn't displayed, use the Add certificate option to add it. When done, select Next.
Create agreement - Choose whether you want to create a new Microsoft tenant or connect an existing cloud account.
Microsoft details - Do the following depending on the selection in the previous step:
For a new cloud account, provide a new domain name and then fill out the contact form. You'll need to provide the following details:
Company name.
Company registration ID or tax number.
Special qualifications - Select the checkbox if your organization is a entity. Otherwise, leave it clear. A company is classified as state-owned if it is either controlled by the government or performs functions that the government considers its own.
Support contacts - Enter the contact details of your support administrator and choose your preferred support language. Select Next.
Items - Complete the following steps and select Next.
Read and understand the attestation: "By clicking Next, I confirm that my organization is acting as an indirect partner when choosing a reseller and as a direct partner in the absence of selecting a reseller".
Select Add items to choose the items you want to order.
Details - Provide reference details, like additional IDs or notes, and select Next.
Review order - Read the terms and conditions and the privacy statement. When done, select Place order to submit your order.
Summary - Select View details to go to the order details page. Otherwise, select Close.
Enter a value based on the split percentage or license count and click Save. Make sure that 100% of billing or all licenses are allocated. Otherwise, the platform displays a message.
Start the Add Certificate wizard
To start the wizard:
On the details page, select the Certificates tab.
Select Add.
Use the Add Certificate wizard to enroll
Complete the following steps in the wizard, ensuring you enter or verify all required information at each stage.
Certificant - Choose the buyer who will represent this certificate and select Next.
Partner details - Do the following, then select Next:
Authorize SoftwareOne as your indirect provider. You must select a country that is within your region. For regional markets, see .
Enter the email address associated with your Microsoft partner account. We will use this email address to link your CSP customers with your Microsoft reseller account.
Enter the MPN ID associated with your Microsoft partner account. We'll associate your Microsoft subscriptions with the MPN ID.
Details - Enter a unique name for the certificate. When done, select Next.
Overview - Review the details and select Add.
Summary - Select View details to open the enrollment details page. Otherwise, select Close.

Displays all files available for download within the agreement. See to learn more
Certificates
Displays certificates that were used during the ordering process.
Details
Displays the timestamp and additional IDs, including the client and vendor IDs.
Audit trail
Displays an audit trail of events, including the log details and summary. To learn more, see .
General
Displays the latest information about your order.
Items
Displays the items you've ordered and the pricing information for each item.
Parameters
Displays the order's fulfillment and ordering parameters.
Entities
Displays the entities linked to the order, including the licensee, buyer, and seller.
Subscriptions
Displays the subscriptions associated with the order and their details. Subscriptions are displayed only after they have been activated.
Notes
Displays the notes you may have entered during the ordering process. You can add or update the notes using the Edit option.

Attachments
Before getting started with the tutorial, it's essential to have an understanding of the platform's key concepts. You must also be familiar with the platform's interface and know how to navigate it.
Activating split billing
Split billing can only be activated at the agreement level. To activate split billing:
Navigate to the Agreements page. Then, select the required agreement.
On the agreement details page, select the arrowchoose Split billing.
In the Split billing dialog, select the checkbox to enable split billing, then select Save.
Split billing is activated, and the Split billing tab appears on the agreement’s details page. You are now ready to configure the buyers to whom you want to allocate billing.
Configuring buyers
In this tutorial, Stark Industries is the Owner buyer who has been allocated 100% of the billing. We will configure Stark Industries II and Stark Industries III as additional buyers and then divide the costs across buyers.
To configure buyers:
Select the Split billing tab on the agreement details page.
Allocating split billing
Billing can be allocated by specifying percentages for each buyer. You can also specify the estimated license count. Both of these options are linked, meaning changing one updates the other automatically, although only the allocation % is used during billing (see to learn more).
To start configuring the split for each buyer:
In the Actions column for the Owner buyer, select Details.
If you have additional subscriptions and want to split the billing, you can repeat the same steps for those subscriptions. You can also edit the split at any time. For instructions, see Edit Split Billing.
A package is a bundle of one or more files containing descriptive metadata. Packages are uploaded to collections. A collection is an isolated storage space. If a collection doesn't exist for your company, you'll see an option to create a new collection. The option will be unavailable if a collection already exists. After creating a collection, you can upload your packages/files and distribute them to the other users via email or through the Client Portal.
To create a new collection:
Open the Software Downloads module and navigate to the Upload tab.
Provide a name for your collection.
Select Save.
To start the upload process:
On the Upload tab, select Start your Upload Process.
On the Create Package page, choose a collection from the list and select Next.
Provide a name and description of your package. Note that you can create and upload more than one package to a collection. Select Next.
Add the metadata for the package/file and select Next. The following fields are mandatory:
Description
Publisher
Product Family
Operating System
Choose the file you want to add and select Next.
Review the details and select Next to create and upload the package. A confirmation message is displayed when the file is added.
You can search for a package using the filters on the Search tab.
To search for a package in a collection:
On the Search tab, enter the search criteria or select your collection from the Collections menu.
Select Search. All packages that are uploaded to this collection are displayed.
To download a package:
Use the search filters to find the package you wish to download.
From the Actions column, select Download.
Choose the number of downloads you want to allow and select OK.
You can generate an email link to share with anyone in your organization. Note that the person accessing the link doesn't need to have a Client Portal account because the link uses a unique access key.
To generate a link:
From the Actions column, select Email.
Select the duration that the link will be valid for and the total number of available downloads.
Select OK. An email with a link to the package will open.
The History tab displays all of your file uploads and downloads. You can view the data or export it to a CSV and Excel file.
To export the report:
Select the Export option.
Choose Export to CSV or Export to Excel. Your download will begin.
Comparison Panel
Information Panel
Managed Service Panel
Service Articles Panel
This is the backbone of the Cloud Journey Report, where you can easily see your position in cloud service usage compared to their market competitors.
A radar chart outlines service use across cloud service categories, and any gaps are easily identified.
For a better understanding of your market competitor's share across categories, and why they may utilize given services, you can find a list of every category with its share.
You will also find relevant articles that describe the benefits of using those respective services, just under the radar chart.
On the Your service usage tab, you can refer to a complete list of their services for comparison.
As the name suggests, this panel gives you a brief description of your currently used SoftwareONE service. It also shows when it was last updated and you can download the report in PDF format.
There is so much to learn and adapt in the cloud, but many organizations don’t have the time or expertise to achieve optimal results. Consequently, this leads to missing:
Optimal security configurations
Cost optimization opportunities
Understanding of governance strategies
Opportunities to innovate with cloud
Cloud-focused and automated operational outcomes
Optimal migration strategies and full use of the cloud
Understanding of cloud scope against current consumption
Whether a business is using some or many cloud resources, not having a proper strategy will lead to a lack of operational standards, security risks, and wasted cloud costs.
For that reason, we offer our customers an easy way to opt in for Managed Service.
This panel is another good source of relevant articles that can help you on your cloud journey.
To view the full details for a subscription, select the subscription name on the Subscriptions page.
The details page contains general information, such as subscription status, renewal date, commitment timeframe, and more.
The page also contains the following tabs that allow you to view and manage the subscription:
Items
Displays all the items that you ordered along with their details, like the item name, quantity, and pricing.
Parameters
Displays the fulfillment parameters for the subscription. The parameter information varies depending on the parameters enabled by the vendor.
Entities
Displays the entities linked to the subscription and their details. Entities include licensees, buyers, and sellers.
Split billing
Displays the split billing information, including the buyers and billing allocation. This tab is visible only if split billing has been enabled for the agreement. The Edit option allows you to update the buyer allocation. For details, see .
Orders
Displays all orders associated with the agreement along with their status.
Details
Displays additional details, such as references and additional client and vendor IDs, and the timestamps of events. You can also update the client ID using the Edit option. For instructions, see .
You can also perform various actions on the details page. The available actions depend on the status of the subscription:
(only if split billing is enabled)
To add a new message:
Navigate to the Requests page and select the required request.
On the request details page, select the Activity tab, and then select Add message.
In the Add message dialog, type your message and select Add. You can format the text, add links, and insert images by selecting . Your message will be added and displayed on the Activity tab.
Mapped from the agreement details page.
Subscription
Mapped from the subscription details page.
Client ID/Vendor ID
Mapped from the Details tab on the subscription details page.


An agreement is a record that establishes the terms and conditions of a transaction in the Marketplace.
It defines the relationship between different objects, such as buyers, sellers, and licensees, and serves as the foundation for placing orders and creating subscriptions on the platform.
You can view and manage your agreements from the Agreements page in the platform.
To view the full details of an agreement, select the agreement name on the Agreements page.
At the top of the details page, you can see general details of the agreement.
The details page also contains tabs that give you all of the information about the agreement. The following table lists these tabs:
You can also perform various actions on the details page. The available actions depend on the status of the agreement:
Report on your monthly Microsoft Service Provider License Agreements (SPLA).
The Microsoft Services Provider License Agreement (SPLA) is a license agreement for organizations that want to offer their customers hosted software services, including web services, database services, and applications. Microsoft issues a monthly invoice to the service provider that corresponds to the use of the software. Accordingly, the provider must provide adequate reporting so that monthly usage can be reliably recorded.
The SoftwareOne Client Portal has a custom Service Provider Reporting module that offers advanced management and allows you to create monthly reports for your Microsoft SPLA contract.
You can access the module by navigating to the main menu of the Client Portal and selecting Marketplace > Service Provider Reporting.
The Service Provider Reporting page contains options that allow you to edit product quantities and view your contracts. The page also displays products within each contract, along with the prices, item numbers, and pool. Clicking a product opens up its Product Detail page.
On the Service Provider Reporting page:
The highlighted column represents the current month.
The Open status means that this report hasn't been transmitted yet.
The Deadline/Submit Date represents the delivery date by which the report must be submitted. The reporting window opens on the 28th of the reporting month and closes on the 10th of the following month. Orders must be placed during that time and for the given period. If this date is exceeded, it will be highlighted in red. As a result, entries in future months can only be saved as a draft and cannot be transferred.
On the Service Provider Reporting, you can also view details of the past reports that have already been submitted, for example, the date of the last order, the day of the last invoice, or the PO reference. To view such information, click Details.
You can view your contracts using the Contracts option on the Service Provider Reporting page.
After selecting a contact, click the magnifying glass icon to view the details associated with your selected contract. When you click the magnifying glass icon, the License Agreement Details page opens.
You can edit the quantity of products using the Edit All Contracts Quantities option. Follow these steps to edit the quantity:
On the Service Provider Reporting page, click Edit All Contracts Quantities.
In Edit All Contracts Quantities, click Download Template. When you click this button, an Excel file is downloaded to your system.
Open the downloaded file and provide the information in the Open Quantities and Comment columns.
The report view reloads automatically to display the updated data. All changes in the quantities after importing the SPLA template are marked with a green star and can also be checked in Latest Import Changes Applied.
Follow these steps to adjust the quantity:
On the Service Provider Reporting page, click within a cell. The background color of the cell changes and a Details window containing details of the data set opens.
Enter the new value in the cell and add your comments in the Comments field.
Click Save to update your changes.
When you save your changes, the yellow-colored fields will change to their original color. This creates or updates a draft for the revised month, which can be edited until it is transferred via Create Order.
You can add new products from the SPLA catalog using the Add Product option (available under the Product column).
Follow these steps to add a new product:
On the Service Provider Reporting page, click Add Product.
Select a product from the list or type the product name. The product is added.
Click Save. The feature creates or updates a draft for the revised month, which can be edited until it is transferred via Create Order.
The Copy Quantities option allows you to copy the values from the previous month.
To copy the quantities, select the cell for the month to be filled out to select it and click Copy Quantities. After clicking the button, the values from the previous month are transferred.
To clear the values, click Clear Quantities.
The Save option is enabled when you make any changes, for example, if you add comments or new products.
The action creates a draft that can still be edited. Draft numbers are always stored and can be changed until the final submission. The orders that are not submitted or completed are marked as Draft in the bottom line of the table as well.
The Create Order option allows you to move your changes to the shopping cart.
Before clicking Create Order, make sure to review the address details and contact persons. Personal references or order numbers can also be stored, and related documents can be attached.
The PO Number 1 field is blocked from editing because the SPLA month year is automatically displayed. The payment method and special instructions can be transmitted.
After checking the specified details and products in the shopping cart, the order can be submitted. Once you've placed the order, the color of the submitted month in the overview changes from green to gray, and the status changes to Submitted.
It means that your request has been sent to the appropriate team. If there are inconsistencies, or if there is a better cost model that you could use, they will contact you.
The Submit Zero option allows you to confirm that no usage statement should be sent for a given month.
For security reasons, the page will open a new dialog window asking you to confirm the action. Then the column background of the submitted month in the overview changes from green to gray, and the status changes to Reported Zero.
Collaboration Site allows you to share large files, for example, your project files and deliverables for a managed service engagement. Access to the Collaboration Site is based on permissions, and only authorized users can access the site.
After your account has been set up, only top-level administrators are granted access to the Collaboration Site. If you cannot view this module, contact your administrator or your SoftwareOne Account Manager.
To grant access through the Collaboration Site:
From the main menu, navigate to Other tools > Collaboration Site.
In the Actions column, select the ellipsis ( ••• ) and choose Manage permissions.
On the Manage Permissions page, make changes as necessary. You can update permissions, assign multiple users to a workspace, and delete a user to remove their access rights.
The Transactions workspace within the Collaboration Site contains files attached to the orders placed through the Client Portal. Only those users who have access to the folder can view and download files.
To enable access to the Transactions workspace:
Navigate to Setup > User Management.
On the User Management page, locate the user that requires access to the Transactions workspace, and select View in the Actions column. The user details page is displayed.
Under Feature Permissions, navigate to Collaboration Site and enable View Storefront Documents.
Authorized users can easily download a folder and its contents from the Collaboration Site.
To download a file or folder:
Navigate to the Collaboration Site. The workspaces that you are authorized to access are displayed.
Choose your workspace and do the following:
To download the entire folder, select the ellipsis ( ••• ) and choose Download. You can also select the Sharing menu in the breadcrumb and select Download to download your current open folder directory.
Your download will begin. Note that it might take some time for the large files to download completely.
Authorized users can create new folders within the Collaboration Site.
To create a new folder:
Select Add New Folder and provide a unique name for your folder.
Select Create. The new folder is created and displayed as a child folder within the main folder.
You can upload a single or multiple files to a new folder.
Before uploading a file, ensure that the file names are unique. If a file with the same name already exists, you can overwrite the file by selecting the Overwrite existing files checkbox. Note that you can upload files up to 50 MB in size. There's no limit to the number of files in a single folder.
To upload a file, select the Upload file option. Then, choose the file that you want to upload.
To rename a file or folder:
Navigate to the folder or file that you want to rename.
In the Actions column, select the ellipsis ( ••• ) and choose Rename
Provide a unique name and save your changes.
To delete a file or folder
Navigate to the folder or the file that you want to delete.
In the Actions column, select the ellipsis ( ••• ) and choose Delete.
Confirm that you want to delete the file or folder.
To move a file or folder to a different location:
Select the checkboxes next to the file/folder that you want to move.
Select Move.
Select the new location or the target directory.
Note that if the file or the directory already exists in your chosen location, a message is displayed.


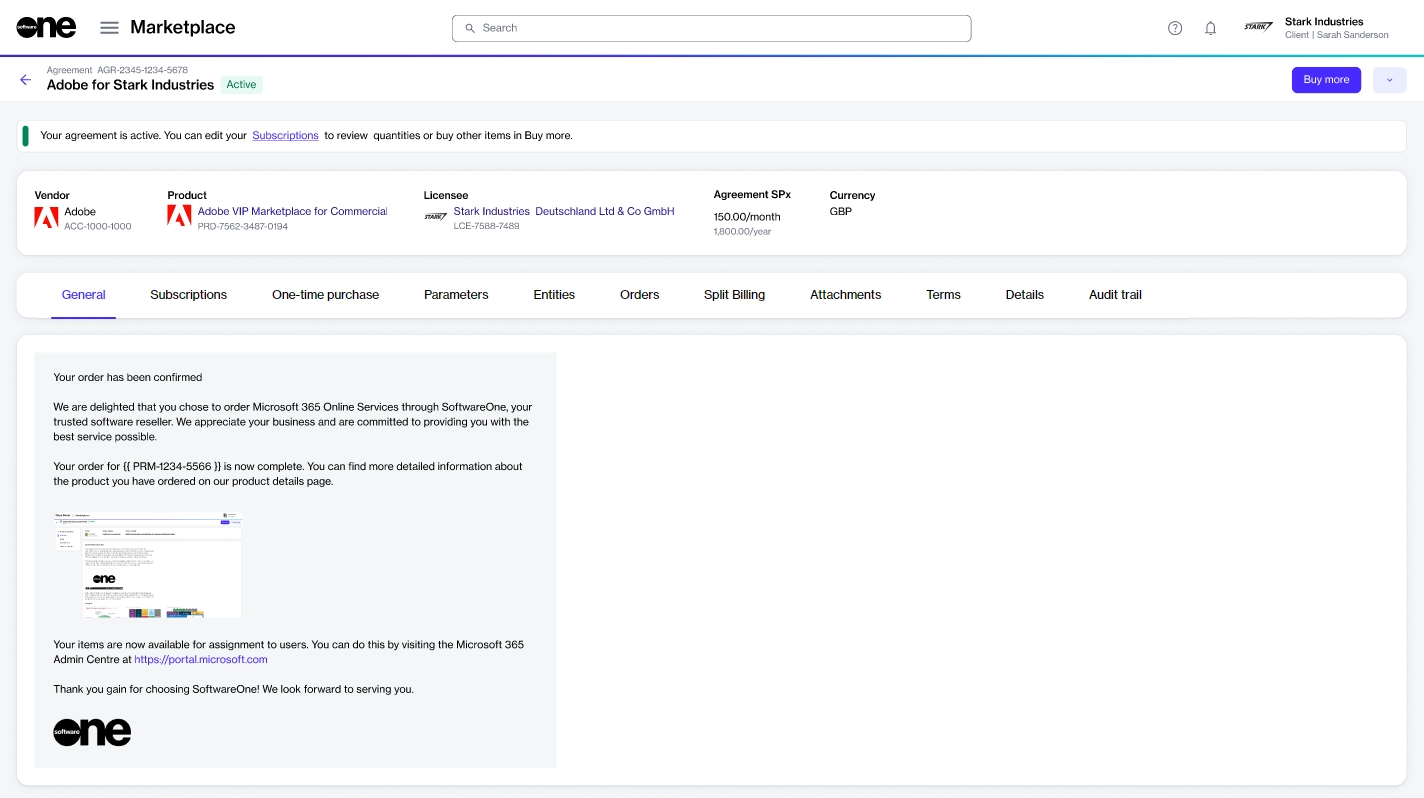
Language
Save your changes.
To download a file, open the folder, locate the file, and select Download.


Complete the following steps, making sure to enter or verify the required information where necessary:
Complete the following steps, making sure to enter or verify the required information where necessary:
Company address, including city and zip/postal code.
Contact details of the person managing your account.
For an existing cloud account, enter your existing domain name and your Microsoft account details.
Complete the following steps, making sure to enter or verify the required information where necessary:
Start the purchasing process
In the Split billing dialog, use the checkboxes to select buyers from the list of your active buyers. When done, select Save.
Stark Industries II and Stark Industries III are added as buyers and displayed on the Split billing tab. You are now ready to allocate billing to these buyers.
Under Allocation%, enter the allocation percentage for each buyer. Then, select Save. In this example, 50% of the billing is allocated to Stark Industries (owner buyer) and the remaining 50% to Stark Industries II. No split billing percentage is assigned to Stark Industries III.
The allocation is updated and displayed on the Split billing details page. By default, the allocation for the owner buyer is displayed:
Use the Buyer menu at the top to view the allocation for the other buyers (Stark Industries II in this example):
Select Close. You'll be returned to the Split billing details tab.
Displayed only if you have enabled split billing. You can view and manage the buyers you have configured for split billing. For details, see .
Attachments
Displays all files attached to the agreement by the vendor or SoftwareOne.
Terms
Displays the terms associated with the agreement and shows when they were accepted and by whom.
Details
Displays the reference details, additional IDs, and timestamps.
Audit trail
Displays all events that have occurred for the agreement. For details, see .
General
Displays the general information for the agreement.
Subscriptions
Displays all subscriptions within the agreement and the details of those subscriptions.
One-time purchase
Shows your one-time purchases. One-time purchase items are non-subscription items where you own the license indefinitely.
Parameters
Displays the different ordering and fulfillment parameters.
Entities
Displays various entities linked to the agreement, including licensees, buyers, and sellers.
Orders
Displays all orders you have placed under the agreement, including purchase orders, change orders, and termination orders. Clicking an order opens up the details page of that order.
Split billing
Select Executive Report and then select Add your Report to create your custom report.
Enter a name for your new report. The name can be changed later if needed.
The report with aggregated Provider data will be added to your new Executive Report.
You will also see spaces with a “plus icon” (4). Clicking on the plus icon allows you to quickly add new data that is of interest to you.
Each element has its filters and grouping – including date range. You can override dates, grouping, and currency in the report context to align all elements.
Dates, grouping, or currency overrides are not saved. So when you open the report again it will present data in the default state.
Only time-based elements will be affected by grouping changes. Elements with a custom “X” axis will ignore this setting.
You can delete a report by selecting the cog icon (3) and selecting Delete report. Once you confirm this action the report will disappear from the drop-down.
Similarly, you can edit the report name by clicking on the pencil icon. All changes made in the report are auto-saved.
To rearrange the elements:
Hover over the element you want to move until you see the cross/arrow icon appear.
Click on that icon and drag the element to the area you want to move it to.
You can remove elements by hovering over the element until you see the bin icon appear. Select the bin to delete the element.
To enter the edit mode, click anywhere on the chart element.
In the configuration section, you can define your data and pick your preferred presentation option.
You can control data displayed on the “X” axis in the “Show By:” drop-down (1). Available options are Day, Month, and None.
The Day and Month settings will make the “X” axis time-based. However, None will render the value selected in the “Group by” section (3).
Reports support advanced filtering (2). This scans through all your data providers (e.g. Azure / Software Assets / Virtual) and provides you with a unified search experience.
Search index breaks words by space or “-” character and uses “starts with operator” for each word. For example: for resource my-test-vmineurope if you type “test”, the index will find this resource. However, if you type “est” this resource will not be found.
By clicking the hierarchy icon (4) you can refine your custom group search using the tree structure. The changes made in the custom group selector are reflected in the filter control and vice-versa.
Grouping Selector
There are many grouping options. Availability depends on the providers you have activated (3).
Chart Type Selector
Depending on your business use case you can choose different presentation layers for your data (4), available options are:
Line (perfect for daily time series)
Bars (ideal for categories, for example, MeterCategory)
Pie (the best for summaries, for example, Providers)
Table (in all listings, for example, Resources)
Currency Selector
Each element can have a different currency. By default your budget currency is selected. However, you can change it at any time (5)
Executive Reports support quick share functionality. You can easily share your report with your colleagues by following the steps below.
To share a personal report, select the report you would like to share from the report selection, and click Share.
Next, select members from your account. Allowed roles are Can view and Can edit. Users with the Can Edit role can also adjust the sharing list with limitations to the Owner role.
You can export an executive reports to a PDF. To export a report, select your report from the report selector and select Exports.
Audit trail
Displays all events that have taken place within the subscription. To learn more, see Audit Trail.
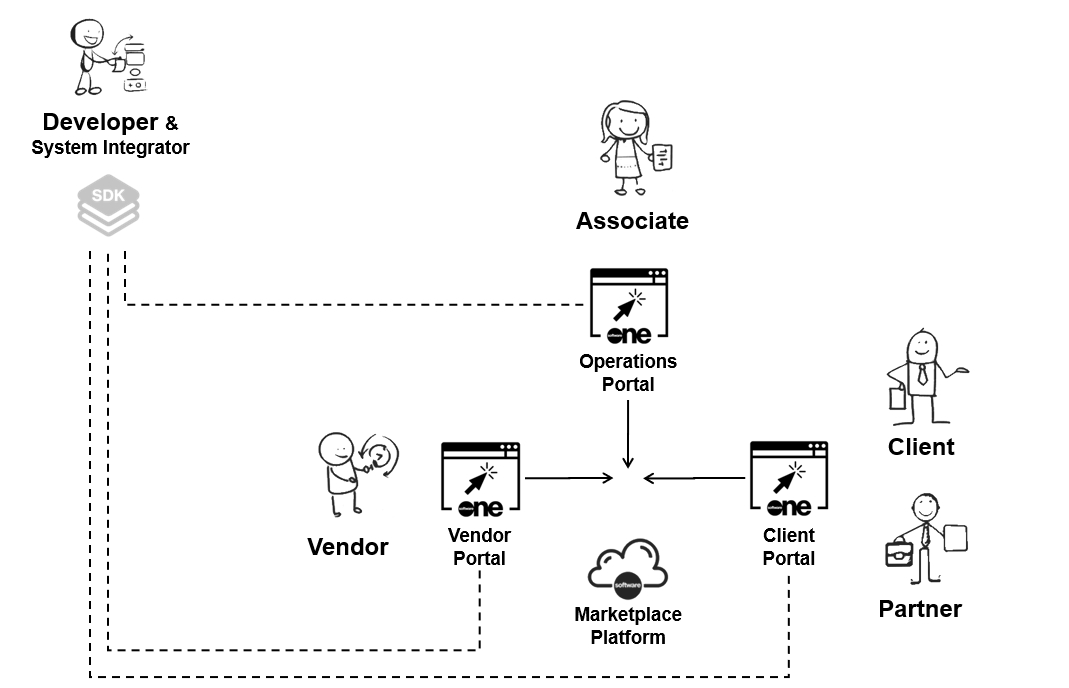


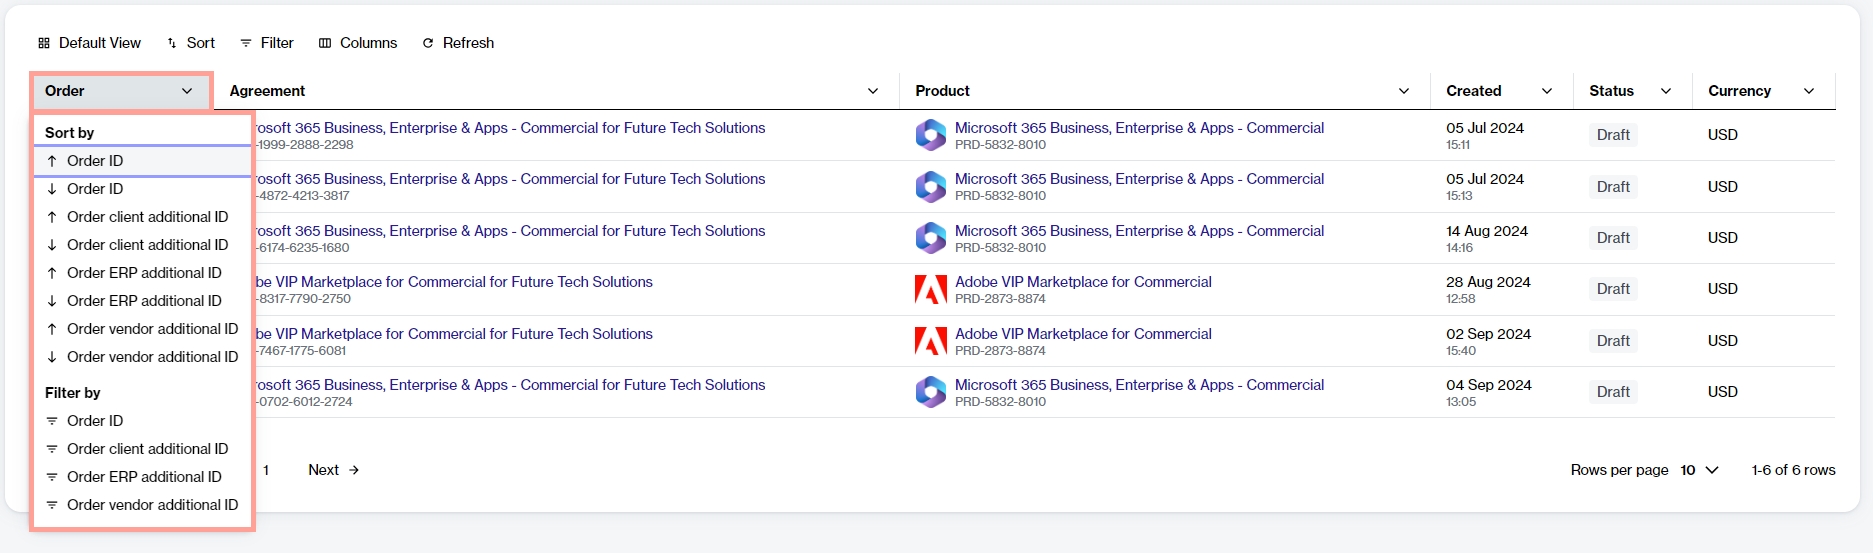
A license agreement is a contract that outlines the conditions and terms under which an organization can use a specific software.
Using the Client Portal's License Agreements module, you can easily view and manage your license agreements and gain visibility into the entitlement data associated with those agreements. You can also create alerts for true-ups, renewals, and expiring contracts.
Watch the following video tutorial to learn how to use License Agreements:
The License Agreements page contains filters to help you find the agreement you want to view or manage. You can search using filters, including agreement or enrollment number, publisher, start/expiration date, status, and more.
The Marketplace Platform's automated billing process generates invoices monthly. These invoices contain subscription charges or usage data recorded in the previous calendar month.
For many cloud-based services, such as Microsoft Azure and Adobe VIP Marketplace, the usage data can result in multiple charge lines on a single billing statement. When each charge line is printed individually on a single invoice, it's challenging to read and interpret.
To enhance clarity and help you monitor charges efficiently, the Marketplace Platform issues two types of billing documents: Invoices and Statements. These documents contain important information about your transactions.
To learn more, continue reading or watch the following video guide:
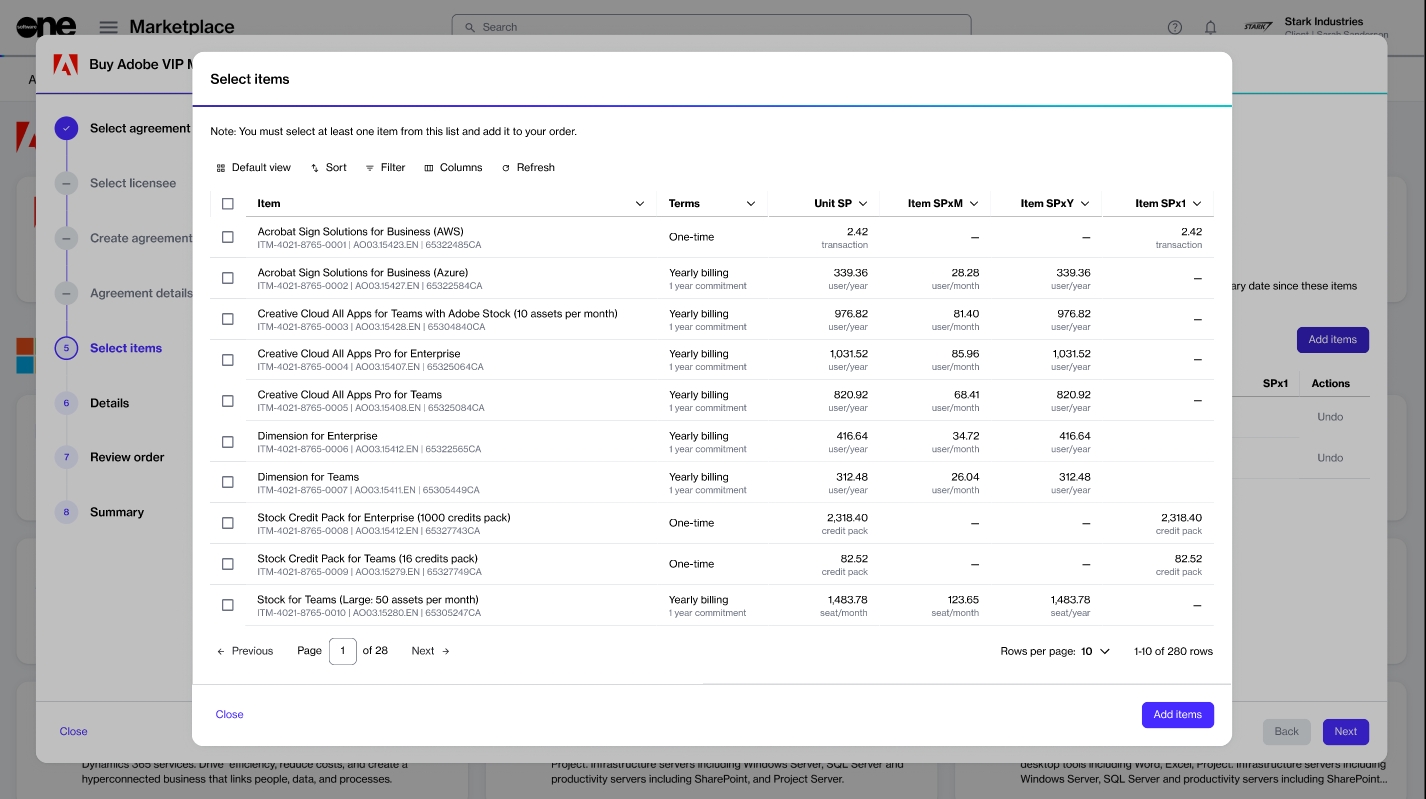
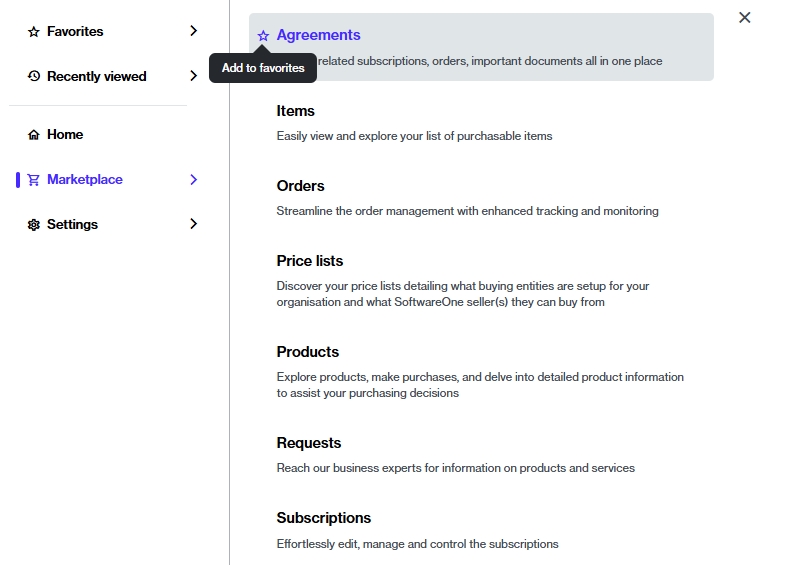
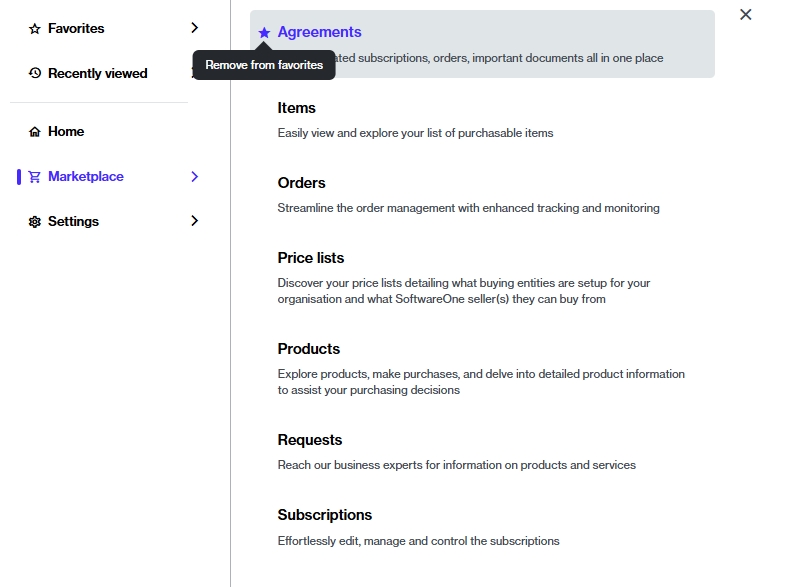

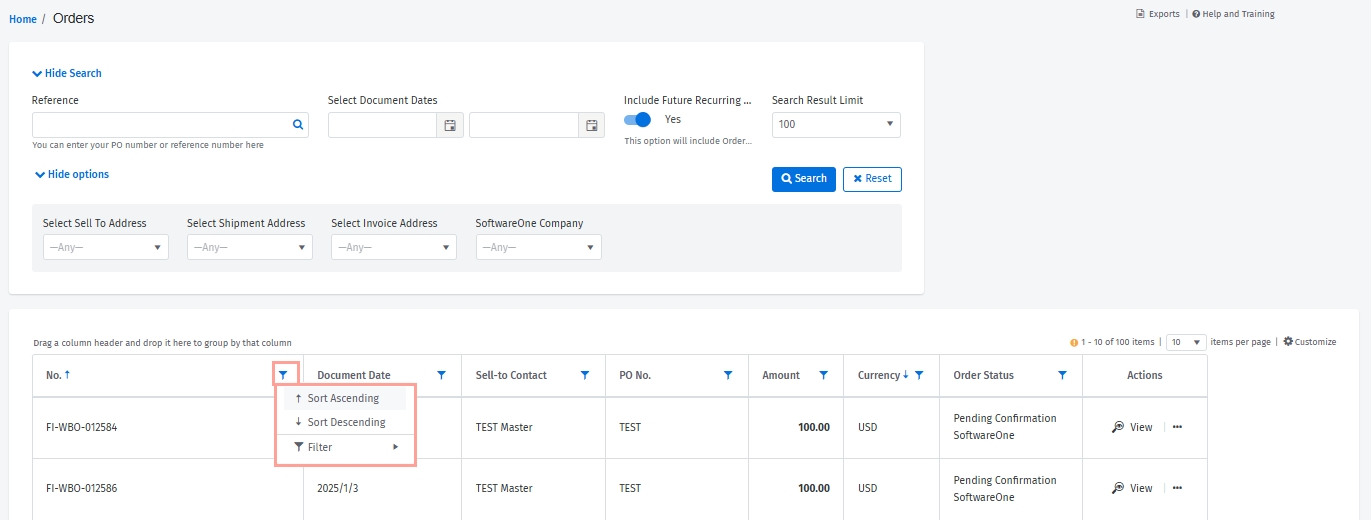
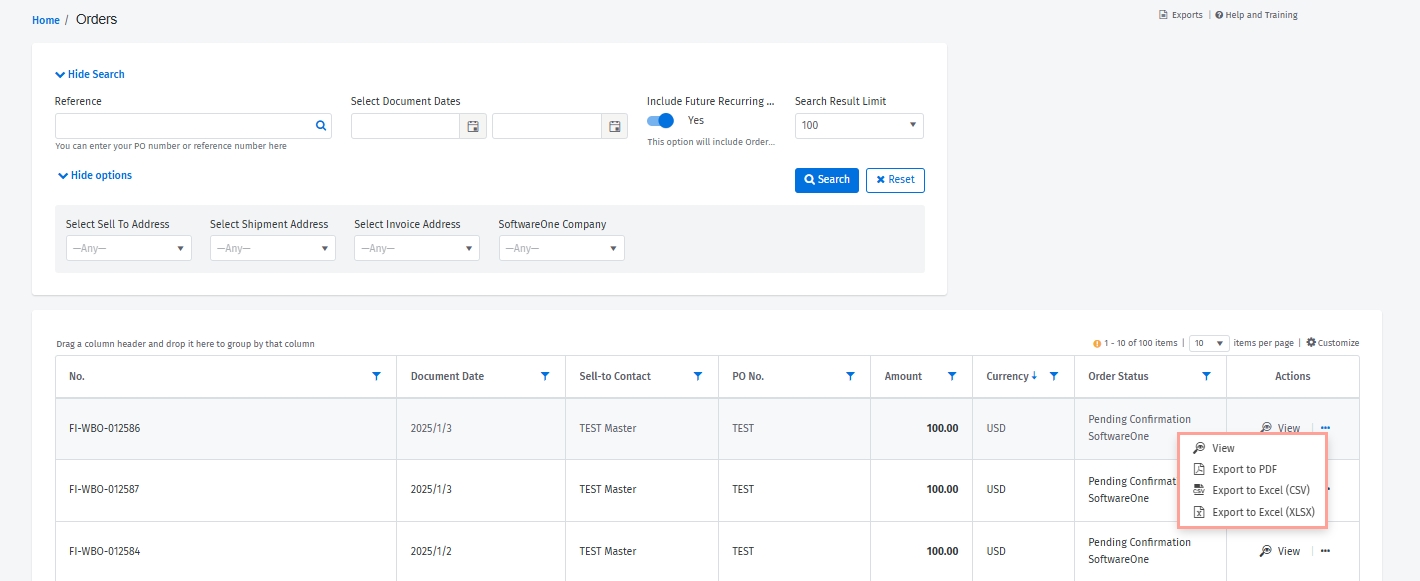
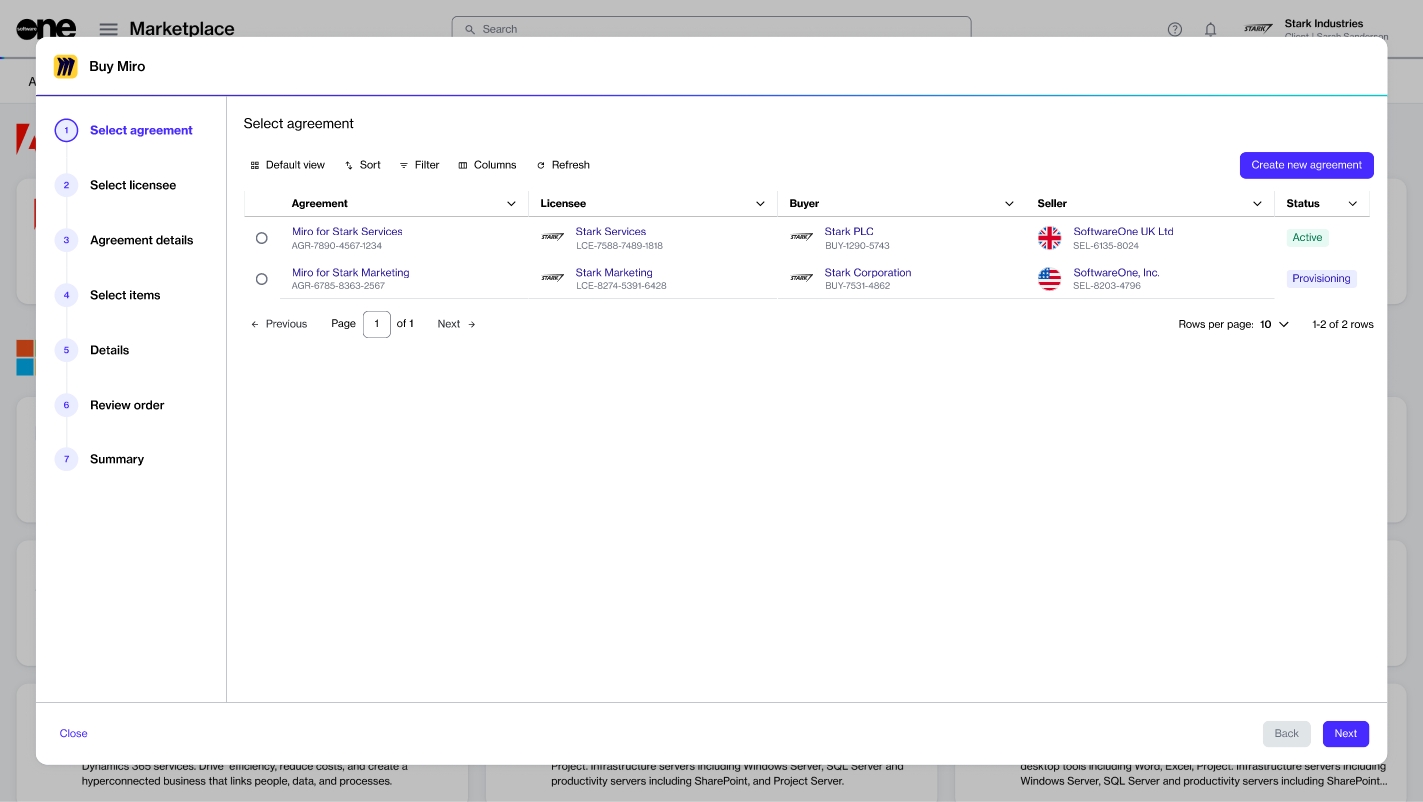
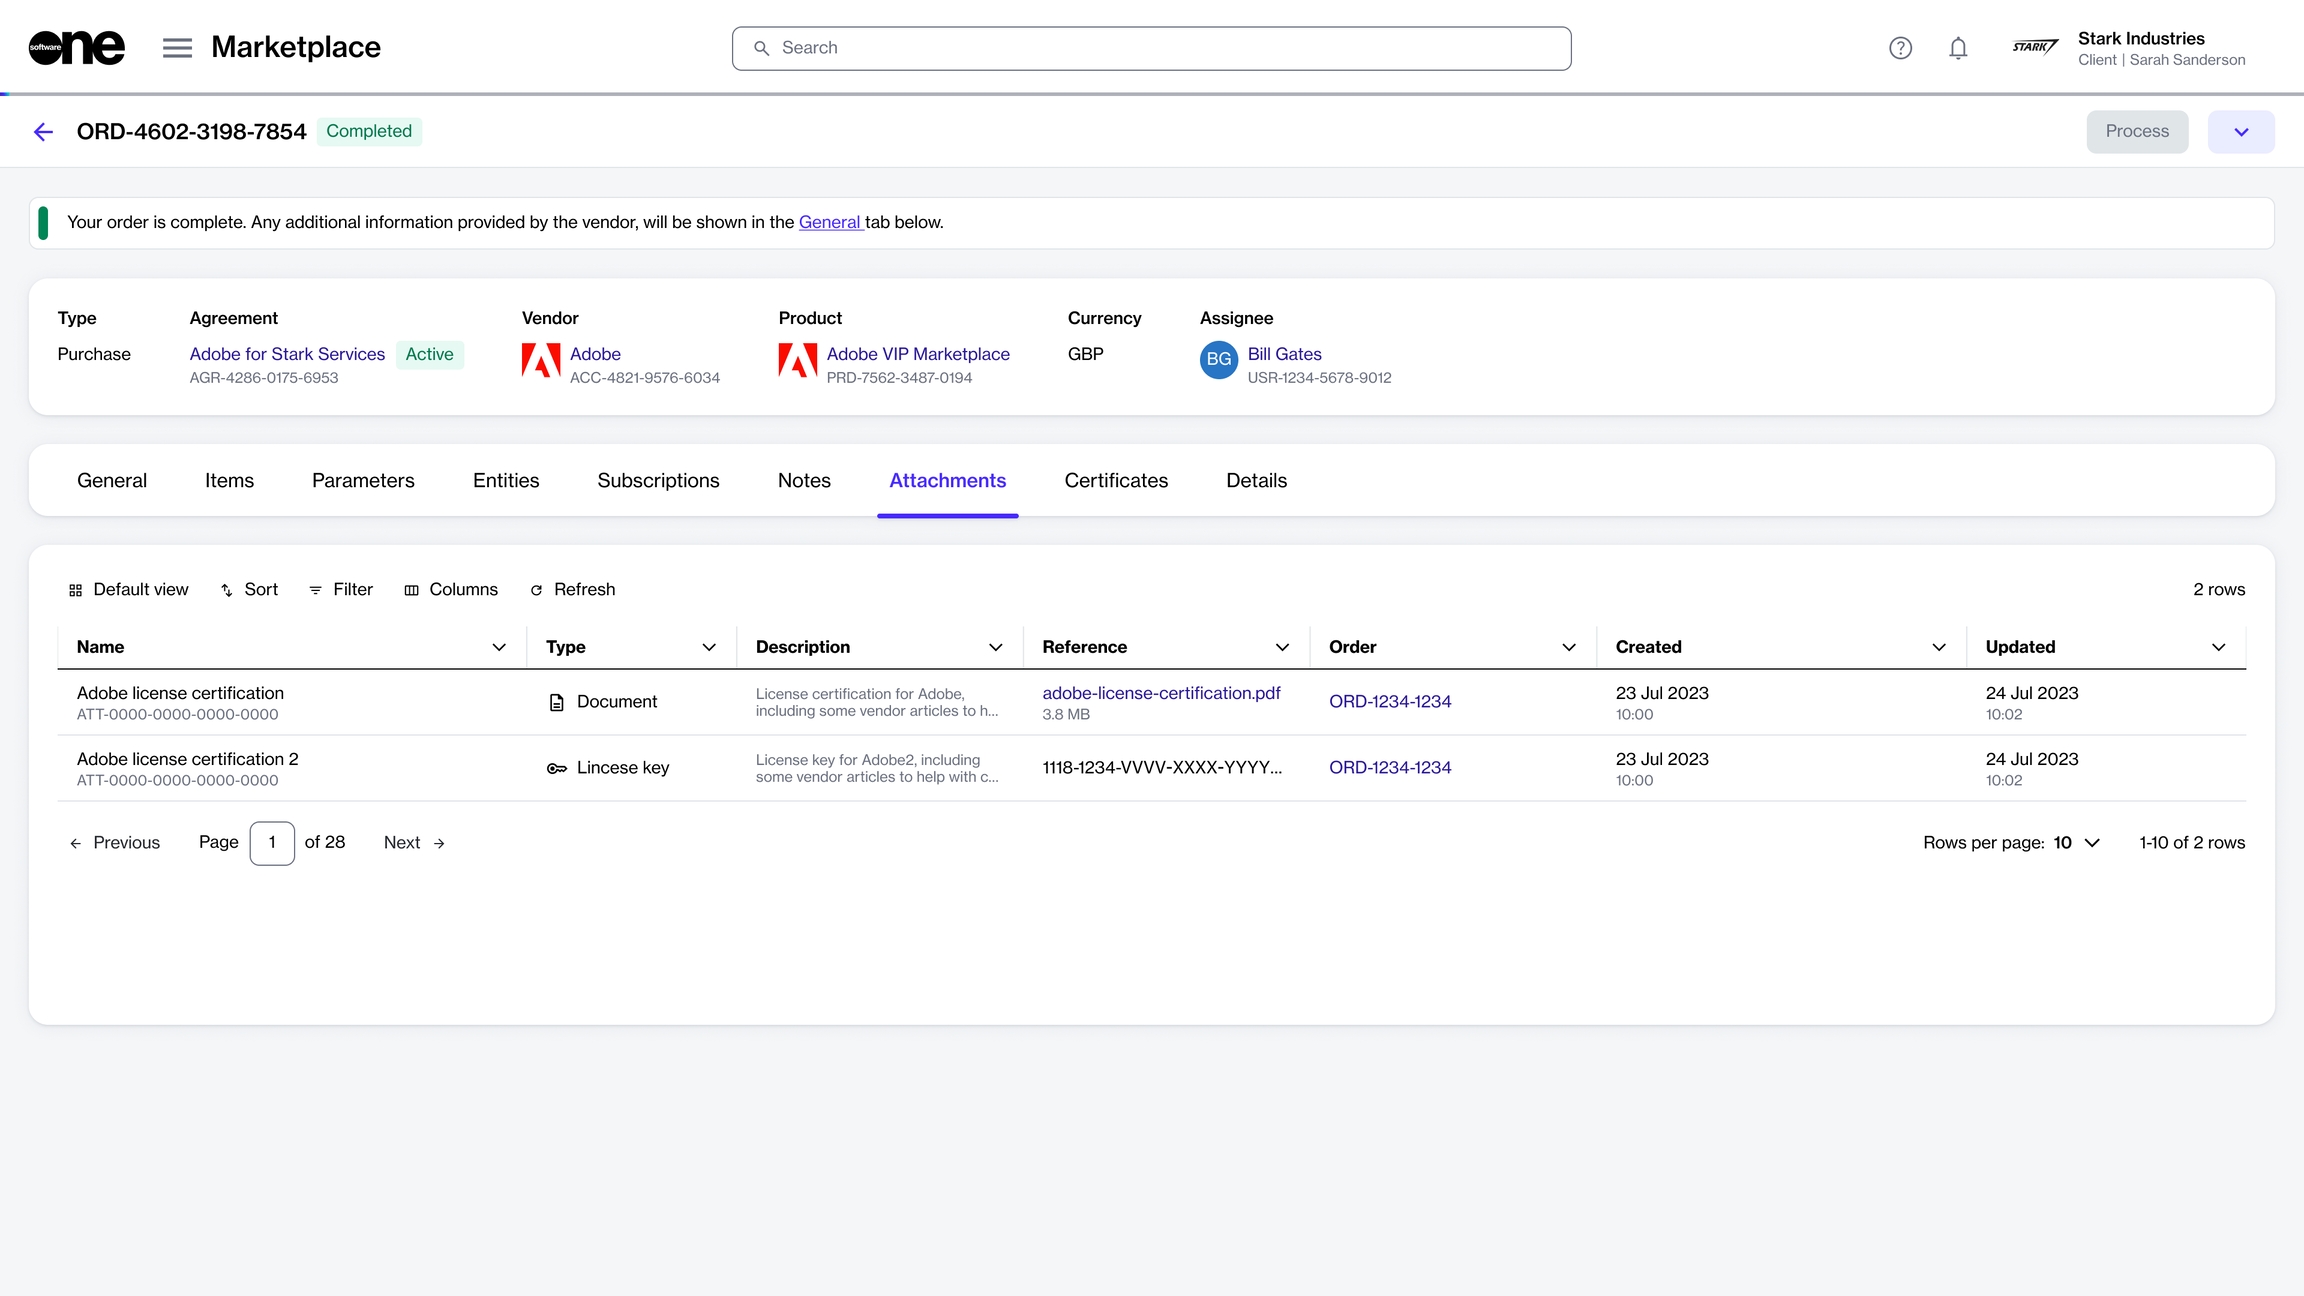
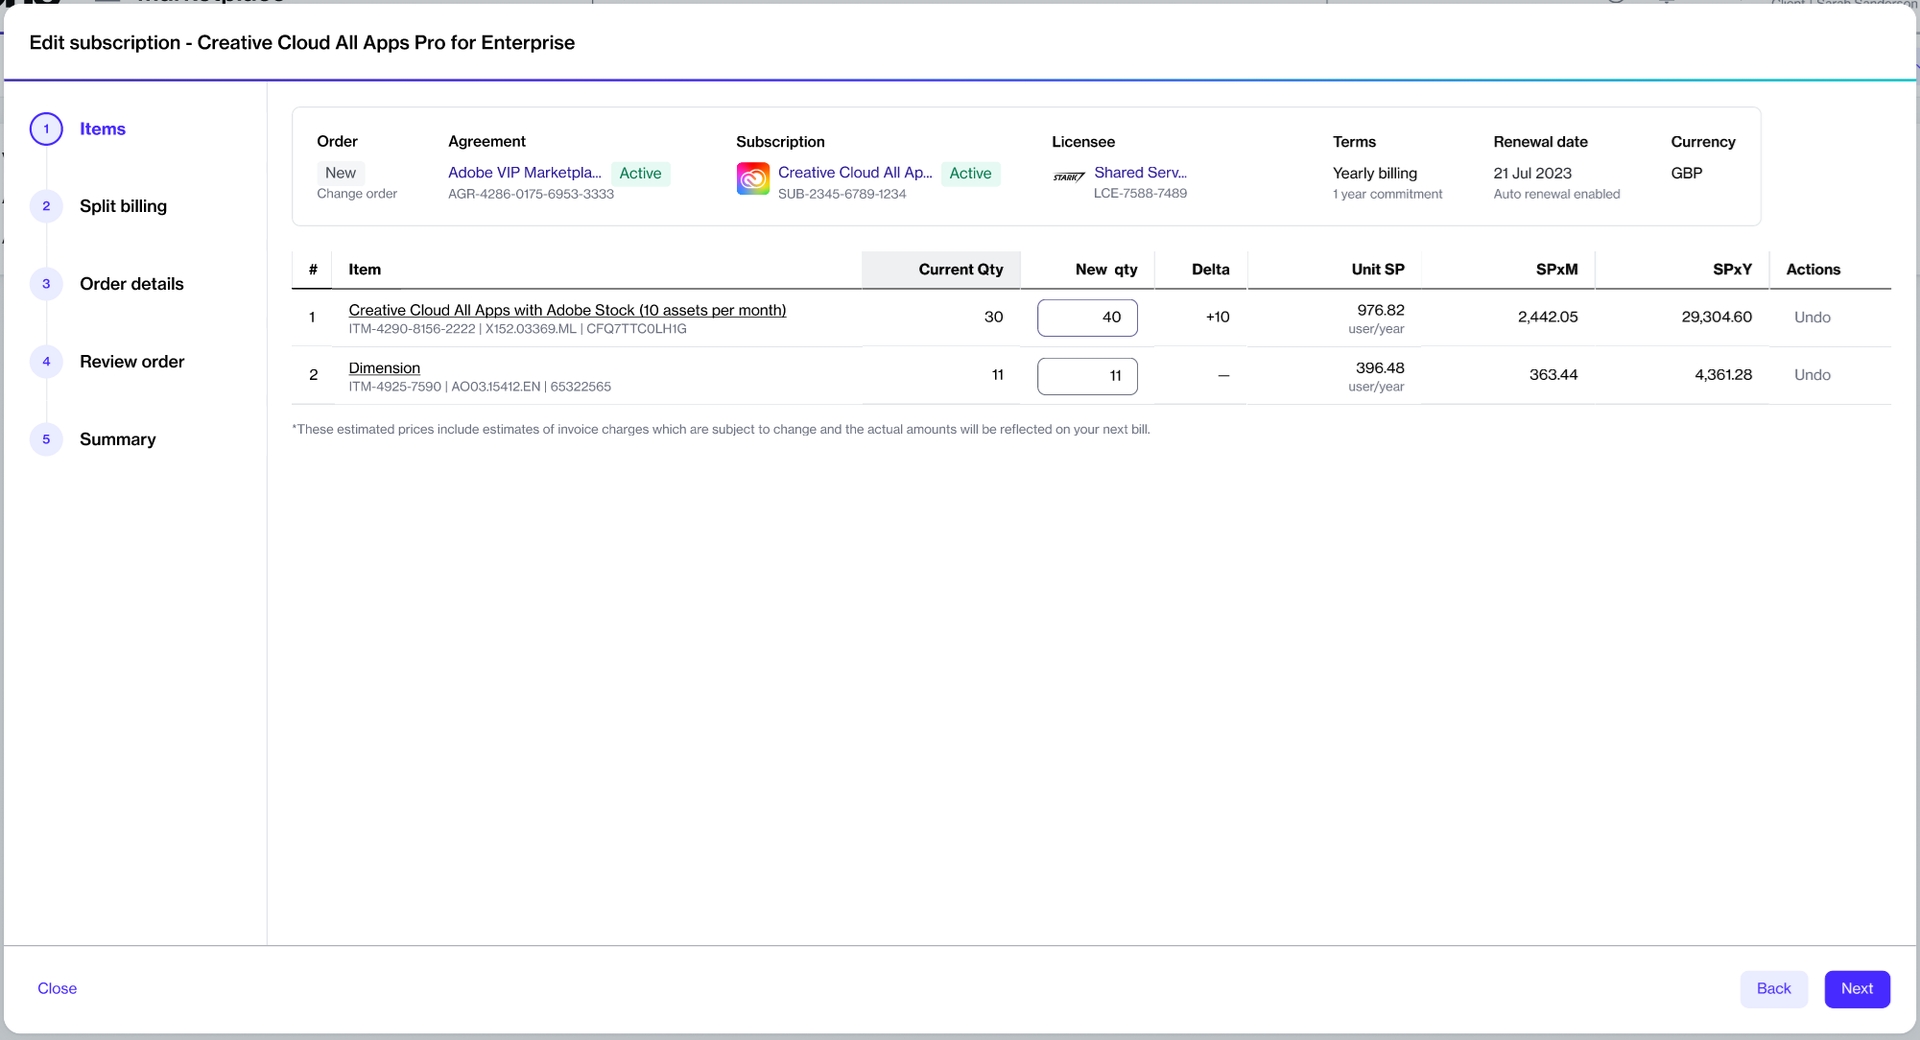
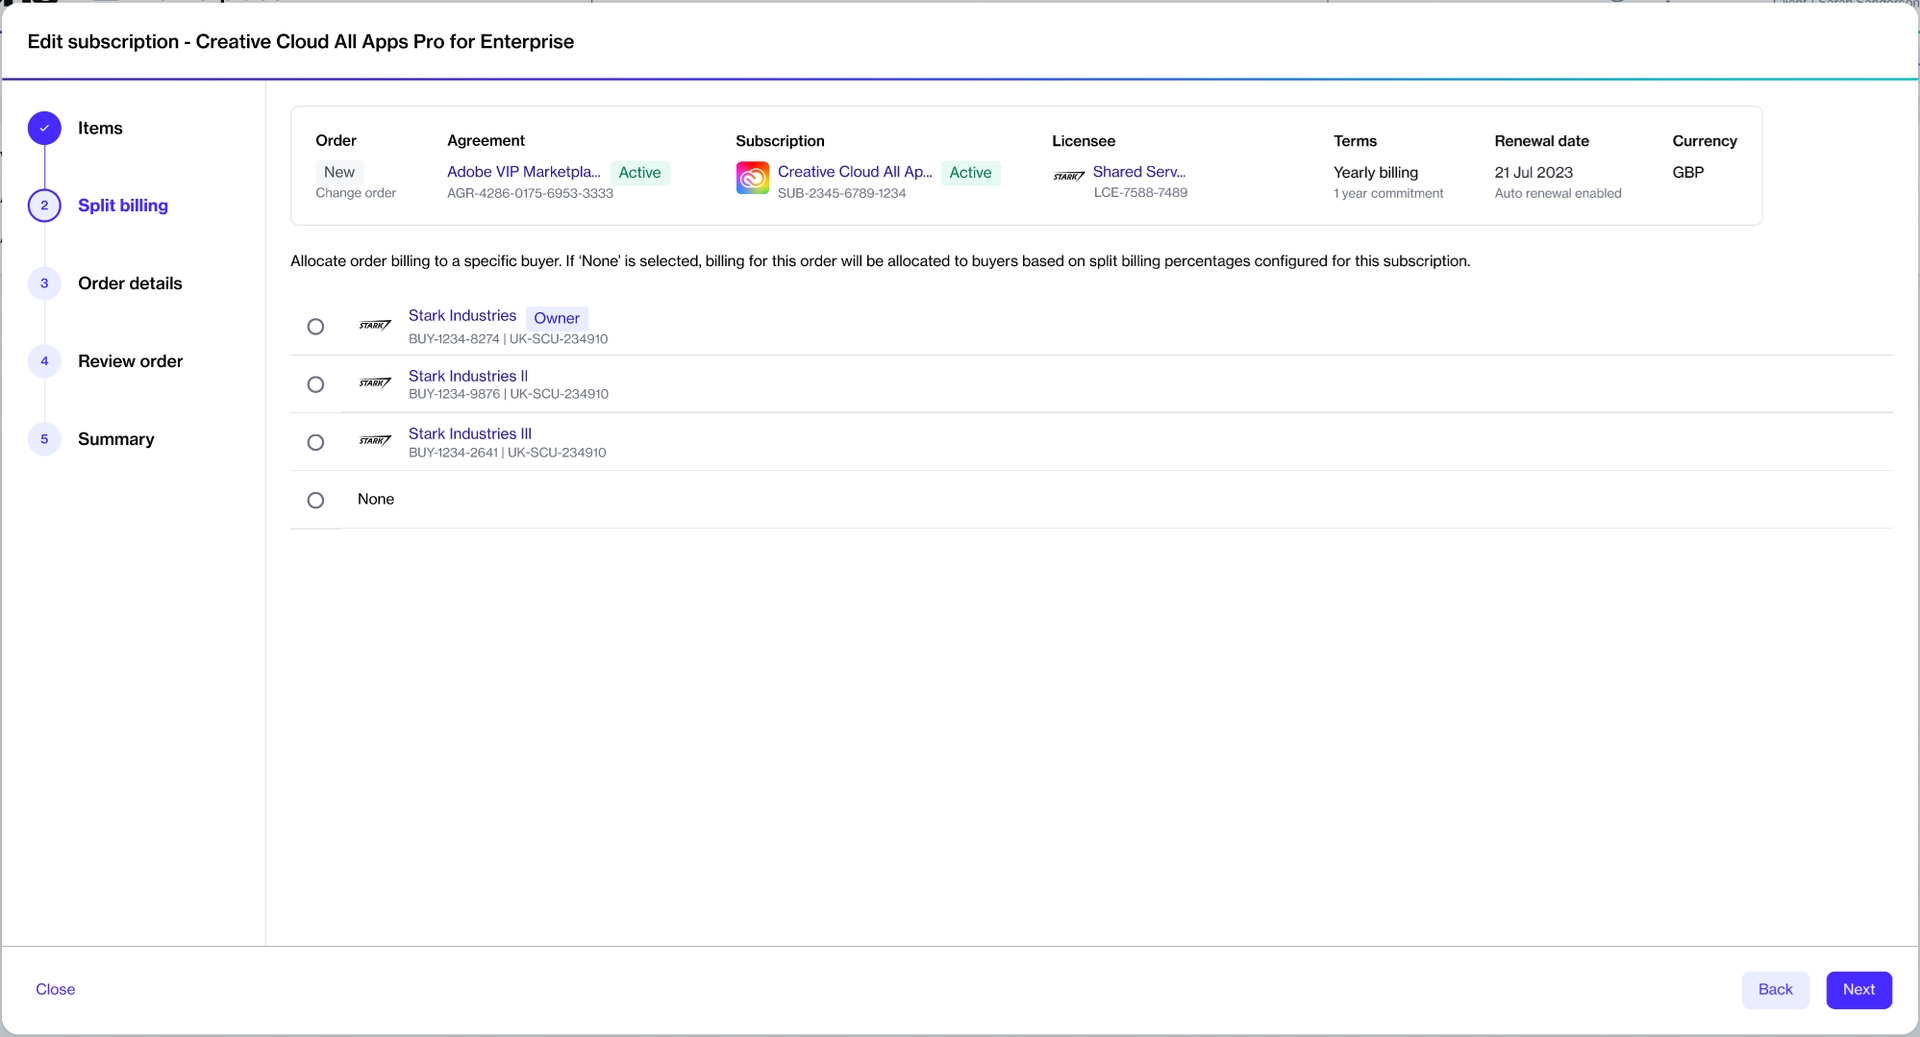

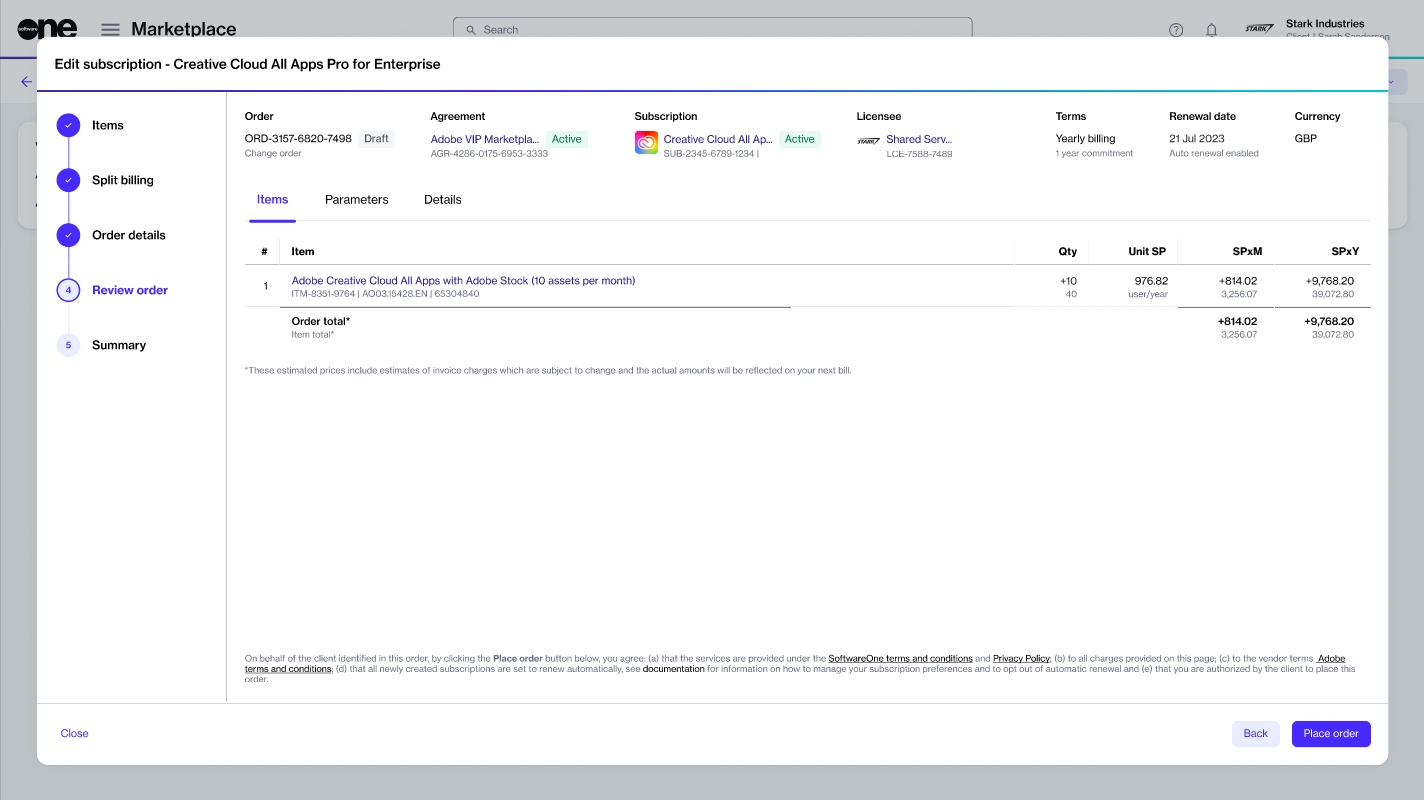
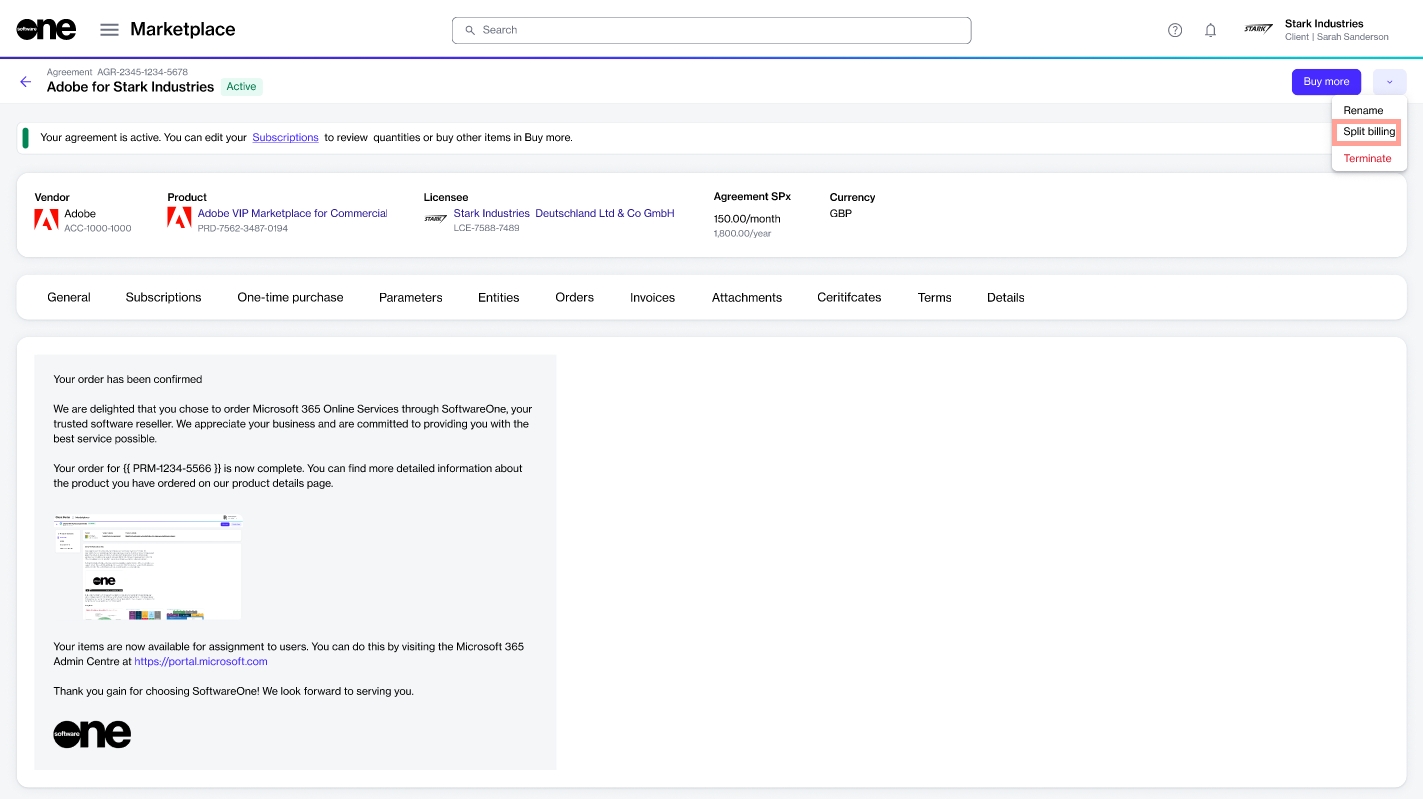

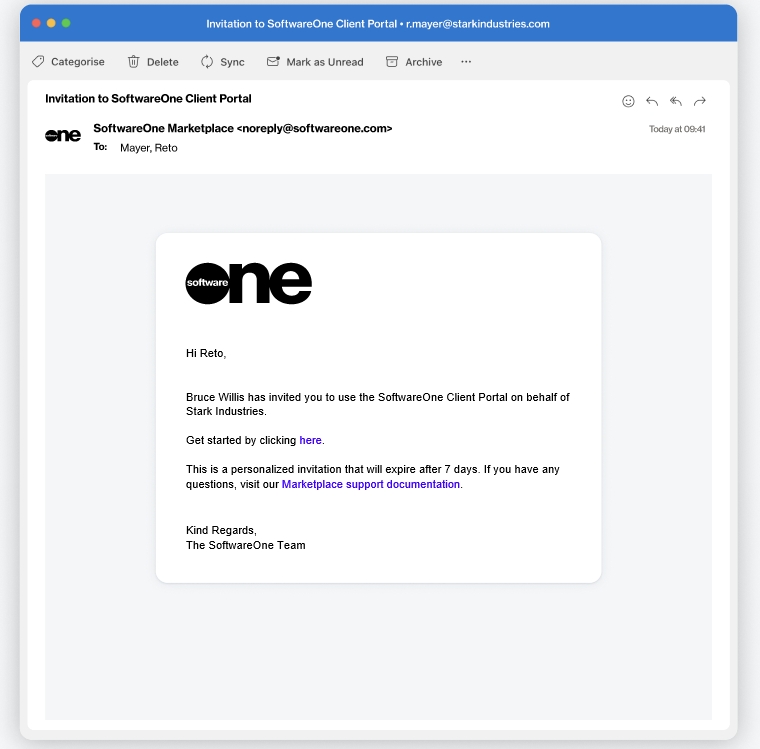
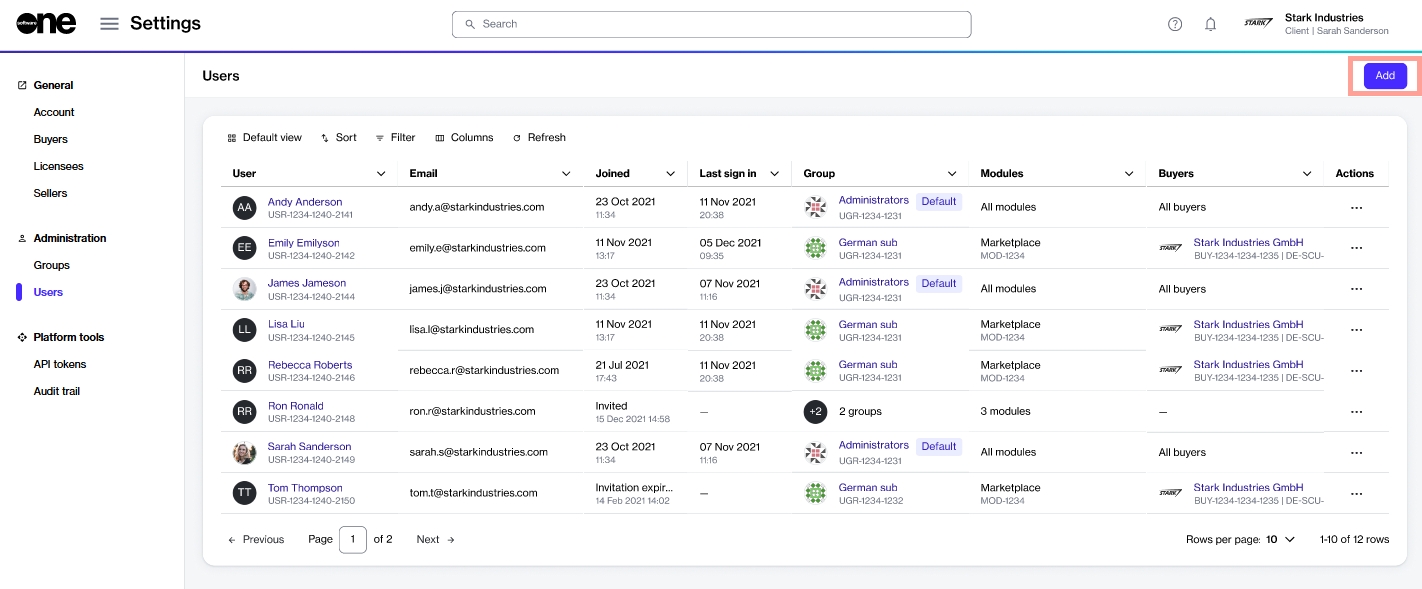
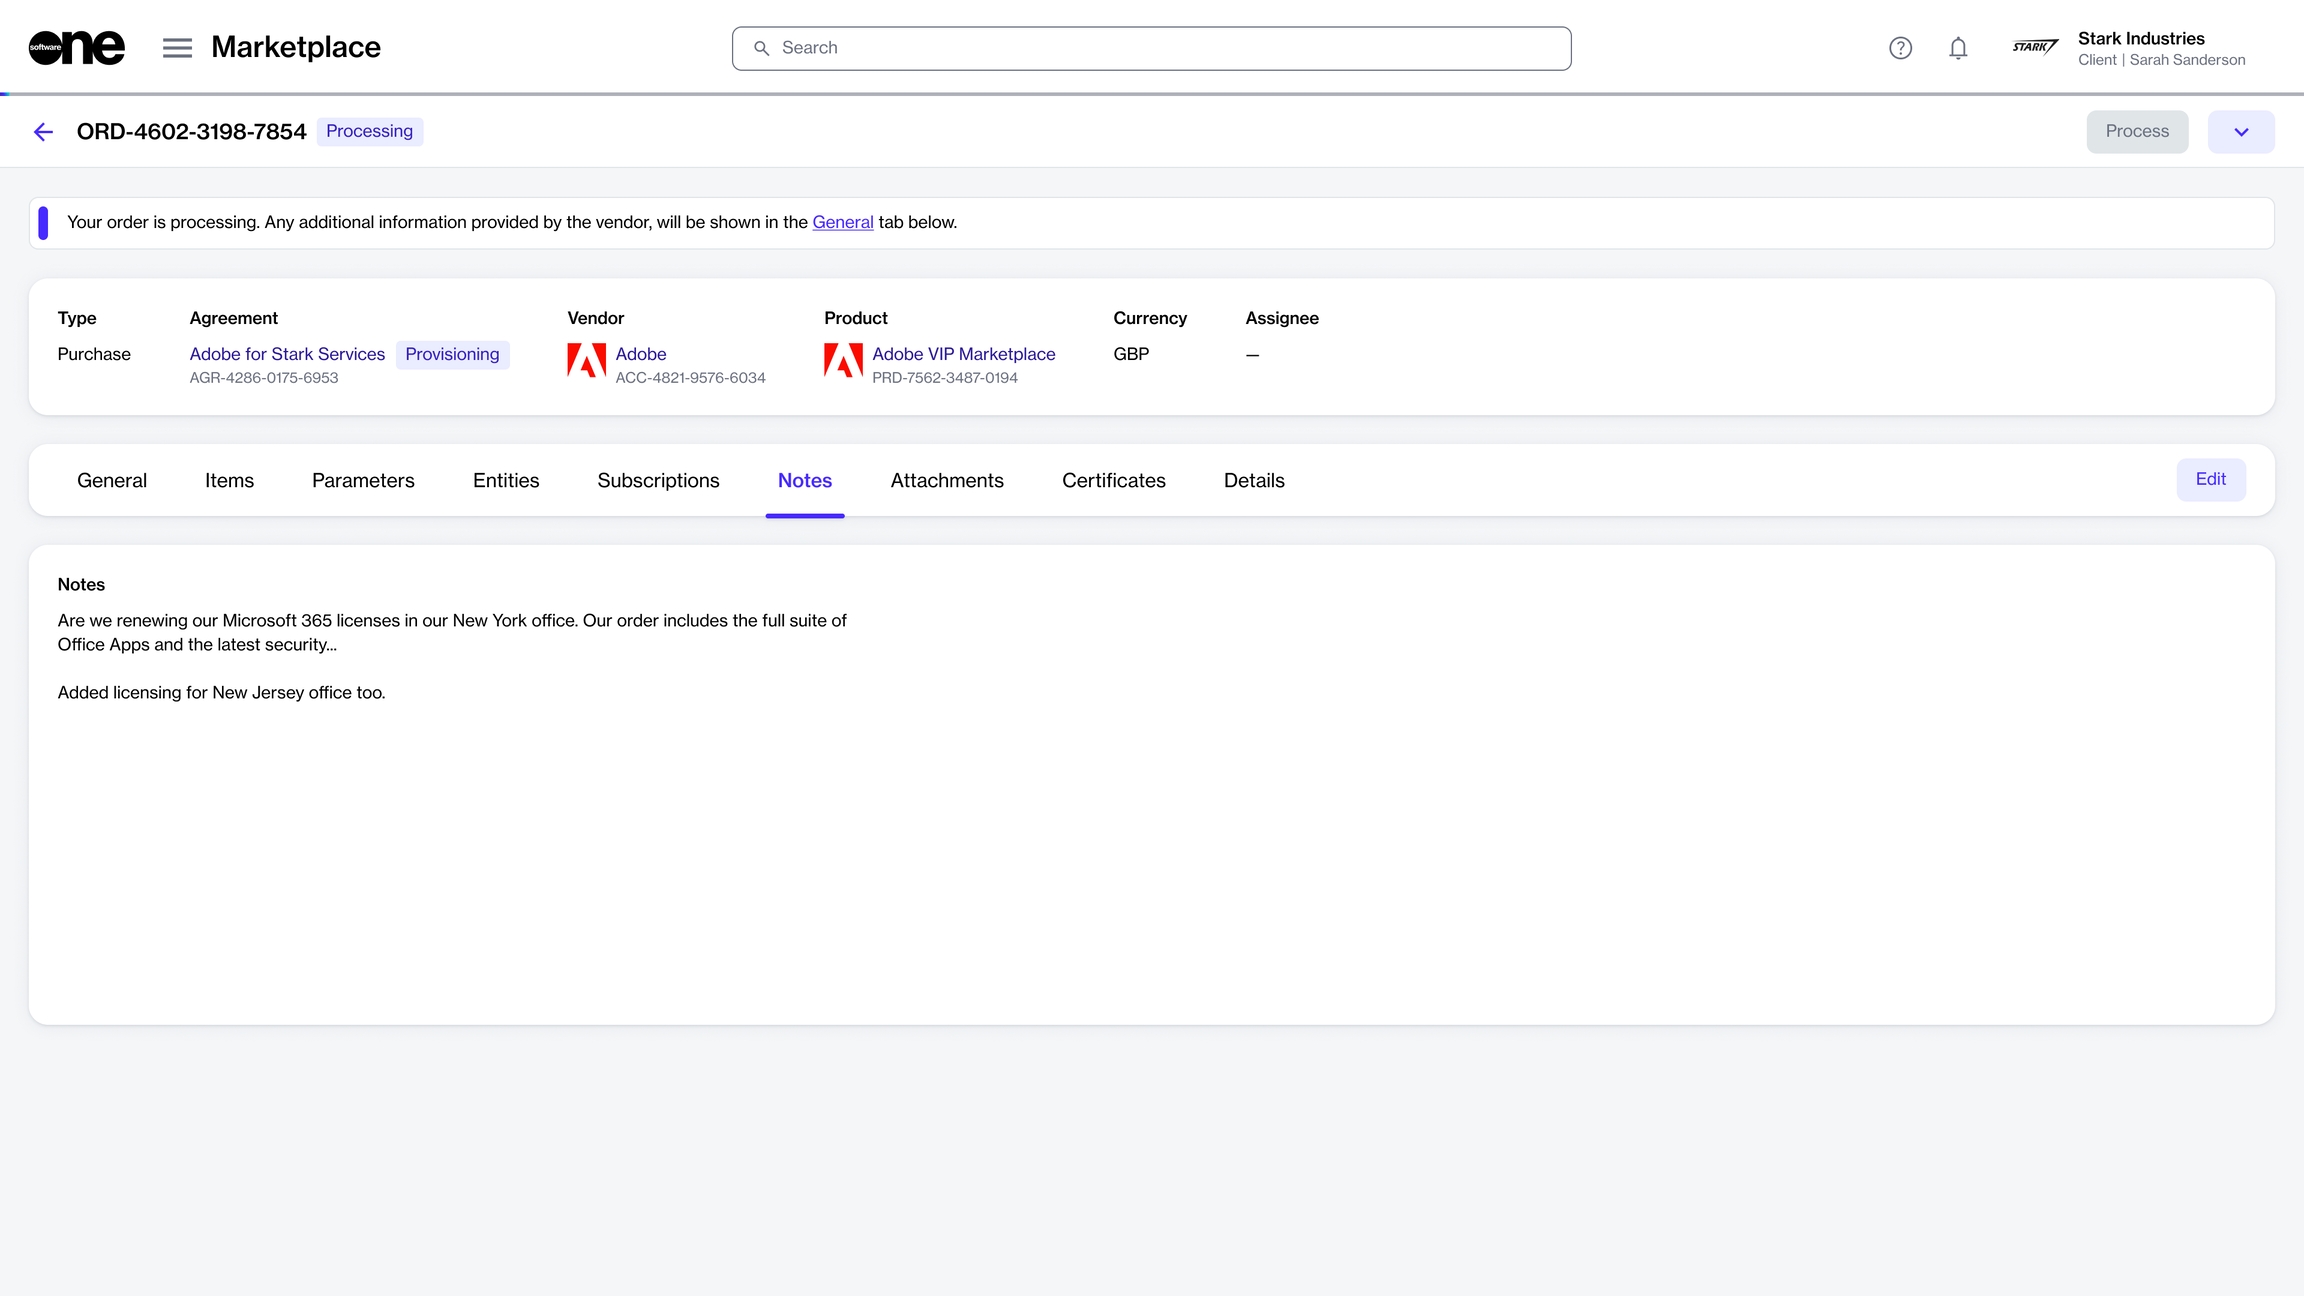
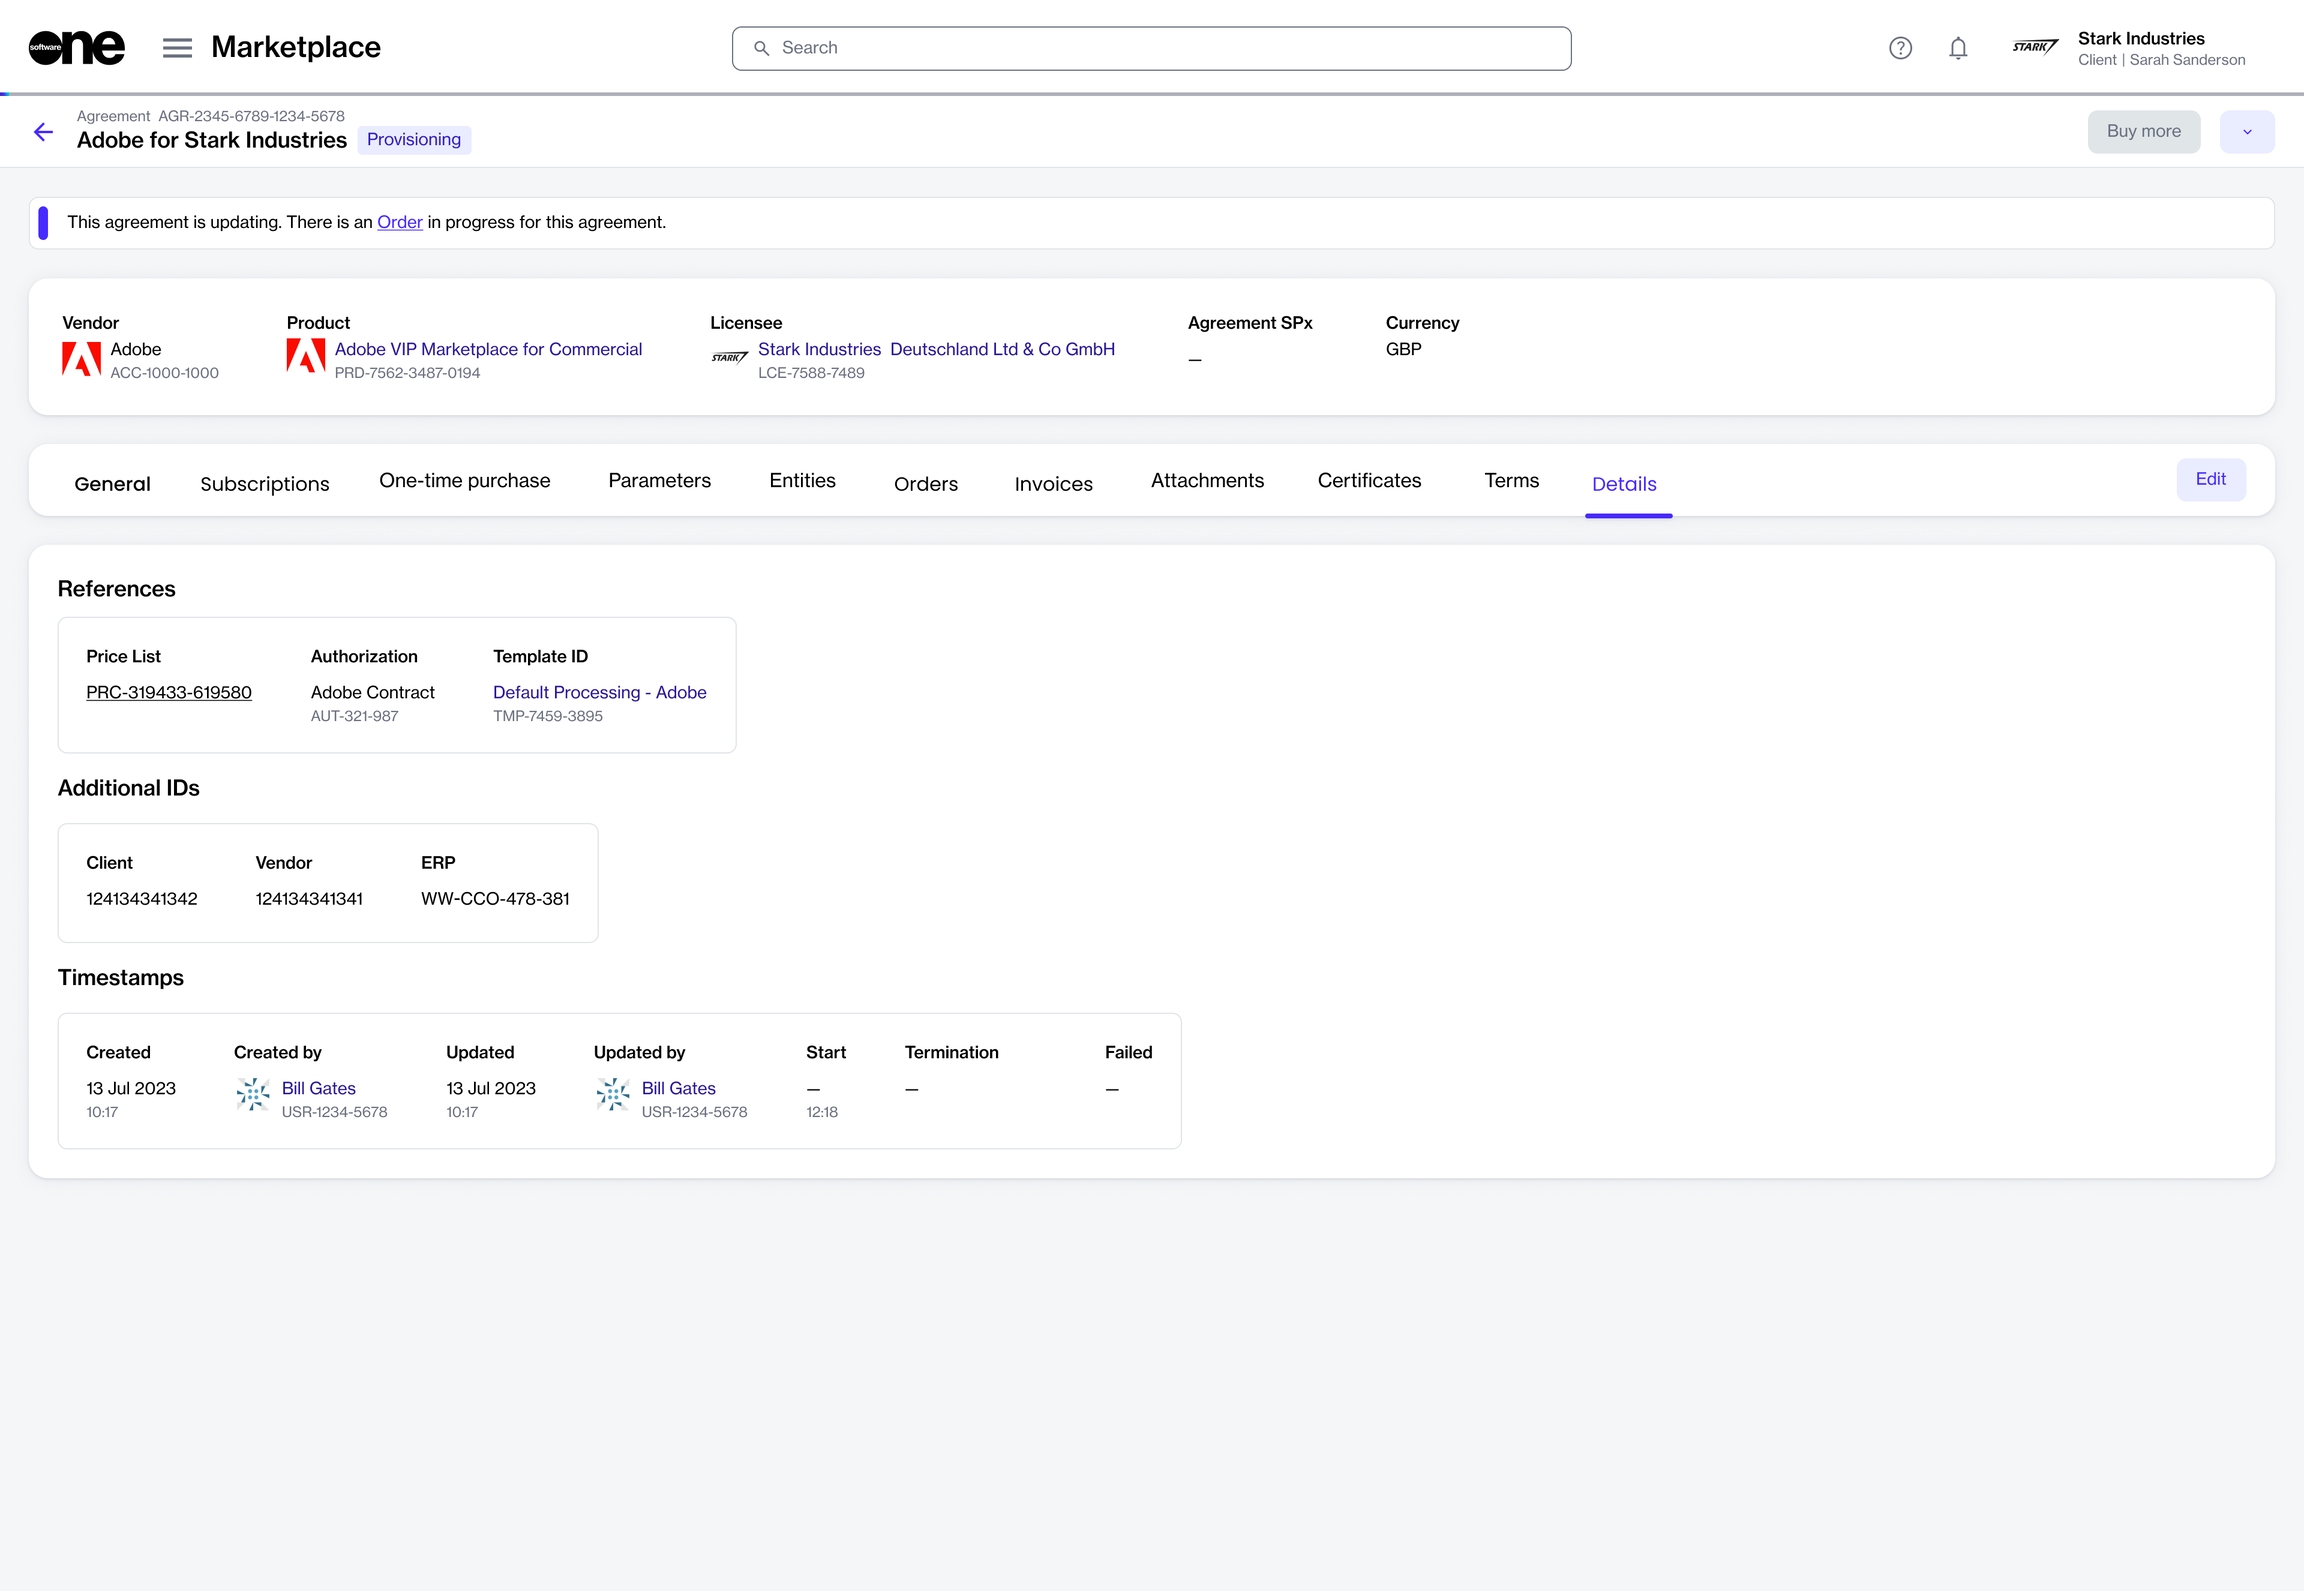
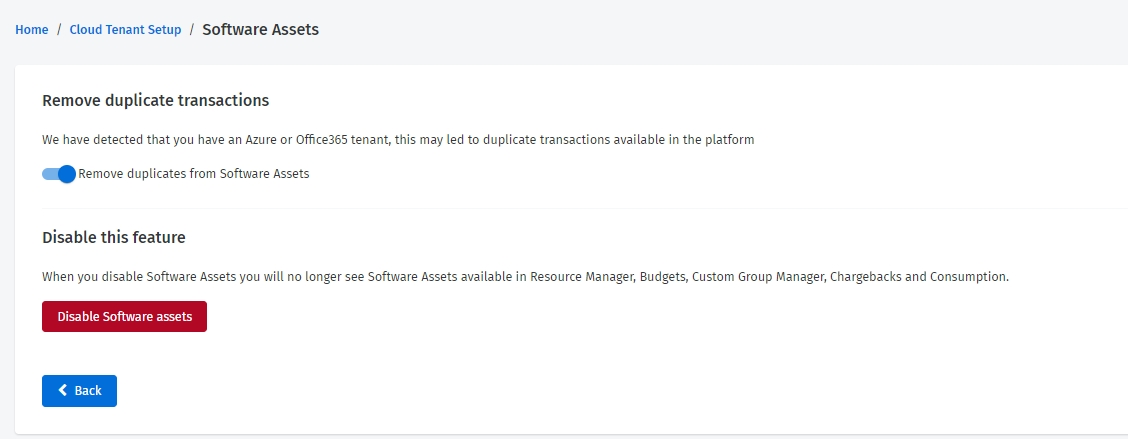
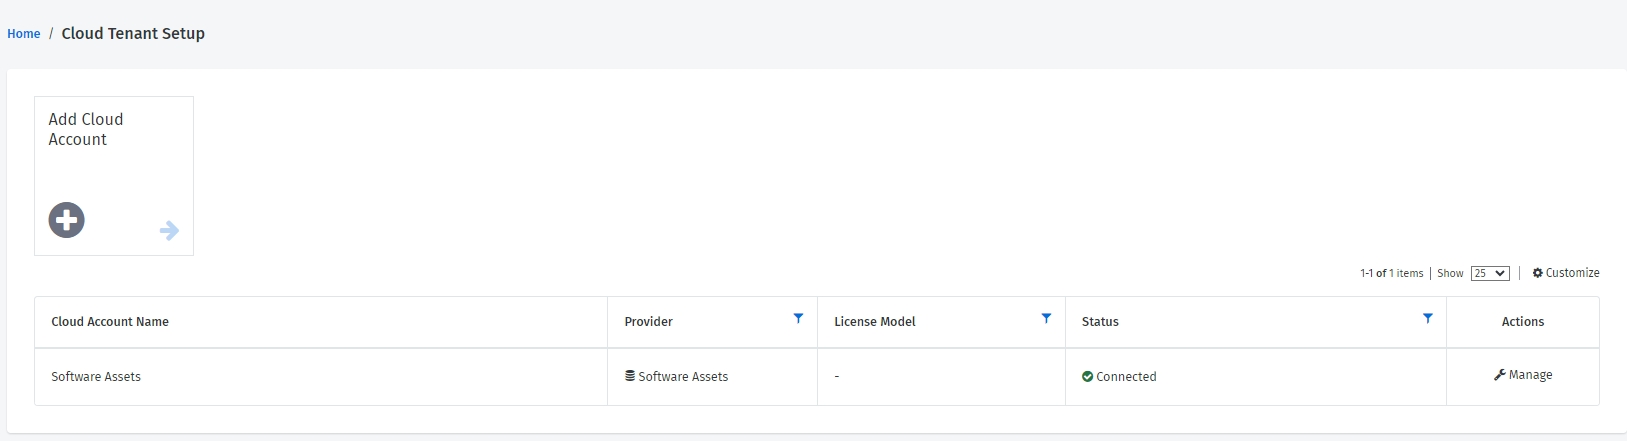
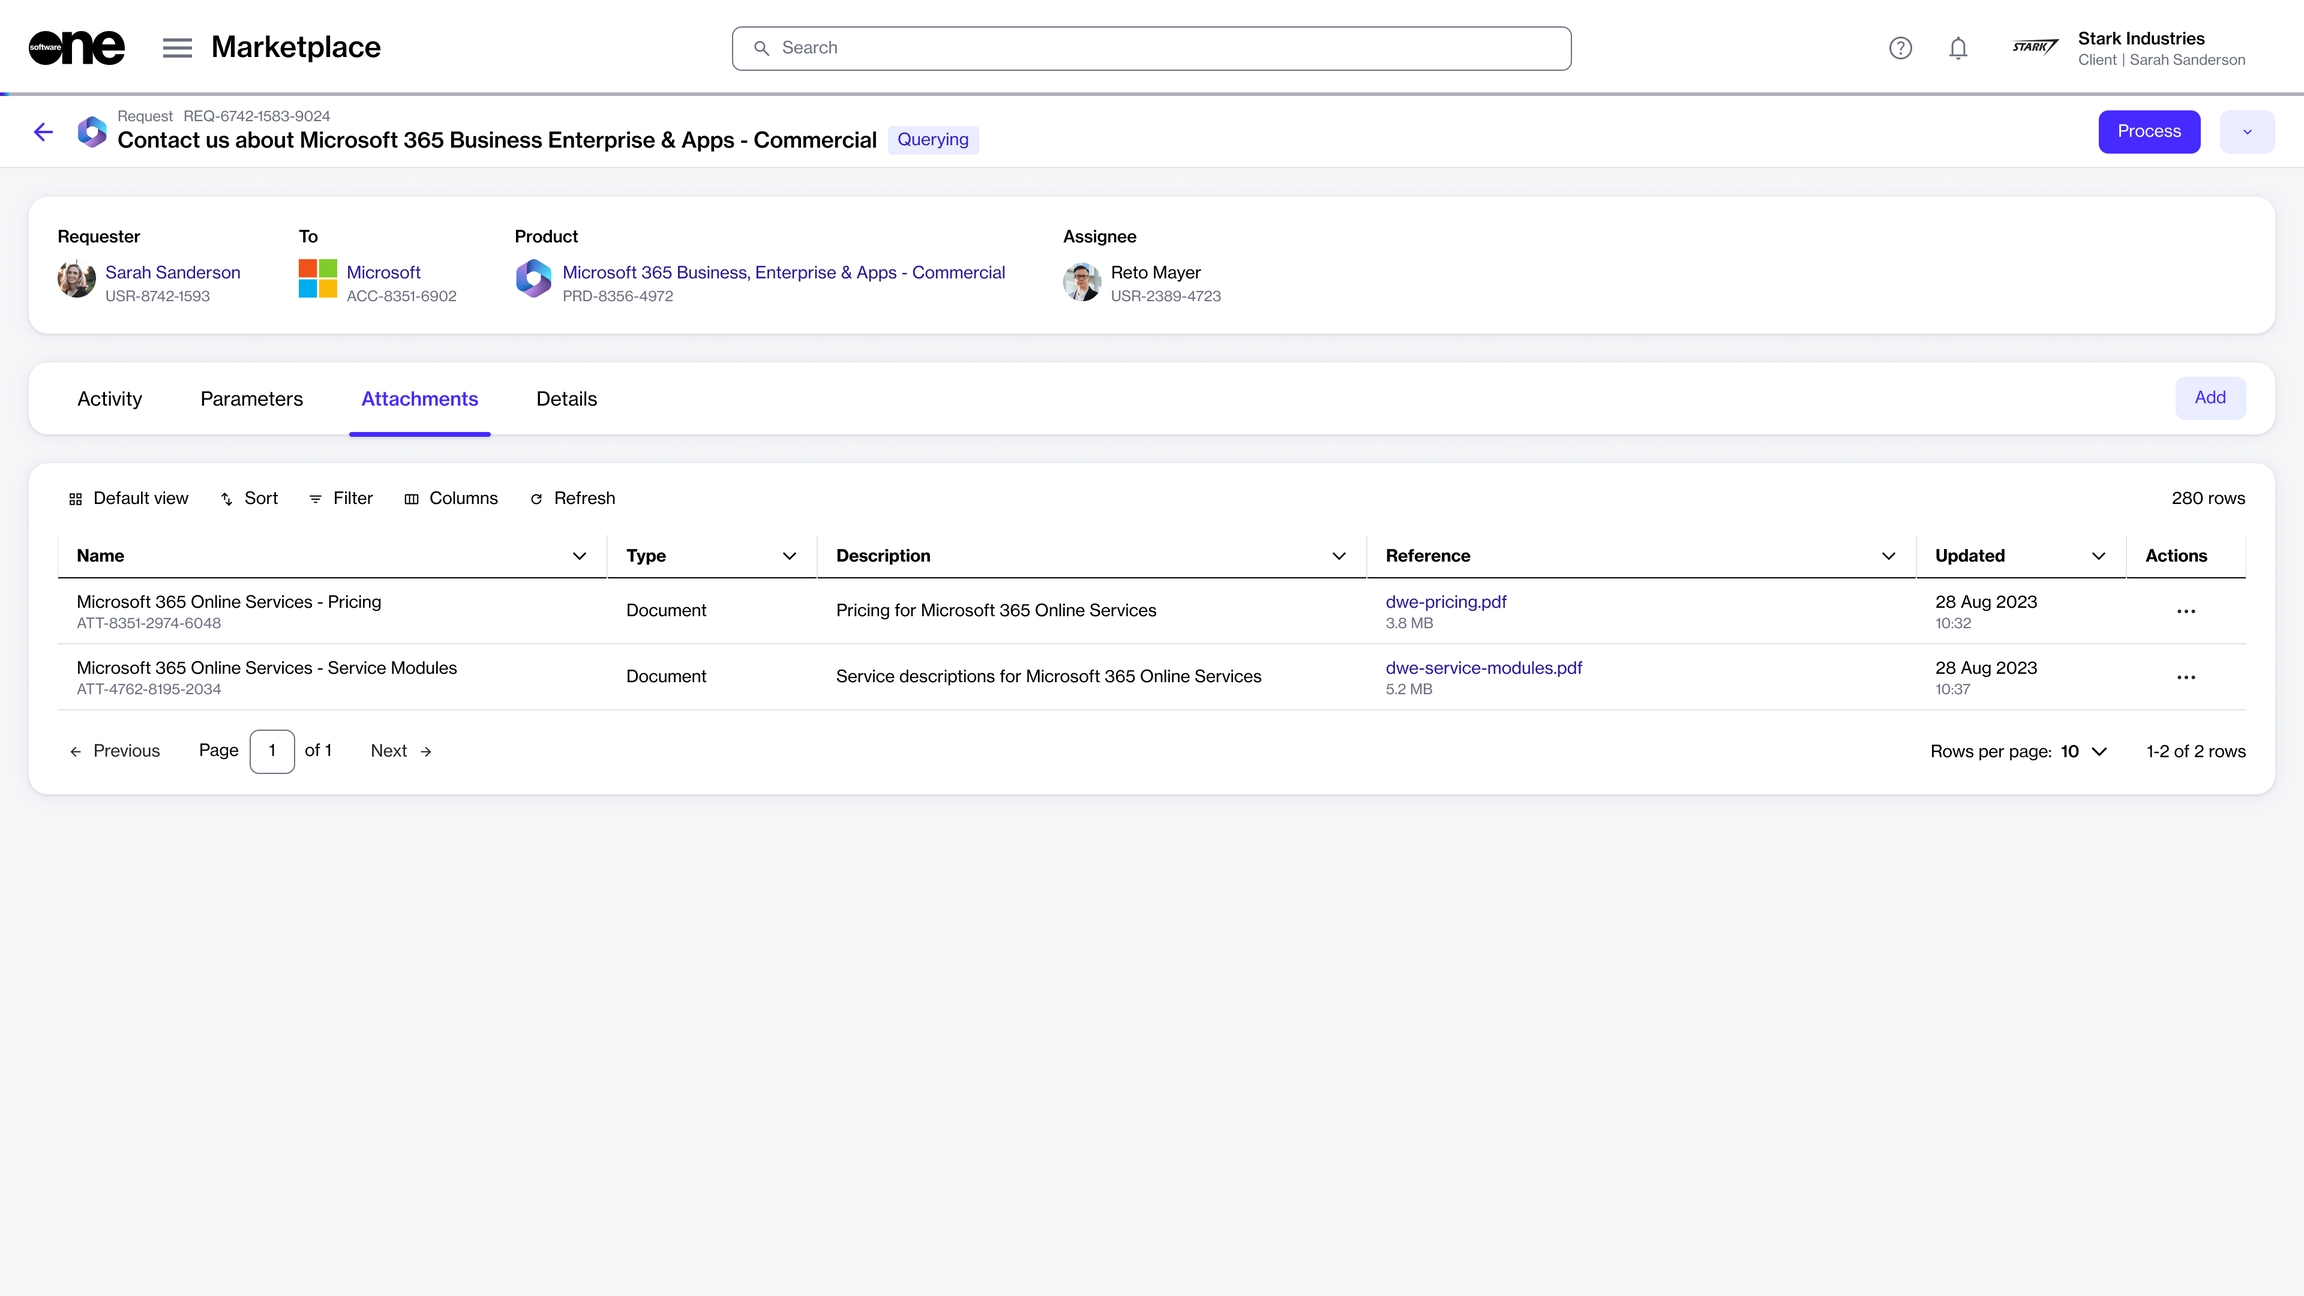
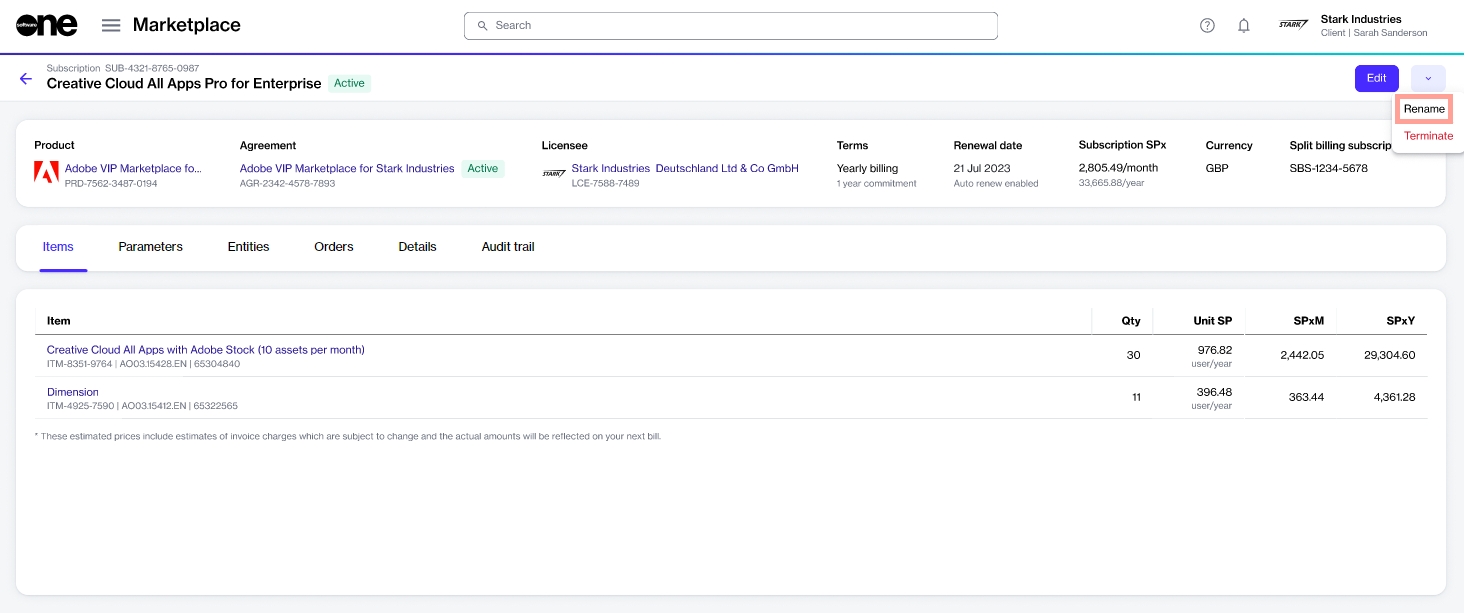

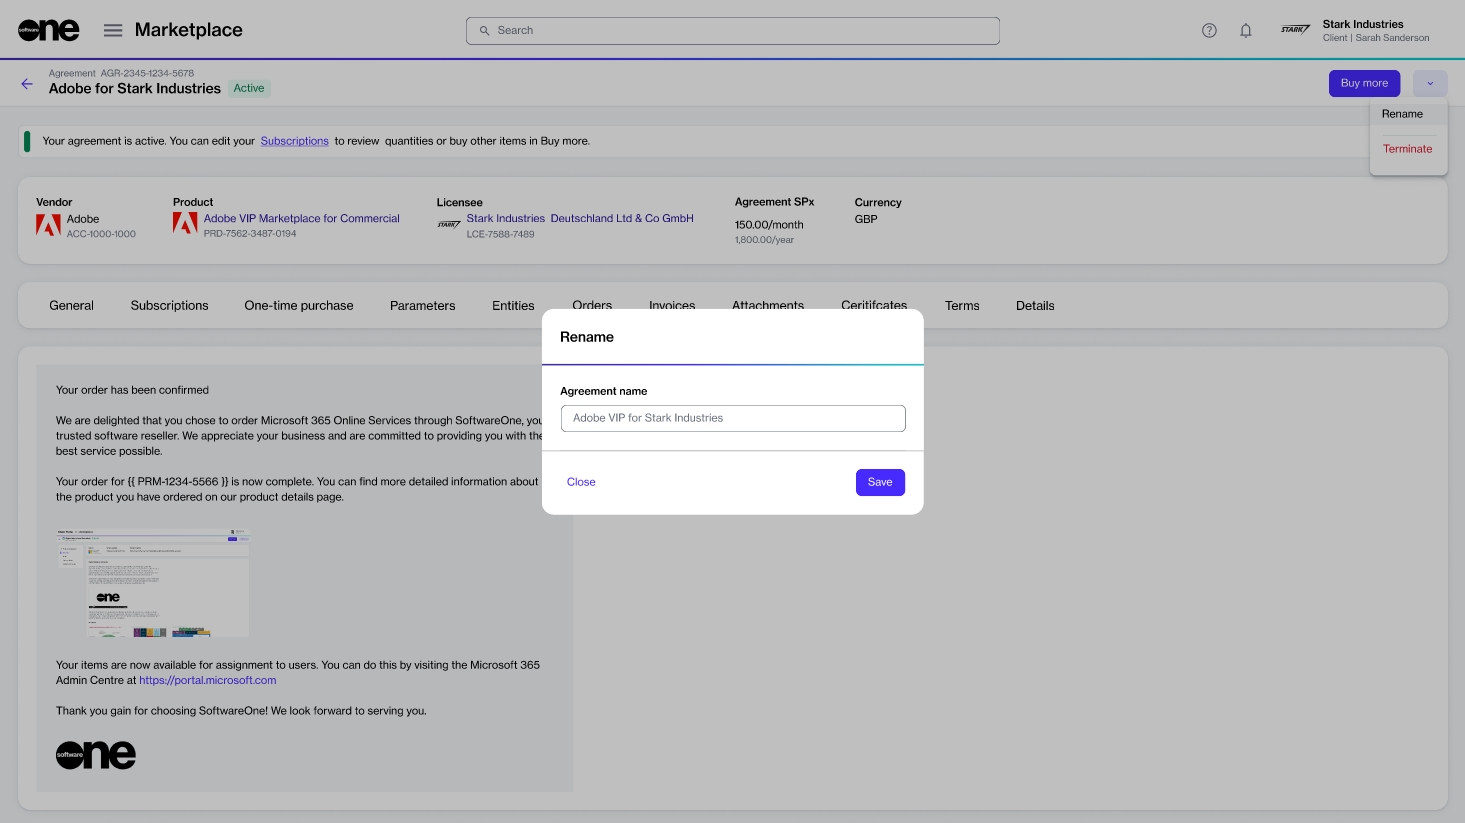
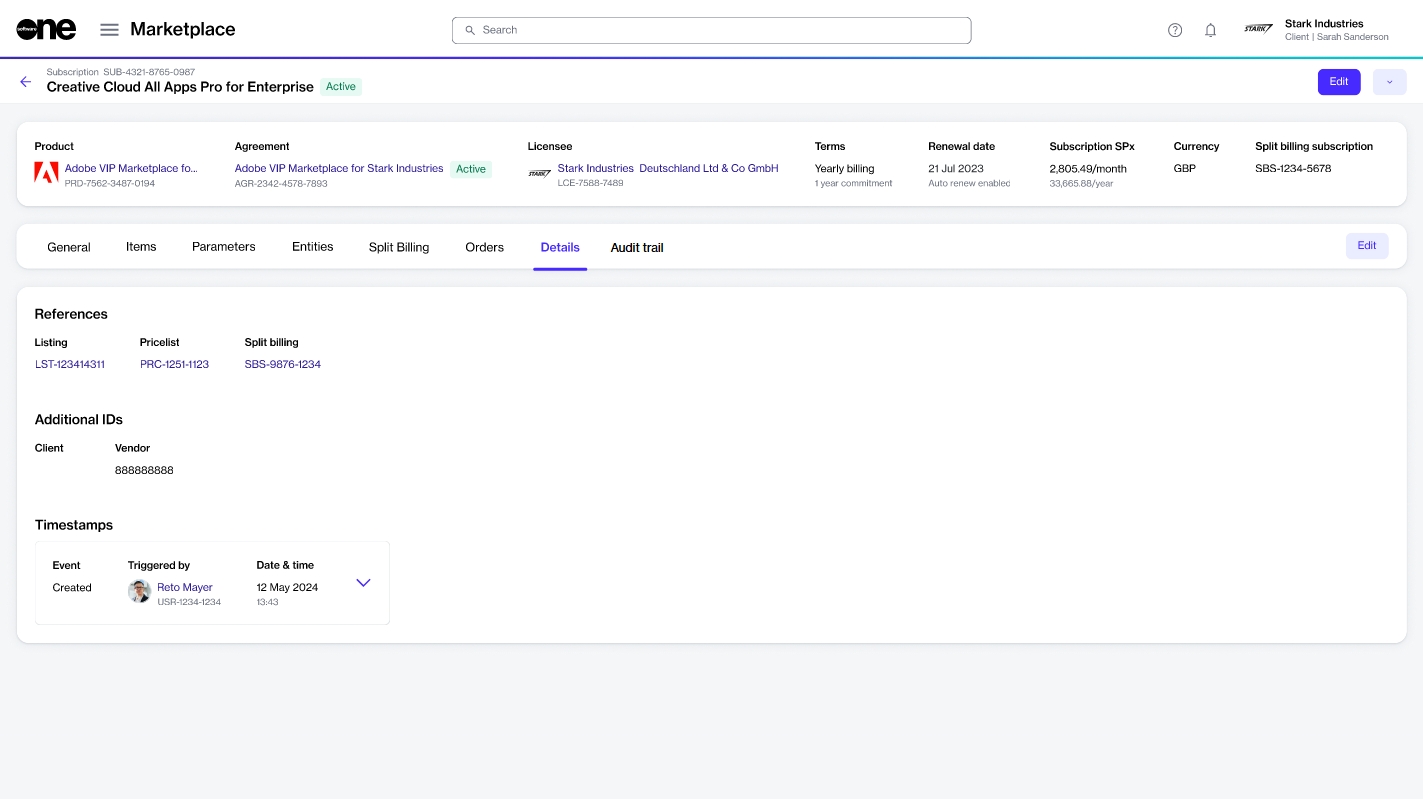
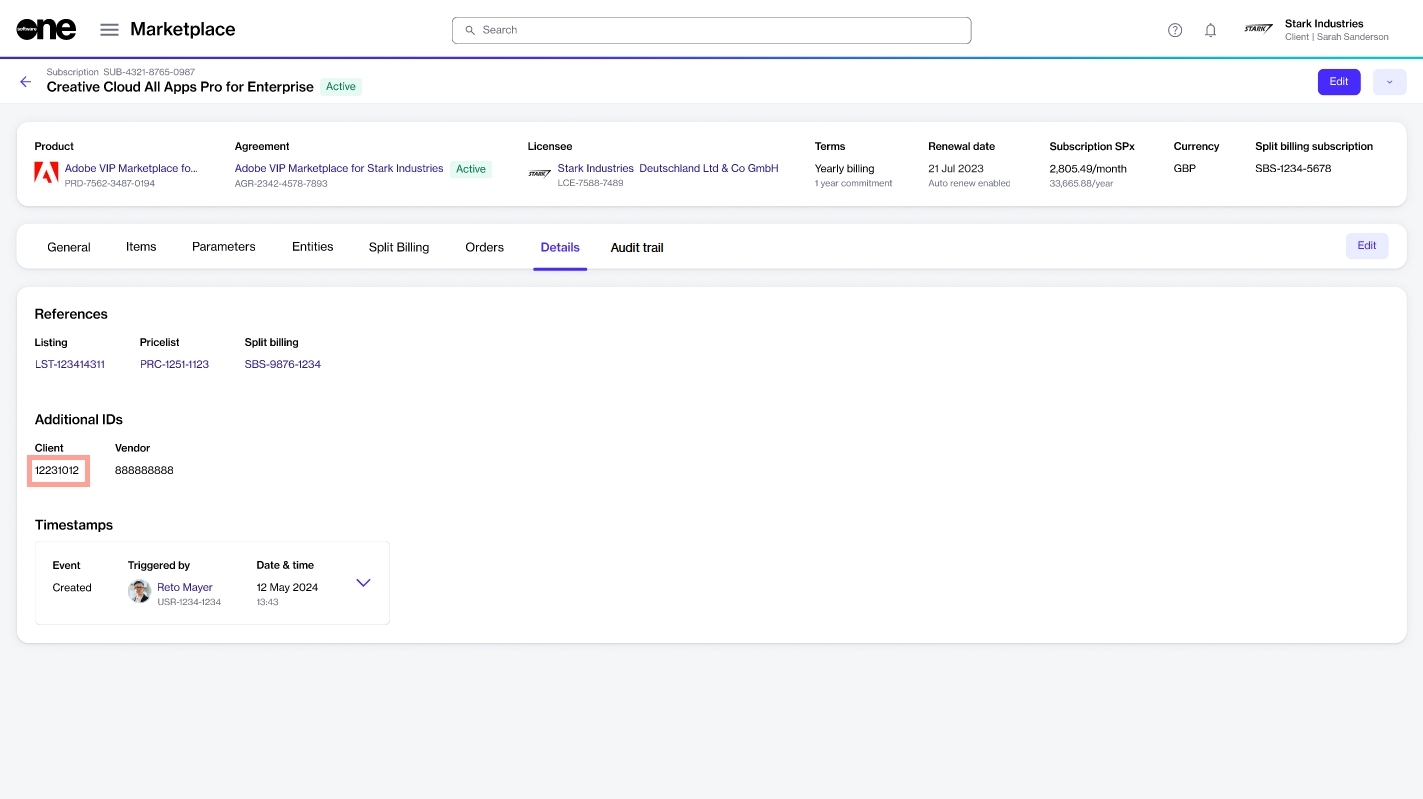
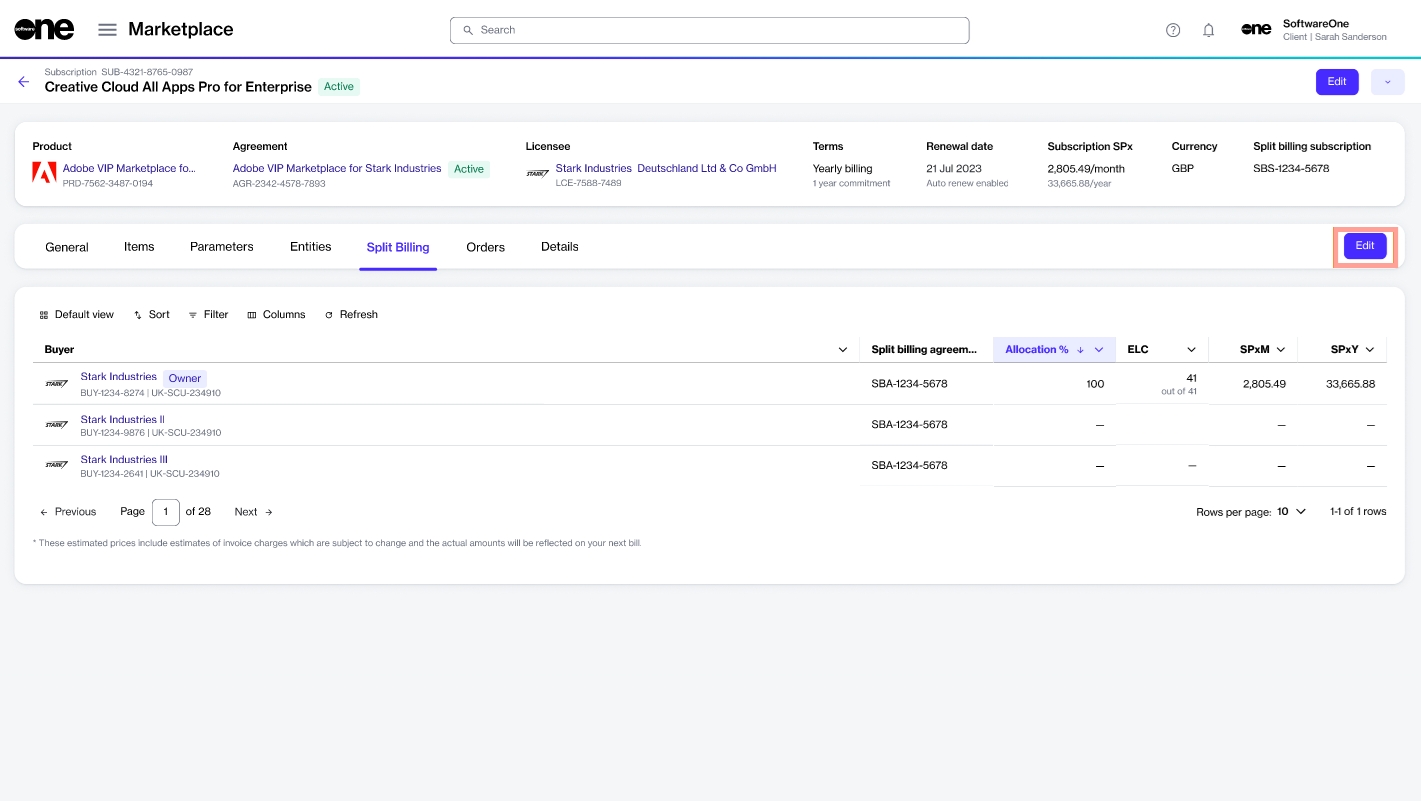
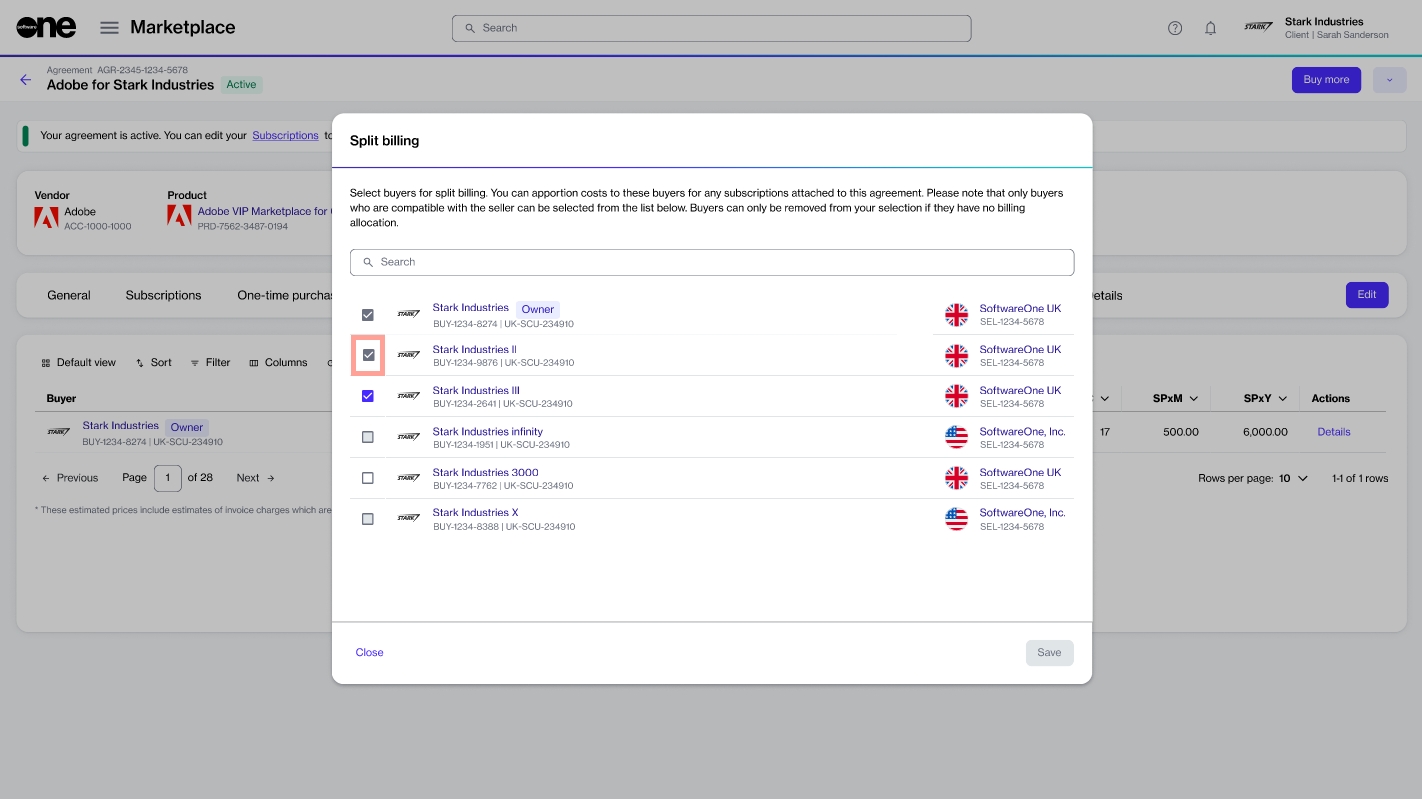
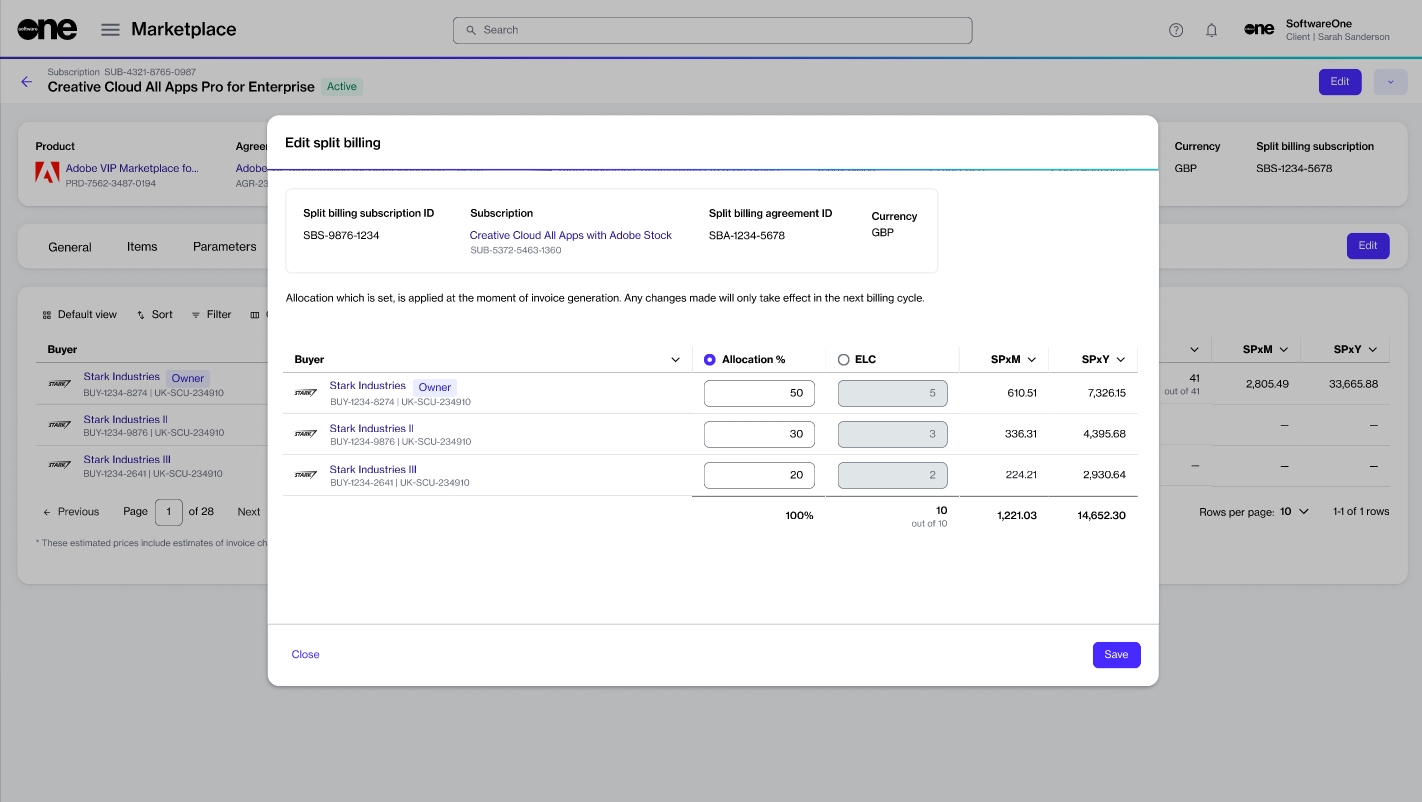
Specify the search parameters, then select Search. A list of agreements matching the criteria is displayed. You can then view detailed information or export the agreement to any of the available formats.
By default, the License Agreements page displays the agreement data in a Grid View. You can customize the data to show selected columns and rearrange them in the order you wish.
You can also change the view and select Timeline View to view your agreements as a timeline. The timeline view allows you to track and visualize your expiring agreements.
By selecting Export to PDF, you can export the timeline view to a PDF file. Note that you must have a PDF reader installed on your system to view the exported PDF document.
You can export an individual license agreement or all of your agreements.
To export an individual license agreement:
On the License Agreements page, find the contract you want to export.
Select the actions icon (•••) and choose Export to PDF, Export to CSV, or Export to Excel. Your report is queued for processing, and a confirmation message is displayed.
To export all of your license agreements:
On the License Agreements page, hover over the Exports option and select Contracts. The Create New Report - Contracts page opens.
Choose the format for your report, schedule frequency, and specify the start and the expiration date of your contract.
Select a template and provide a name for your report. If you don't want to use any template, choose None from the list.
Choose the delivery method, then select Run or Create, depending on whether you are creating a run-once or a scheduled report.
Once your export is complete, you can view it by hovering over Exports and selecting Go to My Reports. This link will take you directly to your generated reports page.
Alternatively, select the main menu of the Client Portal and navigate to Analyze > Reports. To learn more about reports and their features, see Reports.
You can export an agreement expiration date to Outlook to keep track of your expiring agreements.
Note that Outlook reminders can only be set for contracts that have an end date specified. If the contract doesn't have an end date, a message is displayed.
To set up a reminder in Outlook:
On the License Agreements page, search for your agreement.
Do one of the following:
Select the Actions icon and choose Outlook Export.
Open the agreement and select Outlook Export in the upper right.
When the download completes, open the downloaded file in Outlook.
Verify the agreement details and save the event in your calendar.
You can view the details of your agreement by selecting it from the License Agreements page. When the License Agreement Details page opens, the following information is displayed:
Description
The name of the agreement.
Publisher
The publisher of the software for which the agreement is created.
SoftwareOne Contract No.
A unique number assigned to your agreement by SoftwareOne.
Contract Duration
The start and expiration date of the agreement. The duration also shows the agreement status:
Red indicates that your agreement has expired.
Yellow indicates that your agreement is expiring soon.
Green indicates that your agreement is active.
License Model
The licensing model that applies to your contract.
The details page also contains tabs that you can use to view and manage specific details.
Displays a list of products associated with the agreement and their license keys. You can also add new license keys or delete existing keys.
Adding keys
You can add a new license key by selecting Add License Key and providing the product name and the license key.
Deleting keys
You can delete a key by selecting Delete from the Actions column.
Displays a list of documents associated with the agreement, such as license certificates and purchase orders (if applicable). You can add, download, and delete these documents.
Adding new documents
You can add new documents by selecting Add a Document and then uploading the document. To upload, select the file from your system or drag the file into the location.
Deleting documents
You can delete a document by selecting Delete from the Actions column. Note that deleted documents cannot be recovered.
Downloading documents
You can download a document by either clicking the filename or by selecting Open from the Actions column.
Displays the company/entity that is associated with the agreement. Note that you cannot modify any information on this tab.
Displays all alerts for the agreement and allows you to create and delete alerts.
Adding new alerts
You can add a new alert by selecting Add Alert. When the Add Alert page opens, add a subject line and then specify the email address to which the alert should be sent. Note that you can add three email addresses separated by a semicolon.
Next, choose the alert type (Agreement Expiration, True Up, or Renewal) and specify how frequently you wish to be notified. You can select the frequency from the list or enter a date.
Delete alerts
You can delete an alert by selecting Delete from the Actions column.
You can view your invoice on the Invoices page in the Marketplace Platform. To download or view a sample invoice, use the following link:
This Invoice Header contains general information, such as the date your invoice was created, your customer number, and the contact person's details. The header also contains your invoice number and addresses.
The following are the key fields in this section:
PO No. (purchase order number)
This is the Client Additional ID that you specify for the agreement. The value comes from the Details tab on the .
If the value you specify exceeds 20 characters, only the first 16 characters are shown on the invoice, followed by 3 dots (...).
If the value is blank, a dash "—" is displayed on the invoice.
If you want to edit an existing value or add a new one, you can do this through the agreement details page in the platform. For detailed instructions, see .
External document number
This is the ID of the agreement for which the invoice was issued.
Each agreement is assigned an ID automatically by the platform. These IDs can't be changed, but you can view them in the platform along with the agreement name. For more information, see .
Your reference
This is the ID of the statement linked to the invoice.
A statement is an Excel file containing a detailed breakdown of what you are being billed for. To learn more, see .
Similar to an agreement ID, statement IDs are also assigned by the platform and can't be changed. For more information, see and .
The Line Item Details section contains a list of all subscriptions and items for which you are being billed. This section contains various columns, each displaying specific information, and it may span multiple pages.
The following are the key columns in this section:
Pos
Displays the line number for the item being billed.
The value starts from 10 and continues by +10 for each billing item. It means if 5 items are being billed, the POS begins from 10 and ends at 50.
No.
Displays the item number from SoftwareOne's ERP system.
Description
This is the main column listing all subscriptions and items for which you are being invoiced. It contains:
A link to access the statement directly in the platform.
Agreement-related information, including agreement ID and name, product details, and licensee details.
Subscription-related information, including subscription ID and name. You can also view the additional client ID mapped to the subscription (if there's no value, a dash is displayed), and the vendor ID.
Start Date - end date
Displays the duration of the charge.
Qty
Displays the quantity of items.
The value is always '1' because we consolidate all charges. For the actual item quantity, see your billing statement.
Unit price
Displays the total charge for each item in the subscription.
This VAT Amount Specification section contains a breakdown of the tax. It shows how the VAT is calculated and applied to the total amount.
This section outlines the payment terms in accordance with your contract and the date when the payment is due. The section may also contain our bank account information for electronic payments.
A billing statement is a detailed record of charges, and it's issued for each invoice.
Unlike an invoice PDF, which only provides a summary of charges, a statement contains a comprehensive breakdown of all charges. To download or view a sample statement, use the following link:
A SoftwareOne Marketplace billing statement contains these tabs:
Summary - Contains different objects associated with the statement, such as agreement, licensee, and orders. The page also contains links that you can use to access these objects directly in the platform.
Charges - Contains a list of charges and subscriptions for the billing period. You can also view all items within the subscription, their quantities, and prices. If split billing has been enabled, the subscription allocation percentage and estimated license count (ELC) details are also displayed.
Orders - Contains all orders placed during the billing period and their corresponding details, such as the type of order, the date when the order was placed, and more.
An invoice and a statement are both billing documents, but they serve different purposes. The following table lists the key differences between these two documents:
Purpose
Provides a high-level summary of the charges.
Provides a full record of the charges from the vendor.
Format
Excel
Level of detail
Contains aggregated lines, such as per item, per subscription, and so on.
Can have hundreds or thousands of lines for precise usage.
Use case
Used as an official billing and record-keeping document.
Used for reconciliation, in-depth audits, and analysis.
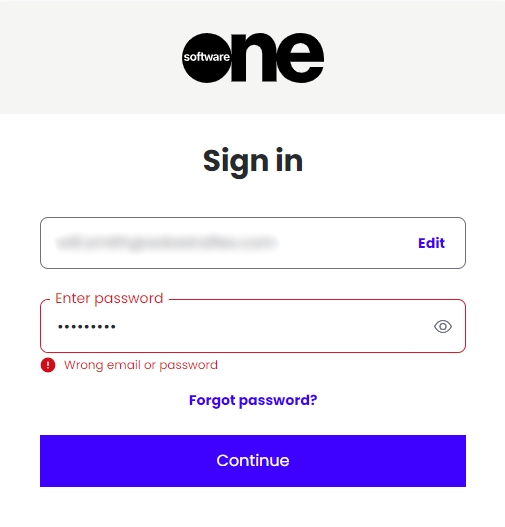
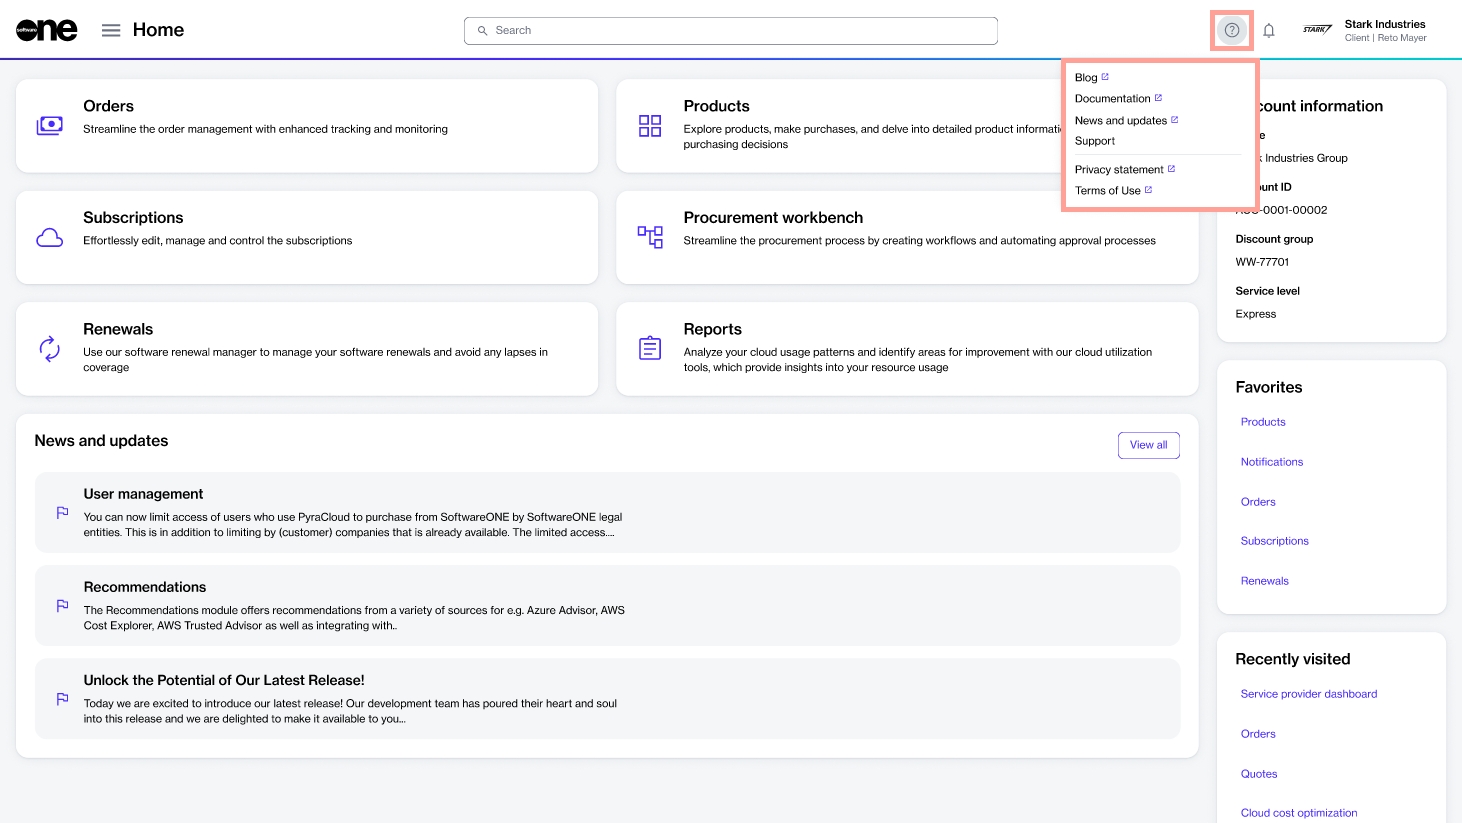
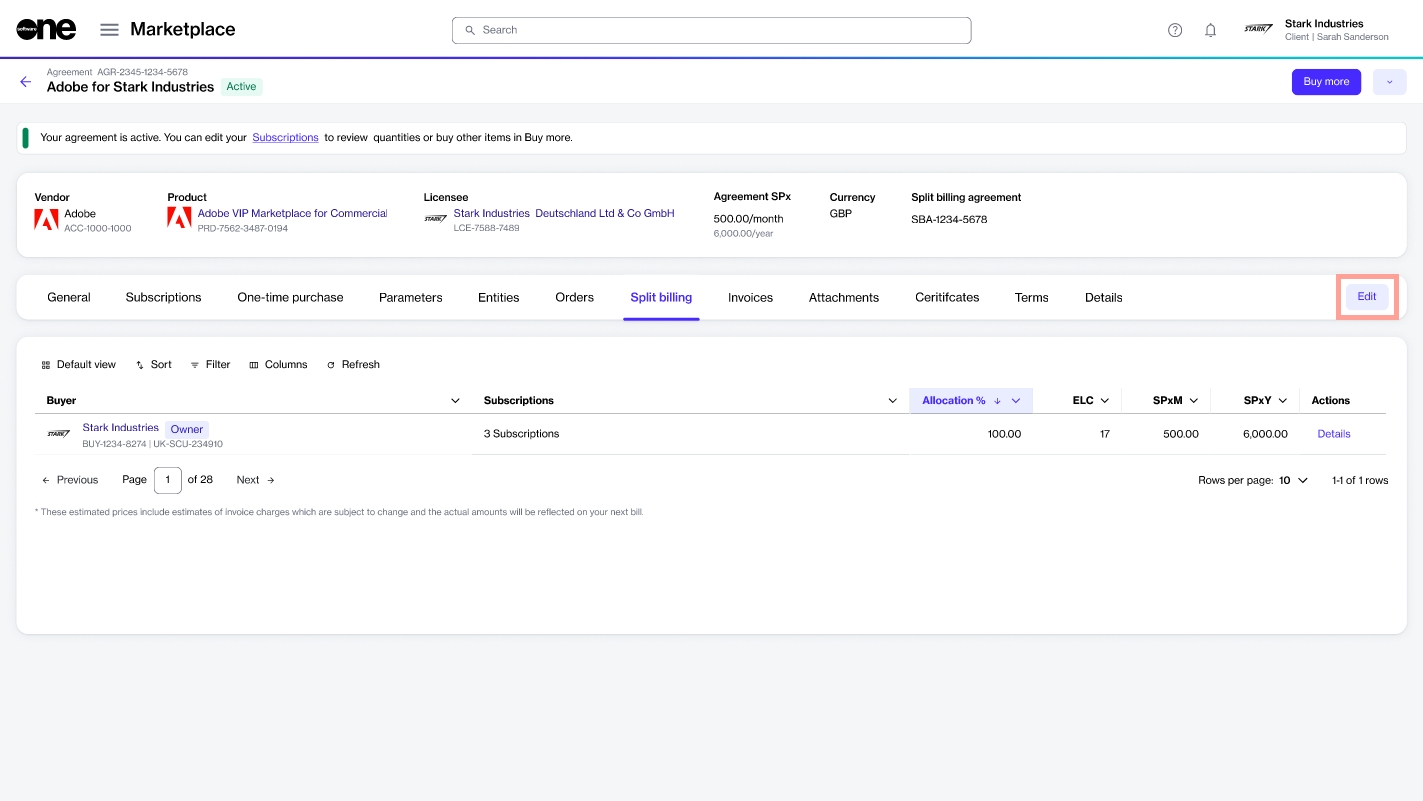

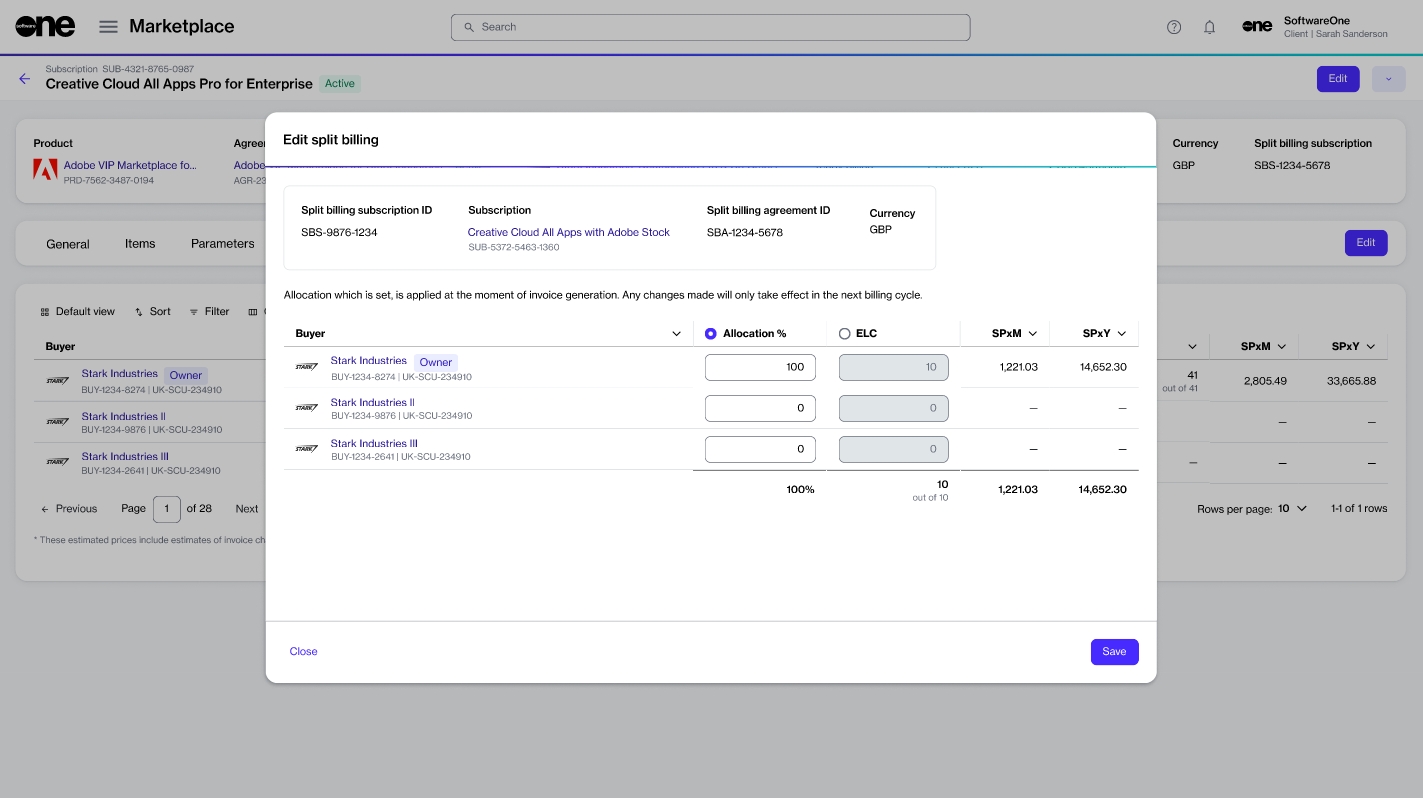

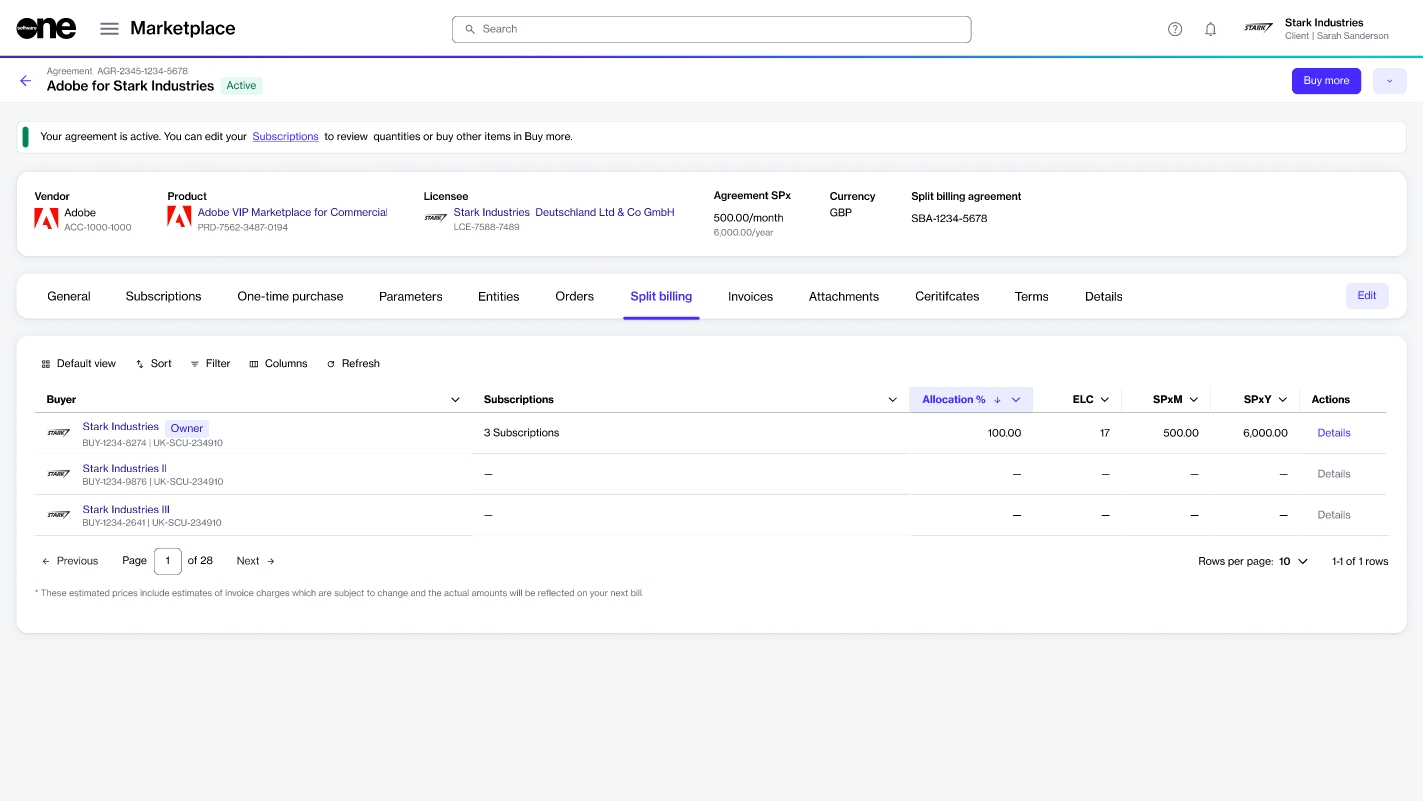
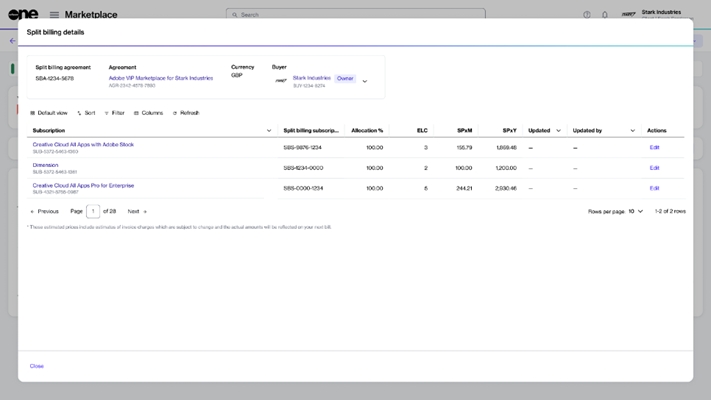
Follow the steps to place your order
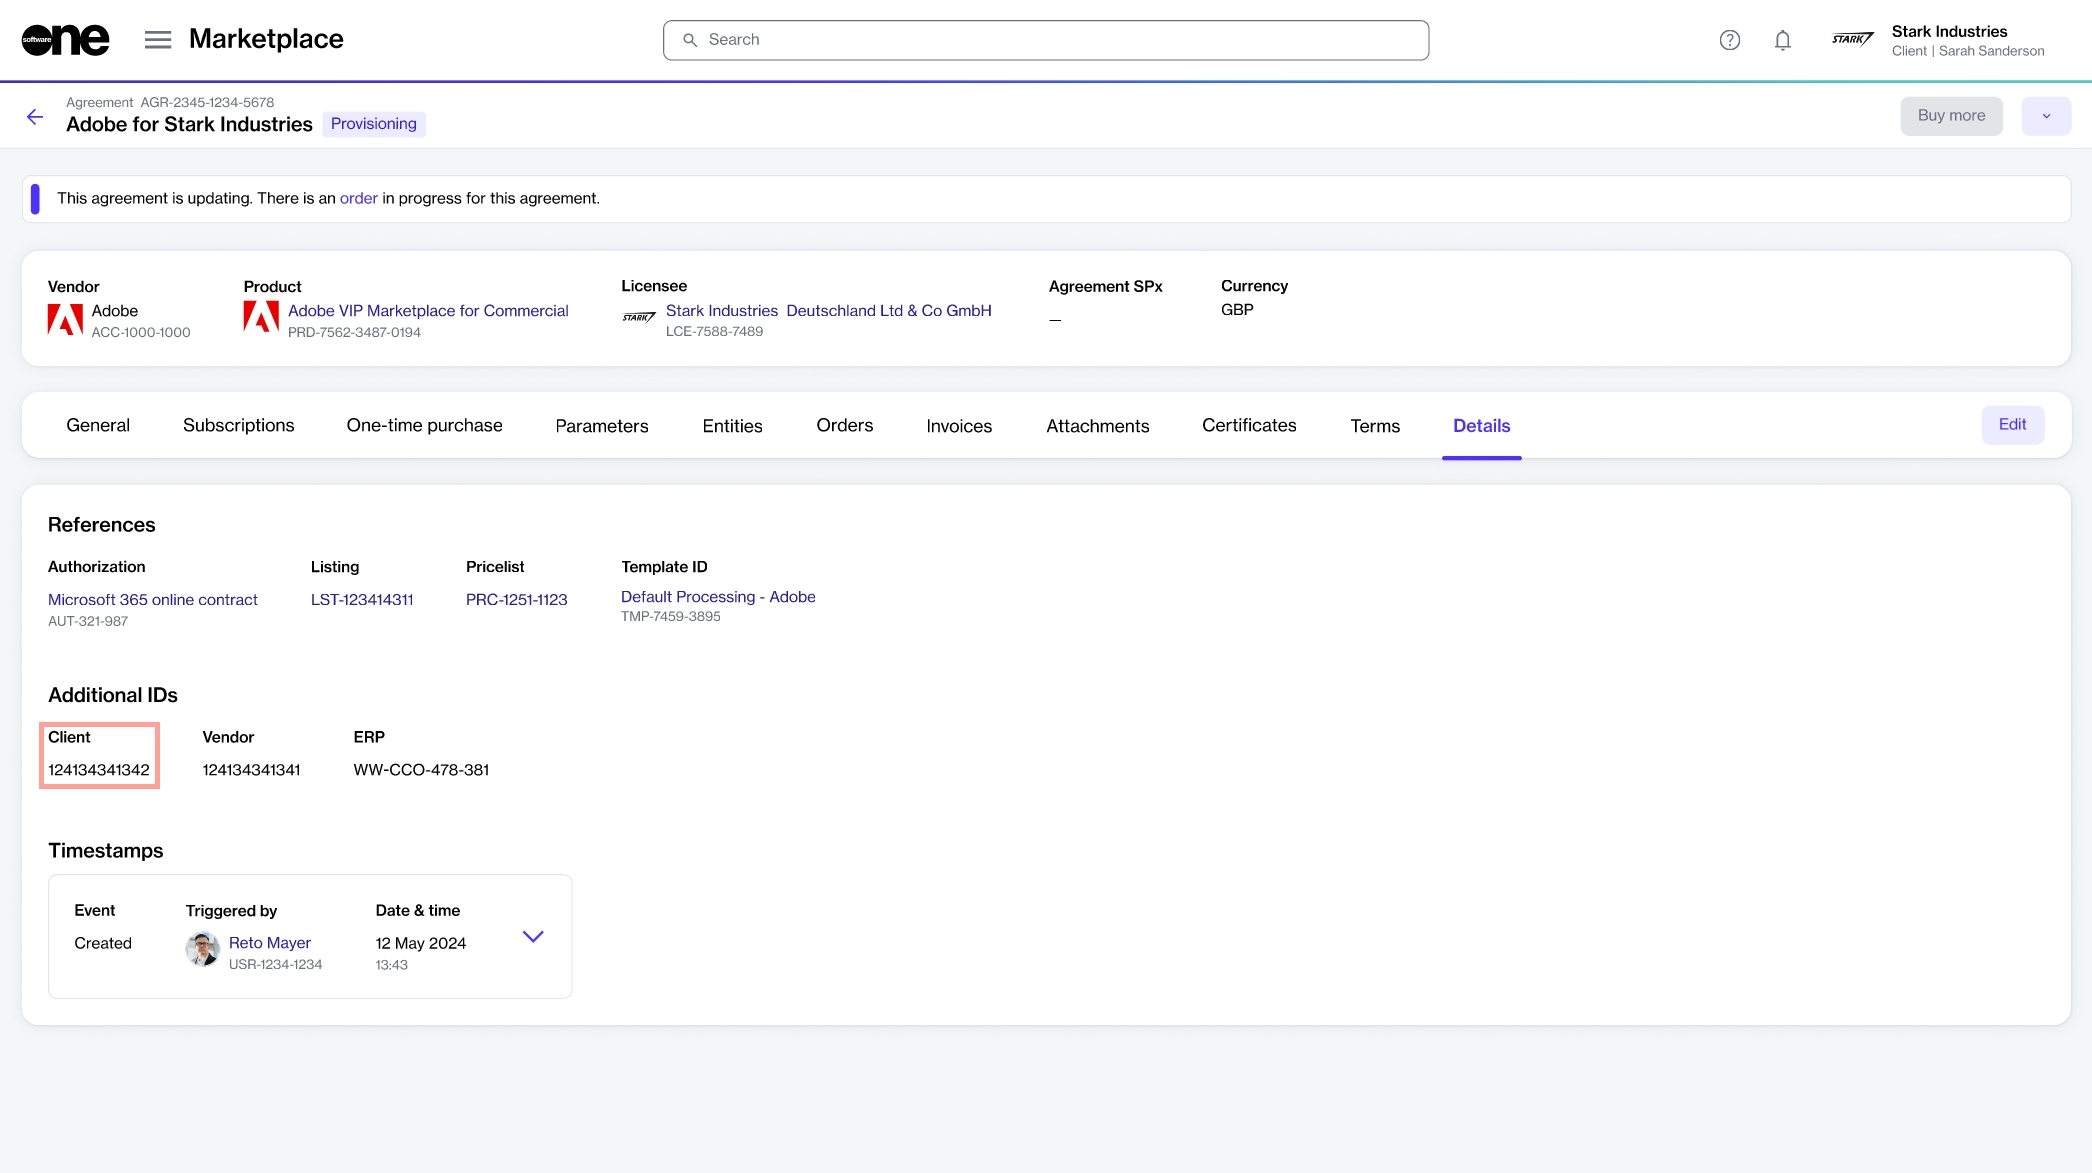
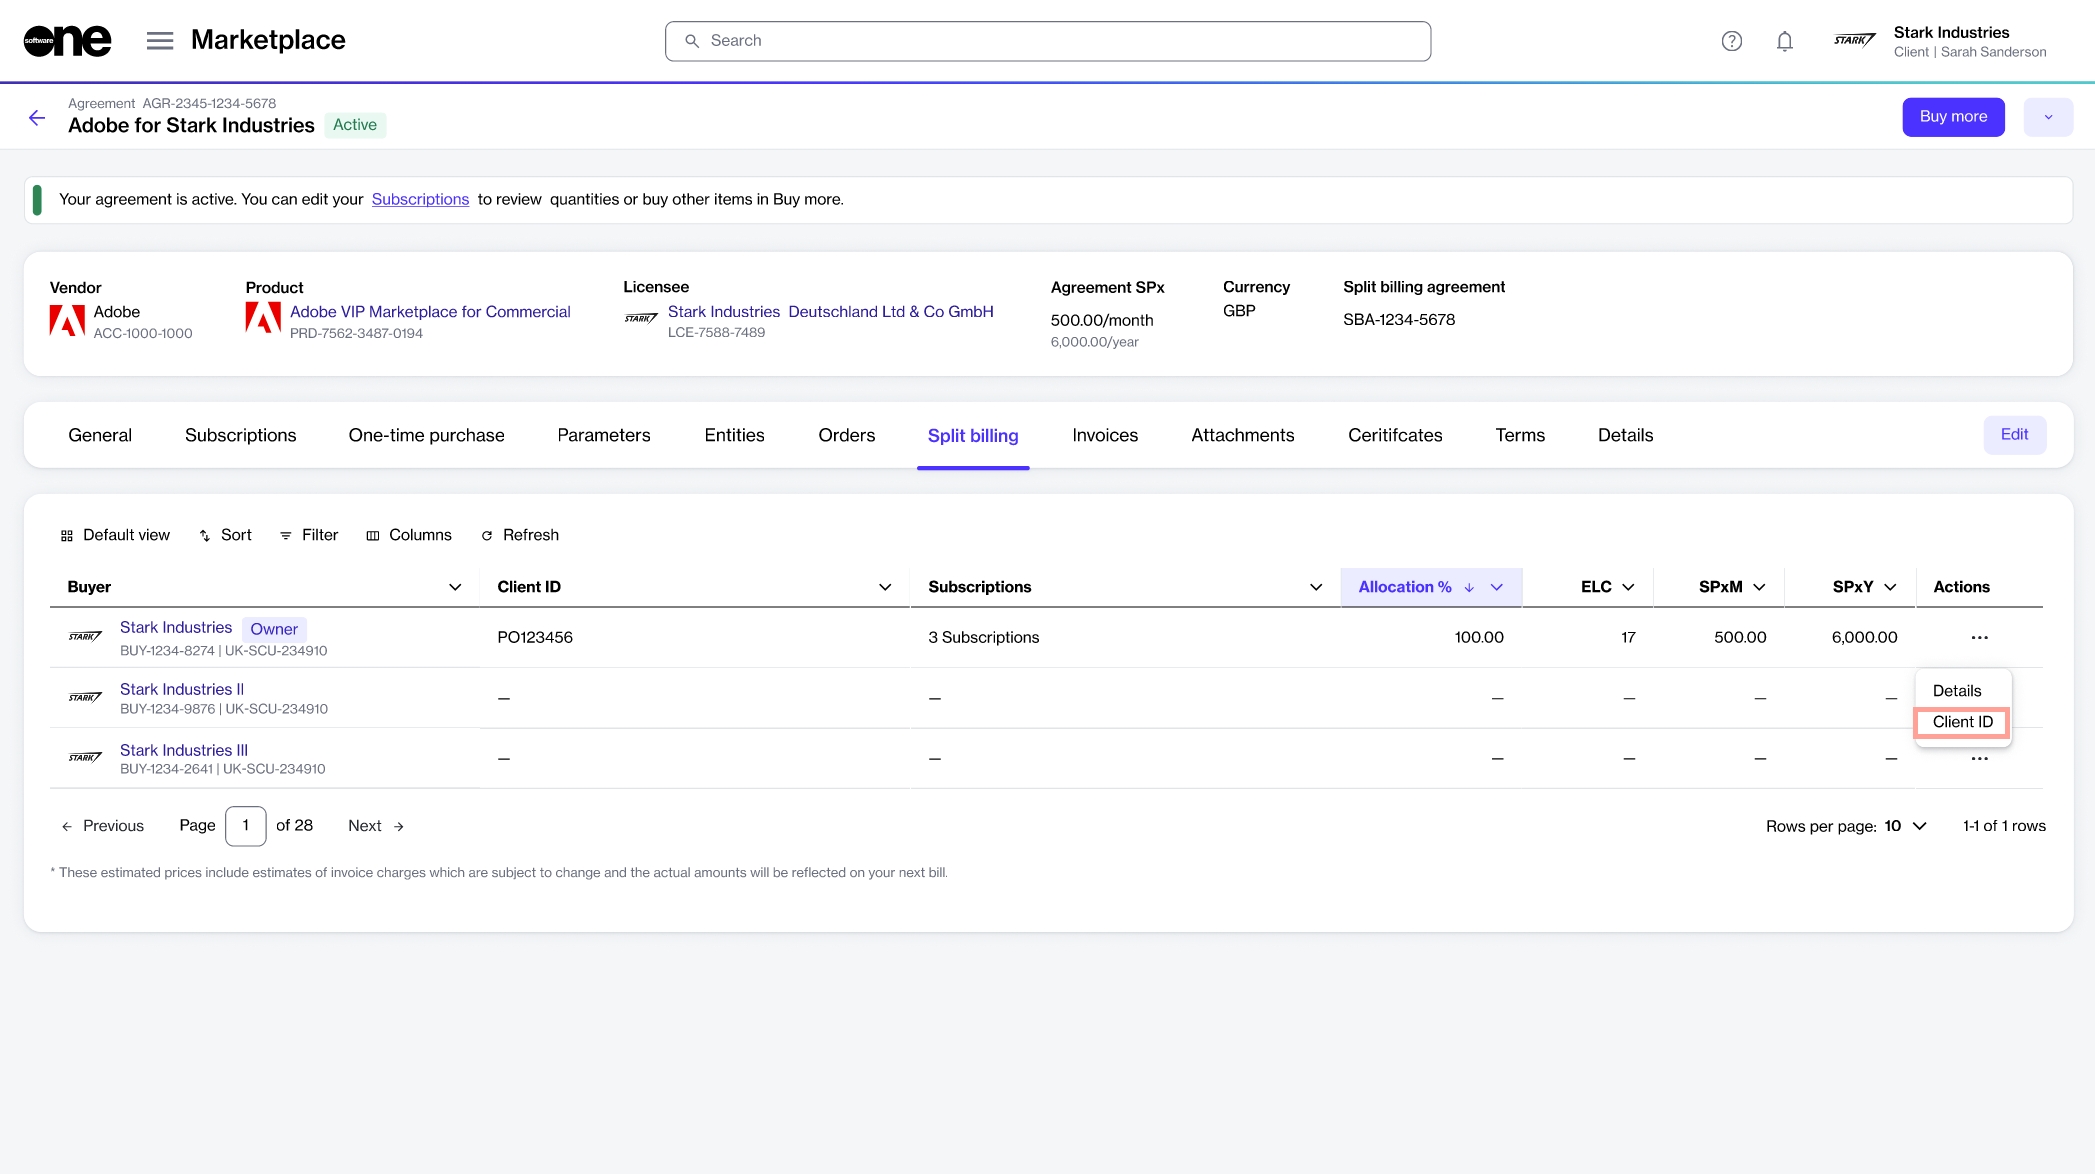
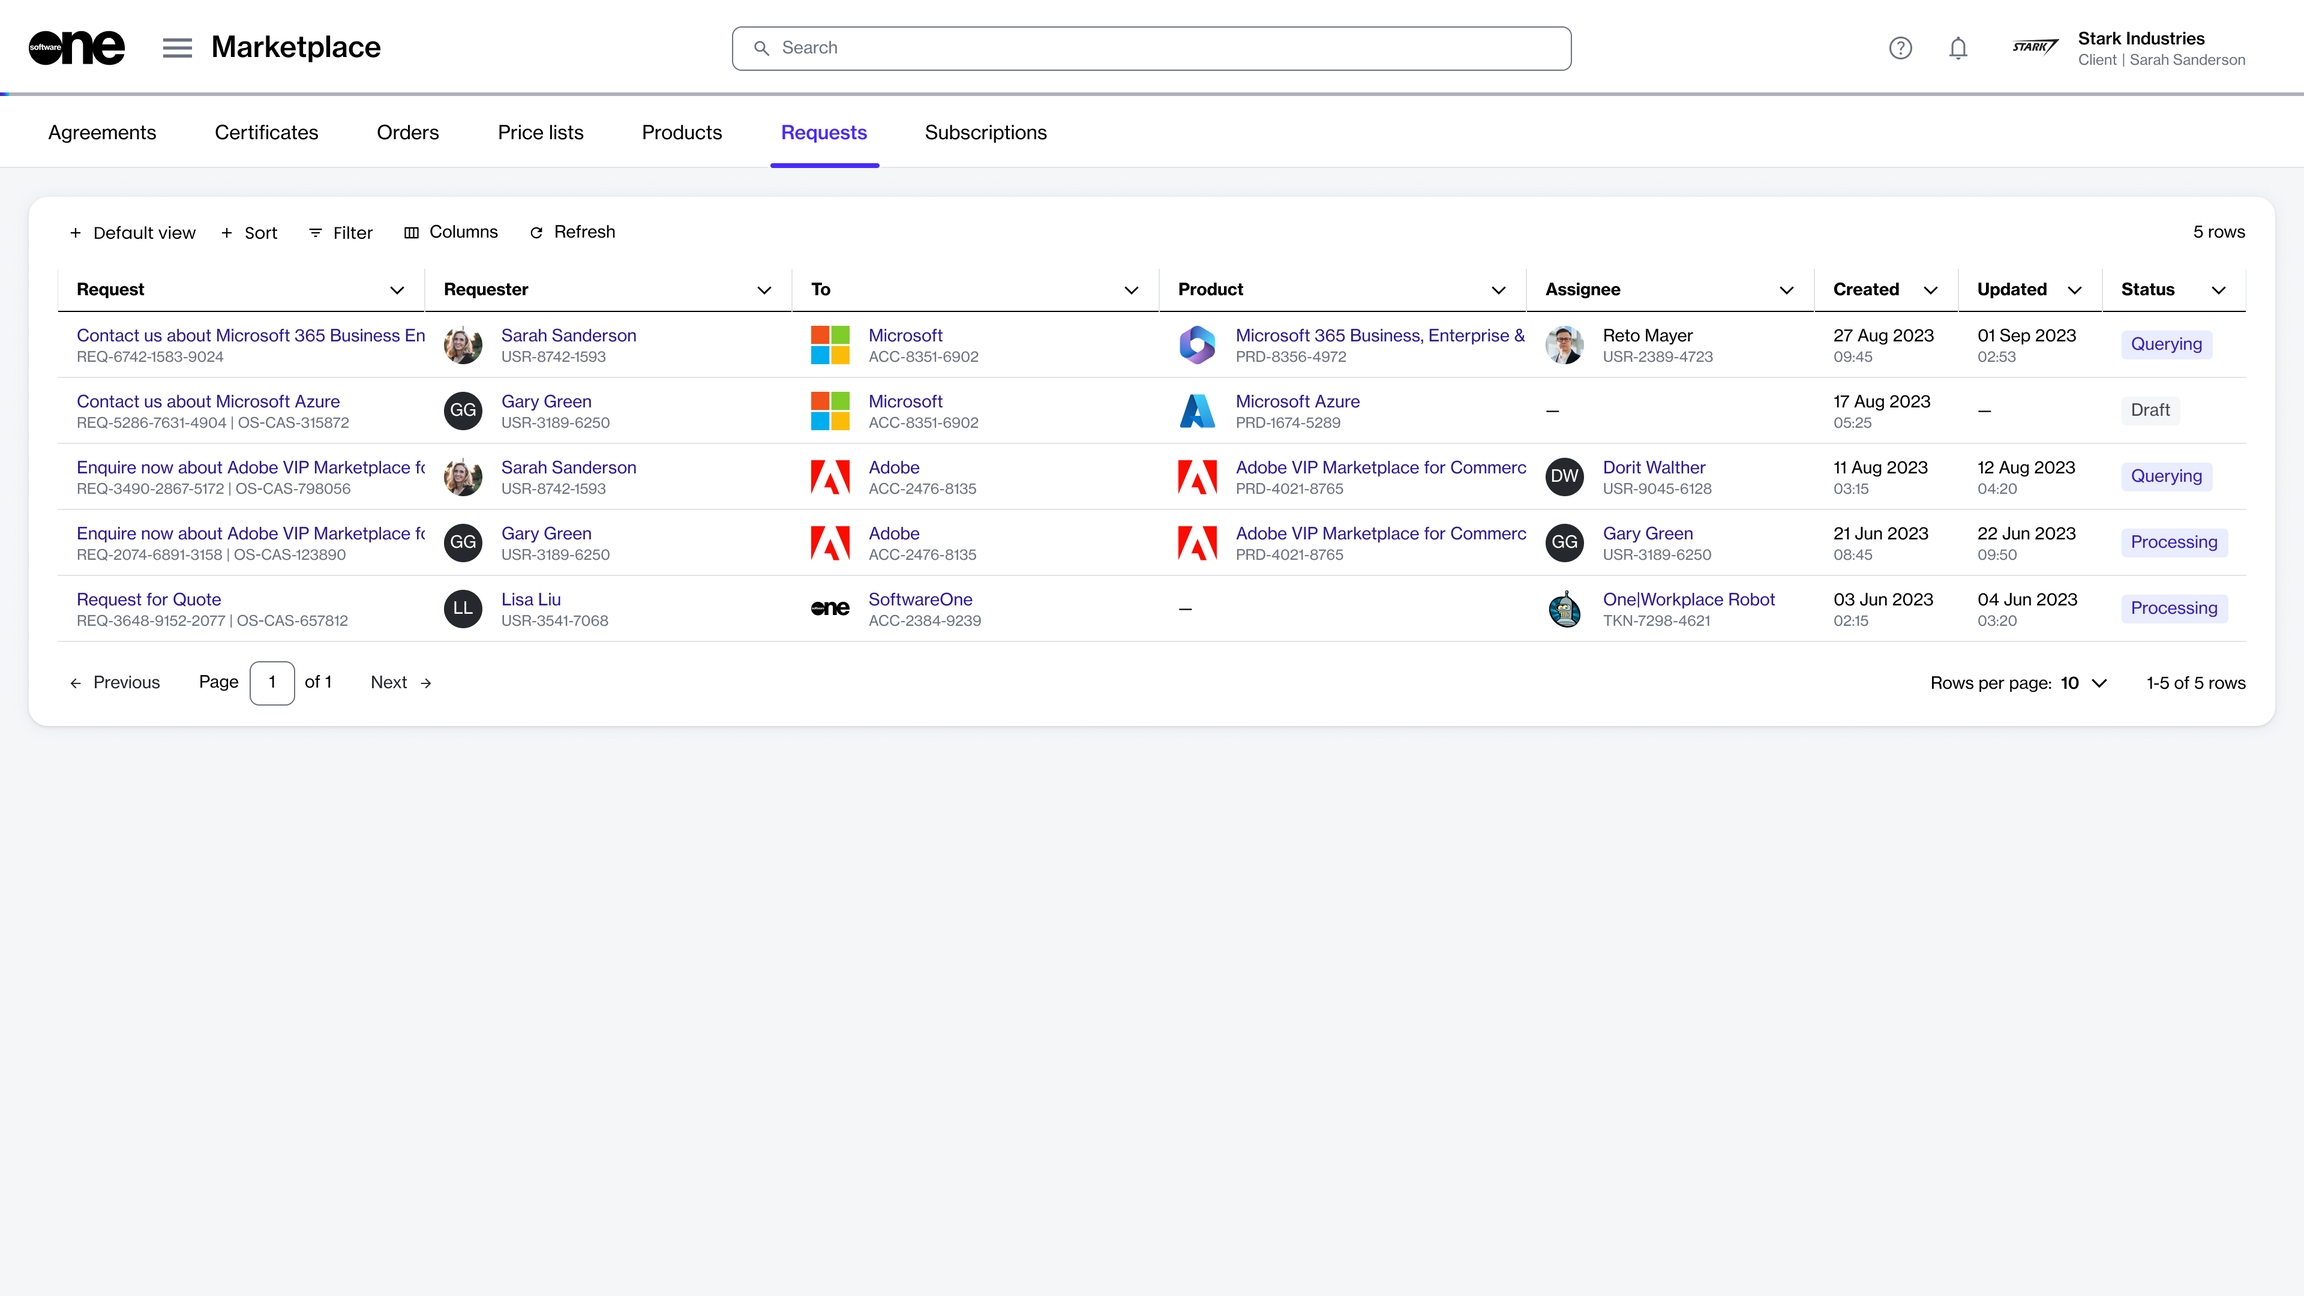
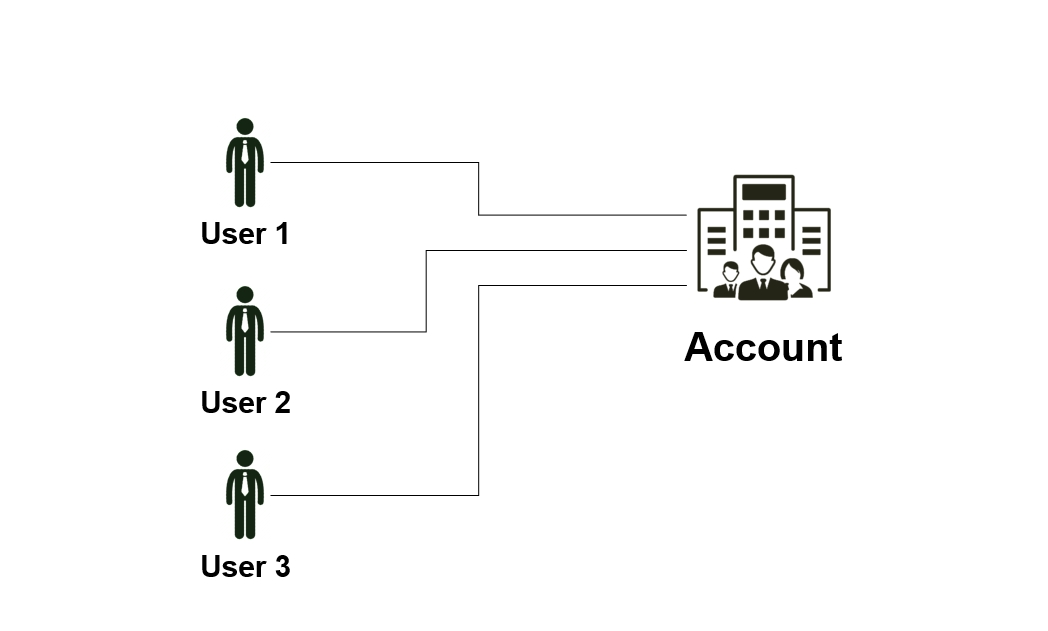
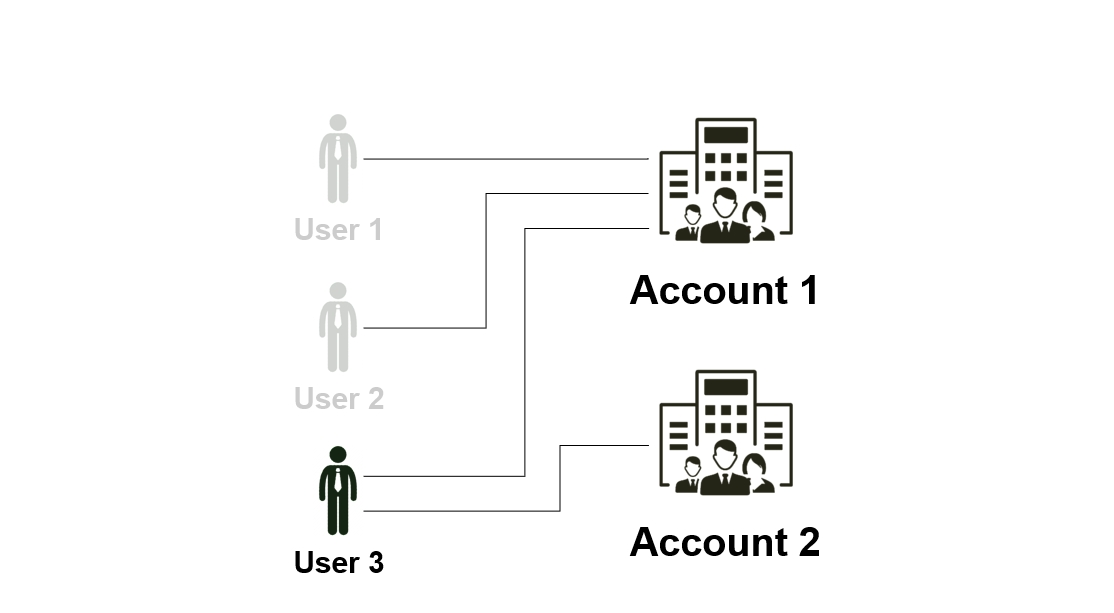
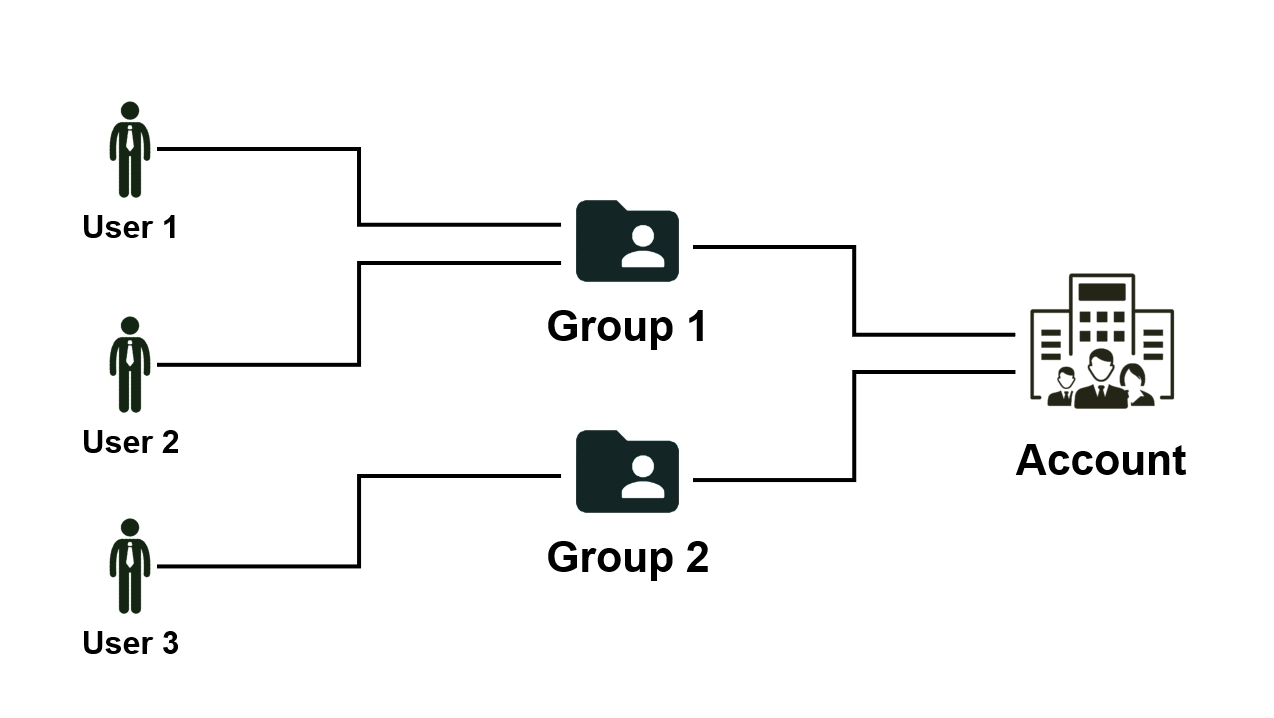
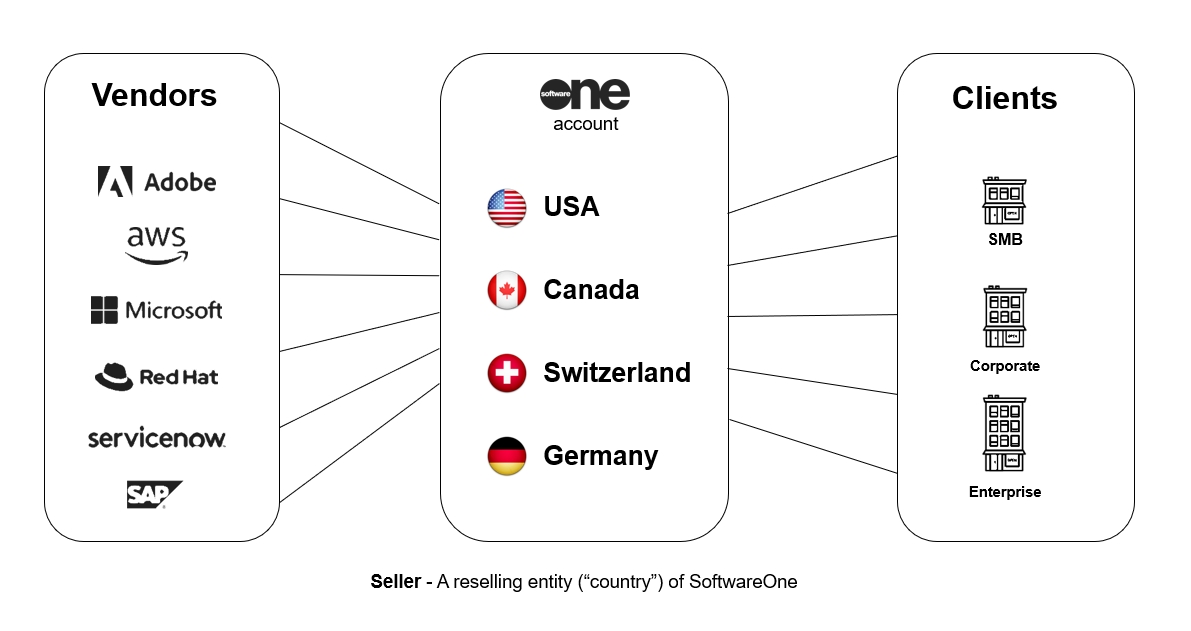
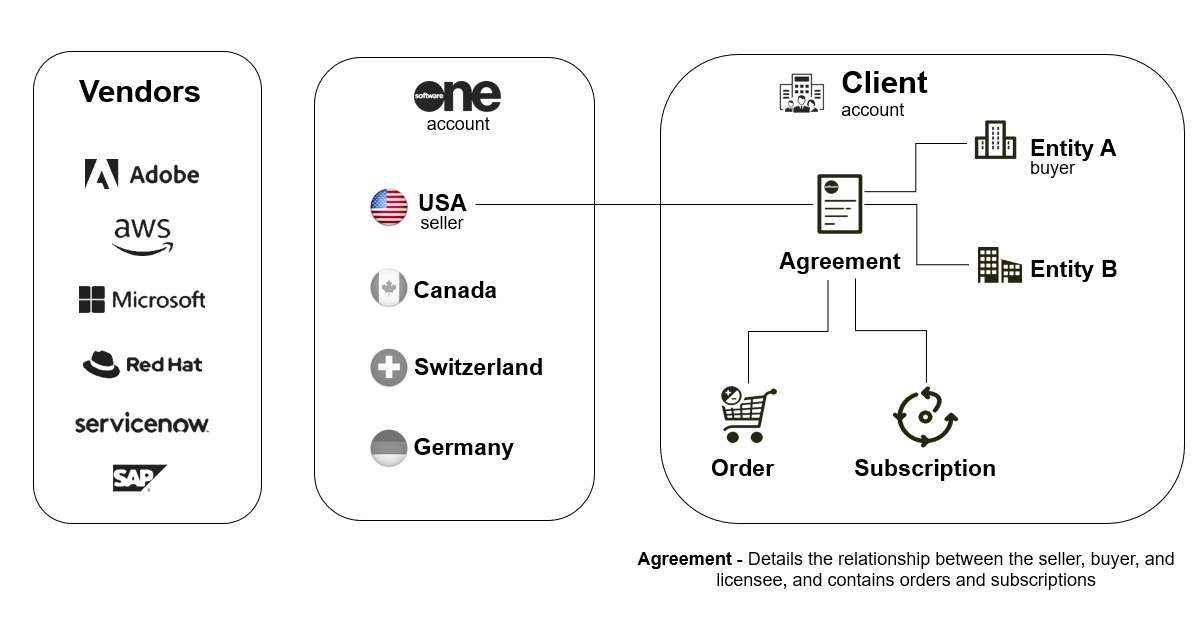
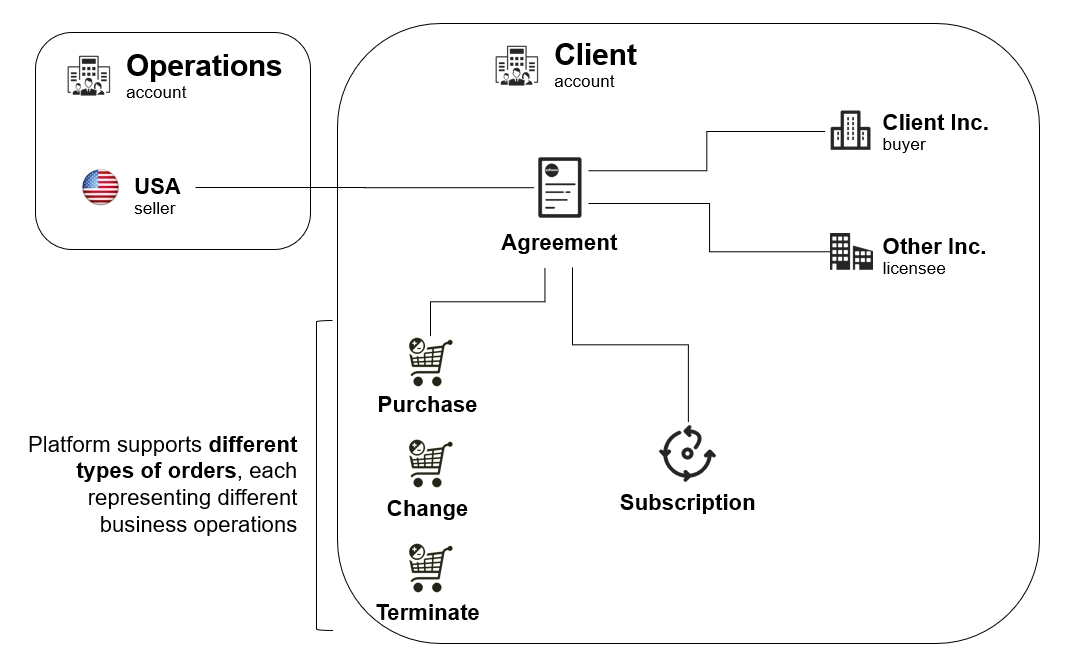
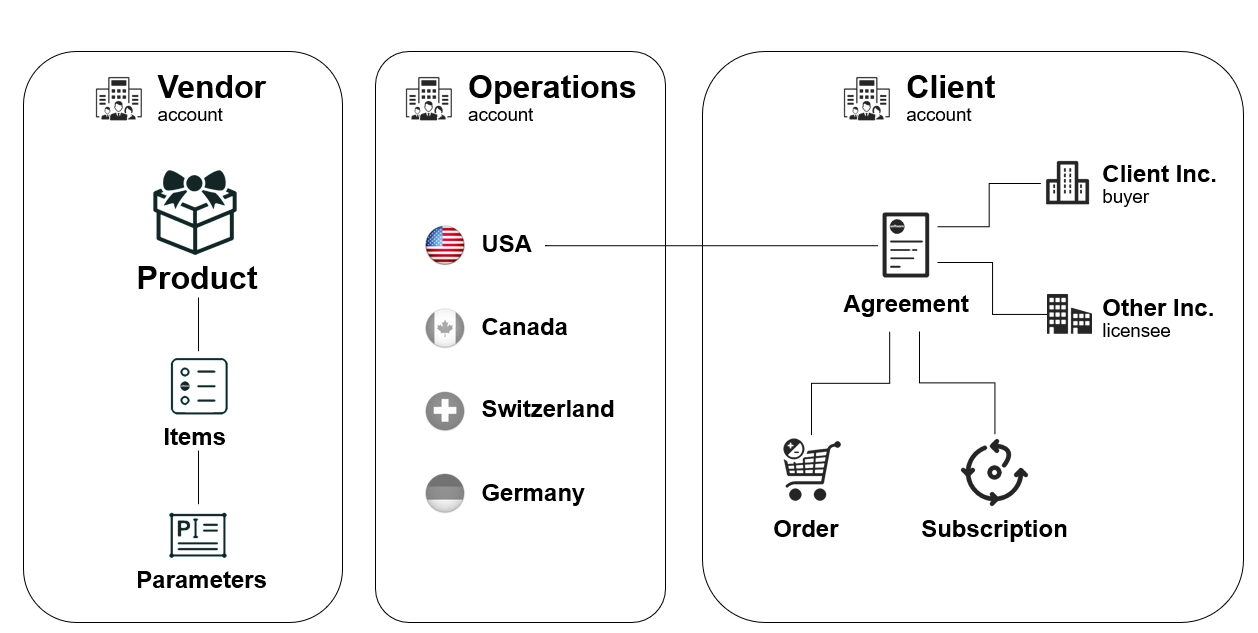
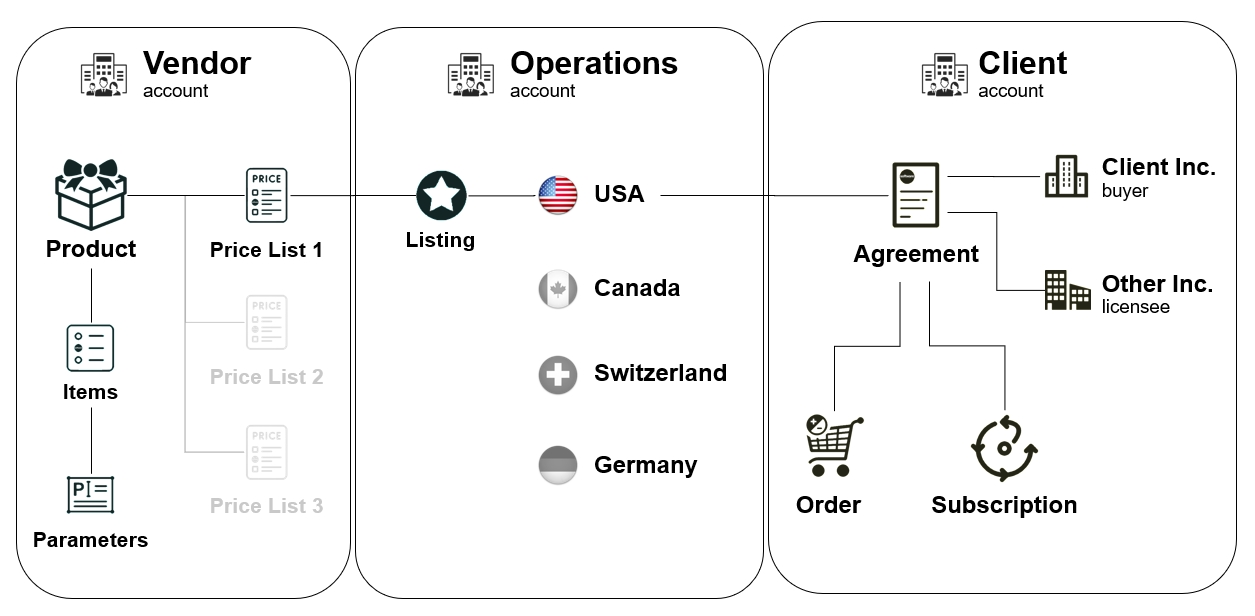
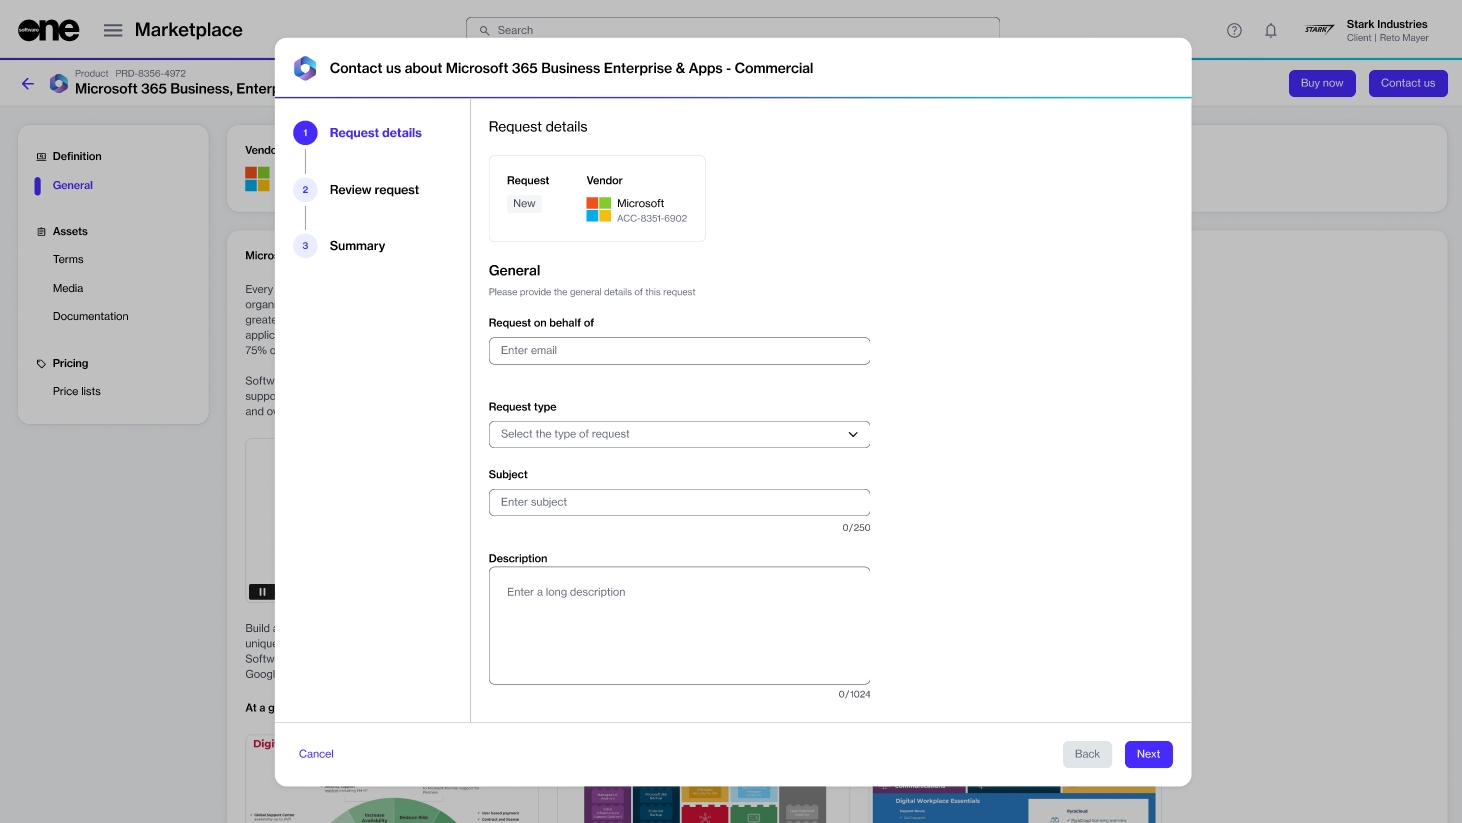
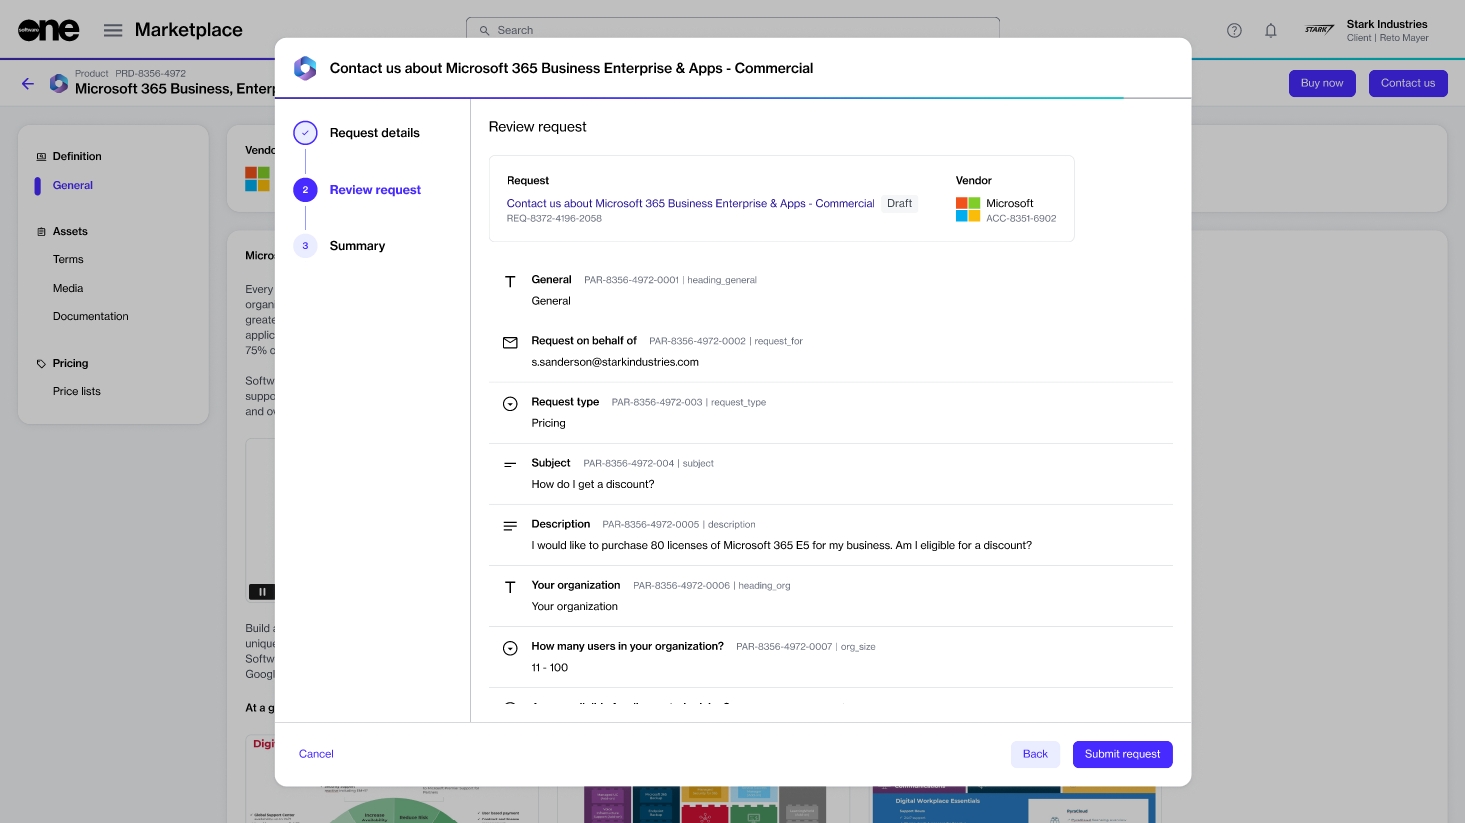
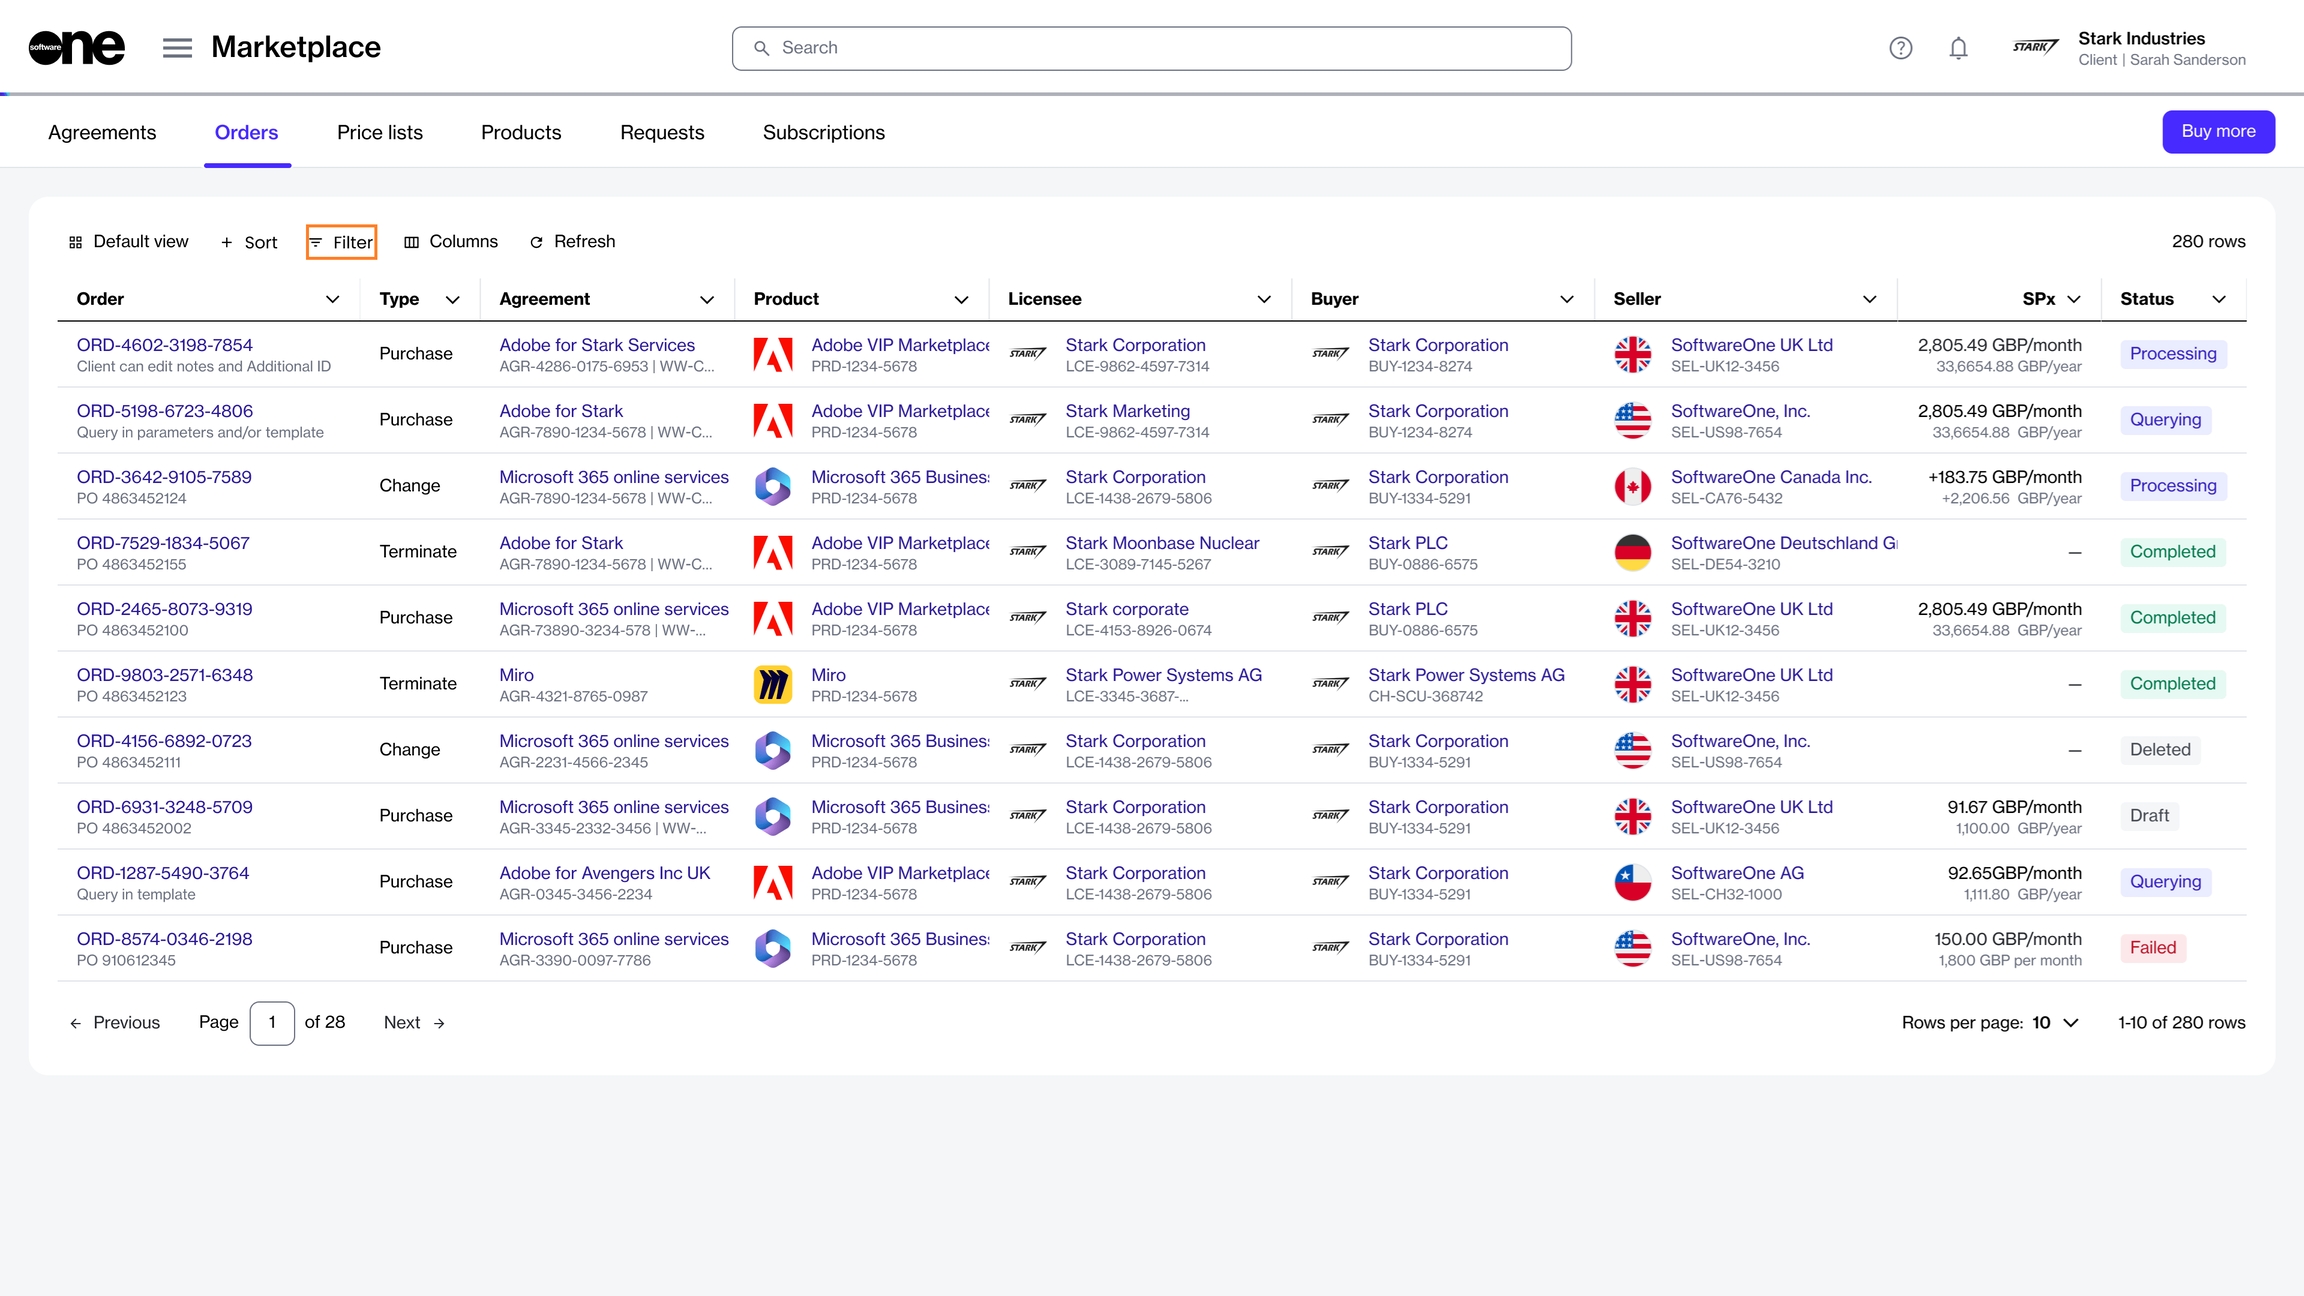
You can set up cloud consumption alerts so that you are notified when your cloud spending exceeds certain thresholds. Consumption alerts are supported for IaaS/PaaS cloud platforms:
Azure
Amazon Web Services (AWS)
Currently, there are three types of cloud consumption alerts - Spike Alerts, Overage Alerts, and Reserved Instance Utilization.
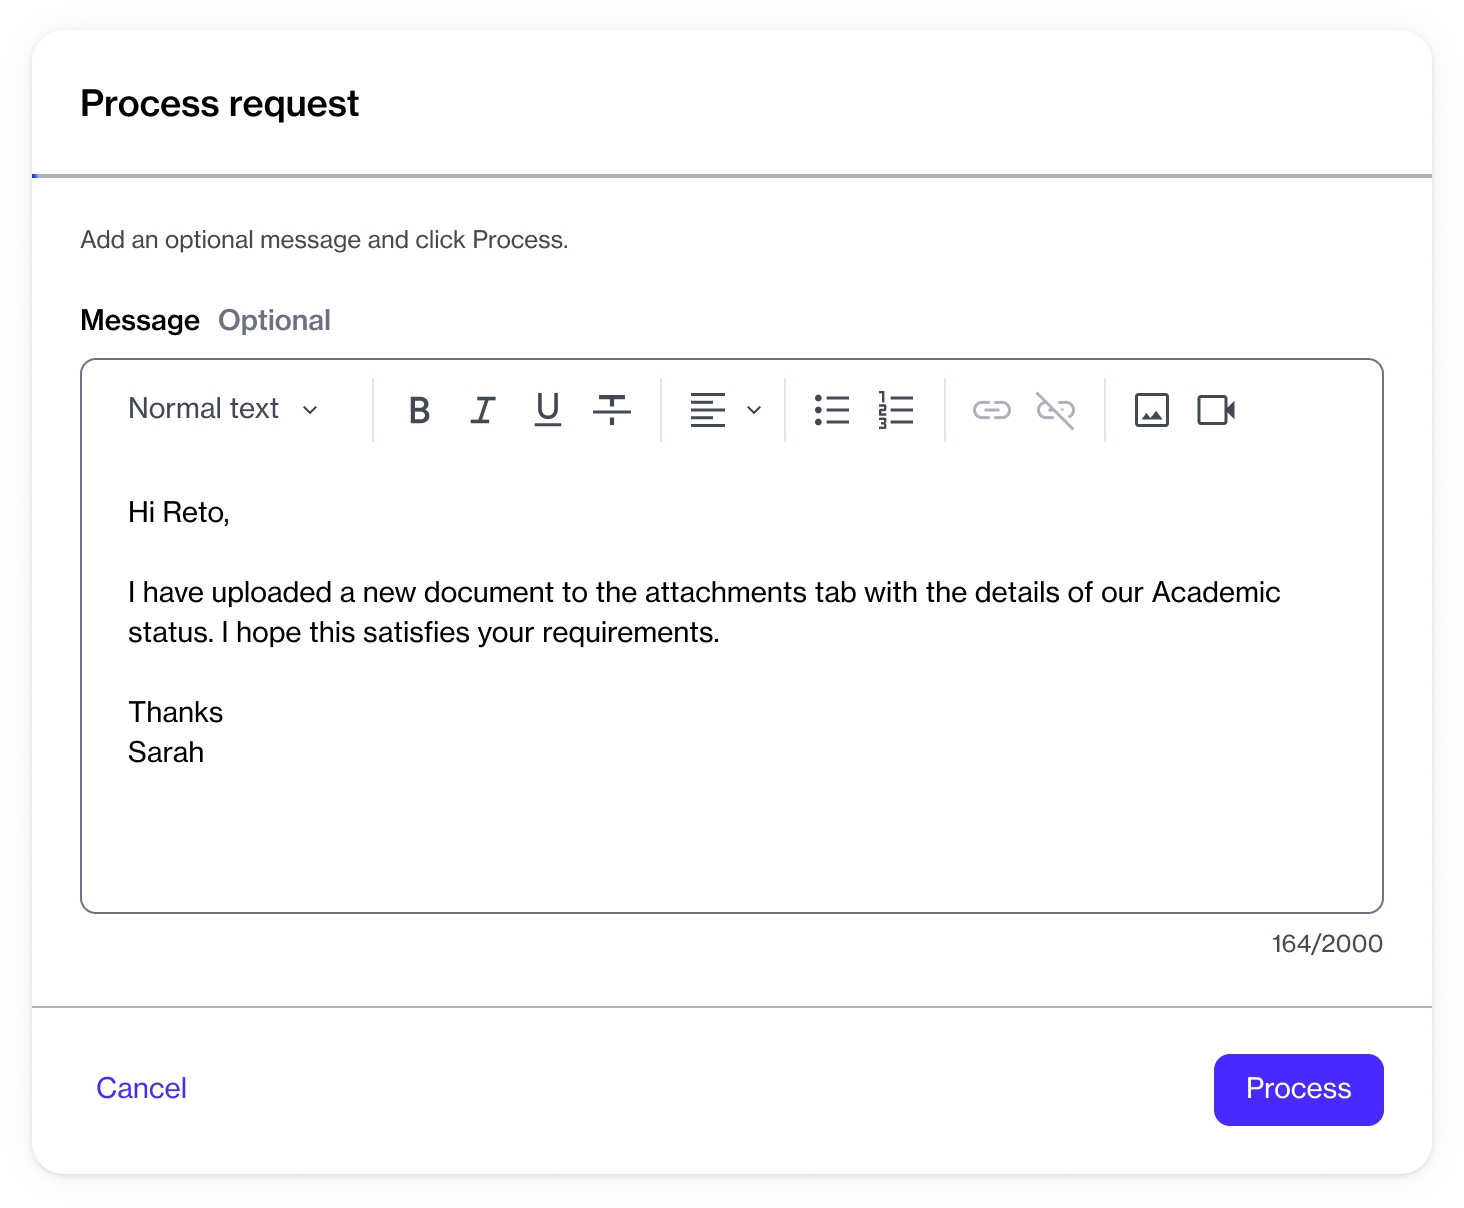
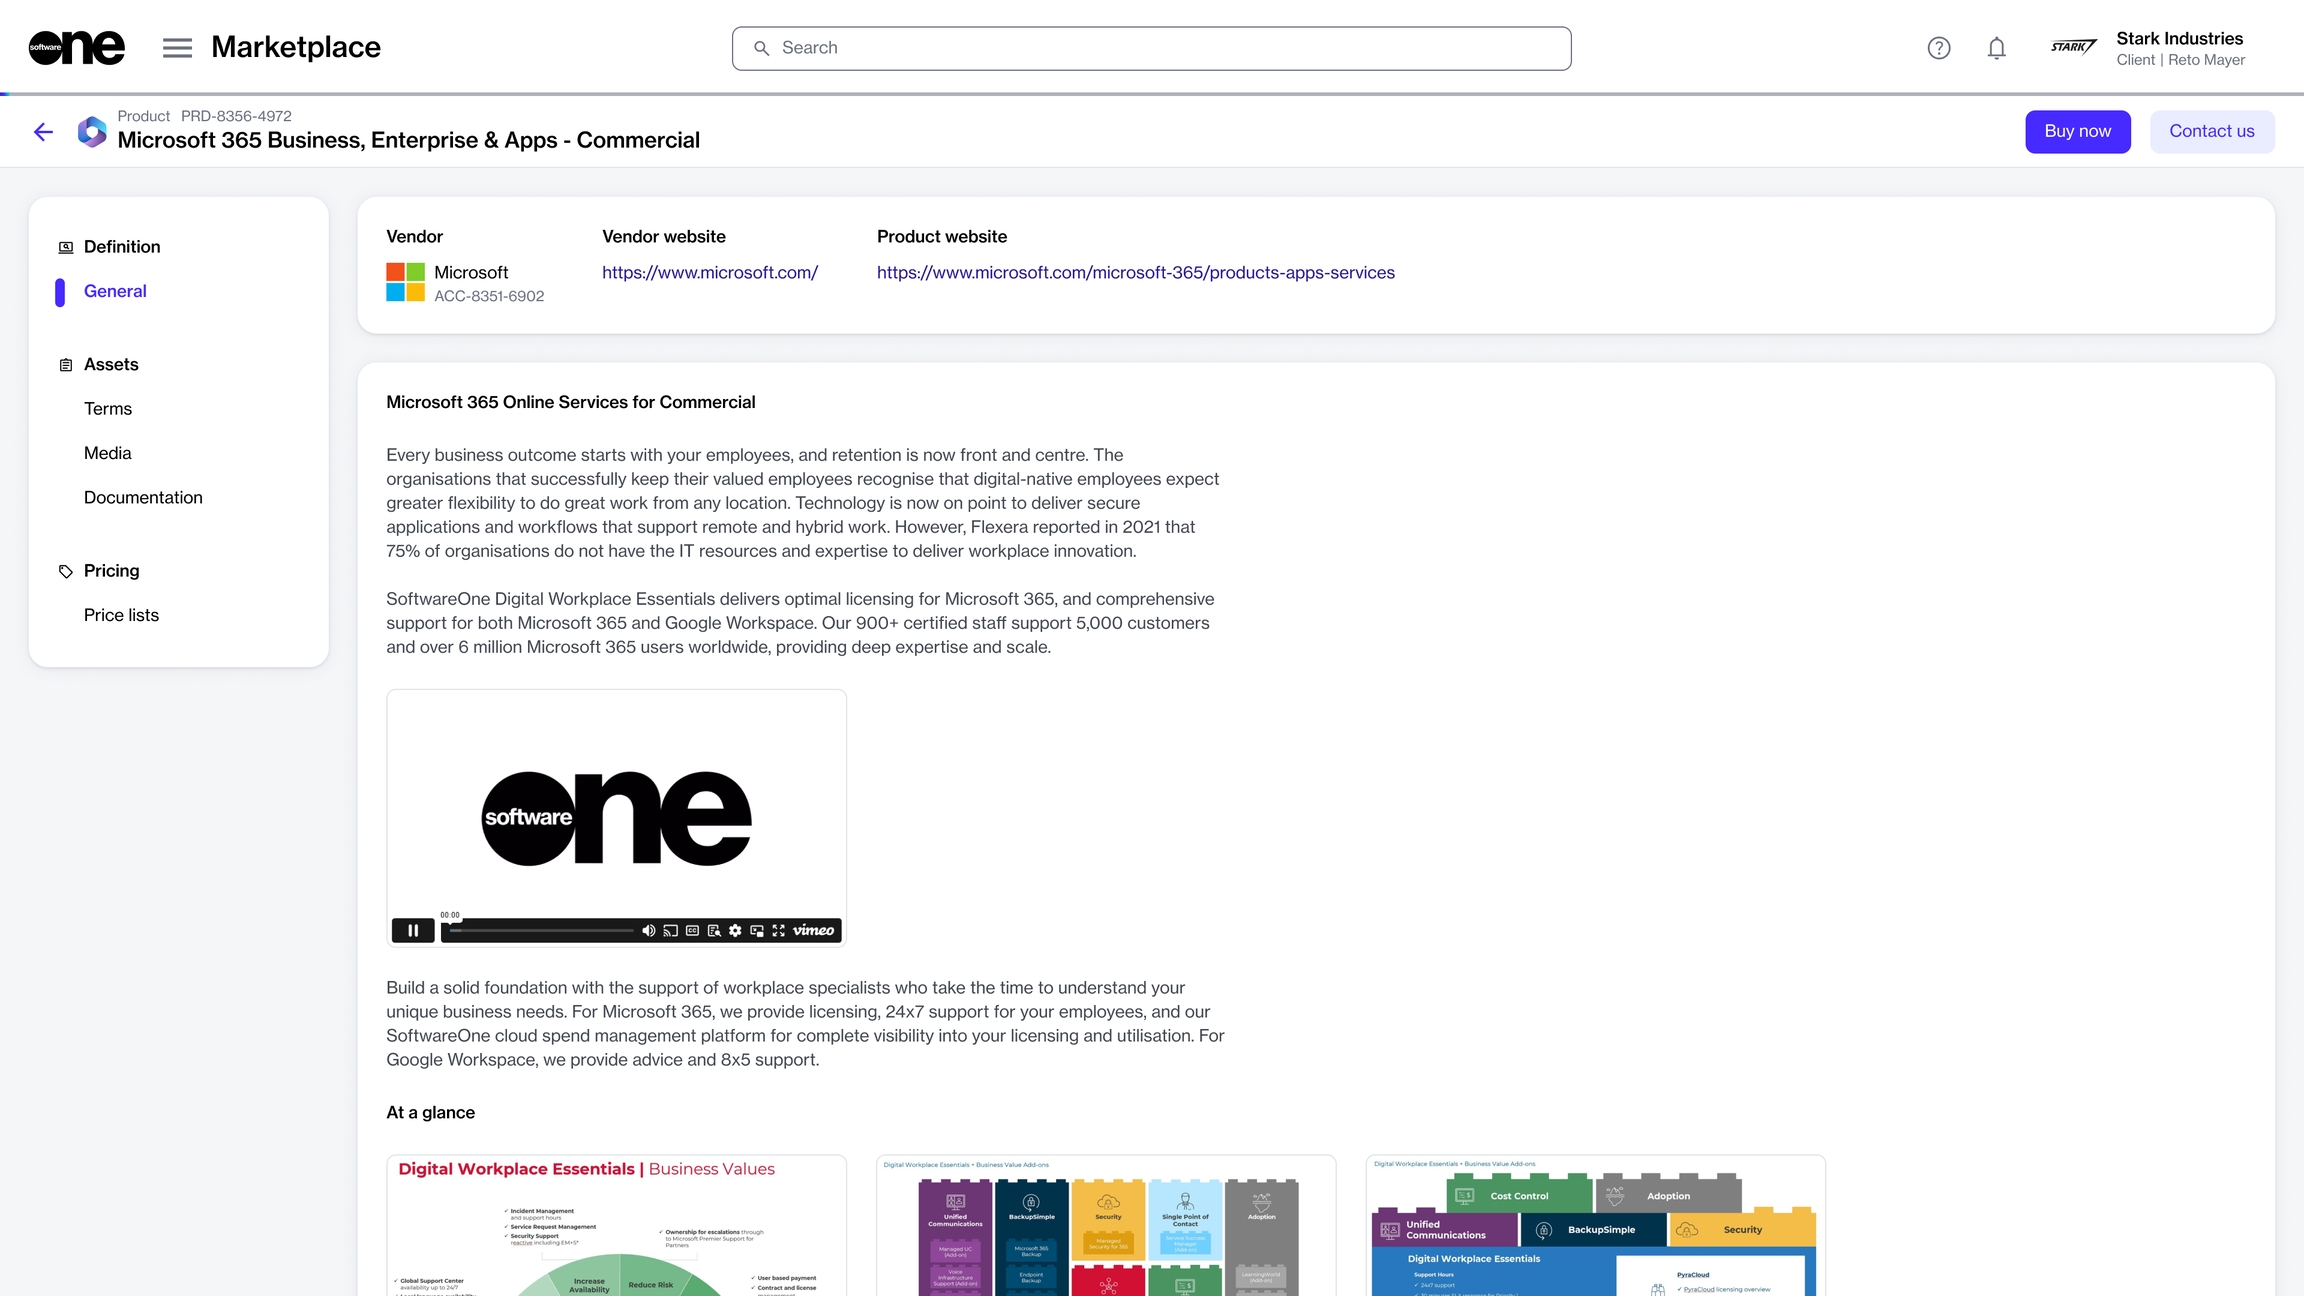

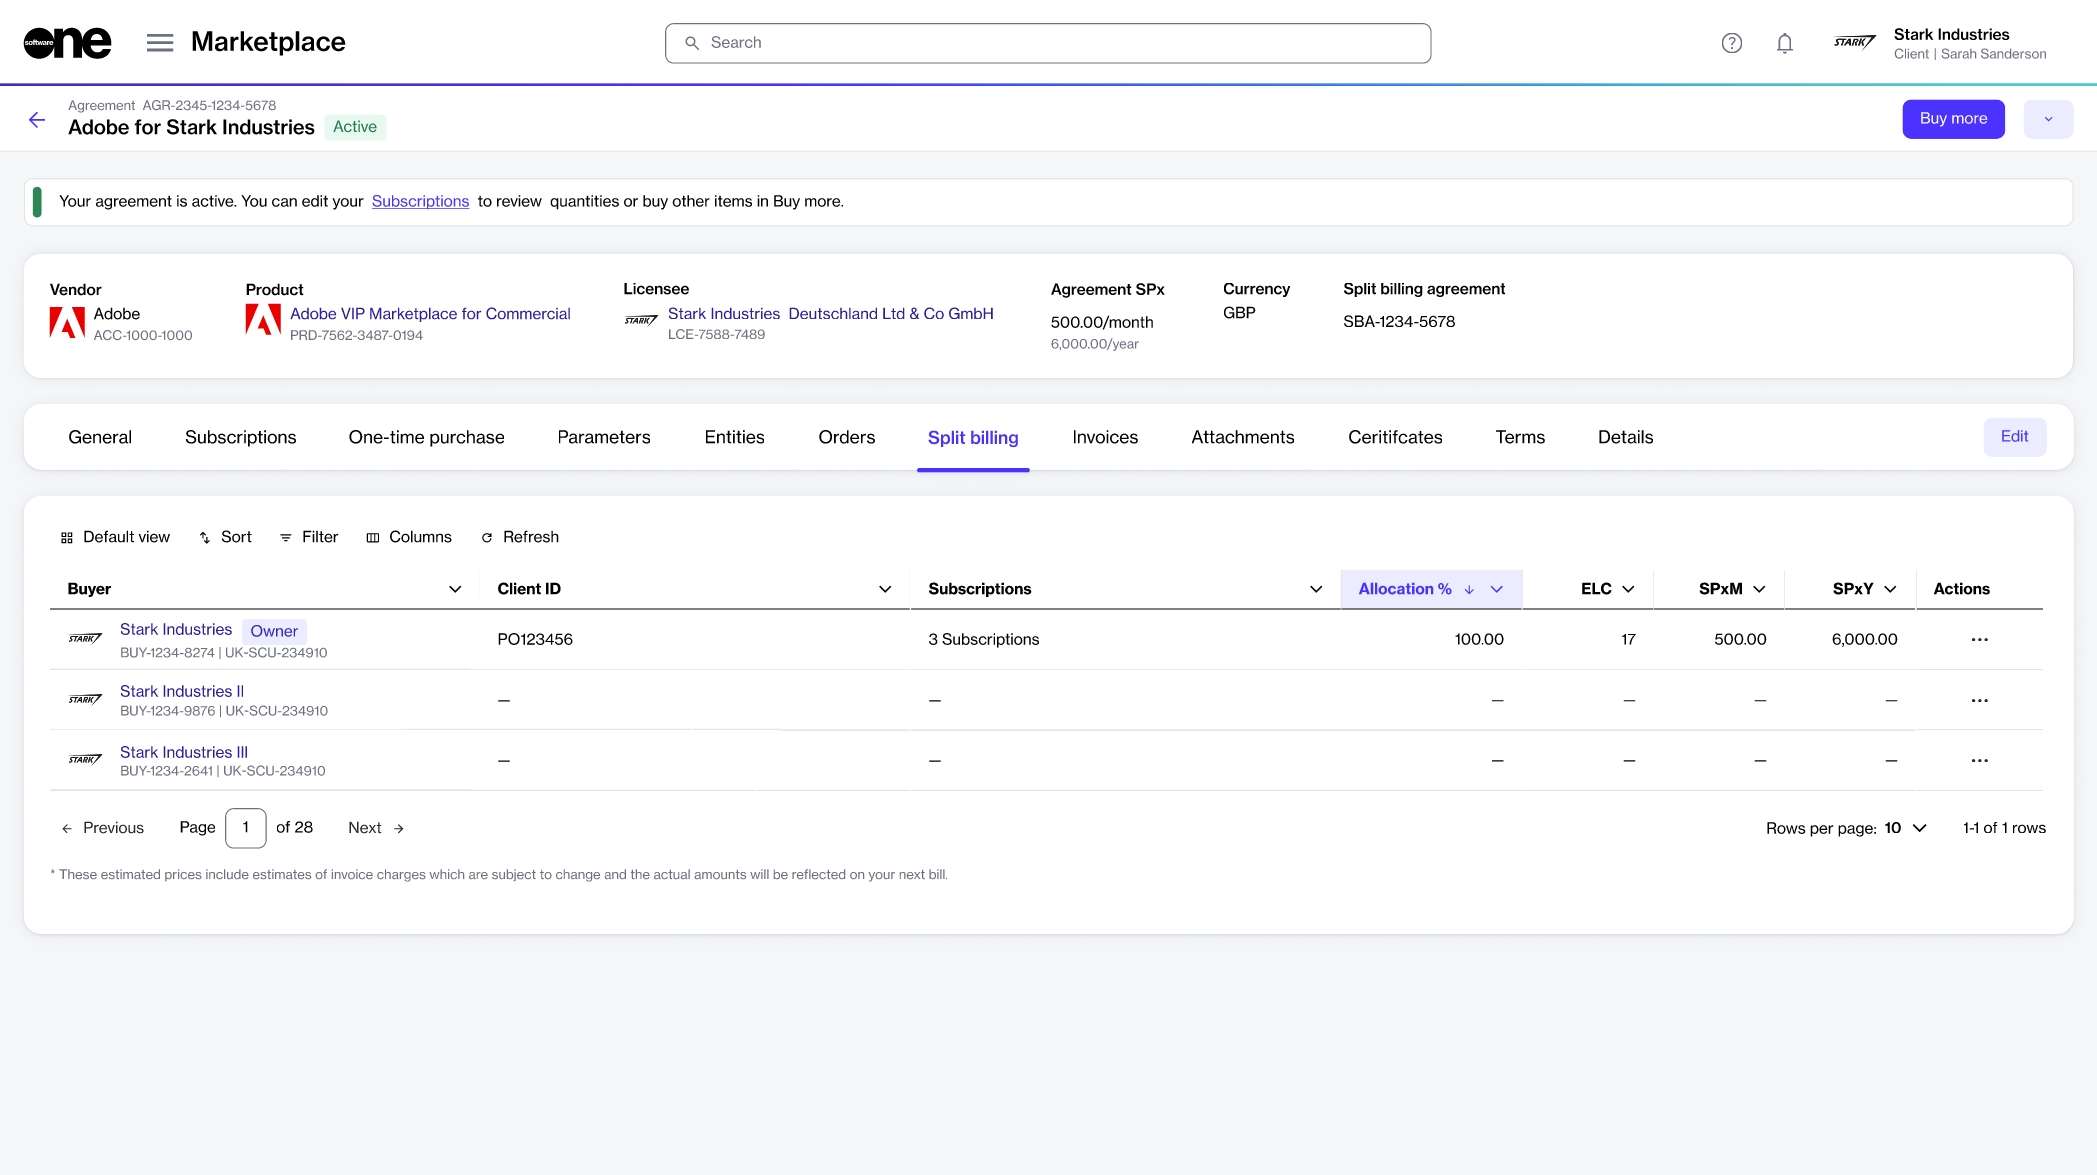
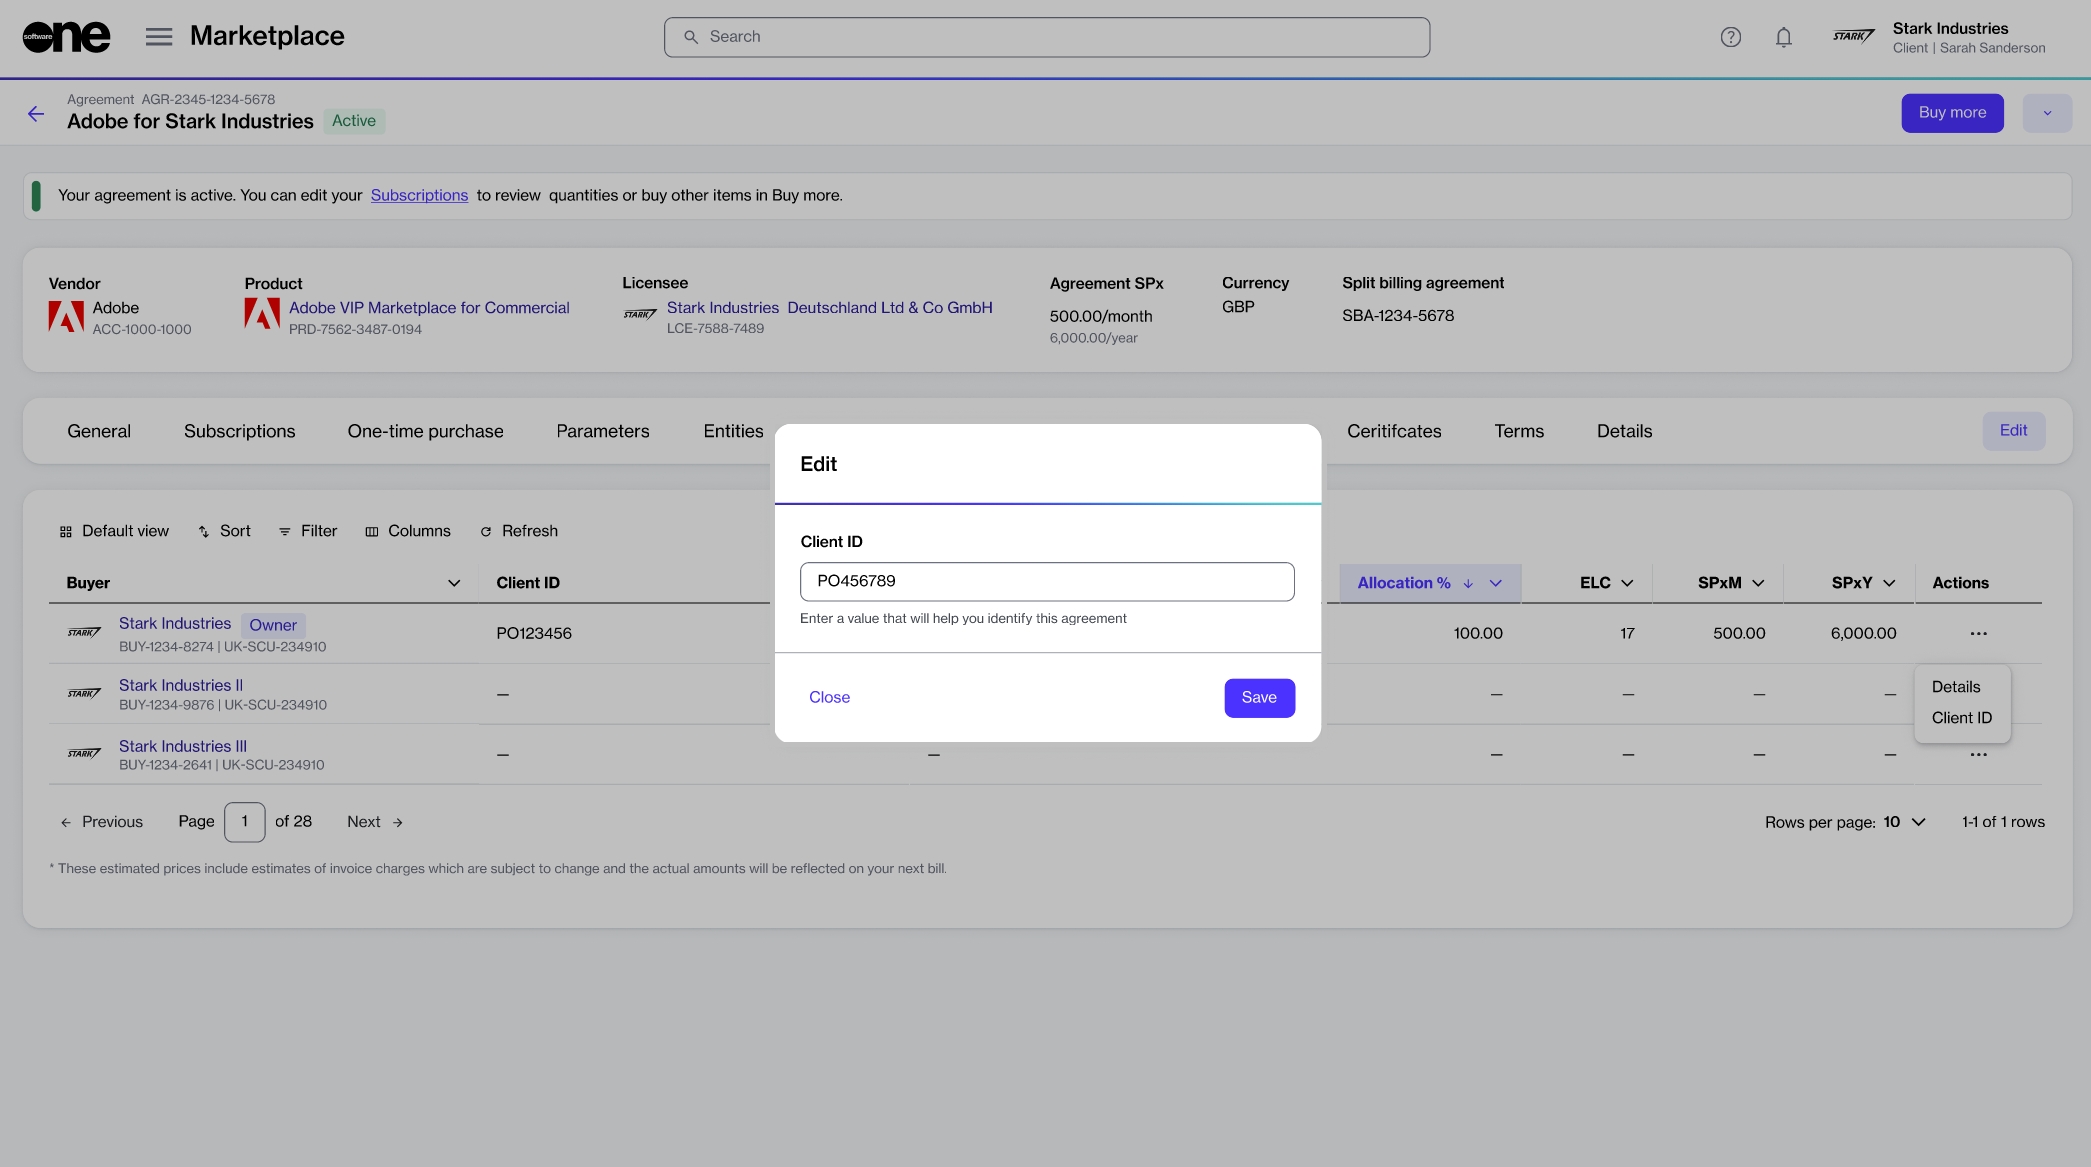
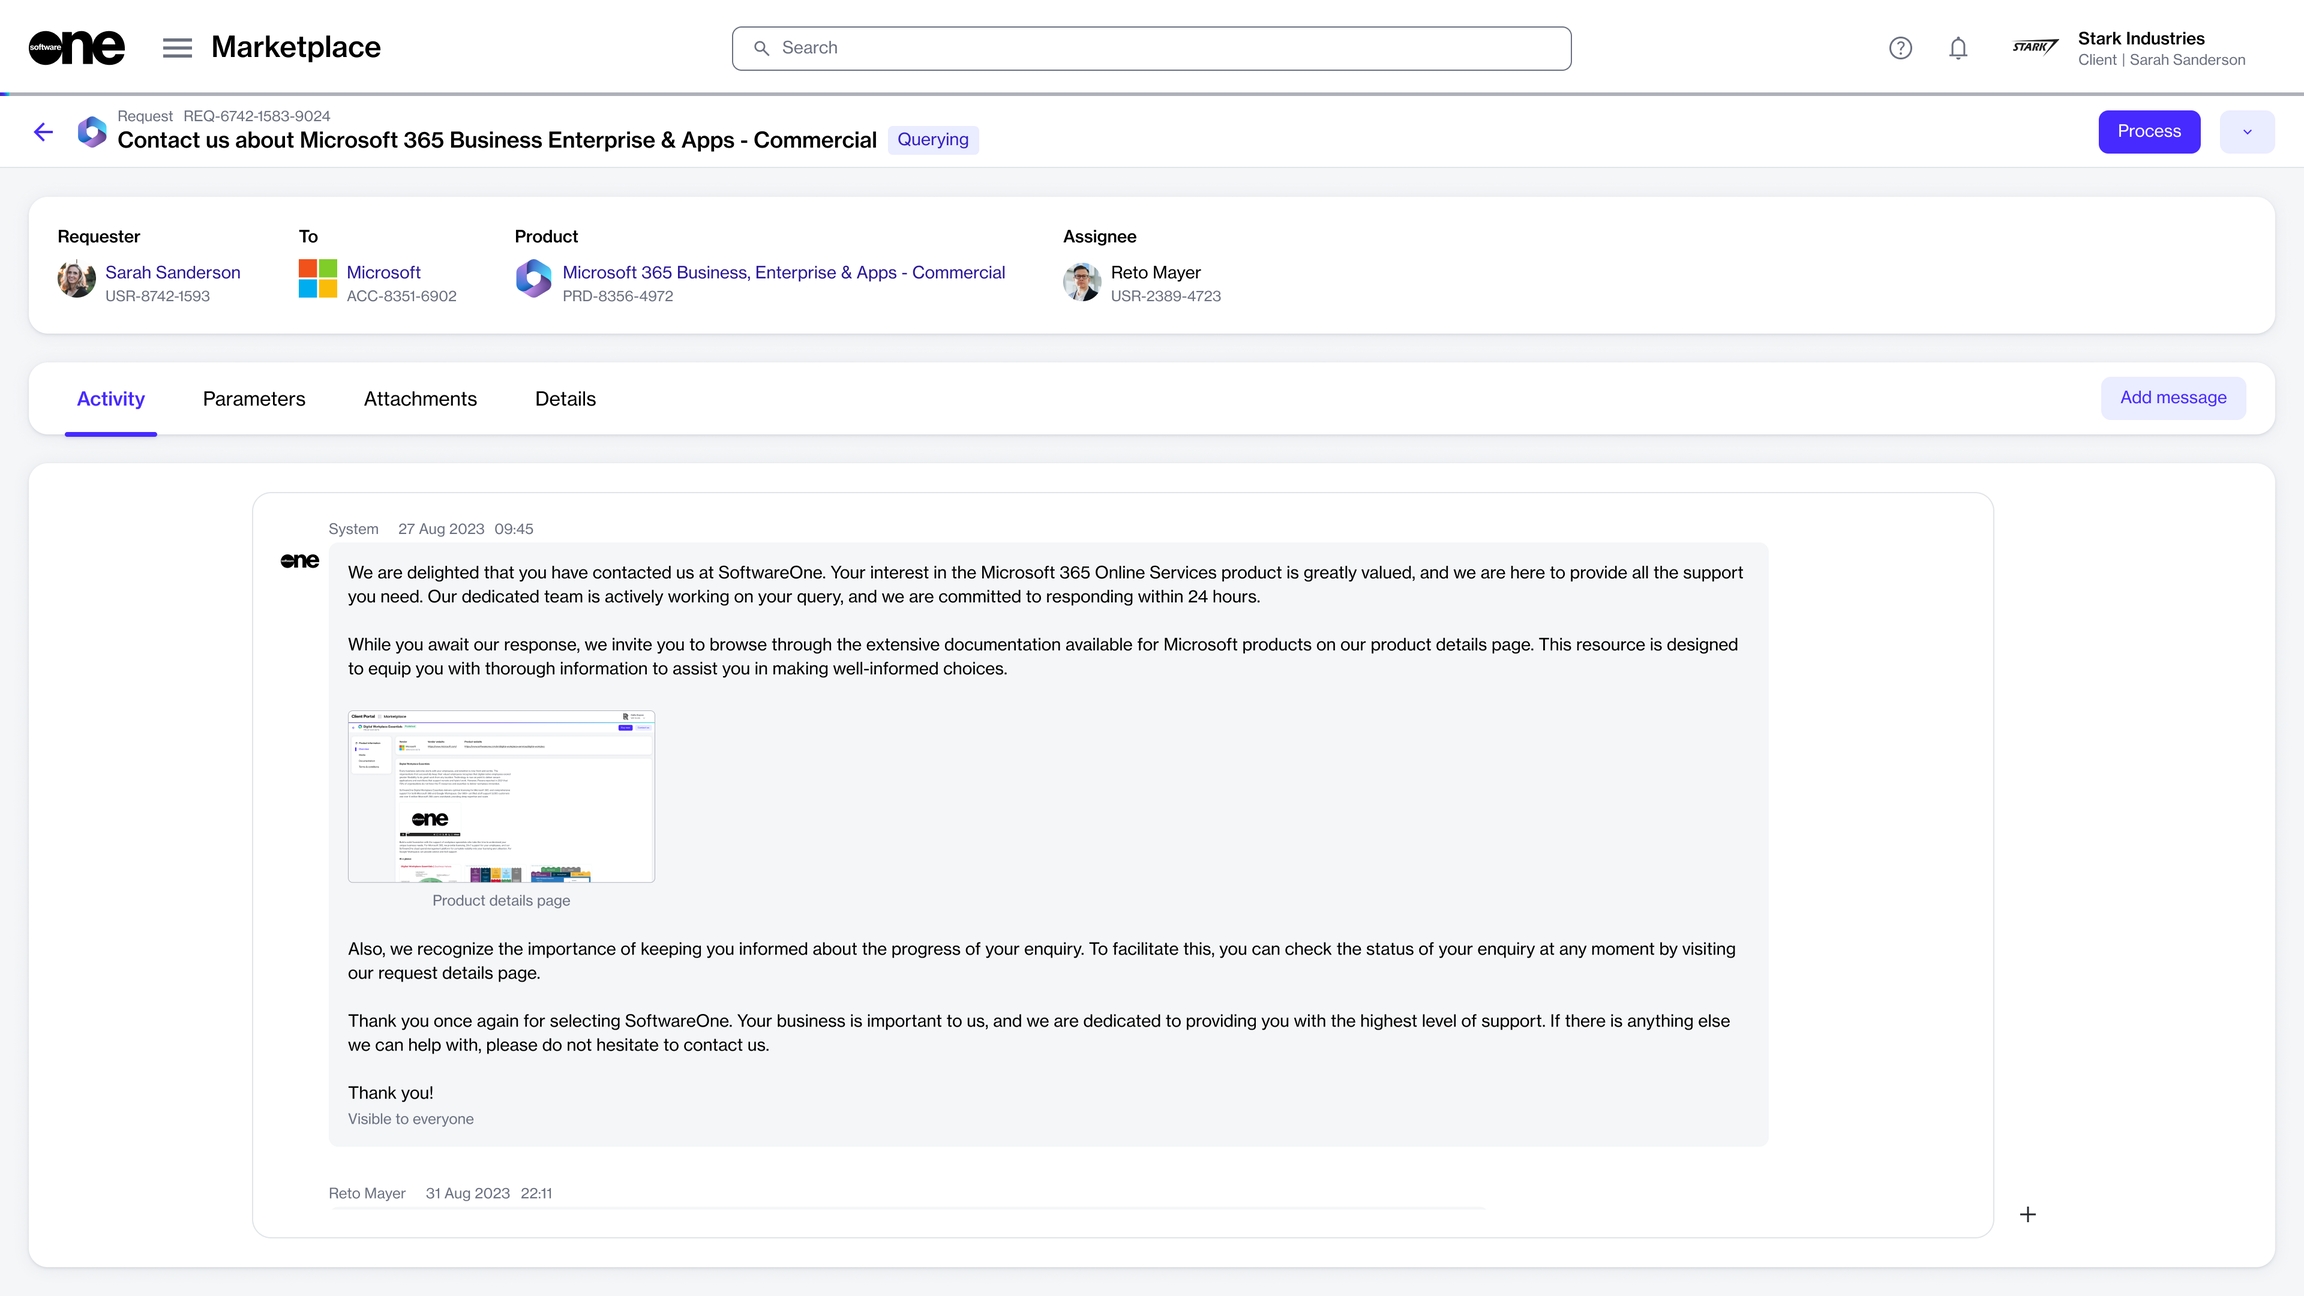
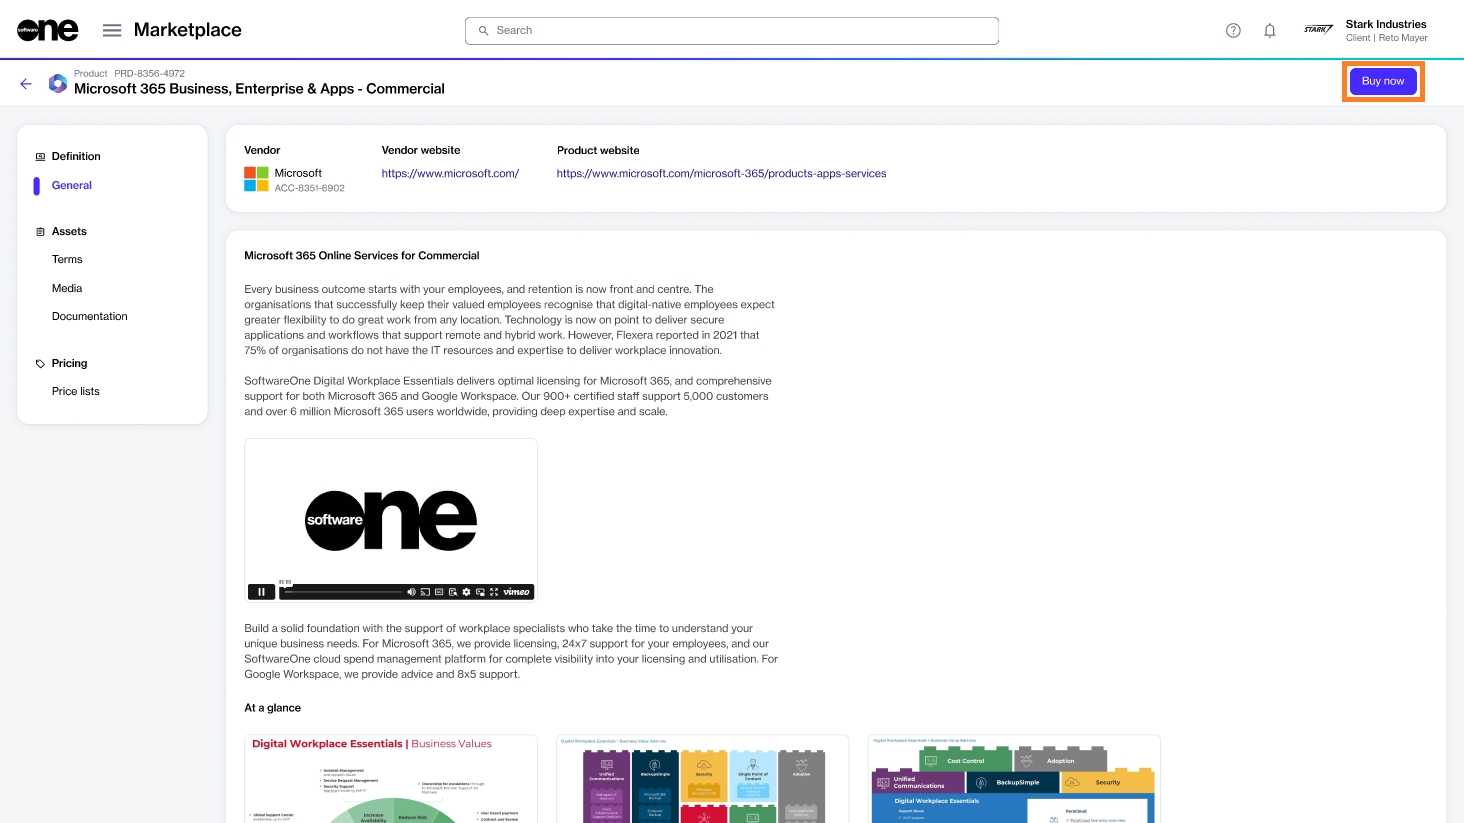
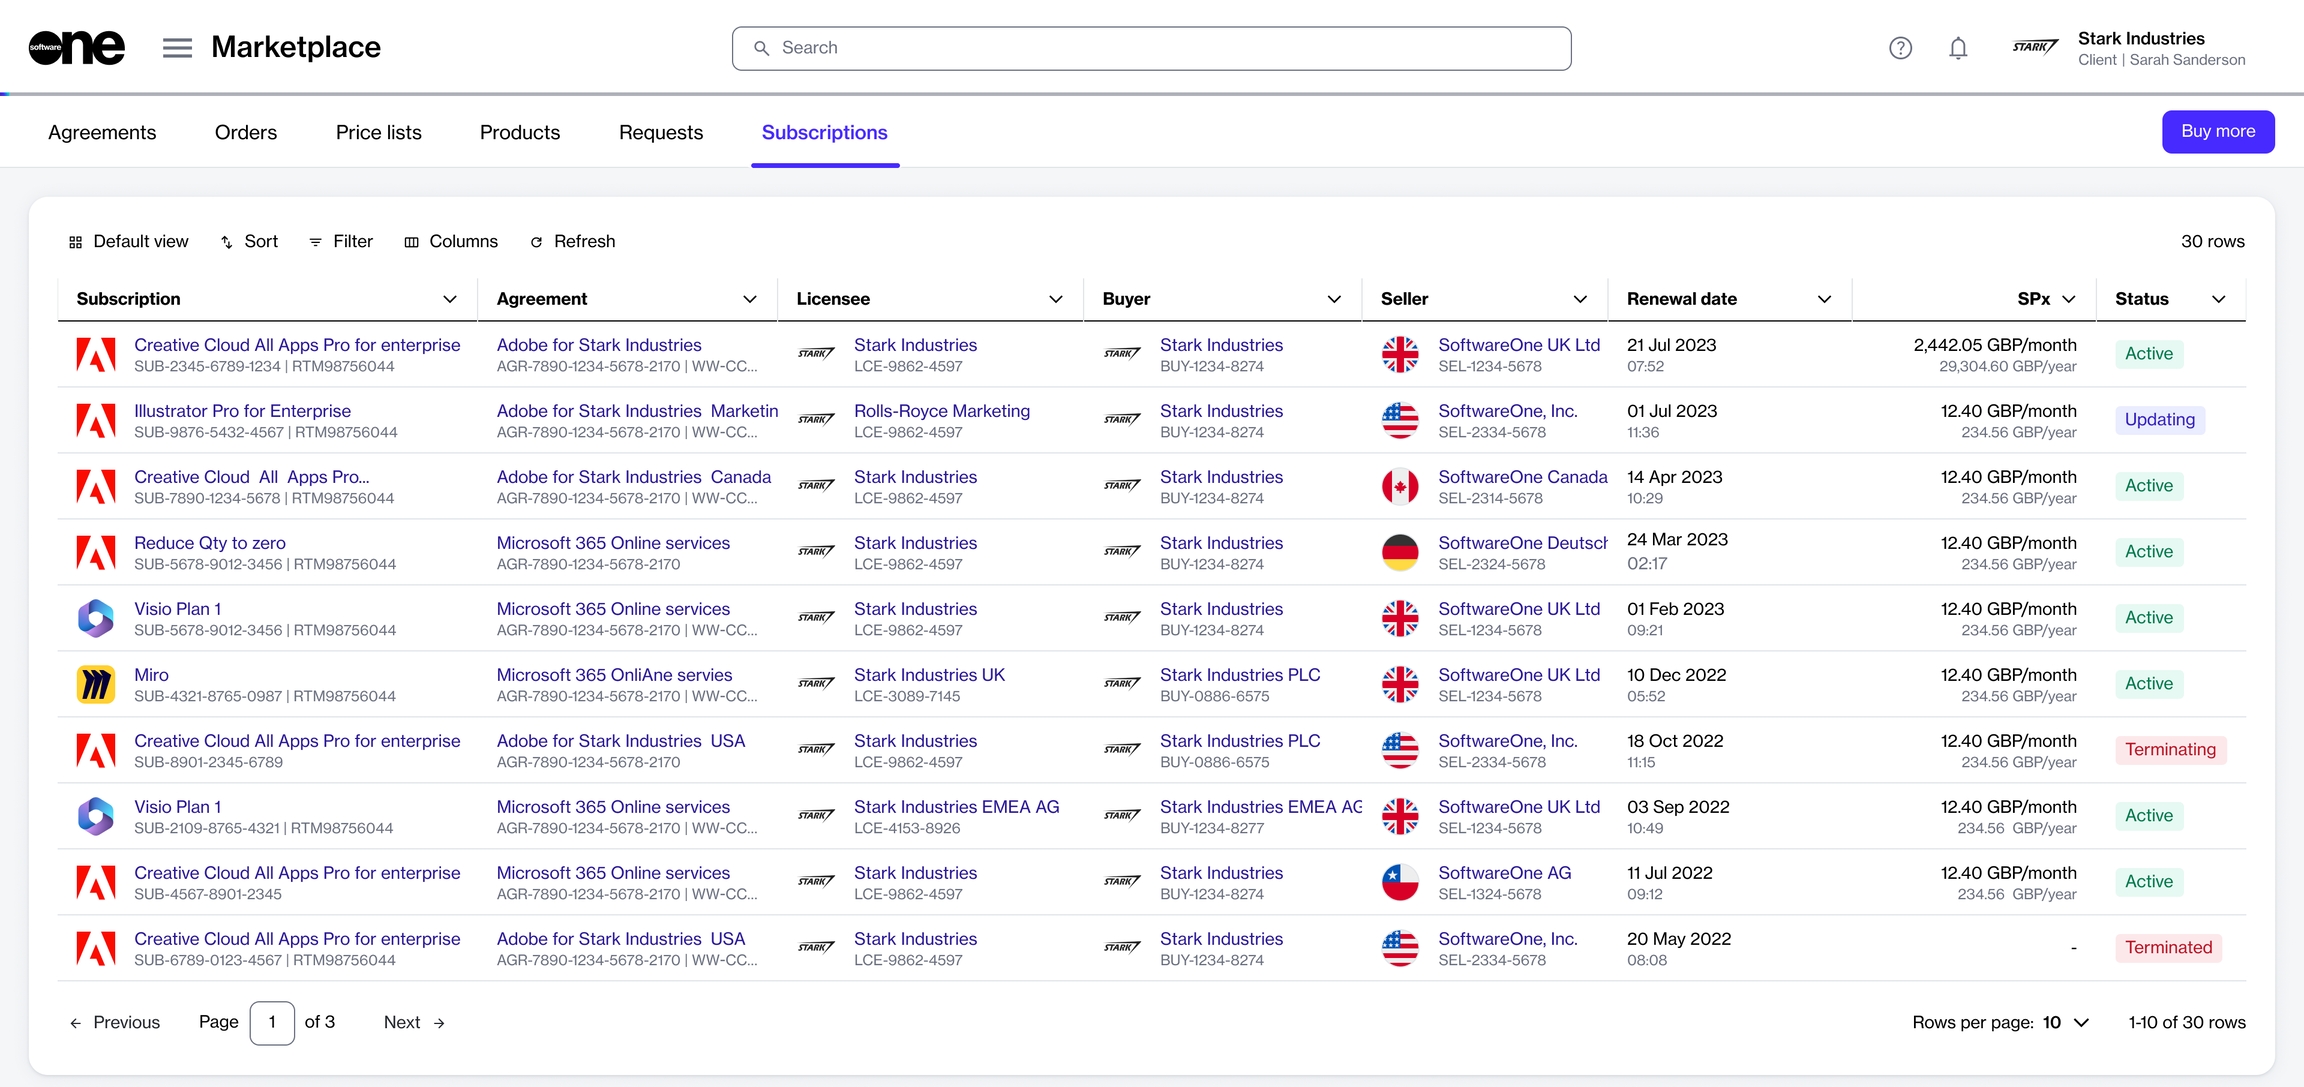
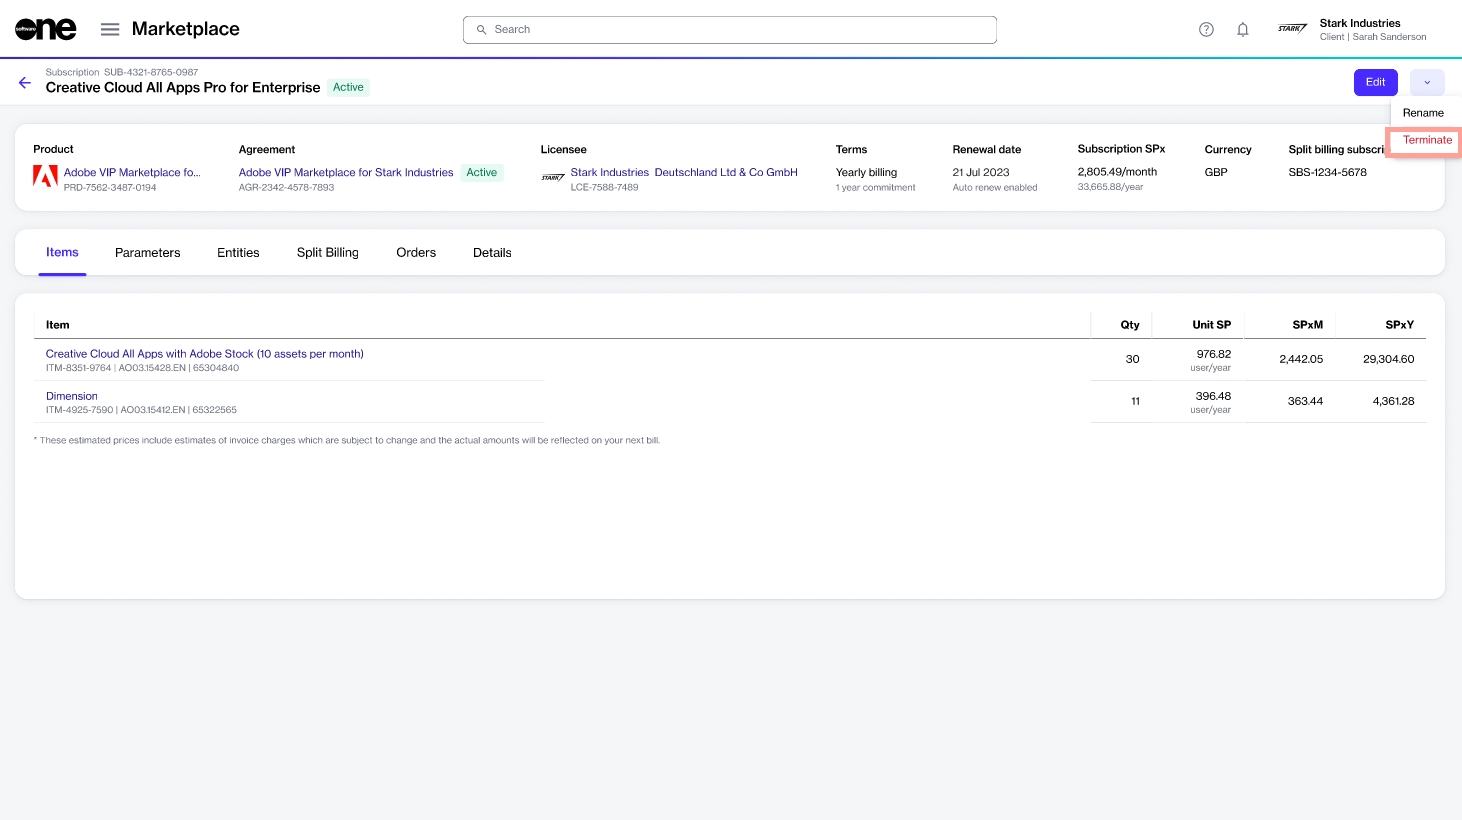
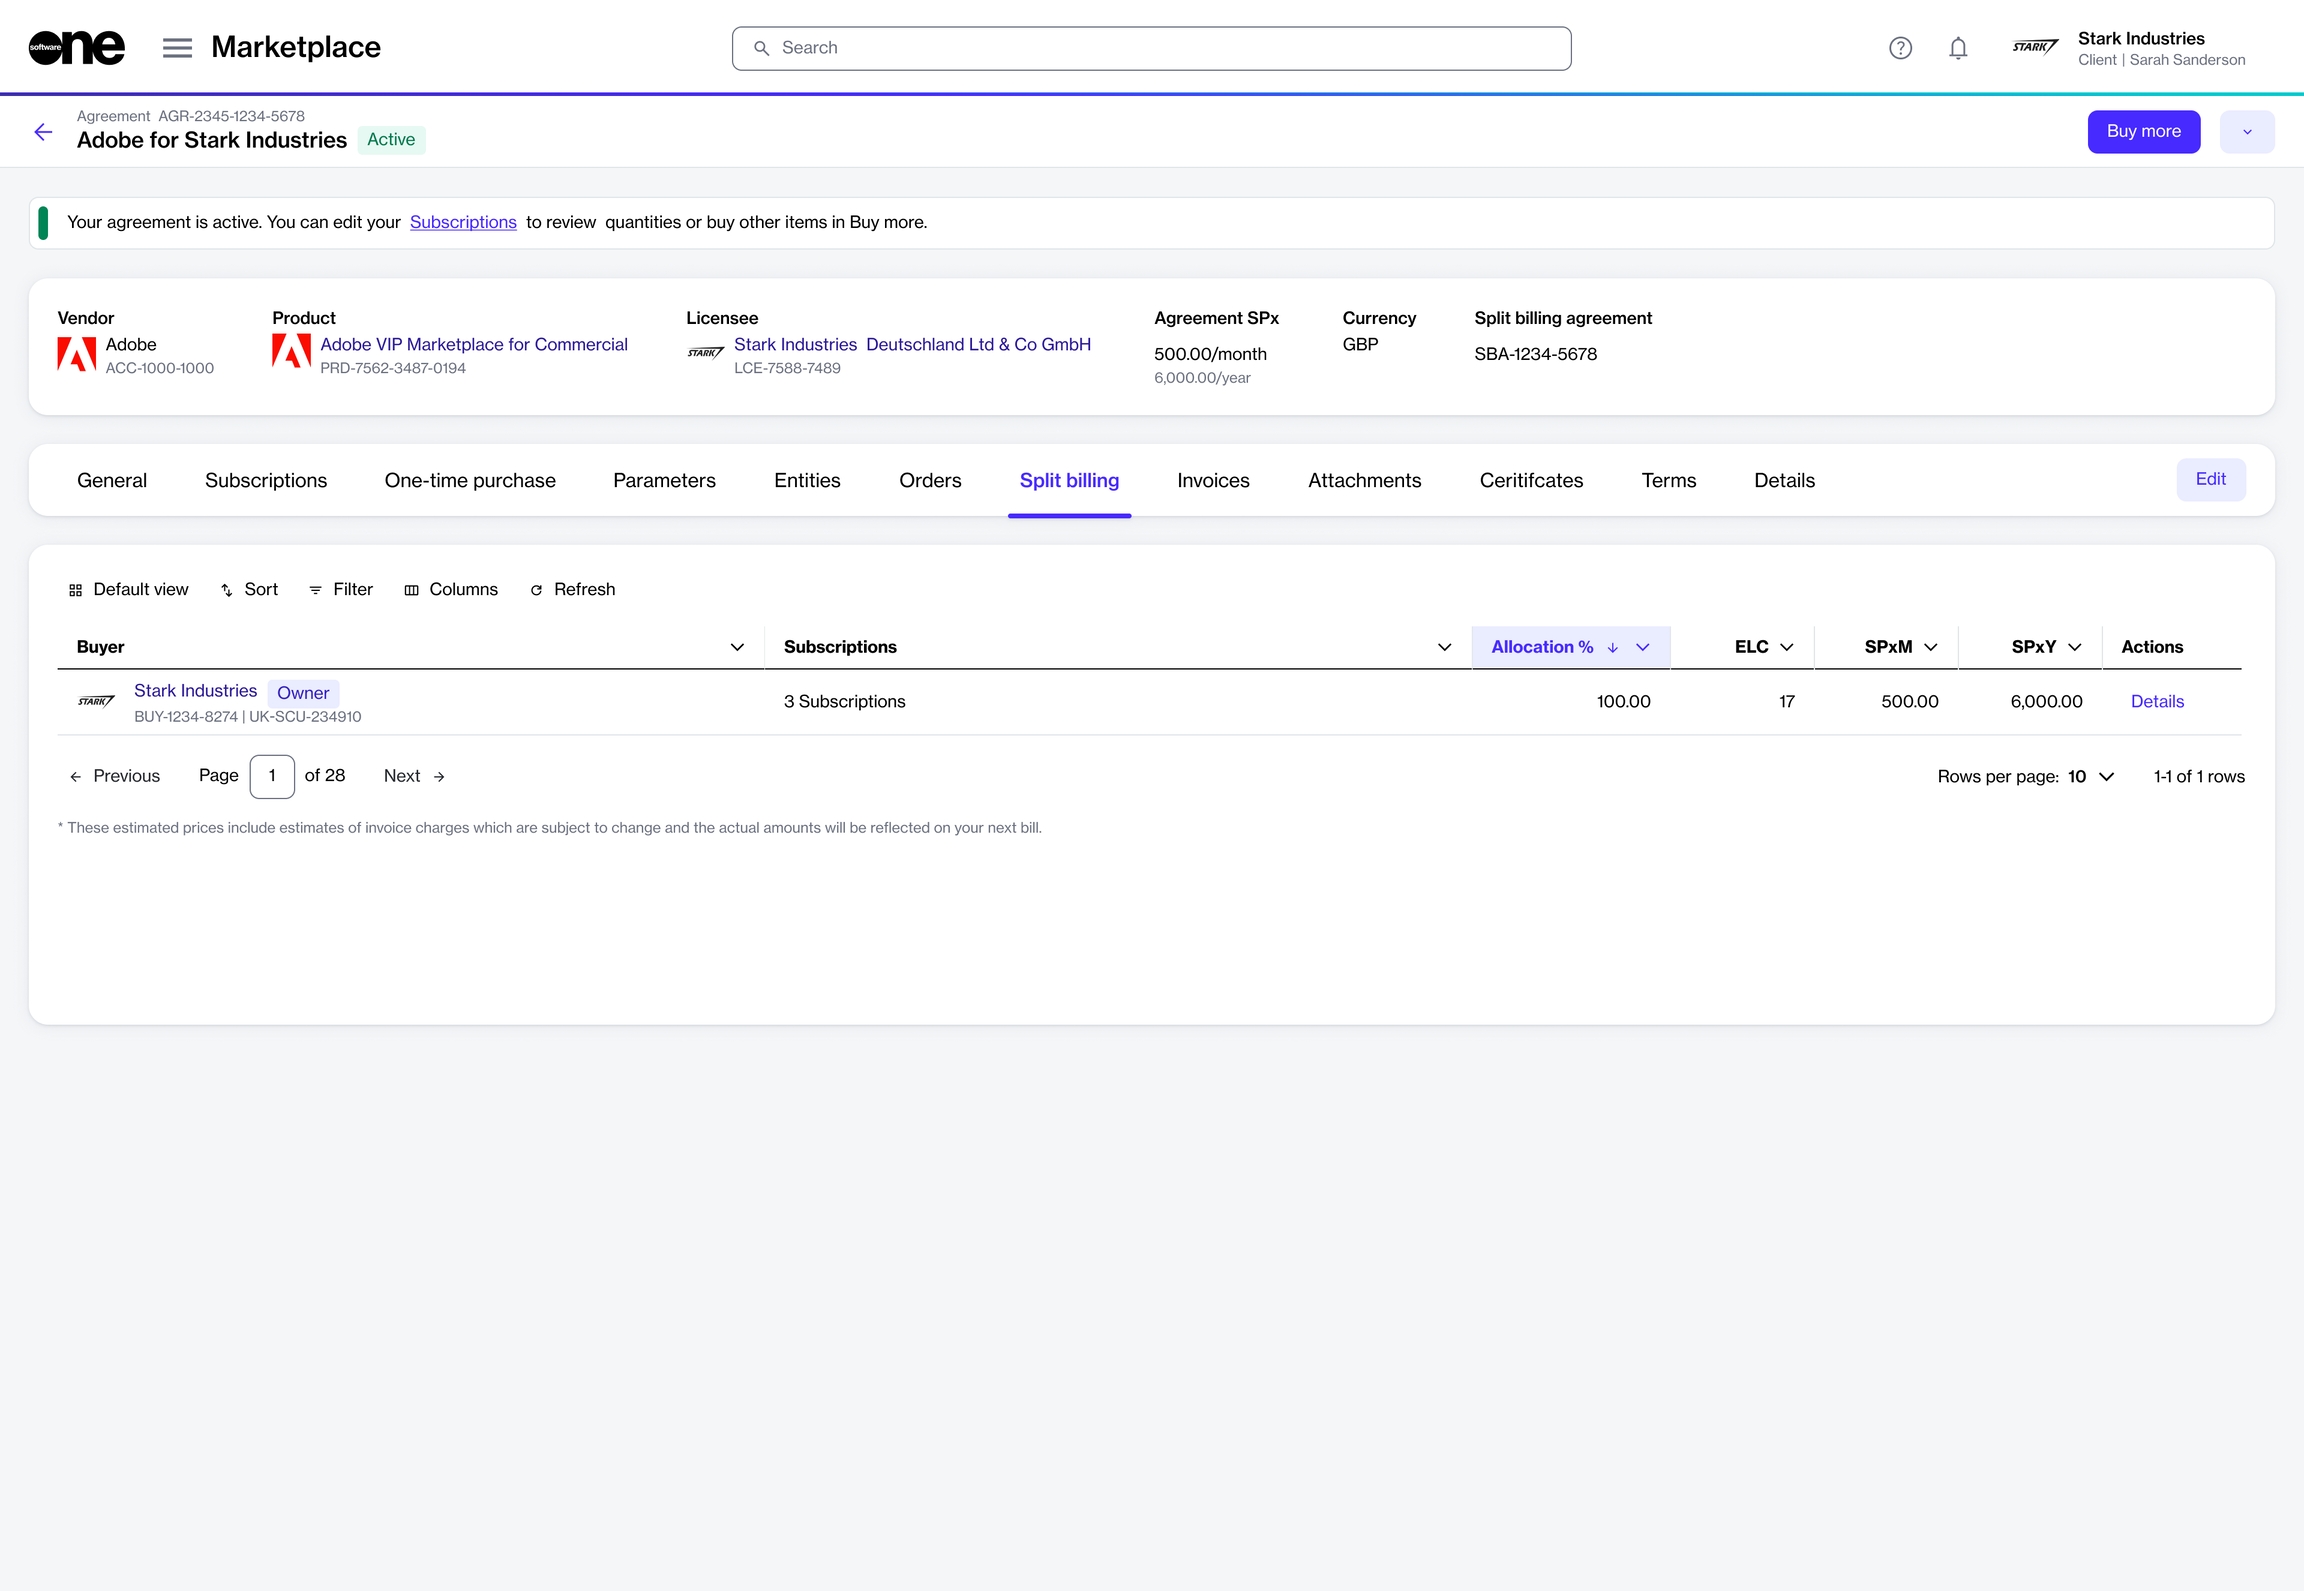

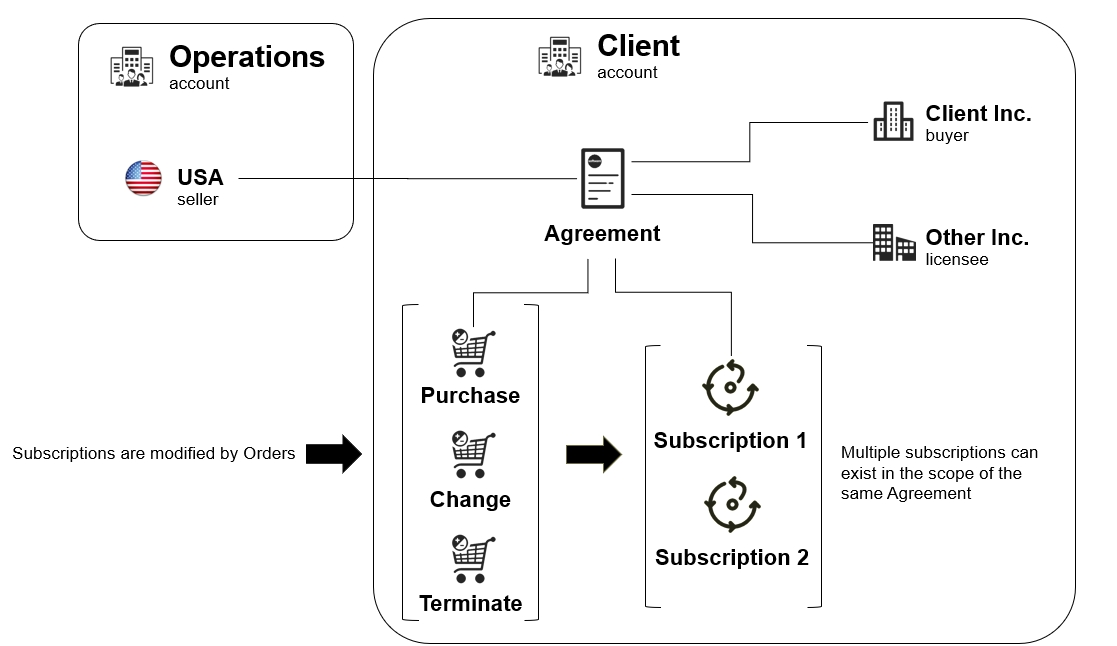
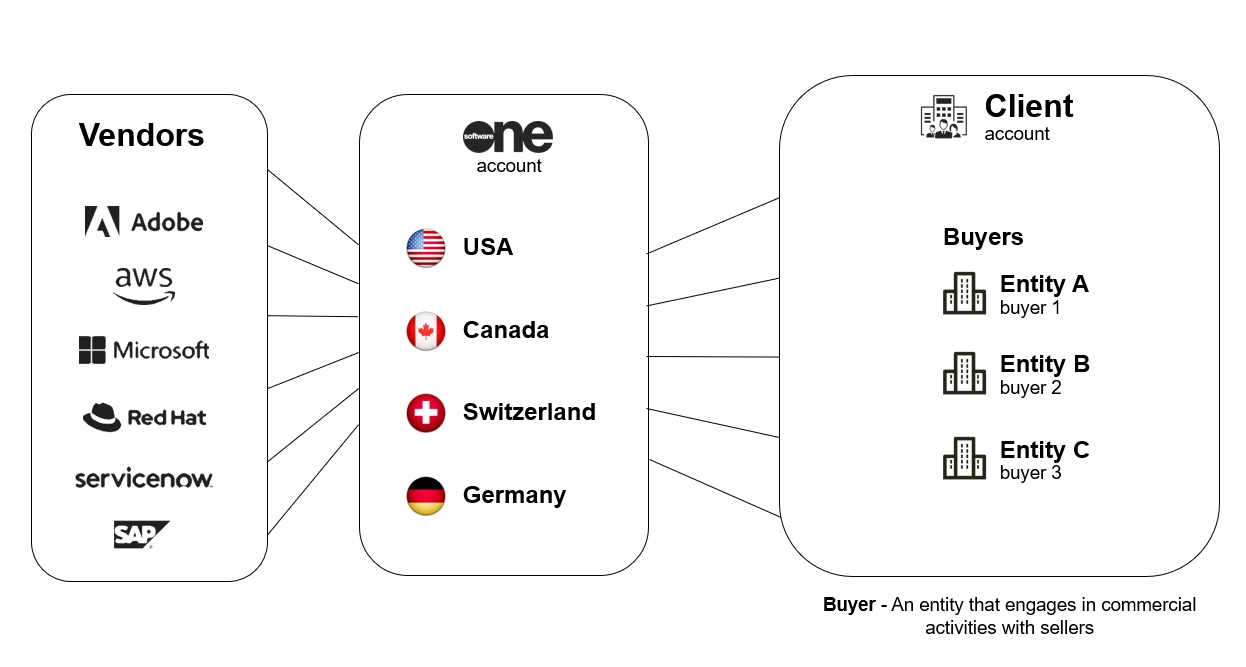
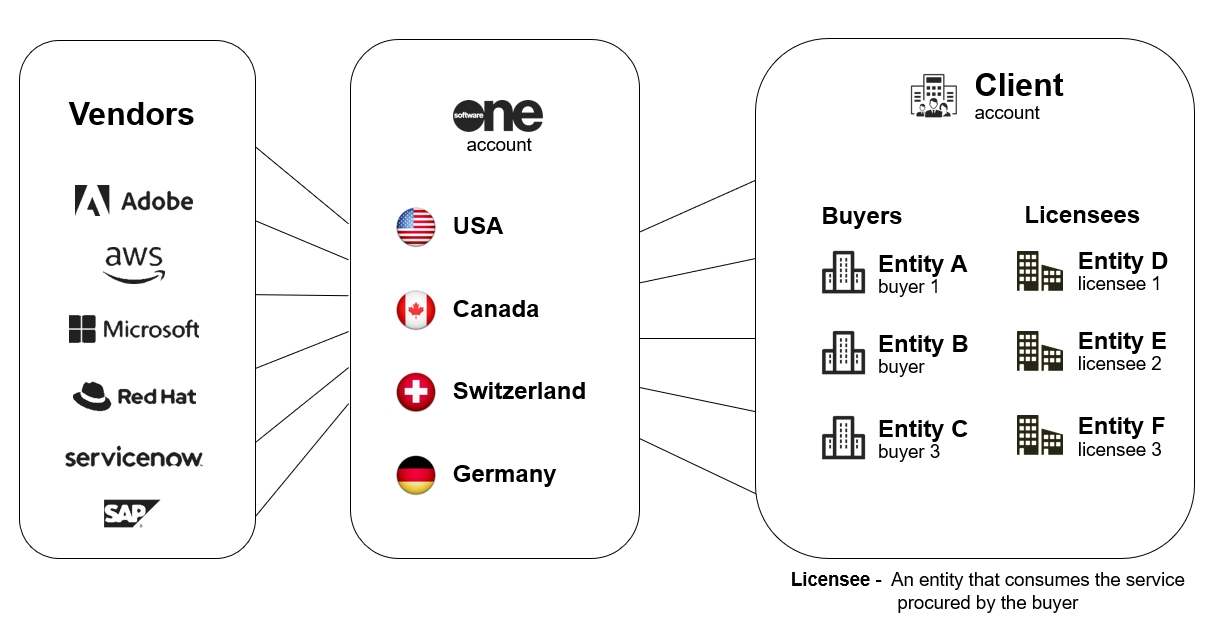
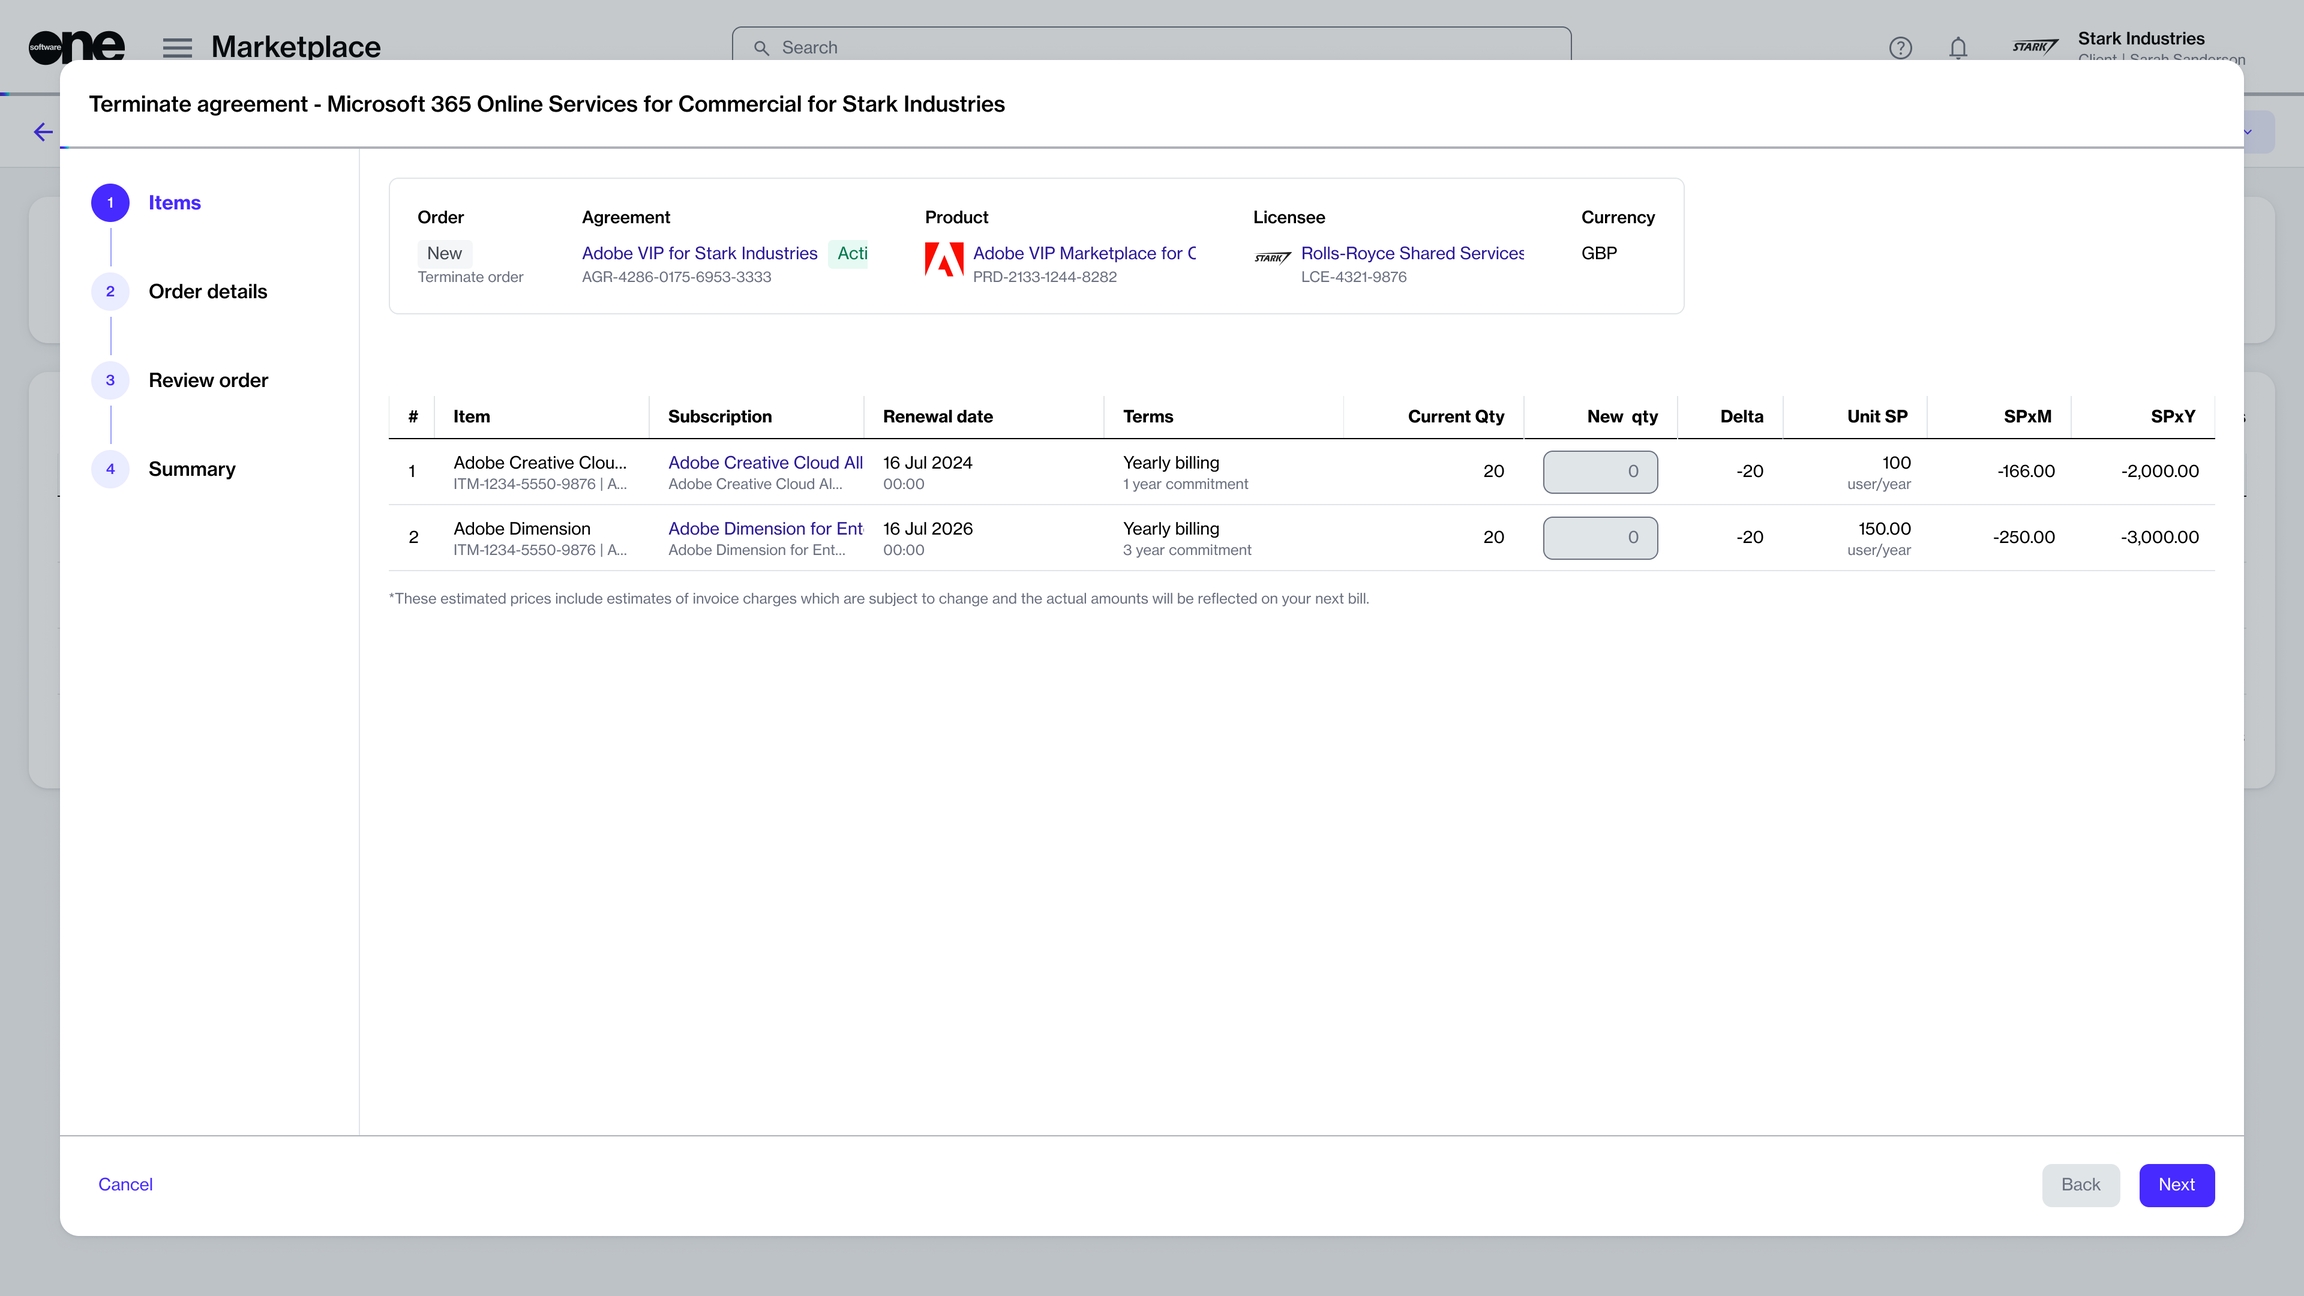
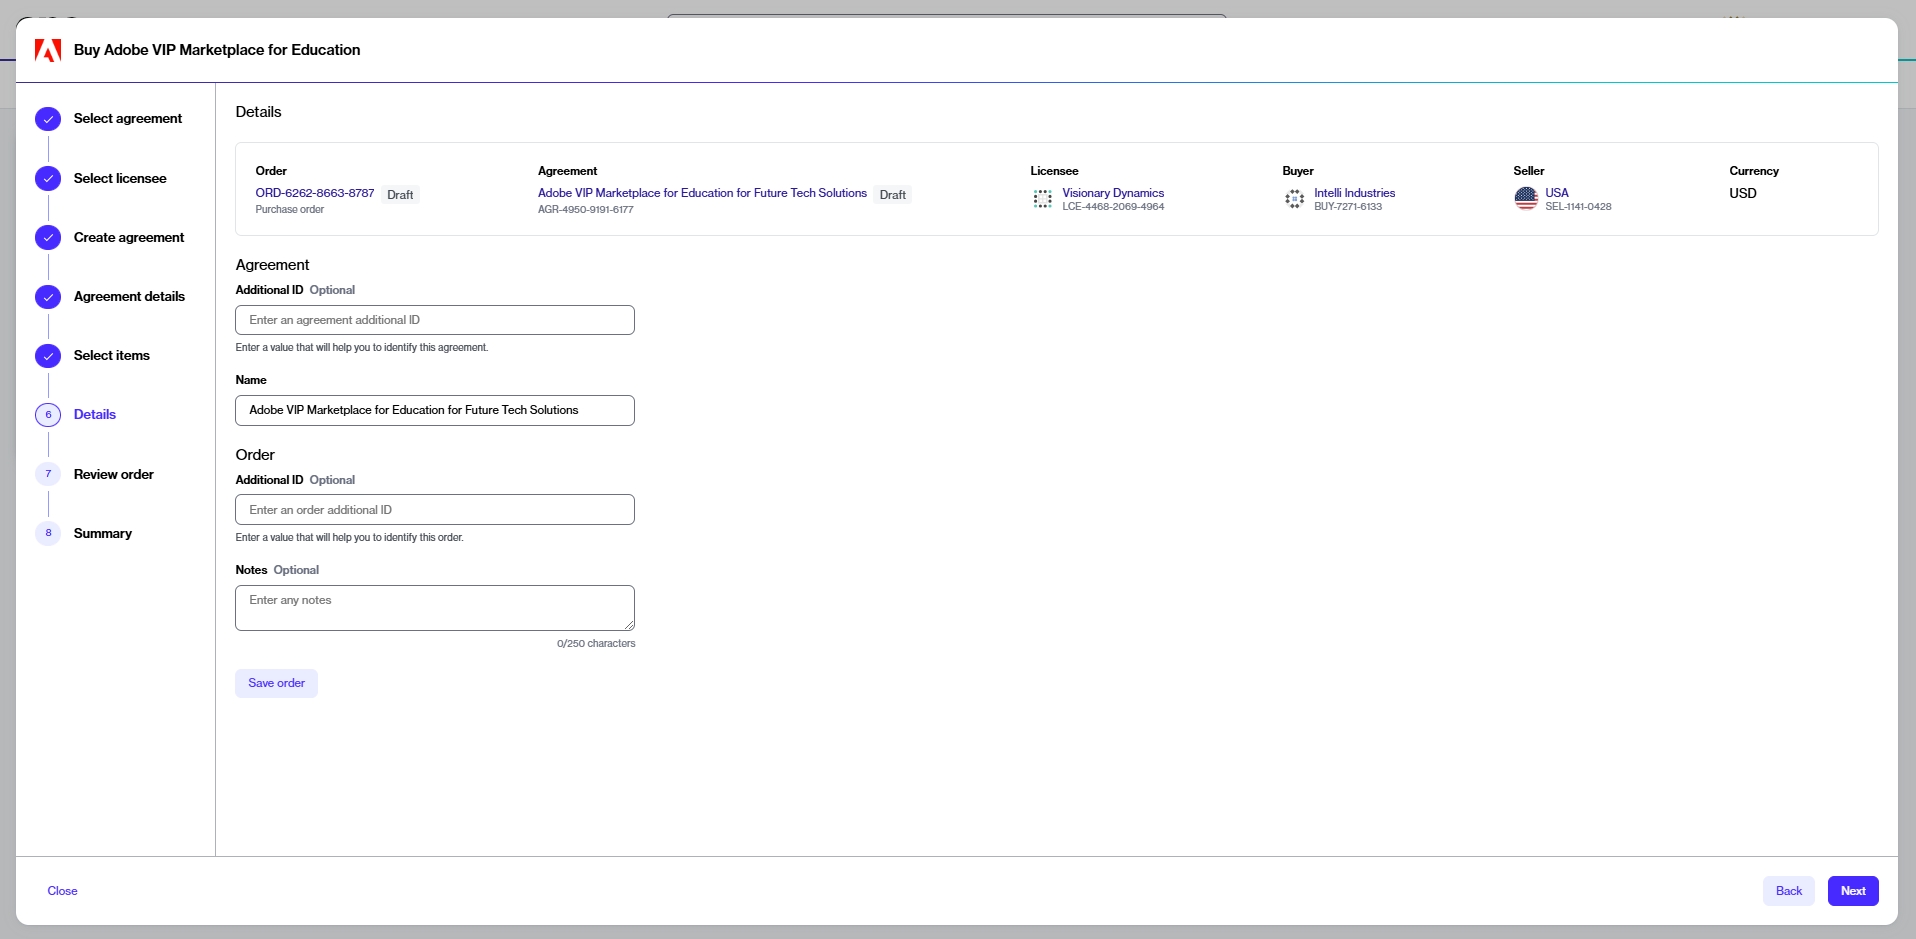
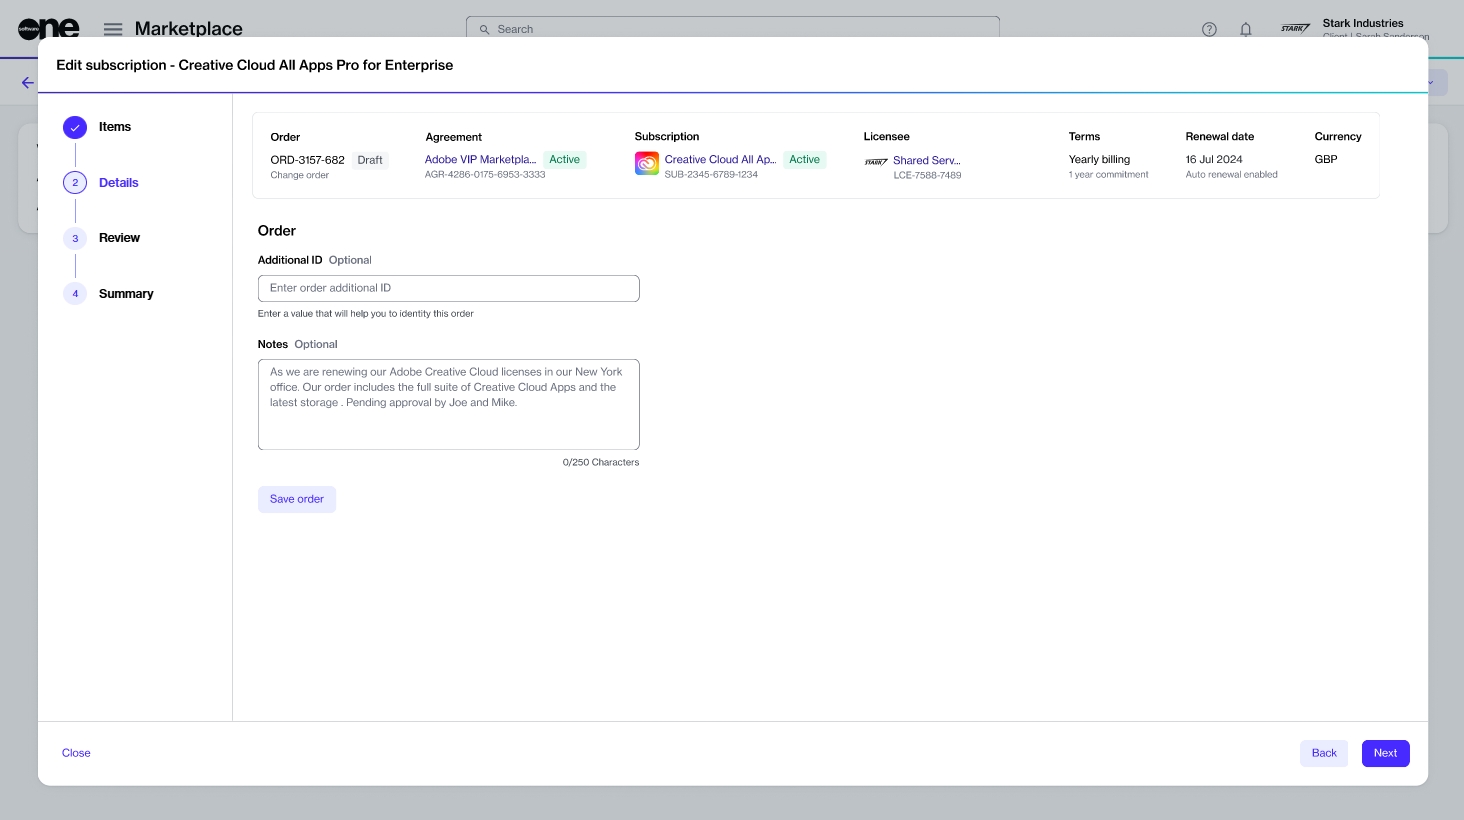
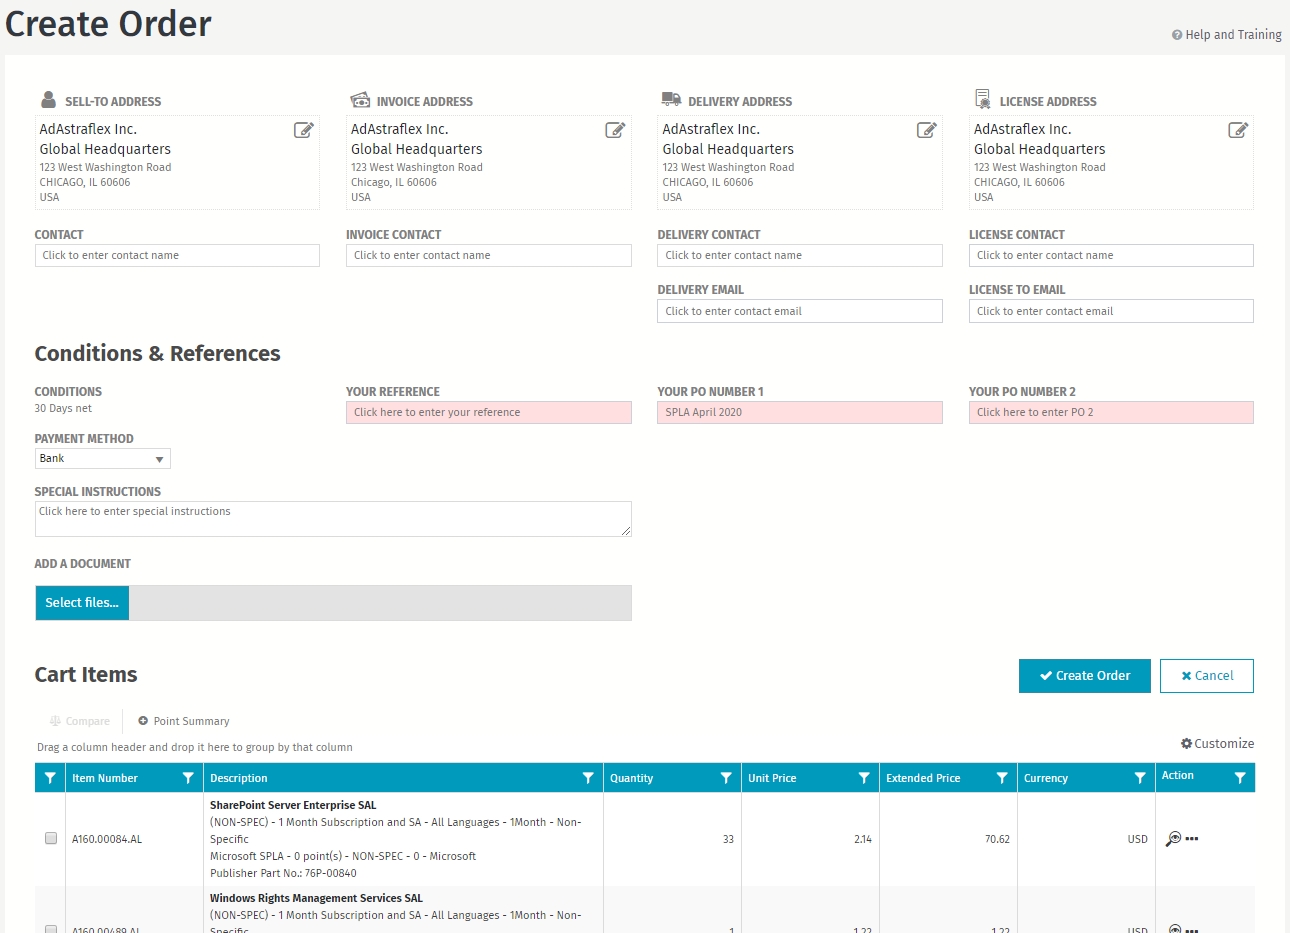
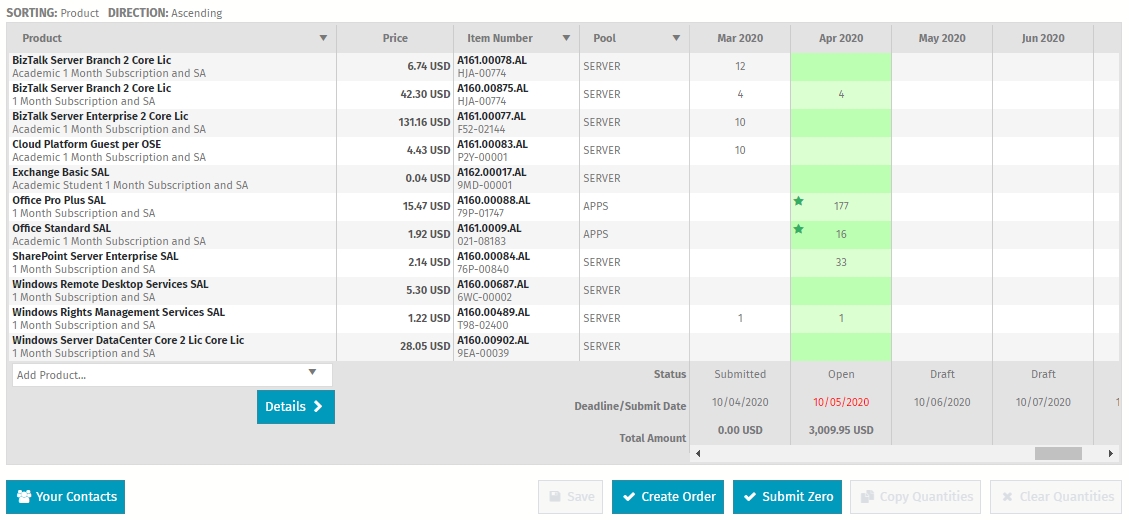

Allocation percentage, if split billing is enabled.
Total number of items within the subscription, but only if the subscription is active at the time of billing (for example, 'Qty 20 of ITM-XXXX-XXXX-XXXX / 65325070CA'). If the subscription is inactive, the item is represented as 'ITM-XXXX-XXXX-XXXX / 65325070CA' instead.
VAT %
The VAT percentage applicable to the item.
Total excl. VAT
The subtotal without any taxes.
Total incl. VAT
The total amount due with tax.
Quantity
Always displays the quantity as 1 because multiple lines are consolidated.
Each line shows the actual quantity of items.
Spike alerting is designed to identify and alert you to usage anomalies in your Azure or AWS environments. You can configure usage thresholds and communication preferences if your consumption exceeds your defined threshold.
Overage alerting gives very granular control, allowing you to set the consumption value as well as a period against which the service is monitoring consumption.
Reserved Instance alerting allows you to set minimum utilization thresholds that monitor the consumption of your reservation purchase.
The top section (1) describes the Notification Hub settings. In the example above, you can see that this user only has Web notification enabled for both Spike and Overage alert types.
The left Pane (2) is a list of all alerts for the past 30 days, and the right pane (3) shows details about the currently selected alert.
You can access consumption alerts from any cloud consumption report. You see the alert list by default. This report provides a basic overview of generated consumption alerts for every Cloud Provider that you configured.
Essentially, two modules are available in consumption alerts:
Consumption Alerts
Manage Alert
This tab contains information about all generated alerts.
The top section (1) describes the Notification Hub settings. In the example above, you can see that this user only has Web notification enabled for both Spike and Overage alert types.
The left Pane (2) is a list of all alerts for the past 30 days, and the right pane (3) shows details about the currently selected alert.
This tab allows you to manage your alert definitions and notifications.
Create new alert (1) opens a new interactive form where you can precisely configure your alert definition.
Manage Notification (2) brings you to the Notification Hub configuration page, where you can precisely configure in which form you wish to see notifications.
In the Alerts section (3), you can see a list of all created alerts, along with the most important columns to quickly grasp the context of the definition.
The subscribe column (4) has a toggle button where you can subscribe/unsubscribe from particular definitions. If you are not subscribed, you will not receive any notification from that alert in any form.
Quick actions (5) can be used to modify or remove alert definitions.
The Consumption Alerts tab presents all created alerts. Alerts are evaluated once a day at 23:00 (Universal time zone)
New execution entries have a “New” badge, and by default, you can view entries from the last 30 days. By clicking on an entry, you are marking it as read; thus, the “New” badge will be removed.
To load more alerts, click the “Load more” button when you reach the bottom of the execution list.
The details section is loaded immediately after clicking on the alert from the left pane.
The top section (1) shows a brief explanation of why the alert was created, for example, 13.39 USD above the set threshold.
You can also see details loaded directly from the alerts definition (2), like threshold, time range, and applied filters.
The bottom section (3) shows the Filters that have been applied.
The preview section is a graphical representation of the alert and highlights the point of time when it occurs.
You can interact with this chart similarly to the Consumption Reports, which includes “hover-over text” when you are viewing a vertical bar in the chart.
The Alert item allows you to perform a more detailed analysis in Consumption Reports so you can find the root cause of that alert. When you follow the “Analyze Consumption” link, the report will be opened in a new tab with the filters and dates extracted from the alert.
Notification configuration allows you to set your preferred delivery methods for the alerts you have configured. The configuration page can be accessed by clicking on the “Notification Hub” link or “bell” icon in the top menu bar.
Once the Notification Hub page appears, a section for consumption settings is displayed. This is where you can individually configure delivery methods for Spike and Overage alert types.
You can access the wizard by clicking Create New Alert or Edit. Remember that the alert name has to be unique across all of your alerts.
Notification alerting supports the following two modes:
The Spike mode is used to detect anomalies in your consumption characteristics, for instance, a Virtual Machine that was left running after performance tests were executed by the team.
The average mode is used to track if the overall consumption is in the defined boundary (threshold).
Parameters allow you to control the behavior and data scope of the alert. By choosing All Tenants or All Subscriptions, each tenant or subscription will be monitored separately.
For example, you configured the threshold as follows:
14 days, and
Spend increase of 25%
This means that the above rule will be applied individually to all subscriptions or tenants. If the condition is met, a notification will be produced.
The Custom option works slightly differently. First, you need to select a report type (1) and then you can precisely craft your definition using that report (2).
For instance, you may only want to monitor virtual machines in a single subscription. To do that in the report selector (1) ,you should select Azure EA Consumption Details, then select Virtual Machine in the Meter Category, and then narrow down the subscription filter according to your requirements.
If you are actively using the Save Filters functionality, you can click Save Search and all saved filter combinations will be available.
In this section, you configure the criteria of the alert. First, you select the time context in which the average or sum cost will be calculated from (1). Then, you should decide on the % or cost threshold to monitor (2).
For example, on a Spike Alert, by selecting 14 days, the average from the last two weeks will be calculated. Let’s assume the result is 100 USD. You now set your threshold to 25%. Your consumption will be monitore,d and any spend that is greater than 125 USD will be reported as notification.
Additionally, you can control two extra parameters (3):
Ignore days with no spend: If enabled, it means that days with no consumption will not be counted within the average. For example, disabling Virtual Machines during the weekends.
Minimum alert value: This means that you will be notified only when criteria (1) are met and the spending is greater than the provided value. This is helpful when monitoring spending under a specific value and a spike in these scenarios may be too noisy. For example, you may have a daily spend of $5, so a spike to $10 may not be as relevant until that spike exceeds a certain amount (like $100).
Alert definitions can be private. A private alert means that it will only be visible to you (1). A public alert means that you can share this alert configuration with anyone in your company (2).
When you select share with your team, an additional dropdown appears where you can add team members individually. By default, people with whom the alert is shared are unsubscribed – they have to subscribe to the alert to see notifications; this prevents you from generating unwanted notifications on other users’ accounts.
Agreement No.
A unique number assigned to your agreement by the publisher.
Remaining Days
The number of days remaining before your contract expires.
Customer Name
The name of the customer.
Contract Type
The type of contract.
Enrollment No.
The enrollment number assigned to your contract by the publisher.
Anniversary Date
The renewal date of the agreement.
Currency
The currency of the agreement.
Level
The price level of the agreement.
Comments
Option to add and save your comments.
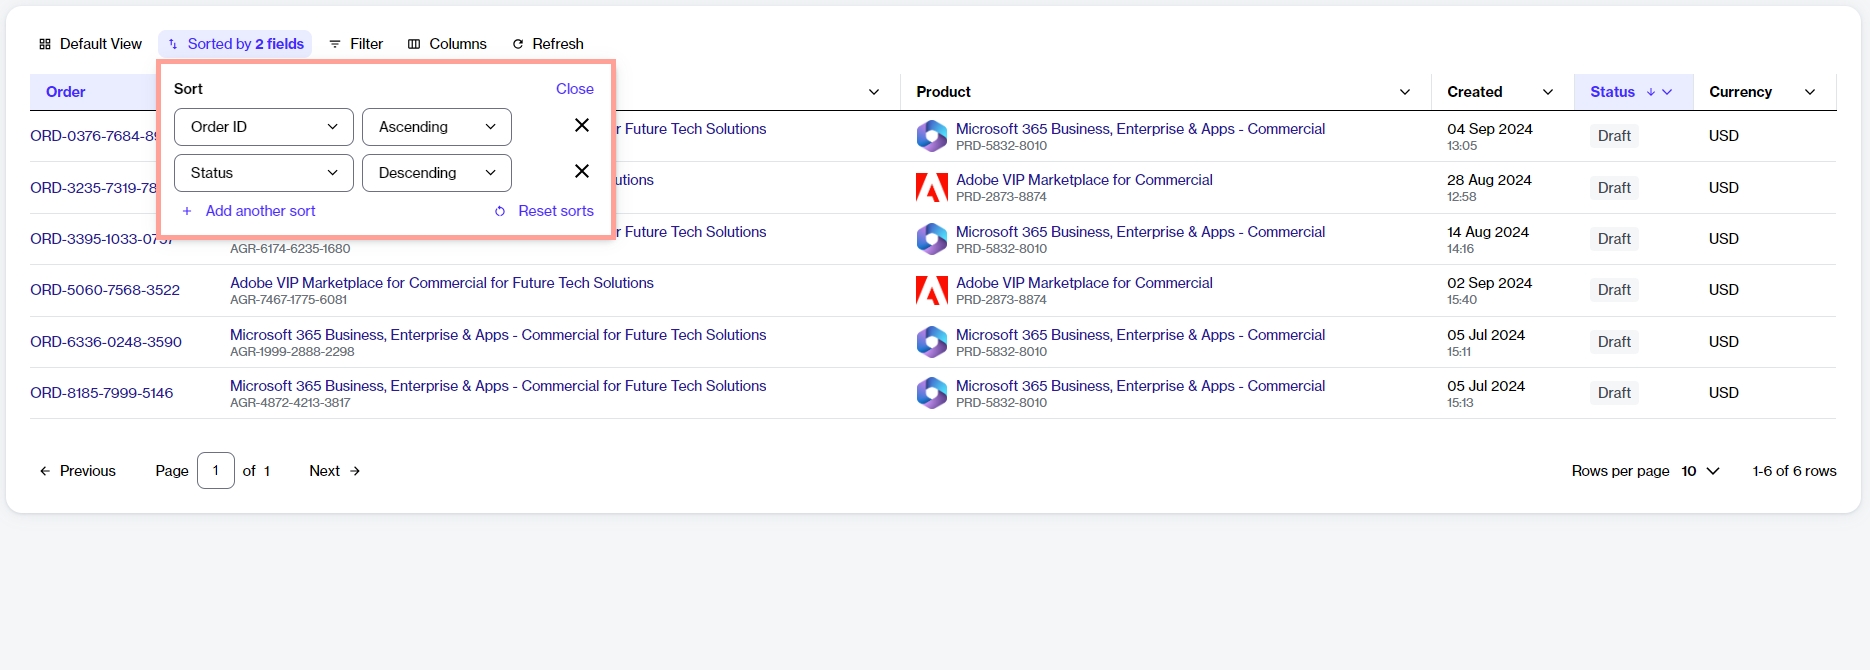
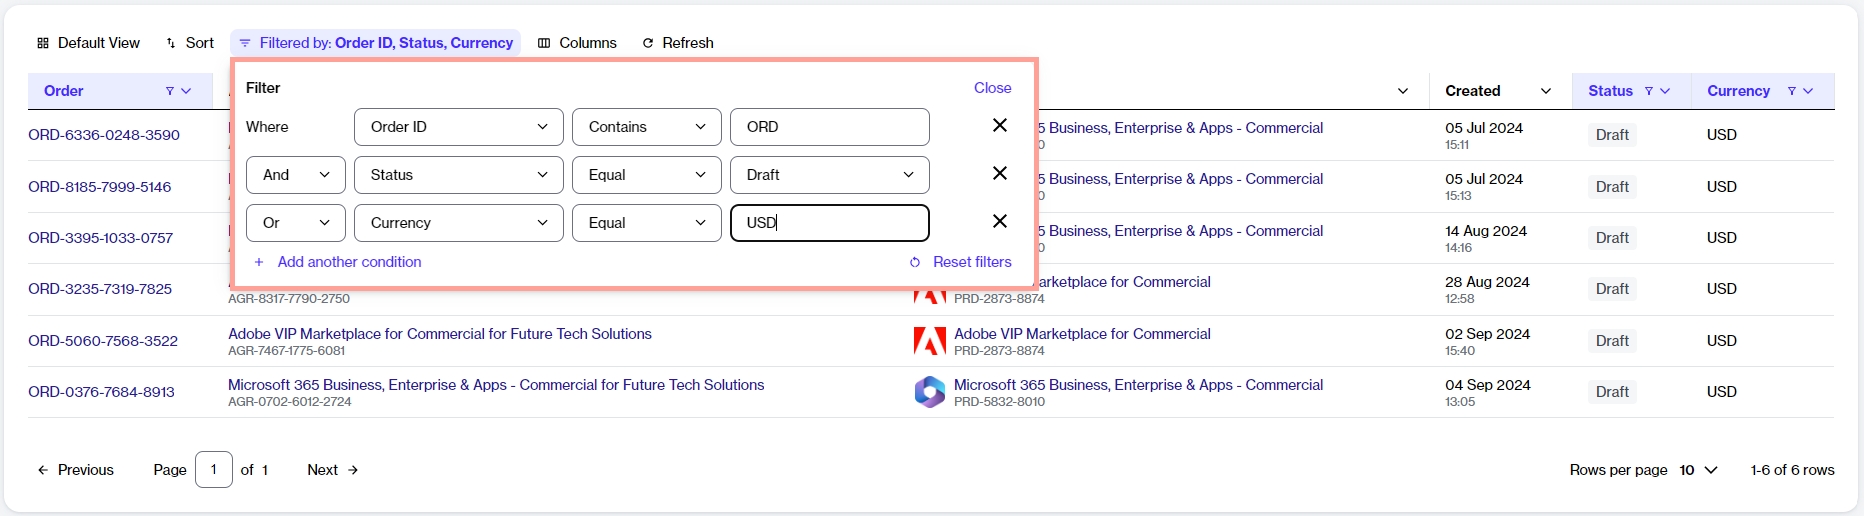
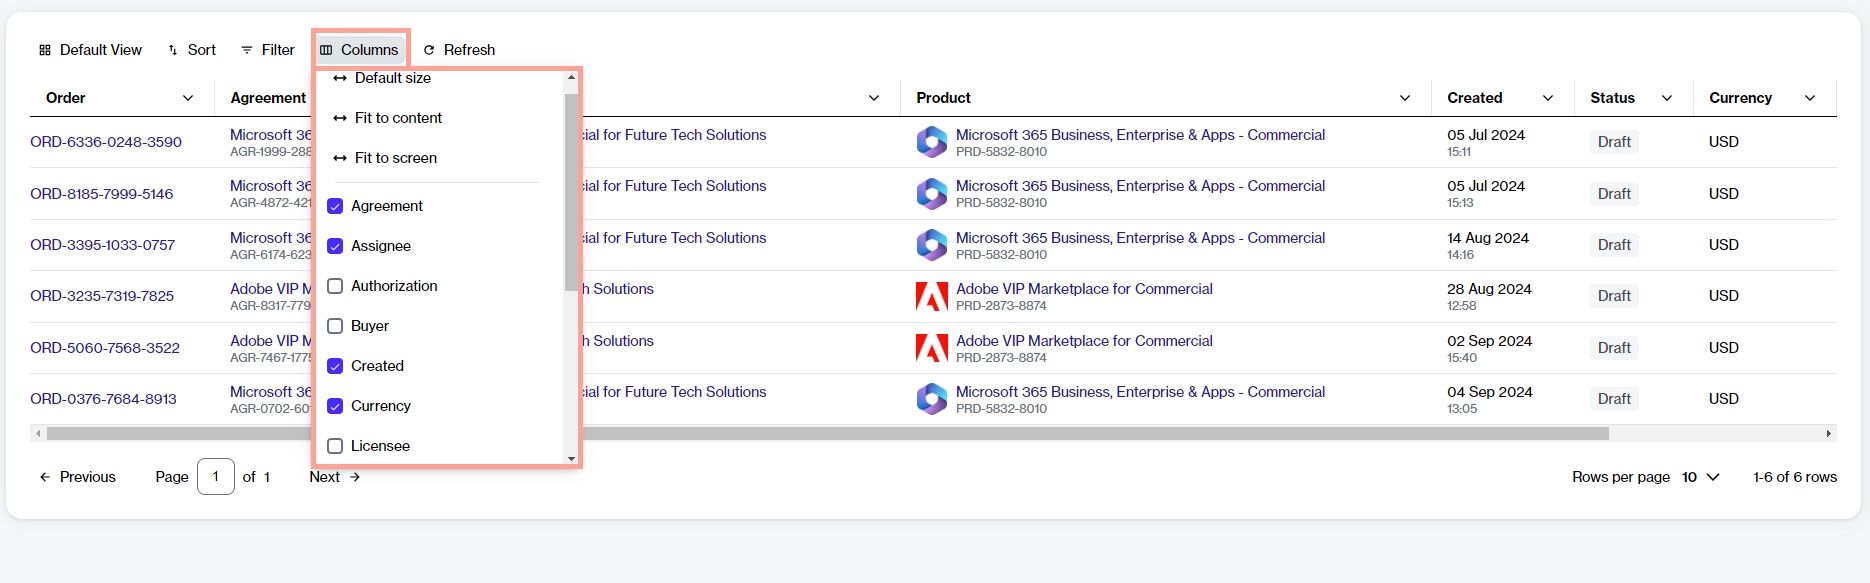
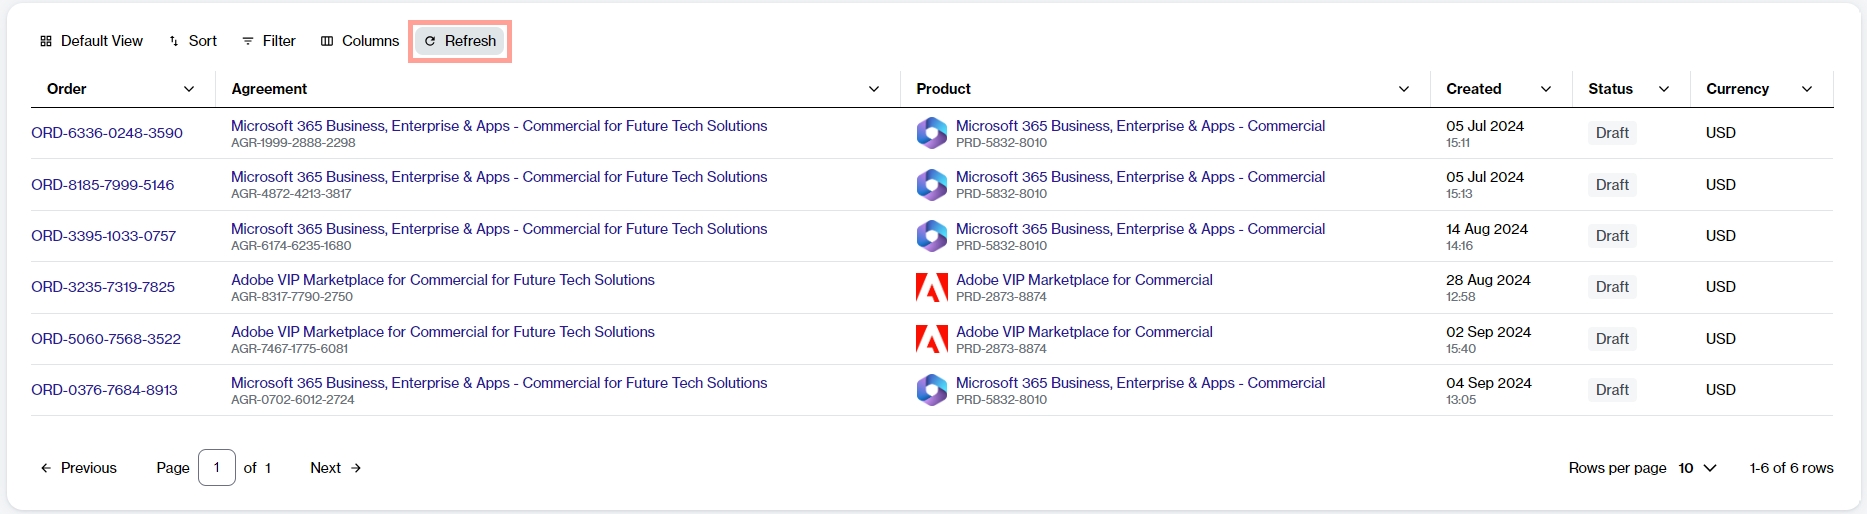

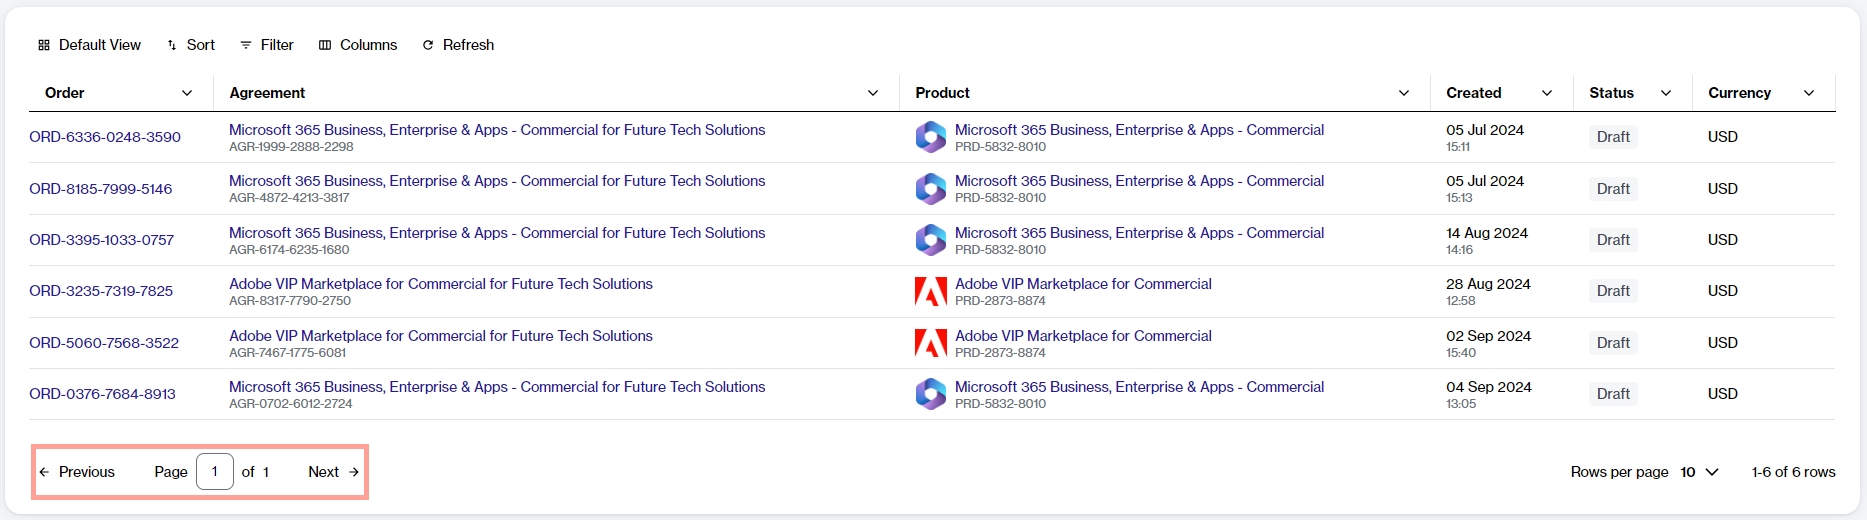
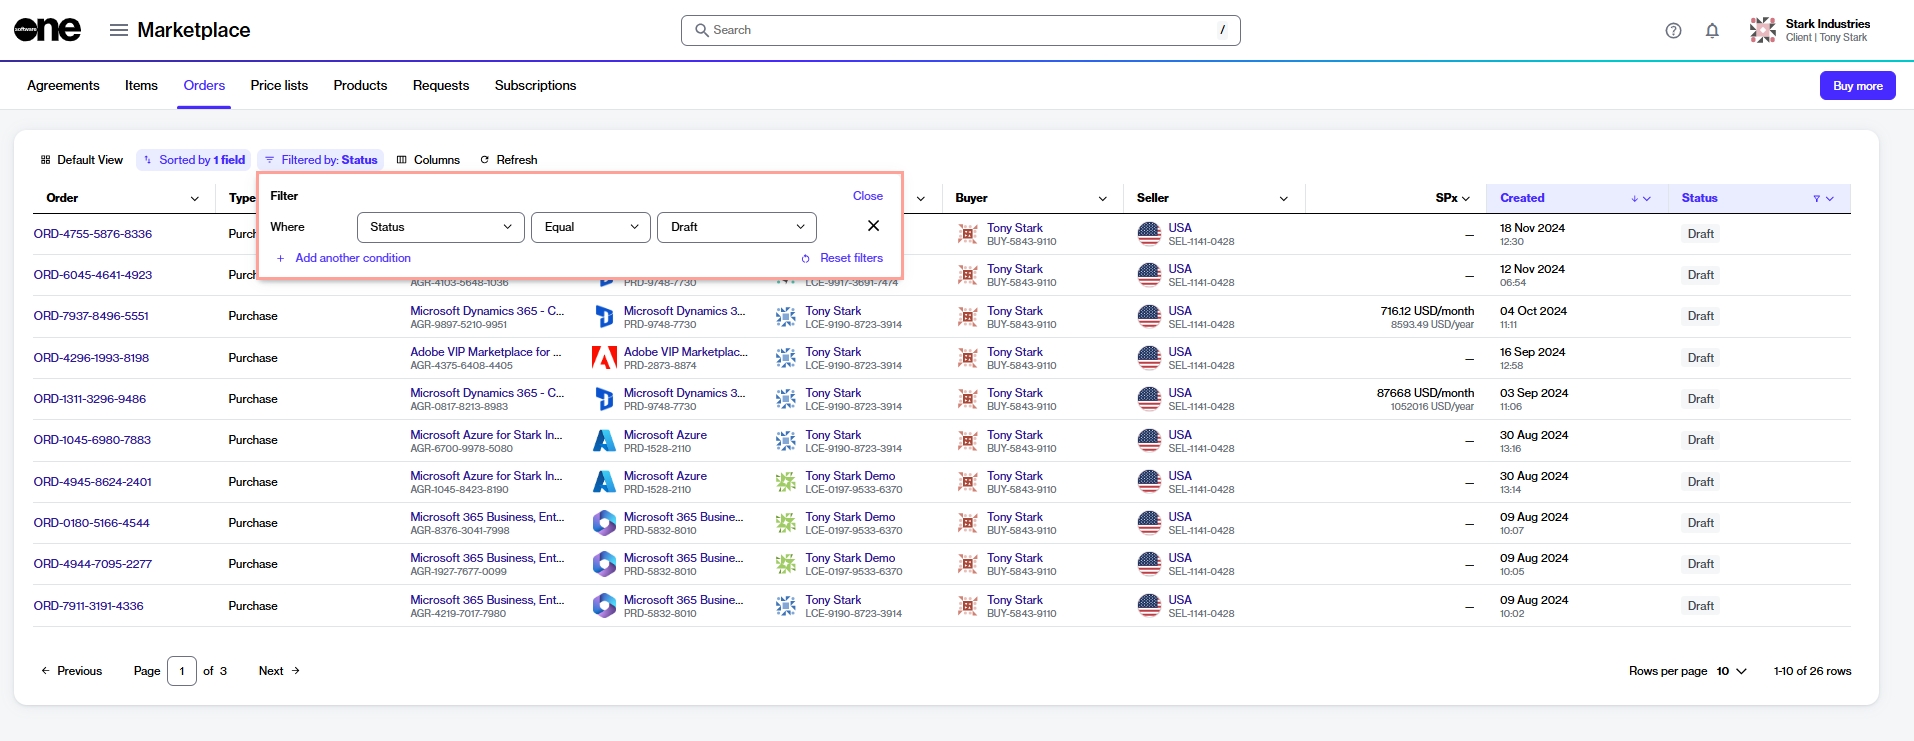
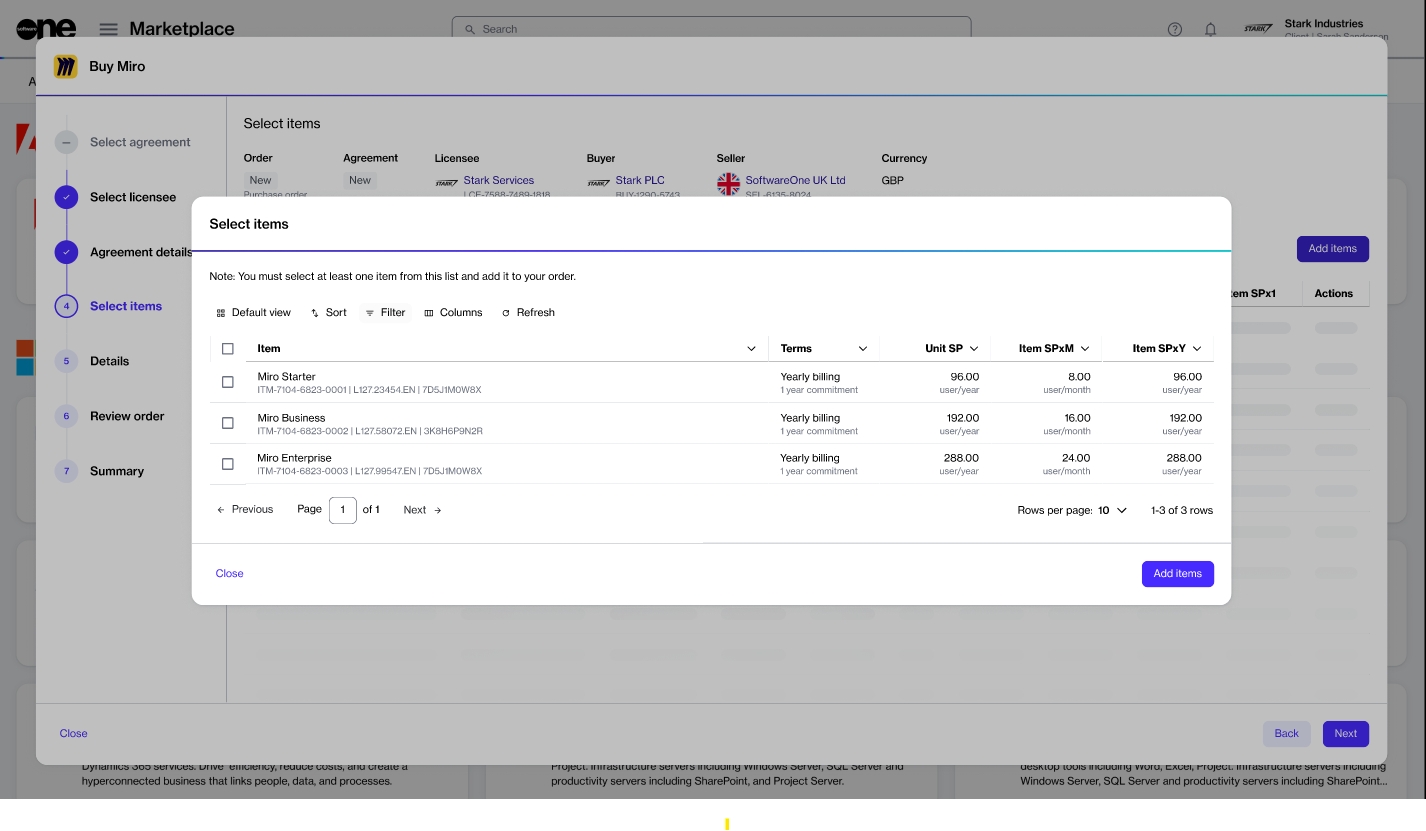
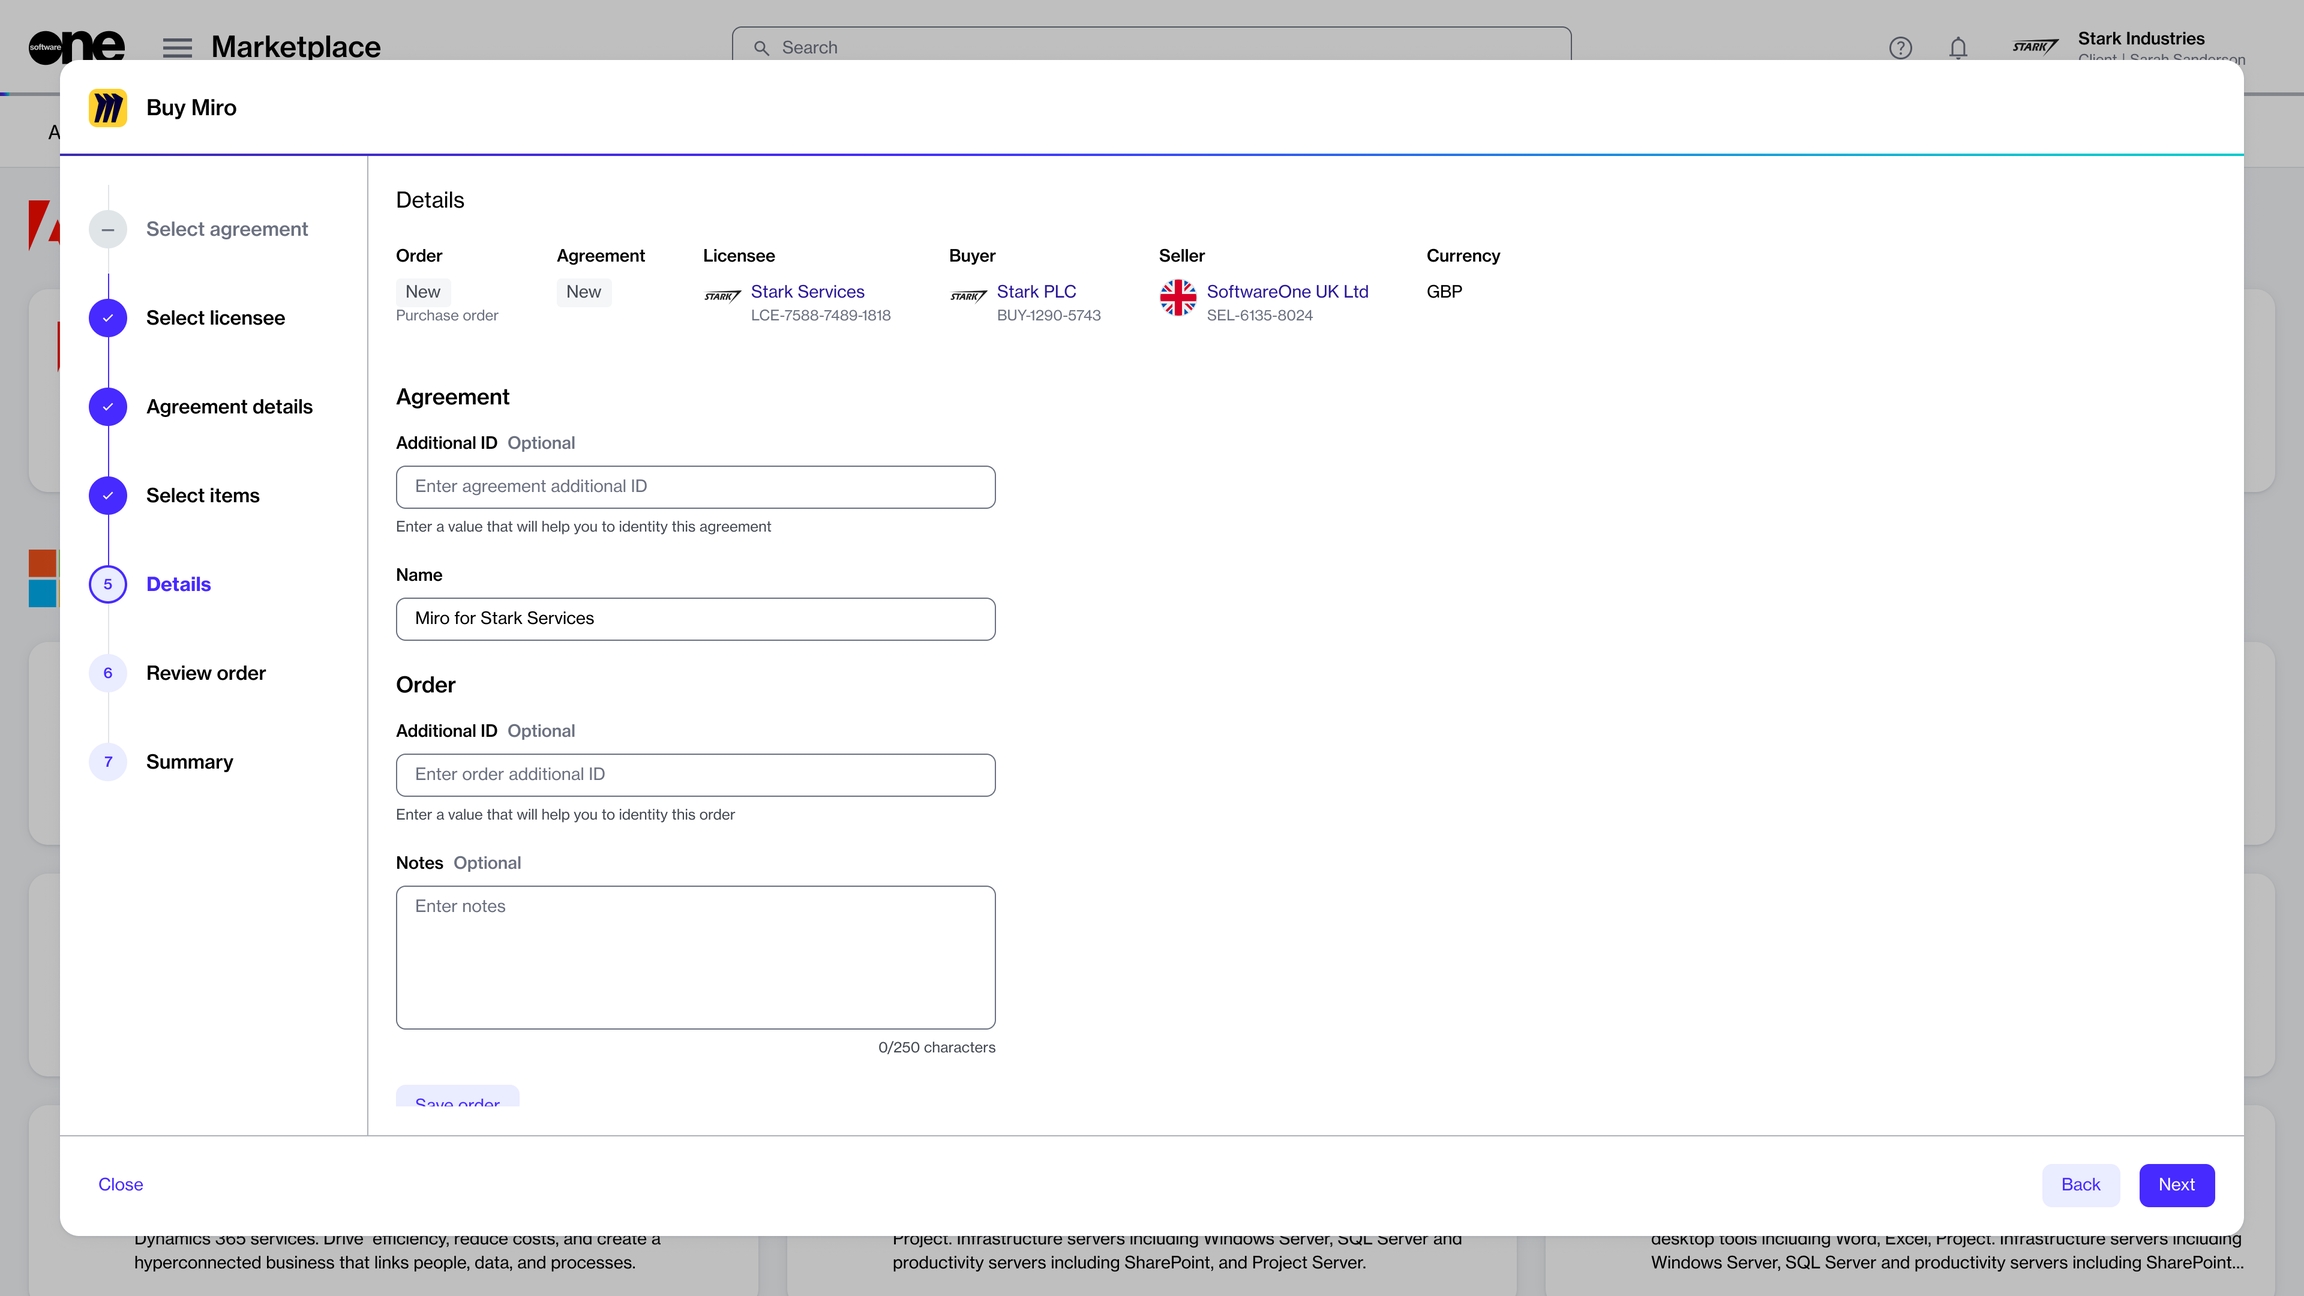
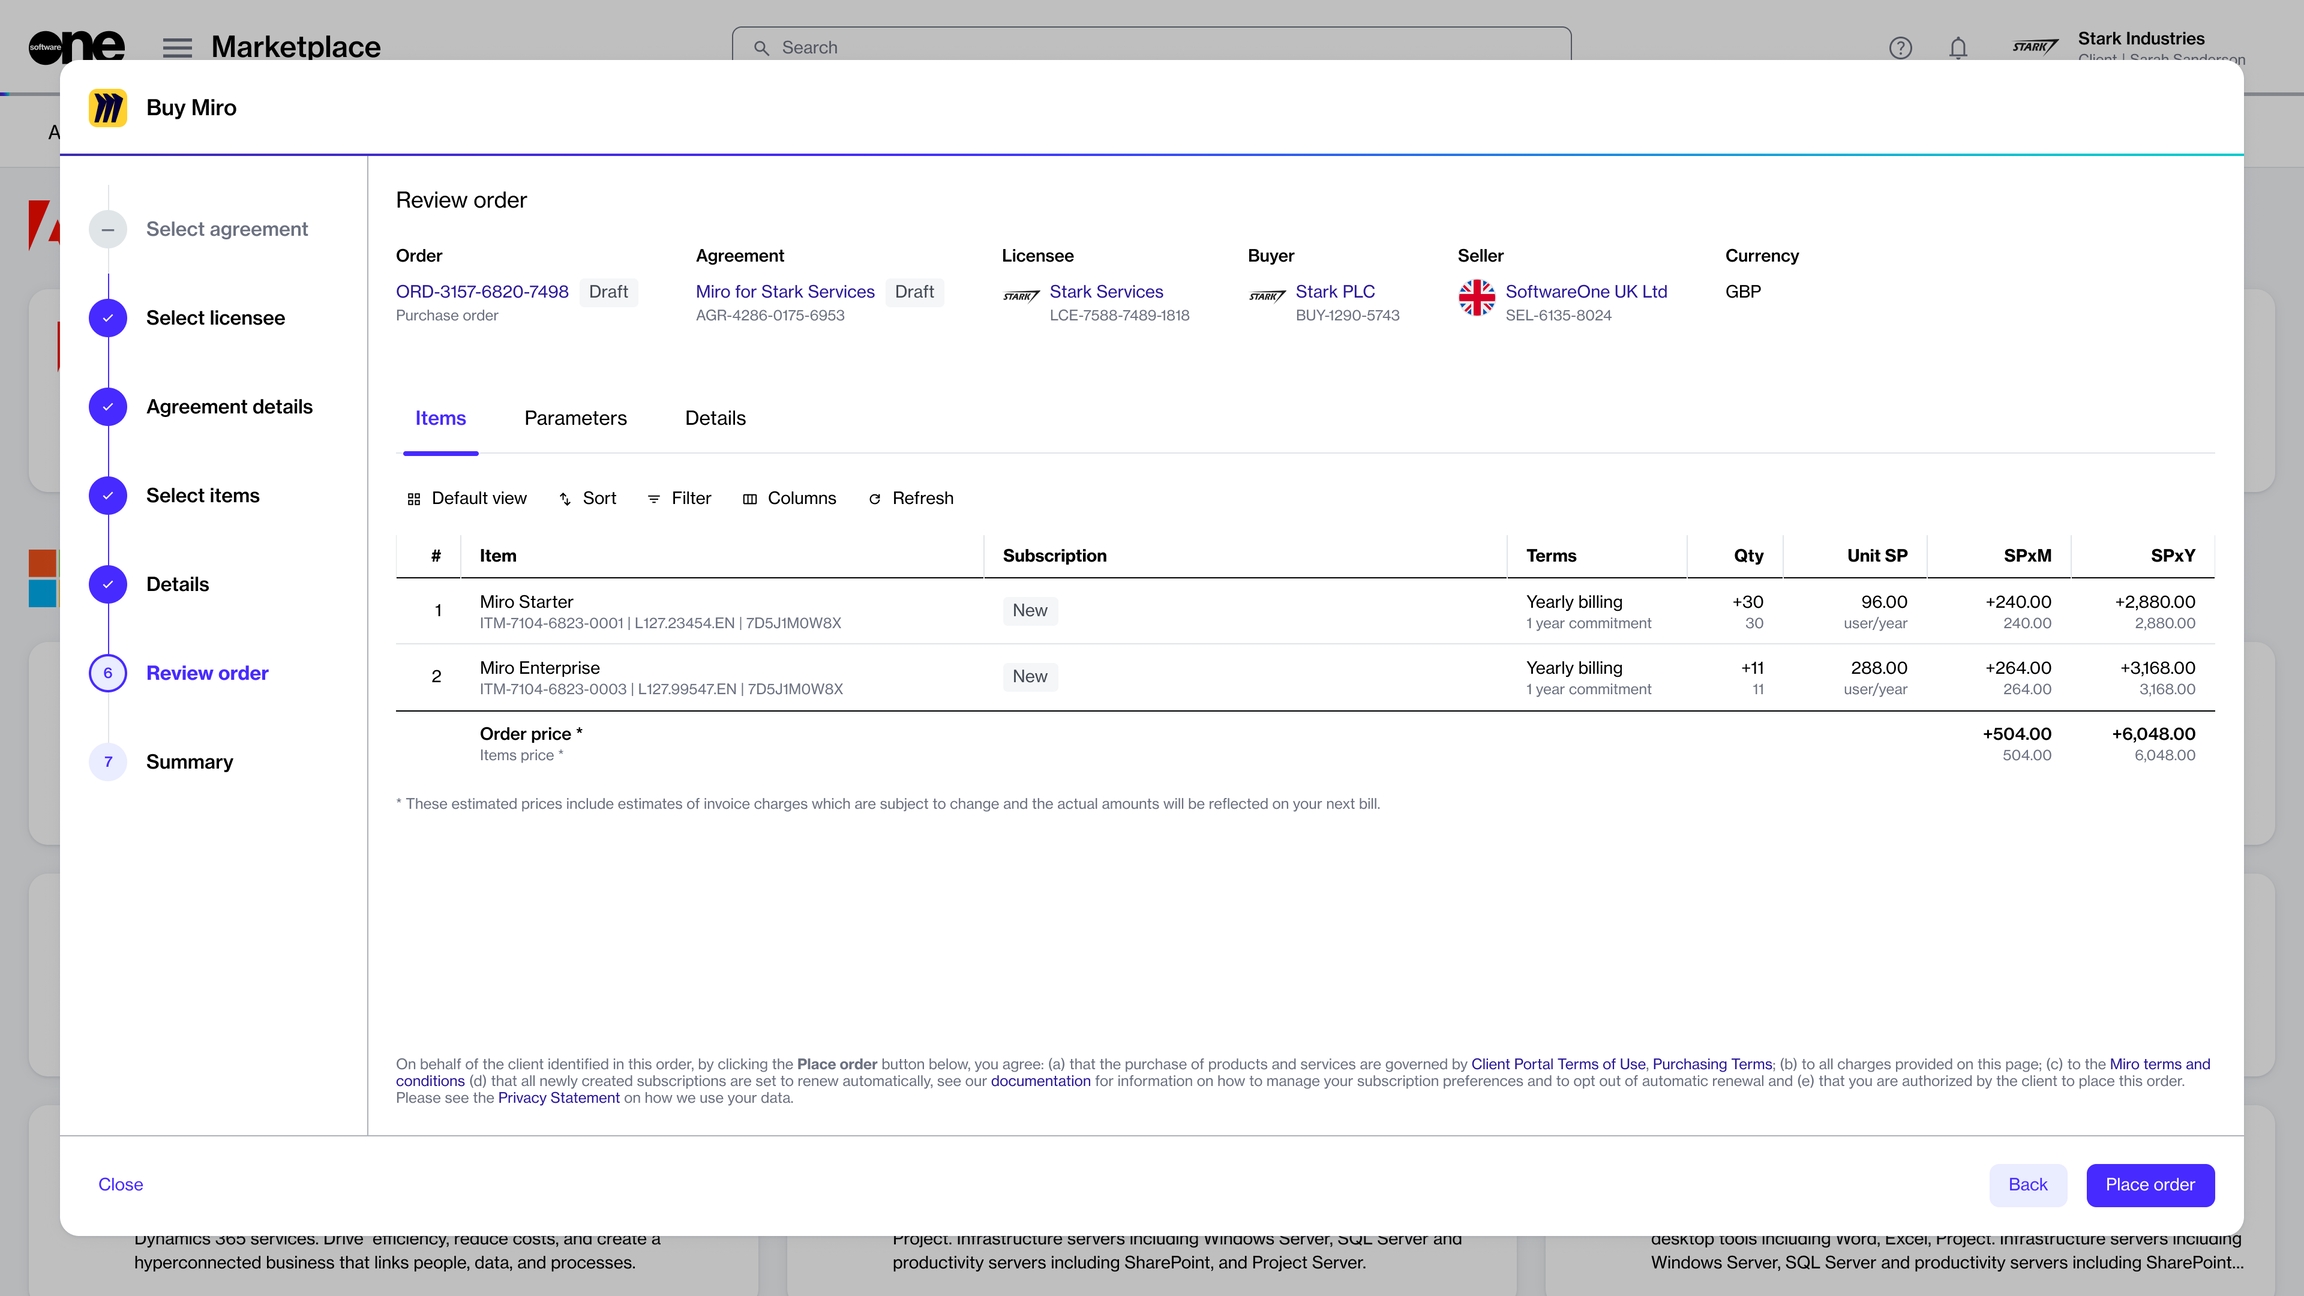
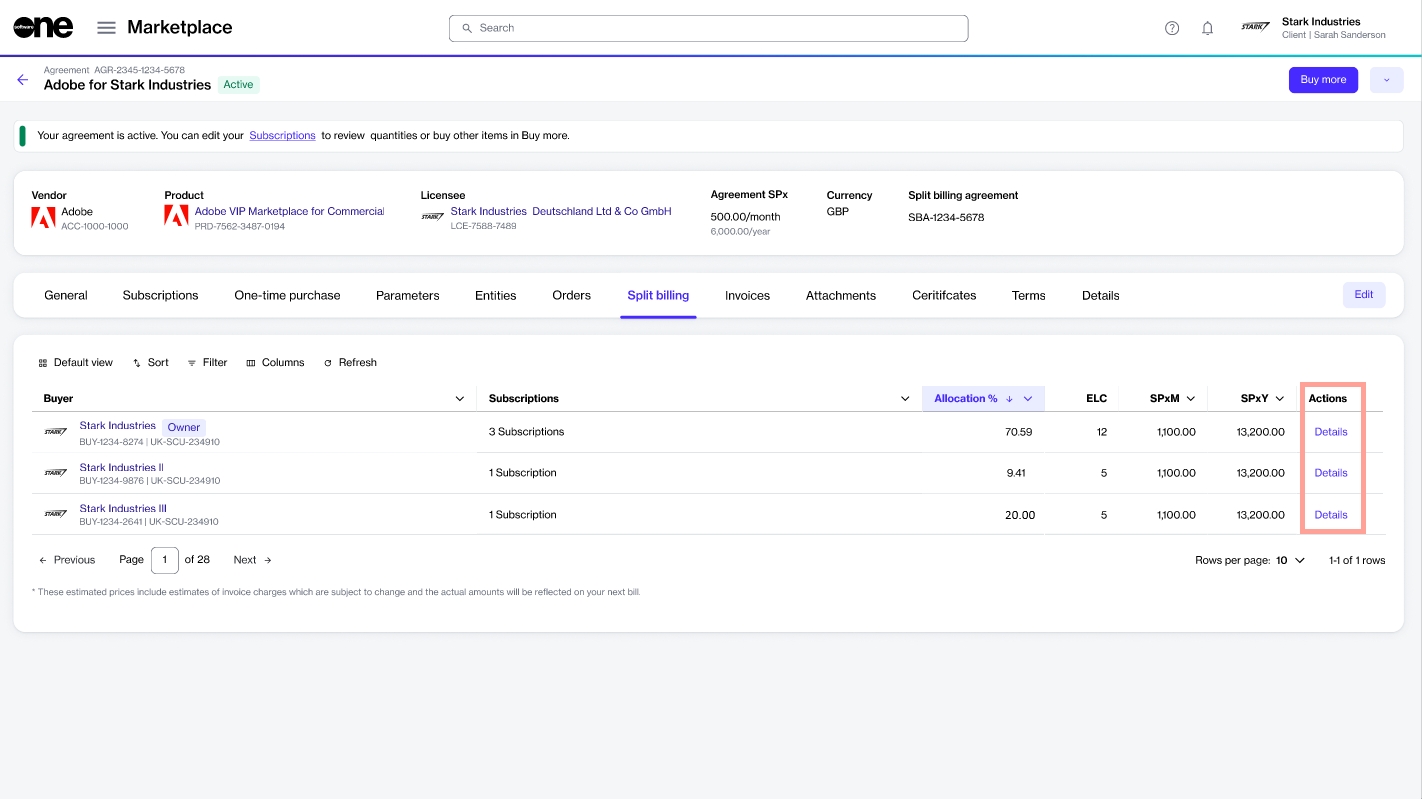

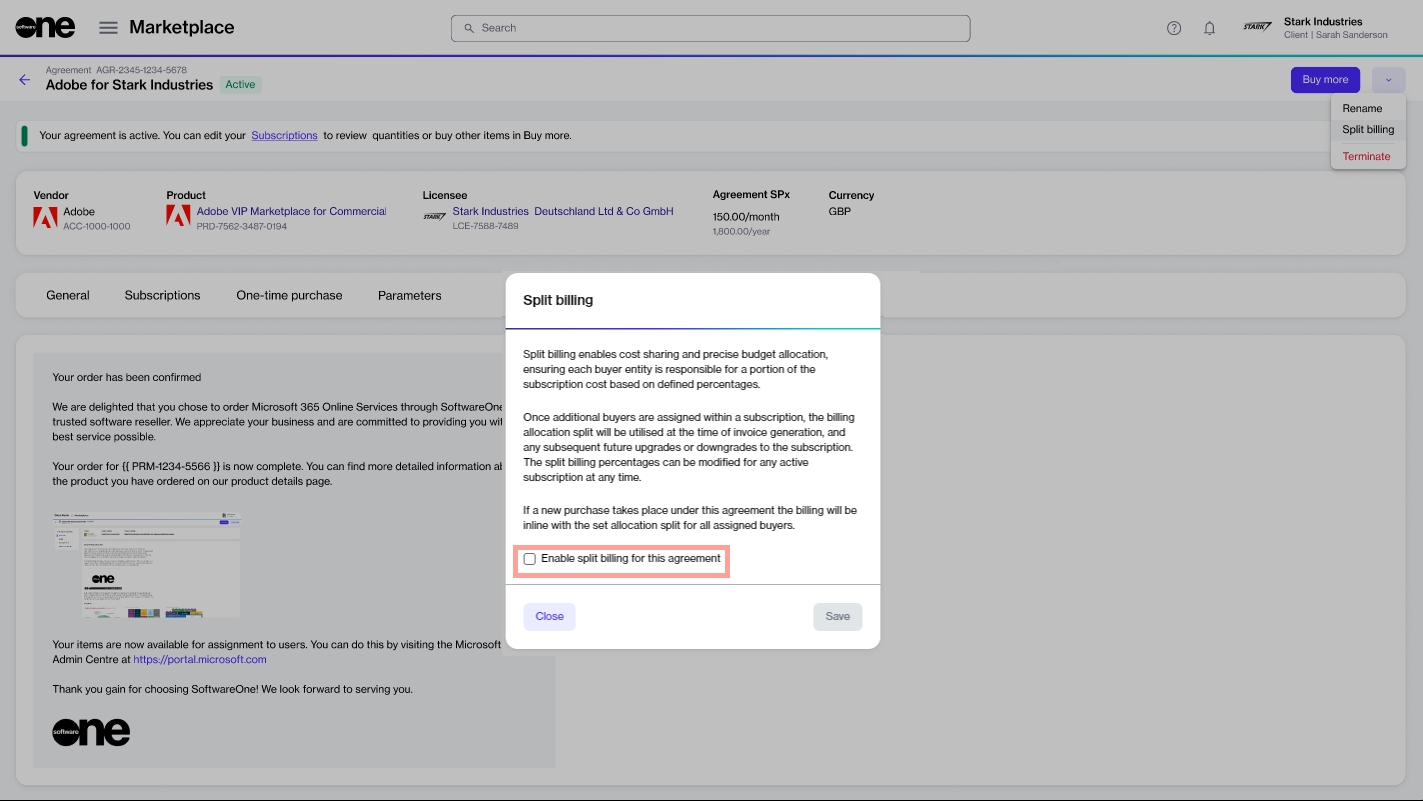
Termination orders - An order to terminate an active subscription or an agreement.
Configuration orders - An order to enable or disable the auto-renewal of a subscription.
To learn more about marketplace orders, see Orders.
In the Ordering section, select Edit. Then, add or update the Existing domain name or Primary domain name fields as needed.
Select Save.
Select Process in the upper right to resume order processing. To learn more, see Change Your Order's Status to Processing.
On the certificate details page, select the Parameters tab.
The MPN ID is displayed under Ordering parameters, and the Indirect Reseller ID is shown under Fulfillment parameters.
Follow the steps in the purchase wizard. Make sure to create a new agreement or select an existing one, select a preconfigured resale licensee, and choose your certificate.
Complete the remaining steps in the wizard to place your order.
For detailed instructions, see How to Order Products for Resale.
Open an individual subscription to check the renewal date.
Marketplace subscriptions renew automatically unless you disable the automatic renewal.

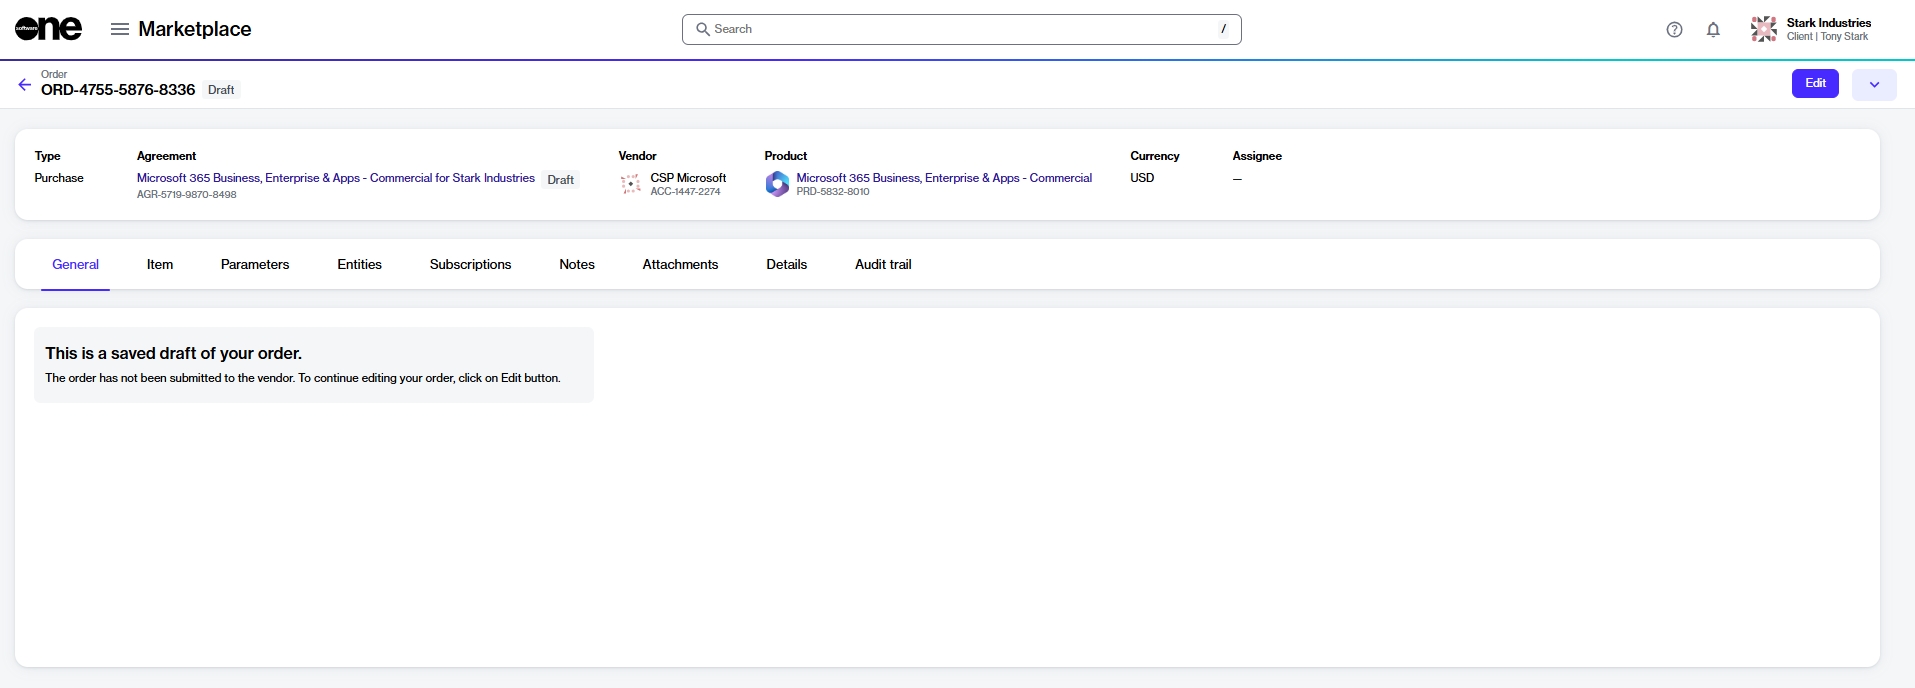
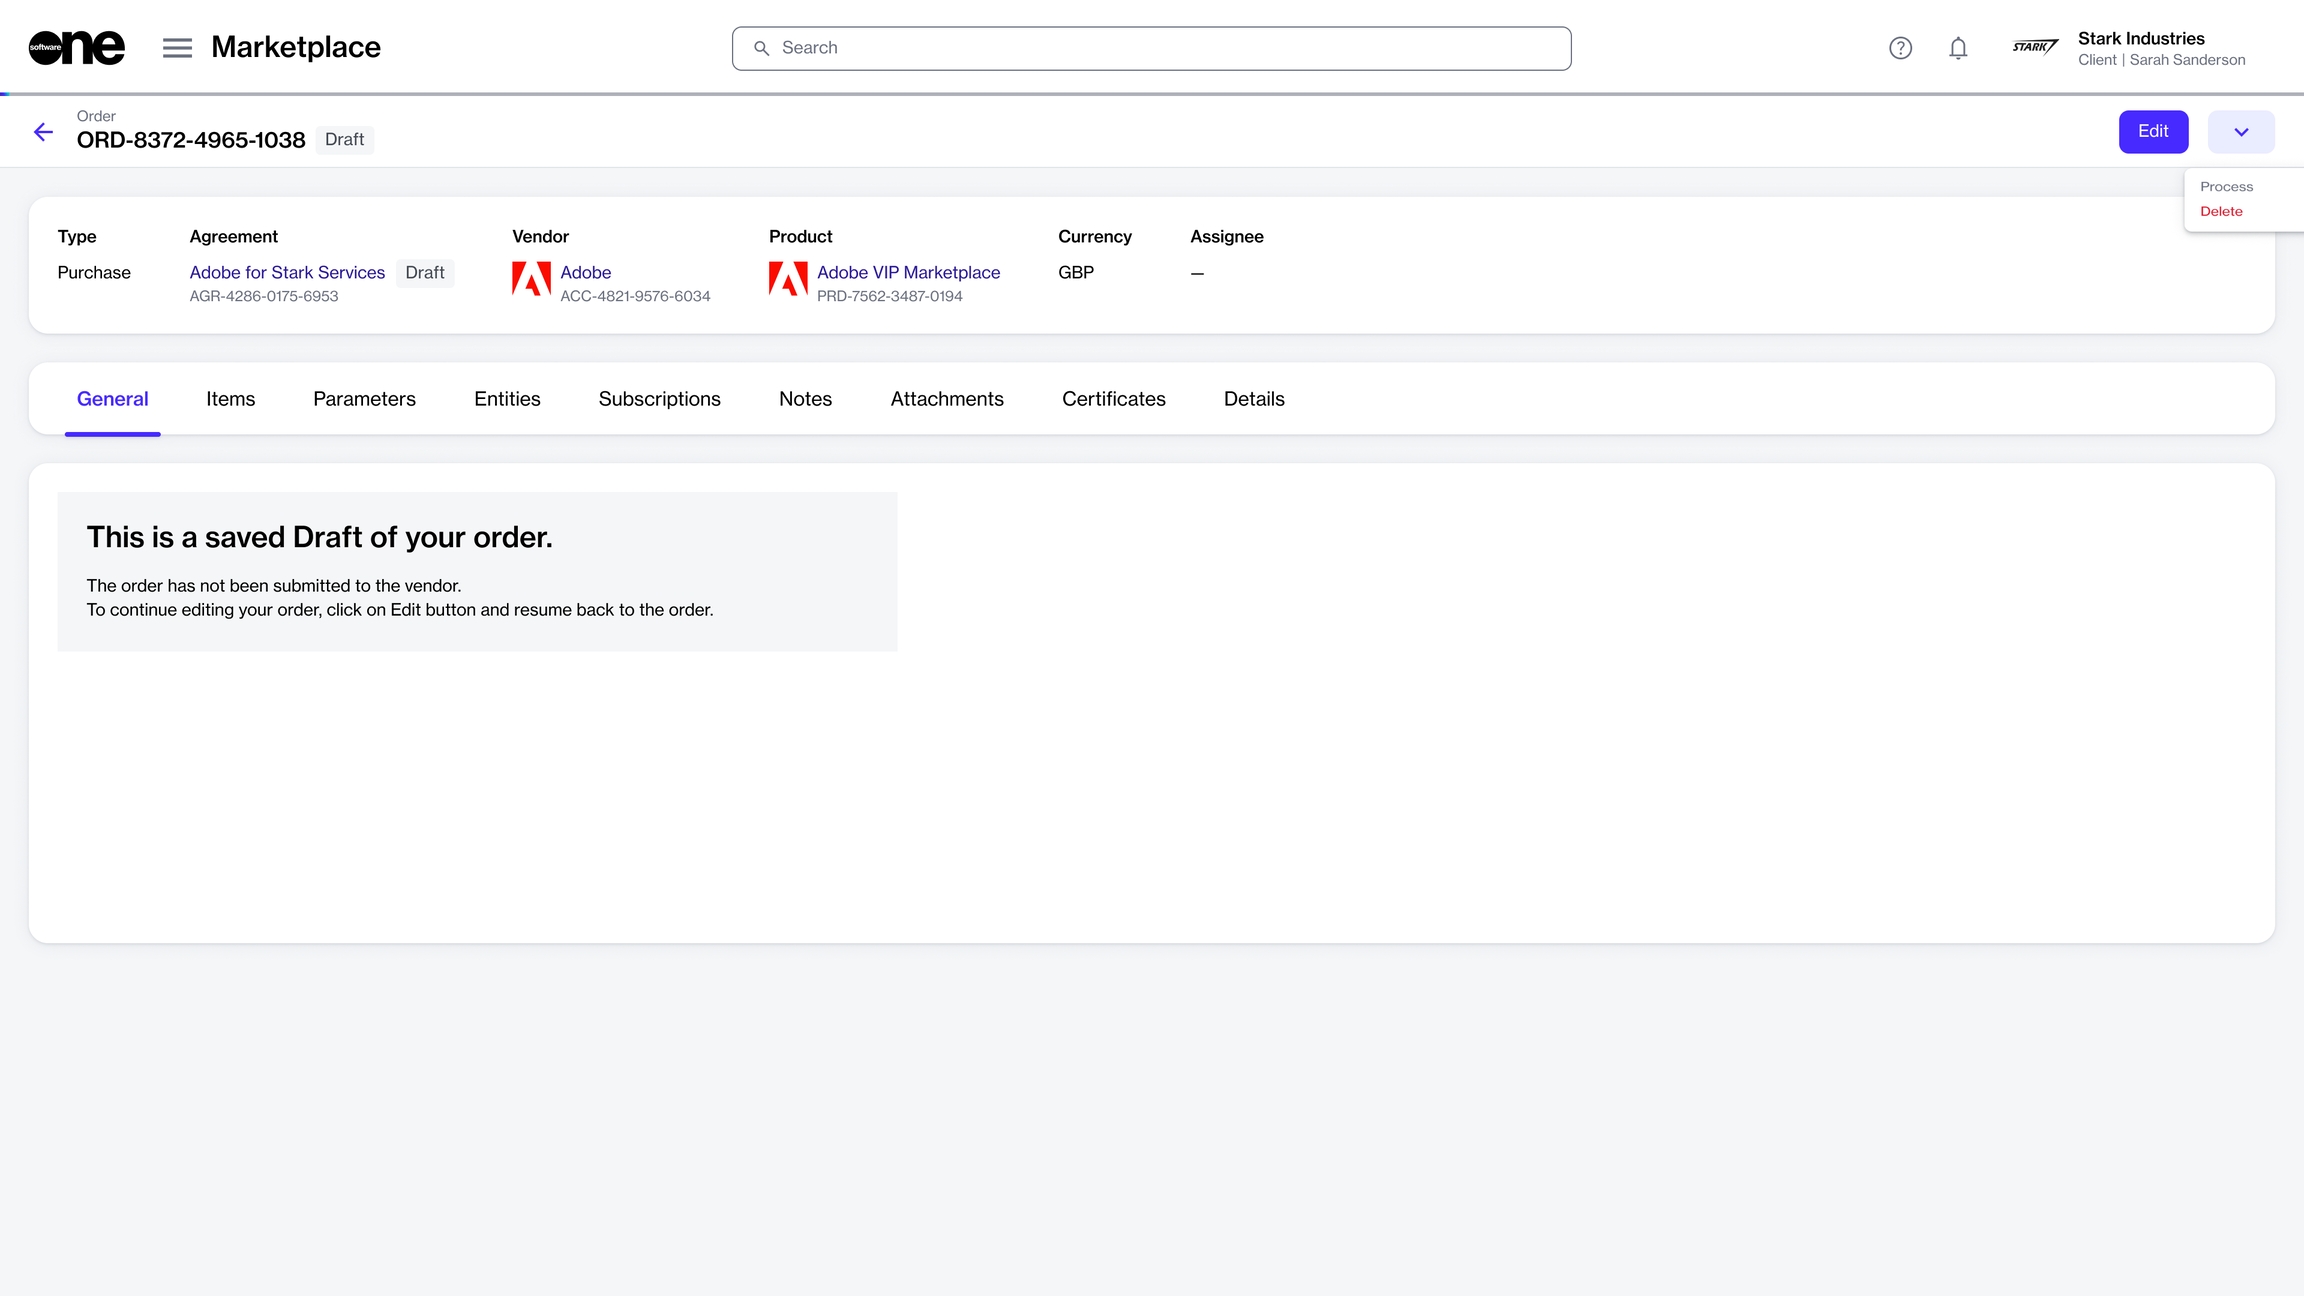
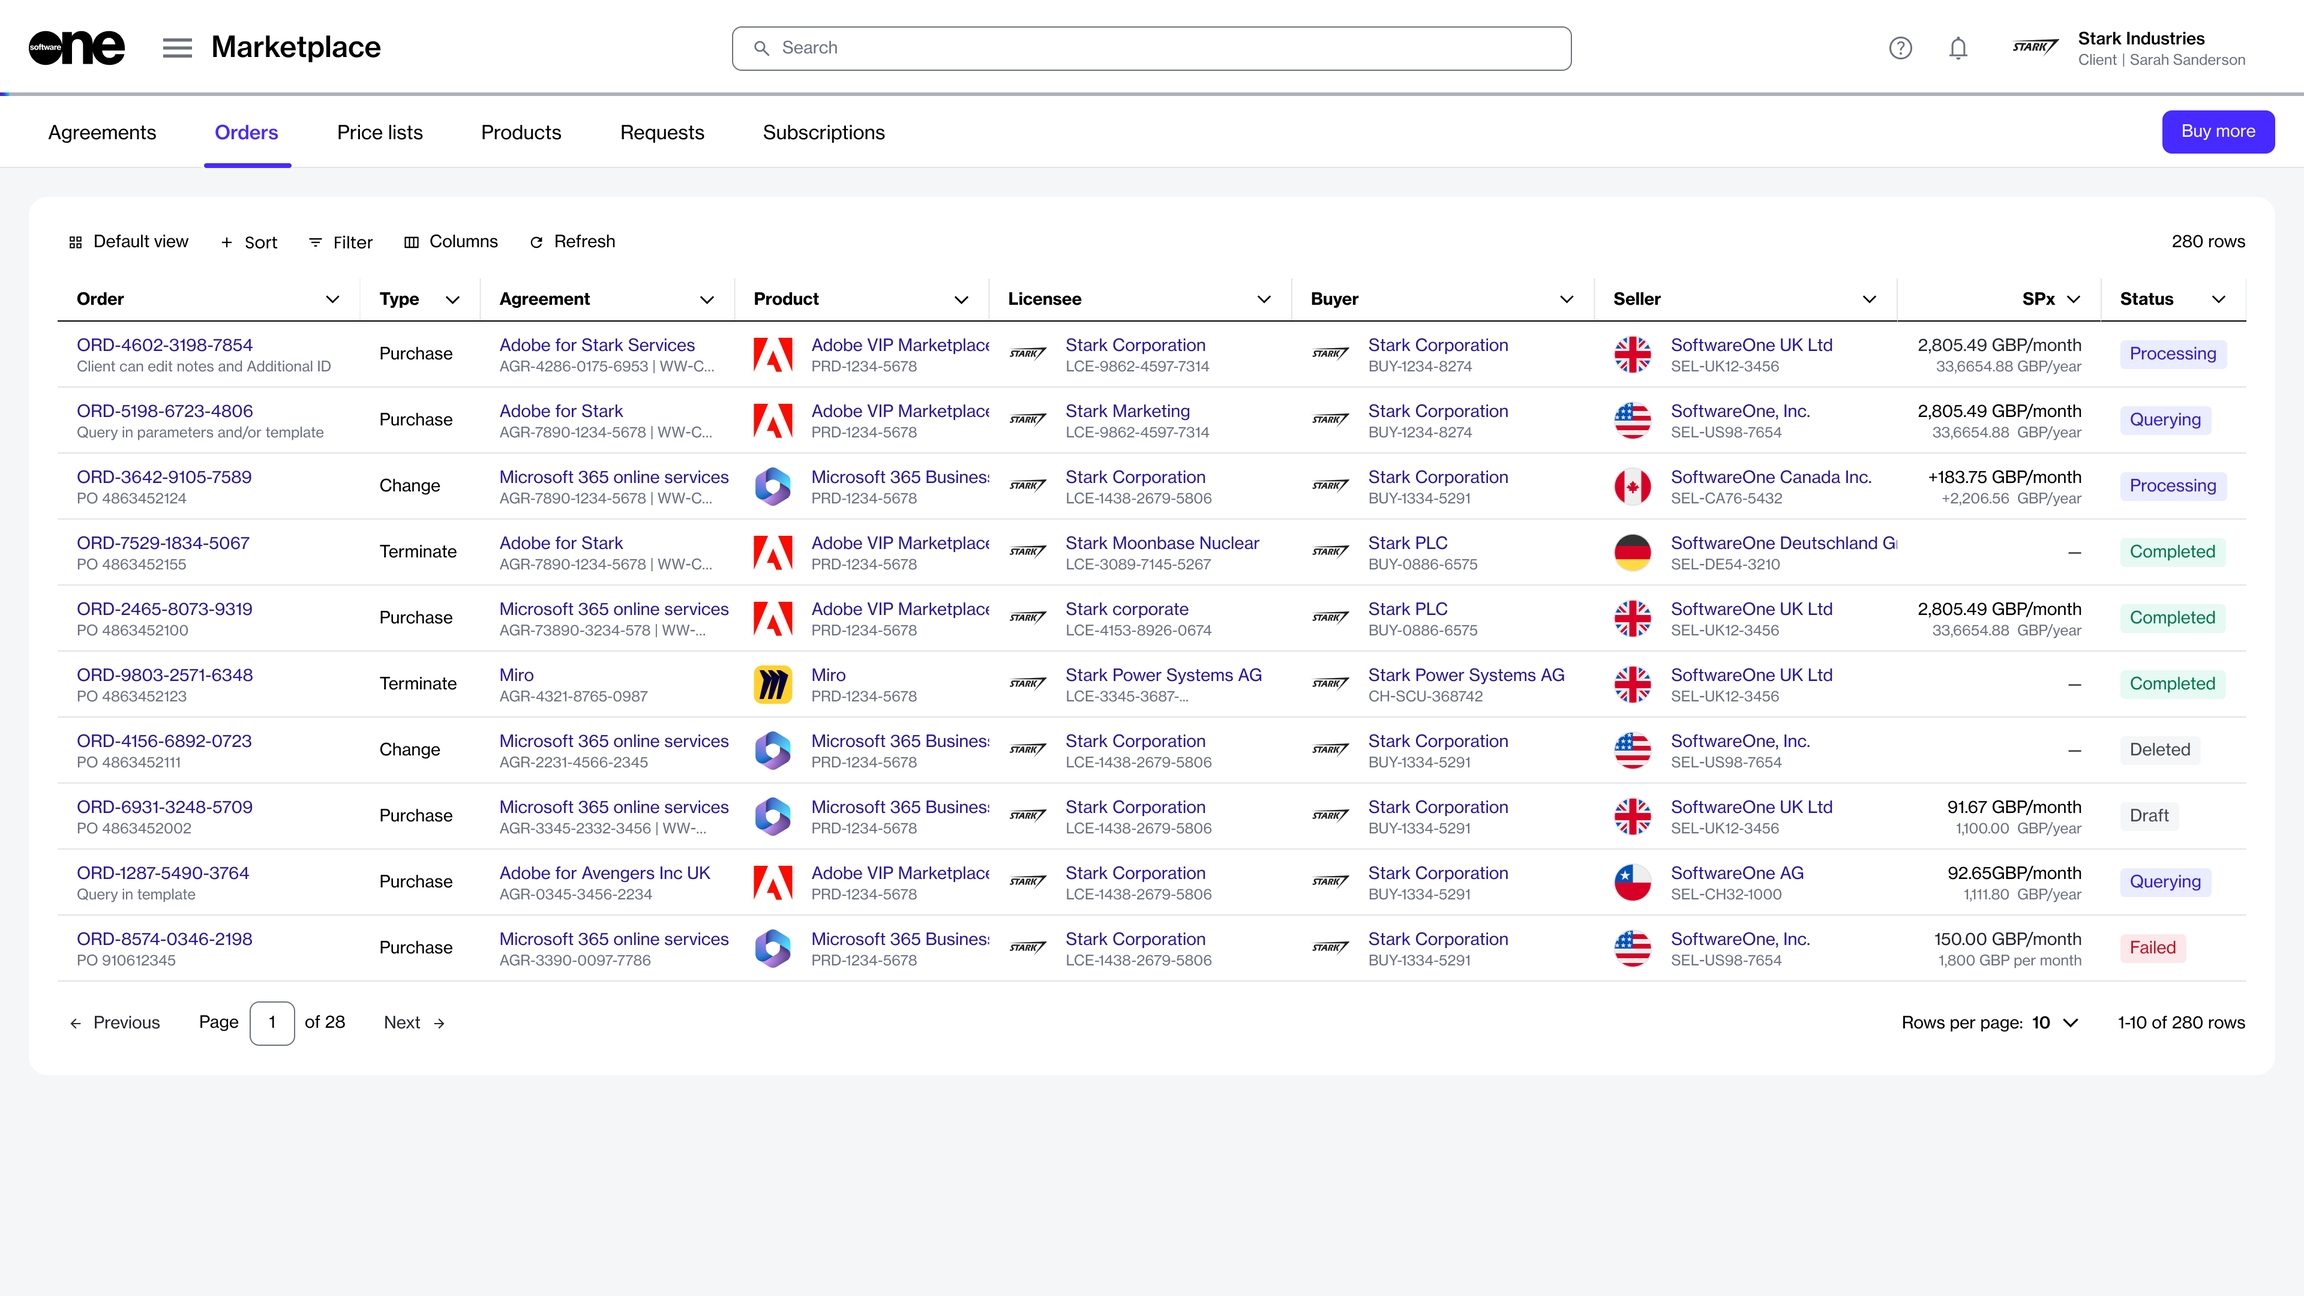
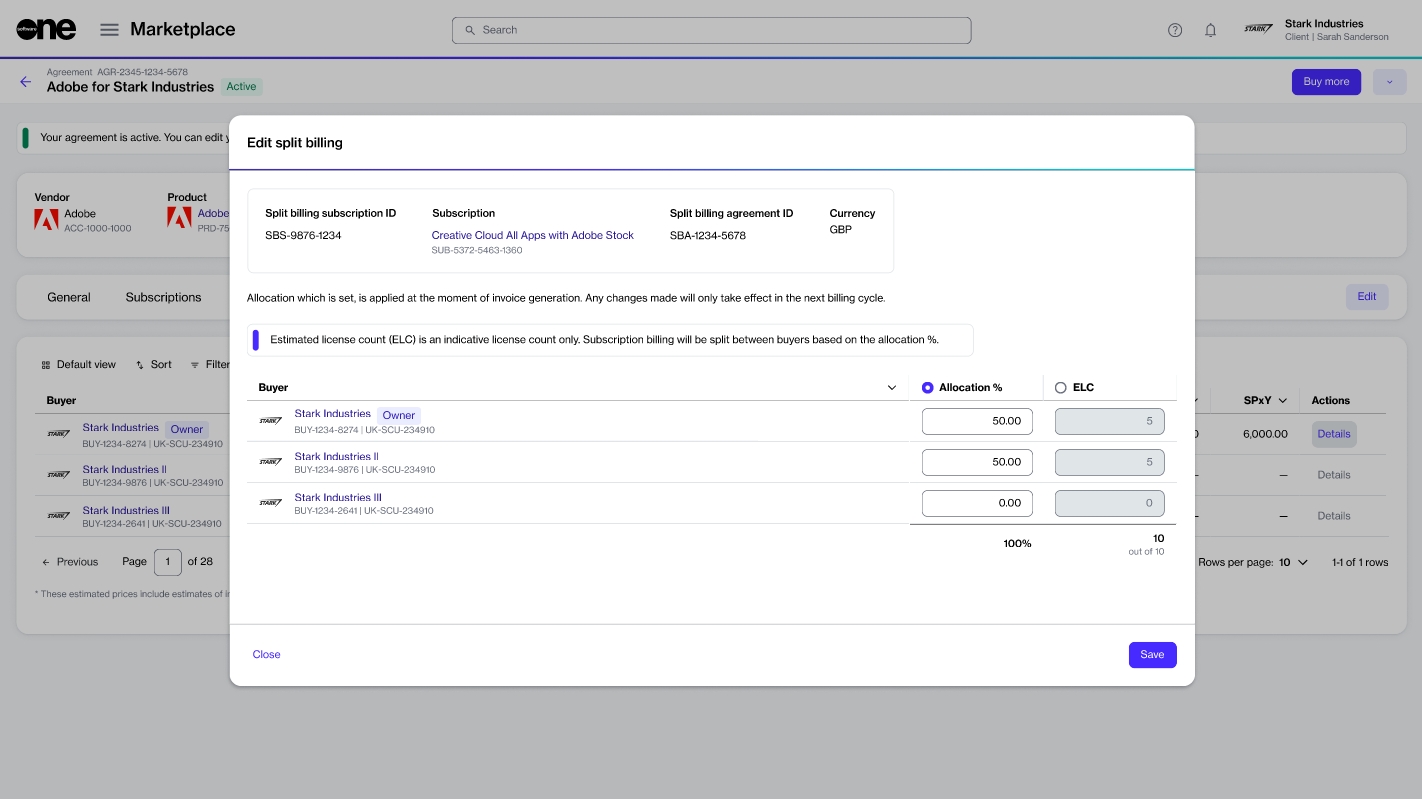
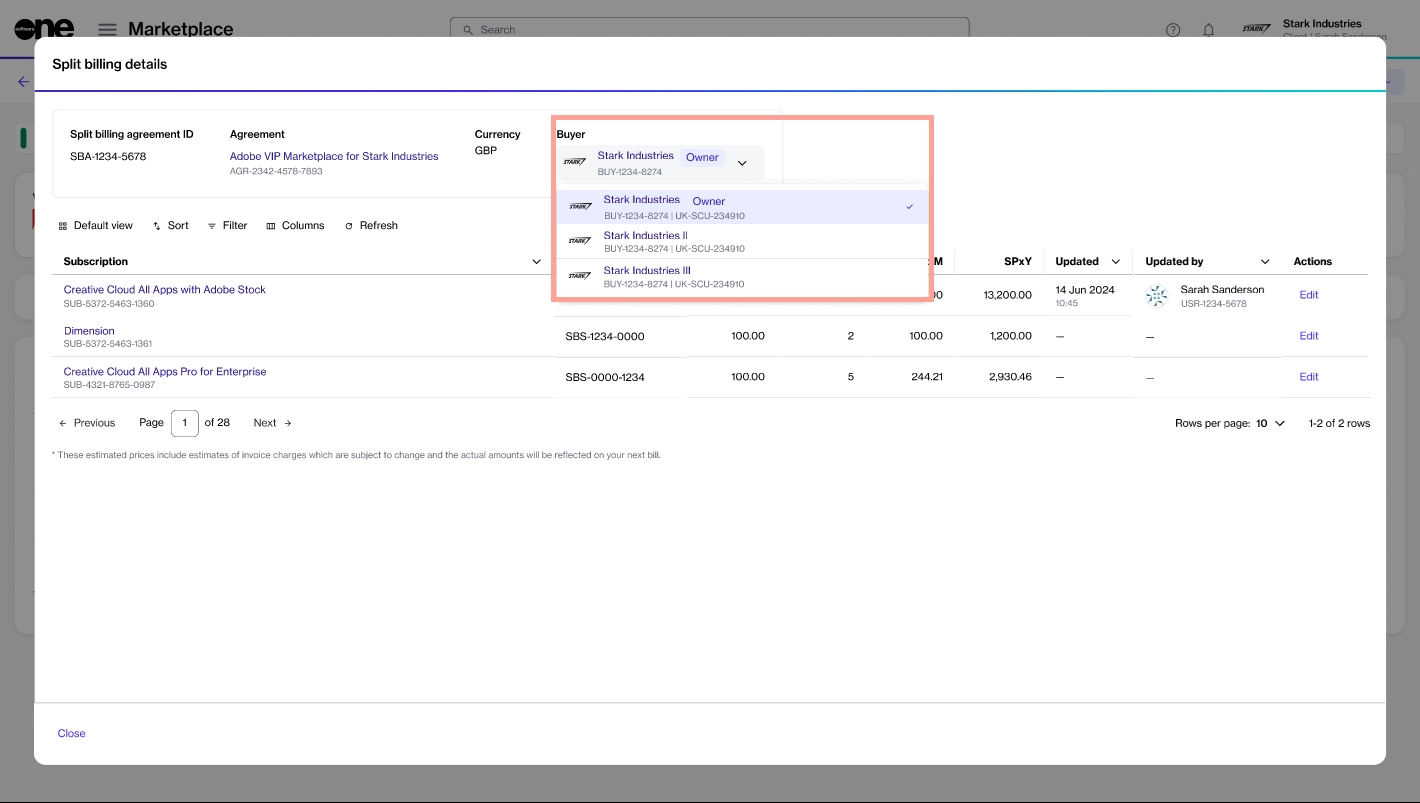


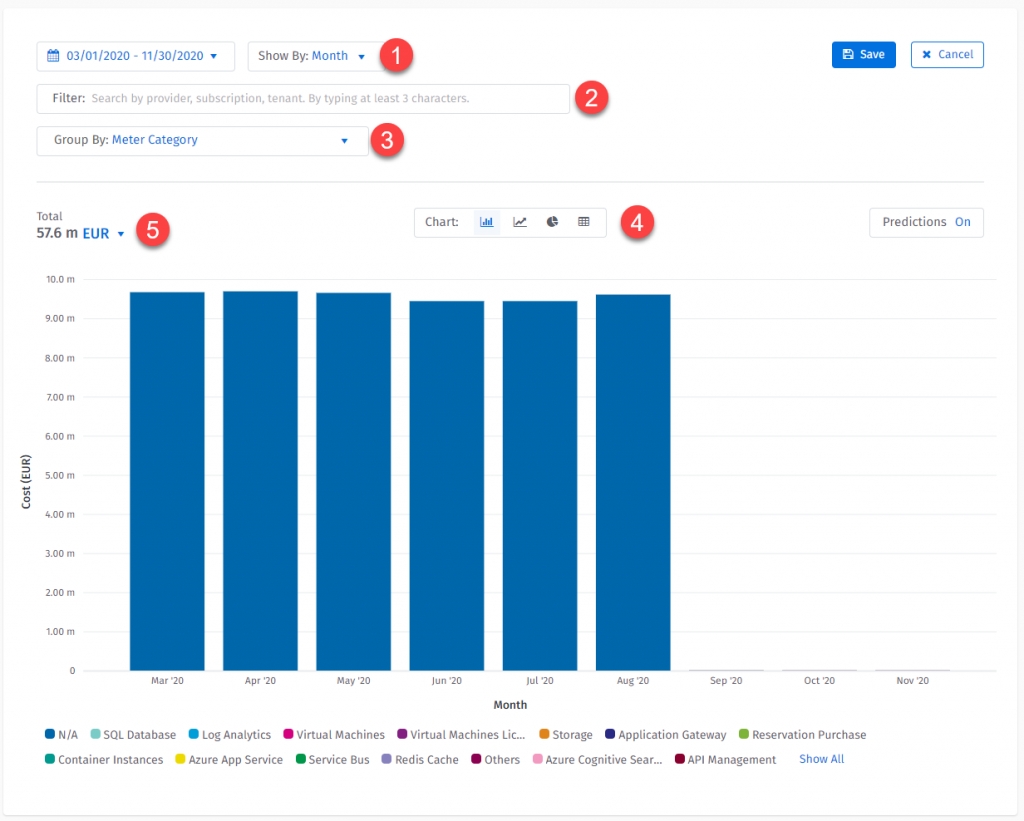
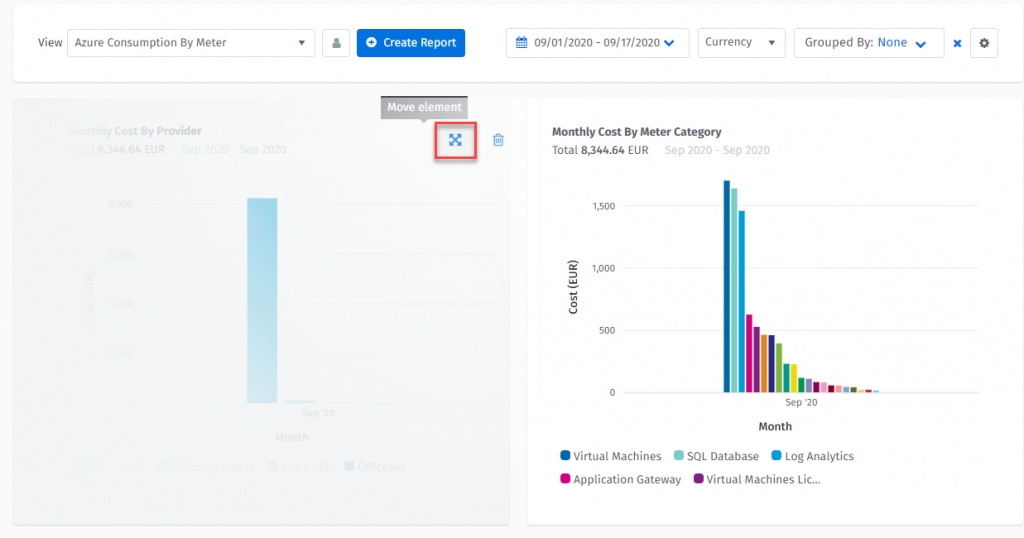
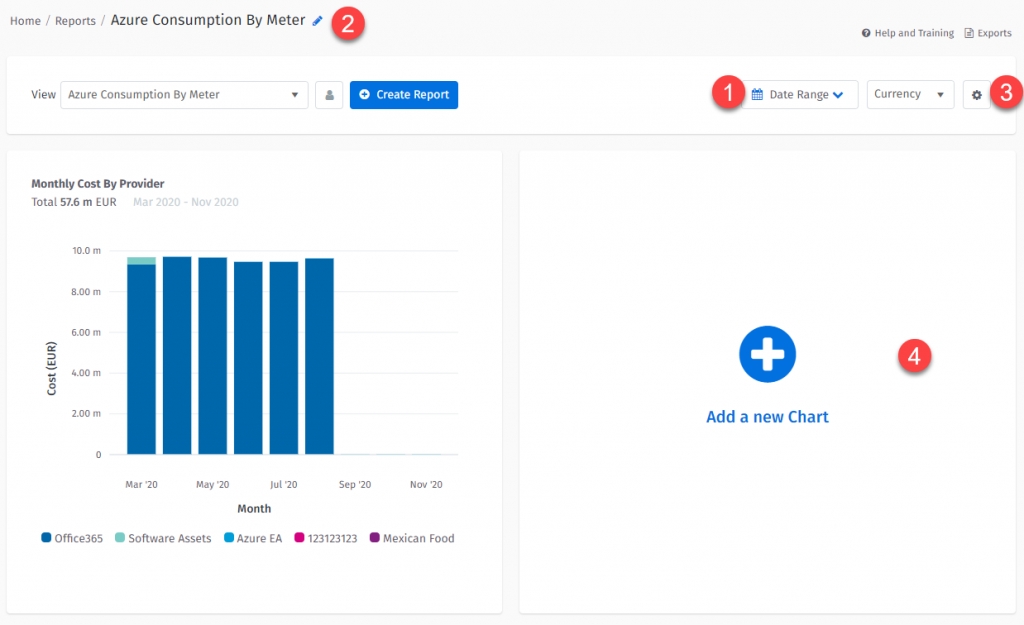
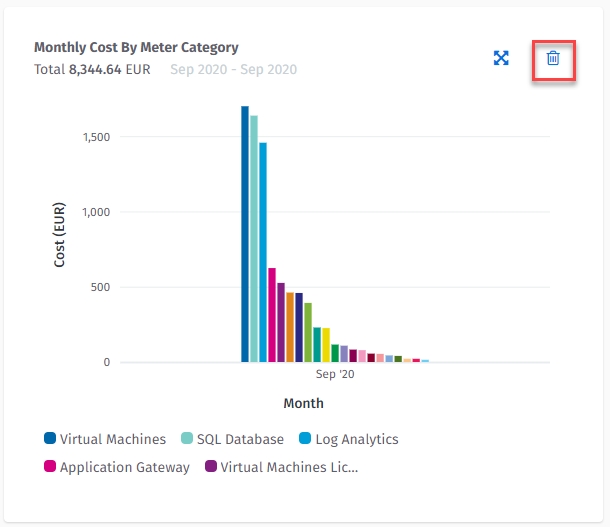
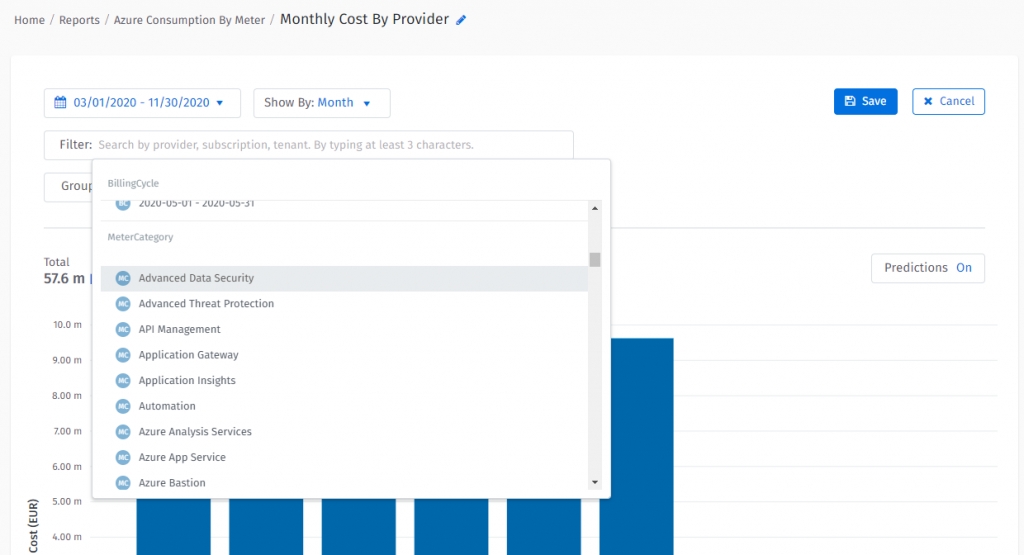

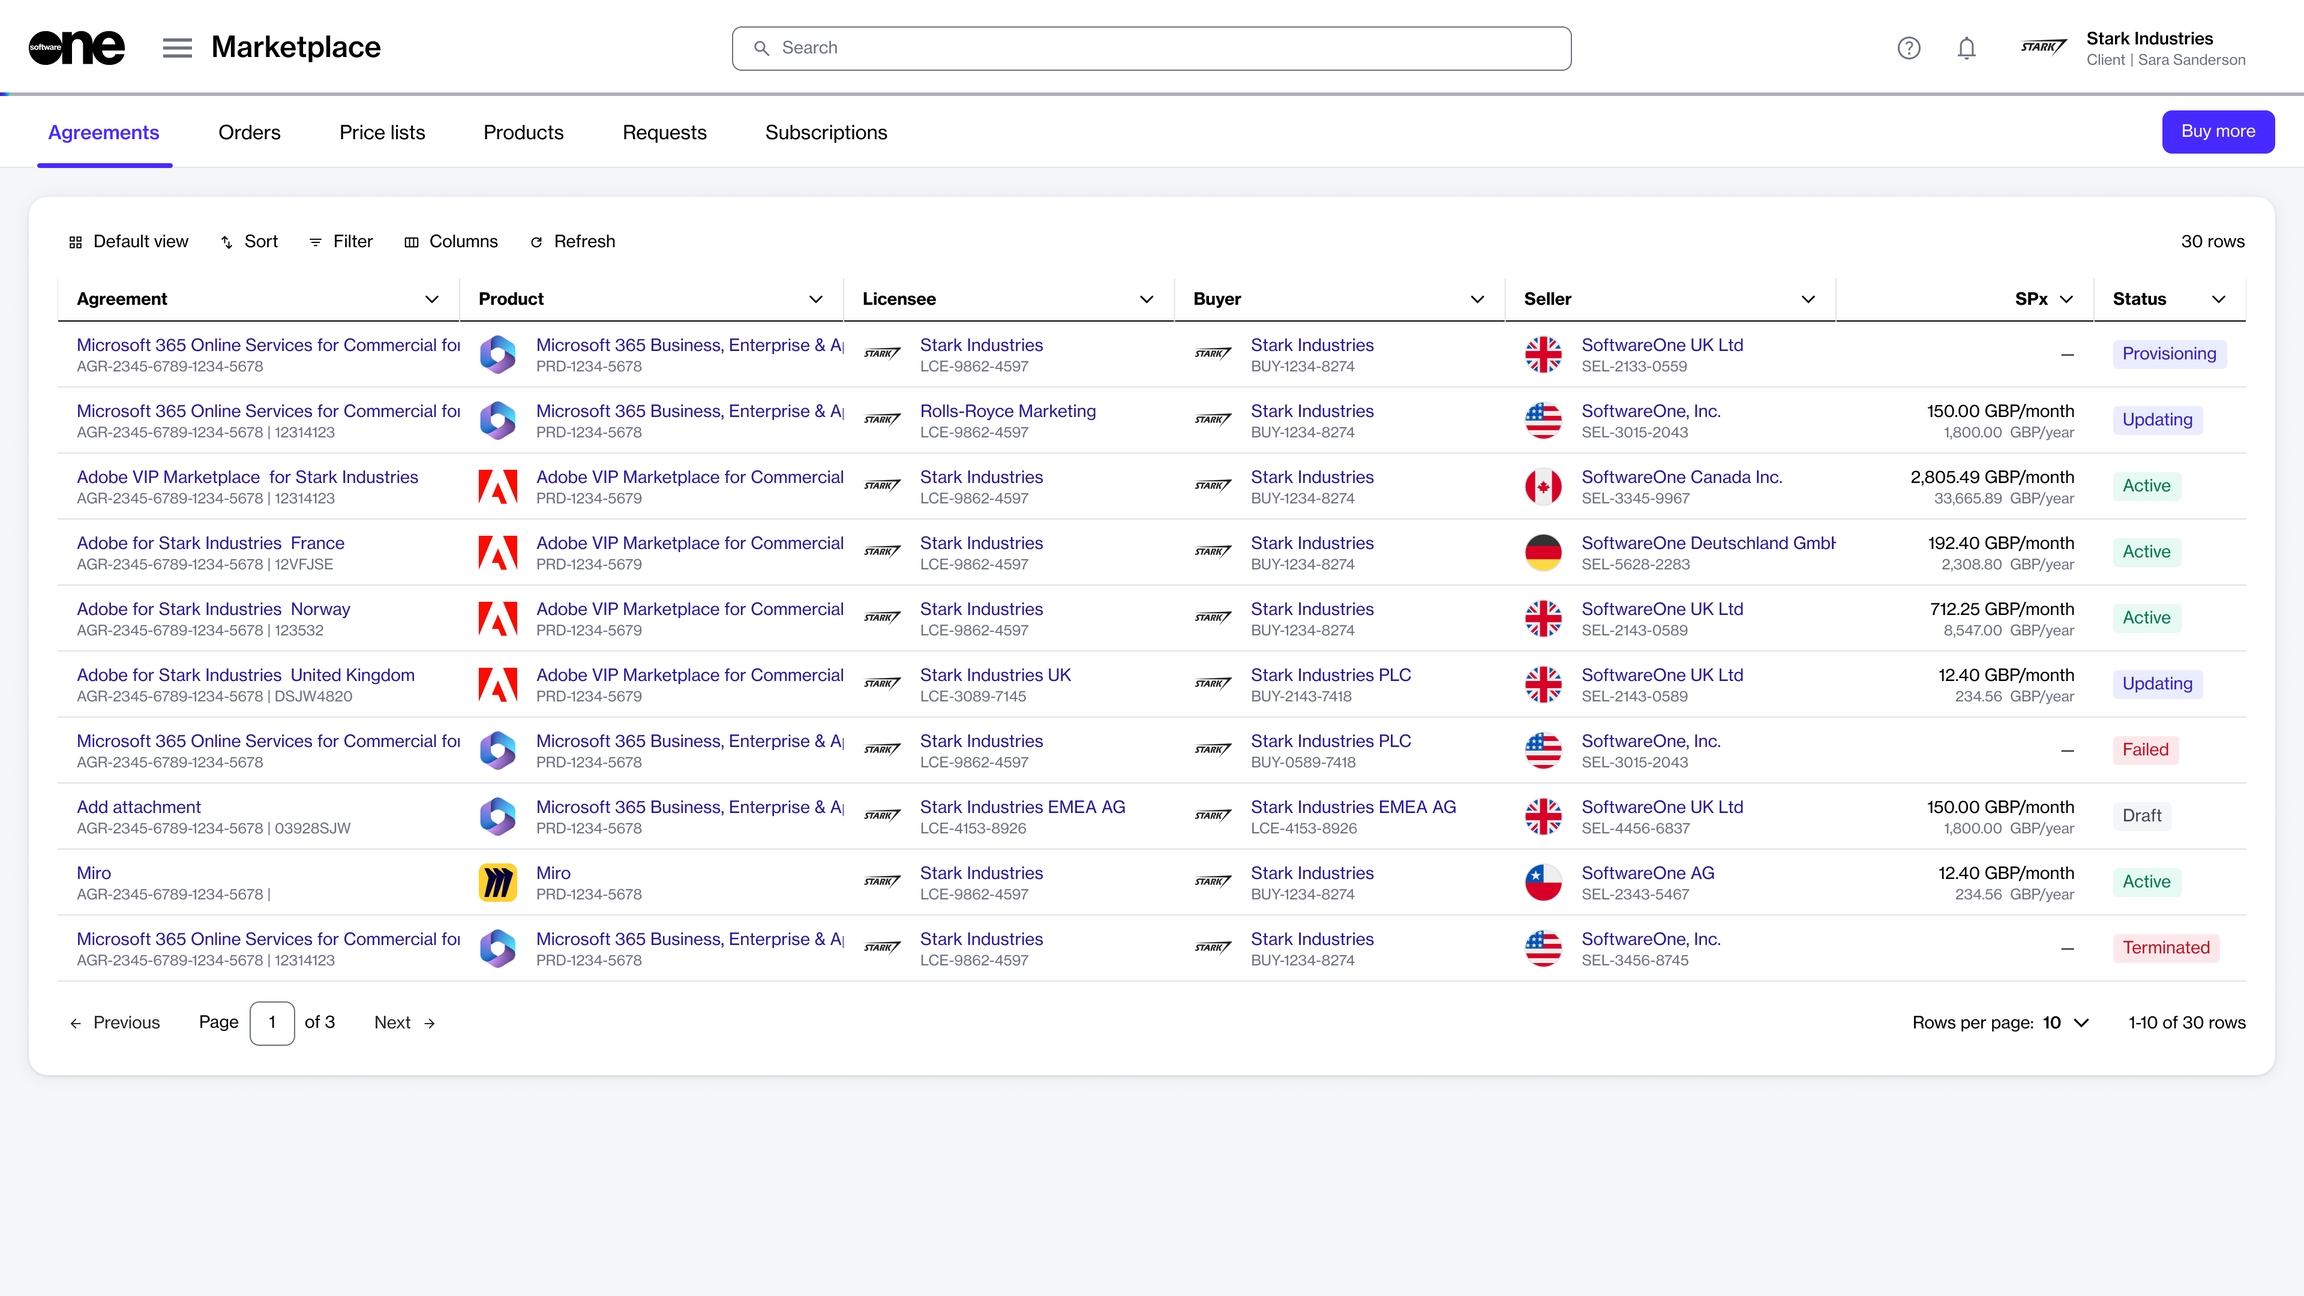


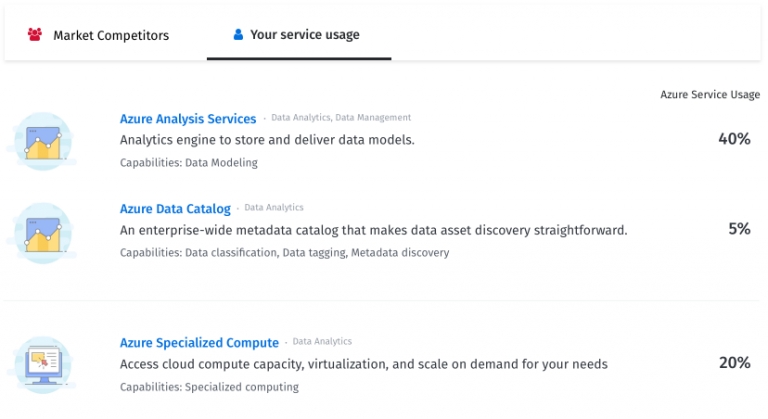

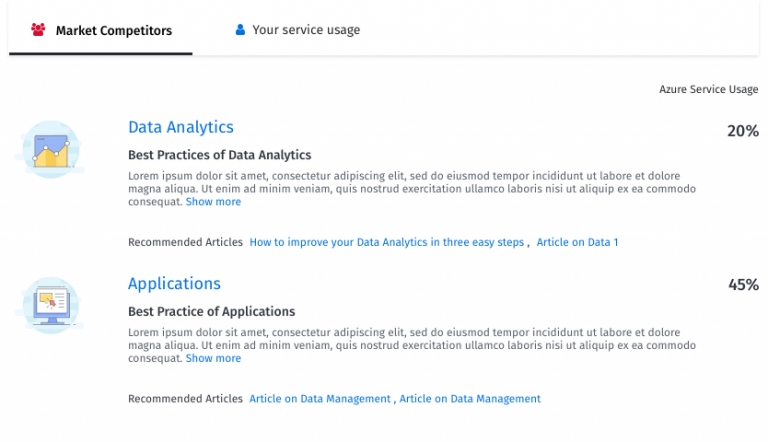

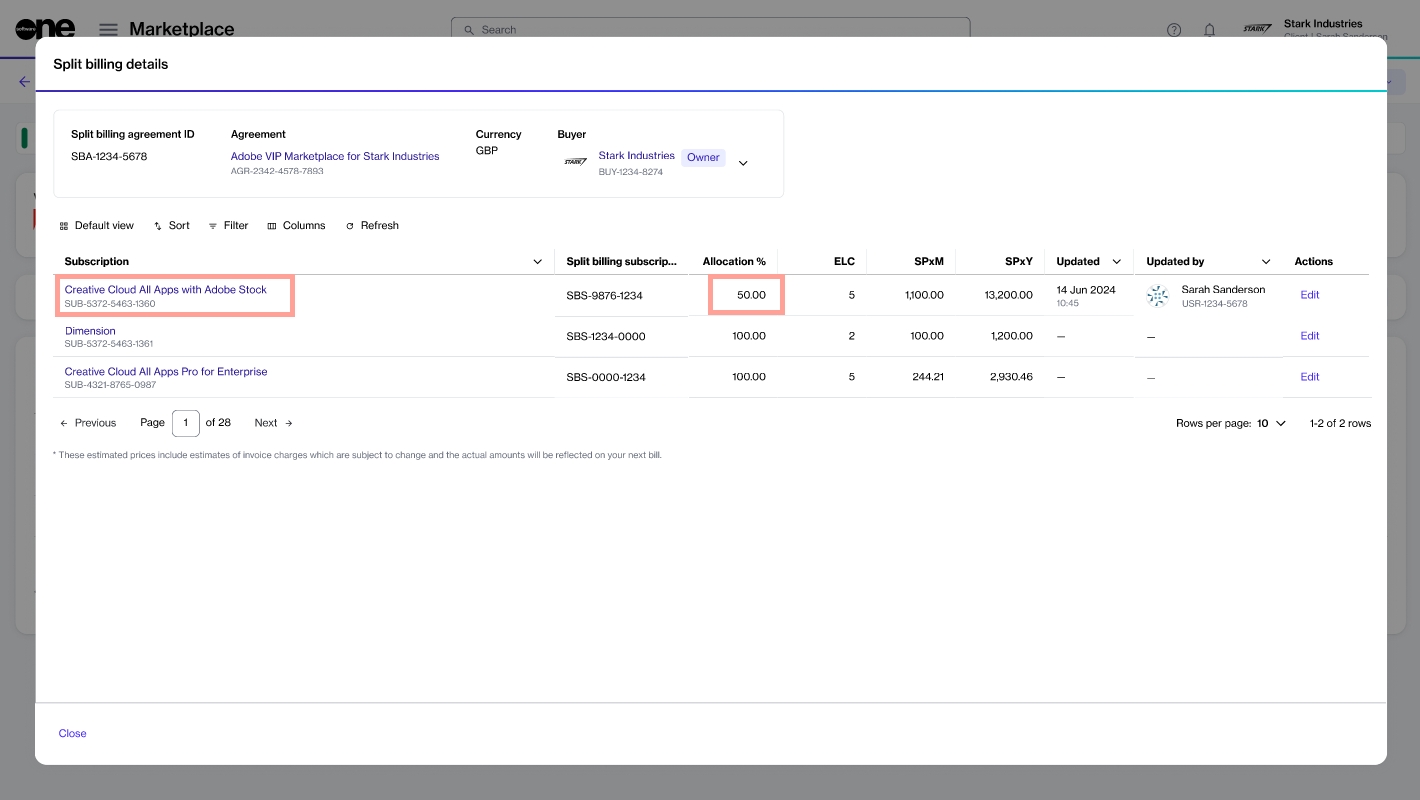
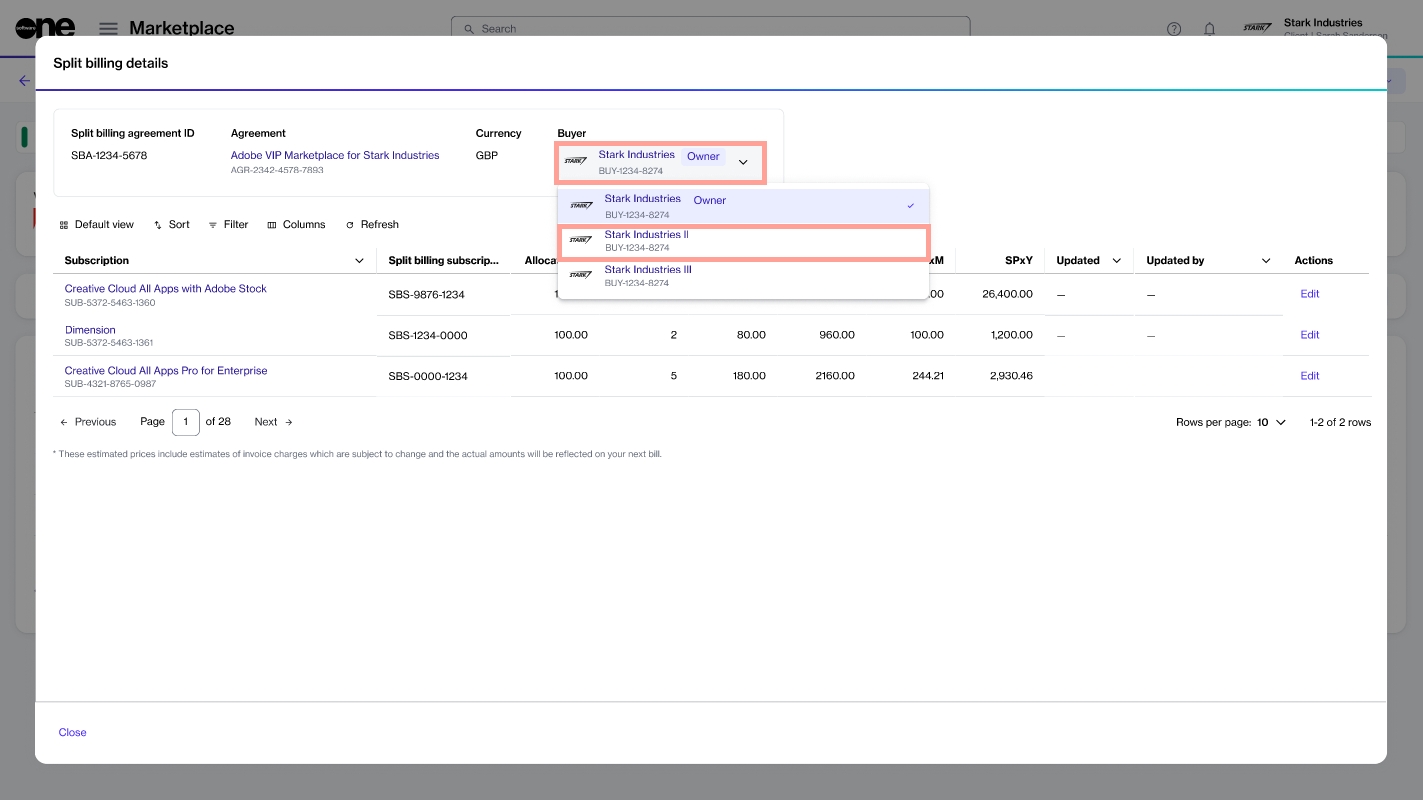
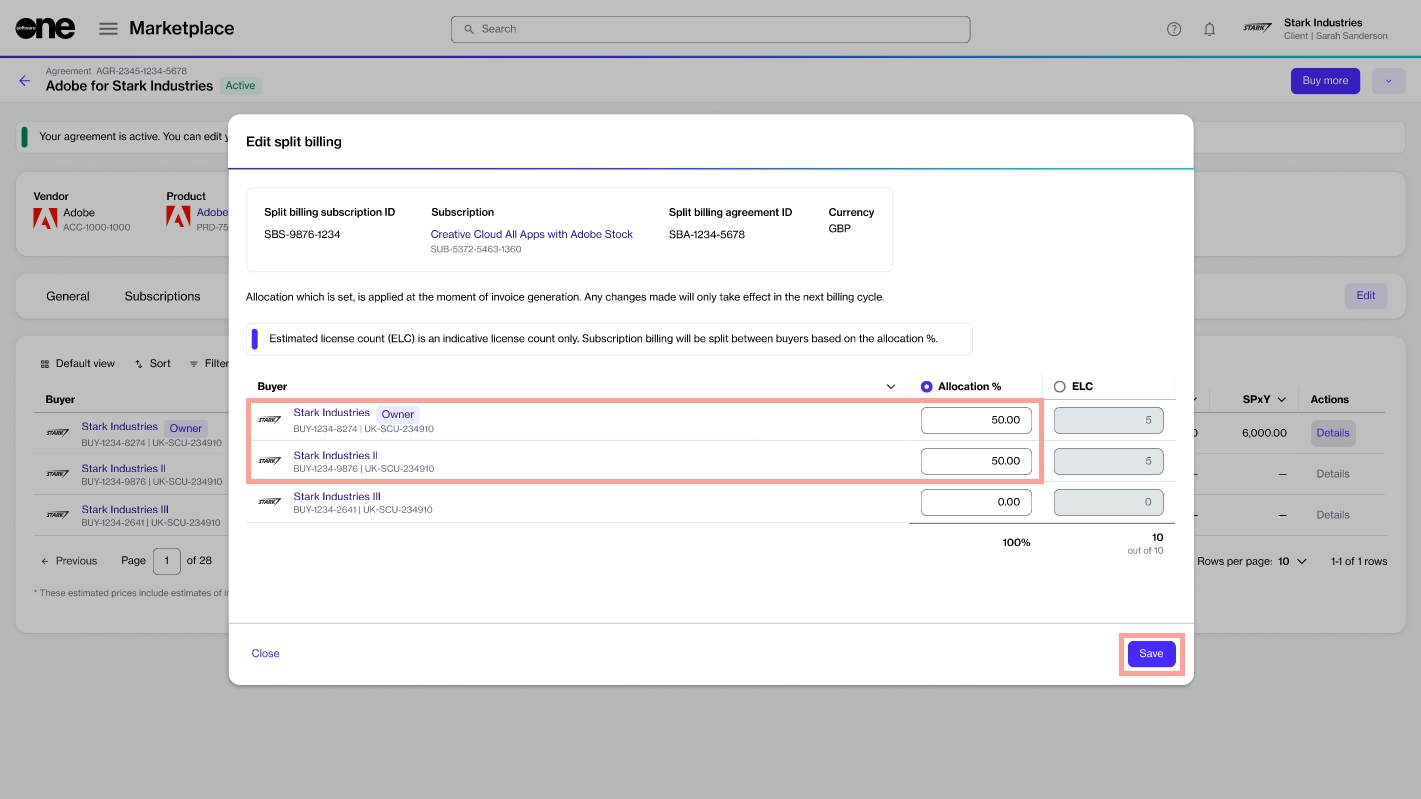

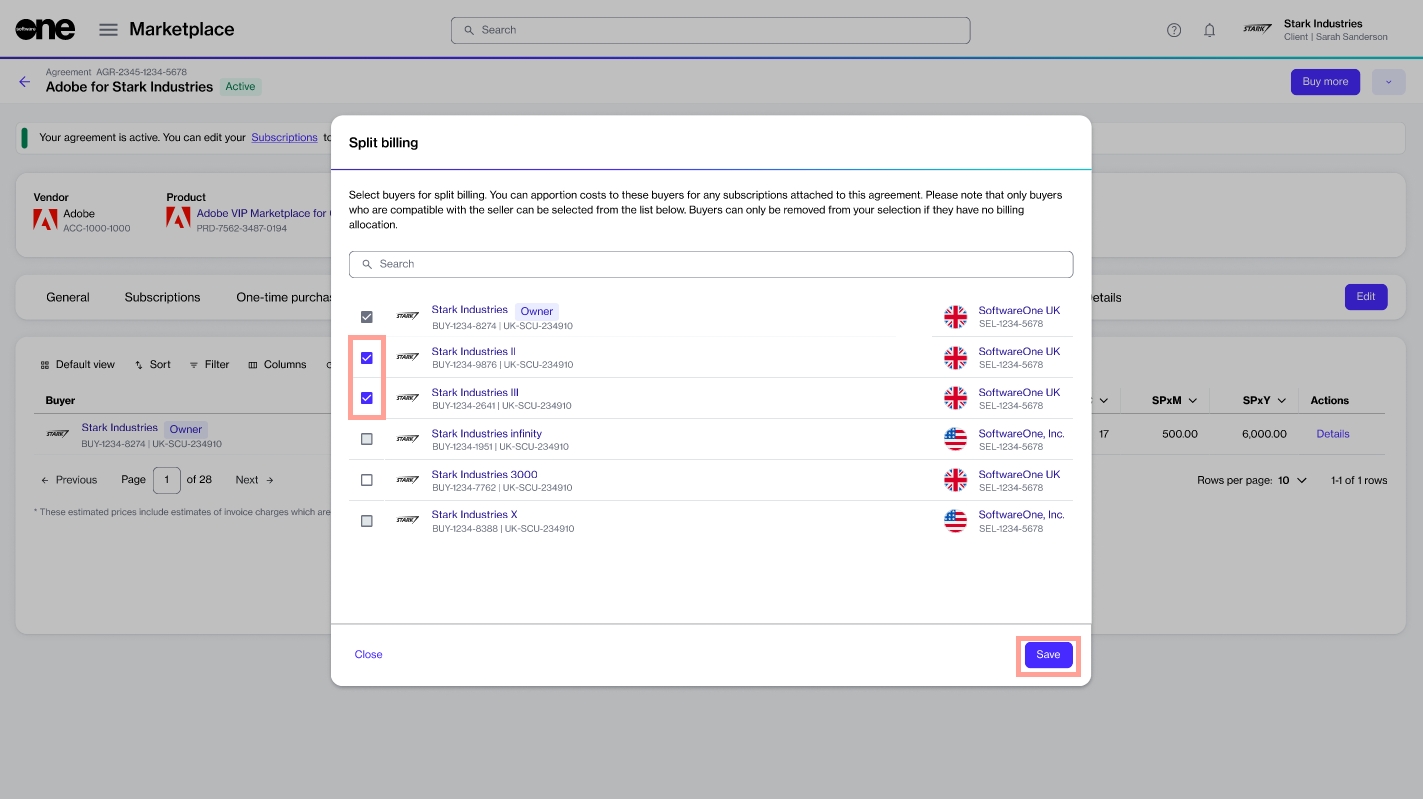
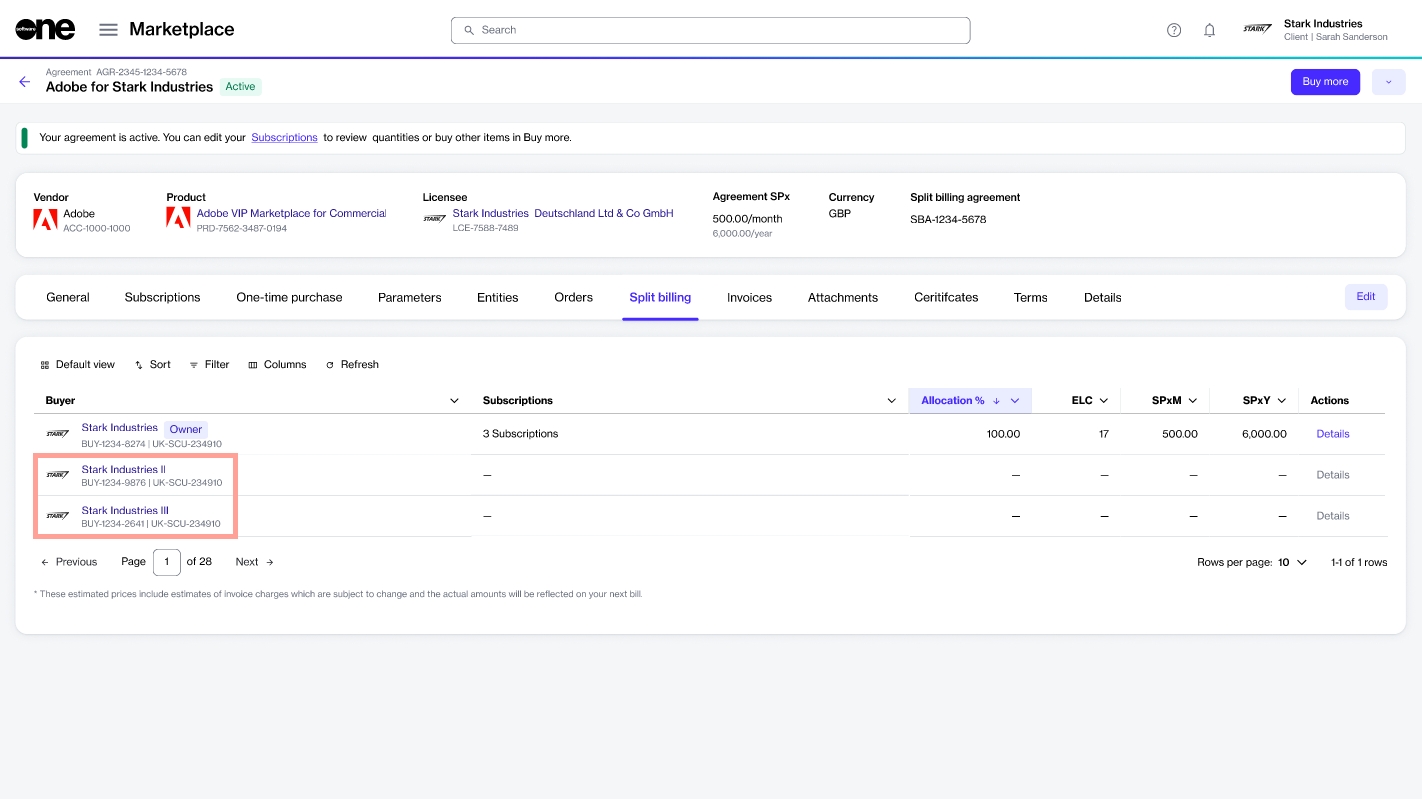
The Client Portal offers a large number of reports, allowing you to gain valuable insights into your software asset inventory, resource utilization, cloud consumption, renewals, and more.
You can set up a report using the Quick Reports feature or create a customized report using the available report options. You can also:
Export your reports to any of the available formats.
Run and publish reports only once, daily, weekly, or monthly.
Modify report configuration and existing schedule.
Delete reports.
Pause or resume scheduled reports.
View, search, and share reports.
Create report templates.
To access the Reports page, navigate to the main menu and select Other tools > Reports.
The Quick Reports tab displays all report options that are available to you and allows you to create a new report based on predefined filters quickly. Note that by default, all quick reports are created as Run Once only.
To create a quick report:
From the main menu, navigate to Other tools > Reports.
On the Quick Reports tab, navigate to the report group and choose the reporting template from the menu.
Select Create. The Create Quick Report page opens.
The Scheduled tab displays the scheduled report configurations and allows you to edit, run, pause, resume, preview, and delete reports.
Note that you must have the SCHEDULED_REPORTING permission to access this tab.
On this tab, you can view the following details:
Name - The name of the report.
Frequency - Indicates if this is a Daily, Weekly, or Monthly report. Off means that recurrence for the report is not yet defined (this is only possible when the report has been created using old reporting).
Status - Indicates whether the report is being generated or paused.
Follow these steps to create a new report:
Navigate to the Reports page and select Create New Report.
Select the report group and the type of report, and then choose the format in which you wish to generate the report. Note that the format varies depending on the report.
Choose the filters and select Next. To set additional filters (related to dates and number formatting), select Show more formatting options.
Select the schedule type. You can run the report once, daily, weekly, or monthly. Note that for the reports that can be run only once, the Run Once option is selected by default, and you cannot change it. All other options are unavailable.
Select the date range for the data you want to include in the report.
Select an existing template from Saved Templates or create a new template. Note that the Saved Templates option is displayed only if the report supports templates. If the report does support templates, but you choose not to apply the template, the system will use the default template.
Depending on your chosen report schedule, the Scheduled Reports page or the Reports History page is displayed. Note that all Run Once reports are triggered immediately.
You can update the configuration of a scheduled report, except for the report group and the type of report.
To update a report, select the actions icon (•••) and choose Edit. When the Edit Scheduled Report page opens, make changes as necessary and then click Finish to save your changes.
You can trigger scheduled reports at any time. After a report is generated, it downloads automatically and is available on the History tab. To run a report, select Download in the Actions column.
Note that triggering a report manually doesn’t impact its next generation time or the last execution time in the Last Report.
To pause or resume a report, select the actions icon (•••) and select Pause to pause the report or select Resume to reactivate the paused report.
To delete a scheduled report, select the actions icon (•••) and choose Delete.
Next, confirm that you want to delete the report. Note that deleted reports cannot be recovered.
The History tab displays all reports that you've generated. The list includes scheduled and run-once reports. From the Reports History page, you can download, send, delete, or edit a report.
On this tab, you can view the following details:
File Name - The file name of the report (visible only for generated reports).
Report Type - The output format of the report.
Time Requested - The approximate time when the report was requested.
Status - The status of the report. Possible values include:
You can download a single or multiple reports from the History tab.
To download a report:
Locate the report or select the checkbox for the report you wish to download. You can select multiple checkboxes.
Do one of the following:
In the Actions column, click Download.
You can only update the name of a generated report and file name. Updating a generated report name doesn't change the scheduled report name based on which the report has been generated.
To update a report or file name:
Select the actions icon (•••) and choose Edit. The edit mode is enabled.
Update the report name and file name as needed. Note that the file name must include an extension, Invoices.xlsx.
Update your changes.
If a report is bigger than 25 MB, it's always sent as a link only. Note that to download a report from the link, your email recipients must have access to the report in the Client Portal.
To send a report through email:
Select the actions icon (•••) and then choose Email.
Provide the email addresses (separated by a semicolon) and choose if you want to send the report as an Attachment or Link.
Send your report.
You can send a report directly to a secure FTP server. If needed, you can also add a new SFTP configuration or edit the existing configuration.
To send a report to an SFTP:
Select the actions icon (•••) and select SFTP.
Select an SFTP server from the list and choose Use Selected Server.
You can delete reports that are no longer needed. You can delete a single report or multiple reports at once. Note that once you delete a report, it can't be recovered.
To delete a report:
Locate the report or select the checkbox for the report you wish to delete.
Do one of the following:
Select the actions icon (•••) and then select Delete.
You can create a new template when you are creating a report. Note that only some reports support templates.
To create a template:
Click Create New Report. The report wizard starts.
In the Template section, click Saved Templates > Edit Default Columns.
Make the following changes as needed and select Save as new template.
You can edit or delete your report template by selecting the template and choosing Edit or Delete.
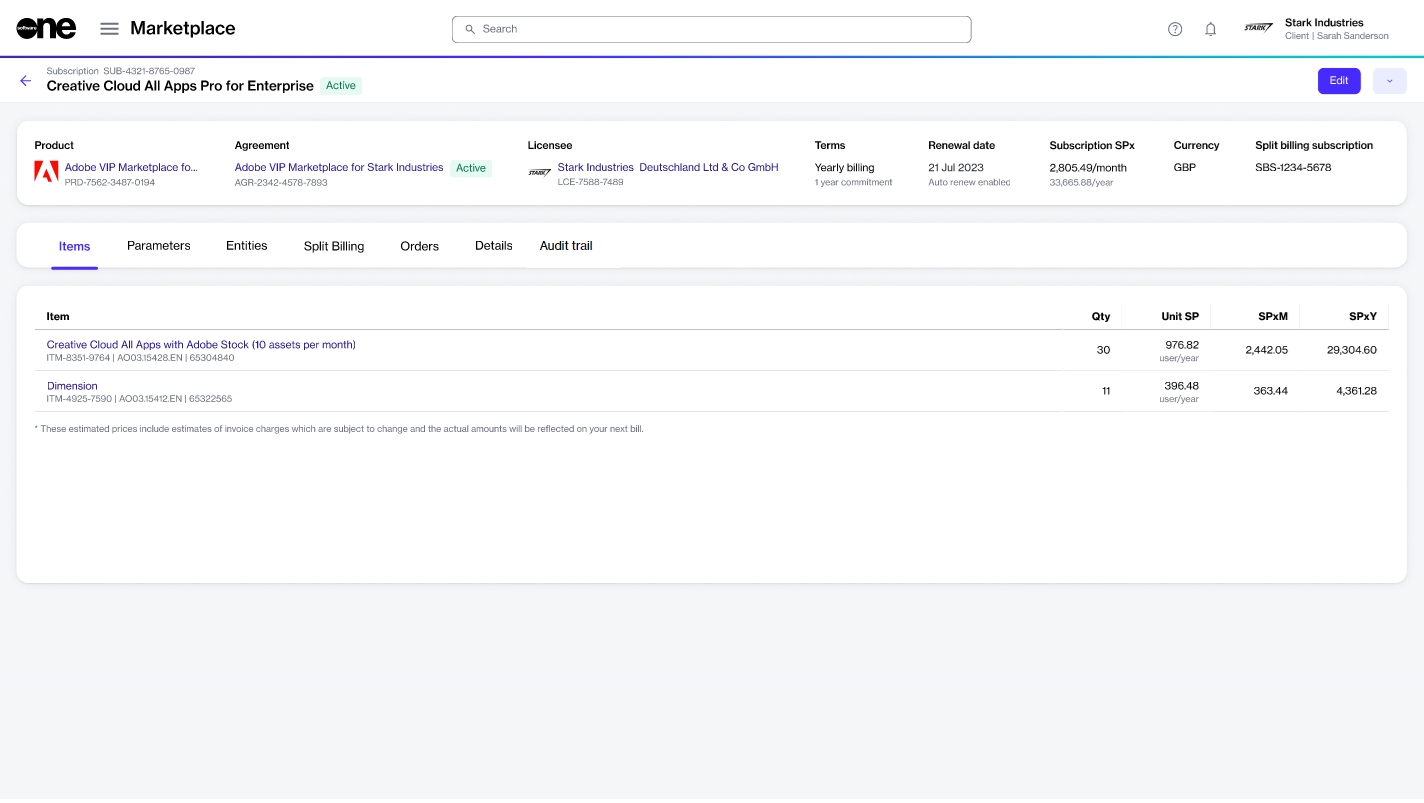
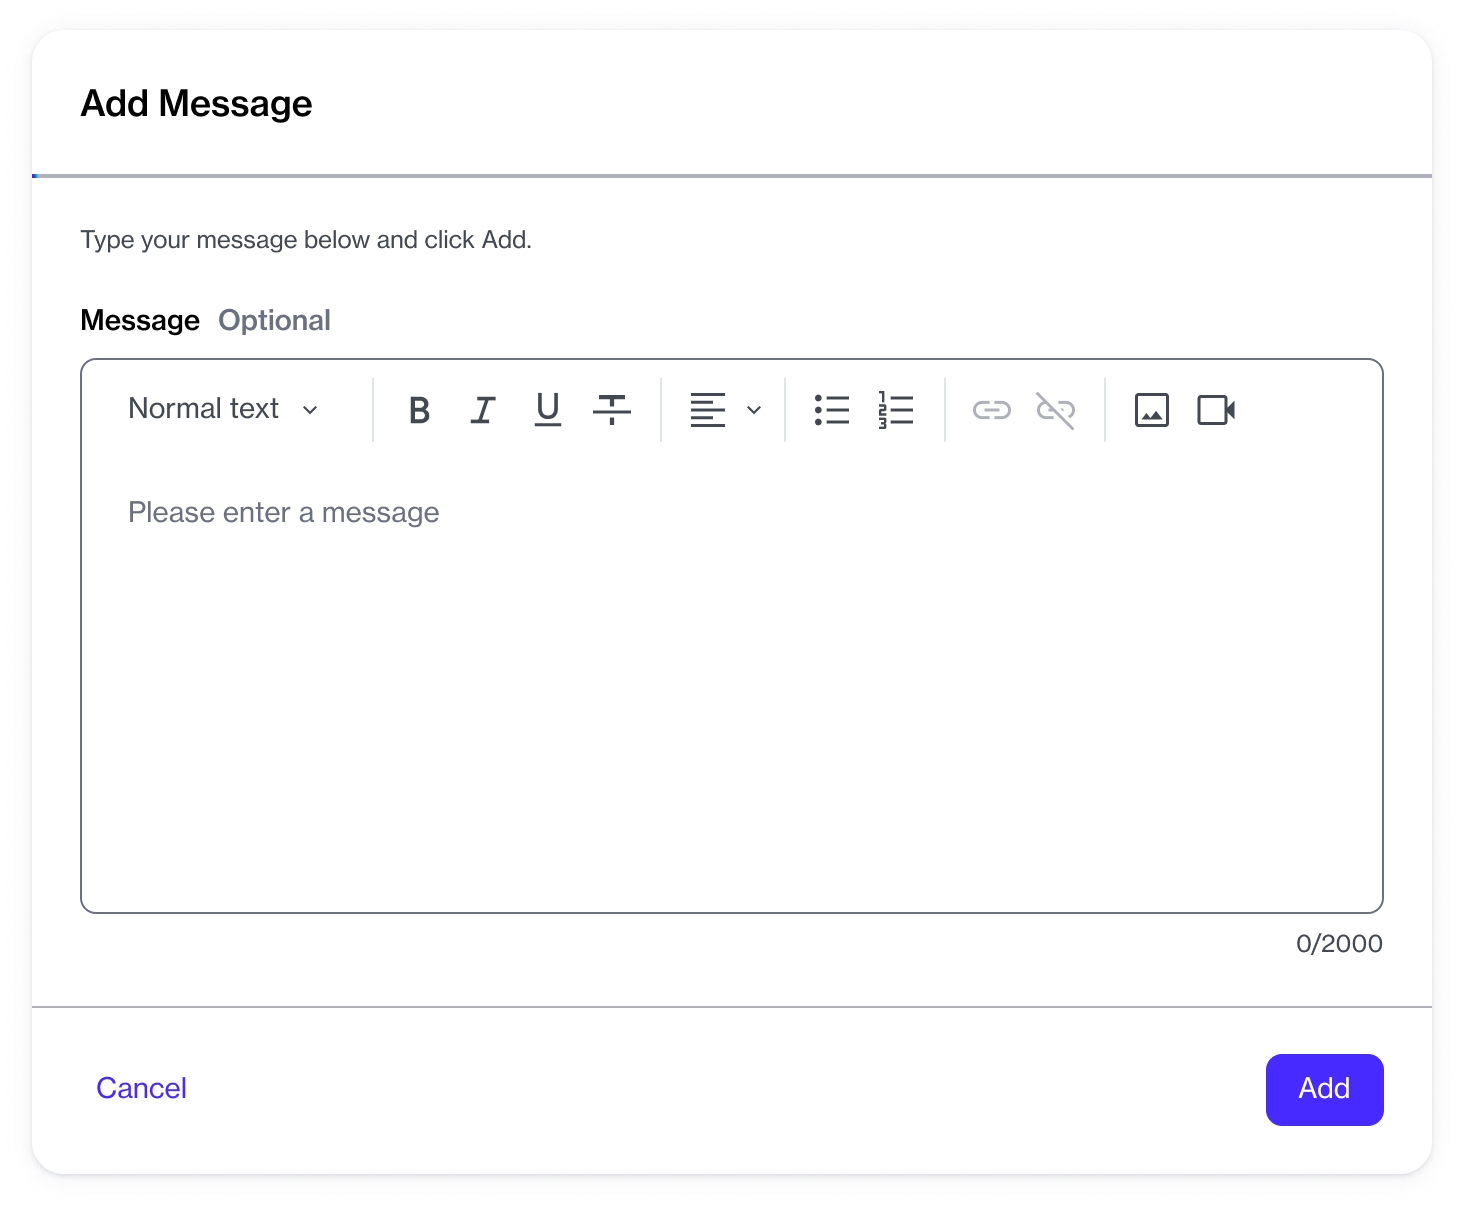
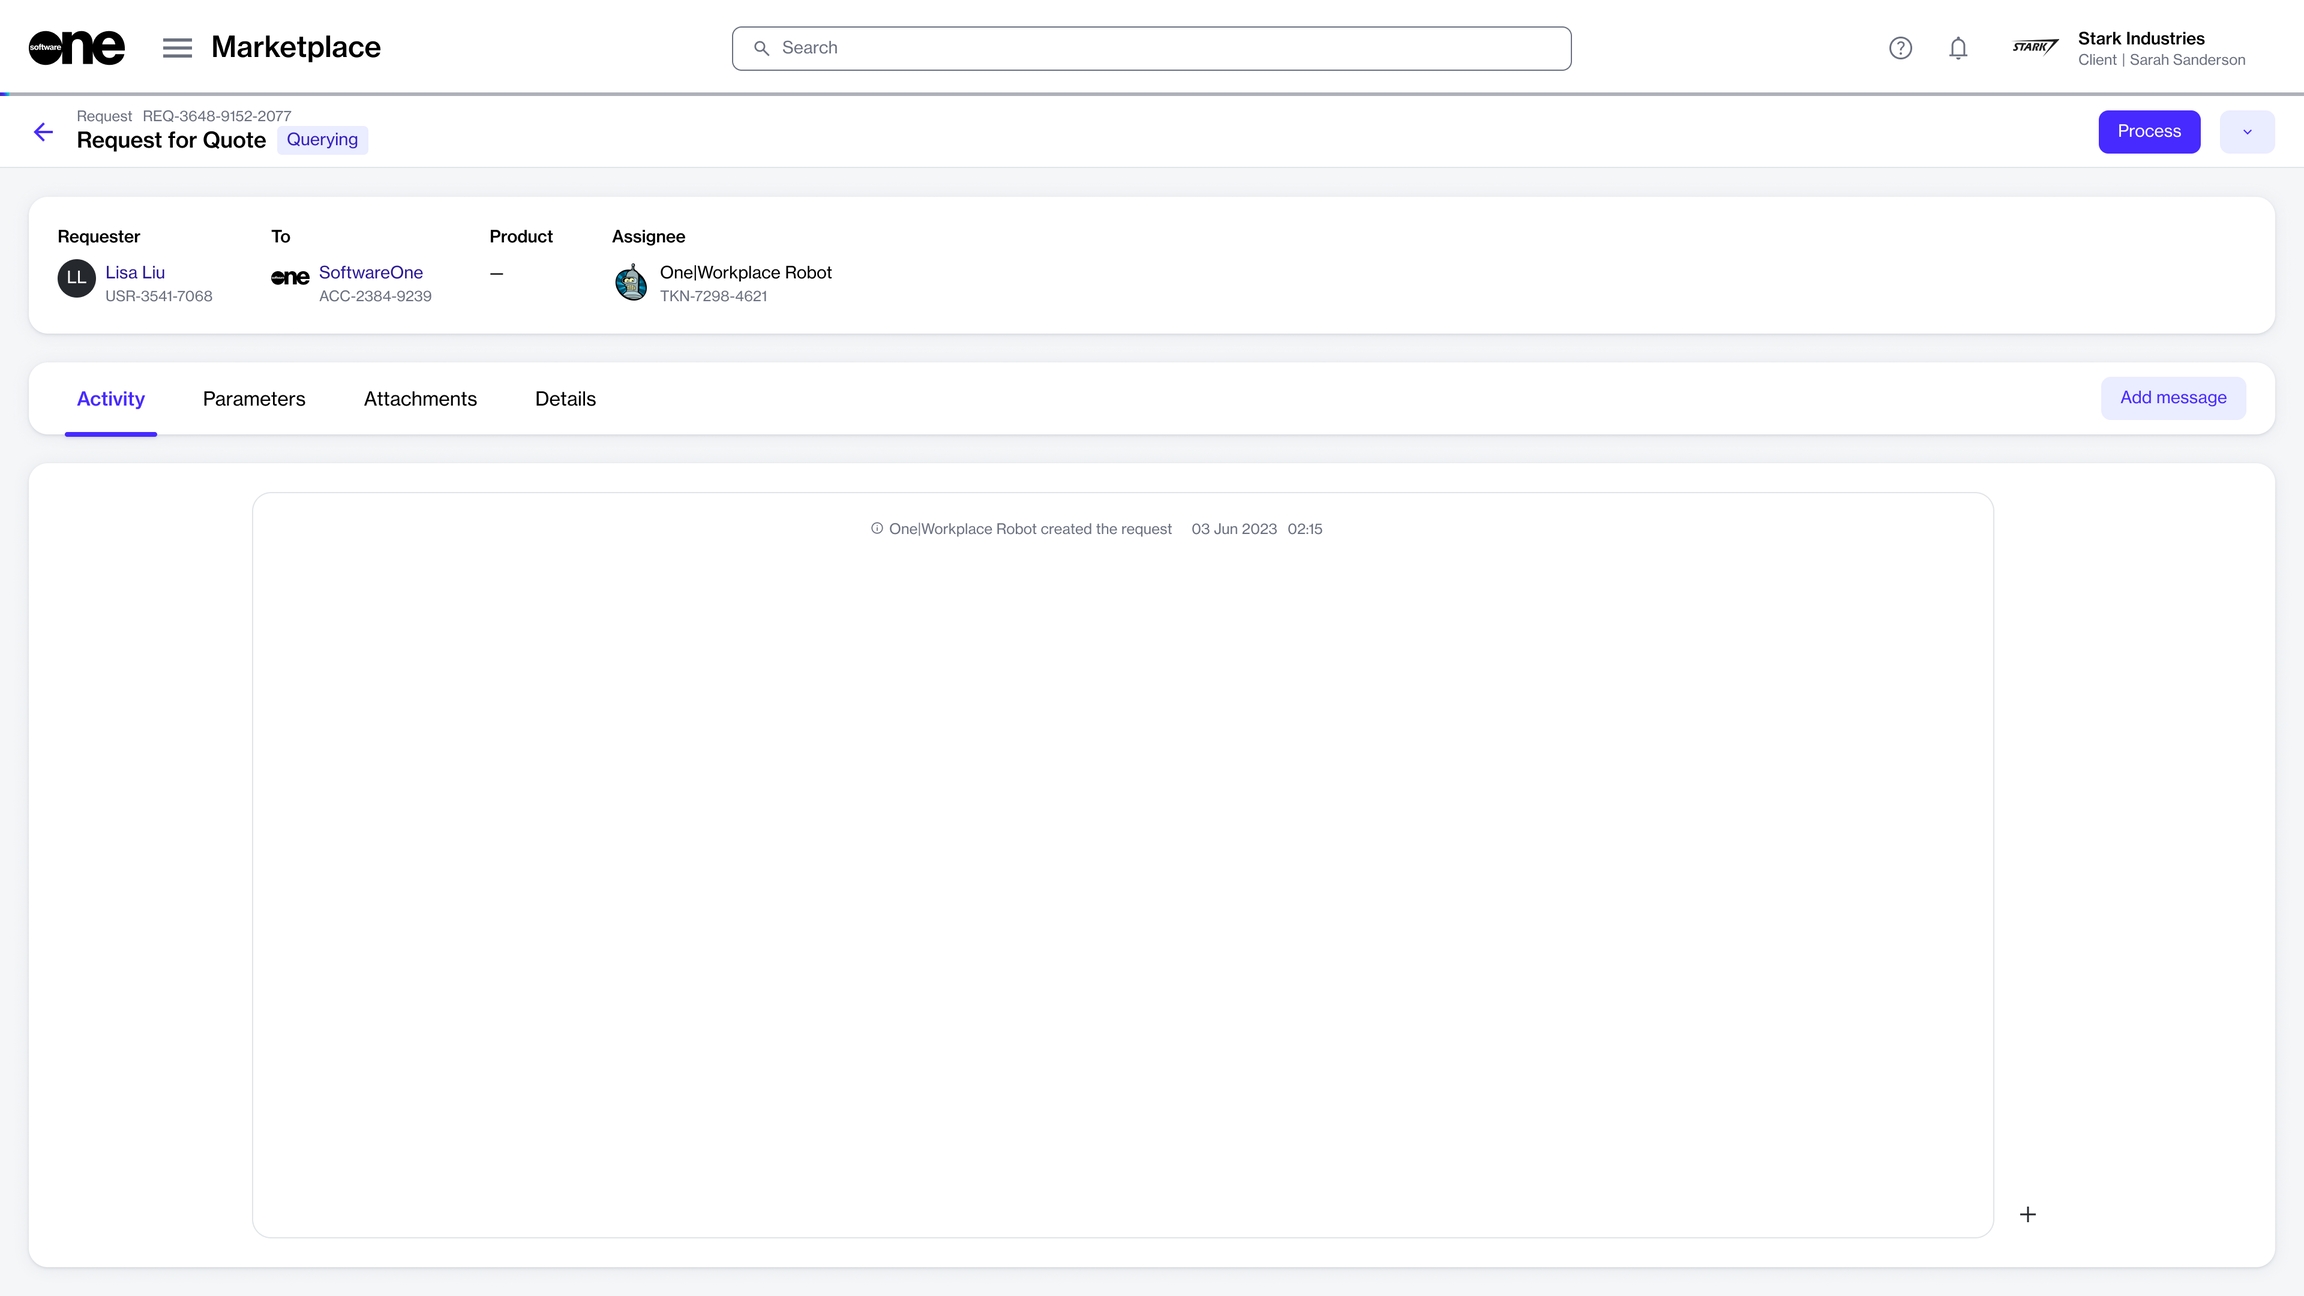

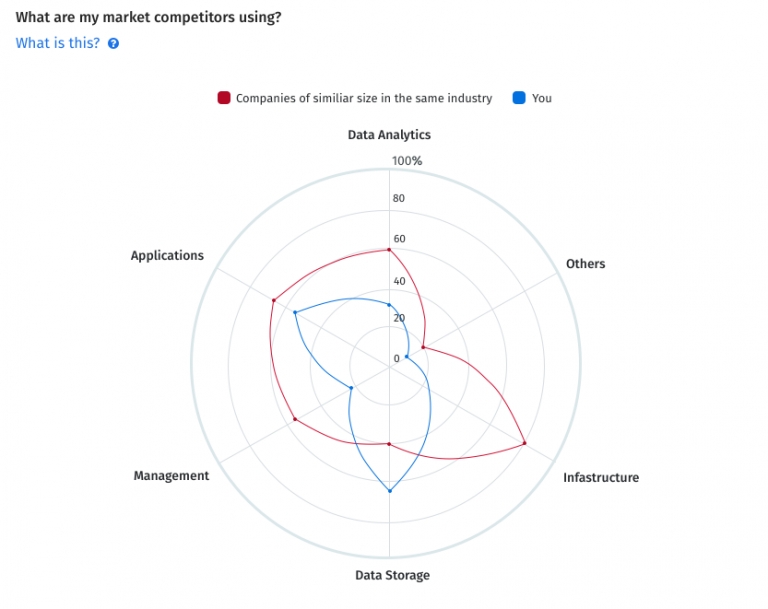
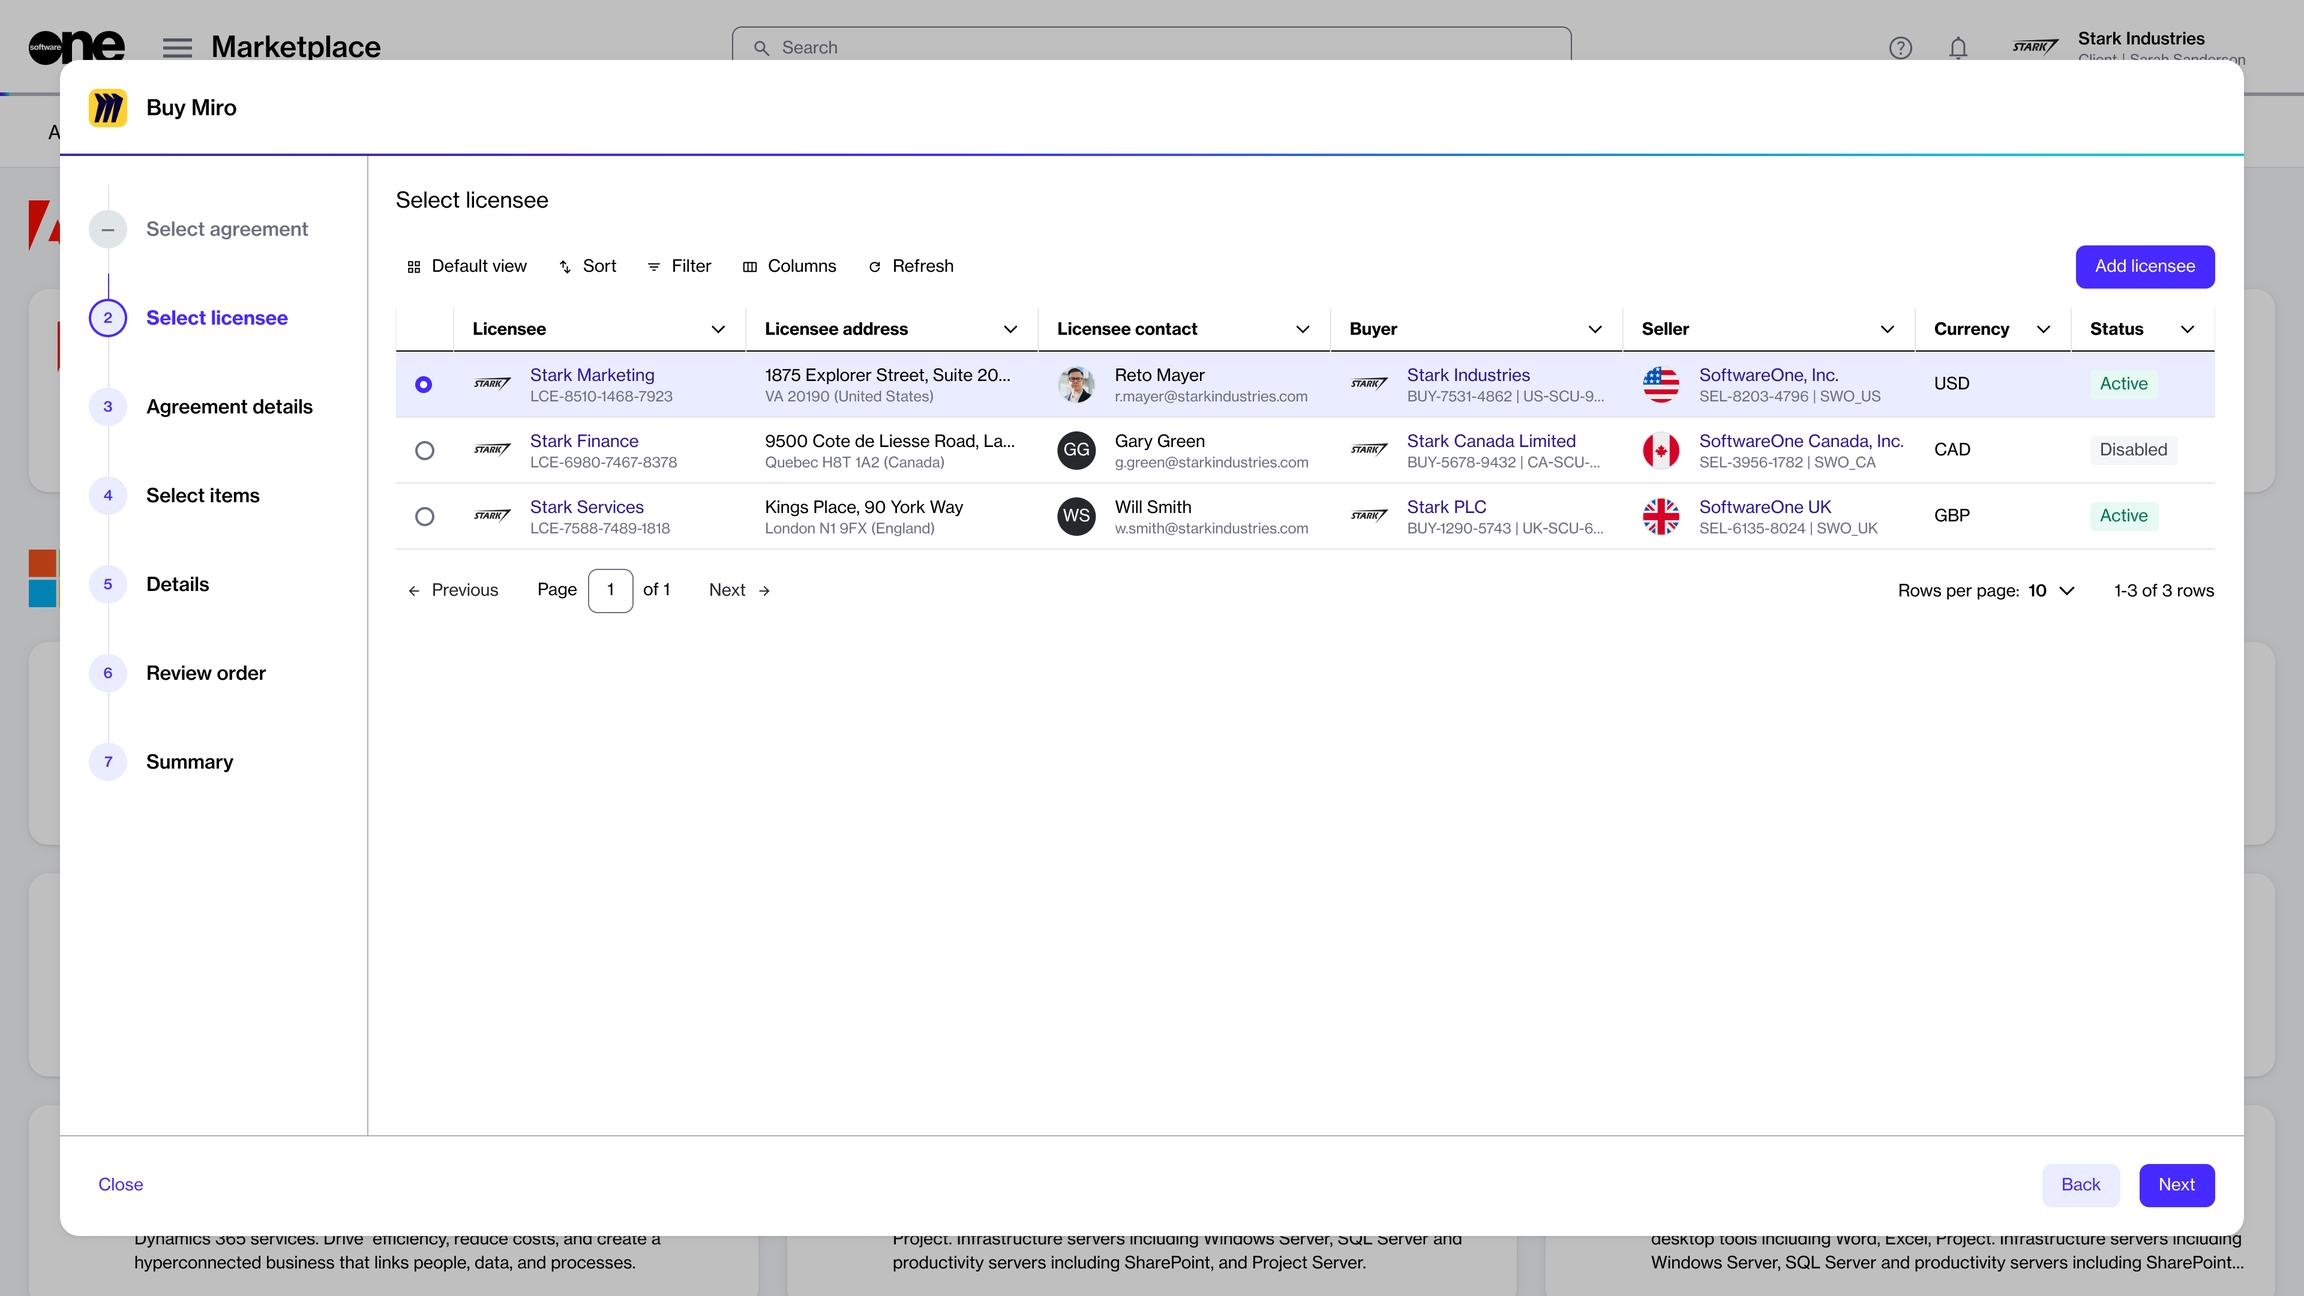
Select Finish. Your report is created, and a confirmation message is displayed.
Last Report - The time when the report was last generated.
Created - The date and time when the report was created.
Next Report - The time when the next report will be generated.
Group - The type of the report group.
Recipients - The email address of the recipient.
Render type - The format of the report.
Type - The type of report.
Template - Indicates whether any template has been selected for the report.
Last Modified - The date and time of the last update of the report configuration (in the local time zone).
Actions - The list of actions for the report.
Companies: Allows you to restrict data in a report to selected companies. Users can select multiple companies. If none are selected, then data for all companies will be included.
Also include companies added in the future: When selected, any new companies added in the future will be automatically added to the report.
Select Finish. A confirmation message is displayed.
Queued - The report is queued for creation.
Processing - The report is being generated.
Ready - The report has been generated and can be downloaded.
Report Ready - SFTP Failed - The report has been generated, but there was an issue when sending it to the configured SFTP server. You can manually download the report and send it to an SFTP.
No Data - The generated report contains no data.
Error - There was an unexpected error during the report generation.
Error – Bad Configuration - There was an error in the report configuration.
No permissions - The report couldn’t be generated because the user no longer has permissions.
Report Name - The name of the report.
Recipients - The list of recipients for the Email delivery method only.
File Size - The size of the generated report file (visible only for generated reports).
Scheduled - The information whether it is Scheduled or Run Once report.
Actions - The list of actions for reports.
Confirm that you want to delete the report.
To change a column position, drag the column to the desired position. You can move columns between groups.
To move all columns from one group to another, drag the entire group to an unfolded group.
To override a column’s value, enter a new value in the Override value.
To duplicate or delete a column, select the actions icon ( ••• ) and choose Duplicate or Delete.
Provide the Template Name and choose whether the template is Personal (only you can see or edit it) or Shared (anyone in your company can see or edit it).
Select Save as new template.