Loading...
Loading...
Loading...
Loading...
Loading...
Loading...
Loading...
Loading...
Loading...
Loading...
Loading...
Loading...
Loading...
Loading...
Loading...
Loading...
Loading...
Loading...
Loading...
Loading...
Loading...
Loading...
Loading...
Loading...
Loading...
Loading...
Loading...
Loading...
Loading...
Loading...
Loading...
Loading...
Loading...
Loading...
Loading...
Loading...
Loading...
SoftwareOne's Cloud Managed Services customers can optimize spending across multiple cloud resources through the Marketplace Platform.
Cloud Spend Management enables you to view and predict cloud usage across Azure, AWS, and Microsoft 365. Additionally, you can tag cloud resources, set budgets, and track your usage and spending against those budgets.
If you want to be notified when you are nearing certain thresholds, you can create alerts.
Viewing recommendations that can identify possible cost savings, performance, and security enhancements is also possible through the platform.
To learn more, see any of the following links:
365SimpleAzureSimpleBudgetsChargebacksCloud Cost OptimizationCloud Tenant SetupCustom GroupsPricelist CenterRecommendationsSimple for AWSTags and ResourcesUtilizationLearn about the 365Simple dashboard.
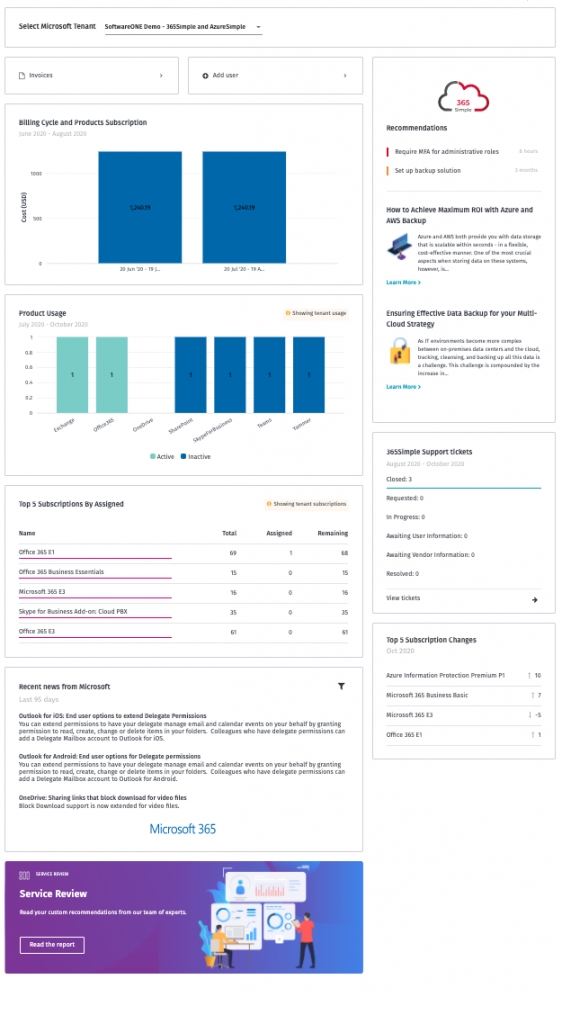
The 365Simple dashboard provides an overview for clients using SoftwareOne’s 365Simple service.
You can access the dashboard by navigating to the main menu of the Client Portal and selecting Cloud tools > 365Simple.
The dashboard provides a single point of access to other areas of the platform, such as invoices and user administration. Through the dashboard, you can also view your billing information, product usage, and more.
The dashboard consists of the following sections:
If you have multiple Microsoft tenants, you'll see an option to switch between tenants.
When you switch tenants, the widget values in the dashboard change accordingly. As tenants are permission-based, you may not see all available customer tenants. Also, widgets like Invoices and Add users are based on permissions. If you are unable to view the sections, contact your administrator to check your permissions.
This widget displays billing cycles from the past 90 days. It will usually contain the last 3 billing cycles, but it may also contain 4 if the billing cycle spans across two months.
If you hover over each billing cycle, you will see the billing date range, currency, subscription breakdown and total amount. Clicking the section opens the My Subscriptions page where you can see more details.
The Product Usage and Top 5 Assigned Subscriptions show information per Microsoft tenant (as noted on the yellow label within each widget). Viewing the usage and subscription assignments per agreement is impossible as the vendor does not support the functionality.
The Product Usage section provides an overview of the active and inactive licenses and highlights opportunities to adjust the use vs. cost ratio. Clicking on the widget opens up 365Analytics.
The Top 5 Subscriptions By Assigned section can be used to evaluate subscription utilization and accompanying costs. Clicking on the widget opens up a full consumption report.
All 365Simple recommendations are provided directly, and articles are written by SoftwareOne experts and backed by data-driven intelligence.
This section provides a quick overview of all requests and incidents reported in the past 90 days including their respective status. Clicking on the widget takes you to the Help and Support page.
This widget provides a quick overview of all subscription changes in the current month, ordered by the biggest license seat count change. If no changes are available, the widget will provide access to the My Subscriptions page.
365Simple customers can also quickly check the latest Microsoft 365 news without leaving the platform. You can narrow down new features by products that are already rolled out, products that are planned, and products that are currently in development.
As 365Simple surfaces data from multiple platform systems, there may be a difference in data refresh rate across the widgets. The table describes each widget and its data refresh rate.
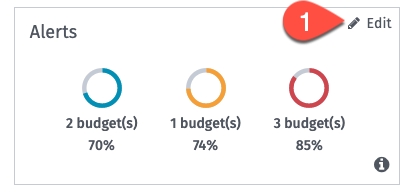
Manage your budget utilization alerts.
Both Custom Group and the Per Provider Budgets offer utilization alerts.
You can set three thresholds that will trigger notifications for particular budget owners. These values are initially set by default, but you can adjust the percentage values by selecting Edit.
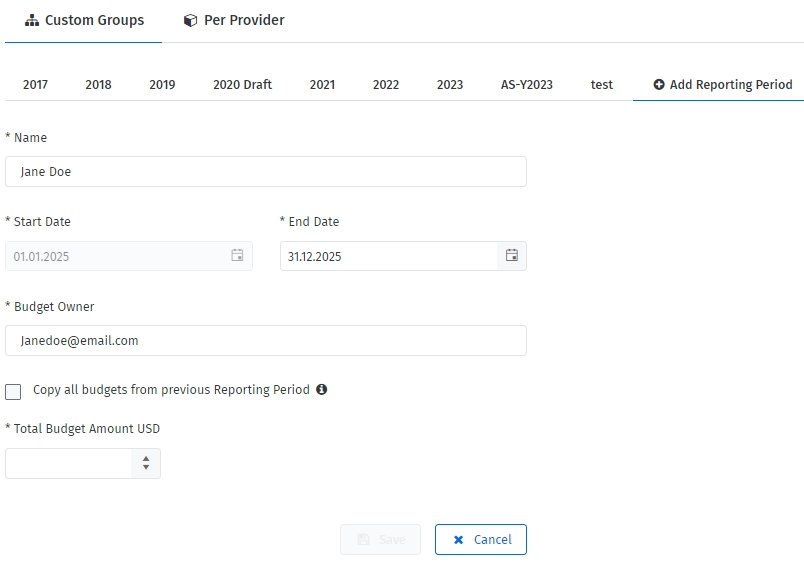
Create a reporting period.
A reporting period represents a period that you use to schedule budgets in your organization. For example, financial year, calendar year, quarters, or any custom period.
Each reporting period is treated as an overall budget for all Custom Groups. Therefore, it carries information like Budget Amount and Budget Owner.
To create a reporting period:
Navigate to Cloud tools > Budgets.
On the Budgets - Custom Groups page, select Add Reporting Period.
Provide a name for the reporting period.
Choose an end date for the reporting period.
Enter the email address of the person who owns the budget and will receive utilization notifications.
Select a currency that will be applied to every Custom Group budget.
Service Articles
latest with every page refresh
Service Review
latest with every page refresh
Billing
latest with every page refresh
Recommendations
once a day
Product Usage
once a day
Top 5 Subscriptions by Assigned
once a day
Support tickets
every hour (after page refresh)
Enter the budget amount.
Select Save. Your reporting period is created, and a confirmation message is displayed.
Create a custom group budget.
Before creating budgets, note the following prerequisites:
To assign budgets to individual groups, you must first set up the structure in Custom Groups. Without Custom Groups, you can only see the Per Provider view in Budgets.
Currency setup is also required so you can use your internal reporting currency across all Custom Groups, and manage the budgets and consumption in your currency. This is done for the following reasons:
If you are using multiple providers in different sourcing currencies, the platform will convert them to your set currency.
The configured currency is also the default currency within Consumption Overview (native sourcing currency available at any time).
Consumption values are converted daily based on the Foreign Exchange rates. A currency can only be changed before configuring the first budget. Changing currencies later will require the removal of all budgets.
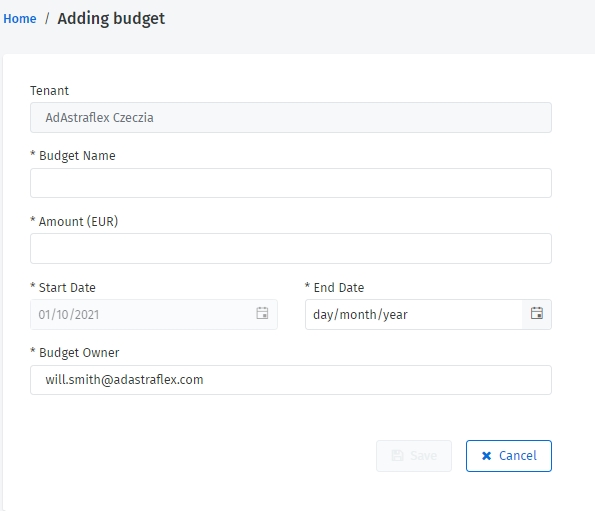
You can assign a budget to any custom group defined within the Custom Groups. To create a budget:
Navigate to Cloud tools > Budgets.
On the Budgets - Custom Groups page, select Add Budget.
(Optional) Use the Search option to find a specific group.
Select the custom group and select Add.
On the Budget Details page, provide the following details:
Total Amount - The amount you have budgeted to spend on this group.
As a Global Administrator, you can manage all Azure subscriptions and management groups in your tenant by elevating your access.
When you elevate your access, you'll be assigned the User Access Administrator role in Azure at root scope (/). This allows you to view all resources and assign access to any subscription or management group in the directory.
To elevate access, follow the instructions in Microsoft documentation: Elevate access to manage all Azure subscriptions and management groups, or perform these steps:
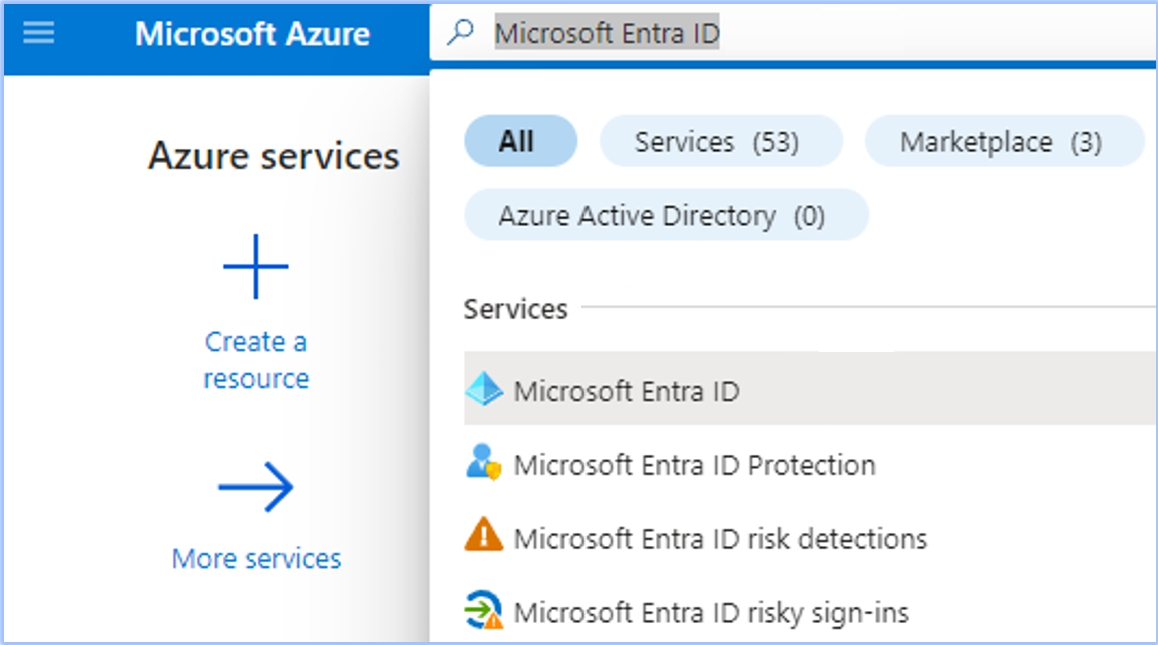
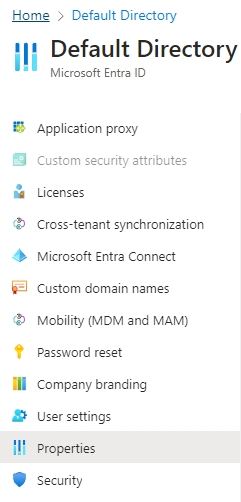
Sign in to Azure Portal as a Global Administrator.
Open Microsoft Entra ID. You can use the Azure search bar to find Microsoft Entra ID.
Under Manage, select Properties.
Under Access management for Azure resources, set the toggle to Yes.
Click Save. This will grant you permission to assign roles in all Azure subscriptions and management groups associated with this Microsoft Entra ID.
If required, sign out and sign back in to refresh your permissions.
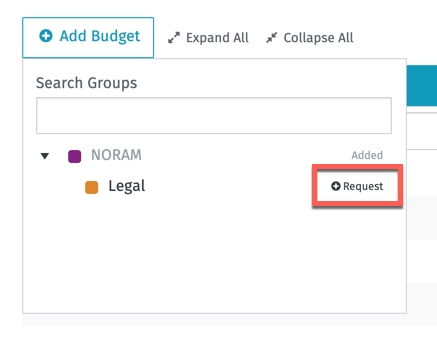
Request to create a new budget or update an existing budget.
When you have limited access, you can't control budgets for your main Custom Groups or Subscriptions. Instead, you'll see a Request option for both types of budgets.
This means you might only see part of your Custom Groups or Providers, depending on the permissions your administrator has given you. The budgets you can view are determined by your Spend Management access settings.
To request a new budget:
Select the Request option corresponding to the group.
In the Budget Request form, enter the budget amount and then confirm your request. The budget owner of the parent Custom Group will receive your request and create the budget.
To request an update to an existing budget that you're unable to modify directly:
Select the Request Budget Change option.
Provide the amount and then submit your request. The Budget Owner of the parent budget will receive your request.
Distribute cloud spend to the relevant business units and cost centres across your organization.
Chargebacks allow you to take existing cloud consumption and distribute the cost across the organization. Users can pull cloud consumption spend for direct and indirect agreements, define chargeback based on organizational structure, and create single or multiple internal chargeback invoice documents.
This is one of the last steps to achieving full end-to-end Cloud Management. Chargebacks offer the following benefits:
You can create invoices, split invoices by provider, and then charge the respective business unit or department for the cloud services they are using.
You can view, manage, and send internal invoices.
In some cases, you must configure your Azure subscription manually so that the Client Portal can access the resources and tags.
When you onboard your tenant to the Client Portal, an Enterprise Application called SoftwareOne Cloud Consumption (formerly PyraCloud Azure) is created in your tenant. You must then assign the and roles to the PyraCloud (Azure) Enterprise Application.
These roles allow the Client Portal to read a list of all the resources in your Azure subscription, and read and write tags on those resources. You can control whether you want the Client Portal to write tags back to resources in your Azure subscription using the Cloud Tenant Setup feature.
View recommendations.
The Overview page of the Recommendations module is an analytics-based view that helps you understand how recommendations are associated with various parts of your infrastructure and how they are tracked (potential or completed).
All recommendations are divided into Cost Optimization, Operational Excellence, and Security.
Each tile on the Overview page displays how recommendations are distributed across different areas, and how advanced you are in implementing them. Additionally, under each tile, you can find information about the most impactful recommendation type.
Simple for AWS Dashboard.
The Simple for AWS dashboard provides an overview for customers using SoftwareOne’s Simple for AWS service.
You can access the dashboard by navigating to the main menu of the Client Portal and selecting Cloud tools > Simple for AWS.
The dashboard is a single point of access to various sections of the platform and allows you to view your quarterly spending information, support tickets, service recommendations, and articles. It consists of the following sections:
The Client Portal supports both legacy Enterprise Agreement and modern models. This topic describes how to add an Azure MCA account to the Client Portal. For information on adding an EA or MPSA account, see .
Before adding an MCA account to the Client Portal, make sure your account has the correct billing account type set up. You can verify the account type in the .
To verify, select Cost Management + Billing and then navigate to Settings > Properties. The account type is displayed in the right pane.
Define cloud budgets and assign them to groups within your business or cloud service provider.
Budgets allow you to define cloud budgets and assign them to groups within your business or cloud service provider. You can assign individual budgets in the following two areas:
Custom groups - Allows you to assign individual budgets to Custom Groups defined within Custom Groups. This allows you to manage time and monetary values for your spending, defined by your business.
Service Provider - Allows you to assign individual budgets to Enrollments, Subscriptions, or Tenants (depending on the provider terms). Service provider budgets enable you to manage time periods and monetary values for your spending tied to your providers.
Optimize, improve, and secure your software and cloud environment with intelligent recommendations.
The Recommendations module contains functionalities that facilitate intelligent recommendations and suggestions to optimize, streamline, and improve your software environment.
The following are the key features of the module:
It offers recommendations from a variety of sources, such as Azure Advisor, AWS Cost Explorer, AWS Trusted Advisor, and SoftwareOne services to provide tailored recommendations to help you optimize your software environment.
It allows you to track metrics, such as realized savings and completed recommendations. You can use these metrics to track, manage, and report on savings opportunities.
Learn what's new and improved in Client Portal's Azure Cloud Spend Management.
Release Date: 22 April 2024
On 1 May 2024, Microsoft will retire the legacy Azure Enterprise Reporting (EA) APIs. Currently, the Client Portal uses these APIs to get your Azure EA consumption data.
If you have an Azure Enterprise Agreement, you must migrate to the new Azure Cost Management APIs to maintain your cost and usage data in the Client Portal.
For instructions on migrating to the new APIs, see .
You can also see Microsoft's documentation on
You no longer need to manage this process manually in a spreadsheet.
Chargebacks depend on the Consumption and Custom Groups modules. Only the Consumption Module is mandatory.
It is possible to generate a summary document and split it by tenants and subscriptions without further configuration. Custom distribution of costs across separate documents requires “Custom Group” to be configured and resources properly assigned.
Chargebacks have two access levels called User and Admin. If you need to get your access level changed, contact your SoftwareOne Account Team.
User Level - Individuals with this access level can only see the Chargebacks tab. The Add New Chargebacks page will not be available to individuals with user-level access. User Level Access is for users who need to view chargebacks but don't need to create chargebacks. These users can then access the document details to analyze the charges using the Consumption module. This will give users detailed information on the relevant chargeback.
Admin Level - Users with this access level can access the Chargeback and Add New Chargebacks tabs. Admins can view, create, modify, and delete chargebacks.
To access chargebacks, navigate to Cloud tools > Chargebacks.
On the Chargebacks page, you can view the Chargebacks and Settings tab. You can also view scheduled reports, add a new schedule, or add new chargebacks.
If you have purchased any Reserved Instances, you can choose between the following two cost models:
Actual Cost - Represents the Reserved Instance purchase cost as a one-time cost (single spend record).
Amortized Cost - Equally distributes the Reserved Instance purchase cost across the months of the reservation period.
When a budget is created or changed by someone other than the budget owner, the owner will receive a notification regarding the change, including when:
A new budget is created.
The budget amount has changed.
The budget name has been changed.
The start date or end date of the budget has been changed.
It provides recommendations for on-premise and cloud environments.
It allows you to collaborate with your peers and SoftwareOne services through messaging and mentions. You can also track the progress of every recommendation at every stage of the recommendation.
You can access the Recommendations module from the main menu of the Client Portal as well as the Software Asset Management and Cloud dashboard templates.
You can access Recommendations by navigating to the main menu and then selecting Cloud tools > Recommendations.
Follow these steps to access the Recommendations page through a dashboard:
Open the Software Asset Management or Cloud dashboard.
Select the SLM Recommendations or Azure Recommendations tile depending on the template.
The appropriate section within the Recommendations module is displayed. For example, if you select SLM Recommendations on the Software Asset Management dashboard, the Software Lifecycle Management Saving recommendations are displayed. Similarly, in the Cloud dashboard, selecting Azure Recommendations displays the Azure Saving Recommendations, and selecting AWS Recommendations displays the AWS Saving Recommendations.
Owner Email Address - The email address of the person who owns the budget and will receive utilization notifications.
Select Save.
Before granting access, ensure that you've onboarded your tenant.
To grant access to individual subscriptions:
In the Azure Portal, search for Subscriptions.
On the Subscriptions page, choose the subscription you want to integrate with the Client Portal.
Select Access control (IAM).
Select the Role assignments tab.
Select Add > Add role assignment.
Select Reader from the Role menu. Then, search for SoftwareOne Cloud Consumption (formerly PyraCloud Azure) and select it from the search results. Click Save.
Select Tag Contributor from the Role menu. Then, search for SoftwareOne Cloud Consumption (formerly PyraCloud Azure) and select it from the search results. Click Save.
Access is granted.
From the main menu of the Client Portal, navigate to Cloud tools > Recommendations.
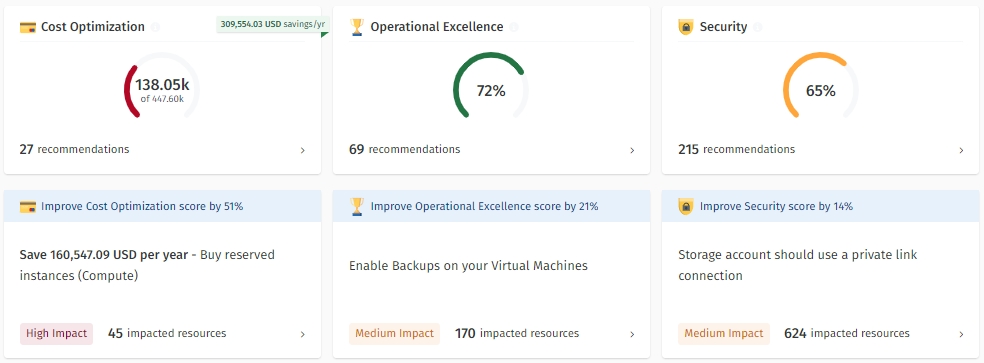
Click the Cost Optimization, Operational Excellence, or Security tile to view the recommendation The following image shows the Cost Optimization recommendations:
Click the individual recommendation to view more details about that recommendation. The following image shows the Potential and Realized savings for Cost Optimization recommendations:
Clicking Invoices opens up the Invoices page, where you can view and search for your invoices. This section is displayed only if you have permission.
Displays your spending information from the last 3 months. You can view more details and get a breakdown of your spending if you hover over one of the columns in the chart. Clicking the section opens up the Consumption report where you can see more details, and use filters to narrow down your results.
Provides a quick overview of all requests and incidents reported in the past 90 days, including their respective status. You can also create a new ticket by clicking Submit a ticket.
As Simple for AWS surfaces data from multiple platform systems, there may be a difference in data refresh rate across sections. The following table describes the data refresh rate for each section:
Billing
latest with every page refresh
Recommendations
once a day
Support tickets
every hour (after page refresh)
Service Articles
latest with every page refresh
Service Review
latest with every page refresh
To assign the Billing account reader role to the Client Portal through Azure:
In the Azure Portal, search for Cost Management + Billing.
In the left navigation pane, select Billing scopes and then select your MCA billing scope.
Select Access Control (IAM) to start assigning permissions.
On the Access Control (IAM) tab, select Add > Add role assignment. The Add role assignment pane opens. From the Role list, select the Billing account reader role.
For Members, select SoftwareOne Cloud Consumption (formerly PyraCloud Azure) application to give access to the Client Portal.
SelectSave. Your MCA billing data will be synchronized with the Client Portal after 24 hours.
After assigning permissions to the billing account, you can add the tenant to the Client Portal via Cloud tenant setup, found under Cloud tools in the main menu.
For instructions on how to add the tenant, see Activate your cloud account.
In the cloud tenant's details page, the Access Tokens tab has been replaced by a new tab called Enrollment Numbers.
This change is made because the new Azure Cost Management APIs don't require access tokens. Instead, they use Microsoft Entra ID (also known as Azure Active Directory) for authentication.
On the Enrollment Numbers tab, you can view all enrollment numbers that are migrated to the new API, along with the enrollment status. For possible statuses and their description, see Enrollment statuses.
Clients who have a Microsoft CSP subscription through SoftwareOne and commit to an Azure Saving Plan can now see their savings plan cost in the Client Portal.
To support this update, the following changes are made:
Each savings plan has a details page that shows resource details. You can access the details page by clicking the savings plan on the Resources page.
A new subscription type called Savings Plans and a new resource type called Savings Plan Order is added, making it easy for you to search for your savings plan resources.
New filters and dimensions specific to Azure savings plans are added so you can break down your data. You can find the new filters and dimensions on various reporting and analytics pages in the Client Portal.
Create a per provider budget.
Before creating a budget, note that there can be only one subscription budget under an Account budget.
Depending on the provider, you can create a budget for an account and a subscription.
to create a per-provider budget:
Navigate to Cloud tools > Budgets.
Select the Per-Provider tab.
Select Add Budget and then select Add after selecting the tenant. If you have a long list of tenants, you can use the Search Tenants option to find the tenant.
In the Adding budget page, provide the following details:
Budget name - If you are creating a budget for an Account, you'll need to provide a budget name. In the case of subscription budgets, the name is automatically set to the subscription name.
Amount - Add the amount.
Select Save.
If you purchased SoftwareOne's Digital Workplace Essentials/365Simple, and Azure Essentials/ AzureSimple services, you must activate your cloud account in the Marketplace Platform.
Cloud accounts that require activation are displayed on the Cloud tenant setup page and have the Activation Required status and links to activate Microsoft 365 and Microsoft Azure, depending on the service you purchased.
This topic describes how you can access the Cloud tenant setup page and complete the activation.
To activate Microsoft 365:
Navigate to the Cloud tenant setup using one of the following steps:
Select this link: .
Sign in to the platform. Next, select the main navigation menu and go to Cloud tools > Cloud tenant setup.
On the Cloud tenant setup page, locate the account that needs activation. The status will be Activation Required.
In the Actions column, select Activate Microsoft 365.
On the Microsoft sign-in page, enter your username and password. Note that you must provide your Global Administrator credentials.
Review the permissions and select Accept to grant consent.
To activate Microsoft Azure:
Navigate to the Cloud tenant setup using one of the following steps:
Select this link: .
Sign in to the platform. Next, open the main menu and go to Cloud tools > Cloud tenant setup.
On the
On the Microsoft sign-in page, enter your username and password. Note that you must have the Owner or User Access Administrator role for the account to activate.
Review permissions and click Accept to grant consent.
On successful validation of your credentials, your account is activated, and the Cloud tenant setup page displays the activation status as Connected.
Manage your AWS recommendations.
AWS recommendations are divided into the following categories:
Savings - These recommendations can enable cost savings.
Security - These recommendations can help improve the security of an AWS environment.
High Availability - These recommendations can help to improve the availability of an AWS environment.
Performance - These recommendations can help improve the performance of an AWS environment.
The Client Portal downloads AWS recommendations from and .
AWS Trusted Advisor is available in any environment configured with the correct AWS . AWS Trusted Advisor provides information for various recommendation categories, for example, Savings, Security, Performance, High Availability, and Service Limits. Recommendations are fetched from the AWS Trusted Advisor if:
AWS Business or Enterprise support plan is enabled for an account within AWS.
Correct permissions are enabled for AWS accounts in the Client Portal.
AWS Cost Explorer is available to any environment with the Cost Explorer enabled in AWS. The Client Portal can fetch Reservation-based recommendations from the Cost Explorer. These reservation-based recommendations are Reserved Instance (RI) purchase recommendations that could help you reduce costs. Recommendations can be fetched from the AWS Cost Explorer if:
.
Cost Explorer is enabled for your AWS Account through the Cloud Tenant Setup module in the Client Portal. The Cost Explorer is enabled by default.
By default, all AWS accounts are configured to pull recommendations from AWS Cost Explorer.
The synchronization with AWS Cost Explorer occurs once a week (as opposed to all recommendations-related synchronization processes that run once an hour). This schedule is not configurable. This is so we can minimize costs, as fetching data from Cost Explorer is chargeable.
AWS charges 0.05 USD per account for every sync. The Client Portal will sync recommendation data per account once a week. When Cost Explorer is turned on (within AWS and the Client Portal), the amount should be a maximum of 0.20 USD per AWS account per month.
To effectively utilize these recommendations, make sure that AWS Cost Explorer is turned on within AWS for each of your accounts. See to turn on Cost Explorer within AWS.
If you're facing synchronization issues, see .
Cost Explorer recommendations provide reserved instance purchase recommendations for Amazon EC2, Redshift, and RDS. Turning off these recommendations will mean that you won't have access to these savings-based recommendations.
You can turn off Cost Explorer at the AWS account level. There is no option to turn on Cost Explorer for all AWS accounts in one go.
Manage your recommendations, add comments, and view progress logs.
Follow these steps to mark a recommendation as complete or dismiss it:
On the Recommendations page, click the recommendation type (Cost Optimization, Operational Excellence, or Security). All recommendations for your chosen type are displayed.
Click the recommendation name. The details page of your selected recommendation opens.
Select the checkbox for the recommendation and then click Mark complete or Dismiss. You can also select multiple recommendations at once.
Confirm the action.
After you complete a recommendation, it is moved from the Active tab to the Realised tab. If you dismiss a recommendation, it is moved from the Active tab to the Unrealised tab.
The messaging feature allows stakeholders to participate in a conversation, so multiple collaborators can keep on top of recommendations and their progress. Through the use of the ‘mentions’ feature, you can tag your peers or SoftwareOne Services Consultants to bring items, to-do lists, or issues to their attention.
Every recommendation can be also tracked through its lifecycle with the progress log functionality.
Follow these steps to add comments or view the progress:
Open the details page of your recommendation. You can do so by clicking the name of the recommendation.
To add comments, select the Comments tab, and then type the individual's first name and last name. Save your comments.
To track progress, select the Progress Log tab.
Learn about the AzureSimple dashboard.
The AzureSimple dashboard provides an overview for clients using SoftwareOne’s AzureSimple service.
You can access the dashboard by navigating to the main menu of the Client Portal and selecting Cloud tools > AzureSimple.
The dashboard provides a single point of access to other areas of the platform, such as invoices and user administration. Through the dashboard, you can also view your saving opportunities, billing information, spike and outage alerts, and more.
Microsoft will retire the legacy Azure Enterprise Reporting APIs on 1 May 2024. Currently, the Client Portal uses these APIs to get your Azure EA consumption data.
If you have an Azure Enterprise Agreement (EA), you must migrate to the new Azure Cost Management APIs to maintain your cost and usage data in the Client Portal.
Before migrating to the new Cost Management APIs, note the following points:
Manage your Azure recommendations.
Microsoft Azure recommendations are divided into the following categories:
Savings - These recommendations enable cost savings.
Risk - These recommendations help mitigate compliance risk for licenses that may come from a non-compliance position.
Budget Owner - Email address of the person responsible for creating the budget.
In the Actions column, select Activate Microsoft Azure.
If you have multiple Microsoft tenants, you will see a dropdown option next to your tenant name on the AzureSimple dashboard, allowing you to switch between tenants.
When you switch tenants, the widget values in the dashboard change accordingly. As tenants are permission-based, you may not see all available customer tenants. Also, widgets like Invoices and Add users are based on permissions. If you can't view the sections, contact your administrator to check your permissions.
This section is a monthly representation of potential AzureSimple savings opportunities. Clicking the section opens the Recommendations page to view detailed filtering and other savings recommendations.
This section displays billing cycles from the past 90 days. It usually contains the last three billing cycles, but it might also contain four if the billing cycle spans two months. Clicking the section opens the Consumption Report page.
This section displays the three latest and most severe alerts from the past 30 days. This allows you to address unusual spending and prevent further cost impact. Clicking the section opens the Notifications Hub to view all notifications.
All AzureSimple recommendations are provided directly and the articles are written by SoftwareOne experts and backed by data-driven intelligence.
This section provides a quick overview of all requests and incidents reported in the past 90 days including their respective status. Clicking on the section opens the Help and Support page where you can view all ticket details.
As AzureSimple surfaces data from multiple platform systems, there may be a difference in data refresh rate across sections. The following table describes the data refresh rate for each section:
Potential Monthly Savings
the source is MS Azure Advisor, so the data could change every hour (after the page refresh)
Billing
once a day
Alerts
once a day
Support tickets
every hour (after page refresh)
Service Articles
latest with every page refresh
Only individuals with the Azure EA Enterprise Administrator role permission can carry out the migration steps. If you have trouble finding out who is your EA admin in Azure, see Microsoft's documentation on EA Billing administration on the Azure portal.
During the consent flow, the SoftwareOne Cloud Consumption app is added to the organization tenant. This enterprise application is granted the EA Reader permission, which allows us to read the consumption data. To add the application to the tenant, you'll need permission to approve an Enterprise Application.
If your EA admin doesn't have access to the Client Portal, you can collaborate with them by sharing your screen, so your EA admin can sign in and complete the authorization required for migration.
During migration, our system automatically assigns the EnrollmentReader role permission to the service principal.
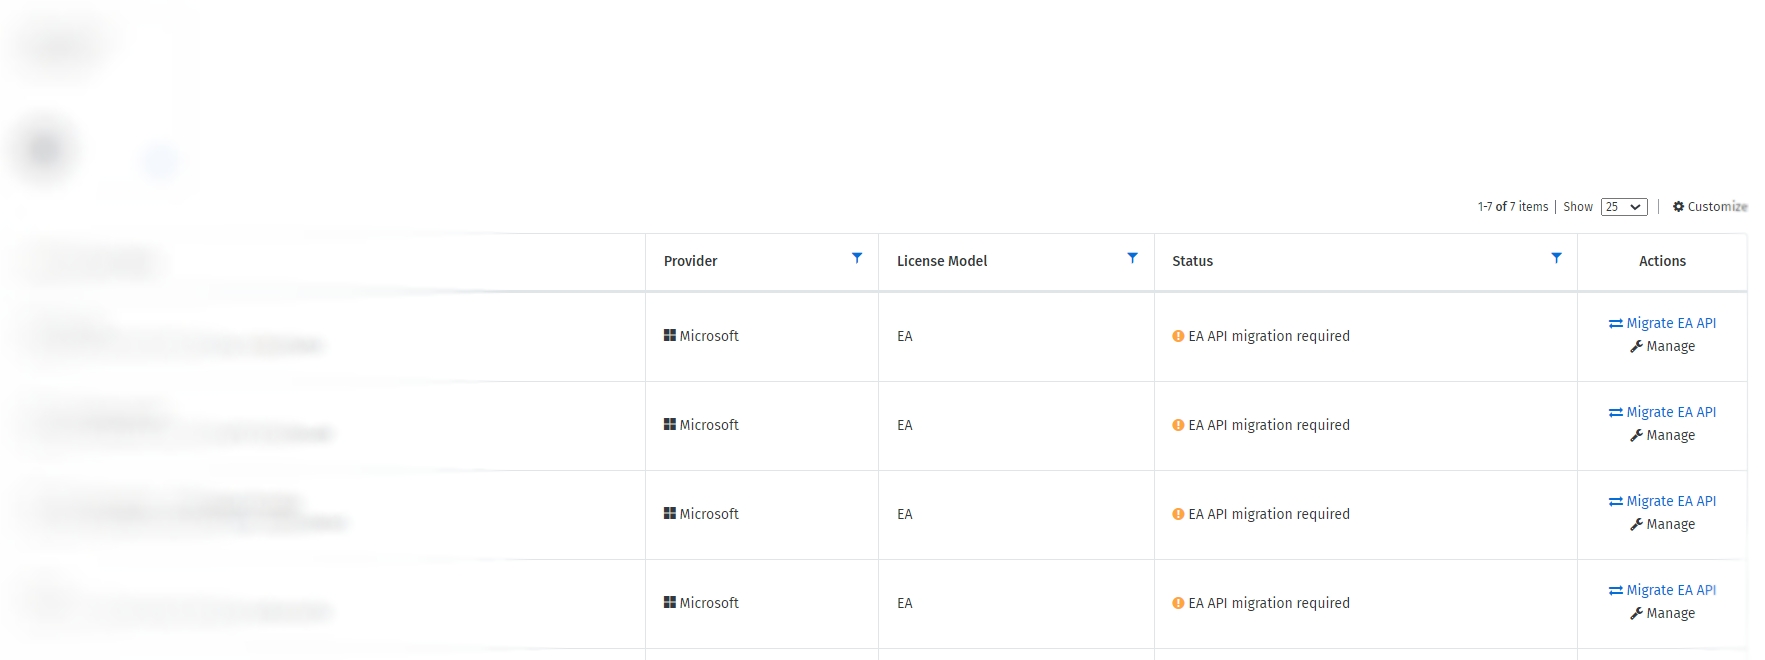
If you've already onboarded your EA cloud account to the Client Portal and have appropriate permissions to approve Enterprise Applications, follow these steps to transition to the new API:
Open the Cloud Tenant Setup page. EA cloud accounts that haven't been migrated will display EA API migration required in the Status column.
Select Migrate EA API.
In the Migrate to EA API window, enter the enrollment number and select Migrate.
Sign in to the Microsoft portal using the credentials of a user with Enterprise administrator permission.
On the consent page, review the permissions required by the Client Portal and select Accept to grant consent.
You'll be redirected to the Cloud Tenant Setup details page.
The system will mark the enrollment number you provided as migrated, and automatically assign the Enrollment reader permission to the SoftwareOne Cloud Consumption (formerly PyraCloud Azure) application. When the migration has been completed, the consumption data is fetched from Microsoft.
If you can't provide consent to approve enterprise applications or have environment restrictions, you can follow these steps to migrate and assign permissions manually:
On the Cloud Tenant Setup page, locate the required EA cloud account with the status EA API Migration required.
In the Actions column, select Migrate EA API.
In the Migrate to EA API window, enter the enrollment number, then select Migrate without consent.
On the details page of the tenant, select the Enrollment Numbers tab and select Show manual steps.
In Manual steps, assign permissions using Cloud Shell or REST API and select Close. Note that you must have the Azure EA Enterprise Administrator role to assign permissions.
The Enrollment Numbers tab on the details page of the cloud tenant displays the enrollment numbers that are migrated to the new API, along with the respective enrollment status:
Connected - Indicates that the system is connected and working as expected.
Cannot connect - Indicates that the Client Portal doesn't have access to the new Azure Cost Management API and the EnrollmentReader permission is missing. You can assign permissions using the Azure Cost Management API or Azure Cloud Shell.
Activation required - Indicates that the Client Portal can access the enrollment data, but the cloud account has not been set up as an EA account type.
If you're adding a new EA cloud account to the Client Portal, you'll need to provide the enrollment number while adding the account. For information on how to add a new EA account, see Activate your cloud account.
Locate the budget you want to view, and then in the Actions column, select View. The following details are displayed:
Utilized - Spend generated by resources assigned to the budget group within the budget time.
Final Spend - Prediction calculated until the end of the budget period.
Time Remaining - Days left until the end of the budget period.
Budgeting period - Start and end date of the budget.
Owner - Email address of the person responsible for this budget.
On the details page of your budget, you can also select the following tabs to view additional details:
By default, the budget amount is equally distributed across budget months.
Based on this, the table displays consumption and utilization information for every month. You can Edit Monthly Budgets to adjust the budget amount for each month.
This tab provides information about child budget amounts and utilization.
Consumption in child budgets is included in the parent budget utilization value. You can edit the child budget amounts by selecting Edit Budgets.
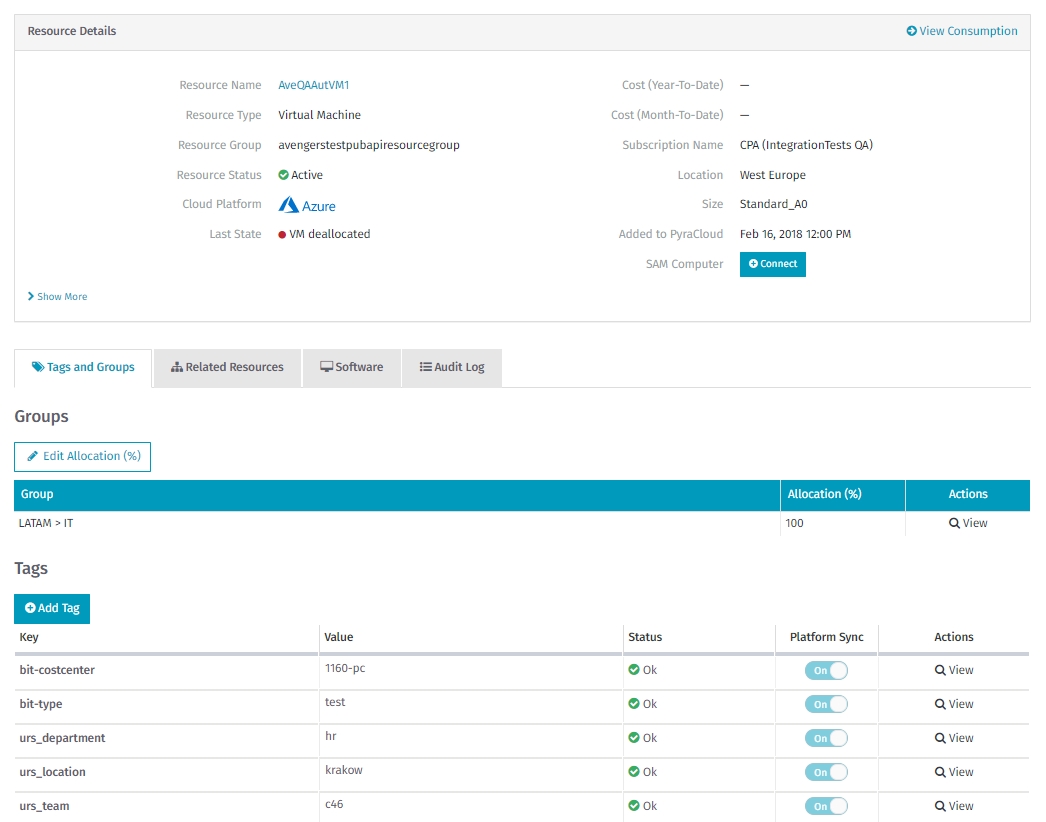
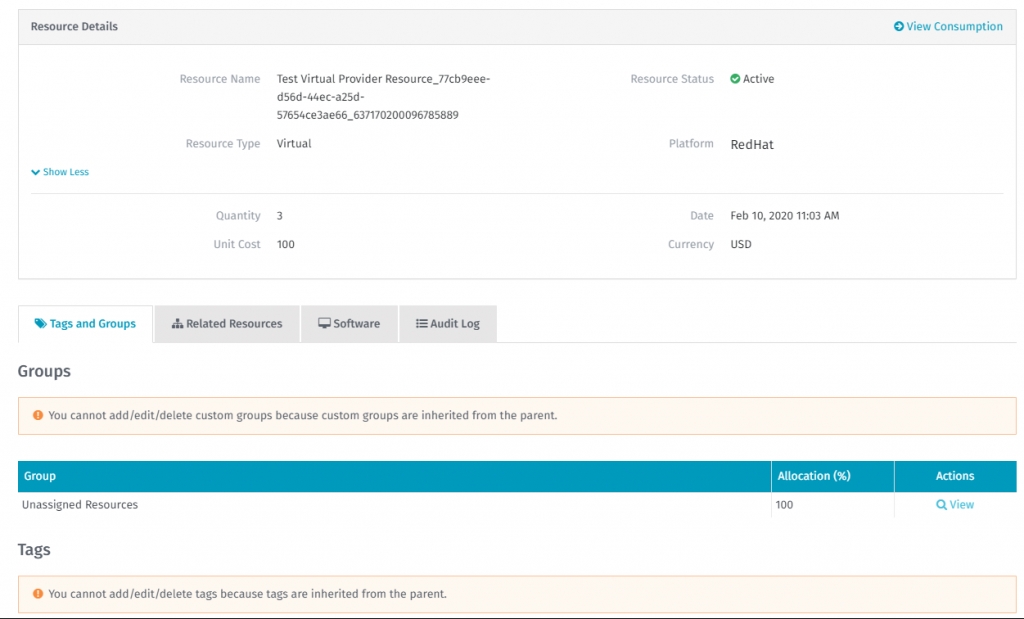
This tab shows the top-consuming resources of the displayed budget. You can expand a resource to view more details.
Select View in Resource Manager to open resource details in Resource Manager.
Select View Consumption to open resource spend analytics.
To view a per-provider budget:
Navigate to Cloud tools > Budgets.
Select the Per-Provider tab.
Locate the budget you want to view, and then in the Actions column, select View. The following details are displayed:
Utilized - Spend generated by resources assigned to the budget group within the budget time.
Final Spend - Prediction calculated until the end of the budget period.
Time Remaining - Days left until the end of the budget period.
Budgeting period - Start and end date of the budget.
Owner - Email address of the person responsible for this budget.
On the budget details page, you can also select the following tabs:
Subscriptions - Displays the list of subscriptions along with consumption and prediction details. You can add and edit the budget for a selected subscription by clicking on Edit Budgets or Add.
Top 50 Resources - Displays a list of the top resources consuming the most for that budget (Account or Subscription). You can expand the selected resource to view more details and navigate to the Resource page or the Consumption Details page in Consumption Overview.
High Availability - These recommendations help to improve the availability of an Azure environment.
Performance - These recommendations help improve the performance of an Azure environment.
All Azure Recommendations have a Cloud Recommendation type. The following are some examples of the Azure recommendations:
Buy Reserved Instances
Shutdown or Resize your Virtual Machine
Security Center Recommendations
Enable Soft Delete
Enable Backup
All Azure recommendations that are recommended by Azure (and not by SoftwareOne services) are automatically associated with resources whether they are virtual machines, storage accounts, or databases. For example, recommendations of SQL DB Advisor recommendations type are associated with SQL databases that need to be acted on.
The association from a recommendation to a related Client Portal resource is available on the Related Resources tab:
The Client Portal can detect the completion of recommendations in Azure. When a recommendation is completed in Azure:
The status of that recommendation is set to Completed in the Client Portal.
The potential savings amount on the recommendations is set to Realised.
The recommendation is moved from the Active tab to the Realised tab.
The realized savings from the recommendation are displayed on the Savings tile.
Before adding an account, make sure that you have the following details:
Account Information - You must have the tenant ID or domain name of the tenant that contains your Azure or Office 365 subscriptions. The tenant ID and domain name are available in your Azure account. For information on how to find these details, see Find IDs and domain names in the Microsoft documentation.
Permissions - You must have sufficient permissions to complete the onboarding process. The setup will fail if the permissions are not configured in the .
For an Azure account, you must have owner permission for the subscription you want to add.
For an Office 365 account, you must be a Global Administrator of the tenant that contains the subscriptions.
Follow these steps to add a new cloud account to the Client Portal:
On the page, select Add Cloud Account.
On the Add Cloud Account page, click Azure and provide the following details:
Friendly Name - Provide a name for your Microsoft tenant.
On the consent page, review the permissions required by the Client Portal and click Accept to grant consent.
After clicking Accept, you'll be redirected to the Cloud Tenant Setup details page to view the new tenant and its activation progress. After activating your tenant, you can add subscriptions and allow the Client Portal to write tags back to your Azure resources.
When you return to the Client Portal, you might see a blank page for a few seconds. To learn about the process that takes place after you provide consent, see
Many organizations have several Azure subscriptions in a single Microsoft tenant. In some cases, it's not always the same person who has Owner permissions on all those subscriptions. In such cases, each subscription owner must activate their subscriptions.
Follow these steps to add more subscriptions:
On the Cloud Tenant Setup page, select Manage.
Select Add Existing Subscriptions to add more subscriptions.
In Add New Subscription, choose the type of subscription and select Add.
When you activate your Azure subscriptions for the first time, the Client Portal assigns the Reader role by default. This means that the Tags and Resources feature can import your resources and tags from Azure, but it cannot synchronize any tag changes you make in the Client Portal back to Azure.
For Tags and Resources to synchronize tags back to Azure, you must change the level of access the Client Portal has for your Azure subscription.
To change the level of access:
On the Cloud Tenant Setup page, select Manage.
Select Change Access for the subscription you want to modify.
Select one of the following access levels and click Change:
This topic describes how to manually integrate your Azure tenant and assign the Reader and Tag Contributor roles to the Client Portal using Azure Management Groups.
Integrating a Microsoft tenant involves the following steps:
Granting consent to the Client Portal in your Azure tenant.
Assigning the Tag Contributor and Reader access roles to the Client Portal using Azure Management Groups. The Tag Contributor and Reader roles allow the Client Portal to read a list of all the resources in your Azure subscription and read and write tags on those resources. You can control whether you want the Client Portal to write tags back to resources in your Azure subscription. For more information, see .
Providing the details to SoftwareOne to complete your onboarding.
To grant consent through your Azure tenant:
Select one of the following links:
On the
To assign the Tag Contributor and Reader access roles:
Launch the and search for Management groups.
On the Management groups page, select Start using management groups.
Provide the Group ID and a display name for your group. Select Submit. The new group is created and displayed under the Tenant Root Group.
After completing the integration steps, provide the following details so we can complete the onboarding of your tenant:
Your Microsoft Tenant ID (or domain).
A friendly name for your tenant to recognize easily across the Client Portal.
The start and end date of your Enterprise Agreement.
After we have added your tenant, you'll need to provide an access token from the EA Portal.
View or add prices from the IaaS/PaaS cloud providers.
Follow these steps to open a provider price list
Go to the Pricelist Center and choose a “Price List Type” and for some providers the “Region”.
Select Search to display the results of that provider’s prices.
IaaS/PaaS Price Lists often have specific prices for certain Regions.
For instance, Microsoft may charge a different price for an A3 Cloud Service or Virtual Machine, between a US and UK region.
Use the Product Name and the Region fields to narrow down the prices:
As a result, many A3 options will be displayed, but only based on those two regions. Here is an example:
SaaS Price Lists are different from IaaS/PaaS Pricelists from Cloud Providers. SaaS Price lists are based on what Subscriptions or Licenses are active for that SaaS Provider.
To search for a specific Price for an Office 365 product, be sure to select the Office 365 Pricelist and type in a product name or select from an Active Tenant.
It’s important to add any missing price to the Pricelist Center, to ensure accurate Consumption reports are generated as you analyze spending over time on the Consumption Overview page.
To determine what SaaS Subscriptions/Licenses require prices, go to the Pricelist Center and select the Missing Prices tab.
If this is the first time entering prices, you might notice several Subscriptions/Licenses with missing prices.
Add the proper pricing to each Subscription/License by selecting + Add new price button. Note that adding prices requires a recalculation of the historical spending information within our system. This could take up to 24 hours to complete.
After the SaaS prices are added, you can update them in the future or remove them if they are not accurate.
To do so, navigate to the Pricelist Center and select Customer Set Prices.
On this page, you can see the current prices for SaaS products.
By selecting View, you can review the history of prices and their start dates, for example, if you are renewing a contract with a different price or want to see how far back prices are applied. You can also view the historical prices, change prices, or add new prices.
If you are unable to edit or add a new price, it might be due to your permissions. Contact your administrator to change permissions.
Define your organizational structure and assign cloud resources based on your business requirements.
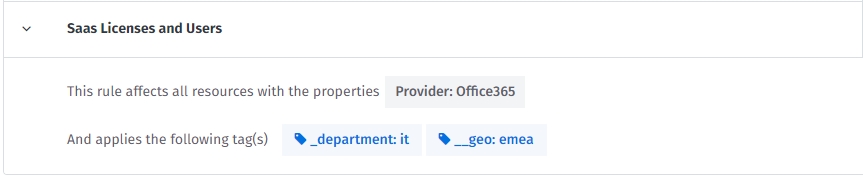
Custom groups allow you to define an organizational hierarchy (for reporting and budgeting) and govern cloud environments (resources running on Azure, AWS, and Office365 licenses).
With Custom Groups, you can build a hierarchical structure based on custom-defined dimensions, for example, departments, teams, or projects, and map resources.
To keep the organizational assignments of a resource (tag) consistent with the tagging on the cloud provider environment, Custom Groups interfaces with the Tags and Resources. This allows you to ensure data consistency within the portal and within the cloud environments of Azure and AWS.
Manage your Office 365 recommendations.
Office 365 recommendations are recommendations from SoftwareOne that you can take advantage of. These recommendations are populated by your SoftwareOne Services Account team, so you can make the best use of your Office 365 environment.
All Office 365 Recommendations have a Cloud Recommendation Type. The following are some examples of recommendation types:
Find information on how the IaaS/PaaS Cloud provider price lists work.
The Pricelist Center is a part of our Cloud Management experience. You can use the Pricelist Center to check the latest prices from IaaS/PaaS Cloud providers or set prices for SaaS Cloud providers.
Many supported IaaS/PaaS Cloud providers publish a price list either based on current pricing levels or a list price for their service. In addition, those same providers offer Reserved Instances as a separate price list.
SaaS Cloud Providers don't provide price lists, but prices have to be set by you or SoftwareOne.
If you are an Office 365 EA or Adobe client, you might need to set the price for each of your subscriptions/licenses and then update them by date, based on any changes to contract renewals.
Microsoft Tenant ID or Tenant Domain - Provide the tenant ID or domain.
License Model - Select the license model (Enterprise Agreement or Microsoft Customer Agreement).
Enrollment Number - Provide the enrollment number. Note that this field is displayed only if you select Enterprise Agreement as your license model.
Select Add Cloud Account.
Sign in to the Microsoft portal using the credentials of a user who has Owner permissions to the Azure subscriptions you want to add.
If you select Office 365, the user performing the consent must be a Global Administrator of the tenant.
Sign in to the Microsoft portal using the credentials of the user with Owner permissions to the Azure subscriptions you want to add.
On the consent page, review the permissions and select Accept to grant consent. After granting consent, you'll be redirected to the Client Portal.
Sync resources and tags – write back of tags disabled - Tags and Resources will download your resources, including the tags currently assigned in Azure. Any changes to tags will be stored in the Client Portal only. Any tags assigned to resources in Azure will overwrite the tags for the corresponding resource in the Client Portal. This setting requires the Reader role in your Azure subscription and will not make any changes to resources or tags in your Azure subscription.
Sync resources and tags – write back of tags enabled - Tags and Resources will download your resources to the Client Portal, including the tags currently assigned in Azure. Any changes to tags will be synchronized back to your resources in Azure. This setting requires the “Tag Contributor” role in your Azure subscription and will only make changes to tags.
Sign in to the Microsoft portal using the credentials of the user with Owner permissions to the Azure subscriptions for which you wish to modify the access level.
On the consent page, review the permissions and select Accept to grant consent. After granting consent, you'll be redirected to the Client Portal to view the updated access level. If you notice a blank screen, refresh the page.
After granting consent, launch the Azure Portal and navigate to Azure Active Directory > Enterprise applications to make sure that SoftwareOne Cloud Consumption (formerly PyraCloud) is listed in your enterprise applications.
Navigate to Role assignments and select Add > Add role assignment from the dropdown.
Assign the Reader role to the Client Portal:
Choose Reader from the list of roles and select Next.
On the Members tab, click Select Members.
Search for SoftwareOne Cloud Consumption (formerly PyraCloud Azure for Azure or PyraCloud Office 365 for Office 365) and then select it from the search results. Click Save.
Assign the Tag Contributor role to the Client Portal:
Choose Tag Contributor from the list of roles. Select Next.
On the Members tab, click Select Members.
Search for SoftwareOne Cloud Consumption (formerly PyraCloud Azure for Azure or PyraCloud Office 365 for Office 365) and then select it from the search results. Click Save.
Select Review + assign and then Review + assign again. The new roles are displayed on the page.
From the left sidebar, select Access control (IAM) and go to the Role assignments tab.
Choose the role that you want to remove and select Remove.
Select Yes to confirm the role removal.
The built-in functionalities across Custom Groups and Resources allow users to decide how to handle those tag assignments (lock, allow overwrite, and so on) and are included as a framework that can be configured according to your requirements.
Before creating custom groups, ensure that you document the objectives for the structure. The common requirements that influence the setup of Custom Groups include the following:
Business related
What is the granularity of chargeback requirements?
What is the granularity of budget requirements?
What are the reporting requirements (e.g. every month the global cost to CIO and department, split by departments)?
IT related
Is tagging already in use and how?
Is it enough to stay high level or is there a need to also report on different stages of the workload (e.g. Test, UAT, Production, etc.)?
Custom Groups are structured in a way that they allow almost endless scenarios of an organizational setup. Therefore the horizontal (Groups) and vertical (Group Levels) structure must be defined:
Custom Groups use structure levels to define the levels of an organization, and are used to assign individual groups. Examples of common dimensions are:
Company
Location
Department
Team
Service
These dimensions are directly mapped to Tags and Resources as tag keys. This allows you to directly synchronize between the portal and the Cloud Provider.
Identifying the right setup and sequence of dimensions is critical to keeping flexibility throughout the use of Custom Groups. The dimensions are the predecessor to the hierarchical structure of Custom Groups and changing a dimension requires removing the groups.
Defining the group name is a bit more flexible than defining the dimensions. Group names correspond with the tag values and can be created and deleted at any time. Examples of common group names include:
SoftwareOne (for Company)
Switzerland (for Location)
Marketing (for Department)
Sales Area South (for Team)
Mail (for Service)
You can assign one group across the same parent dimension to allow for cross-vertical reporting. For example:
1st dimension values for Location: Switzerland, USA, Brazil, and so on.
2nd dimension values for Department: Finance, HR, and so on.
This will allow reporting, budgeting, and chargeback by location including the corresponding departments (top-down), and run cross-vertical reporting by department (independent from location).
To better outline the link between the organizational requirements and the recommendation on how to structure your groups in Custom Groups, the following customer scenarios will be used throughout the document and reflect 3 examples:
This scenario represents organizations that are:
Single company
Flat structure
Single Country
Most likely department's view
Changes to the organization are unlikely
In this case, the recommendation is to define two dimensions:
This scenario represents organizations that are:
Group of companies
Requires support for M&A
Multi-country
Fragmented department structure
Organization changes throughout the year
This scenario represents organizations that are:
Services oriented
Multi-customer (internal and external)
Focus on release management
Frequent on-/off-boarding
The recommendation is to define 3 dimensions:
License Cleanup & Reconciliation
Savings
Shared Mailbox Size – Mailbox approaching 50GB
Savings
SecureScore Recommendation – Device
Security
SecureScore Recommendation – Apps
Security
SecureScore Recommendation – Identity
Security
SecureScore Recommendation – Data
Security
Email Forwarding
Security
Empty Groups
Infrastructure Hygiene
You can filter the Office 365 recommendations based on certain criteria:
Category
Allows you to filter the recommendation based on the category. Possible options are:
Savings
Security
Infrastructure Hygiene
New Features/Updates
Provider
Allows you to filter the recommendation based on the provider. Possible options are:
Software Asset Management
Azure
AWS
Office 365
Cloud Recommendation Type
Represents the type of recommendation.
Severity
Possible options are:
High
Medium
Low impact
Alert
Represents the alert statuses associated with the recommendation. Possible values are:
Unread
Updated
Expires soon
You can access the Pricelist Center by navigating to the main menu and selecting Cloud tools > Pricelist Center.
On the Pricelist Center page, you can view the following information:
Pricelist View tabs
The following tabs are available:
All - Shows all pricelists.
Missing Prices - This tab shows missing prices. Missing prices mean that a consumption report might not be accurate. Click the tab to add any missing prices. This view is empty if all products have a price.
Customer Set Prices - This tab shows all products containing customer-defined prices. On this tab, you can maintain configured prices.
Filters
Allows you to find products by Price List Type, Product Name, Region, or Currency.
More Options
Allows you to find products of interest.
Product
The name of the product, provided by the Cloud Provider and Pricelist.
Agreement
The agreement ID. The ID is displayed if you have multiple agreements for the same product.
Service Review
latest with every page refresh
1
The starting date for the price entered.
The Client Portal only collects SaaS data based on when the SaaS Subscription was added to PyraCloud. So dates can either be the date the SaaS Subscription was added to the Client Portal or the date when you purchased these subscriptions/licenses.
Anything before the integration with Client Portal will be ignored. If you don’t know the prices for your SaaS license, contact the individual who purchased the SaaS service for your organization.
2
Enter the price for your SaaS subscription/license. Once complete, click Add to add this price to the subscription/ license.
3
The Currency is set based on the contract information stored in the Client Portal.
If the currency requires updating, contact Support or the SoftwareOne Account team.
You can use Azure Management Groups to grant the Client Portal access to your Azure subscriptions. This approach has the following benefits:
You can assign access to multiple subscriptions in a single step.
If you create more Azure subscriptions in the future, access will be automatically granted. It means that when you add an Azure subscription to your tenant, activating it in the Client Portal is unnecessary.
When you onboard your tenant to the Client Portal, an Enterprise Application called SoftwareOne Cloud Consumption (formerly PyraCloud) is created in your tenant. You must then assign the Tag Contributor and Reader roles to the "PyraCloud (Azure)" Enterprise Application:
These roles allow the Client Portal to read a list of all the resources in your Azure subscriptions and read and write tags on those resources. You can choose whether you want the Client Portal to write tags back to resources in your Azure subscription using the Cloud Tenant Setup feature.
Use the following commands to onboard your Azure subscriptions:
The following table explains these commands:
Before granting access through the Azure Portal, note the following points:
Ensure that you have .
Ensure that you have the correct permissions to manage access to all Azure subscriptions and management groups in your tenant. For instructions, see in the Microsoft documentation.
Track your cloud resource usage.
The Utilization module allows you to track your cloud resource usage so you can determine which resources can be de-allocated or resized.
You can access the Utilization module by navigating to the main menu of the Client Portal and selecting Cloud tools > Utilization.
The Utilization page contains search filters and tabs that allow you to choose a resource type. When you search for a resource, your list of resources are displayed in the grid.
Search filters - You can search by relevant resource properties and additionally, you can filter resources by recommendations (if applicable). For example, you can review all resources recommended for “shutdown” and see if utilization is low.
Virtual Machine and Storage tabs - Utilization currently supports two resource types, Virtual Machines (that include Azure scale sets) and Storage accounts. Utilization supports both Azure and Amazon resources in one single unified view.
List of resources - On the main page you will see a table with a list of your cloud resources with the main metric selected – for Virtual Machines it is Average CPU, and for Storage Accounts it is Capacity
You can navigate to details by clicking View on the Utilization page.
The page contains four main areas:
Resource Basic Information - This section contains information, such as group, subscription, provider, and tags. Additionally, you can navigate directly to the Recommendation module.
Date Range Selector - Currently, there are two types of selectors – 30 days and 7 days (older data is automatically removed). In “30 days” mode you see a daily aggregation chart (4) and in the 7 days chart you see hourly aggregation.
Metric Selector - This drop-down allows you to view available metrics. The module currently supports CPU and network traffic for Virtual Machines, and Capacity and Counters for storage accounts. After selecting, the metric chart is adjusted automatically.
By clicking on the legend (1) you can show/hide scale set nodes.
The utilization module supports custom alerts, so you can set up notifications based on the low utilization of your machines, or overutilization of your storage accounts.
To create alerts, complete your search and then select Create Alert.
By default, the alert modal appears with Virtual Machine (CPU) notifications. You can configure notifications to be alerted if machine utilization (from your search criteria) drops below (10%, 20%, or a custom percentage).
You can also configure alerts based on the capacity of the storage accounts. If it grows above a defined threshold you will then be notified. The alerts are generated once per day at 5:00 a.m. UTC
If the utilization module is not able to pull utilization metrics, you will see the following message:
Utilization uses CloudWatch to pull metrics. If you see the above message, it means CloudWatch was not assigned to PyraCloudRole.
Follow these steps to resolve this issue:
Open the AWS Console and navigate to IAM.
Locate PyraCloudRole.
In the role, click PyraCloud ReadOnlyPolicy.
Click Edit policy.
Switch to JSON view.
In the editor, add cloudwatch:GetMetricStatistics and click Review.
In the review summary, you should see CloudWatch permission.
Save your changes.
If using AWS Organizations, repeat these steps for all linked accounts. Utilization synchronizes data every hour, so your utilization metrics will be synchronized with the Client Portal during the next sync.
Others
Inactive Distribution Groups
Infrastructure Hygiene
Inactive Mail Recipients
Infrastructure Hygiene
Email Archive
Infrastructure Hygiene
Owner
Represents the name of the person to whom the recommendation can be assigned for better tracking and management of the recommendation.
On the Management groups page, select Tenant Root Group. Note that regardless of your organization's configuration, you'll always have a Tenant Root Group. It might have been renamed, but it always appears at the top of the hierarchy.
On the Role tab, select Reader as the role and then select Next.
On the Members tab, select User, group, or service principal if it's not selected by default. Then, choose Select members.
In the Select members panel, search for SoftwareOne Cloud Consumption (formerly PyraCloud Azure).
Use Select to add the enterprise application to the Members list. After the app has been added, select Review + assign.
On the Review + assign tab, review the details and select Review + assign to confirm the role assignment.
To assign the Tag Contributor role, follow all the steps in Step 3: Assign the Reader role, but choose Tag Contributor as your role instead of Reader.
After completing the steps, the roles are assigned and displayed on the Role assignments tab.
az login
Log in to your Microsoft tenant.
az rest --method post --url "/providers/Microsoft.Authorization/elevateAccess?api-version=2016-07-01"
Elevate your permissions to manage all Azure subscriptions and management groups. See Microsoft Documentation.
az ad sp create --id 2a4807a4-d9e4-457d-b32f-a455e0d3662a
az ad app permission grant --id 2a4807a4-d9e4-457d-b32f-a455e0d3662a --api 00000003-0000-0000-c000-000000000000 --scope "User.Read"
Create the PyraCloud (Azure) service principal (Enterprise Application) in your tenant.
$root_mg=$(az account management-group list --query "[?displayName == 'Tenant Root Group'] | [0] | id" --output tsv)
Get the ID of your Tenant Root Group.
az role assignment create --assignee "2a4807a4-d9e4-457d-b32f-a455e0d3662a" --role "Reader" --scope "$root_mg"
az role assignment create --assignee "2a4807a4-d9e4-457d-b32f-a455e0d3662a" --role "Tag Contributor" --scope "$root_mg"
Assign the Reader and Tag Contributor roles to the PyraCloud (Azure) application in your Tenant Root Group.
Chart Area - As well as plotting metrics data, the chart can also present scale set resources, so you can analyze multiple nodes running on scale set.
Date
Indicates when the price for this product was last applied by the user or updated by the provider.
Region
The price of the products, if the price is different per region.
Currency
The currently set price or the prices per currency.
For SaaS Prices, only one currency is displayed.
For IaaS/PaaS prices, multiple currencies are displayed.
Unit Price
The price is set by the user or as provided by the provider.
Actions
View - Shows the details of this product.
Add new price - When a price can be added to an individual product, the + Add new price option is displayed.
Customize
Displays additional columns or hides existing columns.
Export
Allows you to export the data.
Cloud Cost Optimization Dashboard.
The Cloud Cost Optimization module allows organizations to deliver optimization to their cloud infrastructure, and deliver savings through various strategies that form a part of the framework.
You can access the dashboard by navigating to the main menu of the Client Portal and selecting Cloud tools > Cloud Cost Optimization.
The Cloud Cost Optimization Overview page contains two sections Overview Chart and the Overview Grid.
The Azure and AWS tabs summarize cost optimization opportunities for the cloud environments. The top pane summarizes savings through a pie chart and the following metrics:
Savings breakdown by Strategy - The pie chart shows a percentage breakdown of achievable Savings as a proportion of the total savings. For example, in the chart above, Savings through Azure Hybrid Benefit is 41.45% of Total Predicted Savings (EUR 1,080,421.31). All the numbers are calculated for 1 year or 3 years depending on the selection in the dropdown.
Year selection - The metrics shown on the top pane are based on the year selection of 1 year or 3 years.
Changing the year selection in the dropdown does not persist in the year setting in the system. It is only meant to show you the savings achievable over 1 or 3 years. Changing the setting in the backend is only available to Cloud Cost Optimization consultants. If you need to change the year setting, please speak to your Cloud Cost Optimization Consultant, who will be able to do it for you.
Total Predicted Cost - This value represents the cost of your Azure environment over the next year or three years.
Total Predicted Savings - This value represents the savings achievable as a proportion of the total cost.
Calculations across the Cloud Cost Optimization system assume consumption data and costs for the last 2 weeks. This setting can be configured by your Cloud Cost Optimization Consultant to one of the last 2 weeks, last 4 weeks, last 12 weeks, and last 52 weeks.
The grid breaks down the savings achievable through each of the strategies. The Predicted Savings % in the grid for each strategy is a proportion of the cost for that strategy. Therefore this might be different from the percentage shown in the pie chart above (which shows it as a proportion of total savings).
The Strategy pages each explain an optimization strategy that allows you to achieve savings. This section explains the components of any optimization strategy and allows you to understand common operations on these pages. The following are the strategies for Cloud Cost Optimization:
Orphaned Resources
DEV/TEST (Not available for AWS environments)
Rightsizing
Resource Automation
Showing for - This indicates the year selection that the rest of the metrics are based on. This can only be changed by the Cloud Cost Optimization Consultant. Please reach out to them if you want to change this.
Cost at point of optimization - This indicates the cost at the point of optimizing all the impacted resources in the strategy.
A strategy can be marked as complete only if all previous strategies are completed. This is because every complete strategy influences the savings achievable on subsequent strategies.
Marking a strategy as complete will mean no changes can be made to the strategy i.e. no resources can be dismissed from the strategy, or no already dismissed resources can be included in the strategy. To do these operations on a completed strategy, you must re-open a strategy. You can reopen a strategy, only if all strategies after it are open.
Each of the strategy pages enables users to export data on the grid to an Excel file using the Export button on the top right of the grid.
The export button will only export the columns visible on the grid at the time of the export. However, you can customize the grid to show extra columns using the Customize button.
The Orphaned resources allow one to identify resources that can be shut down or decommissioned as they are not being effectively utilized. Note that resources that show up in Orphaned Resources, will not show up in other strategies, as they will be shut down on completion of the Orphaned Resources strategy.
Instance modernization is about paying the best price for the same resource while maintaining or improving its capabilities.
This strategy identifies resources that can be rehoused in a cheaper region, thereby reducing the overall cost of the resource.
Optimization recommendations for this strategy are dependent on the selection of a region subset. This selection is done either by the customer or by the consultant.
If the regions have not been selected, then you may likely see this on the Cross-Region Optimization strategy page.
In order to move forward, kindly select the regions by clicking on Edit, and select the regions and save changes.
The Savings threshold is the minimum savings that needs to be achieved to make the resource viable for Cross-Region Optimization.
Note that the savings threshold used is 10% by default, and this configuration can only be updated by your Cloud Cost Optimization Consultant.
Similar to the regions that can be selected at the strategy level, a region can be overridden per resource. You may typically want to do this, if there is a particular resource that you want to house in a fixed region, regardless of the savings available through other regions.
Note that resource-level regions can only be selected from among the region subsets already configured by the user or the consultant. E.g. if the region subset is set to West Europe and North Europe, the resource-level region can only be set to one of these two.
You can do this by navigating to Resource Details > Edit.
Note that if a region is set at a resource level, then it will not be assigned a cheaper region automatically by the system.
This strategy identifies resources that can be automated to be on during certain times of the day and shut down during others.
Resource uptime is defaulted to 24 hours a day, 7 days a week. This setting can be updated by your Cloud Cost Optimization consultant if there is a common Automation uptime window for all your resources.
An uptime window can be configured on resource level using Resource Details > Edit, as shown below.
If a resource is planned to be used more than 60% of the time during a year, it might make sense to commit consumption for 1 or 3 years. Doing this can result in savings of up to 40% on compute cost, depending on the resource being committed.
Reserved Instance term is defaulted to 1 year for every resource.
Resource Level Reserved Instance Term Configuration
Reserved Instance term can be configured on resource level using Resource Details -> Edit, as shown below.
This strategy is not available for AWS Cloud Cost Optimization
Hybrid Use Benefits for Windows Sever provides, under specific conditions, the option to bring your own Windows Licenses, with active Software Assurance to cover virtual machine licenses in Azure. Using this benefit could save up to 40% on license costs, which are normally hidden behind the virtual machine cost.
Similar to Hybrid Use Benefits, Bring Your Own License benefits allow customers to bring other licenses to Azure or AWS, and receive a discount for the licensing portion of the cost. In this section we calculate savings for Microsoft SQL Server and Redhat Enterprise License.
No configuration is available to users on this strategy. License Cost for Windows, Linux and SQL can be updated by your Cloud Cost Optimization Consultant.
This topic describes how to create, remove, and manage custom groups.
To create custom groups:
Navigate to Cloud tools > Custom Groups.
Select Create a group to start building the group structure.
On the Edit Group Structure page, set up the structure levels. Choose Tag Keys as Structure Levels.
Assign groups to the created structure levels. To create groups, choose New group for the required structure level:
You can create groups using already existing tags or manually.
Example
You can also create Custom Groups automatically. The platform can create groups for you based on existing tag combinations that match the defined structure levels.
Enable the following option when editing the structure for this automation:
If groups don't exist, they will automatically be created if automation is enabled and there is a matching tag combination in your infrastructure. This process constantly runs in the background. The group will also be created once you modify resource tags in Resources or you use Resource Rules. The mechanism does not automatically remove any existing groups.
When the automation is enabled, it's not possible to remove a group with resources assigned. Such a group would immediately be created again.
Enable the following option to allow the system to automatically remove groups without resources and budgets:
Once enabled, the system will periodically scan your structure and remove groups that have no resources assigned and no budgets created.
Consider this setting if you want to have your structure maintained fully automatically.
Once the structure has been created, you can go back to Custom Groups to see all resources:
You will see the view shown below. The next step is to navigate to “Unassigned Resources”:
In unassigned resources, you can find all resources that are not assigned to groups. You can use filters to find resources in order to assign them to a specific group.
There are two possible ways to group resources:
Assign resources to a group.
Assign resources to multiple groups.
If required, search for the resources. Then select the check boxes of the resources, select Move, and select the group:
Those resources are now assigned to the selected group, and their entire resource spend will be fully associated with this group.
Assigned resources receive tags that reflect the group assignment structure. As an example, the resources assigned to group “Location-A” have the following tags:
Assigning resources to multiple groups means that the spending of such resources is split between selected groups according to the way users specify.
If required, search for the resources. Then, select the checkboxes and select Edit Allocation.
Specify the split details on the Split Allocation page:
Select the groups and provide an allocation percentage for each group.
Repeat the step to select groups and specify the allocation percentages. If this is done, select Save Cost Split:
The cost of those resources will be assigned in the following way:
70% of the cost is assigned to the group EMEA> HR
30% of the cost is assigned to the group: krakow1
You can see the split resources assigned to the groups provided. They are marked with the “Split” icon.
Resource group assignments can be managed through the following modules:
Custom Groups - Go to the details of a resource and select View Cost Allocation.
Resources - Go to the selected Resource Details page. Resource group assignment information is provided in the Groups section.
az login

az rest --method post --url "/providers/Microsoft.Authorization/elevateAccess?api-version=2016-07-01"

az ad sp create --id 2a4807a4-d9e4-457d-b32f-a455e0d3662a

az ad app permission grant --id 2a4807a4-d9e4-457d-b32f-a455e0d3662a --api 00000003-0000-0000-c000-000000000000 --scope "User.Read"

$root_mg=$(az account management-group list --query "[?displayName == 'Tenant Root Group'] | [0] | id" --output tsv)

az role assignment create --assignee "2a4807a4-d9e4-457d-b32f-a455e0d3662a" --role "Reader" --scope "$root_mg"

az role assignment create --assignee "2a4807a4-d9e4-457d-b32f-a455e0d3662a" --role "Tag Contributor" --scope "$root_mg"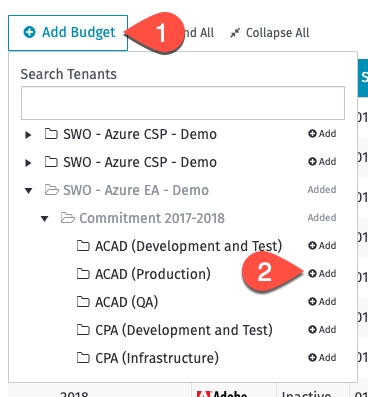
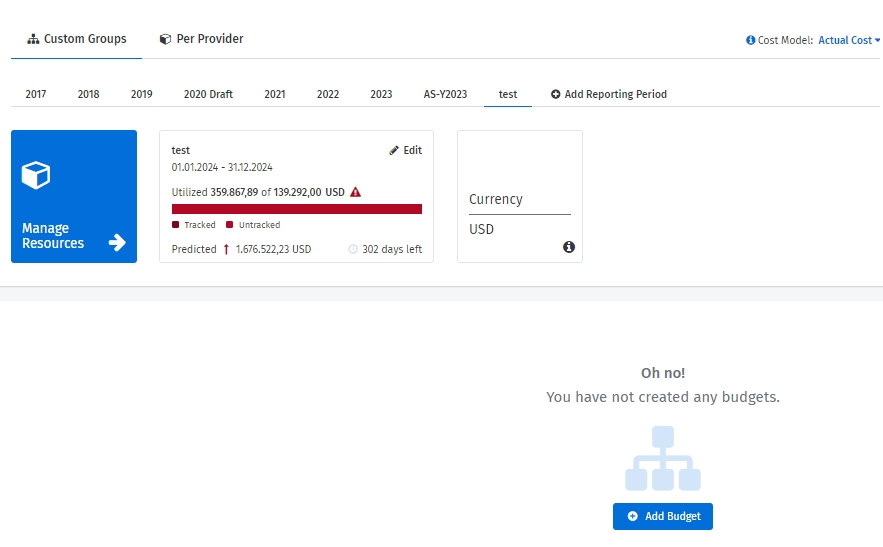
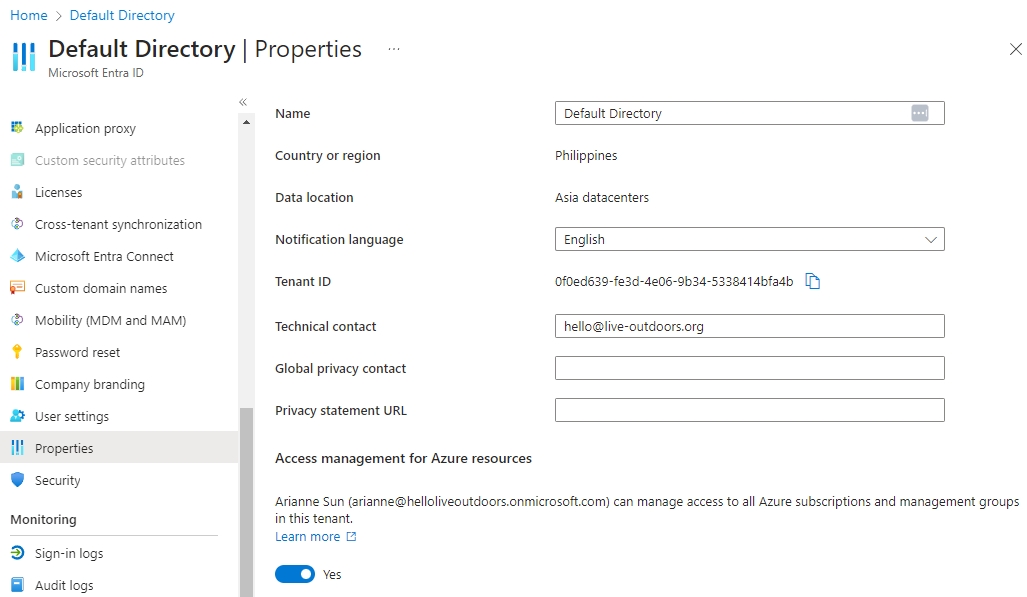
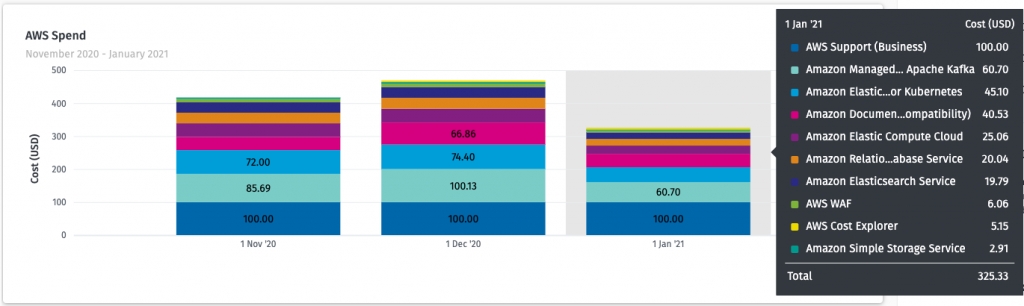
Cross Region Optimization
Instance Modernization
Reserved Instances
Azure Hybrid Benefit (Not available for AWS environments)
Bring your own License
We recommend that you review the Review Changes tab every time you log in, so you are aware of all recent activity within the Cloud Cost Optimization system.
Default Customer
Enterprise Customer
Service Based
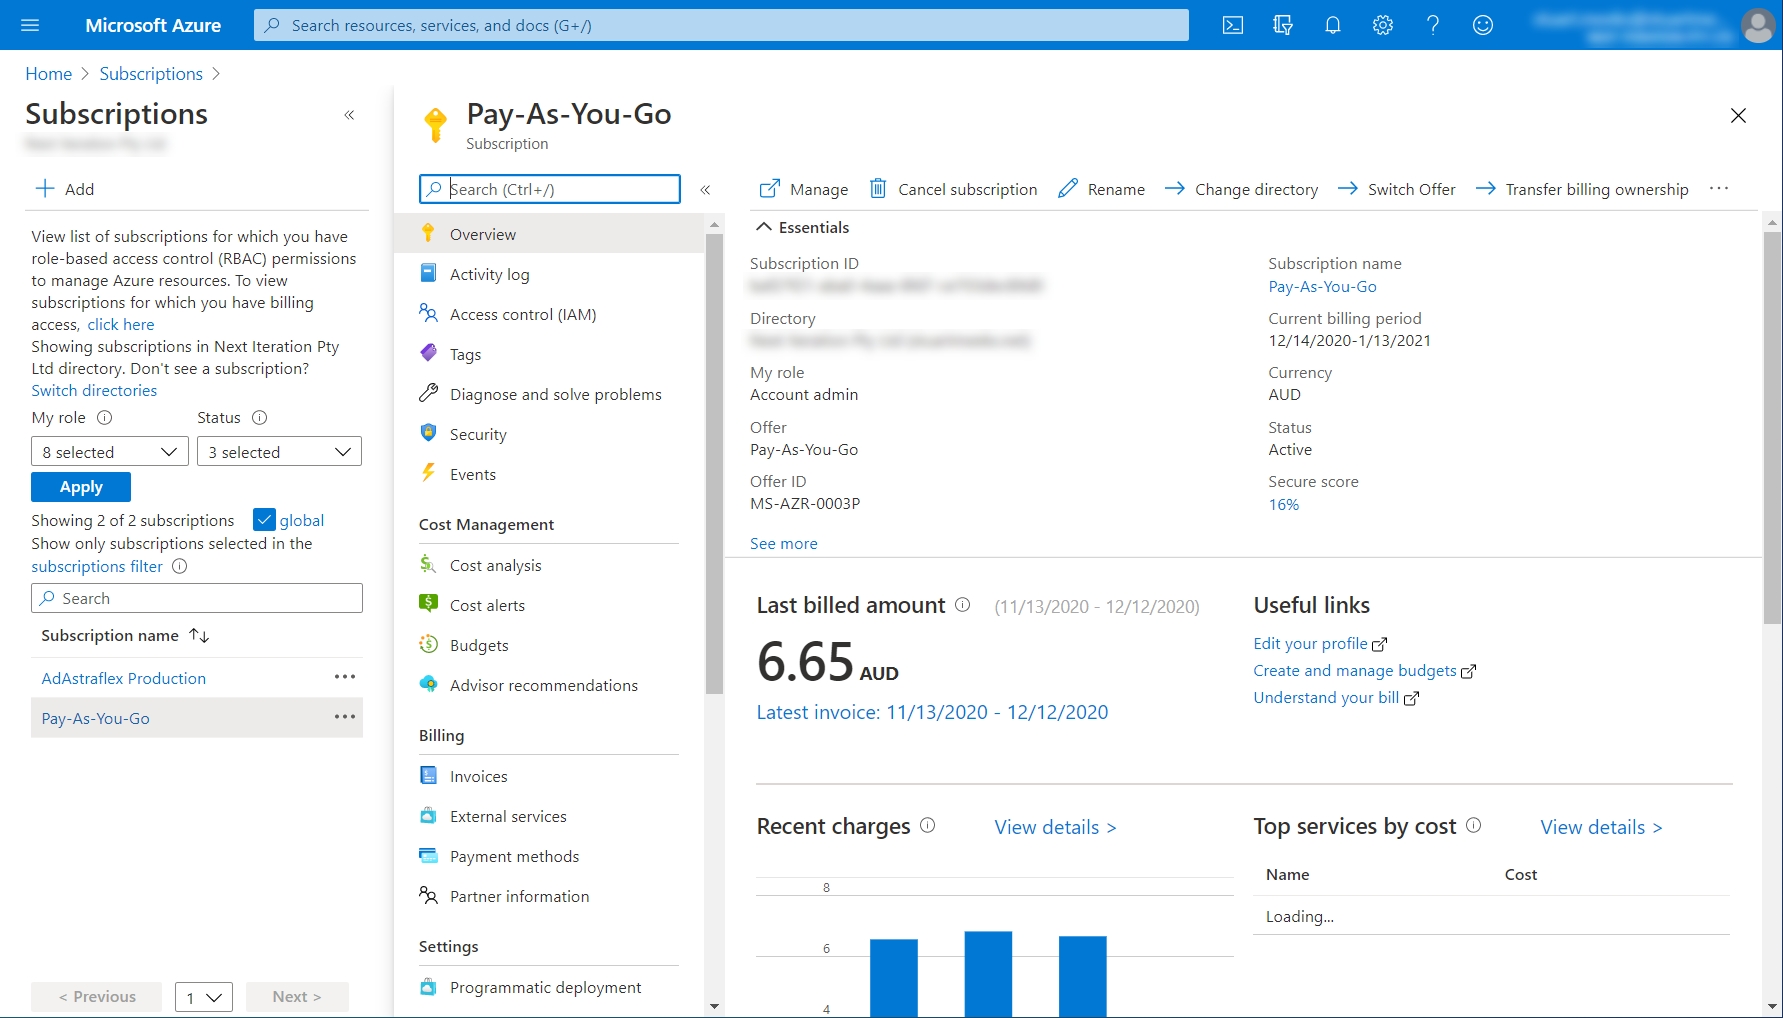
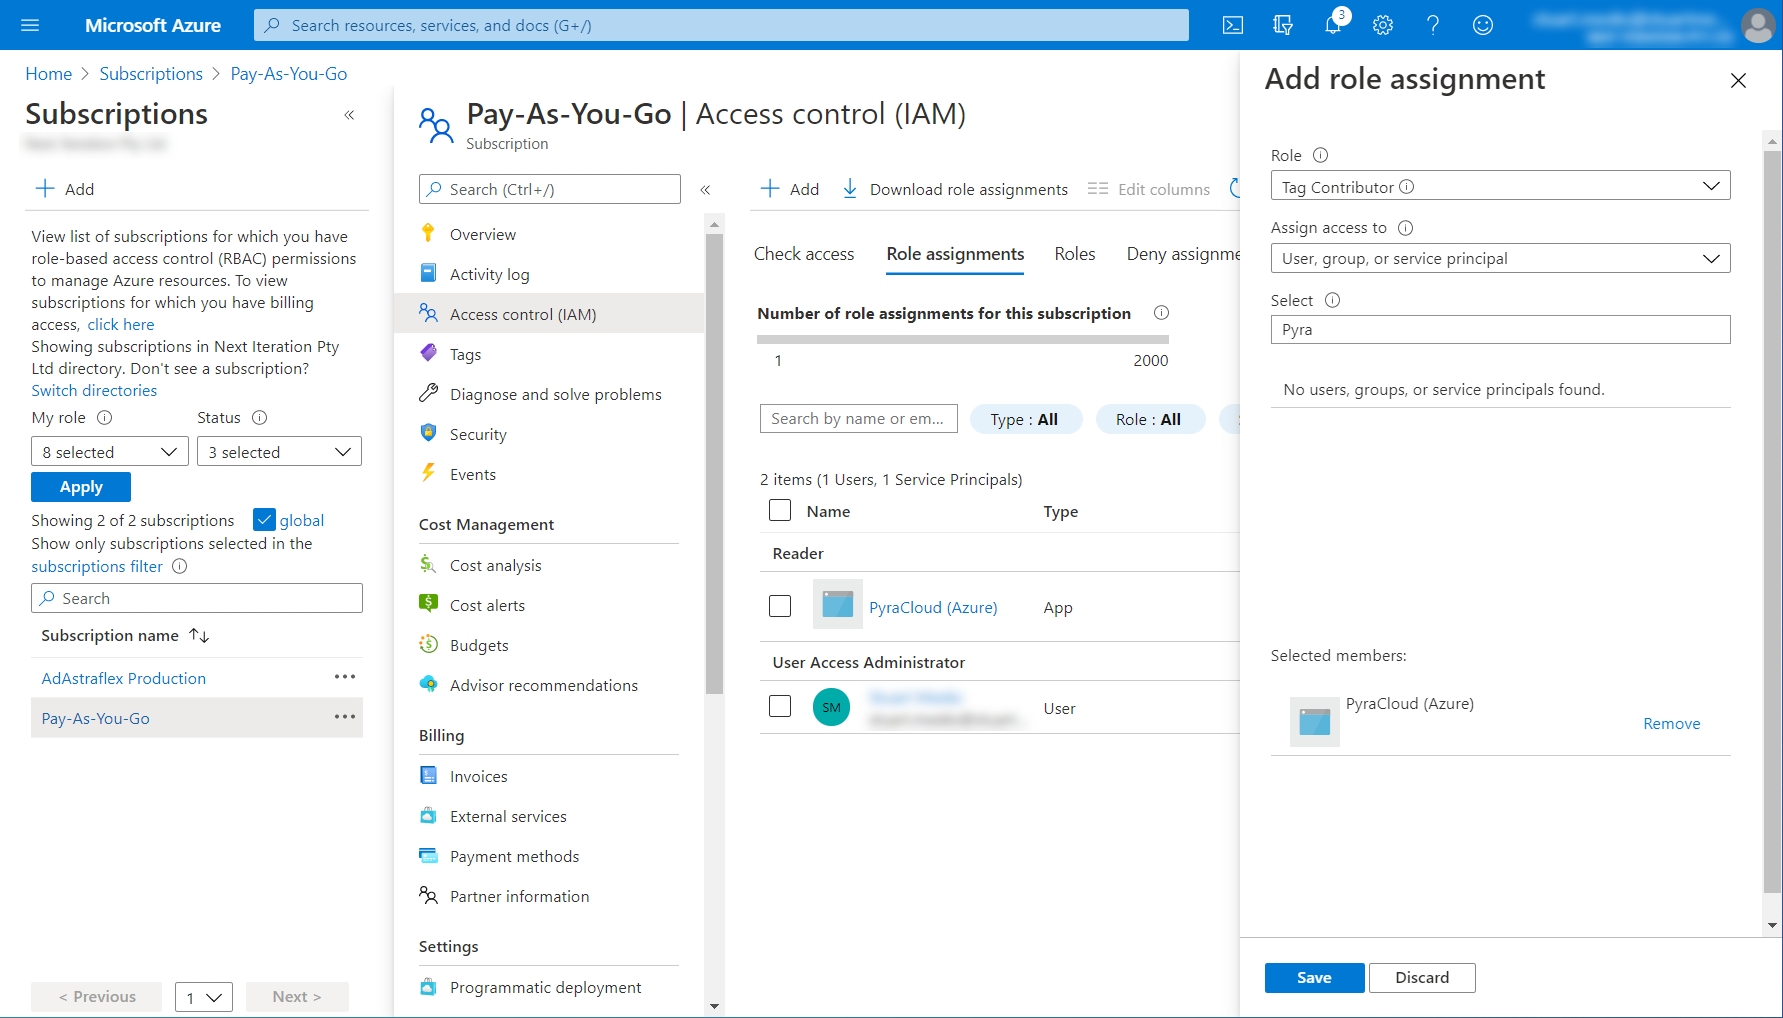
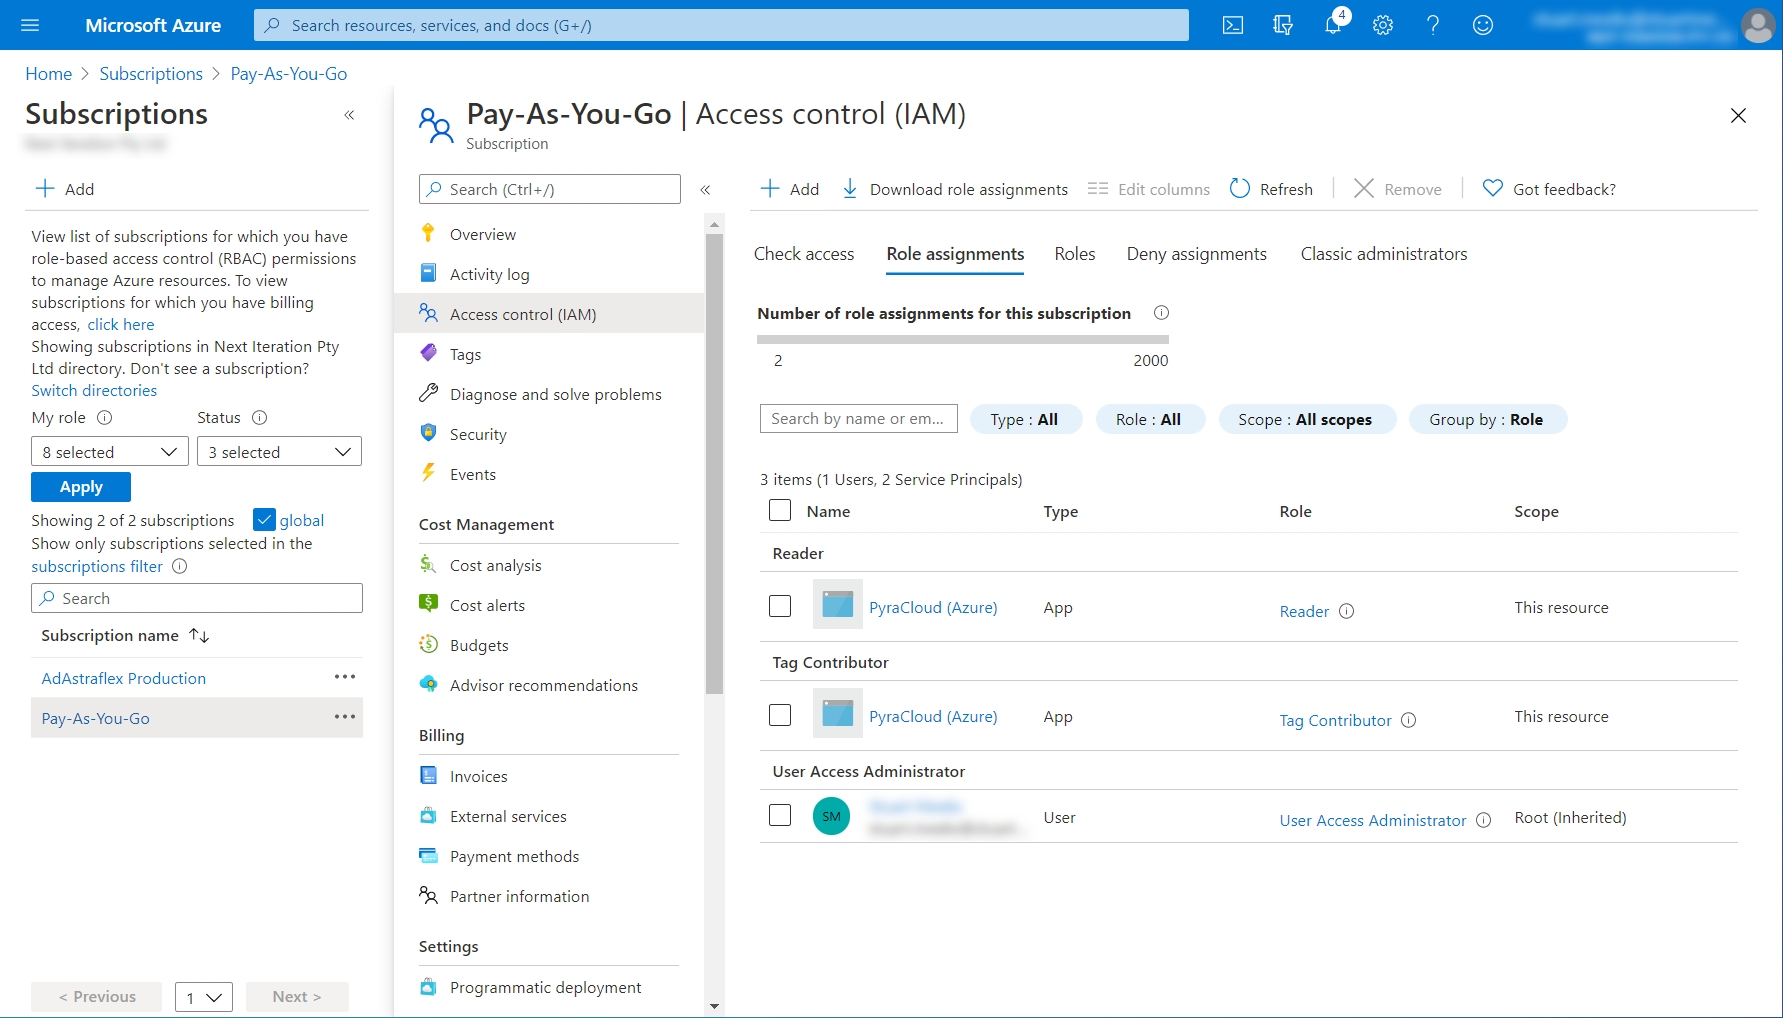
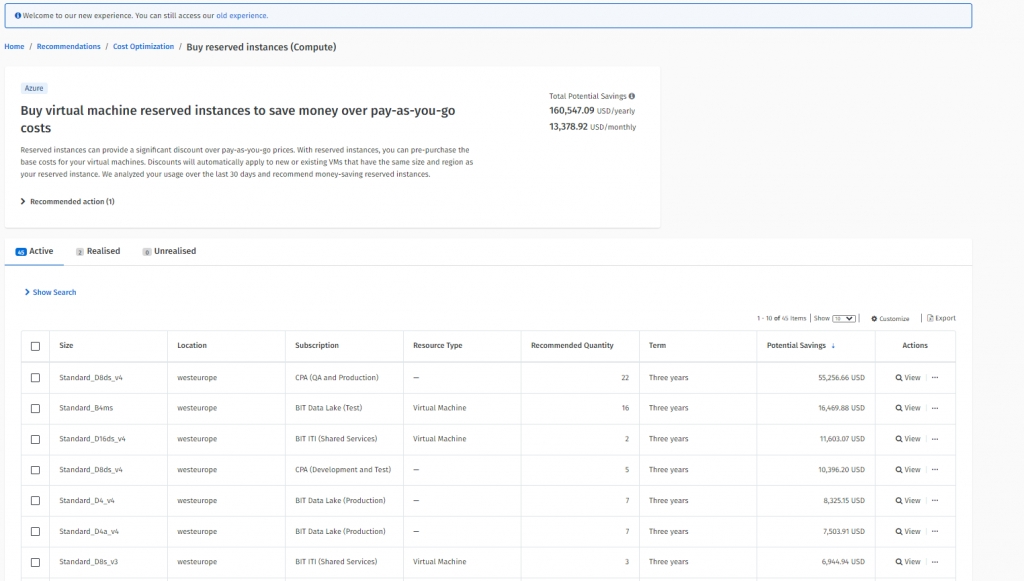
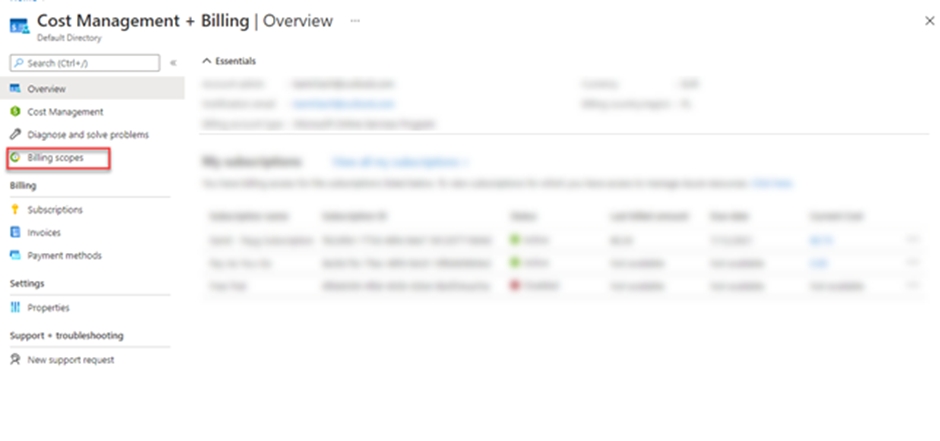
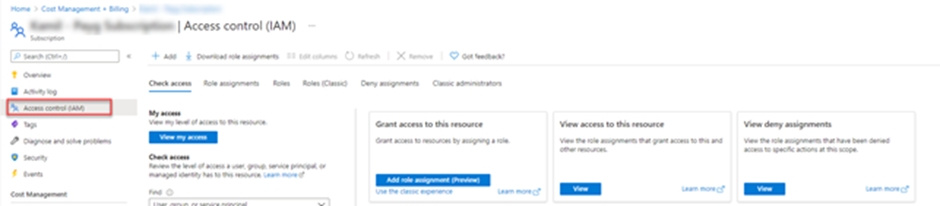
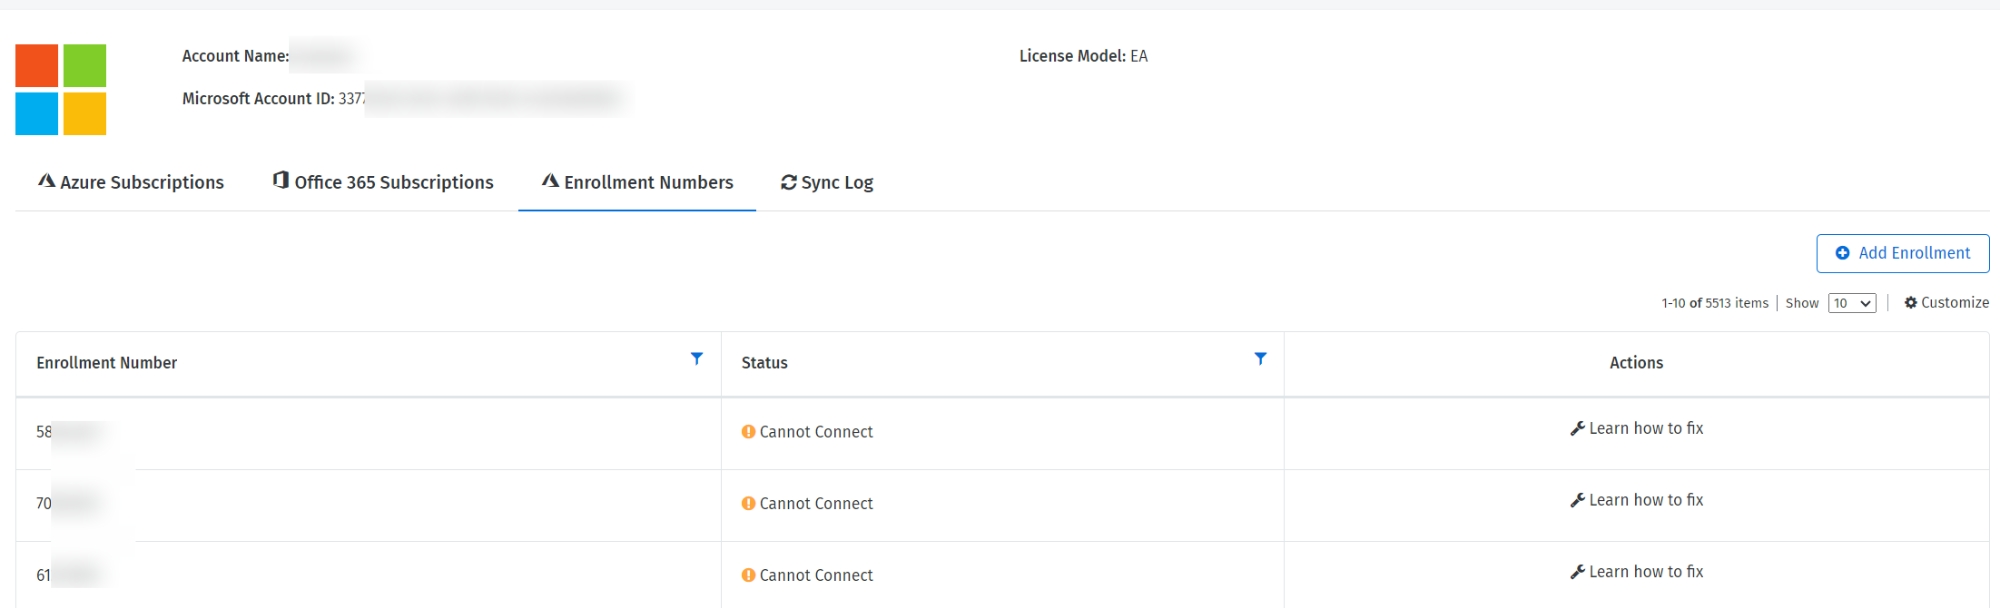
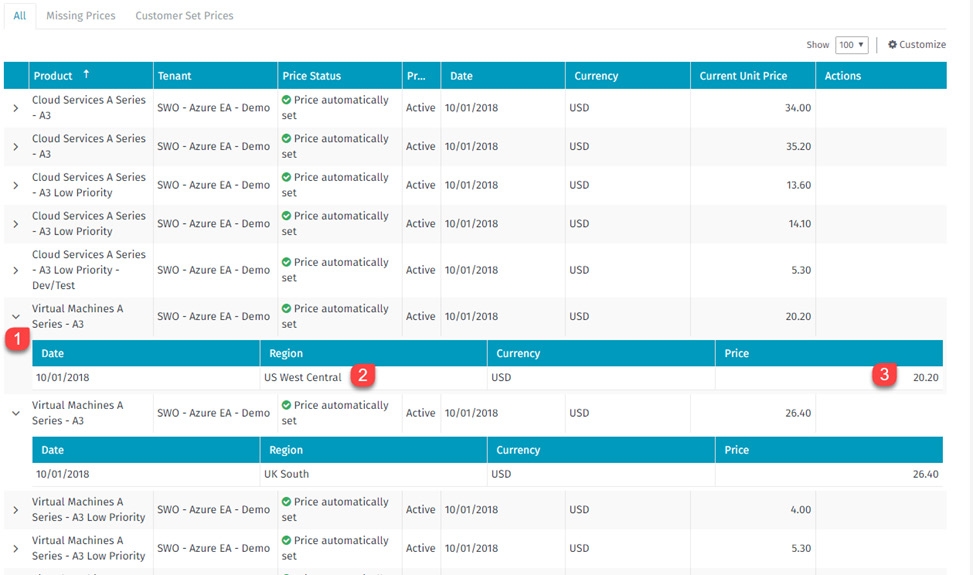
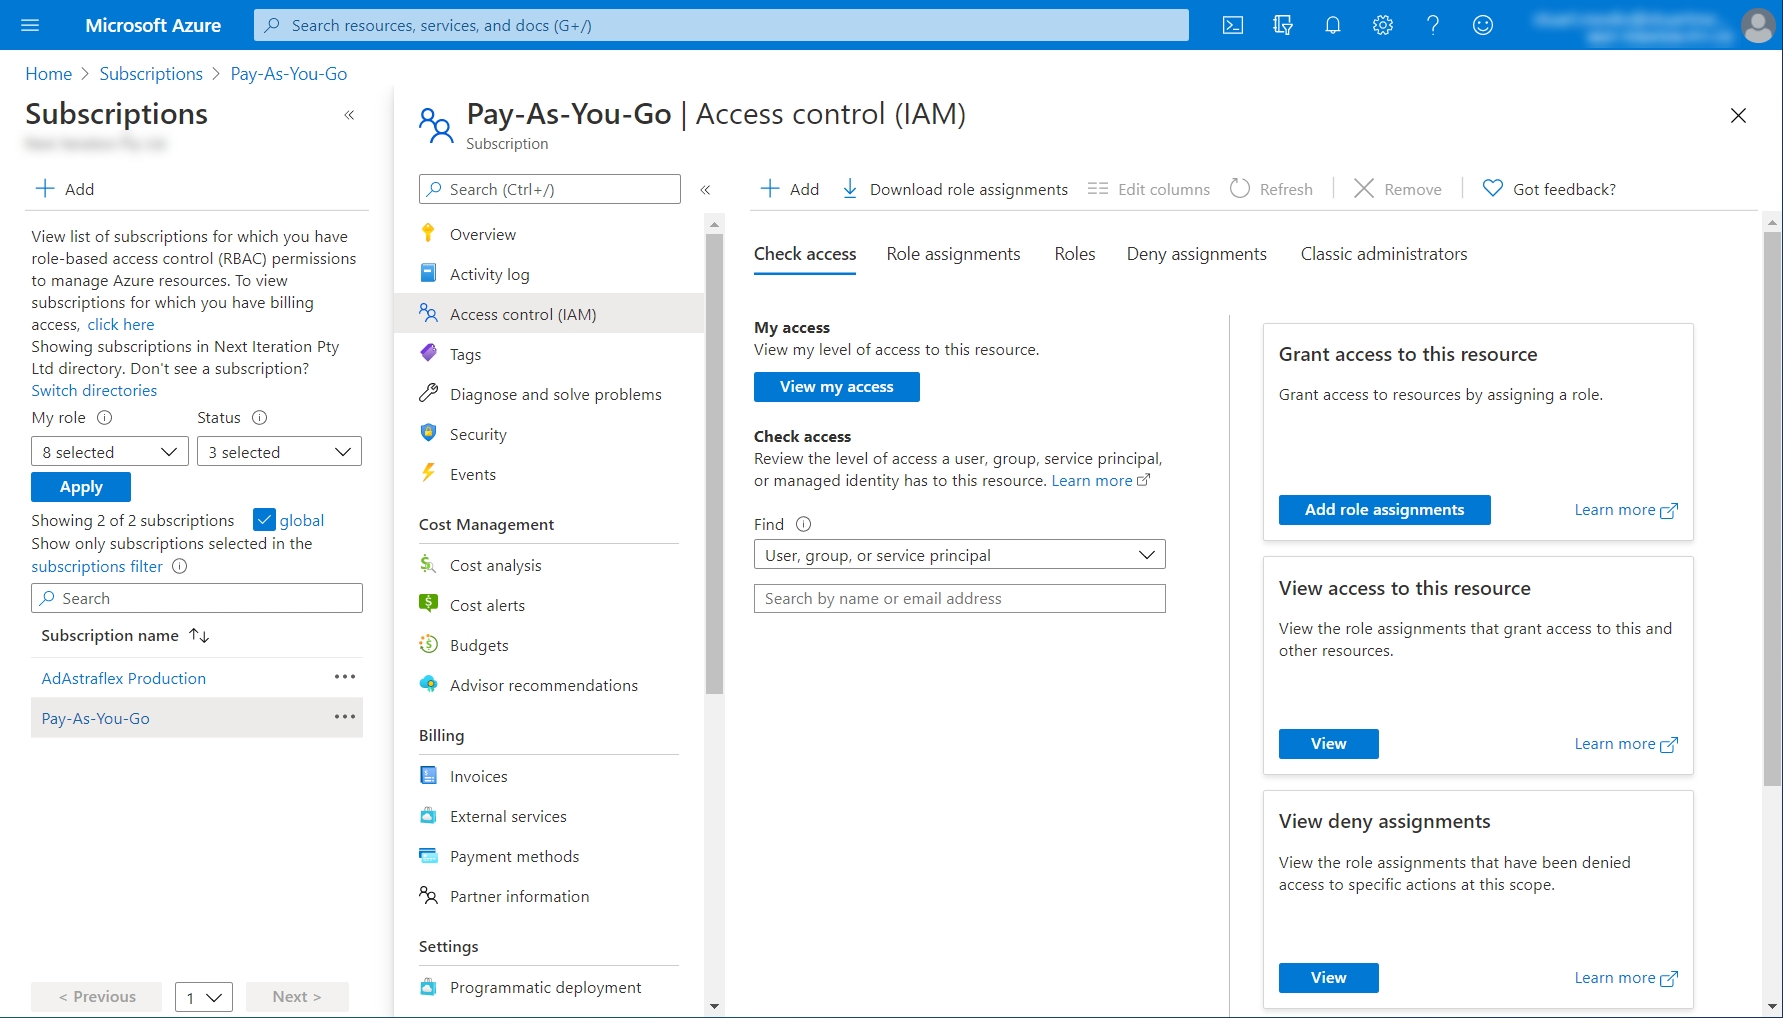
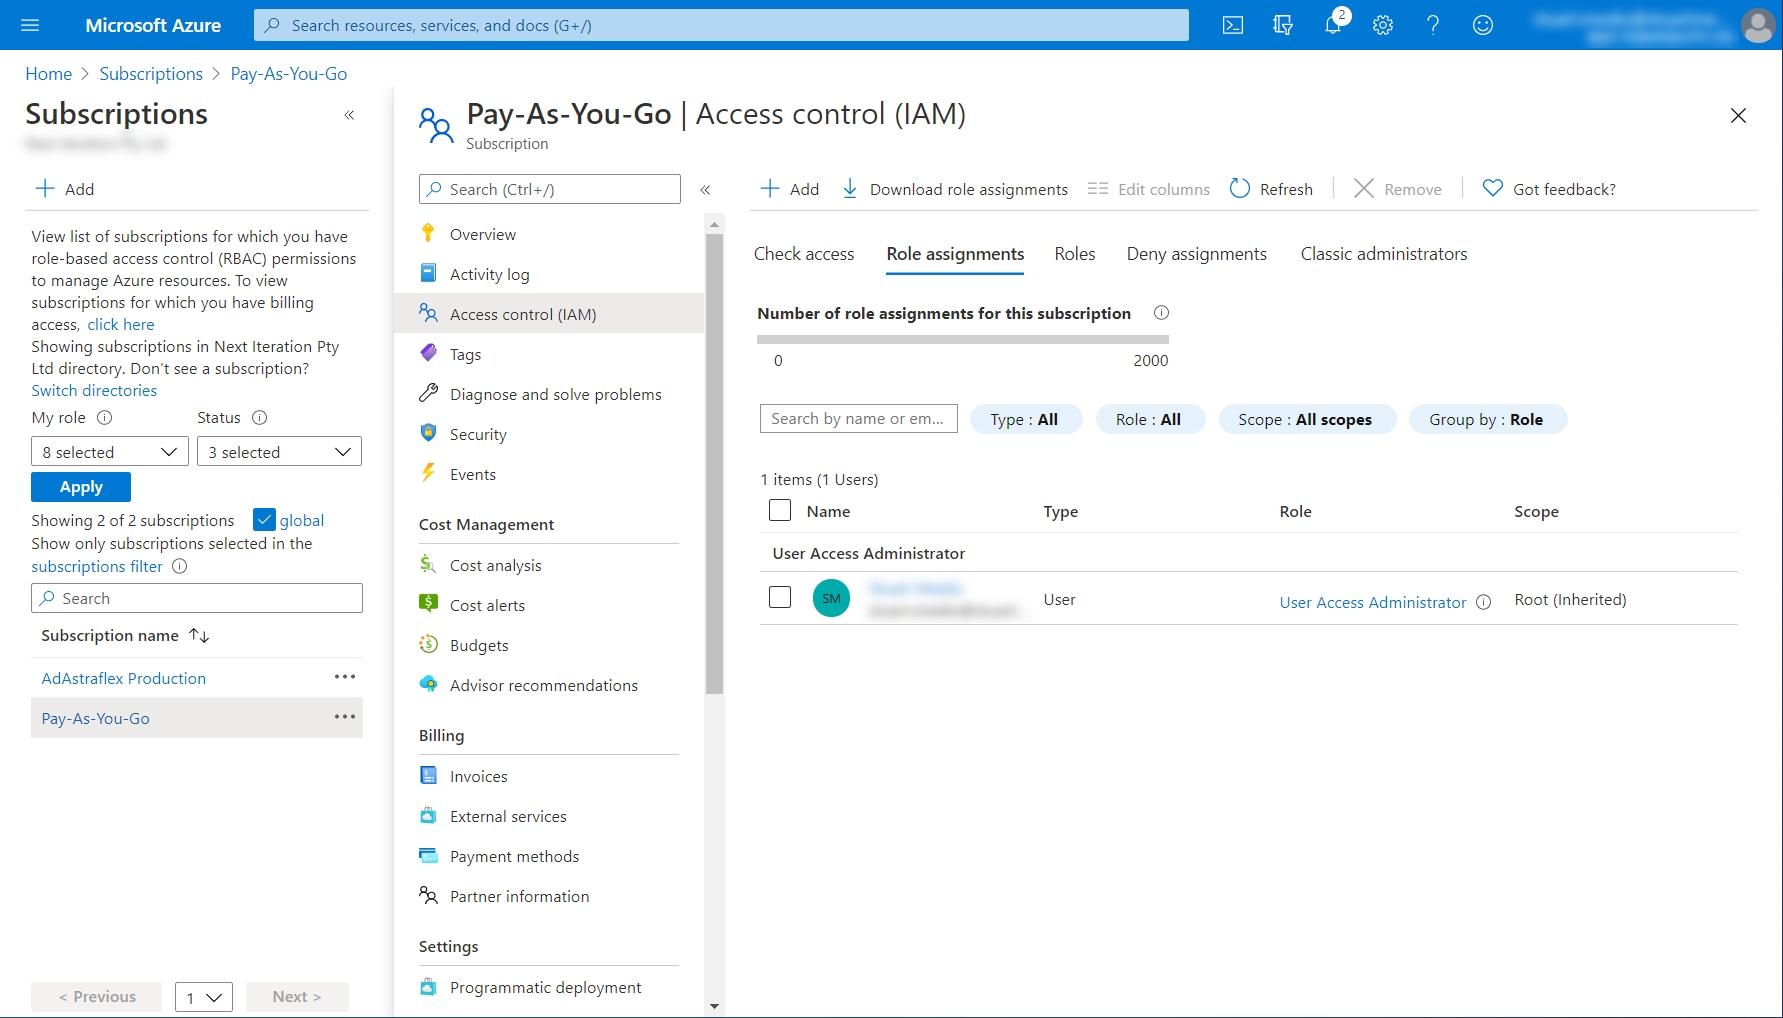
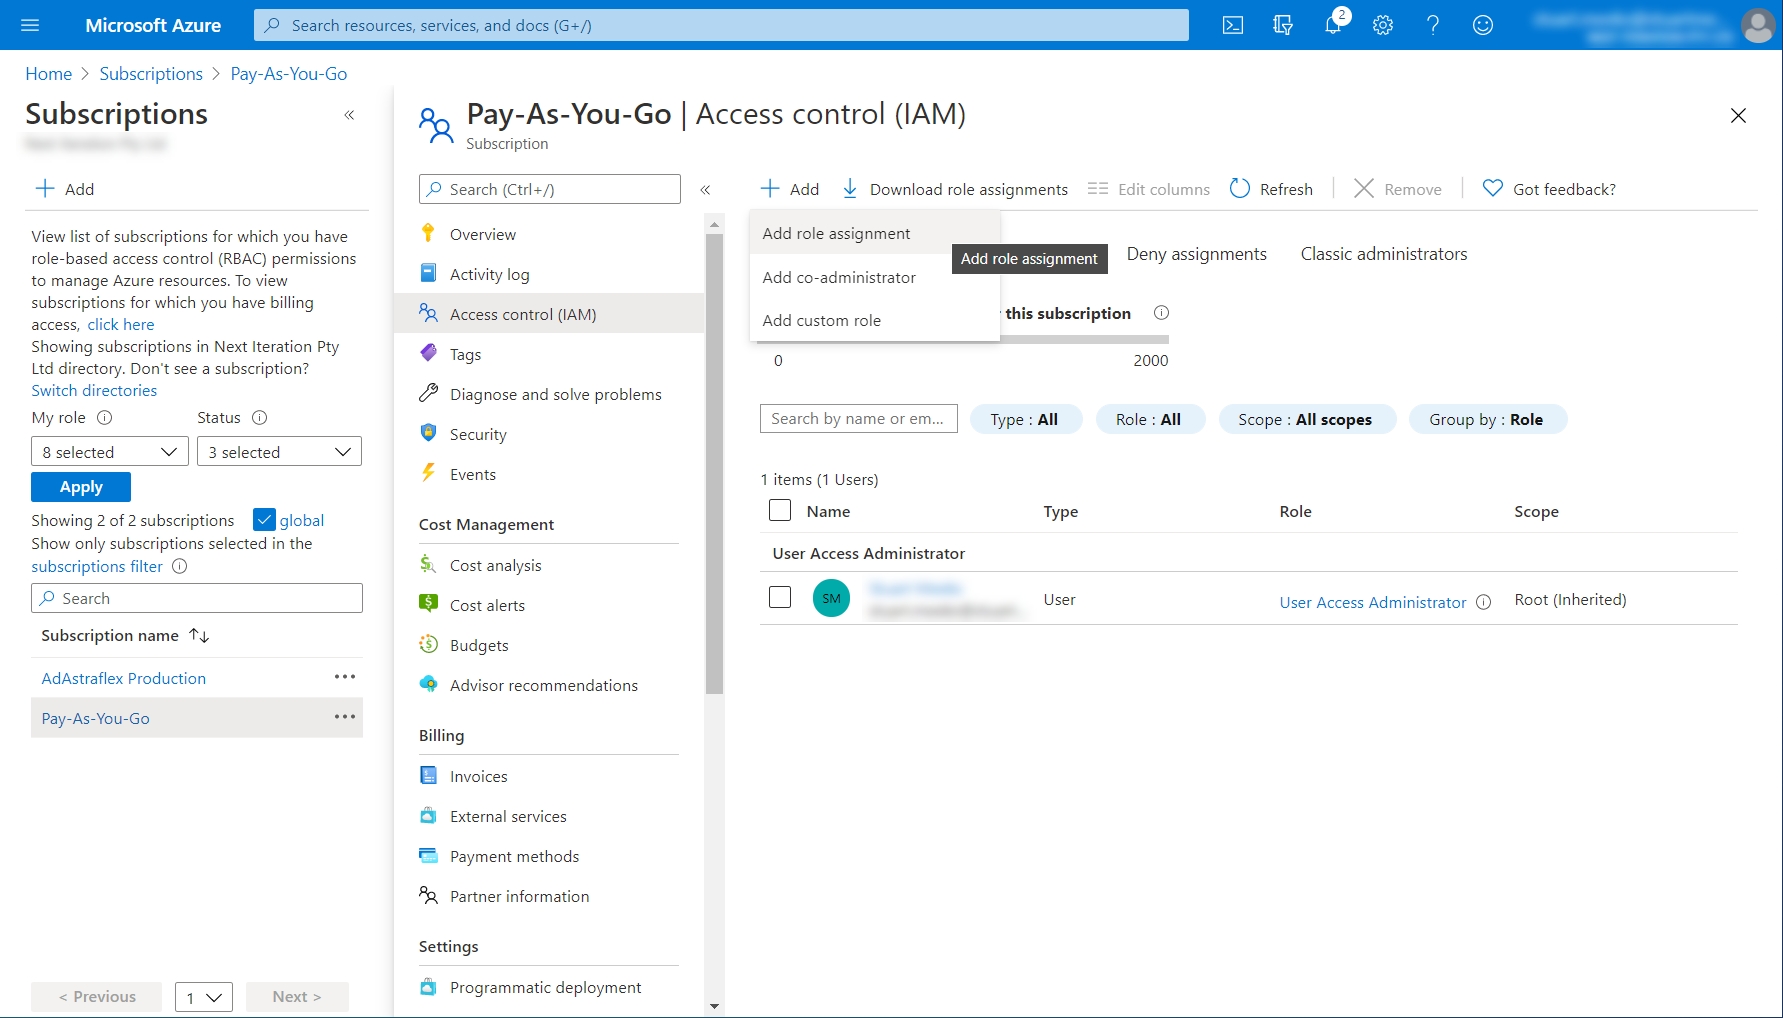
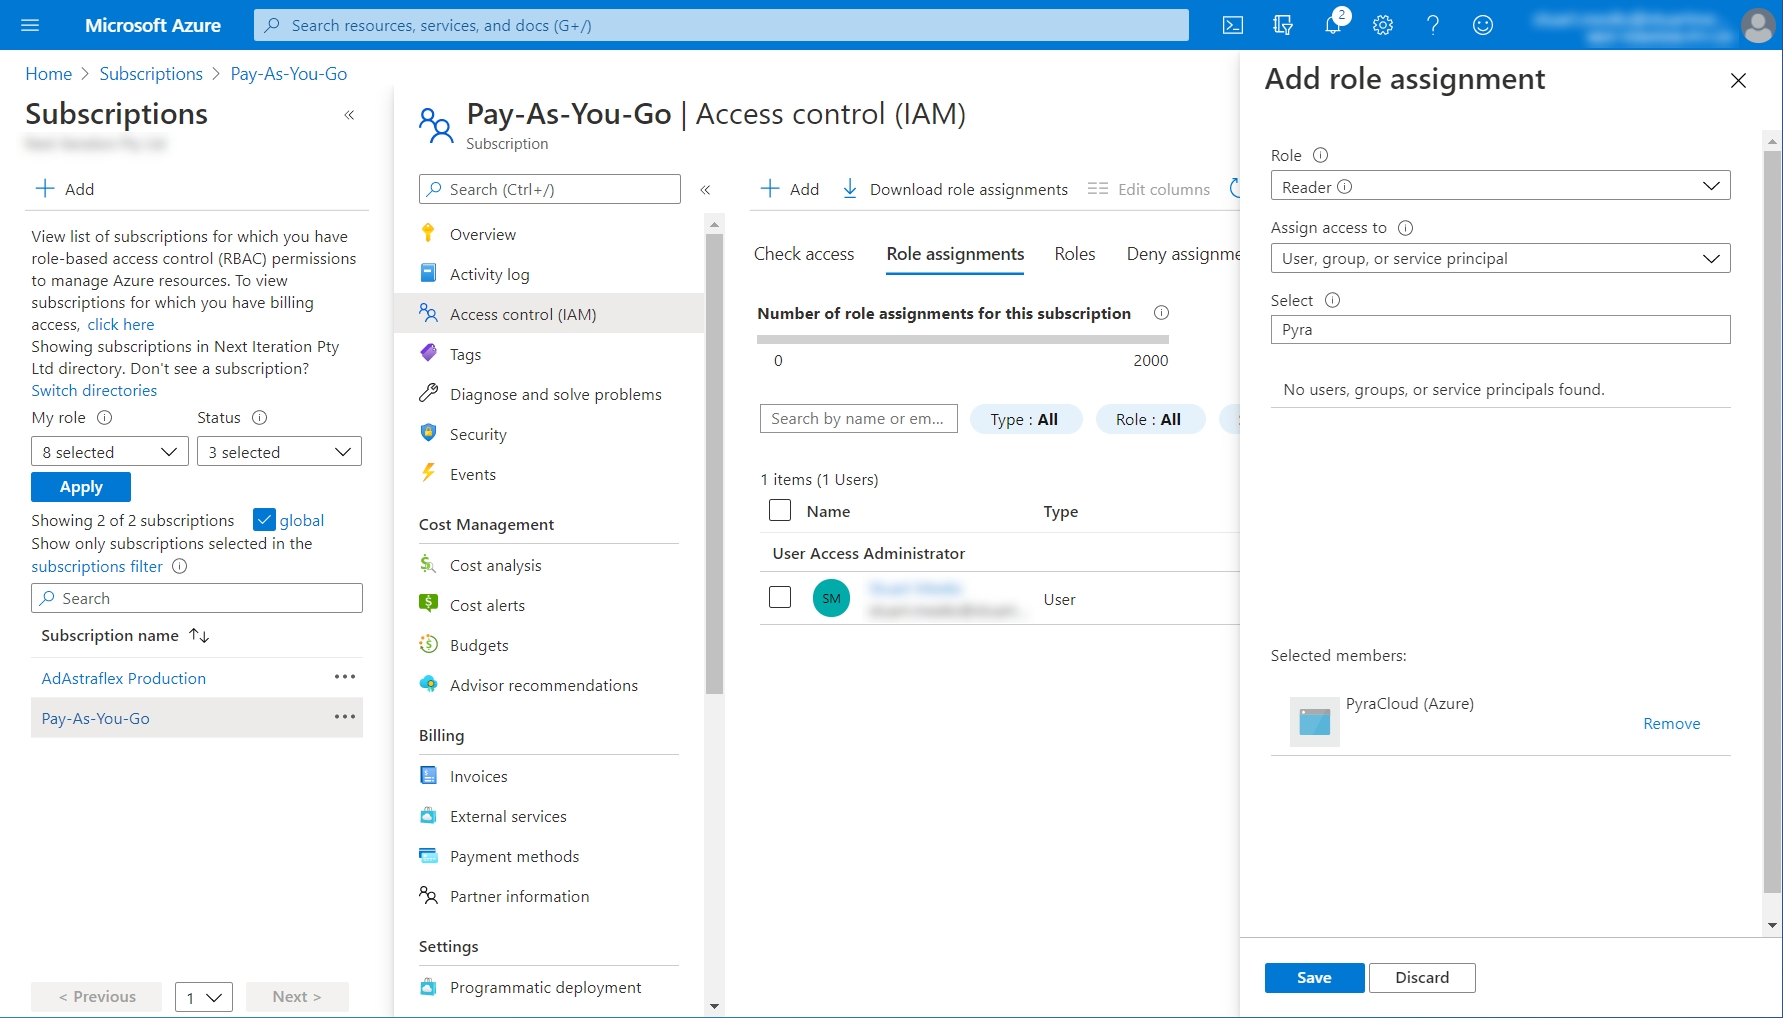
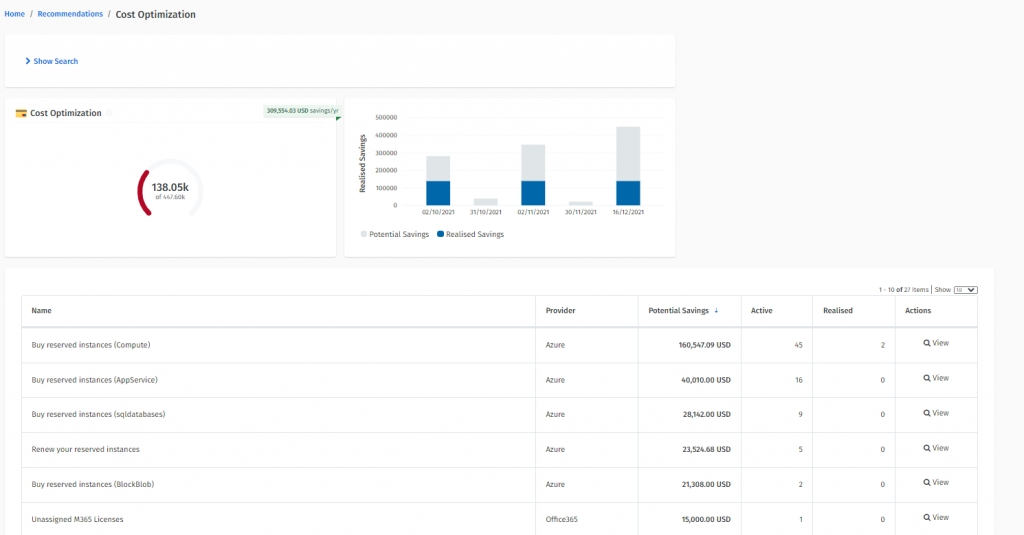
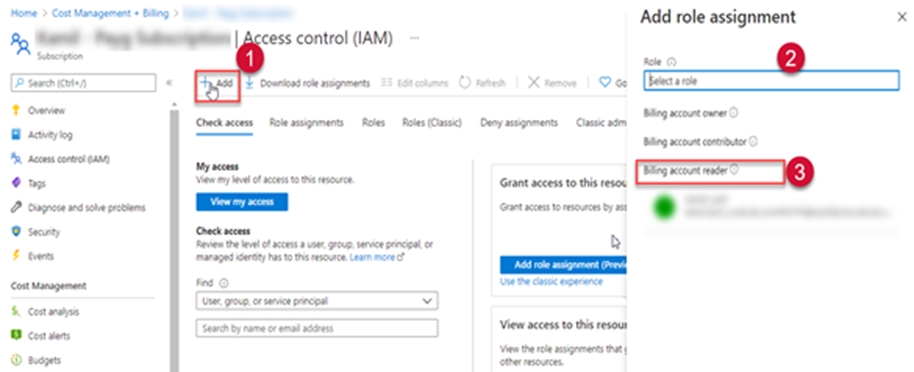
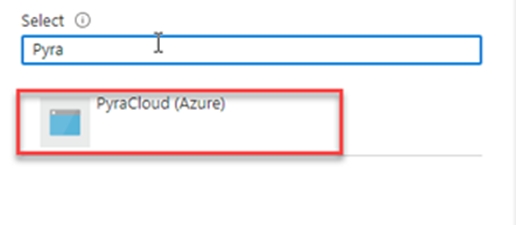
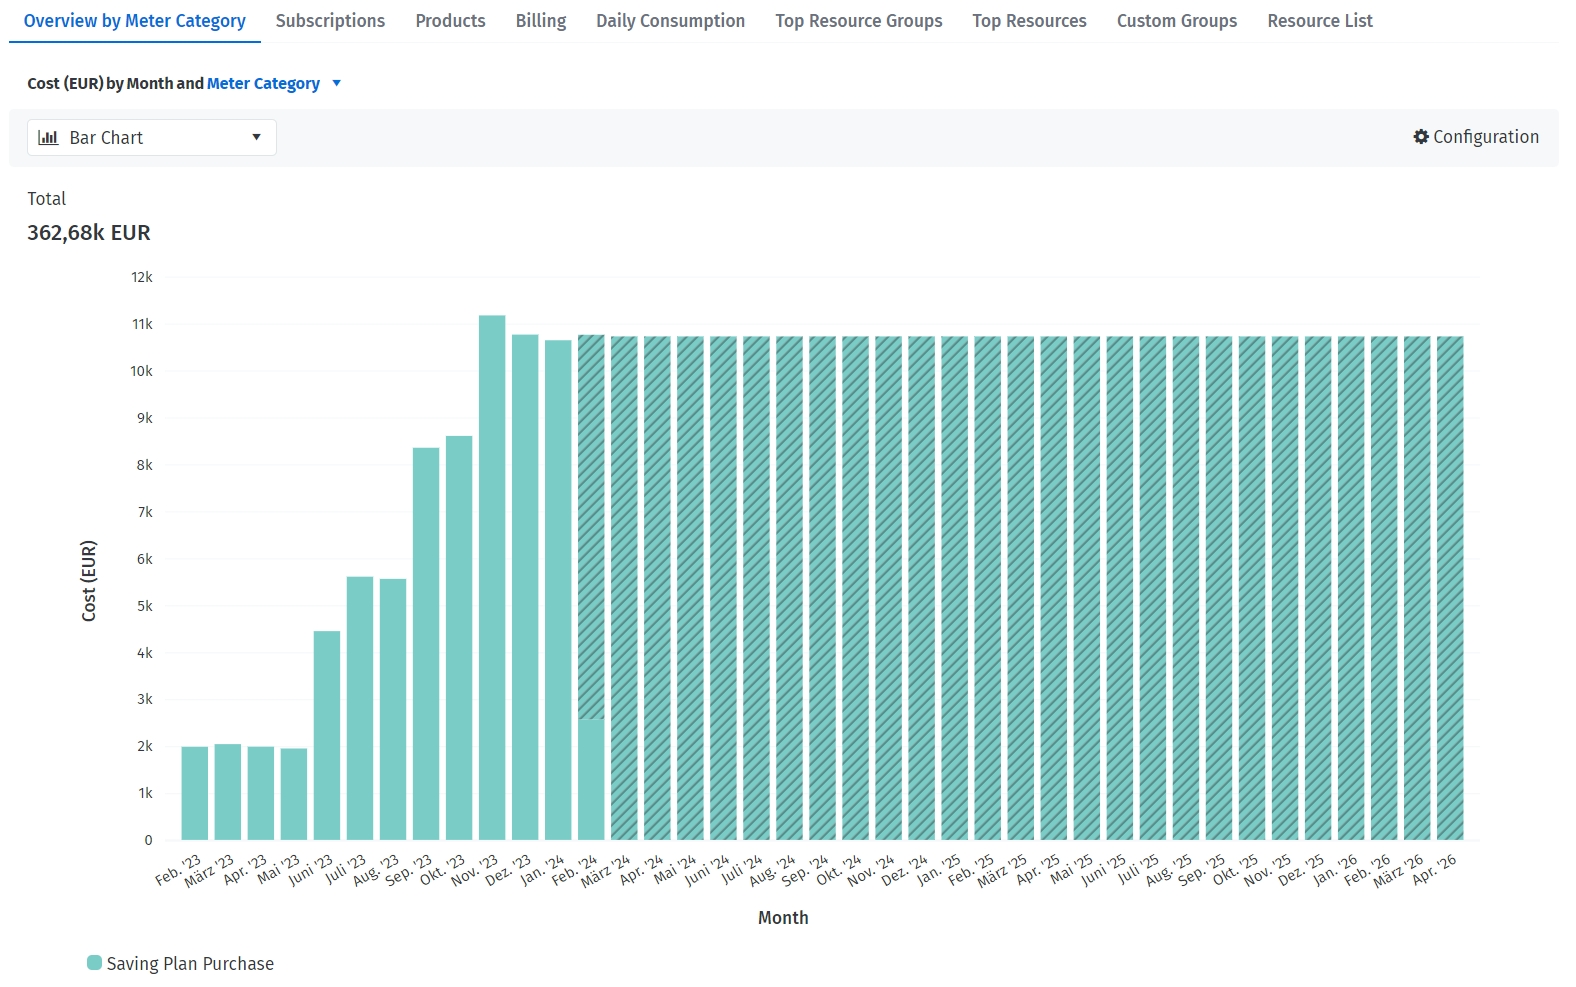
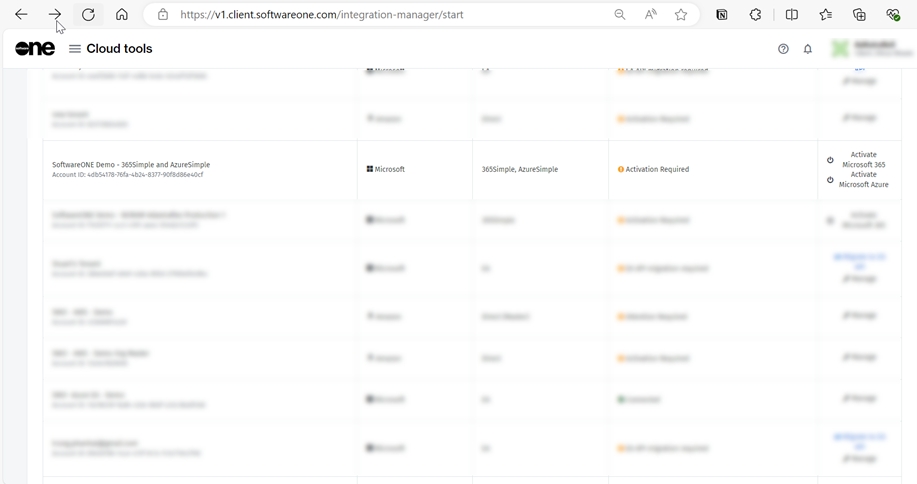
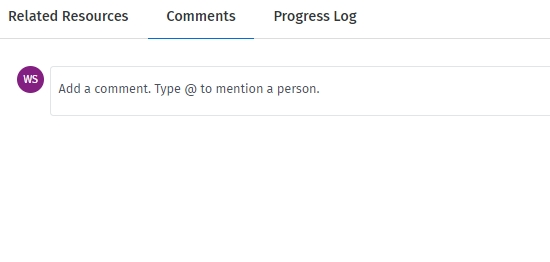
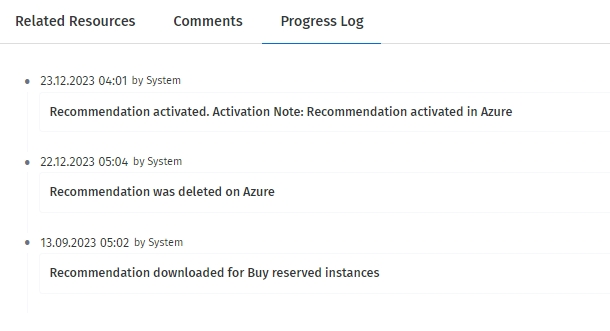
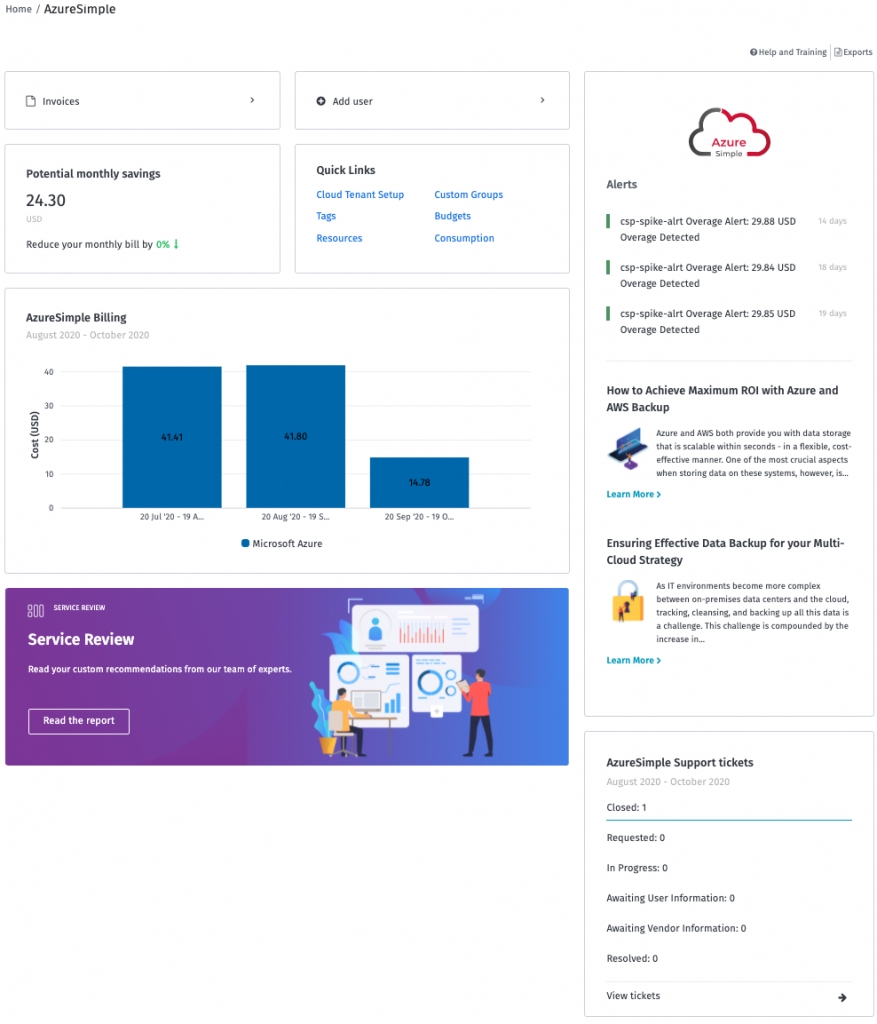
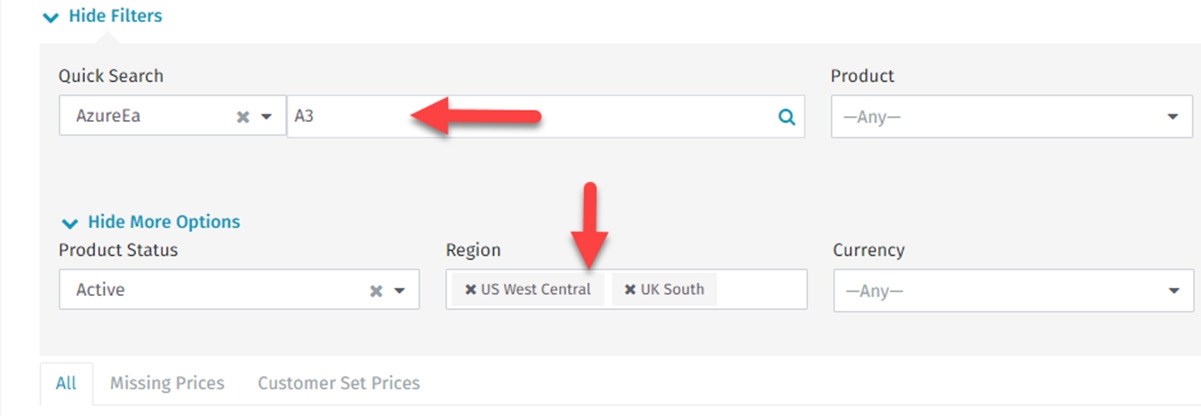
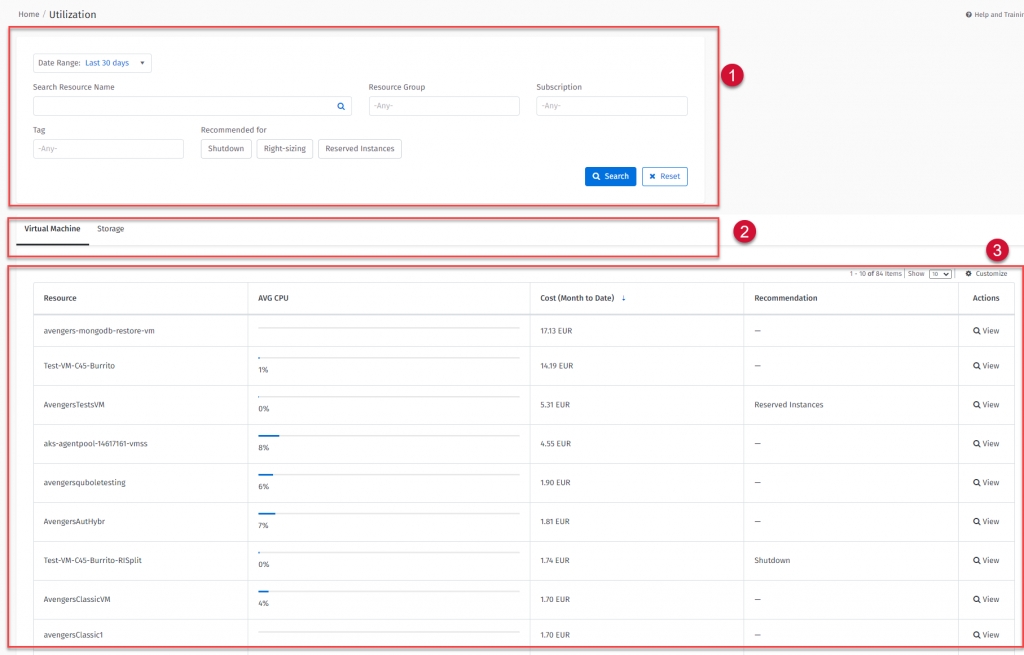

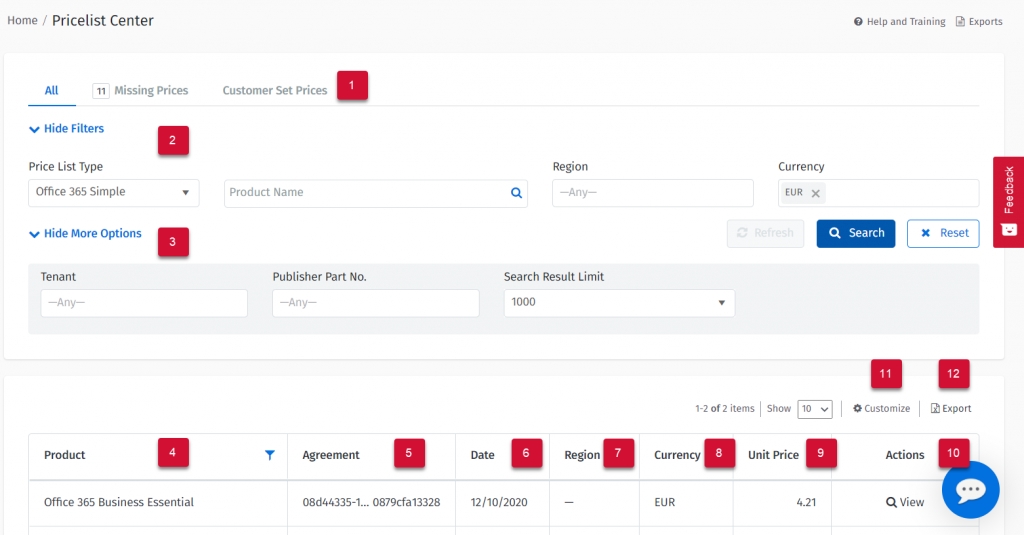
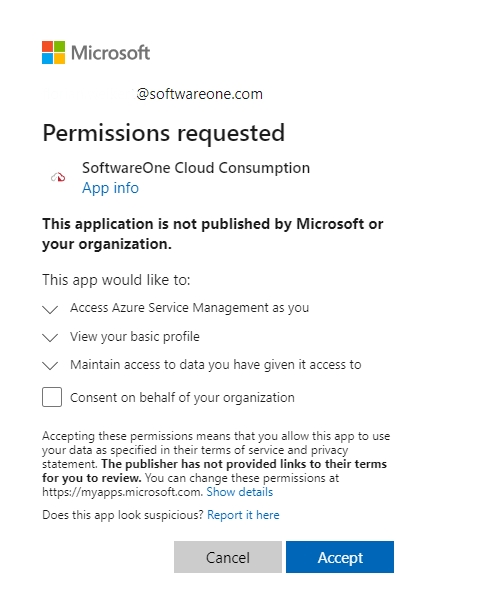
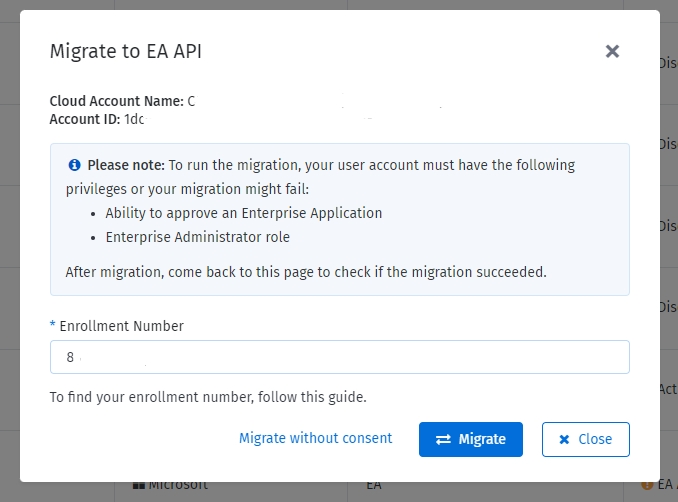
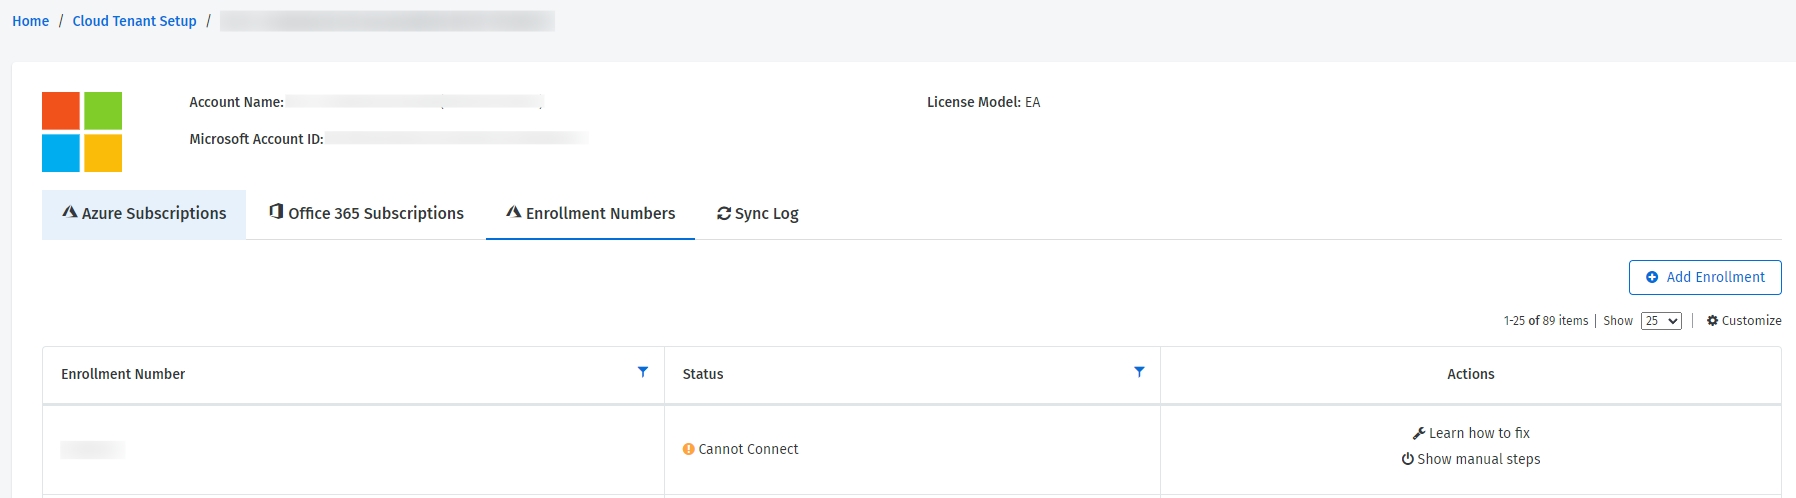
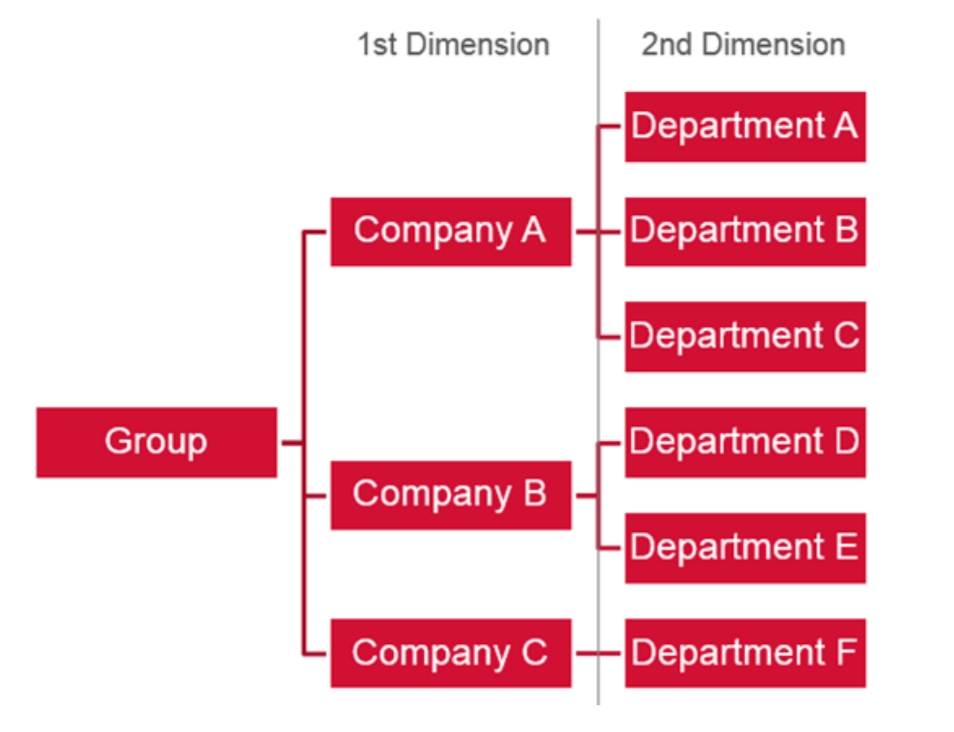
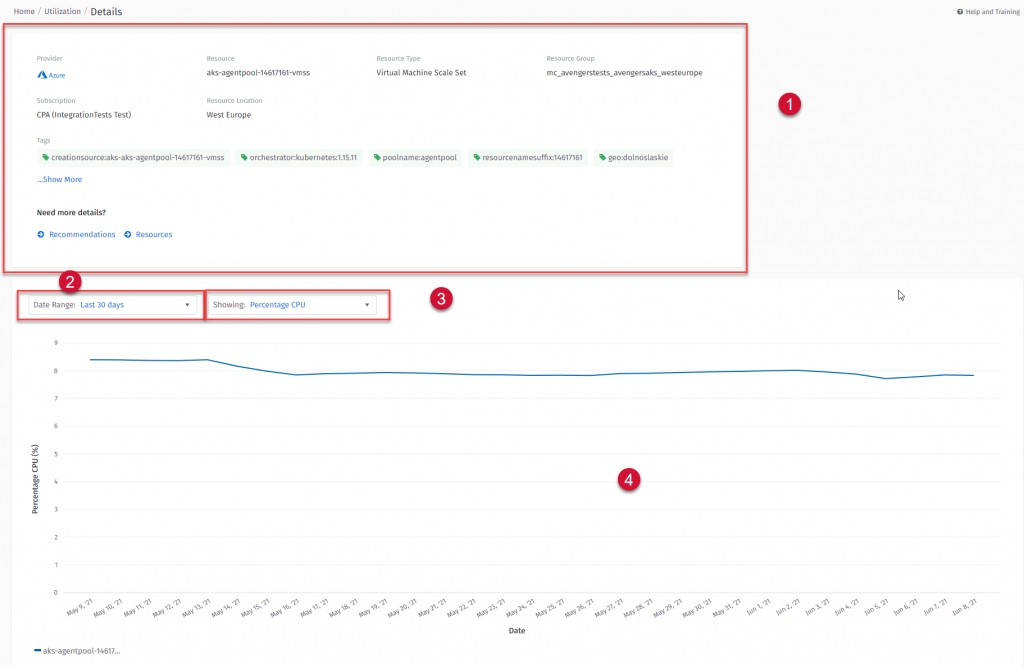

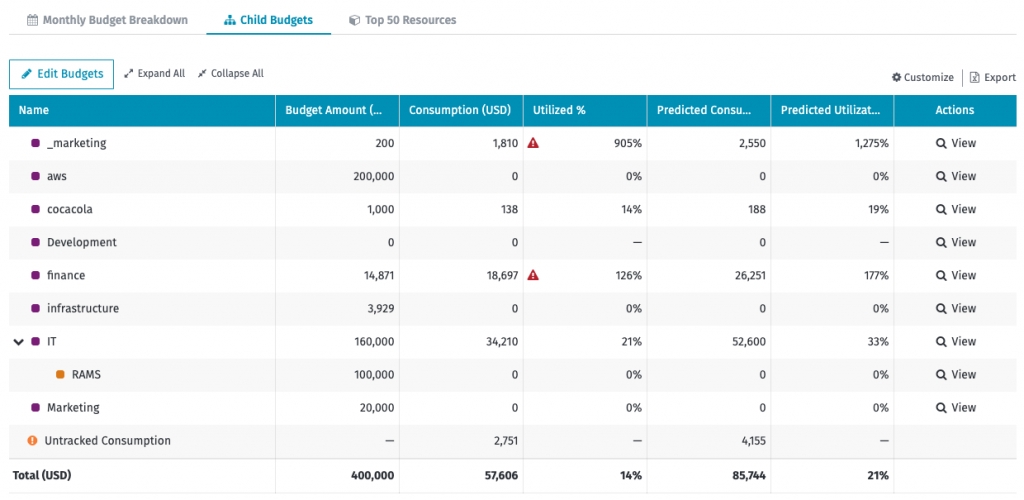
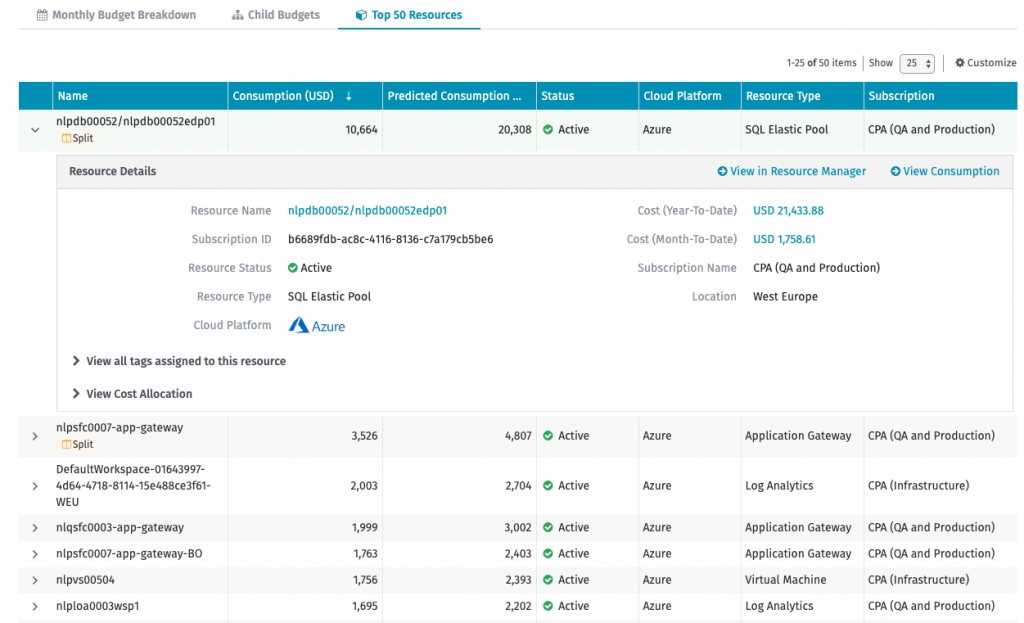
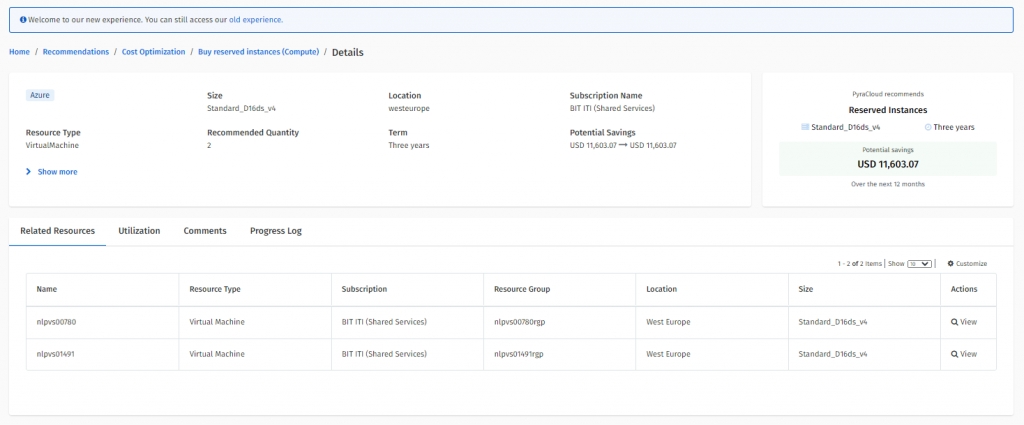

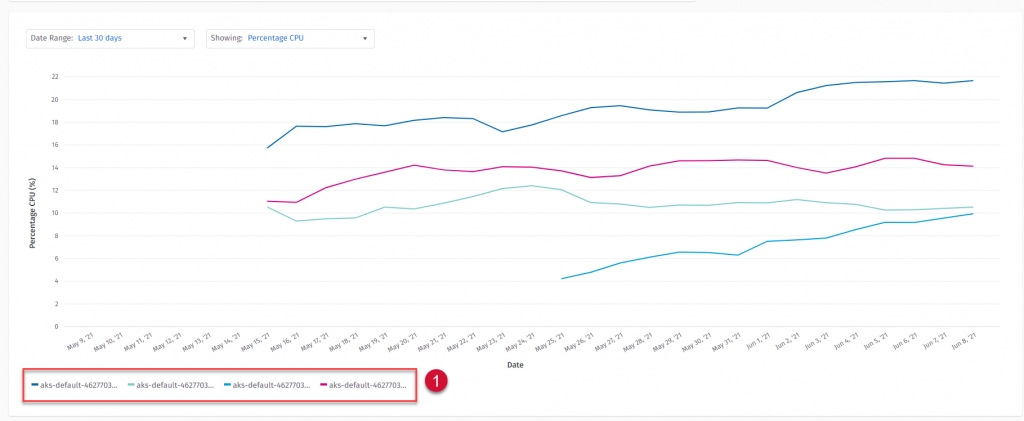

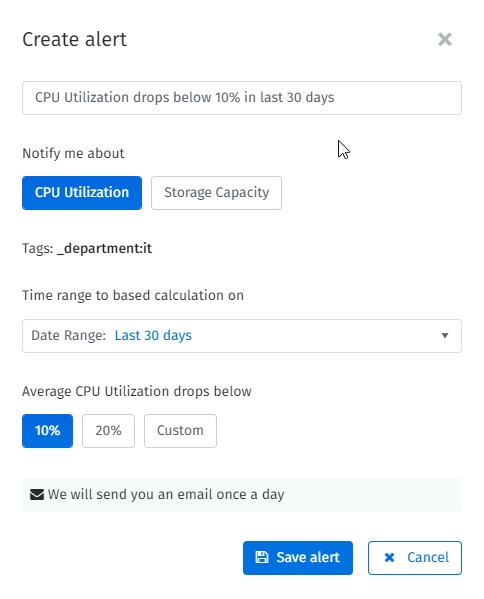
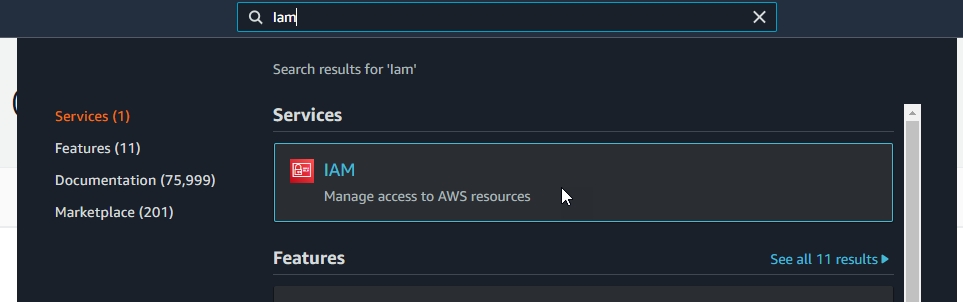

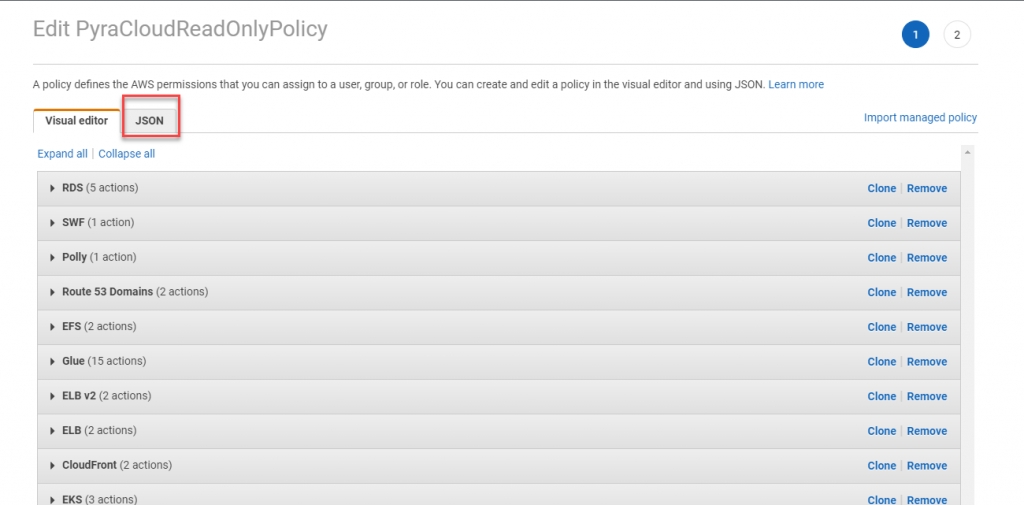
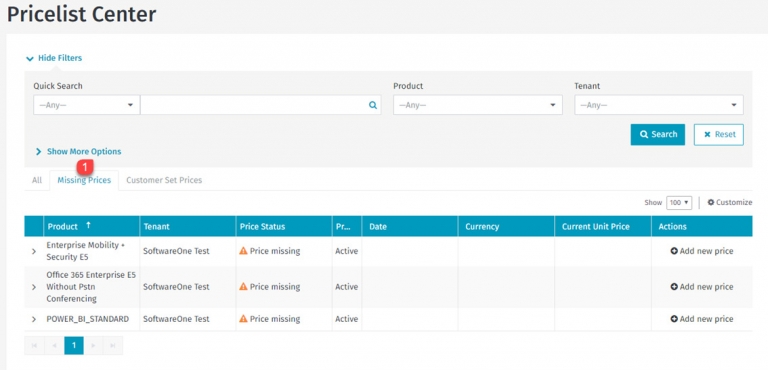
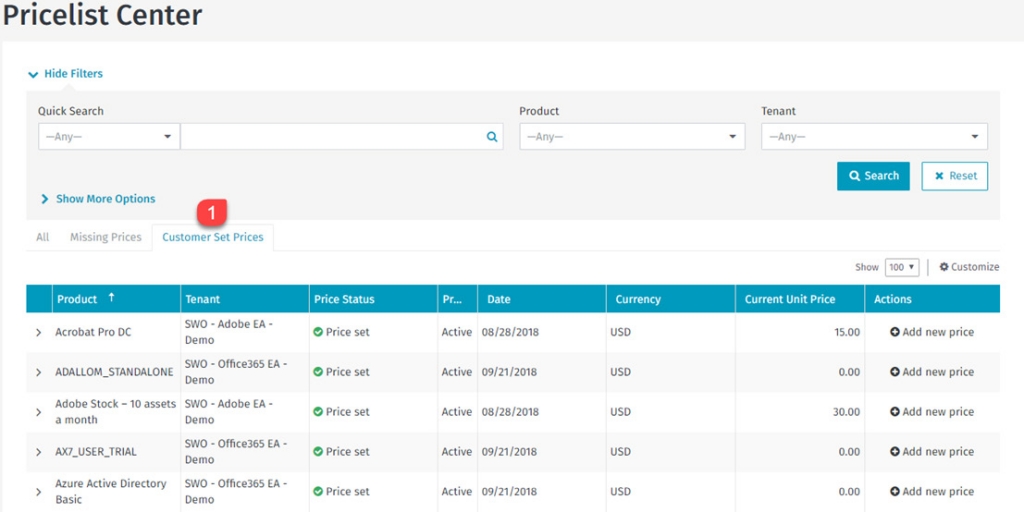
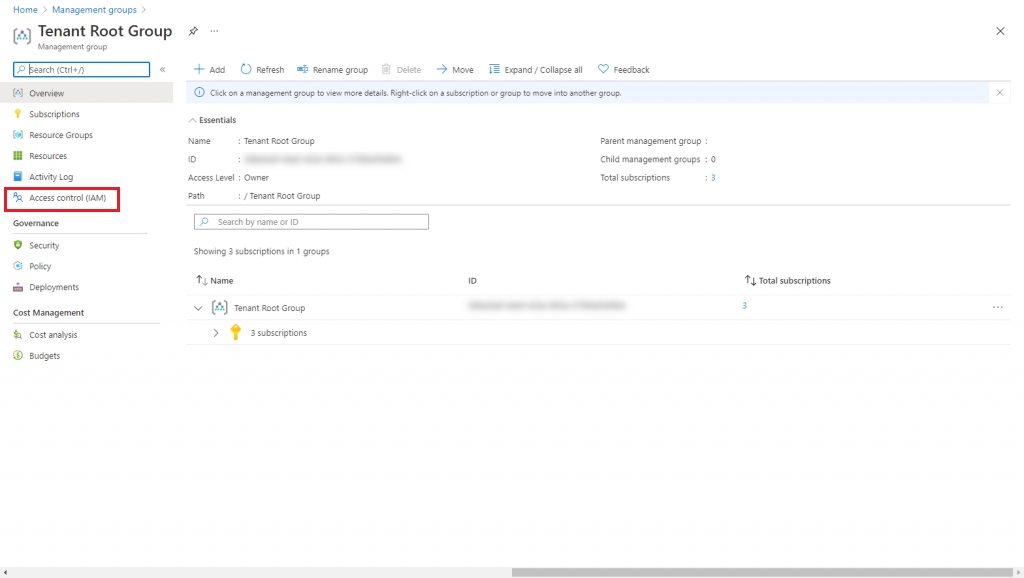
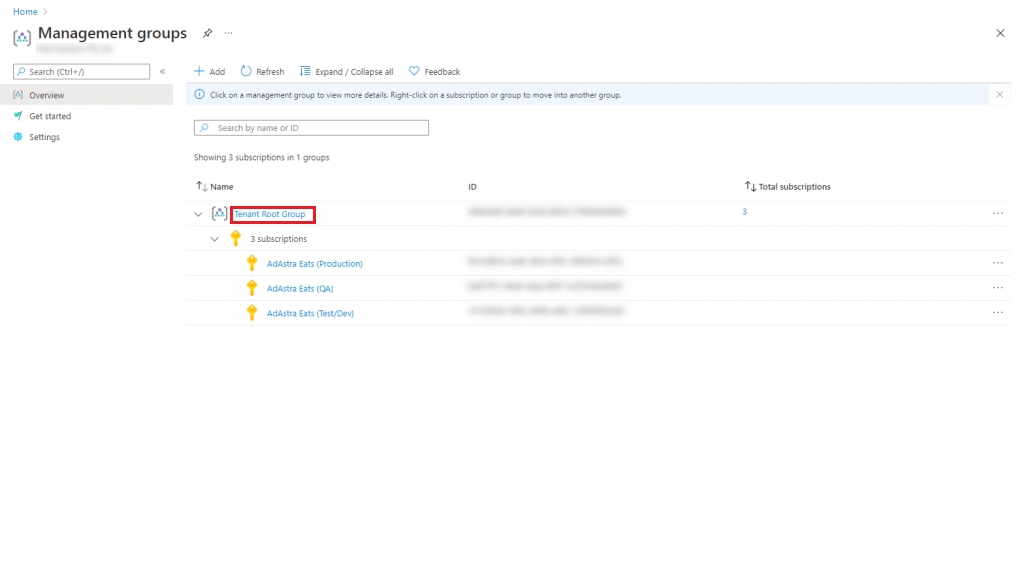
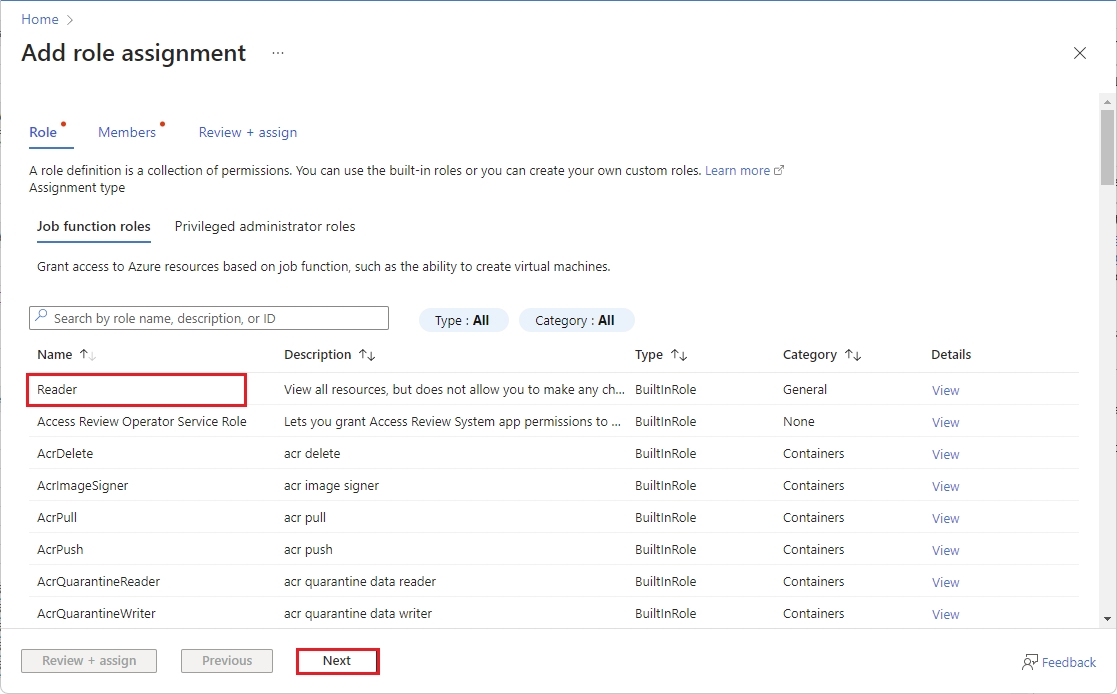
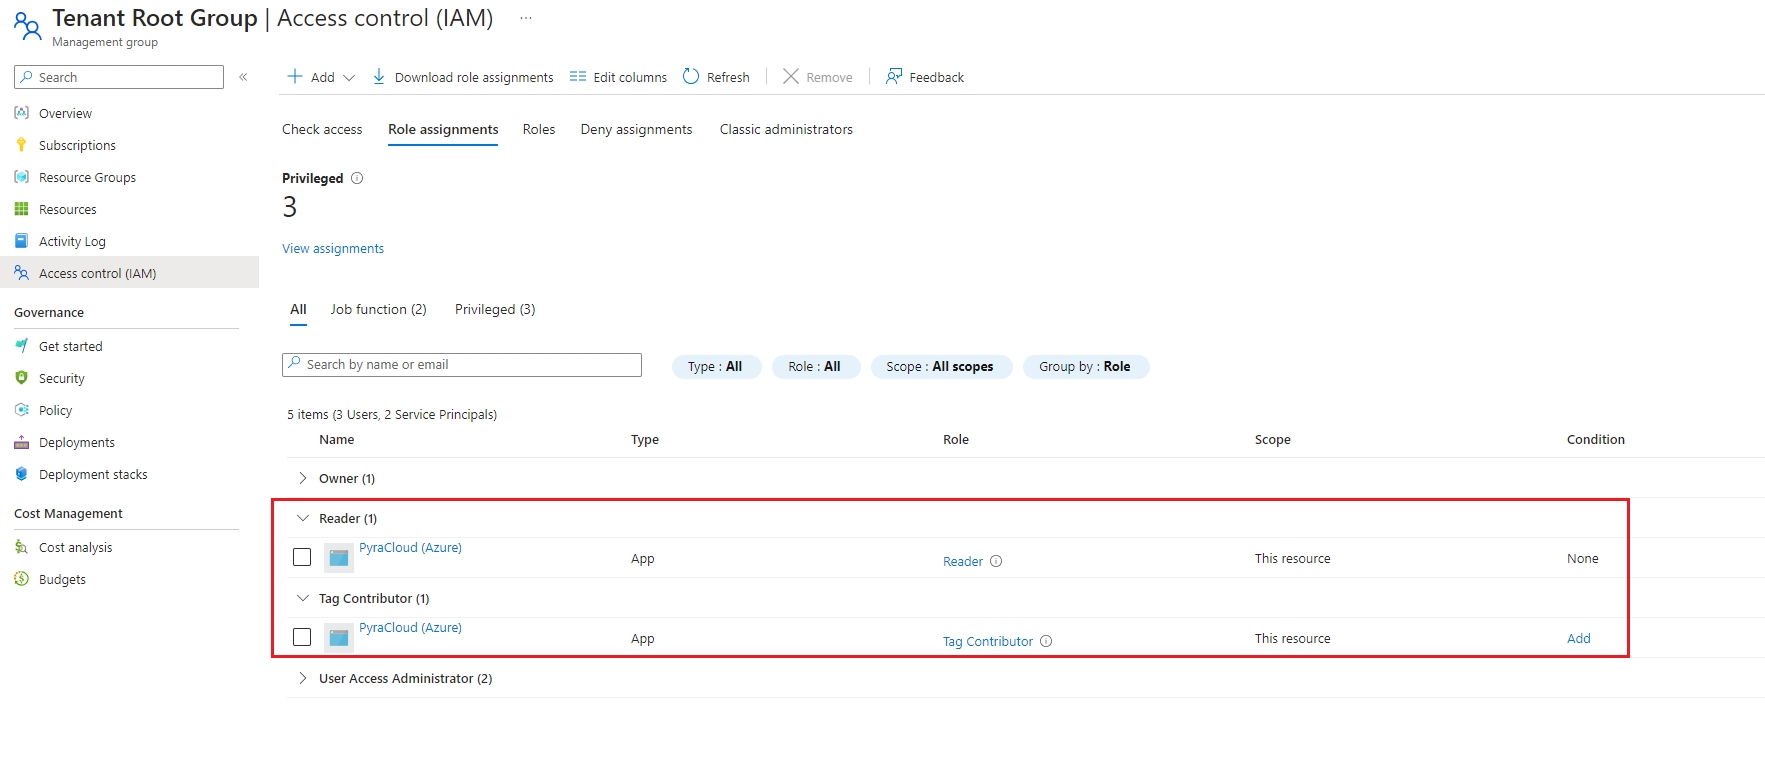
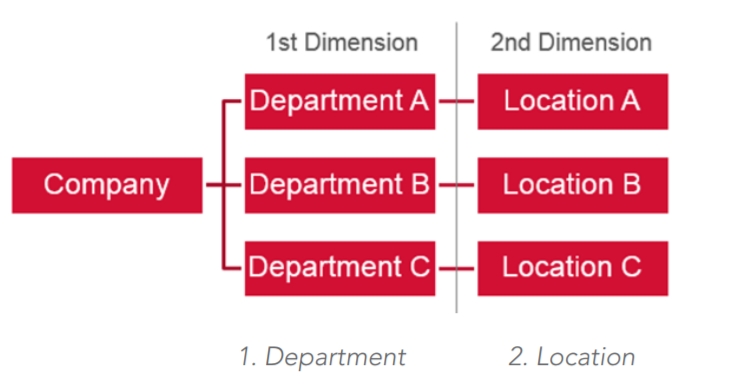
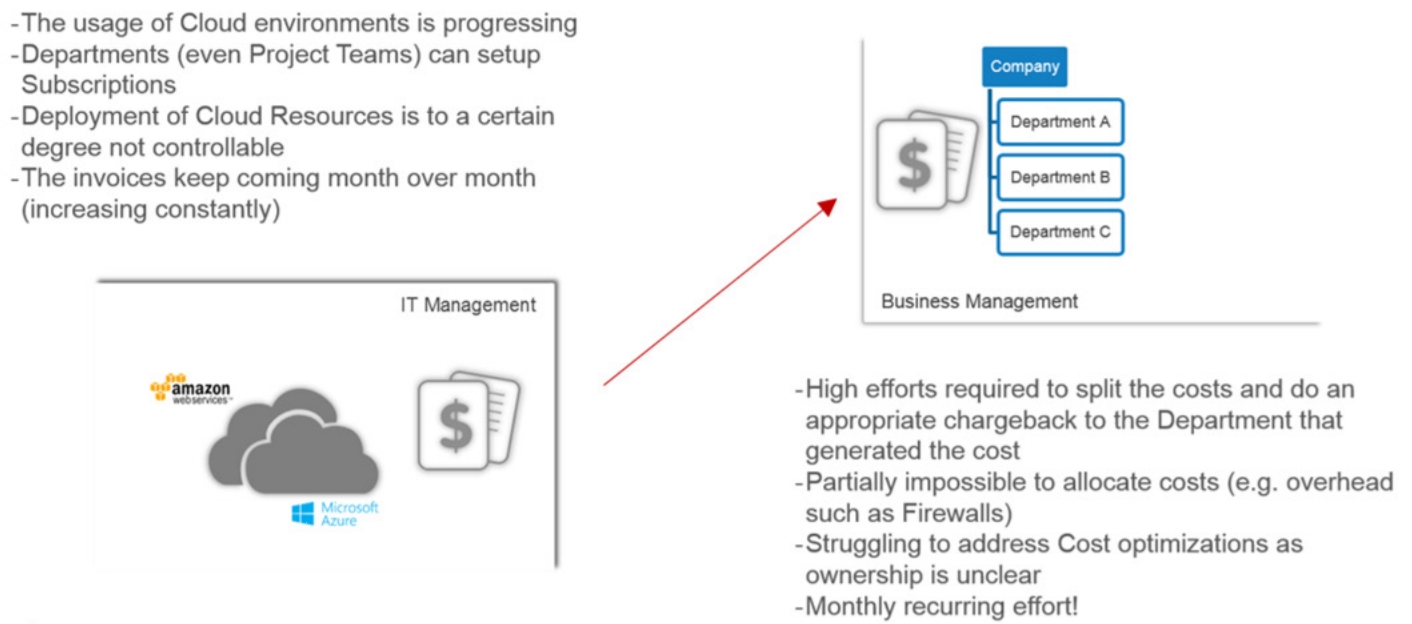
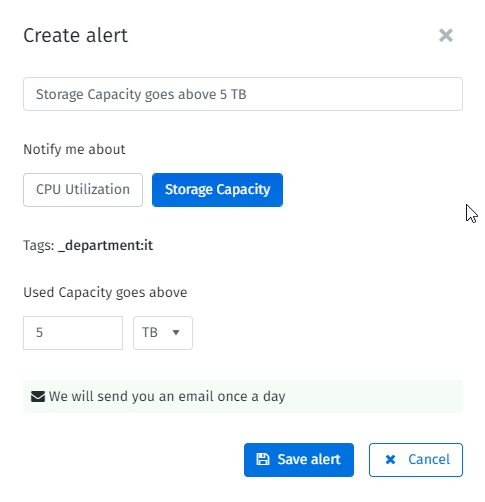
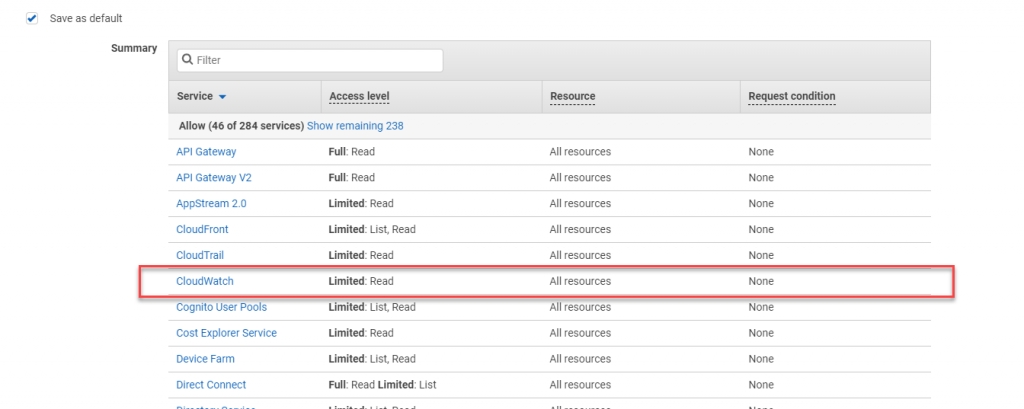
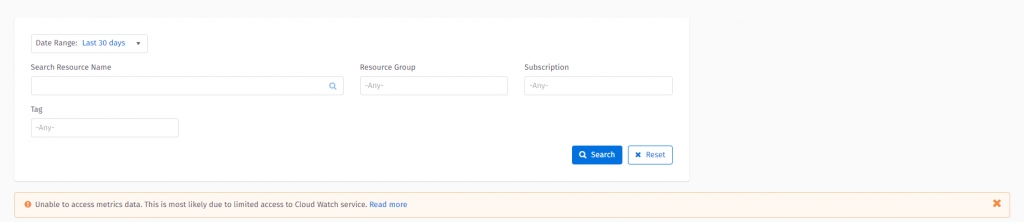
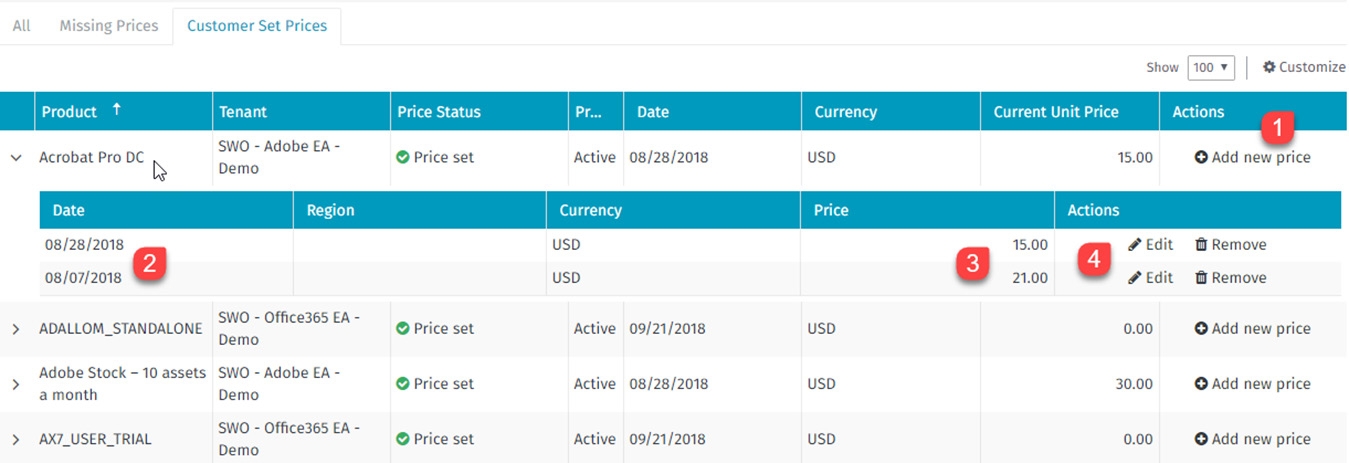
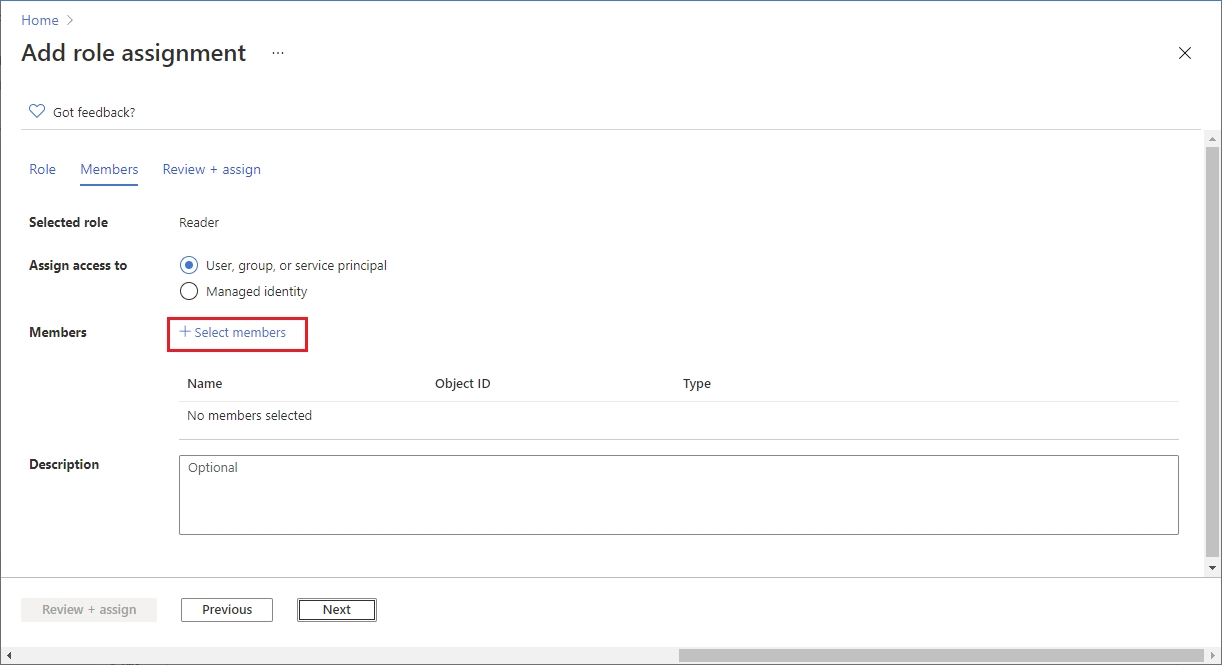
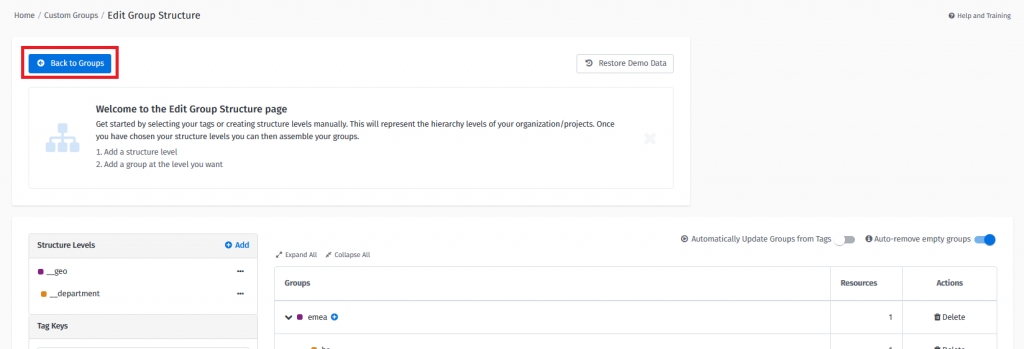
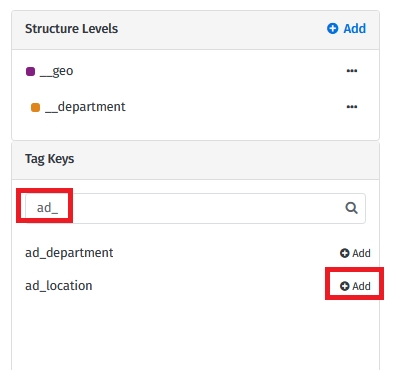


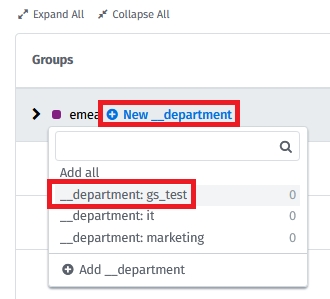


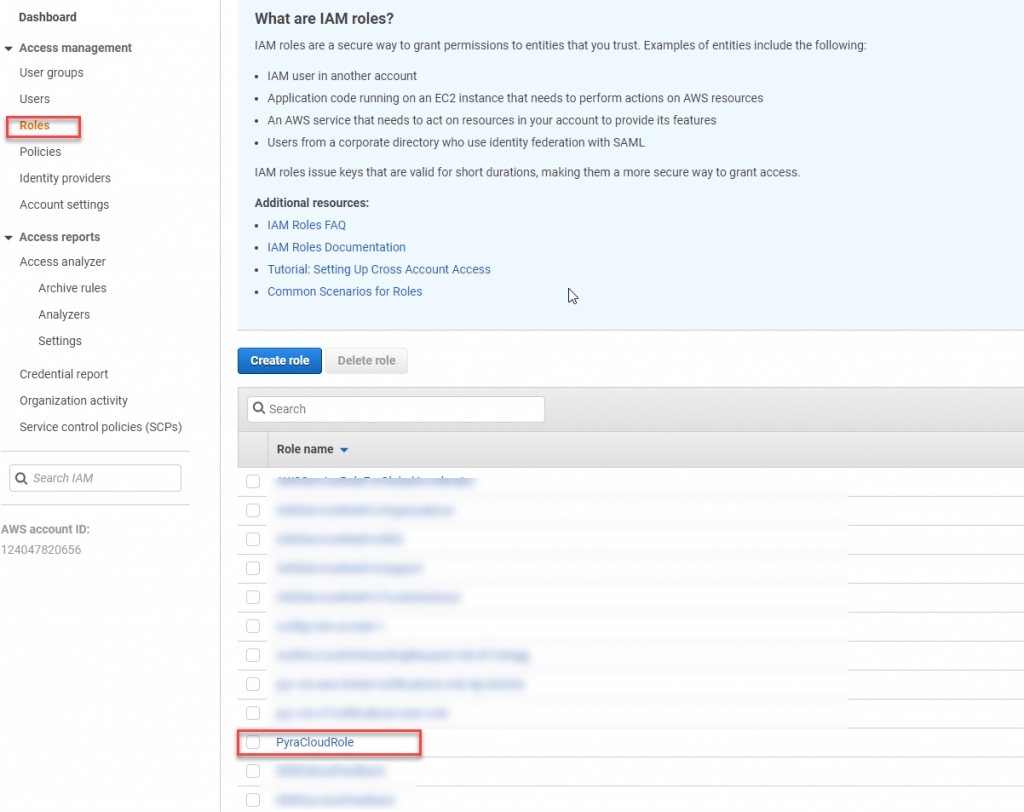
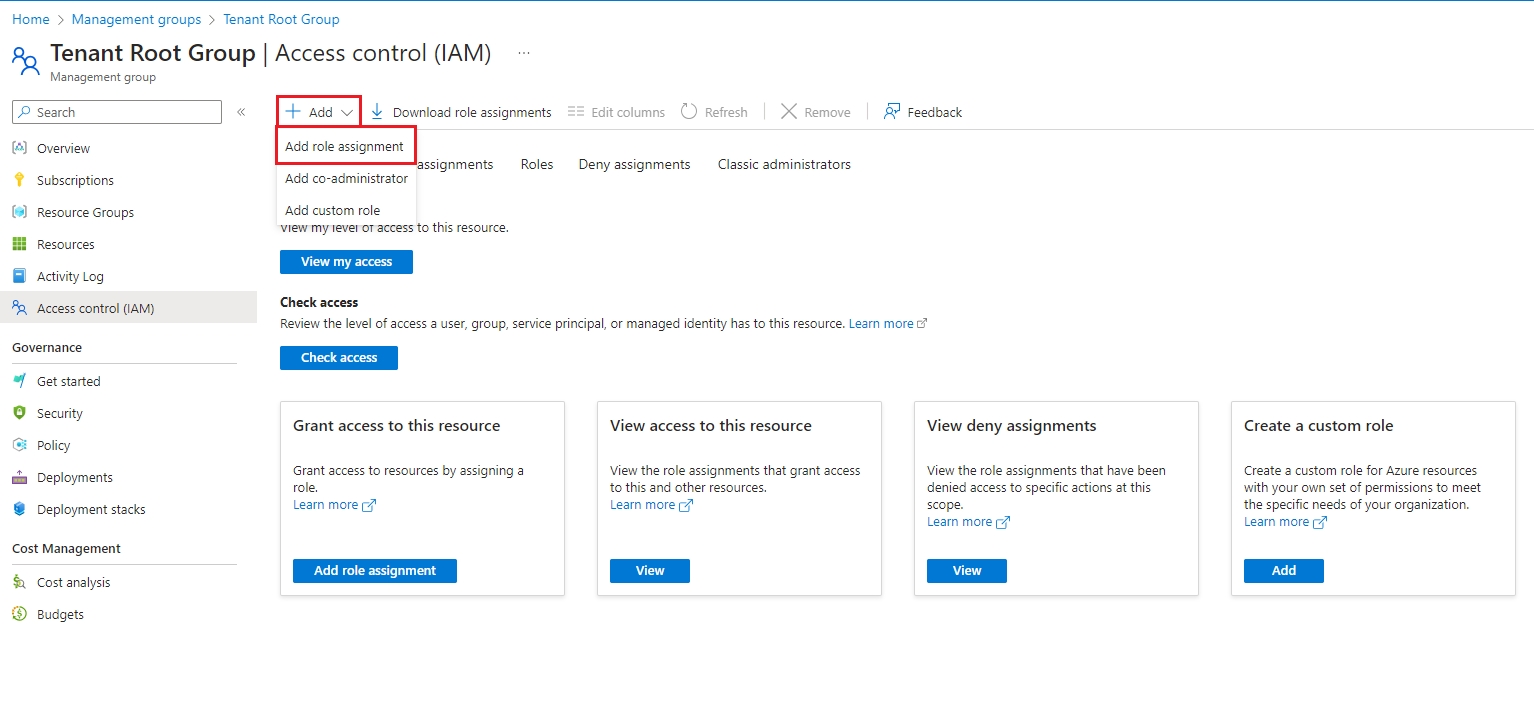


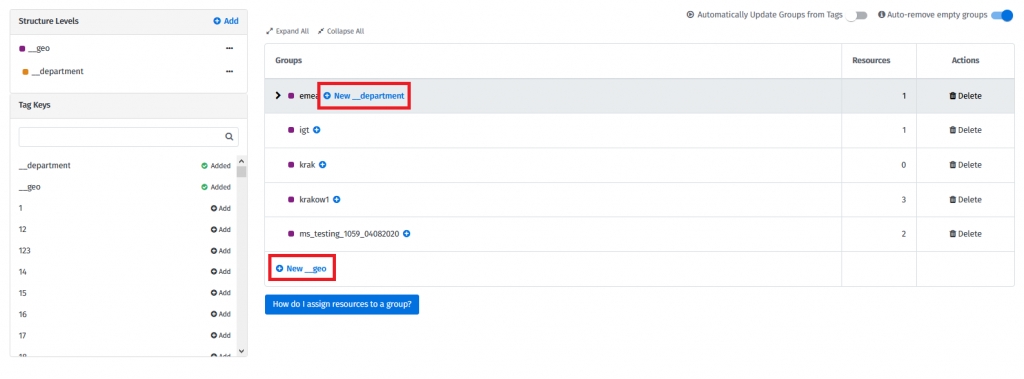
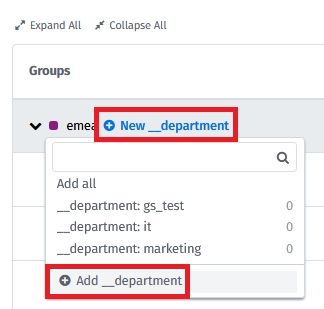
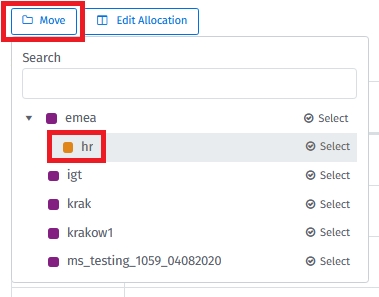
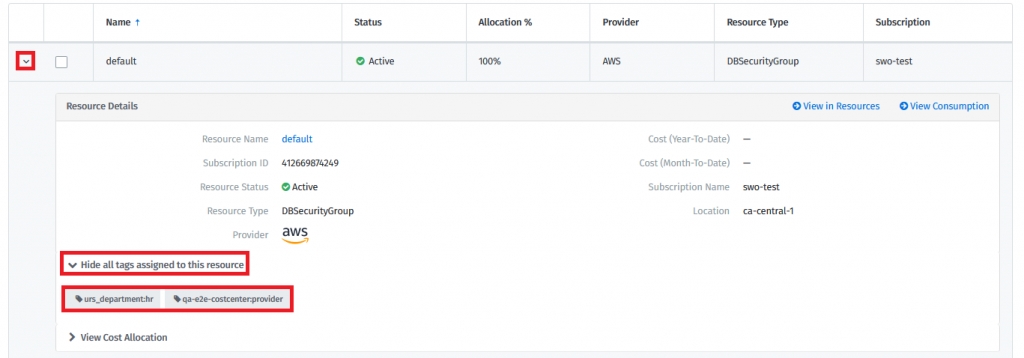
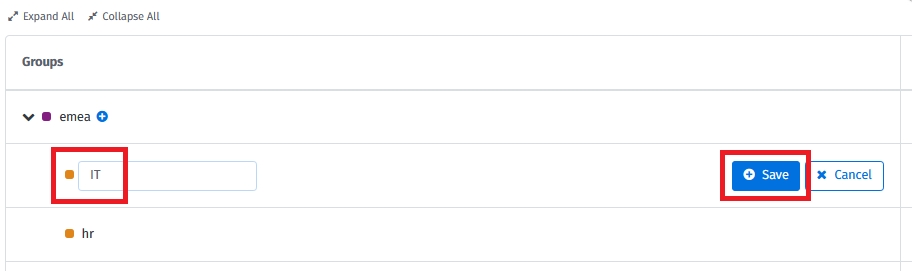
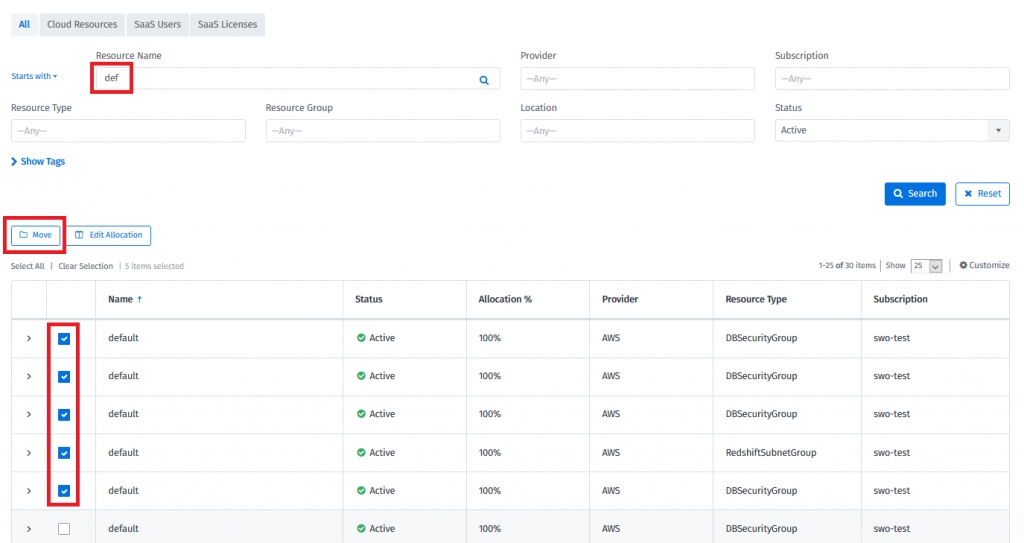
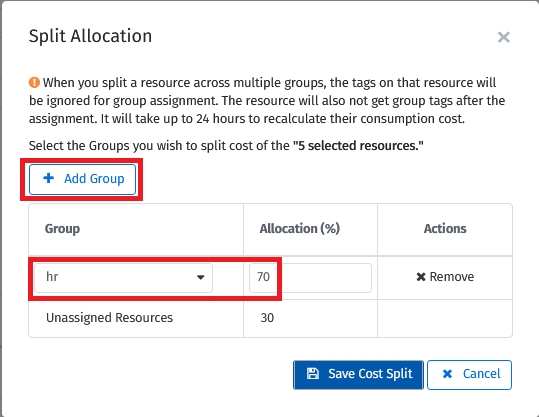
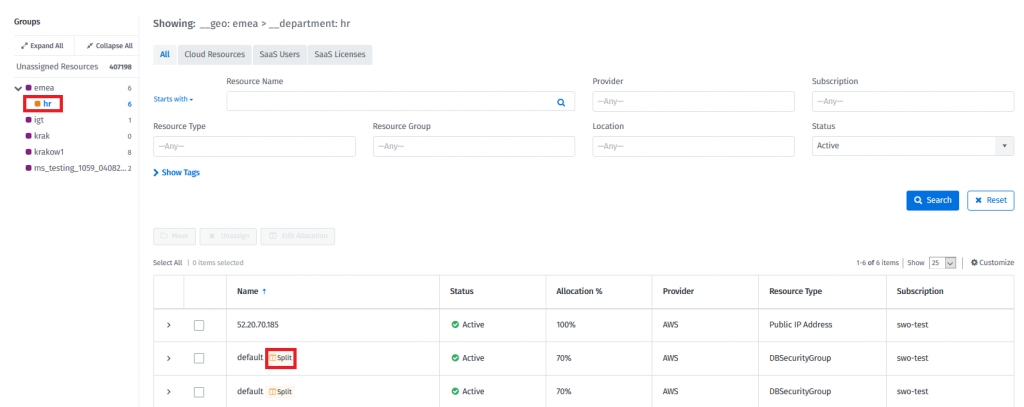

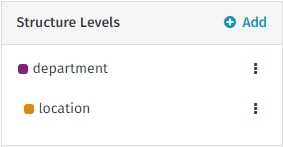
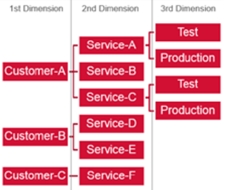
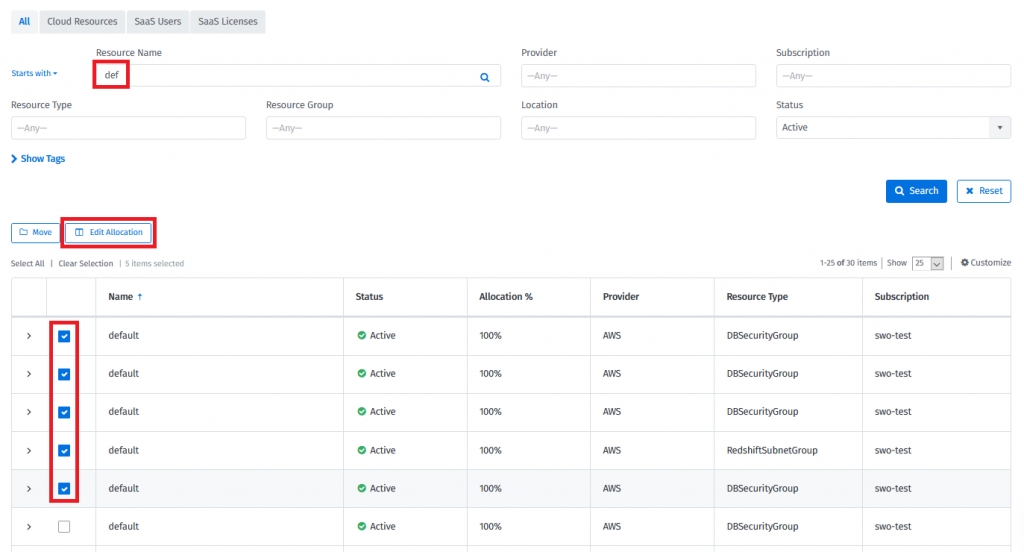
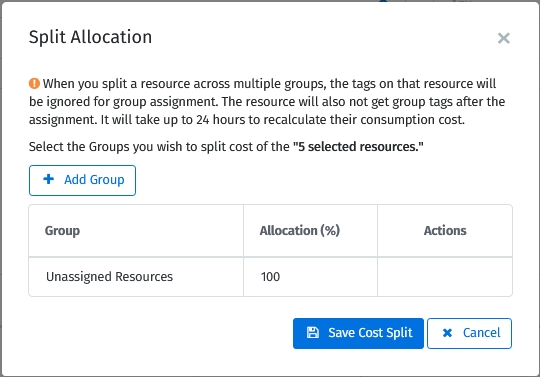
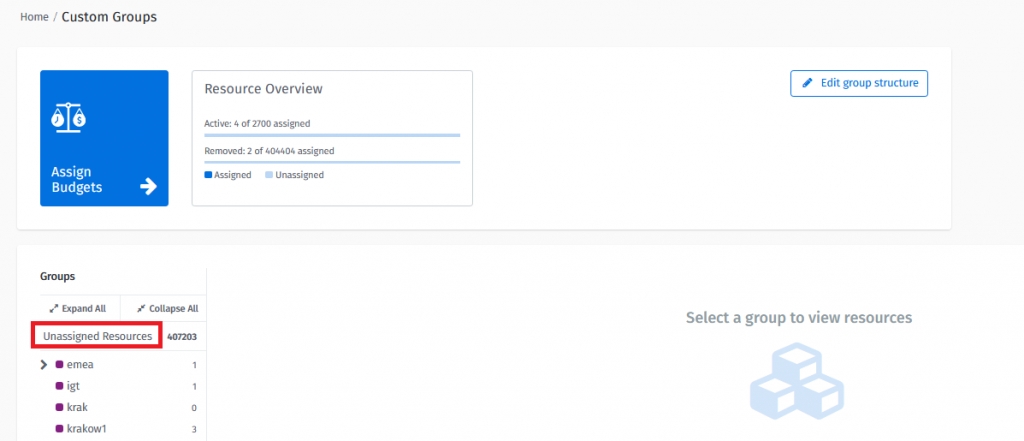
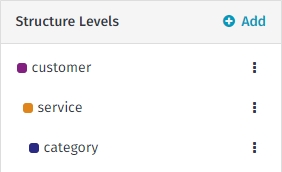
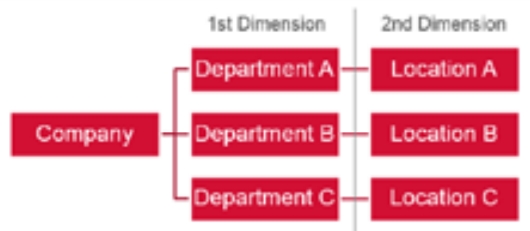
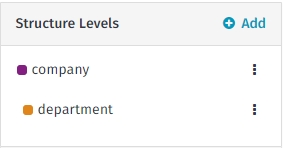
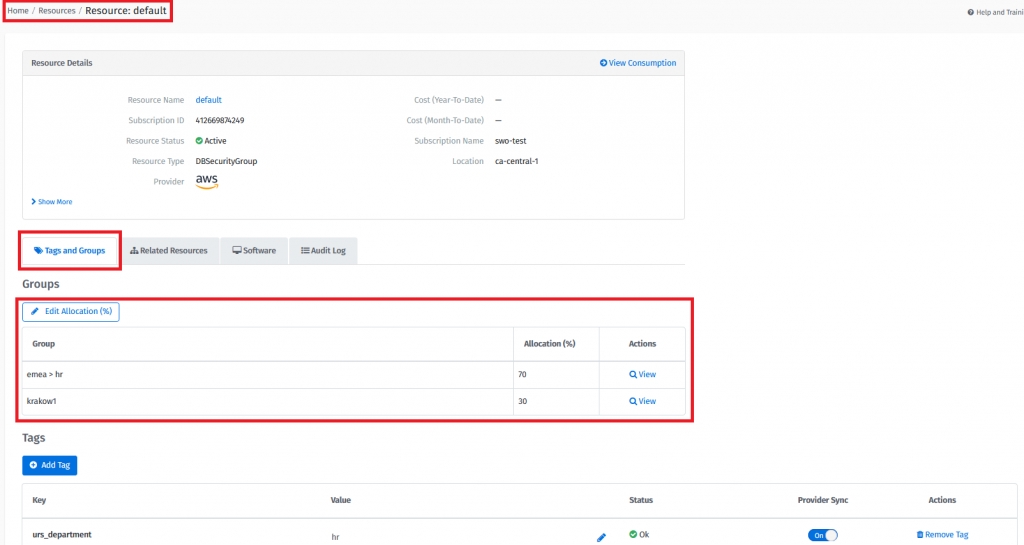
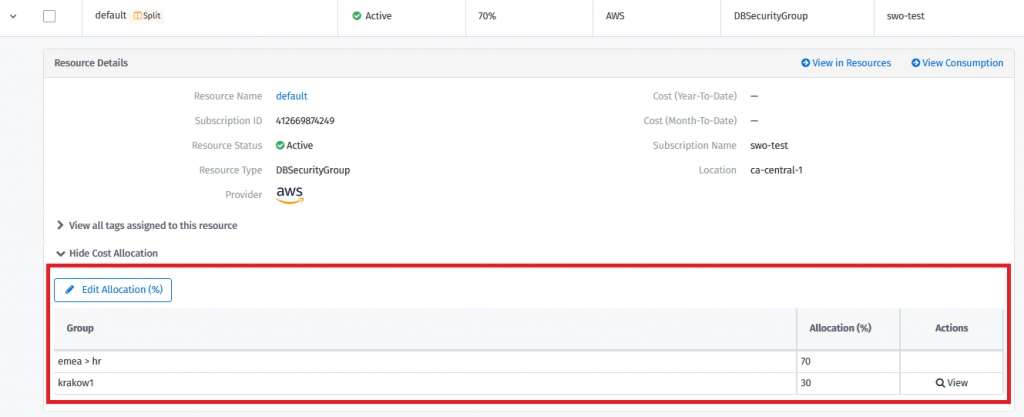
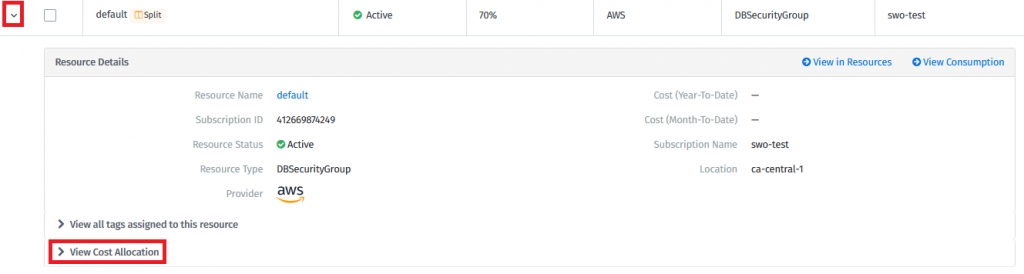
(Optional) Configure Custom Groups or Tenants & Subscriptions (Consumption module documentation).
Set bill-to details on the Settings page.
Configure scheduled report.
Adjust the generated document in the Chargeback section.
Send documents to the recipient.
Generate summary report of issued documents
(Optional) Configure Custom Groups or Tenants & Subscriptions (Consumption module documentation).
Generate the document using the Setup page.
Adjust the generated documents (Chargebacks section).
Send documents to the recipient.
Open the generated document in Chargebacks by selecting the line item in the Chargabacks tab section.
Apply additional charges/discounts, change currency, bill-to, and other properties. If the document has been sent, a new version will be created.
Send the corrected document to the recipient.
On the Chargeback tab, you can see all chargeback invoices including specific details about each invoice:
You can select any row to open a detailed view of the respective chargeback invoice. The page shows all information related to the document and allows you to edit it.
Document view – consists of header, body, and footer. On the right side “Actions”, “Activity” and “Versions” panels are available.
Header – consists of the name and date the document was generated. Bill-to-address, company logo, customer number, consumption/billing period date range, and field to store custom notes.
Body – lists the line items. Each line item is described with appropriate providers, total resources count, and amount. Line items are further divided into sub-lines, which display top Resource Types.
Office 365 licenses are classified by their assignment status. On the chargeback document, assigned licenses are visible as a “User” subline with resource count matching active users. On the other hand, unassigned licenses are gathered under the “License” subline with resource count matching the number of license types (like Office365 E3 or E5).
Additional charges represent new line items added by hand to the generated document. Costs associated with such lines may represent various invoice corrections or items not associated with consumption data. Support fees, discounts, and credits are typical examples of such charges.
Functionality is available through the Add Charge or Credit button.
Additional charges may be fixed or percentage-based. The percentage amount is calculated based on consumption data only, therefore other lines (e.g. markup) are not taken into consideration. Negative values are calculated as discounts. Additional charges can be removed with the Delete button.
Documents based on Custom Groups can display nested group sublines. The whole purpose of sublines is to add more transparency to the cost of the line item. It is an alternative to displaying top Resource Types.
Subgroups are organized in the tree structure. Visibility and depth of presented sublines can be selected in the Customize menu. Please note that the cost of the subline is not calculated into the total cost of the document. In other words, it justifies line costs.
The name of the given subgroup (and therefore line name) can be properly adjusted on the Settings page.
Generated documents often miss crucial information needed to justify the amount associated with line items. Moreover, documents often require appending internal tracking numbers. Notes address both of these needs and have the capability to store text and append it to the generated PDF. The field is accessible near the top of the document.
Chargeback documents are “read-only” after being sent. Further edits of sent documents are treated as separate versions. New versions are marked with the date and person making the edits. All changes are collated as long as the new version is not sent to the recipient again.
Previous versions are accessible through the panel on the right side of the document. Previous versions cannot be changed or deleted.
The Chargebacks page has an “Actions” panel on the right side, which will allow users to perform actions with selected invoices as outlined below:
Export with Charts as a PDF or Export as a PDF.
Analyze Consumption Report.
Export resource data to CSV.
Delete Chargeback. The document is permanently removed from the system.
Sent documents are delivered to the recipient by email. Recipients receive a PDF with the chargeback document along with a link to the detailed report (CSV file).
The detailed file describes every line of the document with the Meter Name, Volume, and Resource Name. Data provided in CSV files are input to calculations performed to generate the chargeback document. The attached details can be imported to external systems for reference or further analysis. Diagnosis of miscalculations is also feasible.
The links to the detailed files expire after 5 days from the time the message is received. Regeneration of links is possible by sending documents once again – using the Send button in Chargeback Manager.
Select Add New Chargebacks. This will open the New Chargebacks page. There is an intro paragraph explaining what chargebacks are that can be hidden by clicking on the [x].
The first section is “Providers”. This represents a list of all available and supported provider groups.
Admins need to select all of the providers they want to create chargeback invoices for. By selecting a provider, the system fetches consumption data for every tenant that is enabled under that provider.
Once providers have been selected, select Done to navigate to the next section Date Range.
The “Date Range” section allows Admin to narrow down the date range of consumption data. The date range is specified in two modes:
Usage Dates – described with start/end dates
Billing Period – list of periods connected to bill cycles
Once the date range has been selected, click on “Done” to navigate to the next section “Create”.
Note: Start and End usage dates are inclusive i.e. consumption would be fetched for these dates as well. Billing Periods are available only for Azure EA and Azure CSP.
Newly selected consumption spend (by selecting providers and date range) may be optionally divided in two ways:
Using a Custom Group structure
Using Tenants & Subscriptions hierarchy
The Custom Groups section shows the group structure as defined in Custom Groups. This allows Admins to select departments/groups they would like chargebacks for.
Selecting each group allows Admins to split chargeback invoices for selected groups. If none of the groups are selected, one global chargeback invoice is created for the complete consumption of selected providers.
Costs displayed against each group are the estimated consumption by that group. Consumption for all ungrouped resources is reflected as “Untracked” in this section.
Click on “Done” to navigate to the next section “Review Chargeback”
Note: Invoice will be created for the first selected group. Lines will correspond to the closest selected groups under the document group. Consumption will show only for selected groups in the invoice.
Tenants & Subscriptions are the foundation of the Consumption module. Chargebacks use the existing structure to create documents. No further configuration is required. Convention-based approach is applied: every Tenant is documented with lines derived from its Subscriptions.
Note: Document/line options can be set on the Settings page. Scheduled generation is supported. Please consult the Original Document subsection in the Reporting section.
Review Chargeback is the last section that summarizes the selections the Admin user has made and provides the following capabilities to Admins:
Admins can preview the document that will be generated
Admins can edit the Bill To details
Admins can change the name of the document i.e. chargeback invoice – This allows users to name the invoice appropriately within the organization
Selecting “Preview” will open a preview of the invoice so that Admins can see how it will be displayed on the chargeback tab.
Note: There will be no costs displayed on the preview tab because the document is not yet generated, however, costs will be available once the document has been generated.
Selecting “Edit Bill To” will allow Admin to edit the Bill-To details if required. Admins can change the address and contact details for the chargeback.
Once all the selections are made and the preview looks good, Admins can go ahead and create the chargeback documents by clicking on “Finish & Create [n] Chargebacks” (where [n] is the number of Chargebacks as shown below
Admins will be taken to the “Chargeback” page, where they can see the invoices being generated. This is shown in the right-hand “Status” column as “Generating”.
Once the invoices are ready, the status will be changed to “Generated”.
Invoice documents are issued many times throughout the year. Manually adjusting documents every time is unreasonable. Common information like bill-to details, margin, or contact information is typically recurring for a given document series.
They can be bound to a single group or subscription. The settings page persists and allows editing most of the information stored in the document header.
Settings can be attached to either Custom Group, Tenant, or Subscription. All levels store the same set of settings. Stored settings are used twofold: as default values for manual generation (Setup) and base data during scheduled generation (Reporting).
The settings tab is divided into left pane and right pane.
The left pane represents the tree structure of either Custom Groups or Tenants & Subscriptions. Clicking on a tree element selects a particular entity and the form is filled with appropriate data (by default form is empty).
The right pane holds a set of information used during document generation. Data filled in the form are auto-saved.
Chargebacks support rich reporting capabilities. Reports allow ad-hoc and scheduled export of data. The granularity of the report extends from a basic overview to resource-level details. It is also possible to generate new documents with a selected cadence.
If you are in Chargebacks, you have the option to “View Schedule Reports” Or “Add New Schedule” by clicking on the buttons on the top right.
You can also navigate to the main reports page by clicking on “Analyze” in the main navigation menu and then selecting “Reports” as shown below:
This will take you to the “Quick Reports” page. From here you can click on the dropdown under “Chargeback Manager” and select the report you want.
The Chargeback module supports four report types.
Scheduled reports enable periodic reporting with automatic delivery capabilities. The scheduled report definition represents a “future report form” which will be filled with appropriate data. Both the data set and the time of running the report can be customized to meet business requirements.
Reports are gathered under the Scheduled Tab.
To create a new Scheduled Report, select Add New Schedule in the top right corner of the Chargebacks page.
This will open the Schedule Report page, where you can follow the steps and fill in the required information for your report.
Date of document generation.
Amount
Amount of this Chargeback i.e. Total of all line items.
Billing/Usage period
Consumption filter – start/end date or list of billing periods – it has been generated for.
Status
Status of the chargeback invoice. Possible values are Generating, Generated, Sent, and Failed.
Footer – displays contacts, company information, and exchange rates applied during currency conversion. Additionally, a system-wide unique Chargeback Number is visible and should be used during contact with Support in case of issues with the document.
Activity – Send the document to the recipient. After sending the document, the status is changed to Sent.
Document Name
Name of the document.
Chargeback No.
This is unique number for generated chargeback invoice. Column hidden by default.
Providers
Publisher list taken into consideration for document.
Bill To
Company name which paying department belongs to.
Recipient’s email. The column is hidden by default.
All Chargebacks Detailed
This is an enriched version of the overview report with detailed line information.
Each row of the report stands for a single line in the document. Line cost, currency, list of providers, and resource count are available.
All Chargeback Overview
This report summarizes basic information about all documents generated within a target date range.
Each row represents a single document. Apart from the header information like document name, bill-to details; total amount, and currency are present.
Chargeback Detail
This is a detailed report for chargeback line information.
Each row of the report stands for a single line in the document. Line cost, currency, list of providers, and resource count are available.
Provider Based
The report focuses on the provider’s shares analysis.
Line information is split across all contributing providers.
Further aggregation of data may answer questions regarding each provider's cost across all selected documents, trends in provider’s shares, etc.
Original Document
This report enables the scheduled generation of documents – in contrast to the analysis of existing documents that previous types focus on.
The outcome of running the report is a set of new documents, which can further be adjusted in the Chargeback module (Additional Cost, etc.).
Rich configuration options of the report in cooperation with Settings allow achieving functionality similar to manual generation.
Document Date
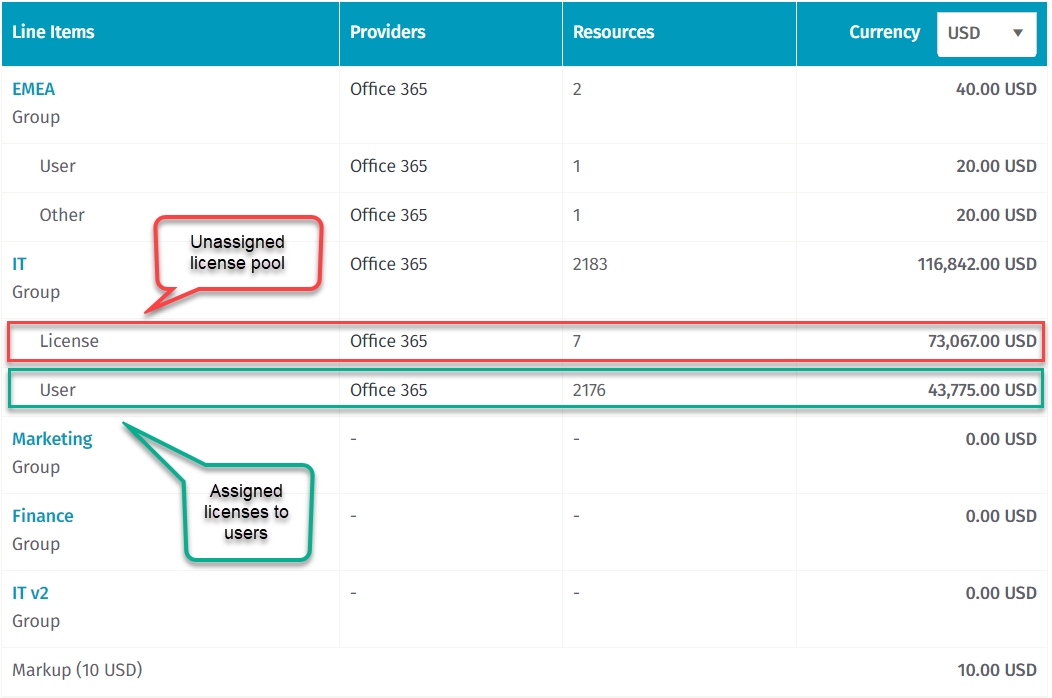

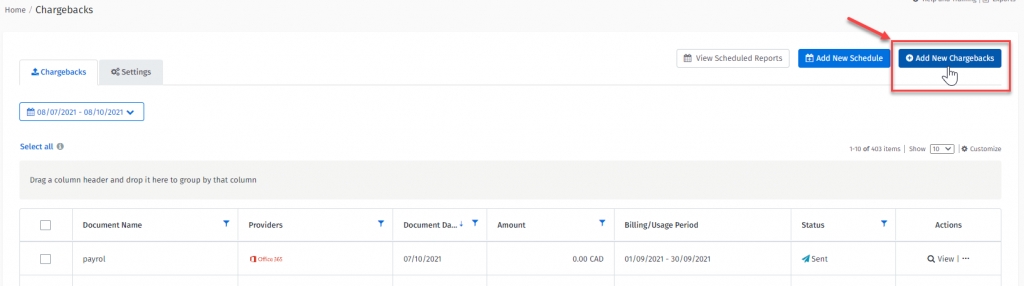
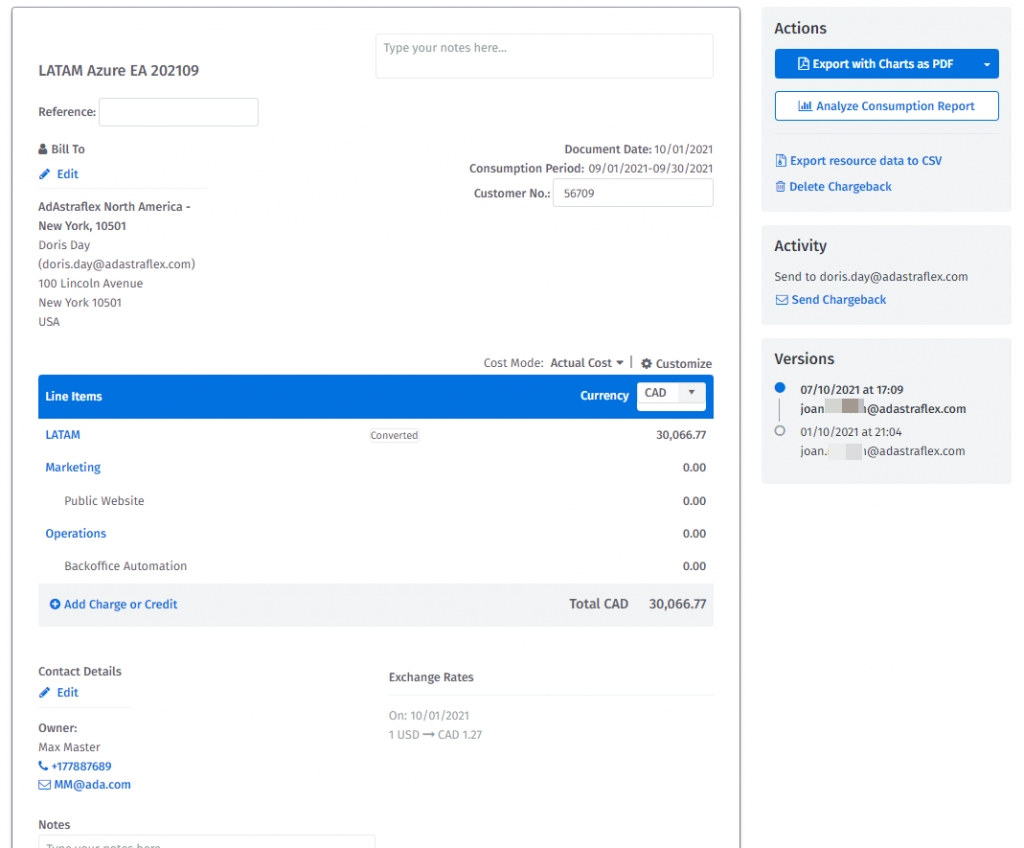
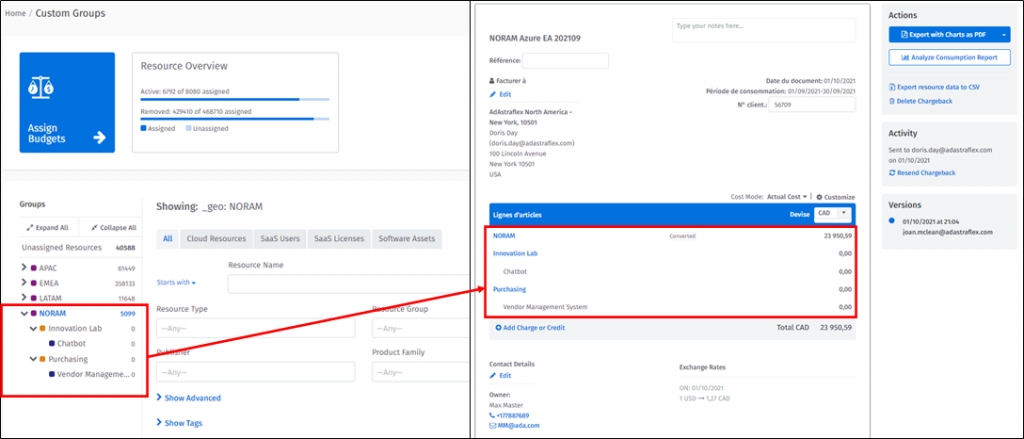

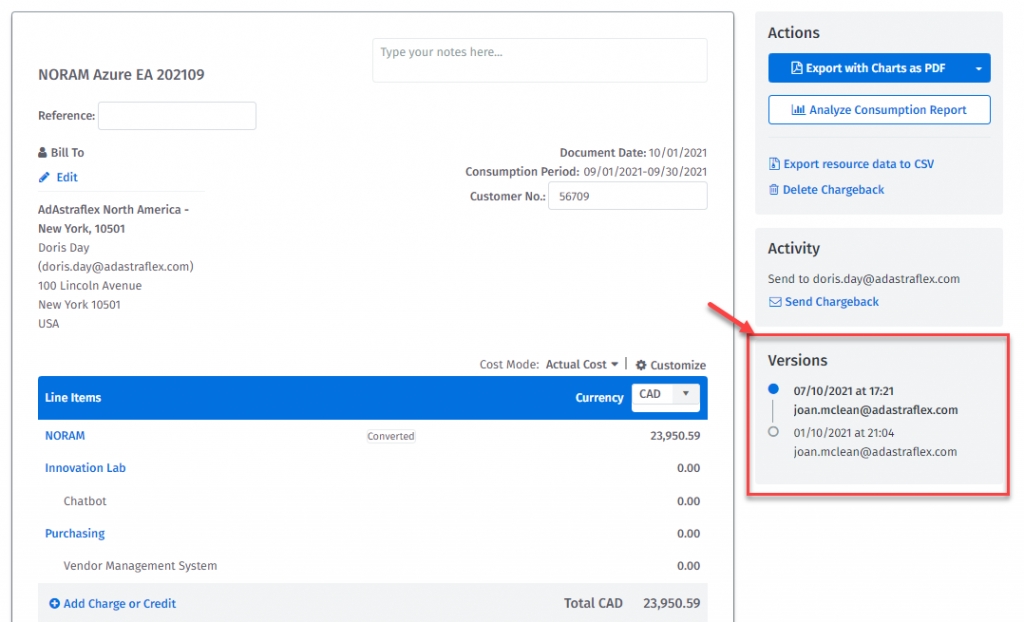
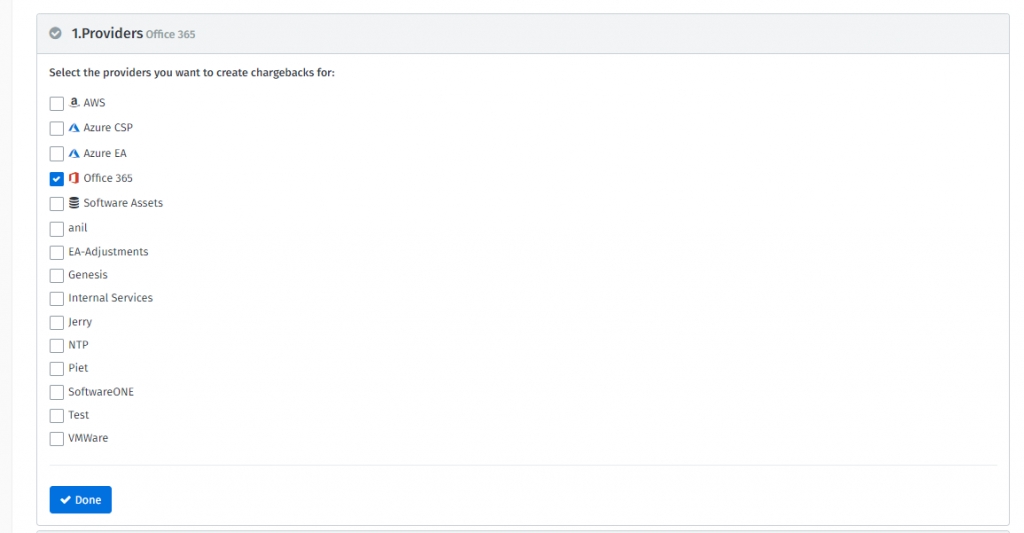
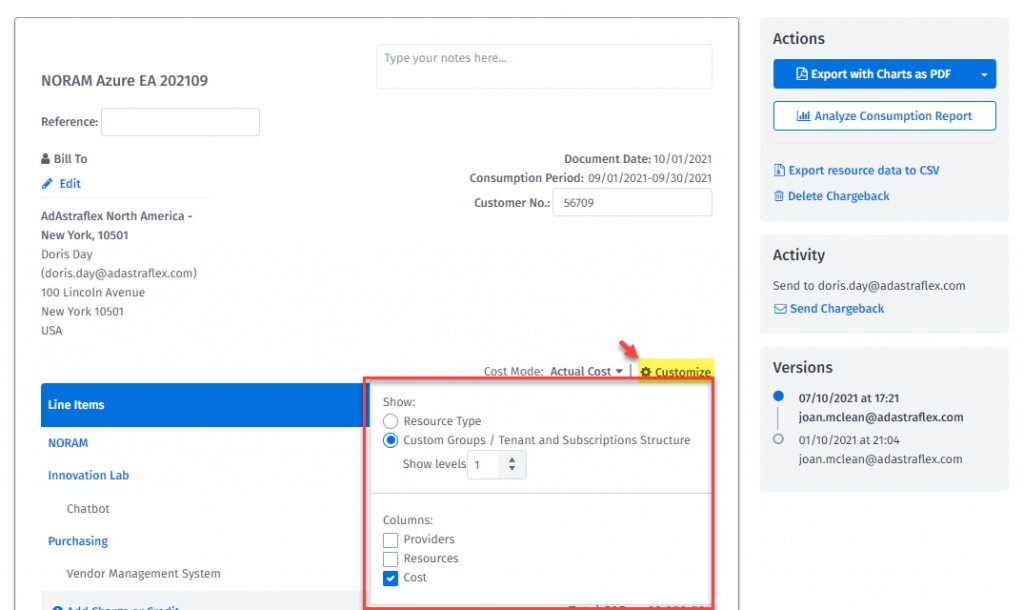
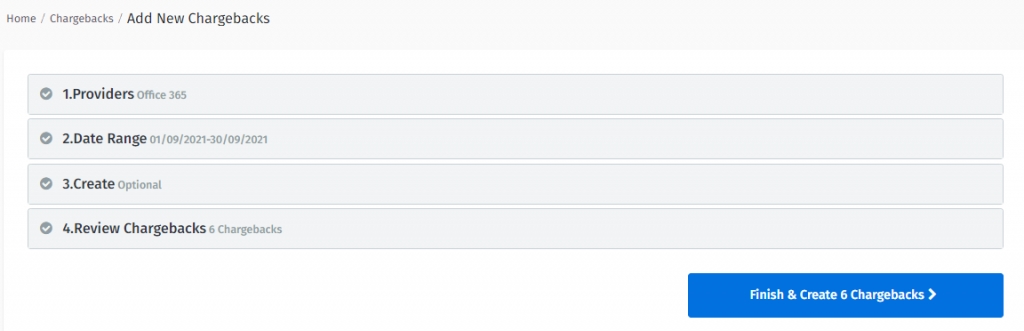
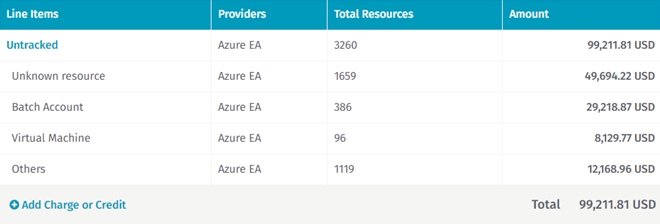
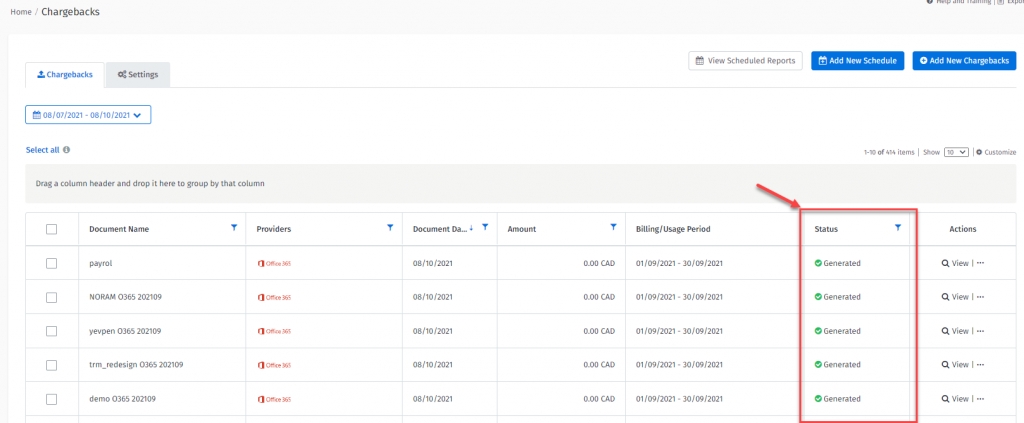
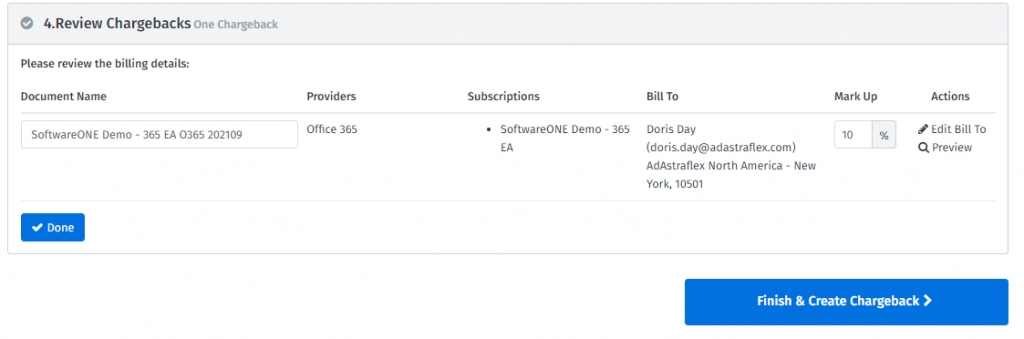
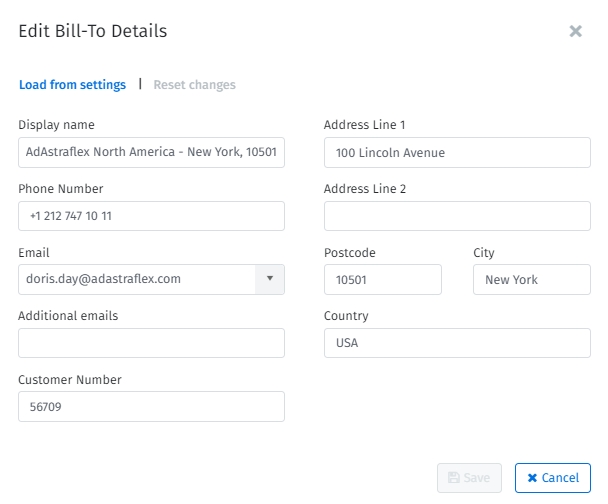
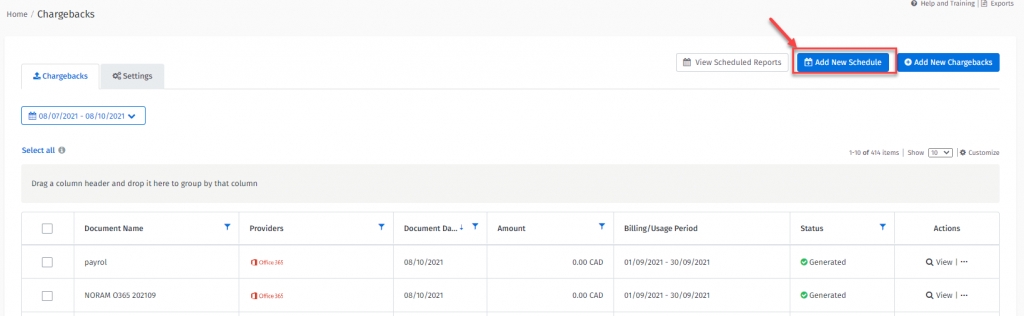
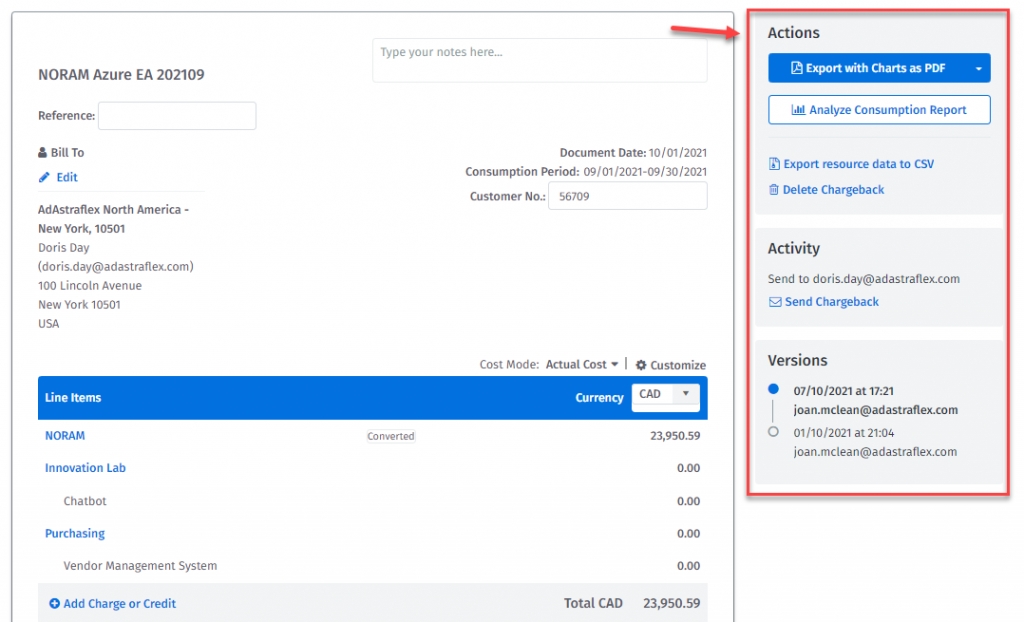
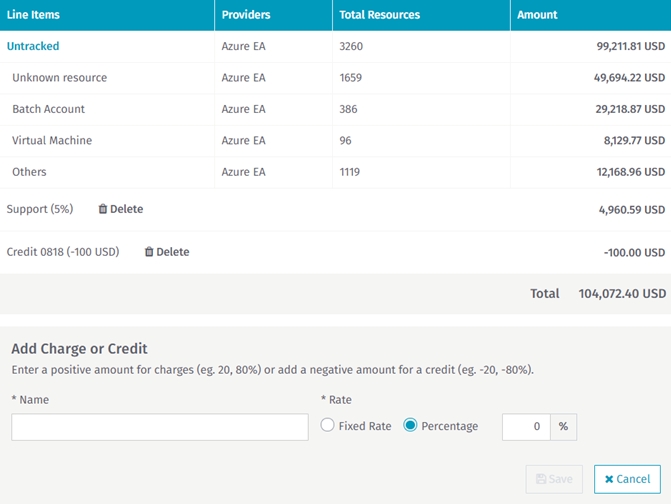
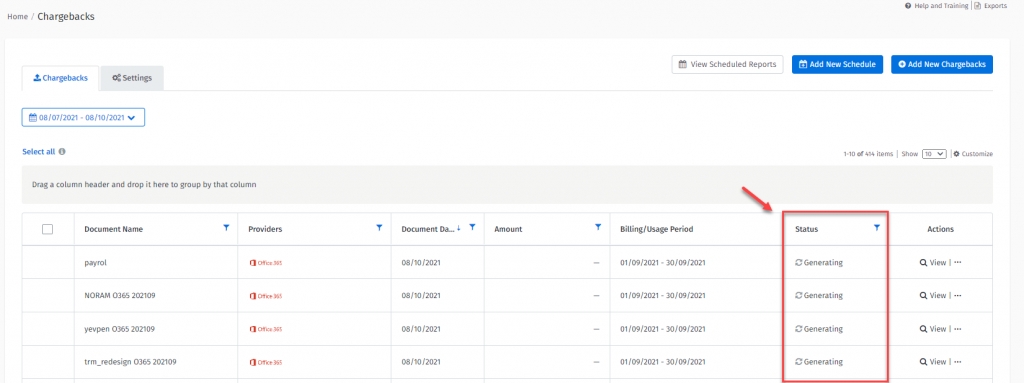
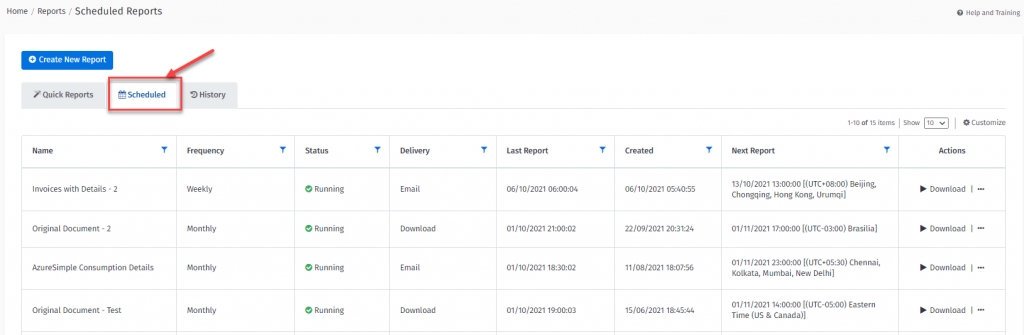

Tags and Resources allow you to create a consistent tag structure across all of your Cloud Platforms that are synchronized with the Client Portal.
Maintaining a consistent tag structure allows you to aggregate resource information from all of your Cloud Platforms to provide better governance, cost analysis, and chargeback. A consistent structure also allows you to deploy a more flexible Cloud Platform structure that fits your business.
The following image shows an inconsistent tag structure:
As you can see from the three examples above, the administrators managing the different cloud platforms and subscriptions had the same intent, but did their tagging differently.
This would make aggregating information within each platform or outside each platform difficult. To solve this, you can use Tags and Resources to apply a consistent tag naming standard to all resources across all platforms. You just define the naming standard you want and add/move those resources to that new naming standard. Once done, the Tags module will allow you to clean up the old tags.
Throughout the rest of this article, we will show you how to use Tags and Resources to drive a consistent standard within your business.
To access Tags, from the navigation menu, go to Cloud tools > Tags.
To access Resources, from the navigation menu, go to Cloud tools > Resources.
Alternatively, you can view your stats using the Resource Manager tile. These stats are pulled from Tags and Resources. Selecting this tile will direct you to Resources.
The tile displays three sets of information:
Resources - Total number of resources we are synchronizing from all of the Cloud Platforms connected to TRM.
Tagged - Percentage of resources that have at least one tag on them.
Tag Conflict - Number of open conflicts reported on the system.
Tags allow you to view and manage the tag structure used, or to be used, by your Cloud Platforms. Tags don't need to exist within your Cloud Platforms to create them within the Tags module. Tags will show up if they have already been applied to resources from the Cloud Platforms you are synchronizing with the platform.
Once you apply tags to resources, they synchronize back to the resource’s Cloud Platform by default. This functionality can be disabled. The Tags page contains the following elements:
Selecting View in the Actions column opens up the Tag Details Page. On this page, you can make edits to your tag.
This page contains the following elements:
Resources is a management page that allows you to view all of the resources that are synchronized from your Cloud Platforms Subscriptions.
You can view the properties of each resource to identify them properly. You can also apply Tags to individual or multiple resources at a time. By default, Tags will synchronize back to the Cloud Platform. You can turn this feature off.
The updated Tag information is pulled from the Resource on every synchronization cycle. The Resources page also supports search/filtering, so you can quickly find the resources you would like to address.
This page contains the following elements:
Export - The Export option will start a download of the list in view, including all of the pages.
Action “View” - Select View to see more details about the resources.
A banner is displayed if you have not been granted the required permissions to read and/or tag AWS resources.
You may see the following messages for the following scenarios:
Select Show Details to view details of the resource type, AWS account, and AWS region that you are missing permissions for, and the impact on the environment.
This modal explains the permissions that are missing for each resource type within an AWS account and region. For example, in the third row, we are missing permissions for RedShiftReservedNodes in the ap-northeast region for the account swo-test.
Resource Details Page
The Resource Details page contains various elements. Selecting View in the Actions column opens up the Resource Details Page you can use to edit your resource.
Resource Details - Common properties of all resources are listed in this section. In addition, we will also display some extended properties, based on resource type. Common resource properties include Name, Cloud Platform, Subscription Name, Location, and Resource Type.
Groups - This is the list of all custom groups the resource is a part of. A resource can be part of more than one group. The table also displays the allocation of the cost of that resource across the different groups. Filtering by Custom Groups will reflect this cost allocation across costs on the Consumption and the Budget pages.
Related Resources Tab - This Section will include resources that depend on this resource as a parent. Not all dependent resources will show up on this list, as some resources can be shared. If the resource was created by the parent, it will show on this list. Child resources do not inherit Tags from the parent resource.
Actions - If you no longer require the tag to be applied to this resource, select Remove Tag.
Add Tag - Allows you to add the tag to this resource. You must specify the Tag Key, Value, and the Platform Sync state. Once complete, save the new Tag.
Virtual Resources are any resources that are not automatically discovered from your existing cloud environments, like Azure, AWS, Office 365, etc., but have a cost associated with them. Examples of virtual resources include full-time employees assigned to certain projects, Virtual Machines from specific providers (like Red Hat, etc.), or any intangible resource that has a cost.
Virtual Resources are associated with cloud resources (that have been discovered from Azure/AWS, etc.), and inherit some of their properties from the resource they are associated with. For example, they automatically inherit the tags and custom groups of the resource they are associated with. This also means that, when the tags or custom groups on the original resource change, they are automatically updated on the child virtual resource.
Adding a virtual resource can be performed by clicking on the ‘Add Virtual Resource’ button on the Resources landing page. Clicking on this will navigate you to a screen requesting more information:
Virtual resources will appear in Resources just like any other resource. They can be searched for by using the Advanced Search filter “Resource Type” as shown below:
Virtual Resources inherit their tags and custom groups from the resource they are associated with (as mentioned above). Therefore, their tags and custom groups cannot be modified.
The parent resource the virtual resource is attached to can be viewed within the Related Resources tab within Resource Details.
The Client Portal will synchronize with your Cloud Platform at a set interval. This means there is a chance the Tags you see within the Client Portal are out of date (by hours). We try to synchronize often to prevent this, but in some cases, changes will be made in Azure or AWS in between Sync cycles.
When the addition/removal/change of a Tag is made to the same Tag Key, this will cause a conflict. (Since the Cloud Platform will only allow for a single Tag Key and any value on a resource.) If the same Tag Key is added or changed on both platforms, in between sync cycles, the Client Portal Tag Key: Value will overwrite the Cloud Platform’s Tag Key: Value.
We realize the Cloud Platform Tag change may have been intentional, so we save this as a conflict. This conflict will allow you to accept the change proposed by the user from the Cloud Platform or leave in place the Client Portal change that was made.
If you ignore this conflict, the conflict notification will expire. To avoid Tag Conflicts, you can always manually run a synchronization on your subscription.
The Resource Details page contains the following options:
If you have conflicts, you will see a table that lists all of the Tags that are in conflict, from the Tag perspective.
Conflict column - This is the Tag that was applied, and that is now in conflict with a resource. If you click on the Tag name, it will take you to the Tags page, in the Tag Edit view.
Cloud Platform column - This is the resource’s Cloud Platform impacted by the Tag Conflict.
Conflicts column - The total number of conflicts related to this Tag.
Select the arrow icon > next to the tag to open up more details about the error.
Select the action you want to take and select Update Changes.
Resource rules enable you to tag and group resources in your software and cloud environment. You can access resource rules using the Resource Rules link on the Resources page. When you select the link, the Resource Rules page is displayed.
From this page, you can create new rules using search criteria, which, if met, will create tags or organize resources into groups as configured.
Example: Company XYZ’s IT department, based in EMEA, manages the organization’s Office 365 licenses. Such a resource rule could look like this:
When the above rule runs, any resources that have the provider Office 365 will be tagged with the department – IT and Geo – EMEA.
Similarly, you can also configure resource rules to group resources based on search criteria, which include properties as well as tags. Here is an example:
The above rule looks at all resources with a tag _geo, value EMEA, and groups them between the APAC and EMEA custom groups.
The order of resource rules is important, as they run in the order defined. You can reorder resource rules by dragging and dropping a resource rule to another position within the grid. The order is also mentioned in the column right of Rule Name.
It takes up to 24 hours to refresh consumption reports after rule execution.
Resource rule conflicts are conflicts that arise when resource rules try and operate on the same resources in question around tags or custom groups.
For example, when a resource rule modifies a tag on a resource to a value, and another resource rule modifies the same tag on the resource to another value, that results in a conflict.
Resource rule conflicts are displayed in a tile on the Resources page. Selecting the tile displays all the resource rules in conflict. Alternatively, the Conflict Status column indicates resource rules in conflict. Conflict status Unknown means that the rule hasn’t been executed since it was last modified.
If you notice virtual tags appearing on your resources unexpectedly, these tags are being applied by an active Resource Rule (Group Rule). This rule automatically assigns your resources to a specific Custom Group based on the criteria you defined in the Select Resources You Wish to Add to Group section of your configuration.
As part of the group-assignment process, the rule also applies a virtual tag to each resource to indicate the assigned group. This behavior is expected and occurs whenever a resource meets the rule’s triggers.
To prevent virtual tags from overriding your expected resource categorization, update the rule configuration or its criteria. To do this:
Go to Cloud Tools > Tags > Resource Rules and review the configuration of your active rules.
Confirm that the subscription criteria accurately reflect how you intend to group your resources.
If you want these resources categorized differently, update the existing rule conditions or create a new rule that aligns with your desired grouping logic.
Resource Rule conflicts show the status as Conflict. To resolve a resource rule conflict:
Expand the resource rule under conflict using the expander to the left of the rule name.
Identify other rules that the rule in question is in conflict with. In the example above, rule demo_117_one conflicts with rule demo_117_two. The message will also mention the tags that the conflicting rules are operating on. In this example, the conflict is due to the tag key ad_department, values do_not_remove, yevgen.
Understand the configuration of the resource rules in question. As you can see, both rules apply different tag values to the tag “ad_department”, therefore resulting in the conflict.
In this example, the resolution would be to edit one of the rules so they don’t apply a tag value to the tag “ad_department”. Editing demo_117_two and applying a different tag would resolve the conflict.
Resource rule conflicts can occur due to a number of reasons. However, most commonly, resource rule conflicts can be addressed by editing the rule to exclude applying tags to resources that already have that tag. This way, the resource rule will not overwrite a tag with another value, which is the most common reason for a rule conflict.
To do this, edit the resource rule, and edit the search criteria of the rule to use something like this:
Clicking on the Sync Health tile will take you to the Sync Health window. The Sync Health window will show you all of the Cloud Platform Subscriptions you are synchronizing with the Client Portal. It will also show you the synchronization status and allow you to run a synchronization process.
The Sync Health window contains the following options:
Multi-select options
When you select one or more tags in the list, you will see a couple more options appear “Clear Selection” and “Delete Tag(s). You can delete a single tag or multiple tags. If you want to start over and recreate your tag structure, select all tags and delete them. All tags will be removed from resources.
Quick Add Tag
You can create a new Tag Key and Value. You can also use an existing Key, but add a new value.
Search by Tag Key field
Quickly find the Tag Key you are looking for by typing it into this field. This field uses type-ahead, so you should start seeing results as you type.
Tags column
This column is used to display the Tag Keys and Values in a collapsed view.
Resources column
This column is used to display the number of resources, out of the total number of resources, synchronized to Resources. E.g., <#resource with key: value> (of <total resources from all subscriptions>).
Actions column
This column is a quick link column to view and edit tags.
Result(s) found
This field will show the number of resources in the list.
If you are filtering the results through Advanced Search on item 10 or the column filter on item 11, this number will change showing the resulting number of resources based on your filtering. (In this case 19).
Single or Multi-Select Column
You can select a single resource or multiple resources to take action.
Actions column
Select View to learn more about the resources on this list.
Advanced Search
This allows you to filter down the resource list based on properties related to the resources, so you can make quick decisions based on the results.
Add Virtual Resource
This functionality allows you to add virtual resources, so you can visualize and track their costs.
Single or Multi-Select Column
You can select a single resource or multiple resources to take action. When you select a resource you will see the “Key” and “Value” fields appear. Enter the Tag Key: Value and click the “+ Add Tag” button to add different tags to the selected resource(s).
Resource List
This is a list of all of your resources, either in filtered or unfiltered view.
Software Tab - This section will include software that has been assigned to this resource.
Audit Log Tab - This section will show the history and audit trail of this resource.
Tag List - This is the list of all the Tags actively applied to this resource.
Value: This is the Tag Value that is applied to this resource. The Tag Key and Value create a unique Tag that is applied to this resource. The same value may exist multiple times on a Resource, but only if the Tag Key is unique.
Status: When adding, changing, or removing the Tag, we actively show the status of that change in this column. If you just added the Tag, you will see a “pending” status until the Tag has been applied to the object. The “pending” status may take longer if we are synchronizing that Tag back to the Cloud Platform Subscription’s resource.
Platform Sync - Platform Sync has two states:
On – When Platform Sync is on, the Tag will synchronize back to the Cloud Platform Subscription’s Resource.
Off – When Platform Sync is off, the Tag will only exist within the Client Portal. If you actively change the sync status from On to Off, the Tag will be removed from the Cloud Platform.
This is the cost per unit of the virtual resource. The total cost of the virtual resource will be calculated by multiplying the unit cost with the quantity.
Actions column - Select View to go to the Resource Details Page.
Sync: If you recently made changes in your Cloud Platform Subscription and you don’t want to wait for the next Synchronization cycle, either click to synchronize the Subscription in question or click on 5 to synchronize all Subscriptions.
Configure – This allows you to configure the subscription as part of Cloud Tenant Setup.
Sync All
This synchronizes all subscriptions.
Close
Select to return to the previous screen.
Navigation Links
Quick links to Resources, Resource Rules, Cloud Tenant Setup, Custom Groups, Budgets and Consumption Overview
Resource Stats tile
These are common stats about your synchronized resources.
Cloud Resources - The total number of cloud resources that are tagged within the Tags and Resources.
Users - The total number of cloud user resources that are tagged within the Tags and Resources.
Most Used Tags tile
This tile talks about the most actively used tags in the system, sorted in a descending manner.
Tag Conflicts tile
This tile informs about the conflicts in tagging that exist within the system.
Sync Health tile
Upon clicking, you will be presented with a window that will show you all of your Cloud Subscriptions being synchronized with Tags and Resources.
Tag
The tag key and value you are editing, for example, _department:hr.
Key
The tag key that you are on, for example, _department. This field cannot be changed.
To change the tag key for these resources, you will have to create a new tag key, select all resources in this tag key, and then assign a new Tag Key:Value to the resources.
Once complete, delete this Tag Key:Value.
Value
The Tag Value you are on, for example, ‘hr’. This field is editable.
You can change the Tag Key’s Value as long as it’s not a duplicate within the same Tag Key.
Changing the Tag Value will update all of the resources listed.
Resource Count
This is the total number of resources with this Tag, for example, 19.
Advanced Search
This allows you to filter down the resource list on this Tag, based on more properties related to the resources, so you can make quick decisions based on the results.
Navigation Links
Quick links to Tags, Resource Rules, Cloud Tenant Setup, Custom Groups, Budgets, and Consumption Overview.
Resource Stats tile
These are common stats about your synchronized resources.
Cloud Resources - The total number of cloud resources that are tagged within the Tags and Resources.
Users - The total number of cloud user resources that are tagged within the Tags and Resources.
Rule Conflicts tile
This tile talks about the rule conflicts in the system, if any. If there are no rule conflicts, then this tile points you to the help article on how best to automate tagging and governance within your cloud environment.
Tag Conflicts tile
This tile informs about the conflicts in tagging that exist within the system.
Sync Health tile
Upon clicking, you will be presented with a window that will show you all of your Cloud Subscriptions being synchronized with the Tags and Resources.
Missing read permissions
This means that the Client Portal is unable to read information about AWS Resources. For example, We detect that you are missing 79 AWS Resource types.
Missing write-back Permissions
This means that the Client Portal is unable to tag AWS Resource types. For example, We detect that you are not able to tag 15 AWS Resource types.
Missing read and write-back permissions
This means that the Client Portal is unable to read information about AWS Resources and tag AWS Resource types. For example, we detect that you are missing 79 AWS Resource types, and you are not able to tag 15 AWS Resource types.
Provider
This is the name of the Virtual Provider to track the virtual resource against while measuring your costs for the virtual resource. The value entered here will appear in various searches within the Client Portal for the filter name ‘Provider’. This is a mandatory field.
Resource Name
This field describes the name of the virtual resource. The name here will appear in searches within the Client Portal for the filter name ‘Resource Name’. This is a mandatory field.
Quantity
Quantity is the amount of resources that you have for that resource name. This is a mandatory field.
Date
This is the date that you would like to track your virtual resources. This is a mandatory field.
Currency
Currency in which you would like to track the costs of your virtual resources. This is a mandatory field.
Navigation links
Quick links to Resources, Tags, Cloud Tenant Setup, Custom Groups, Budgets and Consumption Overview
Resource Stats tile
These are common stats about your synchronized resources.
Cloud Resources - The total number of cloud resources that are tagged within the Tags and Resources.
Users - The total number of cloud user resources that are tagged within the Tags and Resources.
Most Used Tags tile
This tile talks about the most actively used tags in the system, sorted in descending order.
Tag Conflicts tile
This tile informs about the conflicts in tagging that exist within the system.
Sync Health tile
Upon clicking, you will be presented with a window that will show you all of your Cloud Subscriptions being synchronized with the Tags and Resources.
Subscription Name
This is a list of all the Cloud Platform Subscriptions being synchronized with the Client Portal. If you are missing any Subscriptions, contact our Support team or your SoftwareOne Account Team.
Cloud Platform
This is the cloud platform that the resource was synchronized from i.e. Microsoft Azure, Office 365 or Amazon Web Services.
Finished at
This is the time the last synchronization ran and how long the synchronization took, based on the start/stop times.
Status
This is the Subscription Synchronization Status. In normal conditions, the state should either be Running or Success. If you see an error, it may be due to:
Invalid or expired credentials – Contact support if this occurs.
Expired/unused tenant – If this is the case, contact Support to have the Cloud Platform Subscription removed.
Cloud Platform is inaccessible – If the Cloud Platform API is unavailable, an error may occur. Contact Support for a status update.
Access Level
This access level has been set for a synchronization process against a particular subscription. The following are different values:
Read with/without tags- This sync option only synchronizes resources with or without their tags from the cloud provider.
Read/Write – This sync option synchronizes all resources in read and write mode.

Unit Cost
Actions Column