Loading...
Loading...
Loading...
Loading...
Loading...
Loading...
Loading...
Loading...
Loading...
Loading...
Loading...
Loading...
Loading...
Loading...
Loading...
Loading...
Loading...
Loading...
Loading...
Loading...
Manage enterprise agreements, approvals, quotes, orders, and reporting.
Use Procurement to manage agreements, products, approvals, quotes, orders, and reporting.
Manage EA workflows and TrueUp tasks.
Review and manage transactions.
View procurement products and related details.
Create approval groups and workflows.
Track, review, and download sales orders.
Access and manage your sales quotes.
View and download sales quote reports.
View and generate reports for your SPLA contract.
Access and manage special quote workflows.
Only administrators can access the existing workflows and delete rules within each workflow.
To delete a rule within a workflow:
Navigate Procurement > Purchase Approval Setup.
On the Purchase Approval Setup page, select the user. The Approval Workflow Setup window opens.
In the Actions column, select Delete. Then, select Yes to confirm that you want to delete the rule.
Select Save.
Procurement users can view their transactions and manage purchase orders and quotes.
Procurement Workbench provides procurement users with a comprehensive set of features to manage software transactions.
To access Procurement Workbench, navigate to the main menu and select Procurement > Procurement Workbench.
With Procurement Workbench, you can easily access all information related to your quotes and orders. You can also:
View your favorite products and add them to your cart. If product prices are unavailable, you can use special quotes to request prices.
Check items that are awaiting approval and view your open and overdue invoices.
For more information, see View and Manage Software Transactions.
The Sales Quotes page under Procurement allows you to create a new quote and manage your existing quotes.
To create a quote and convert it to an order:
From the main menu, navigate to Procurement > Products.
On the Products page, search for the product to buy and select it from the list.
On the Product Detail page, review the product information. If needed, change the Buying for information, then select Add to Cart. A confirmation message is displayed.
Select Go to Shopping Cart in the confirmation message or navigate directly to your shopping cart (Procurement > Cart).
On the Shopping Cart page, select Create Quote.
Verify and edit your address information, then provide your contact details, including your email address. Select Create Quote again. A new quote is created.
Verify the quote details, including the number and product information. Select Convert to Order.
On the Convert to Order page, provide the PO numbers (mandatory). Optionally, you can add internal comments and reference information. Select Convert to Order.
A confirmation message is displayed, and your order is created. You can download your order information as a PDF.
The Sales Quotes module provides you with real-time visibility, streamlined approval workflows, and integration with our backend financial systems.
Each sales quote includes important details, including status and expiration date, to help you make informed decisions about your purchase.
The Sales quotes reporting page is your centralized hub for monitoring all pending, accepted, and historical quotes.
To open the page, choose Procurement > Sales quotes reporting from the main menu.
On the sales quotes reporting page, you can view various details for each sales quote, including the quote ID, creation and expiration dates, estimated sales price, and more. You can also view the real-time status for each quote. When a quote is marked as Accepted, the platform works asynchronously in the background to generate the corresponding sales order.
If you are familiar with our legacy systems, you can conveniently switch to classic view to see the details using our legacy interface.
You can also select a quote to view detailed information. The information available includes:
Financial and itemized details of the offer.
Corporate entities and addresses linked to the quote.
Details about the software publisher.
A brief description and reference links for the specific items in the quote.
Optimize and simplify the Enterprise Agreement TrueUp process at a local or global scale from collection to license allocation.
The Microsoft Enterprise Agreement offers organizations a cost-effective way to acquire the latest Microsoft technology to help standardize IT infrastructure and simplify license management. A Microsoft Enterprise Agreement offers organizations a manageable volume-licensing program that gives them the flexibility to buy cloud services and software licenses under one agreement.
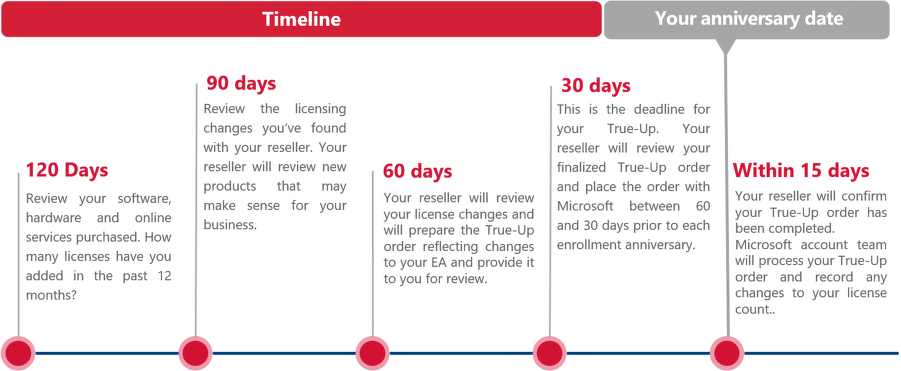
Once a year, customers are asked to align their Enterprise Agreement with the total number of licenses that they have added in the previous 12 months. This is the True-Up process: an inventory of all the qualified devices, users, and processors added over the course of the year.
Although organizations with Enterprise Agreements may place any number of orders throughout the calendar year, the annual TrueUp order must be received by Microsoft in the period between 60 days and 30 days prior to the anniversary of enrolment.
It is important to note that the annual TrueUp applies only to products that organizations have already licensed under their current Enterprise Agreement. New products and online services that are not in the current EA must be purchased in the month they are first used. If organizations have not increased device or user counts or used any additional Enterprise Agreement products within the calendar year, they still need to submit an Update Statement (also called a zero-usage order), which must be signed by an authorized signatory within the organization.
The Enterprise Agreement TrueUp module helps customers optimize and simplify the EA TrueUp process with the power of a dedicated application instead of hundreds of Excel spreadsheets. The EA TrueUp Module can help manage this process on a local or global scale from collection to license allocation. For information on how to access and use the EA module, see .
You can download a PDF version of your sales order from the sales order details page.
To download your sales order as a PDF:
Go to Procurement > Sales orders.
(Optional) Use filters to find the desired sales order.
Select the order ID. The details page of the sales order opens.
Only administrators can create new approval groups. If another person wants to create workflows, either the administrator can enable access for that person, or the individual can contact their SoftwareOne Account Manager.
To create an approval group:
Navigate to Procurement > Purchase Approval Setup.
On the Purchase Approval Setup page, select New Group.
You can download a PDF version of your sales quote from the quote details page in the SoftwareOne Marketplace.
To download a sales quote as a PDF:
Go to Procurement > Sales quotes reporting.
(Optional) Use filters to find the desired quote.
Select the quote ID. The details page of the sales quote opens.
The Marketplace Platform allows you to set up approval workflows and approval groups depending on the price or publisher. An approval group represents a set of individuals who can approve orders.
By creating workflows and approval groups, you can simplify the configuration and maintenance of the approval limits assigned to individual users.
After creating groups, you can maintain them easily by linking approval groups together through parent-child relationships. Each approval group can only have one parent, but it can be used as a child in several approval groups.
See the following links to get started with purchase approval groups:
Only administrators can create new approval workflows.
To create an approval workflow:
Navigate to Procurement > Purchase Approval Setup.
In the Actions column, select Approval Workflow Setup.
In Create Approval Group, provide the following details:
Name - Enter a name for the group.
Approval Level - Choose an approval level from the list. You can create up to 3 levels of purchase approval groups.
Login(s) - Select members that you want to add to the group.
Select Create. The group is created, and a confirmation message is displayed.
Purchase Approval Group - Select a group that will approve the user’s transaction when approval is required.
Currency - Select the currency on which the rule will apply. Selecting Any applies the rule to all currencies.
Publisher - Select a publisher if you want to create a workflow role for a specific publisher. If you select Any, the workflow rules apply to all publishers.
Total Amount - Specify the maximum allowable spend limit for an individual transaction without the need for approval. Transactions exceeding this limit must be reviewed and approved by the designated Purchase Approval Group.
Select Create Rule.
Select Save.
An Attachments tab for the official sales quote PDF.
The Details tab, which shows backend system information and synchronization status.
Select the Attachments tab.
Complete one of the following steps to download the file:
Select the PDF link in the Reference column.
Under Actions, select the more icon (•••), then choose Download.
Select the Attachments tab.
Complete one of the following steps to download the PDF:
Select the PDF link in the Reference column.
Under Actions, select the more icon (•••), then choose Download.
This topic describes how to view all sales quotes in your account, as well as details about a specific sales quote.
To view your sales quotes:
Go to Procurement > Sales quotes reporting.
View the list of sales quotes displayed on the page.
Review properties, such as the quote ID, quote creation date, quote expiry date, estimated sales price, and more.
On the quote details page, you can view detailed information for a sales quote. The information is categorized logically across several tabs, so you have immediate access to the data you need.
To view details for a sales quote:
Go to Procurement > Sales quotes reporting.
(Optional) Use filters to find the desired sales quote.
Select the quote ID. The details page of the sales quote opens.
Use the tabs on the sales quote details page to access different types of information:
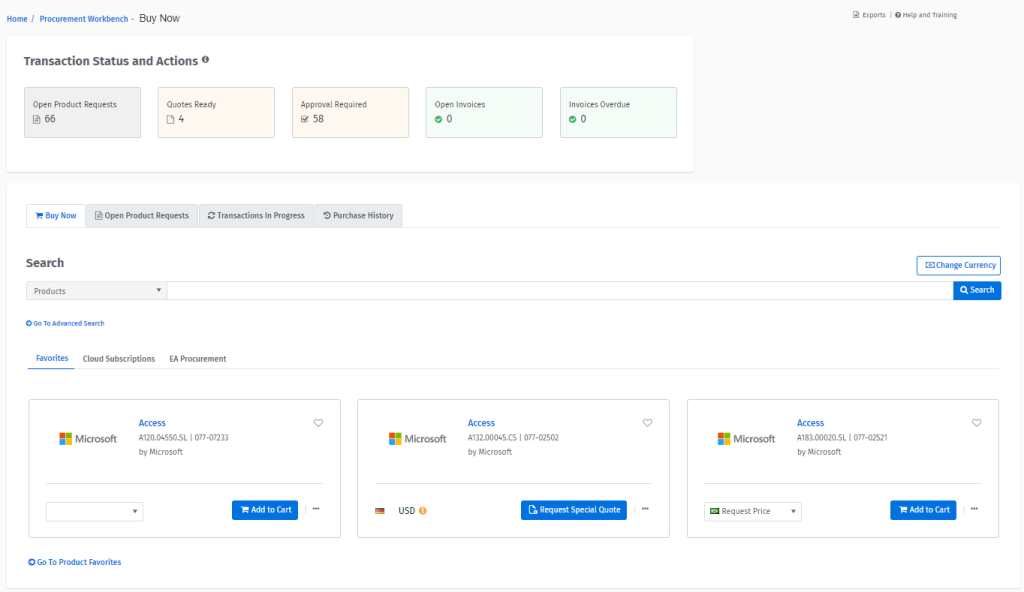
On the Procurement Workbench page, you will find different sections that enable you to purchase products, view your transactions, and check your purchase history.
Additionally, you can get an overview of your transactions and see the necessary actions you need to take.
The Transaction Status and Actions section contains the following information:
Open Product Requests: Allows you to view special quotes that are open. When a special quote is complete, it's no longer displayed in this section. You can also use this tab to request a new quote by selecting Request Special Quote. For information on how to create a special quote, see Special Quotes.
Quotes Ready: Allows you to view a list of quotes that are ready to be converted to an order. You can also view detailed information for a quote, delete a quote, convert a quote to an order, or export a quote to PDF or Excel.
Approval Required: Allows you to view orders that are pending approval. Depending on the purchase approval workflow:
The Approve option is displayed if you can approve the orders yourself.
The Details option is displayed if the order requires approval by someone else, as per the approval workflow.
The Buy Now tab contains the Search, Advanced Search, and Buying for options. It also contains the following tabs:
The Purchase History tab displays the complete purchase history based on the time range you choose from the Show menu.
It provides visibility into the full purchase history and provides links to all documents generated in the procurement cycle. This includes special quotes, invoices along with PO, country, and amount details.
You can also add additional columns to get an idea of how many days it took in each step of the process. This can give your organization a high level of SLA tracking.
This topic describes how to search, renew, or delete a quote.
To search for a quote:
Navigate to the Quotes page.
Use the filter options on the page to find the required quote, then select Search. You can search using a purchase order or reference number, or date.
In the Actions column, select View to see detailed information for the quote.
To renew an expired quote:
Navigate to the Quotes page, then select the quote to renew.
Select Renew Expired Quote.
Select Yes to confirm that you want to renew the quote. Your renewal request is submitted to SoftwareOne for action.
To remove a quote:
Navigate to the Quotes page, then select the quote you wish to delete.
On the Quote Detail page, select Delete Quote.
Select Yes to confirm that you want to delete the quote.
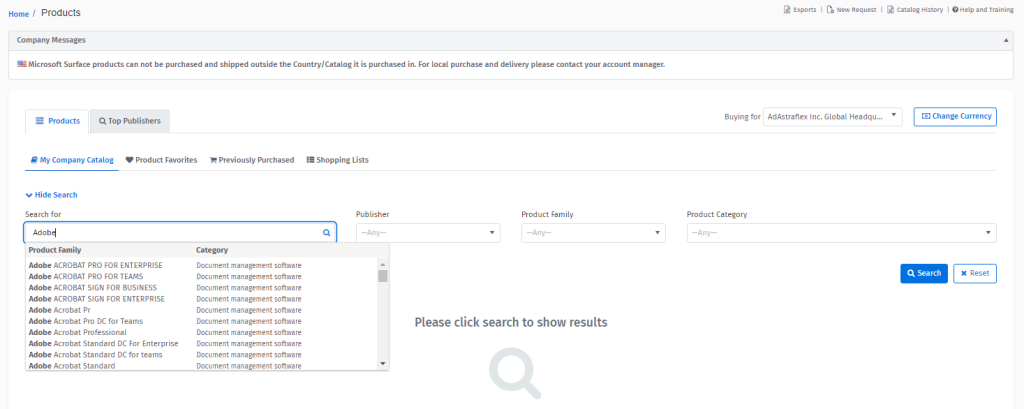
On the Products page, you can easily explore our catalog, search for products, view product prices, and add products to your shopping cart. You can also request pricing for non-catalog items.
To buy a product or service:
Navigate to the Products page (Procurement > Products).
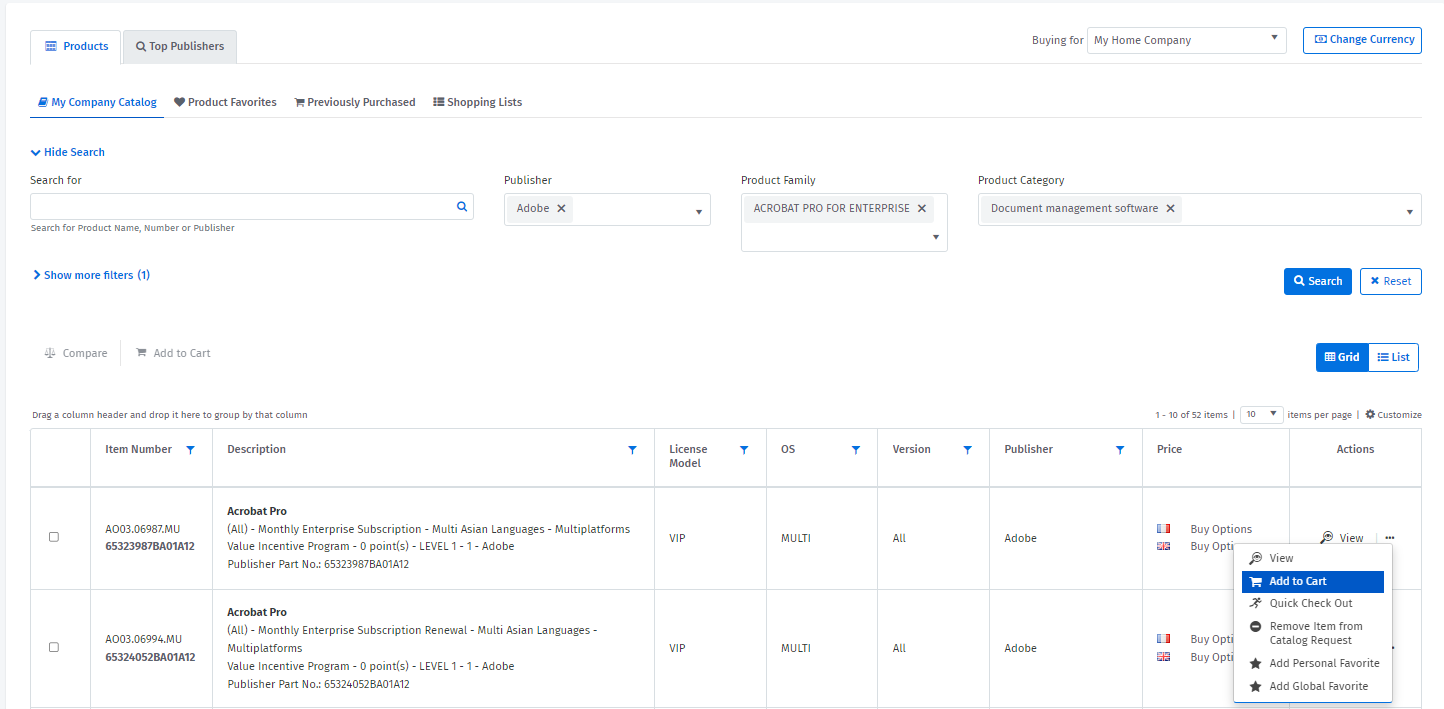
Select the Products or Top Publishers tab and then search for the product.
Select the product from the list of recommended results (displayed as you're typing) or select Search to view all products.
When the product details are displayed, select the ellipsis ( ••• ) in the Actions column and choose Add to Cart.
In the Add to Cart dialog, confirm that you want to add the product to your cart. A confirmation message is displayed when the product is added.
Navigate to your cart and select Create Order. You can access your cart by selecting the Go to Shopping Cart link in the confirmation message or by navigating to Procurement > Cart through the main menu.
Verify your address information, edit it if necessary, and provide your contact details, including your email address.
Your order is created, and a confirmation message is displayed. Select Download PDF on the Order Details page to download your order confirmation.
Track, review, and manage your sales orders.
The Marketplace Platform offers an enhanced, transparent method for managing your sales orders directly within the platform.
A sales order is created after you have accepted a sales quote, initiating the order fulfillment and billing process.
The Sales orders page provides a consolidated view of your organization's purchasing activities.
To open the page, select Procurement > Sales orders from the main menu.
On the sales orders page, you can view various details for each sales order, including the order ID, creation date, estimated sales price, current status, and more. If you are familiar with our legacy systems, you can conveniently switch to classic view to see the details using our legacy interface.
You can also select a sales order to view detailed information organized across several tabs. The information available includes:
Line item details, such as quantities, unit prices, and tax calculations.
Addresses for Sell To, Ship To, Bill To, and License To.
Details about the software publisher.
A brief description and reference links for the specific items ordered.
This topic describes how to view all sales orders in your account, as well as details about a specific sales order.
To view your sales orders:
Go to Procurement > Sales orders.
View the list of sales orders displayed on the page.
Review properties, such as the order ID, sales order creation date, estimated sales price, current status, and more.
View and generate reports for your Microsoft SPLA contract.
The Service Provider Dashboard allows you to visualize your Service Provider Licensee Agreement (SPLA) contract and its cost-related data.
To access the dashboard, select the main menu, then choose Procurement > Service Provider Dashboard.
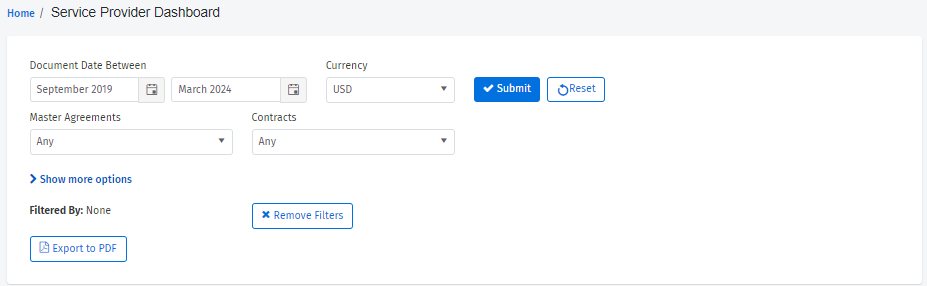
The dashboard contains filters and a display area for data visualization. You can select a date range for your SPLA report and use filter options to control the data you want to visualize.
You can filter by currency, agreements, and contracts, and use Show more options to select the advanced Report and Product filters. You can also choose if you want to show the total quantity and the Product/Month graph on the dashboard.
After applying filters, the following data is displayed on the dashboard:


An Attachments tab for official sales order PDFs.
The Details tab, which shows backend system information and synchronization status.

Products
Display a brief description and reference links for the specific items ordered.
Attachments
Allows you to easily access and download the official PDF version of your sales quote for your internal records.
Details
Provides visibility into payment terms, external reference numbers, and system synchronization events.
Audit trail
Displays all events for the sales quote. For more information, see .
Overview
Displays the core financial and itemized details of the offer. You can also view the buyer and seller relationships, total costs, and the specific line items being proposed.
Entities
Provides a clear breakdown of where the software or services will be billed, shipped, and licensed.
Vendors

Displays the company information and website links for the software publisher.
Open Invoices: Allows you to view the open invoices.
Overdue Invoices: Allows you to view overdue invoices.
Allows you to purchase a product for a company different from your default company. This option is only available if you have multiple catalogs available
Favorites
Displays your personal and global (company’s) favorites so that you can quickly add items to your cart
Cloud Subscriptions
Allows you to select your cloud account. This will list the subscriptions that are active and inactive. You can make changes to your subscriptions by selecting Manage Subscription.
Buying for
Choose your payment method and provide your reference name and purchase order number.
Select Create Order to submit your order.
On the sales order details page, you can view detailed information for a sales order. The information is categorized logically across several tabs, so you have immediate access to the data you need.
To view details for a sales order:
Go to Procurement > Sales orders.
(Optional) Use filters to find the desired sales order.
Select the order ID. The details page of the sales order opens.
Use the tabs to access different types of information:
Overview
Shows a high-level summary of the transaction. You can view the related entities, the associated Sales Quote reference, and the total financial breakdown.
Entities
Shows the addresses and contact points associated with the order.
Vendors
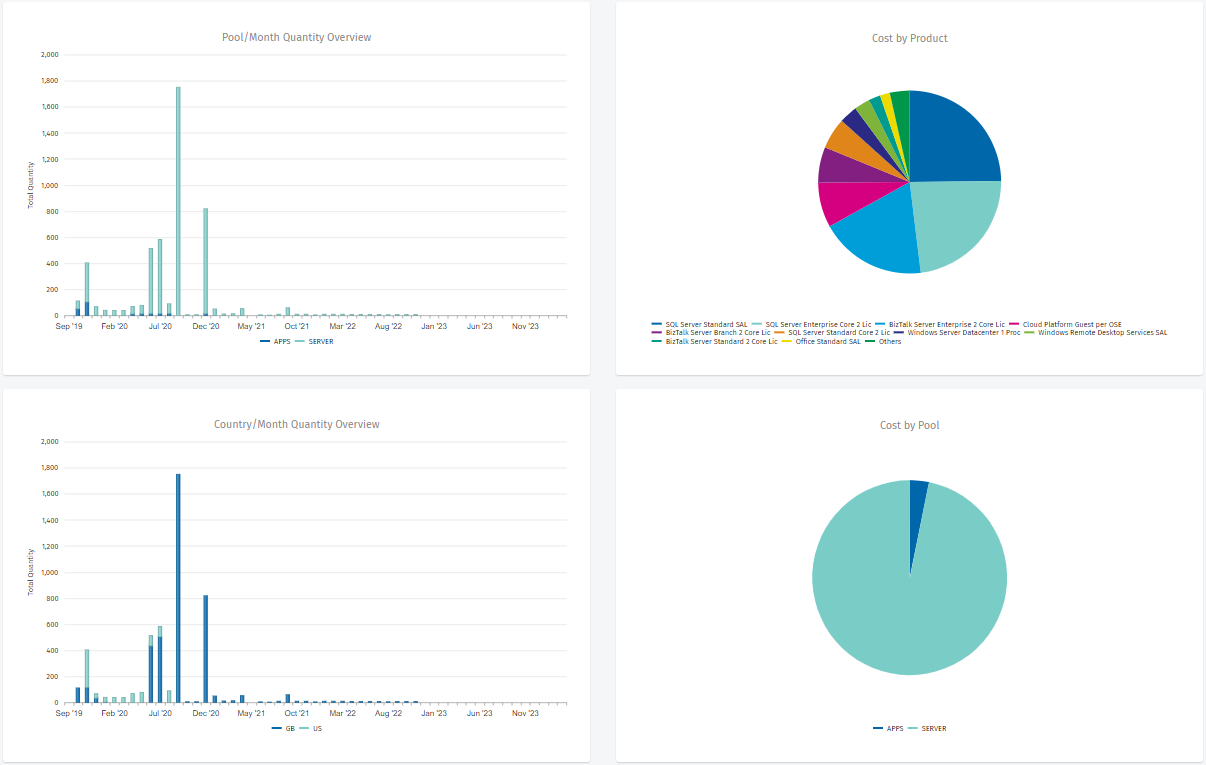
The cost of monthly usage by pool.
The distribution of costs by product.
The monthly costs by country.
The distribution of costs by pool.
After the data appears, you can further refine your filters by clicking on any legend within a diagram. To adjust or clear your current filters, select Reset or Remove filters, respectively.
To export the current page as a PDF, click Export to PDF in the filter options. The file will be downloaded automatically to your system.
Using Special Quotes, you can request pricing for products that are not listed in your catalog.
You can access the Special Quotes module by navigating to Procurement > Special Quotes. Alternatively, you can access special quotes from the Procurement Workbench and Products pages.
To create a special quote:
Go Procurement > Special Quote.
Under Location, choose the SoftwareOne entity that you are ordering from, the country where the product will be used, and your company's address.
Under Products, do the following:
Choose the publisher from the list and provide the publisher's website. If the publisher is unavailable, enter the publisher's name manually.
Add an internal reference number for your quote.
Provide your email address.
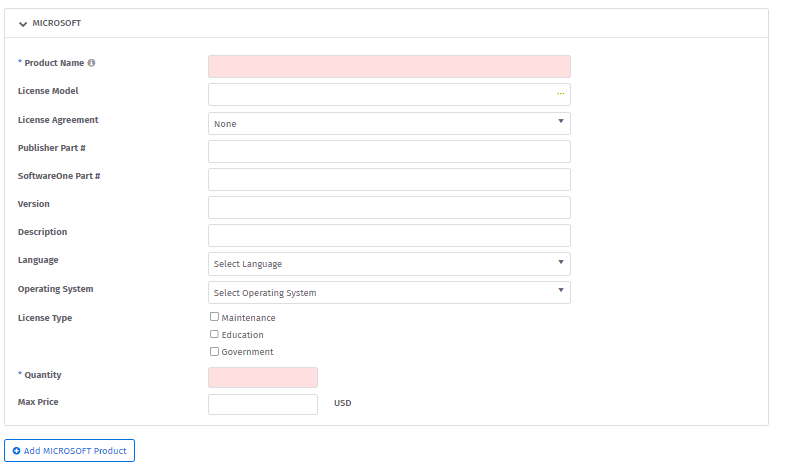
Provide details of the product. Note that this section is displayed only after you choose the publisher.
Under Request Instructions, do the following:
Select a priority level for your request.
Use special instructions to specify additional details about your request.
Upload supporting documentation.
On the Special Quotes page, you can search for a quote and view high-level information, such as your quote history, request status, type, and more.
To view the detailed quote information:
Find the required quote, then select View from the Actions column. The quote details are displayed on the Special Quote Detail page.
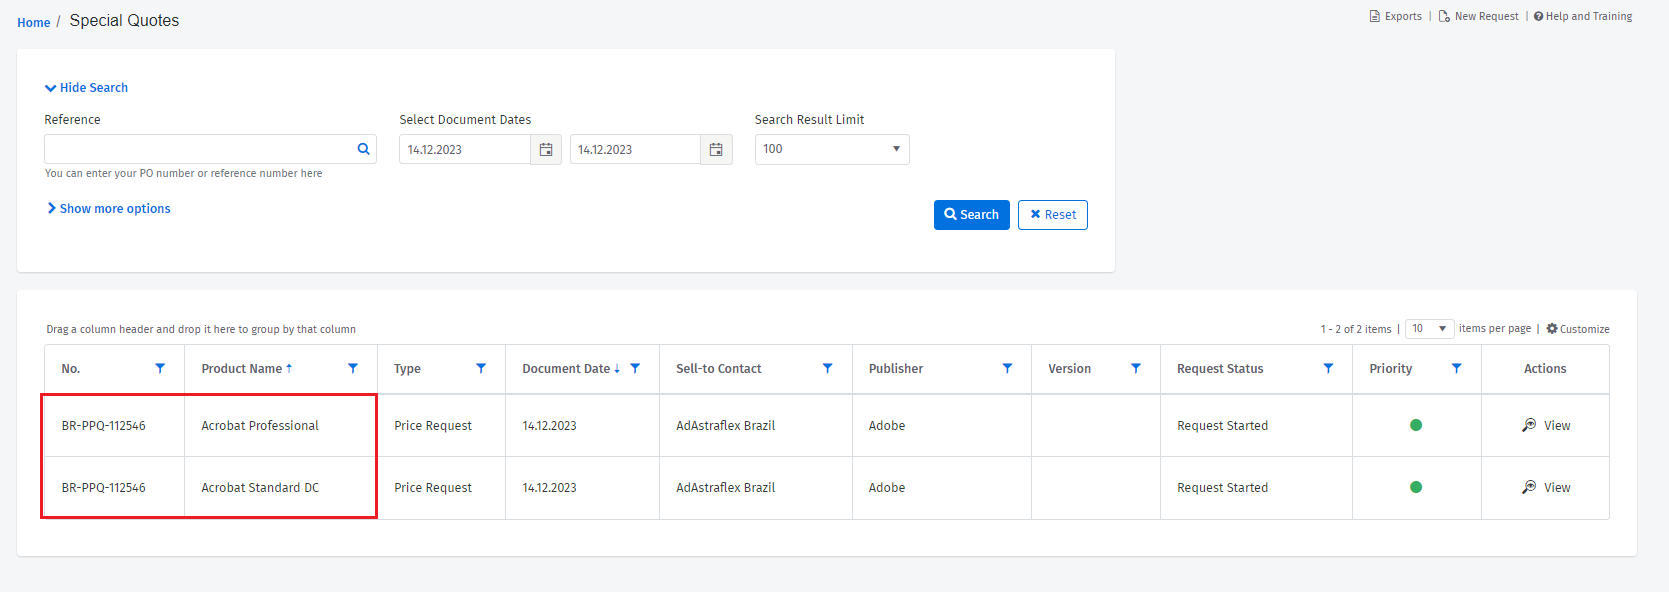
Note that if your special quote contains multiple products, each product request is displayed in a separate row on the Special Quotes page. For example, if your special quote is for Acrobat Professional and Acrobat Standard, both products are displayed separately on the Special Quotes page, even though they are a part of the same request.
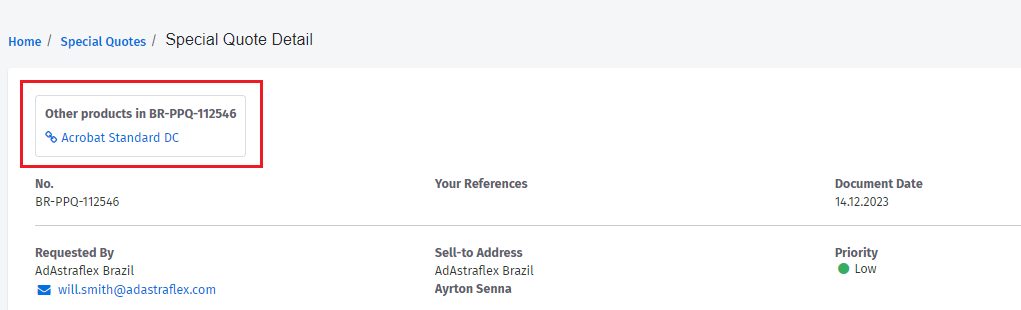
When looking at the details of a special quote, products that are part of the same request are displayed under Other products.
If you want to delete a special quote containing multiple products, you can delete it from any of the products.
To delete a special quote:
Navigate to the Special Quotes page and locate the quote you want to delete.
Select the quote, or from the Actions column, select View. The Special Quote Detail page is displayed.
Select Delete and then confirm that you want to delete the quote. The quote is deleted, and a confirmation message is displayed.
Shows the company information and website links for the software publisher.
Products
Shows a brief description and reference links for the ordered items.
Attachments
Allows you to download the official PDF versions of your sales orders for your internal records.
Details
Shows backend information, including external document numbers, agreed-upon payment terms, and synchronization timestamps confirming that the order has been successfully logged in our ERP system.
Audit trail
Shows an audit trail of events for the sales order.

Choose a currency from the list.
Select the Renewal check box if your special quote request is for product renewal. Clear the checkbox if you're requesting a new product.
Select Submit. Your special quote is created, and a confirmation message is displayed.
Select Yes to receive a quote confirmation via email, or select No to return to the Special Quotes page.
This section of the document will guide you through the Enterprise Agreement Setup Wizard. Running through the Wizard and enabling reporting is the first step in the EA module onboarding process.
The onboarding process consists of 2 phases: Wizard Setup and Asset Allocation.
The purpose of the Wizard Setup is to gather data around agreement structure, company structure, and customer price sheet information.
The following prerequisites are required to run through the Setup Wizard :
Enterprise Agreement
Company structure information
Customer Price Sheet
Only EA Admins can access the wizard. If you do not see this option, it may be a permissions issue. To access this feature, open the main menu and click Procurement > EA setup wizard.
Select Add data in our wizard to start the setup process. The Wizard will run you through 7 steps. All of the steps need to be followed in sequence. You can only move on to the next step once the current step has been completed.
Only one agreement can be set up at a time. It is currently not possible to fill in data for two different agreements simultaneously.
The Wizard automatically saves the data you have added after every change. The data input process may be interrupted at any time and resumed when convenient. The Wizard remembers which step you were actively working on.
To reset the Wizard click on the “Discard all progress” button visible on the bottom of every step.
Select your EA Agreement from the drop-down. The following license model agreements are supported:
Direct Enterprise Agreement
Indirect Enterprise Agreement
Server Cloud Enrolment
Enrolment for Core Infrastructure
Users need to have permission to inspect agreements.
Agreements that have already been set i.e. moved to Asset Allocation or Reporting, are not displayed on the list.
If you do not find your EA Agreement in the list, click on the Register New Agreement tile to create a new agreement. Your SoftwareOne Account Manager will receive a notification and will need to set up the agreement in our backend system in order to get the process completed. Refer to the Register New Agreement section for more information.
Once selected, click on Next to move on to the next step – Structure.
This is to define the structure of the agreement. From this step onwards, you need to have the Customer Price Sheet (CPS) available to proceed.
This page allows you to set tenants and products profiles (as available in your CPS), however both of these fields are not mandatory, so you can have these disabled.
Profiles
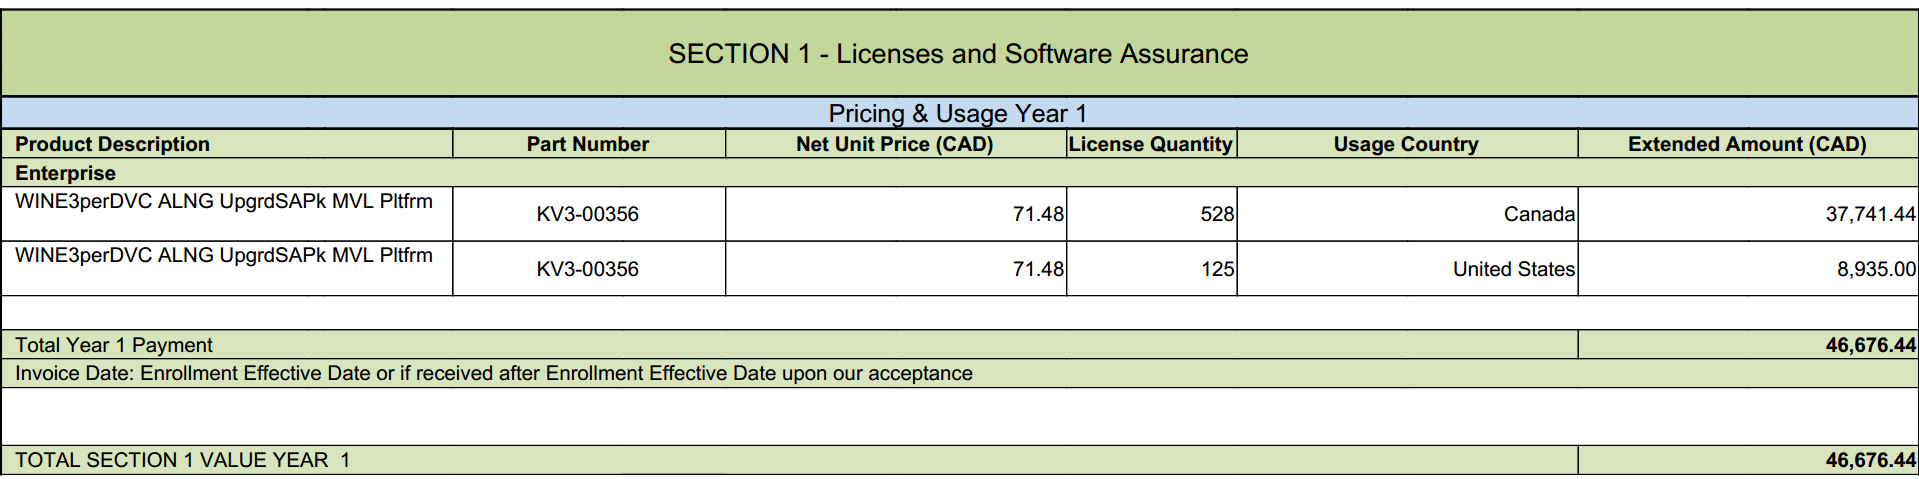
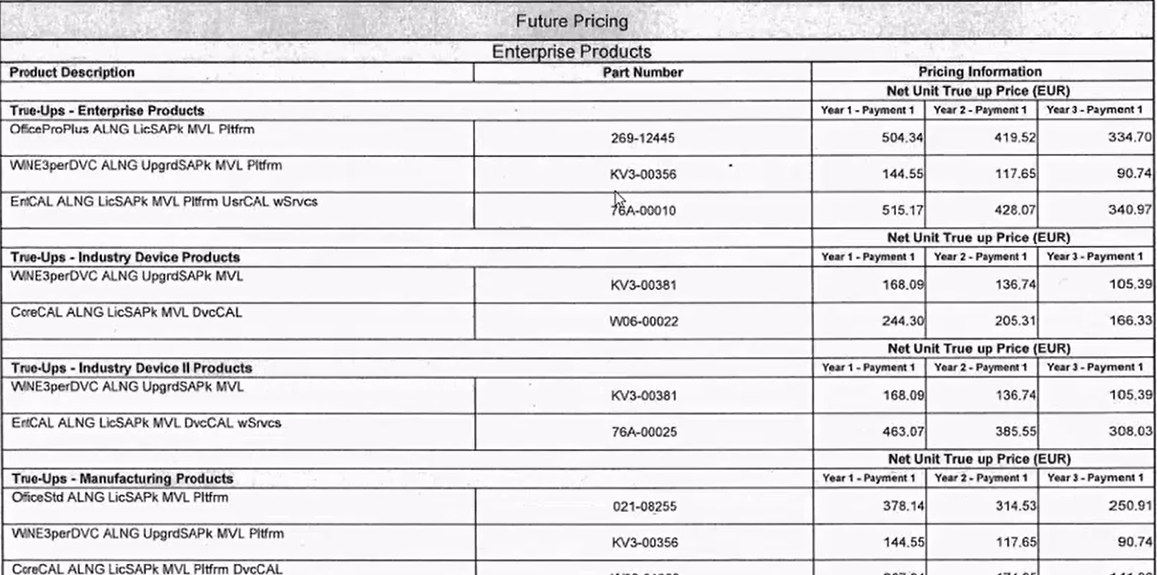
Typically profiles and tenants can be found as a subsection in CPS. Profiles can be found in both “SECTION 1. Licenses and Software Assurance” and “Future Pricing”. Please note that the “Enterprise” subsection should not be treated as a profile and will be automatically added in the Wizard. Please inspect the below screenshot from a sample CPS with “Industry Device II” and “Manufacturing” profiles.
The screenshot below shows the “Enterprise” subsection which should not be counted as a profile:
Tenants
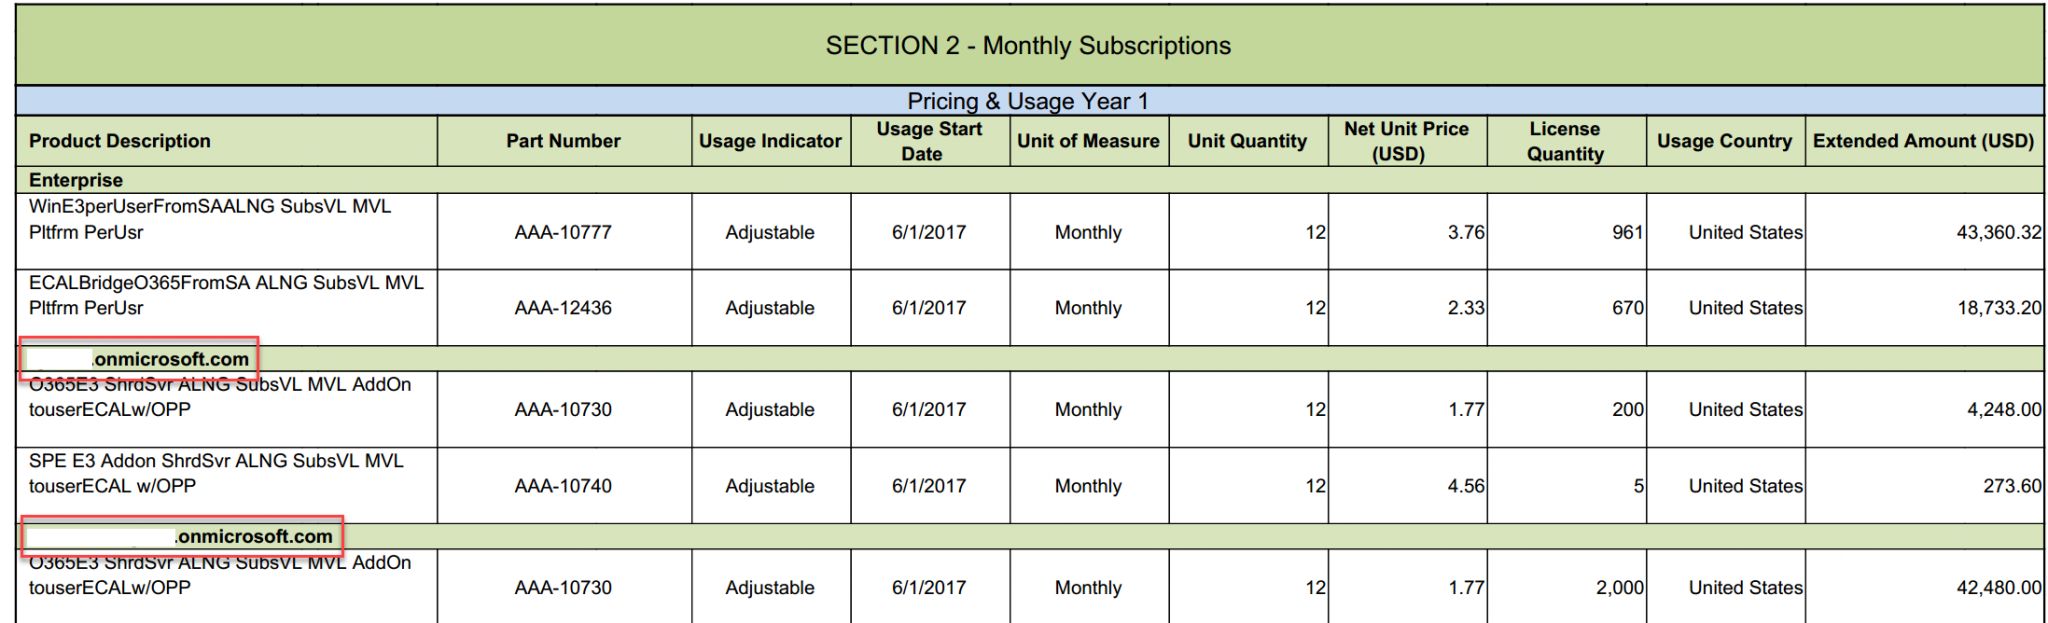
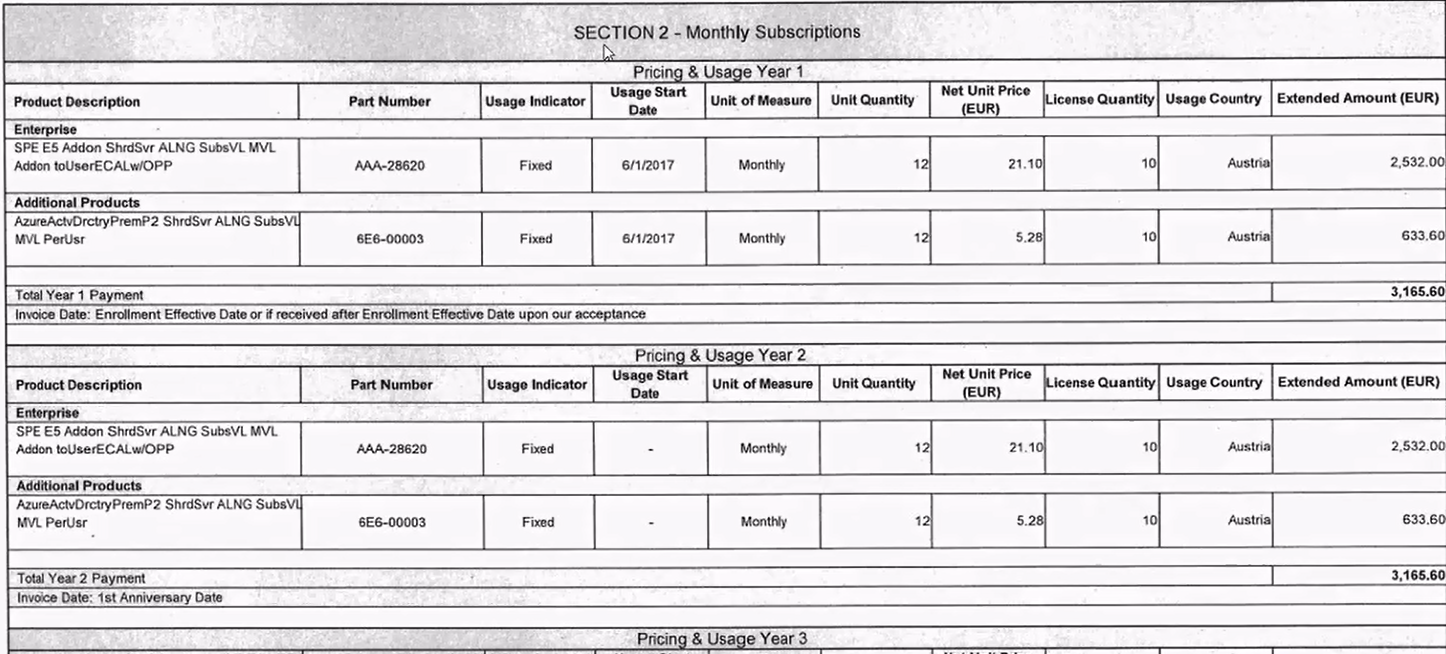
Tenants represent the domain of subscription products. They can be found in “SECTION 2: Monthly Subscriptions” as well as the proper “Future Pricing” subsection. The screenshot below shows two tenants have been identified. Subsections should not be treated as tenants and will be automatically added by default.
Adding Profiles and Tenants
If you want to add tenants or product profiles, you can enable these by clicking on the “switch buttons”. It is also possible to delete existing profiles and tenants.
Once you have inserted the details, click on the “Next” button to move on to next step i.e. Reporting Location.
This step is to add locations that will be used for reporting purposes. The customer Price Sheet is oriented around “Usage Countries”. Each country aggregates license quantities from all locations (e.g. companies) within that country. However, to provide accurate reports we suggest using a more detailed location structure.
Location is the extension of the company which should exist in backend systems. If it does not exist then both “Company” and “extended Location” can be added in the form below. It is advised to have permissions for all companies in the address tree relevant to the agreement being set up. Only one location can be added per company.
The location form consists of:
Company- You can select a company from the drop-down list as it will show you all the companies available in the address tree. The company is required to add a location. If you think a company is missing, you can Create New Company by following the steps in the “Add New Company” section.
Location Group – This is a user-defined grouping, you can group the companies based on your requirements. One group may have multiple locations, however, one location may only exist in one group.
Product Profile – is a drop-down that has profiles from Step 2. Multiple values can be selected.
Once all the details are provided, click on the “Add” button.
Clicking on the “Add” button would bring the reporting location record down and a new form would be available to add more locations.
You can also delete or edit already added reporting locations by using the “Edit” or “Delete” options.
You have to add at least one reporting location in order to proceed to the next step.
When all the reporting locations are added, click on the “Next” button.
The purpose of this step is to add License and Software Assurance details i.e. product and price details from Customer Price Sheet.
Data required in this step can be found in CPS table under the header “Section 1 – License and Software Assurance” as shown below. Products for every year should be added (please inspect the note regarding auto auto-populate feature below).
Pricing information for all products across every year is required. However, due to the structure of agreements only data for the first year need to be added. Subsequent years are auto-populated and only need to be adjusted in singular cases (please see note below).
The screenshot below shows the tabs representing each year relating to your agreement. Pricing for 3 years is available by default. Additional years can be added if needed in alignment with the agreement duration and details available in the CPS. When selecting a year tab it will display all the data for that selected year.
Each year tab has a grid available with two main sections i.e. “Enterprise Products” and “Additional Products”.
In case you have added any product profiles in Step 2, those would also be available under the Enterprise Products section. Products with the same part number but different pricing can be added to multiple profiles.
The order of columns in the Wizard and CPS is different. More importantly, the “Part Number” of the product is the first column and should be inserted before other data. This is due to the fact that “Product Description” and “License Type” are auto-filled based on the product part number. In case that part number can not be found and auto-filled then data should be added manually.
After providing base product information the “Net Unit Price” and “License Quantity” should be filled out. As a result “Extended Amount” will be calculated. The “Calculated Extended Amount” value should match the corresponding value in CPS.
The “Usage Country” field is optional. It may be used for the review process after the list is completed. Especially when “Total Year Payment” (seen at the bottom of the screen) in the Wizard does not match the corresponding value in CPS.
Following the same process, you need to fill in all the products from CPS. You should see the total payment for that year at the bottom of the screen and this amount should match with the total year payment on CPS for the corresponding year.
“Total Year Payment”: Total Year Payment presented in Step 4 should be compared to Total Year Payment contained in “Section 1 – Licenses and Software Assurance” for a particular year table in CPS. Fill in the details for each year and once done, click on” Next” to proceed to the next step i.e. Subscription.
Products auto-population across years”: Data from Year 1 is auto-populated to subsequent years. Typically year-to-year data in CPS does not change. However, if it is required, products every year can be altered manually. Please note that auto-populate propagates changes from a given year to the next ones. Example: For a 3-year agreement. After adding data to Year 1, the user decides to add one new product to Year 2. The auto-populate feature will copy the new product to Year 3, but will not touch Year 1. After that, change from Year 1 will not be propagated to Year 2 and Year 3.
Note: In the screenshot below, details for a few of the products are inserted. However, you still need to fill in the details for each product in the price sheet and under all relevant years.
This step lets you fill in details for subscriptions.
Data required in this step can be found in CPS table under the header “Section 2 – Monthly Subscriptions” as shown below. There are a few columns in CPS that you do not have to take into consideration from now on: “Usage indicator”, “Usage Start Date” and “Unit of Measure”. Those columns should be omitted when inputting pricing information.
Step 5 has a similar grid to Step 4, the only difference is the “Unit Quantity” field is added. “Unit Quantity” represents the number of months. It is set to 12 months by default, however, it can be changed if required.
The grid has two sections i.e. “Enterprise Products” and “Additional Products”. Both sections need to be mapped correctly from CPS.
Filling in “Part Number” will auto-populate “Product Description”..
Filling “Net Unit Price” / “Month and License Quantity” will auto-populate “Extended Amount”. Please note that the price is for one single month, therefore it should be the same as in CPS.
You can “Edit>Inserted Row” anytime. Adding a new product is achievable by clicking on the “Add Product” button.
“Products auto-population across years”: Data from Year 1 is auto-populated to subsequent years. Typically year-to-year data in CPS does not change. However, if it is required, products every year can be altered manually. Please note that auto-populate propagates changes from one given year to the next.
Example: For a 3-year agreement. After adding data to Year 1, the user decides to add one new product to Year 2. The auto-populate feature will copy the new product to Year 3, but will not touch Year 1. After that, changes from Year 1 will not be propagated to Year 2 and Year 3.
In this step, data inserted for Year 1 is copied for subsequent years. Please inspect the notes in Step 4 for more details.
Once completed, click on the “Next” button to move to the next step i.e. Future Pricing.
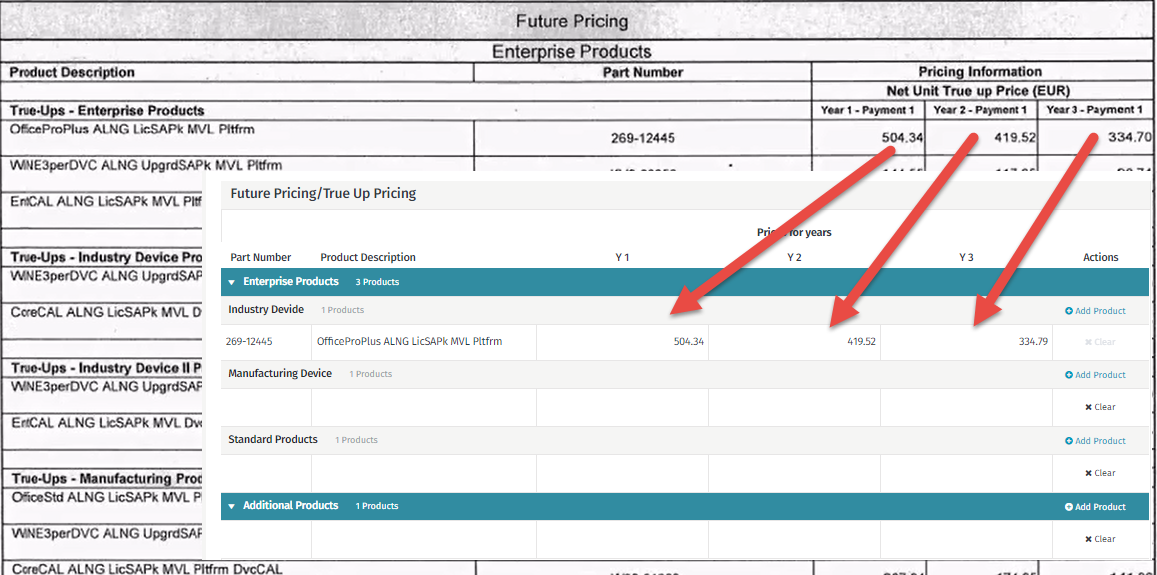
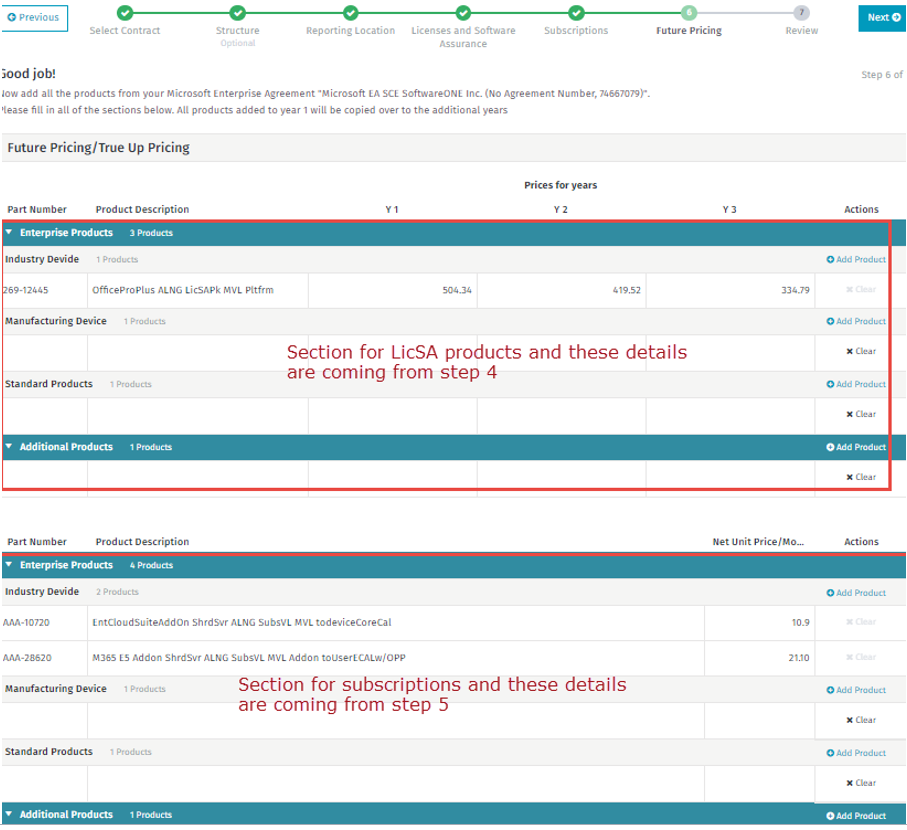
This step is to insert future pricing details that come from the “Future Pricing” section of the Customer Price Sheet. Rows in CPS represent products and columns with the right prices for the TrueUp process for that given year. The “Future Pricing” section in CPS looks similar to what is shown below:
The “Future Pricing” section in CPS typically consists of multiple subsections such as “TrueUps”, “Higher Editions”, “Step-Ups”, “Future Monthly – Enterprise Online Services”, “Future Monthly – Enterprise Online Services”, etc.
Even though these sections are not represented directly in the Wizard, they can be divided into subscriptions and non-subscription products. It is recommended to add all products from “Future Pricing” in the relevant section in the Wizard based on the following three questions:
Is the product a subscription? Yes/No
What is the product category? Enterprise/Additional
What is the product profile? – (Reference profiles added in Step 2 if applicable)
This step is designed around two sections(Related to Question 1 – Is the product a subscription?):
“License and Software Assurance” – referencing products from Step 4
“Subscriptions” – referencing products from Step 5
Both sections are divided into “Enterprise Products” and “Additional Products” (Question 2 – What is the product category?) and further down into profiles if applicable (Question 3 – What is the product profile?).
The following products will be automatically added from the previous steps:
All products of type LicSA (License and Software Assurance Pack) without prices
All products of type SASU (Software Assurance Step Up) without prices
All products of type UpgSA (Upgrade and Software Assurance Pack)
All subscriptions with prices
The number of years on Step 6 is equal to the number of years you have defined in Steps 4 and 5.
Fill in the prices for all products in Y1, Y2, Y3 until Yn (n = no. of years tab you have added in Step 4).
Prices for subscriptions are already populated from Step 5, however, you can add more if needed but existing subscriptions (added in Step 5) cannot be removed.
Once all the details are entered into the Wizard, click on the “Next” button to move on to the next step i.e. Review.
The review step summarizes all the information provided in the Wizard. It allows you to review important details and if something is not correct, you can navigate to the respective step to correct. This step allows you to:
Review all the details.
Go back to any of the steps to edit/amend the details.
Submit all the entered details by clicking on the “Finish” button.
Review the annual and total payment details for the reported agreement. The figures for all years should match with the figures in the summary section of CPS sheet for respective years.
If you feel that all the details are correct, submit by clicking on the “Finish” button. Clicking on “Finish” will submit the agreement for Asset Allocation as shown below:
All 7 steps have a “Discard all progress” button that allows you to reset the agreement and will remove all the details you have set in the Wizard against this agreement.
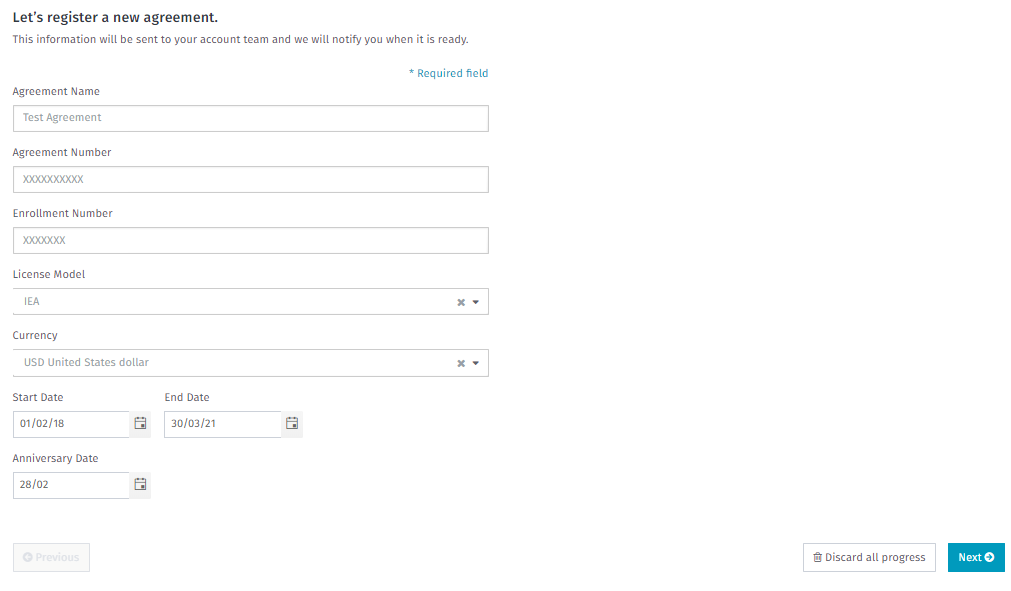
In Step 1, if the user does not find the agreement listed in the drop-down, they can go ahead and register the new agreement by clicking on “Register New Agreement “:
Clicking this tile will take you to the next form as shown below:
Fill in the details and click on “Next” to proceed with this agreement.
In Step 3 the user configures the reporting locations. If the target company is not available in the drop-down, then a new company may be requested.
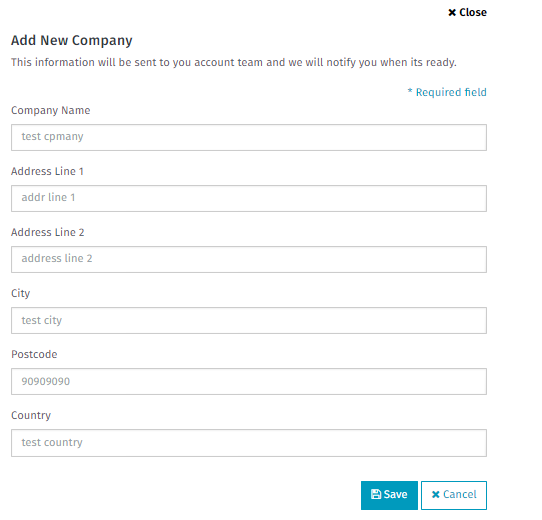
Click on “Add New Company” under the company name drop-down. It will take you to the below form where you can provide the details and click on “Save”.
This section will guide you on how to do asset allocations once the Setup Wizard step is completed and the specific agreement has been submitted. The purpose of asset allocation is to link the products with the reporting locations, i.e. distributing the licenses across all companies. After completion, the chosen Agreement will be accessible from the EA Reporting module.
Below are the prerequisites to proceed with the asset allocation process.
“Wizard Setup” for the required agreement is completed
EA Admin (who would follow this document) should have allocation data available
Asset Allocation can be found under the “Manage” menu option as shown below:
Users can also be taken to the Asset Allocation page when they complete the Setup Wizard by clicking on the “Finish” button in Step 7.
Clicking on “Asset Allocation” takes you to the below page where you can select the specific agreement you want to do asset allocation for.
Note: Only Agreements for which Wizard setup is completed will be shown in this drop-down.
Once the agreement is selected, you are taken to the Asset Allocation page for the selected agreement as shown below:
Note: If you submit the details in the Wizard in Step 7, then you are taken to the below page for the contract you have submitted the details. You do not need to find and select your contract from drop-down.
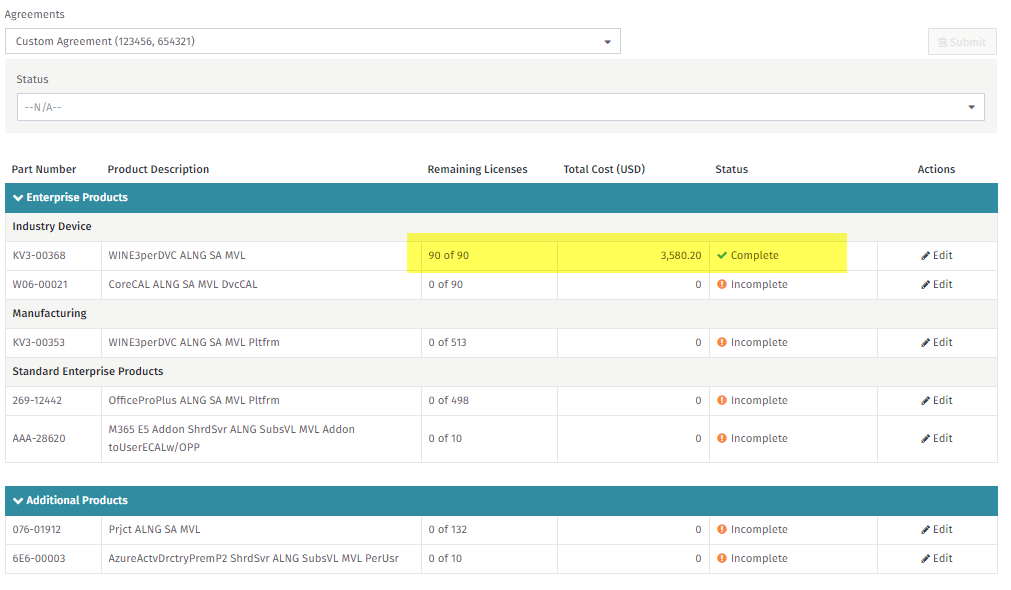
This page is an overview page and you can navigate to the details page for each product by clicking on the “Edit” option under the “Actions” column. The details page is shown below:
This is a read-only page and you cannot make any changes to this page. The grid on this page has data grouped by Product Profiles which you have created during the Wizard setup in Step 2 i.e. Structure.
The grid on this page contains below details:
Part number and Product Description – Fetching data from the details provided in Steps 4 and 5 in the Wizard setup.
Remaining Licenses – shows the number of licenses that have been allocated and the quantity remaining. For the given product, the license pool is equal to the sum of its licenses across all Usage Countries in the Customer Price Sheet.
For Example 0 of 100 – would mean that none of the licenses are allocated yet.
Total Cost – shows the total cost of allocated Licenses
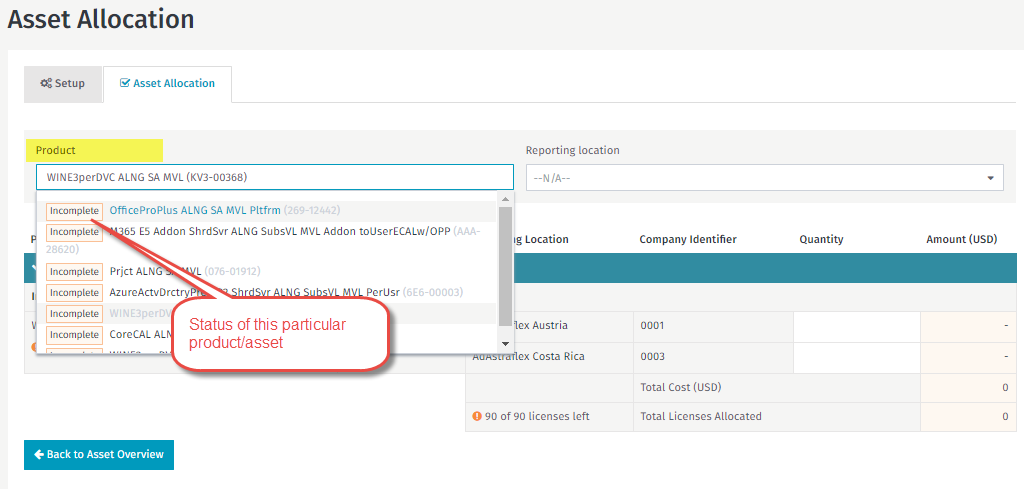
Status – Status has three possible values as defined below:
Complete – When all the available licenses are allocated
Incomplete – When all the available licenses are not allocated, i.e. few/all licenses are still left to be allocated
Overallocated – When too many licenses are allocated
Asset Allocation overview page also has a drop-down to select the products based on the required status (as shown below). If nothing is selected from this drop down list, all the products irrespective of their status will be shown in the grid.
Action – This column has an “Edit” option which can be used to navigate to the details page for the respective product
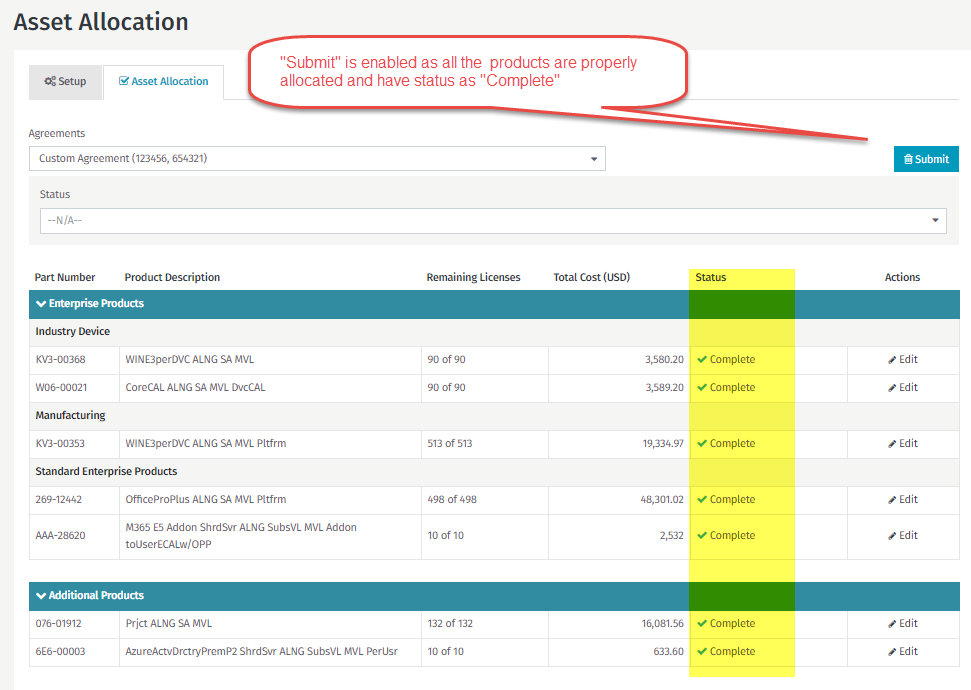
There is a “Submit” button on the overview page to submit the final asset allocation. However, this button is greyed out and would only be enabled when all the assets are allocated properly i.e. status of all the assets changes to complete.
When you click on the “Edit” option under the actions column on the overview page, you are taken to the details page for the respective product. This is the place where you can allocate the assets across the companies.
On this page, all details are shown for the respective product. i.e. if the same product has been added to two product profiles, both profiles would show up on this page.
Product Selection
Even though you have come to this page via a specific product record on the overview page, you can still select any other product directly from top dropdown. There is no need to go back to the overview page.
Reporting Location
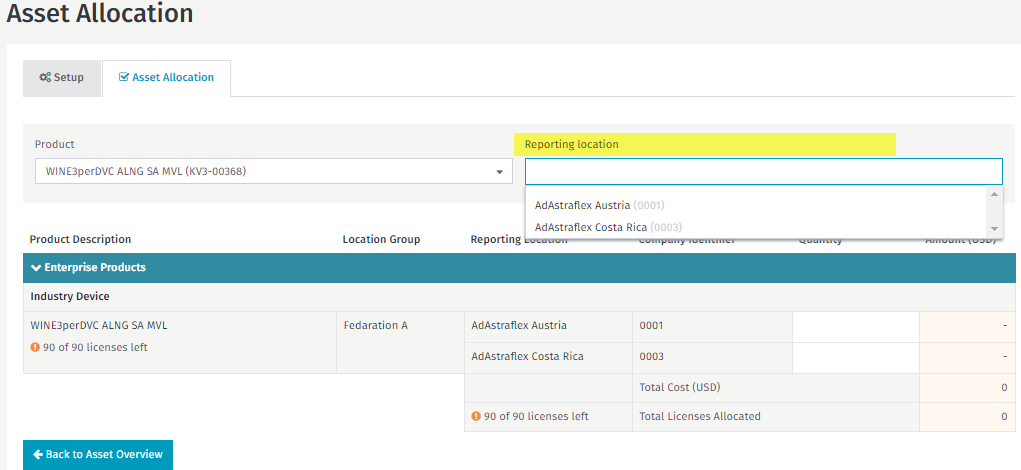
For the selected product, the reporting location drop-down will only contain those options that belong to the available “Product Profile” for the selected product. Depending on the profile setup, different allocation rows may be displayed. Therefore, no invalid allocation can be added.
For example, if a product is set up under the “Industry Device” product profile, only those reporting locations would be available in the drop-down which belongs to this profile.
If nothing is selected in the “Reporting Locations” drop-down, all the available reporting locations are shown in the grid and are grouped by Location Group, as defined in Step 3 of the Wizard setup process.
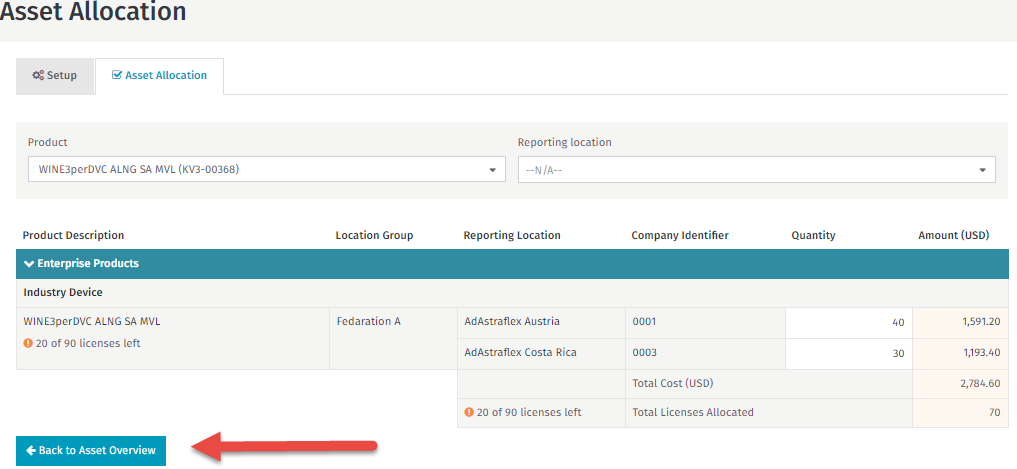
At this step, you need to have the allocation data for the selected product. Numbers representing quantities should be added to the “Quantity” column:
Once you have defined the quantity, the amount will get calculated automatically based on the unit price you have set up in the Wizard (Year 1 of Steps 4 and 5) using CPS.
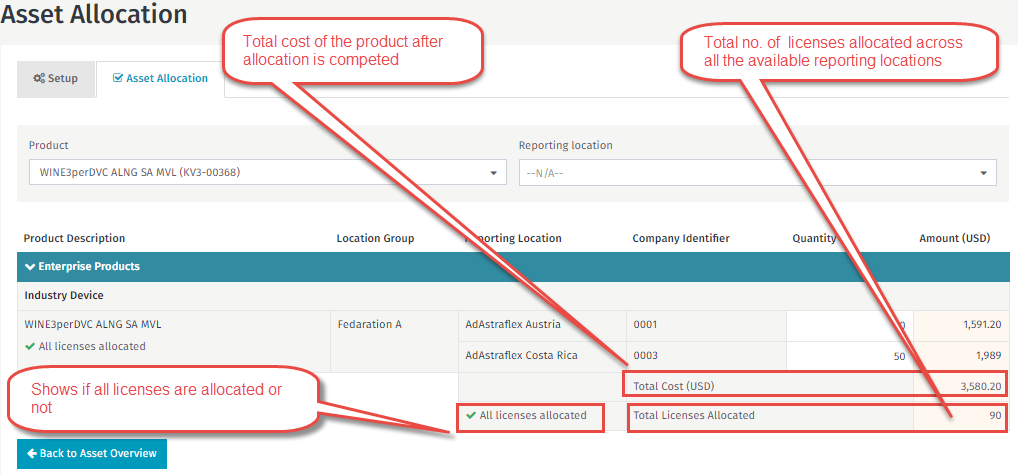
Total Cost – shows the total cost of all the allocated assets/licenses. i.e. if only 40 assets are allocated out of 90, the total cost will show the amount for 40 assets.
At the bottom of the reporting location column, you can see if all the available assets are allocated or not. Three possible values can be displayed here:
Depicts that all the assets are allocated properly and status field is set to “Complete”
Depicts that too many licenses have been allocated and the status field is set to “over-allocated”
Depicts that licenses are still left unallocated and status field is set to “Incomplete”
You can select the products from the product drop-down and allocate the assets to bring the status of all products to “complete”.
If there is no value reported against any location it is considered as 0.
Note: All the changes made on this page are auto-saved.
You can navigate to the Overview page at any time by clicking on “Back to Asset Overview”.
Your changes should be reflected here. You need to complete this process for all the products.
Once this is completed for all the products, the “Submit” button on the Overview Page will be enabled.
Note: In order to enable the “Submit” button, all the products have to be in “Complete” status.
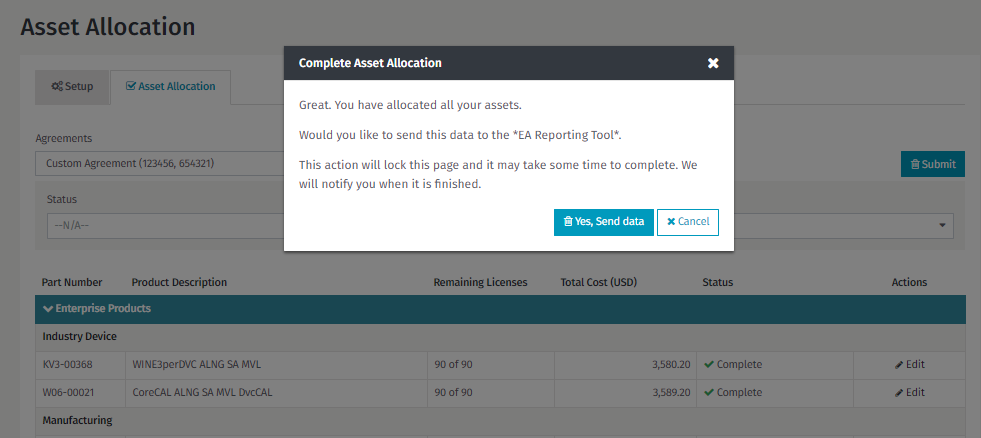
Once the ”Submit” button is enabled you can go ahead and submit the form. You will then see apop message informing you that the data will be sent to the “EA Reporting Tool”, and this page will be locked i.e. no further changes can be made.
You can either “Cancel” or proceed to submit the data by clicking the “Yes, Send Data” button.
Validating Details
At this point, the agreement and company details are validated.
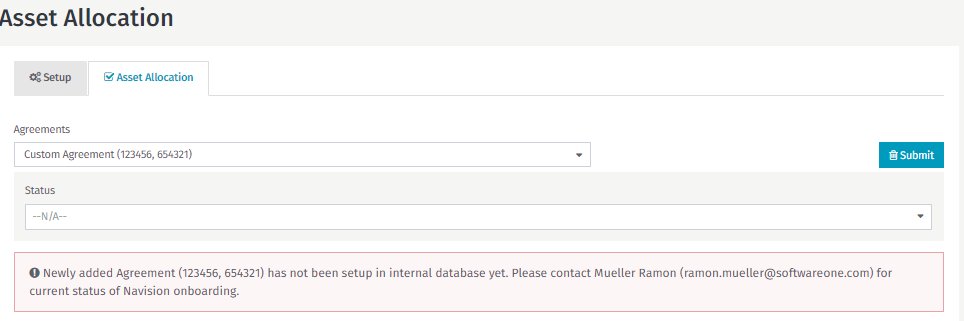
If the allocation data you are submitting belongs to a newly registered agreement, then it is verified in the backend system. After requesting the new agreement in the Setup Wizard, your SoftwareONE Account Manager receives an email with all of the agreement information. Propagating data across all systems may take up to 24 hours. If the agreement has not been set up yet, then an error message will be displayed. It is recommended that you try submitting the form again the next working day.
If you continue to get the error message, please report this to your Account Manager to get this set up in the database. Once this has been done you will be able to submit the form.
Note: If you have created a company in the Wizard, it will follow the same process, i.e. your Account Manager needs to set it up in the database. If this has not been done you will get a similar error message.
The EA Reporting Module simplifies the EA TrueUp reporting process for customers. Due to the individual agreement structure of the Microsoft EA, customers can report on the products they have added within their environment on an ad-hoc or annual basis.
When organizations are multinational or global it brings added complexity. The EA Reporting Module has been designed to allow organizations to determine which locations and users need to report on their current environments license usage. The local users may add in these license counts depending on how the organization determines their reporting cycle i.e monthly, quarterly or yearly.
The onboarding process for the EA Reporting module is outlined in this section of the document. EA Agreements are unique for each customer and this brings added complexity which is why it is important to ensure the TrueUp Module is onboarded correctly.
Below are key points to note whilst setting up the EA Reporting Module for a customer.
All customer locations and users must be set within NAV, including Web shop access
The tree and global NAV push (if needed) must also be set up
Ensure the EA Setup Wizard and Asset Allocation steps have been completed in order to have reporting data available here.
EA Reporting can be found under the “Manage” menu option as shown below.
Note: If you do not see this option available it may be a permissions issue, in which case please get in touch with your Account Manager.
Once you click on “Enterprise Agreement” under the “Manage” menu you are taken to the “EA Reporting” page.
There are two types of permissions for the EA module i.e. EA Admin and EA User. Based on those permissions, the UI and available options on this page might differ as explained later in this document.
With the EA User permissions, the user has restricted access to information and can only perform certain tasks within EA portal. The major difference is that users can only report the usage for the subsidiary or group of subsidiaries that they are responsible for. Users cannot submit the final EA report.
A person with EA User permission would see the below user interface on the EA Reporting page.
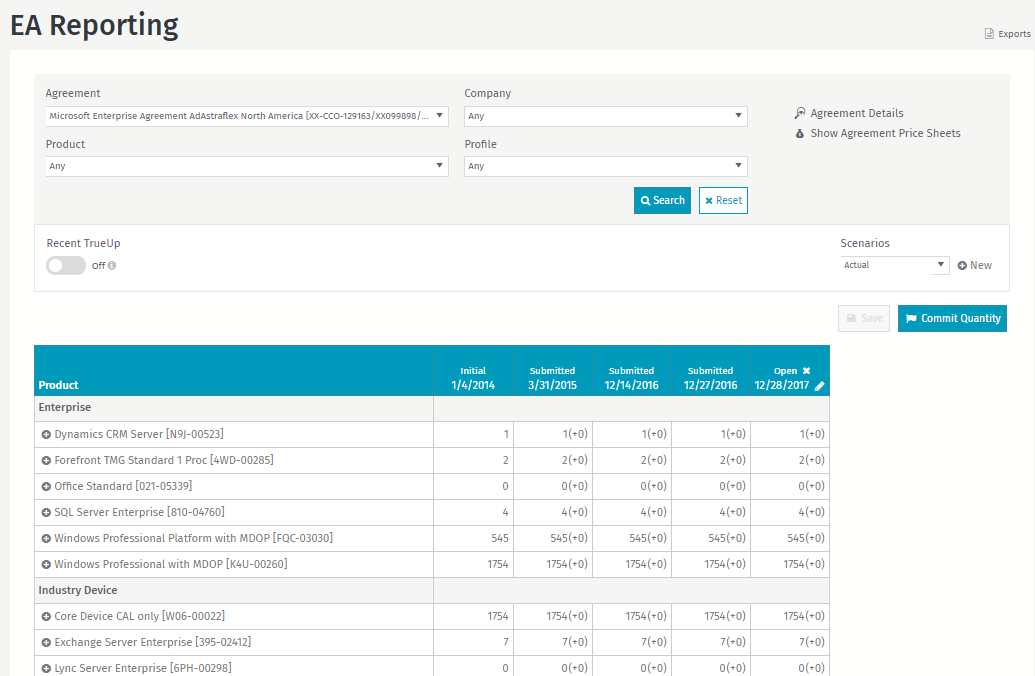
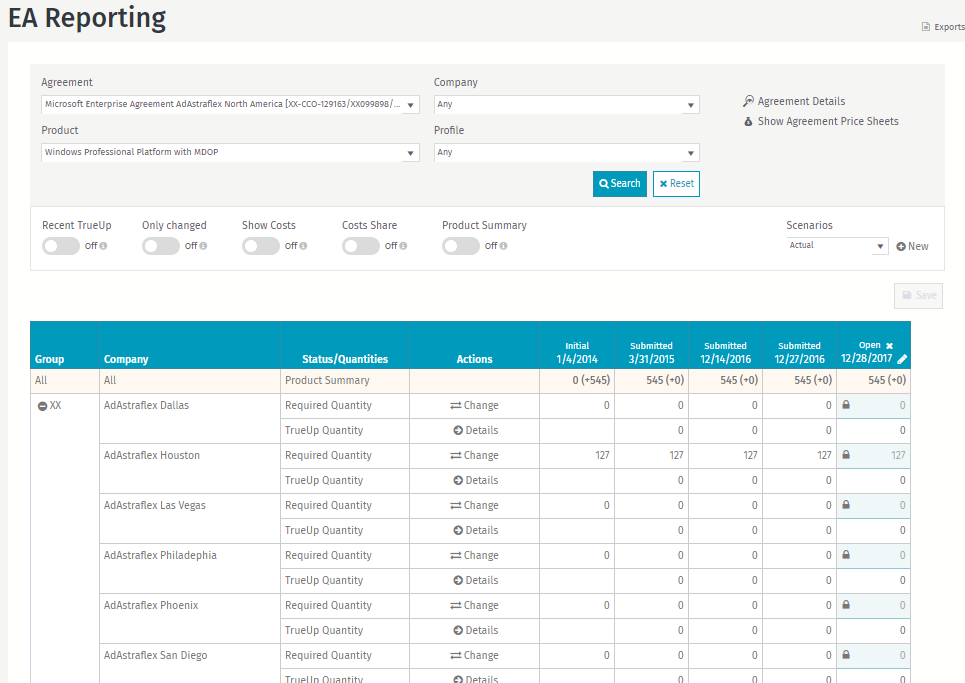
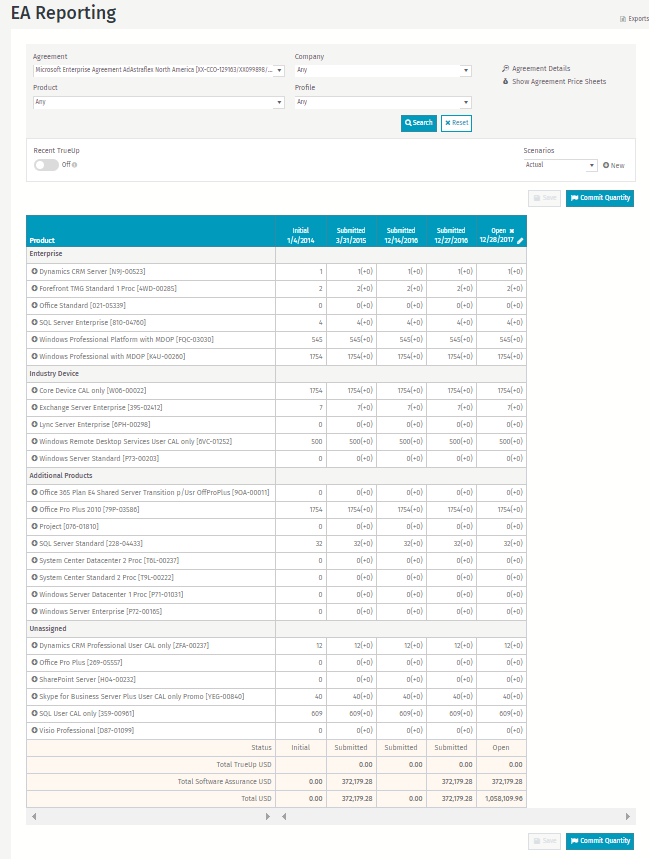
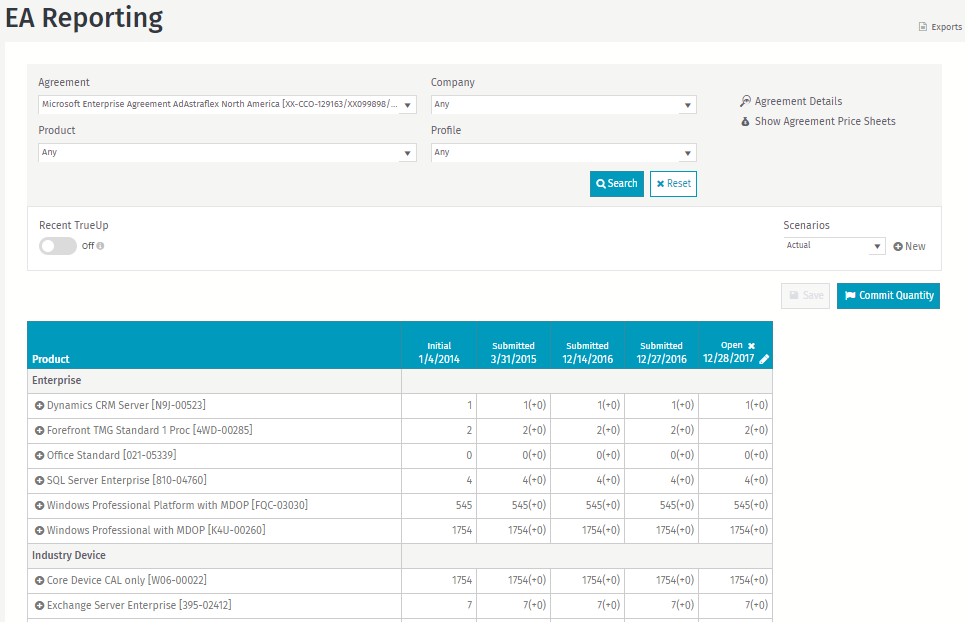
At the top of the reporting page, filters are available which users can select to see required data as shown in the screenshot below:
Once you have selected the values for these filters, you need to click on the “Search” button to render the data of your search.
Agreement – This is to select the agreement you are interested in.
Company – This is to select data from a specific company Product – By default the user will see all the products associated with the contract, however using this drop-down filter they can select specific products they want to report on. The page will only show the data for that selected product.
Profile – This is to select the product profile created during the Wizard setup.
Profile filter is available only if the selected agreement has product profiles created. If there are no product profiles in the selected agreement, this drop-down will be hidden.
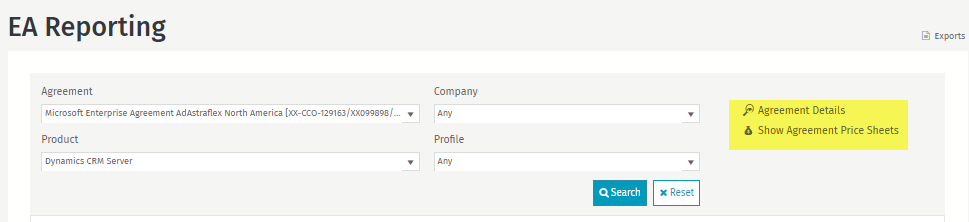
On the right-hand side of filters, there are a few more options available:
Agreement Details – This takes you to the “License Agreement Details” page for the selected contract in “Agreement”
Show Agreement Price Sheets – This can be used to see the price sheet being used for this agreement. It is a reflection of the data submitted via the Wizard Setup
Overview Page
By default, the user lands on the Overview page as shown below:
If the user clicks on any of the line items, they will be navigated to a detailed view for that particular product, as shown below. The product filter gets set to the value you clicked on.
Detailed Page
On the “Overview” page if the user clicks on any item in the grid, or selects a specific company/ product using the filters they are navigated to the ”Detailed” view (shown below) and quick filters are visible. Data available on the “Detailed” page represents possible report entities. If product profiles are used, then only locations bound to those product profiles will be displayed. The same applies to the “Location” view where only products available for a particular location will be displayed.
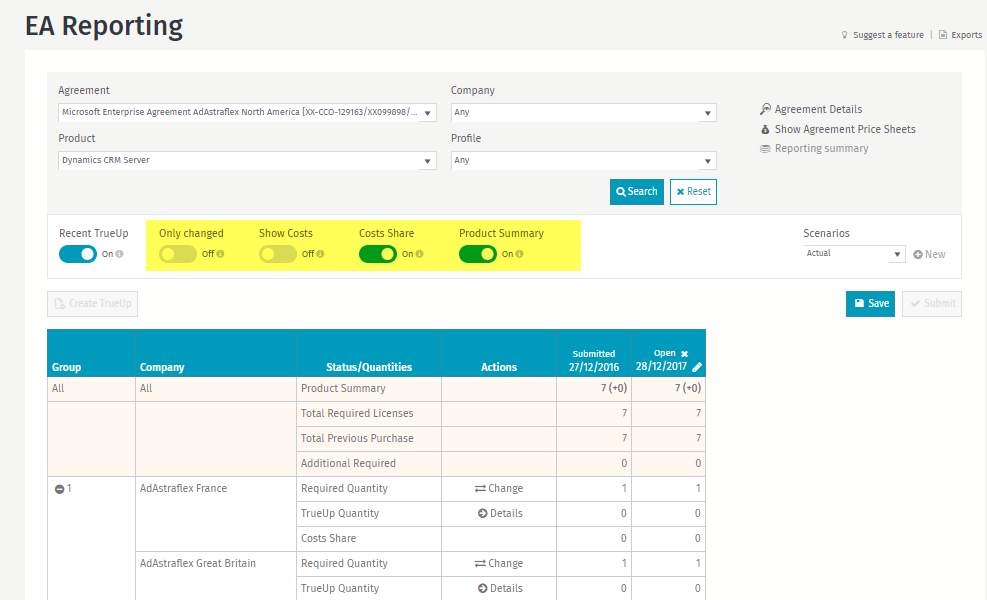
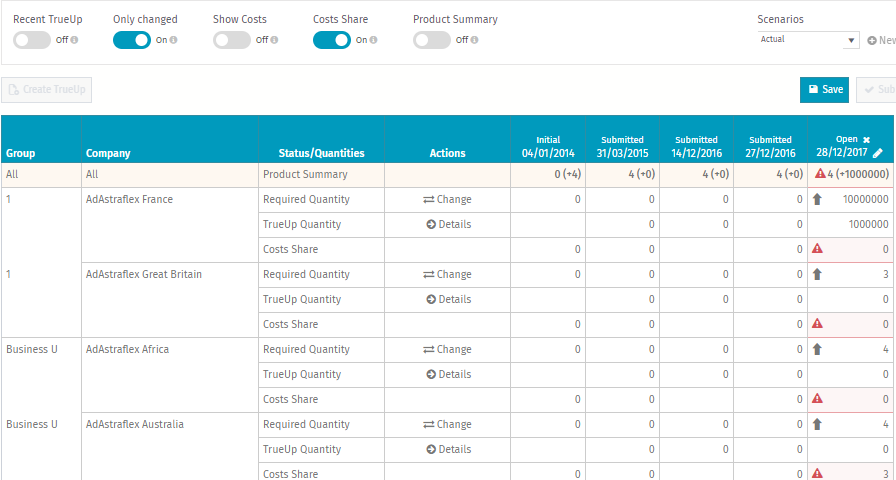
Quick filters are only visible on the “Detailed” page view, and the user can switch them on/off to enable or disable them.
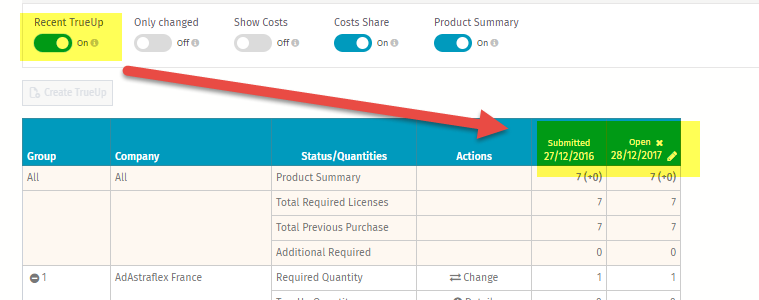
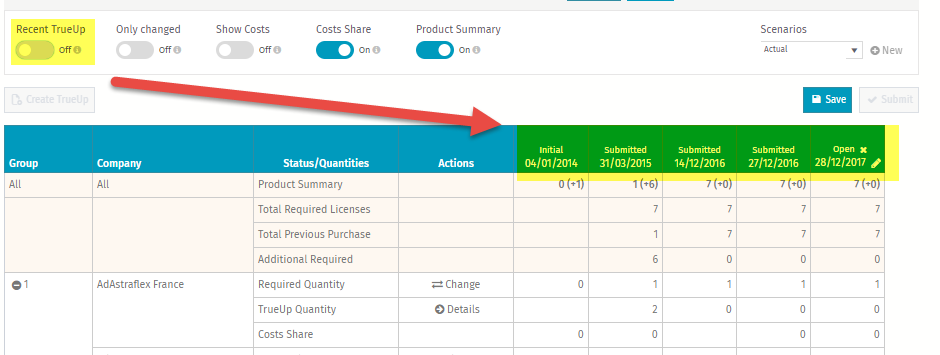
Recent TrueUp
Recent TrueUp is visible on both the “Overview” page and the “Details” page.
It reduces the number of results in the data grid i.e. if “Recent TrueUp” it is enabled, then the user will only see data for the most recently opened and last submitted EA TrueUp as shown in Figure 2 below.
Only Changed
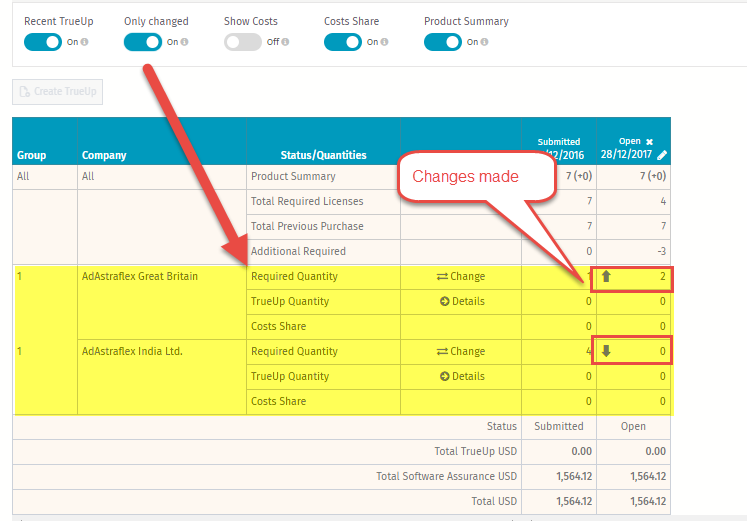
Shows only those records where the user has made a change as shown in the screenshot below:
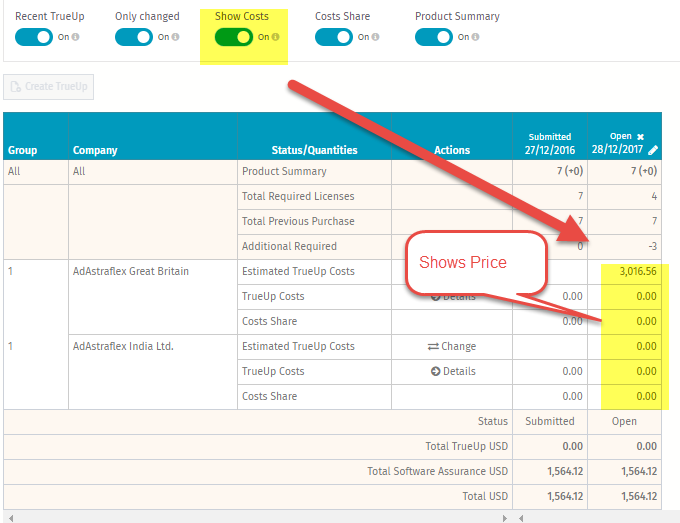
Show Costs
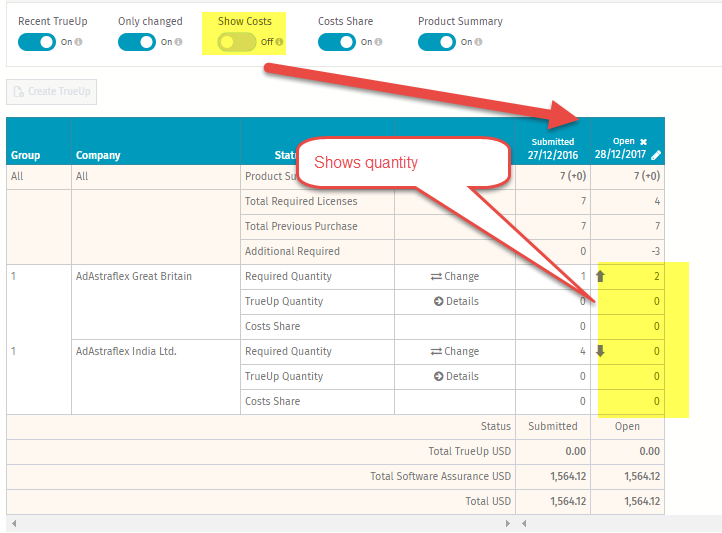
Enabling this filter will show the license cost instead of license quantities. If this is set to “Off”, the page will show the license quantities as shown below.
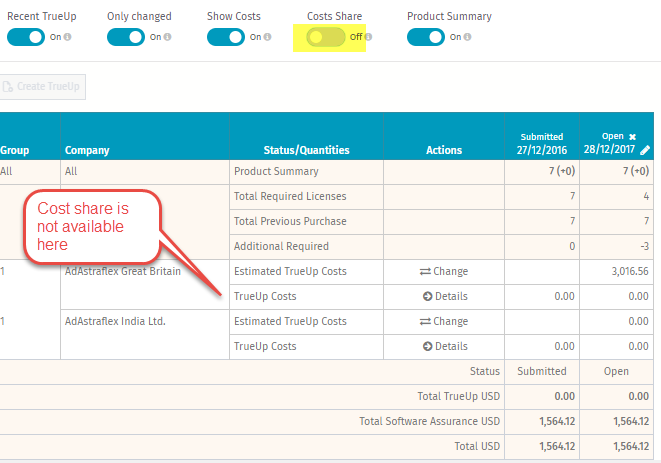
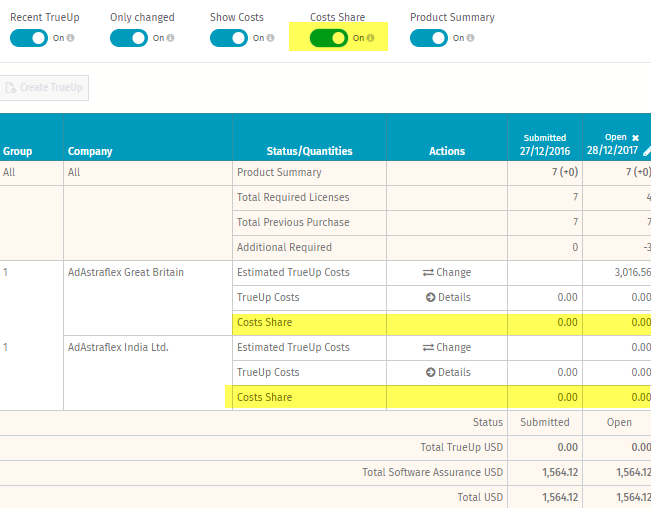
Costs Share
Enabling this will show the Software Assurance cost share for the selected product. If this is set to “Off”, these values will be hidden as shown below.
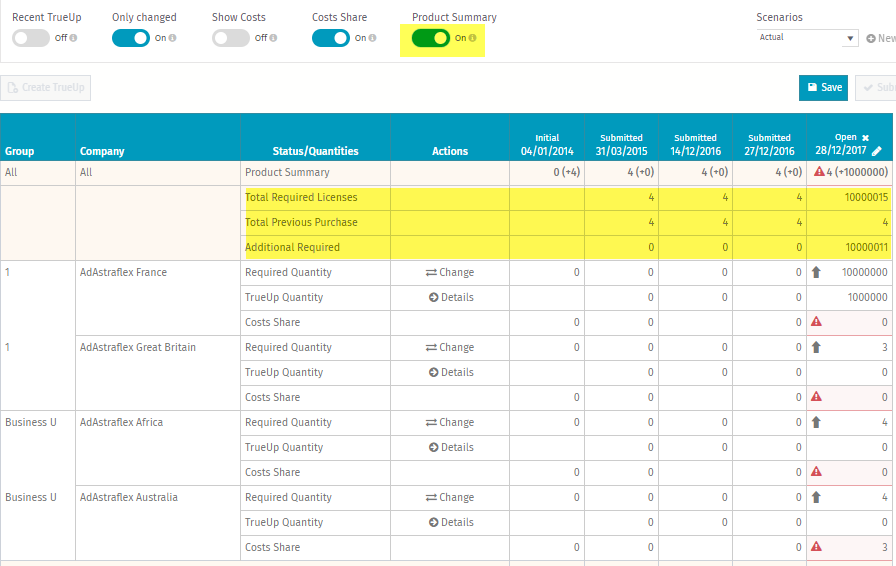
Product Summary
If this is set to “On”, the user will see the license summary for the selected.
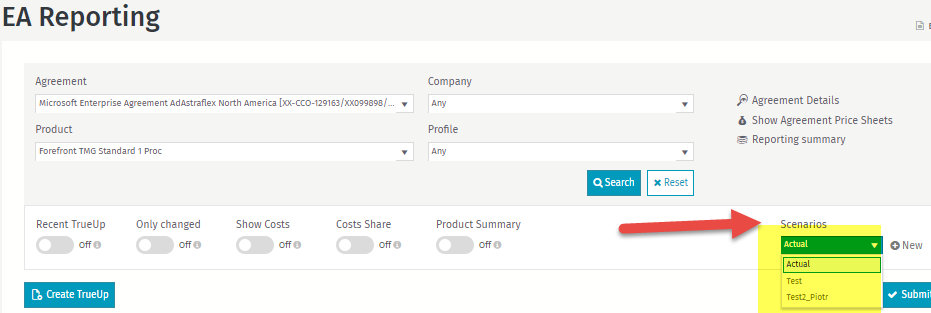
Enables users to create different scenarios which is useful to simulate different allocations of assets.
Users can create a new scenario by clicking on the “New” button and providing the below information:
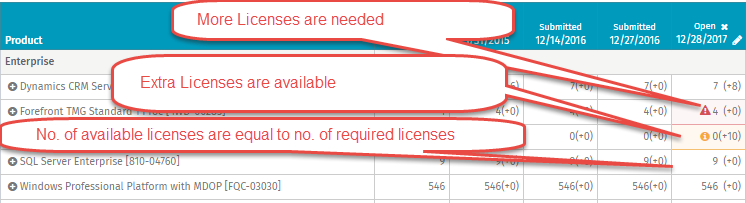
If you see this icon against any record, it depicts that the total available licenses are lower than total required license count i.e. additional licenses are needed.
If you see this icon against any record, it depicts that the total number of available licenses is higher than the required licenses count i.e. extra licenses are available.
The desired state is not to have any such indicators.
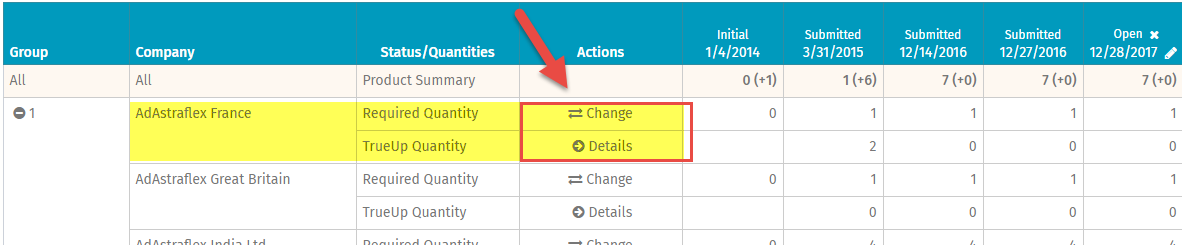
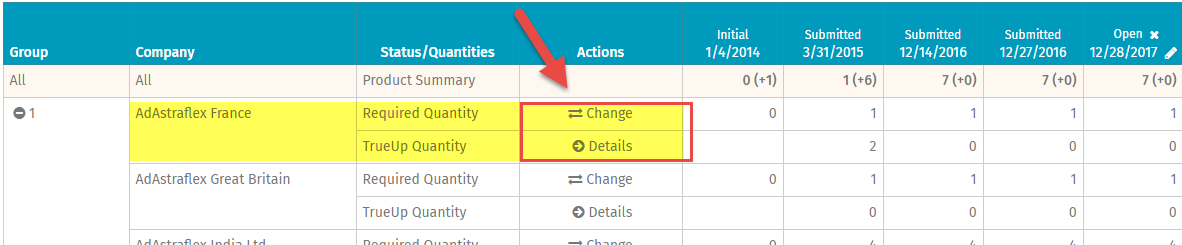
On the detailed page, there is a column called “Actions” and this has two possible values:
Change
Details
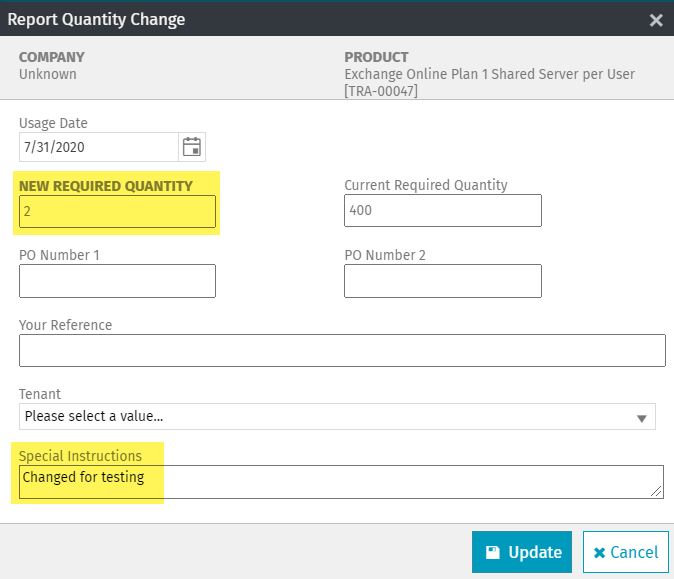
Change
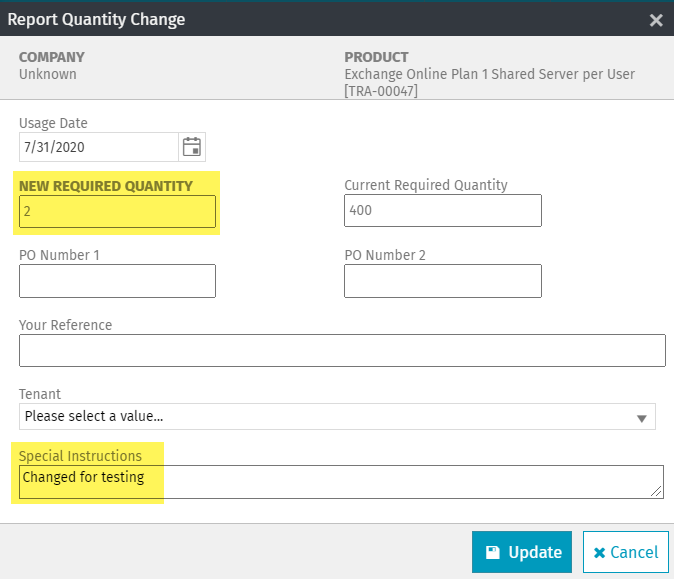
Clicking this option takes you to the below pop-up window.
This shows the current required quantity. Users can change this field and can also add comments to support the changes.
It also allows users to add additional information like PO number, Tenant, and Reference information. Information provided is tracked in the “Details” window.
If any record is updated using this feature, an email is sent to the Account Manager with the details of the changes.
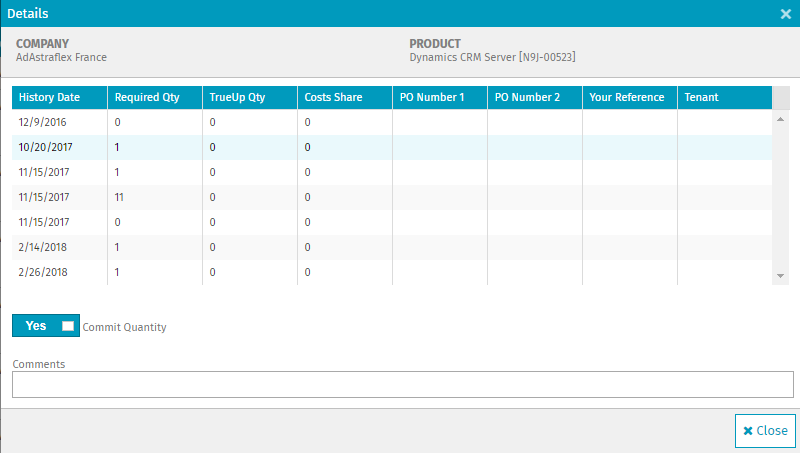
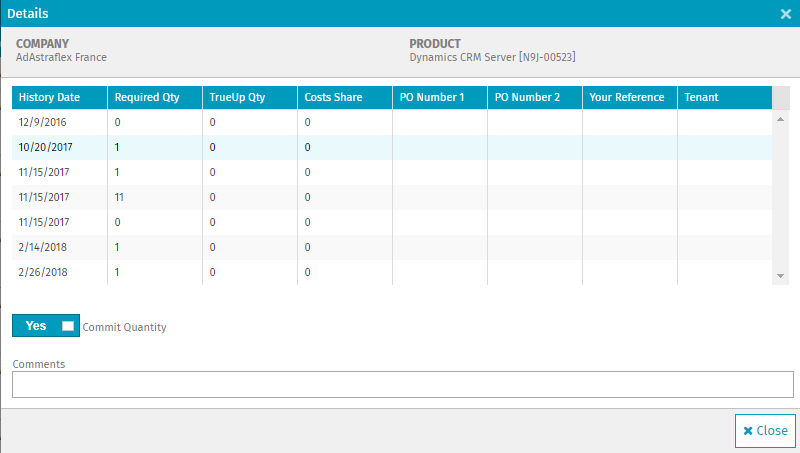
Details
The “Details” option displays the history of the given report entity i.e. when a number of licenses have been changed within a given location. Additionally, it allows users to commit the current value set in the required quantity, with comments, which will be visible to the admin.
EA Users are responsible for reporting the required quantity of licenses for their subsidiary. They need to sync with local users to get this data for each company in their subsidiaries.
To report the required quantity, they should have the “EA Reporting” window open as show below. If this it is not present, it means that the EA admin has not opened it yet.
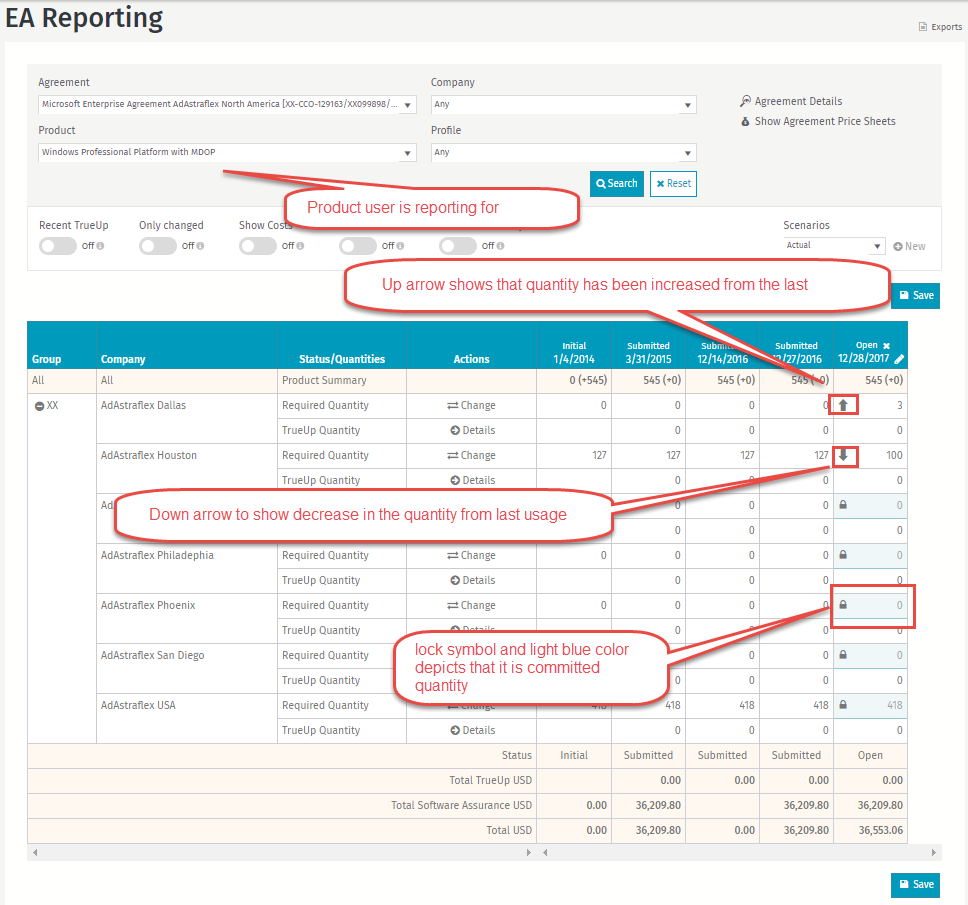
The “Up” arrow shows the quantity has been increased from the reported quantity and the “Down” arrow shows the required quantity has been decreased.
In order to report the usage/required quantity, users’ needs to:
Decide the product and company they want to report on
Go to the open slice of the respective row
Click the required quantity field
Provide the required quantity
These steps should be repeated, as long as all products and all locations have been updated. Then the “Commit Quantity” button should be used to confirm all values.
On the detailed page, there is a column in grid called “Actions” and this has two possible values:
Change
Details
Change Window
Clicking this option takes you to below pop-up window.
This window shows the current required quantity. Users can change this field and they can add comments to support these changes.
Users can also add additional information like PO number, Tenant, and Reference information.
If any record is updated using this feature, an email is sent to the Account Manager with all the details of the changes.
Details Window
The “Details” option displays the history of the cells i.e. when a particular value was changed. Additionally, it allows the user to commit the current value set in the required quantity with comments which will be visible to the admin.
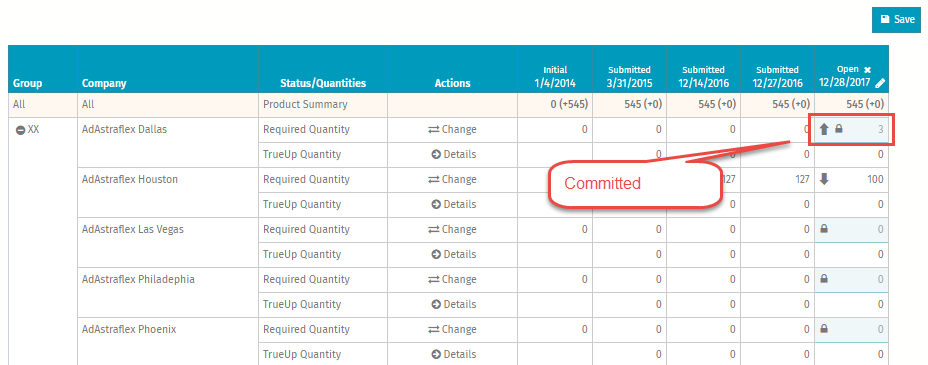
Once it is committed, users will see a lock symbol in the grid.
The lock symbol means users cannot make any further changes. If any change is required, it has to be made using the “Change” option under the “Actions” column which will trigger an email to the Account Manager.
Note: You need to click on “Save” after making any changes or committing any individual quantities otherwise the changes will be lost when the page is refreshed or on the next login.
Users need to report all the products for the locations they are responsible for. Once the user is done with reporting the quantities, they can commit the report by clicking the “Commit Quantity” button on the “Overview” page as shown below. Once it is clicked, the report will be available for the EA Admin.
Users can also click ”Save” to save the changes they have made and can commit later.
Once the quantities are committed, they will be blocked and users will not be able to make any further changes.
If the user wants to make further changes, they need to follow the steps outlined below:
Go to the entry you want to update and click the “Details” option under the “Actions” column
Set the “Commit Quantity” flag to “Off”
Go to the “Change” option under the “Action” column for the same entry
Make the required change and click “Update”
EA Admin roles bring more responsibility. An EA Admin has all the features a User role has, with additional features and functionalities specific to the EA role as outlined below..
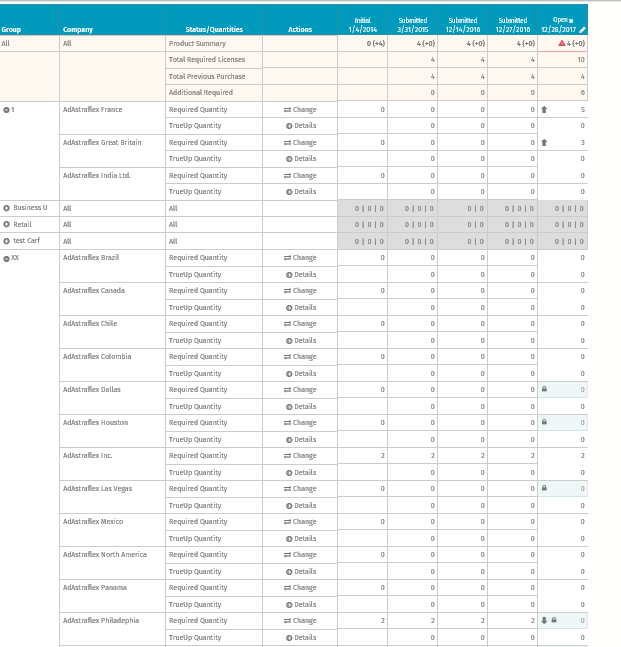
EA Admins can see the committed quantities from different companies as shown in the screenshot below:
Note: In this document, we are selecting a single product to explain it efficiently, however in real scenarios, Admins have to manage more than one product.
Indicators help Admins to understand the reporting status. When an Admin hovers over a value, an indicator will pop up telling the Admin what the color code is referring to i.e. if any extra licenses are available or extra licenses are required, etc.
Indicators show changes in regard to the previous report. The “Up” arrow signifies that there has been an increase in reported quantity and the “Down” arrow shows a decrease. If there is no change in the reported quantity then no indicator is present.
The EA Admin is the responsible person for TrueUp reporting. Before submitting the TrueUp, they need to perform the following tasks:
Add: If an extra quantity is needed, the Admin can add the additional quantity in the “TrueUp Quantity” row.
Optimize Every time an EA Admin inspects the reported usage, they can optimize the additional license count. For example, if the required quantity has decreased in one company but increased for another company, then the Admin can move spare licenses between locations, avoiding additional costs.
Scenario 1 – Adding Licenses
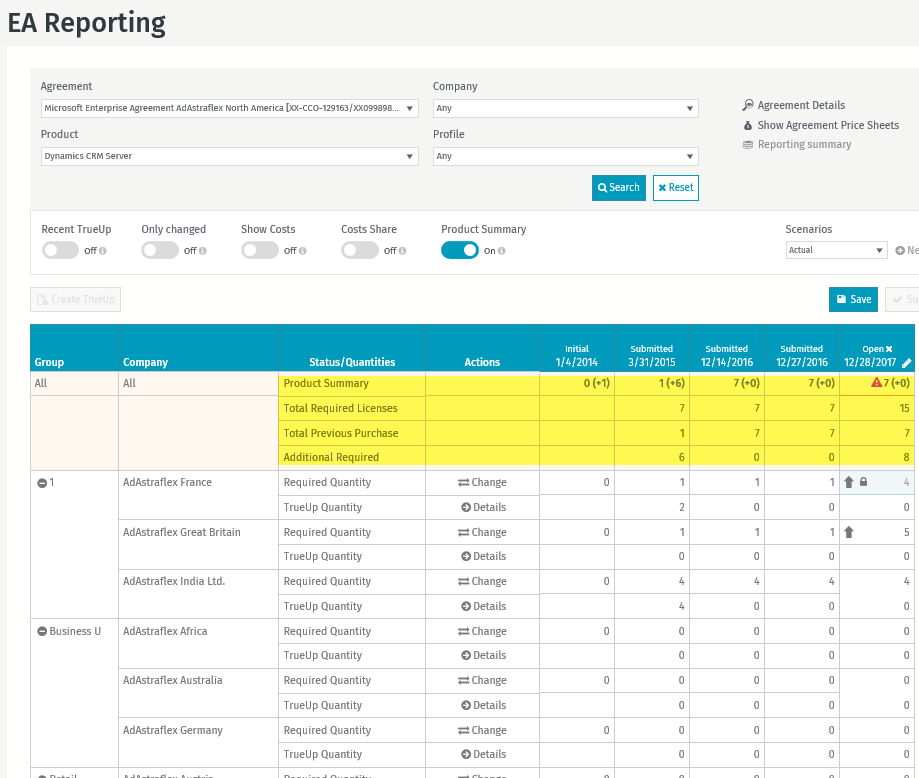
In this scenario, the EA Admin is reporting the TrueUp. First of all the EA Admin needs to look at the header.
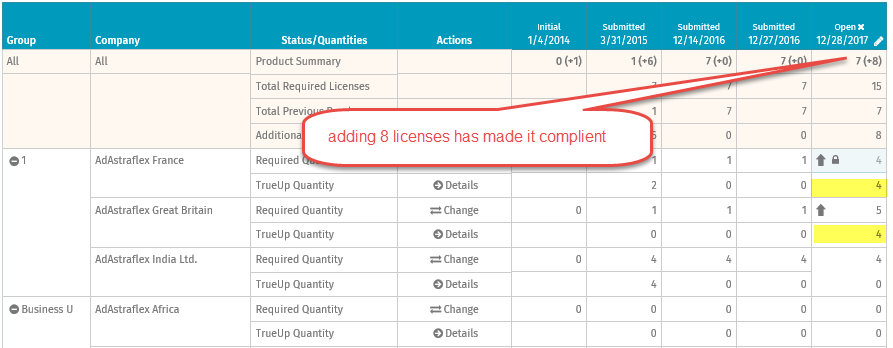
In this case, the total required licenses are 15, whereas from previous purchases the Admin only has 7 licenses. This implies that 8 additional licenses are required in order to be compliant again.
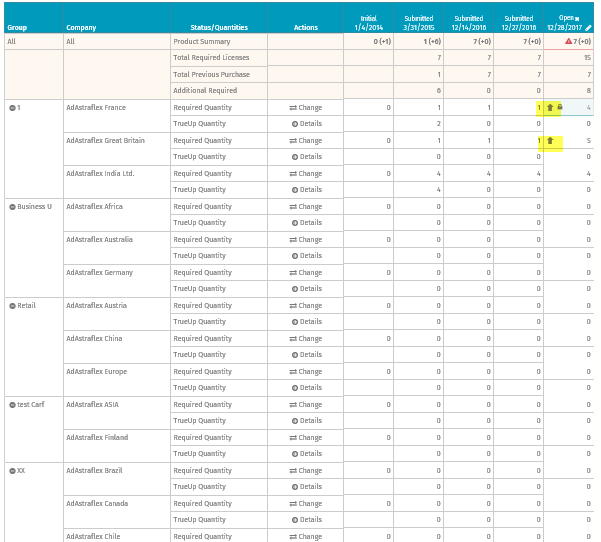
The next step would be for the Admin to check the details reported by all companies and look at any change in the usage. As explained above, the up and down arrow indicators displayed in the cells represent changes in usage. “Only changed” filter can preselect locations/products with changed license count.
The below screenshot shows the usage and the changes reported.
We can see that license usage in France has increased by 3 and in Great Britain it has increased by 4.
These locations would need more licenses.
Here the Admin can decide which location is appropriate to buy these additional licenses based on tax rates and other factors. The Admin can then add license quantity accordingly against “TrueUp Quantity” for those locations.
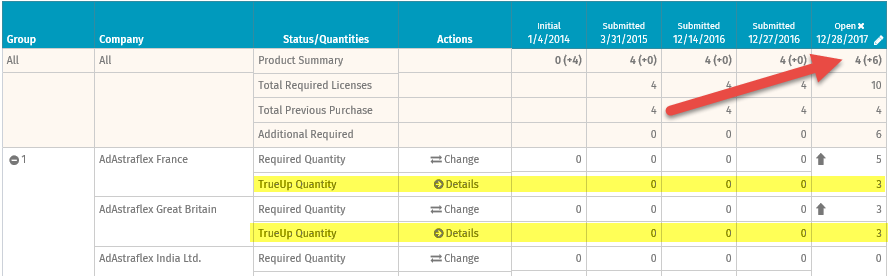
Scenario 2 – Optimization
In this scenario, the total required licenses equals 10, whereas from previous purchases the Admin only has 4 licenses. This implies that 6 additional licenses are required in order to be compliant again.
We can see that license usage in France has increased by 5 and in Great Britain it has increased by 3.
These locations would need 8 more licenses in total, however usage in Philadelphia has decreased by 2.
The two available licenses in Philadelphia can be used by France or Great Britain and thus only 6 more licenses would be necessary.
Here the Admin can decide which location is appropriate to buy these additional 6 licenses based on tax rates and other factors. The Admin can add license quantity accordingly against “TrueUp Quantity” for those locations.
Apart from extra responsibilities, EA Admins have access to additional features that are available on the top and bottom of the EA Reporting page.
Reporting Summary: Using this feature EA Admins can check the reporting summary to see how many products each subsidiary has committed. Based on this summary, they can reach out to the respective representatives of each country if any further information is required. EA Admins can track who reported which company. A responsible contact can be assigned to each company.
Create TrueUp: Only an Admin can create a TrueUp, which means only an Admin can open a slice. Opened slice can be used by EA Users to report usage within locations they are responsible for.
Submit: Used to submit the EA reporting. Once the reporting is completed by the EA Admin, they can submit the report by using the “Submit” button. Users do not have the required permissions to submit the report, they can only commit the usage. Once submitted, the Account Manager receives the report and they will import the TrueUp into the backend system.
Company identifier – is a user-defined identifier for each location. There are no strict rules around identifiers but it is recommended to use a number that does not change frequently. (like internal subsidiary identifier).
Alternatively, change action can be used as described below.
Save the changes
Commit the report again