Loading...
Loading...
Loading...
Loading...
Loading...
Loading...
Loading...
Loading...
Loading...
Loading...
Loading...
Loading...
Loading...
Loading...
Loading...
Loading...
Loading...
Loading...
Loading...
Loading...
Microsoft has released a preview feature to support allowing access to service providers (like SoftwareOne) through Conditional Access policies. To learn about Conditional Access, see the Microsoft documentation.
To exclude SoftwareOne and the Client Portal from your blocking Conditional Access policies, you'll need the Microsoft Tenant IDs of SoftwareOne’s reseller tenants that relate to you.
Even though SoftwareOne has over one hundred of these reseller tenants, only one or two will apply to you. The only way to find out the reseller tenant IDs you need to use is to log a support ticket with our Support team.
For configuring conditional access policies, determine which Conditional Access policies are blocking SoftwareOne and the Client Portal.
Before you can exclude Client Portal and SoftwareOne from your policies, you need to know exactly which policies are affecting access. You can do this using the What If capability of Conditional Access.
Follow these steps to configure conditional access policies
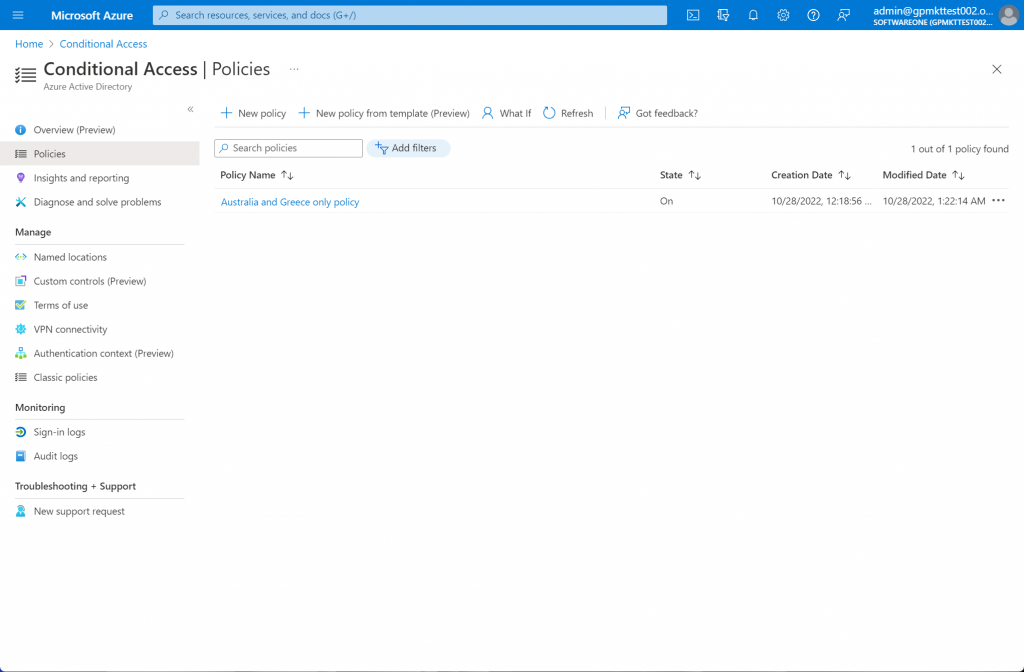
In the Azure portal, navigate to .
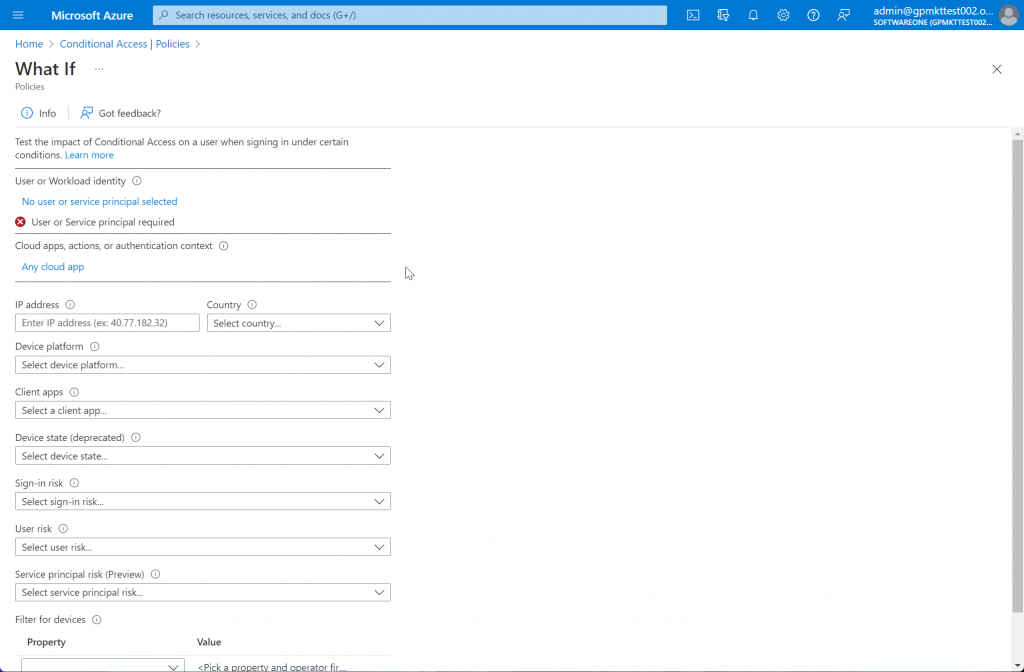
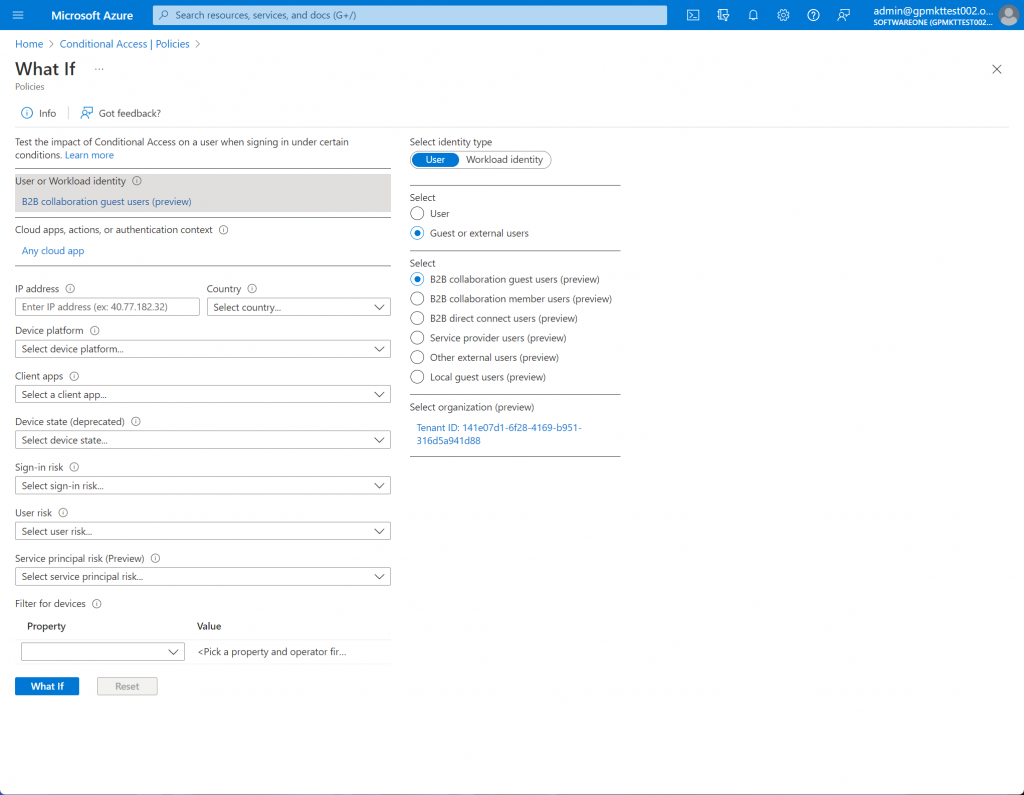
Select What If in the top navigation bar.
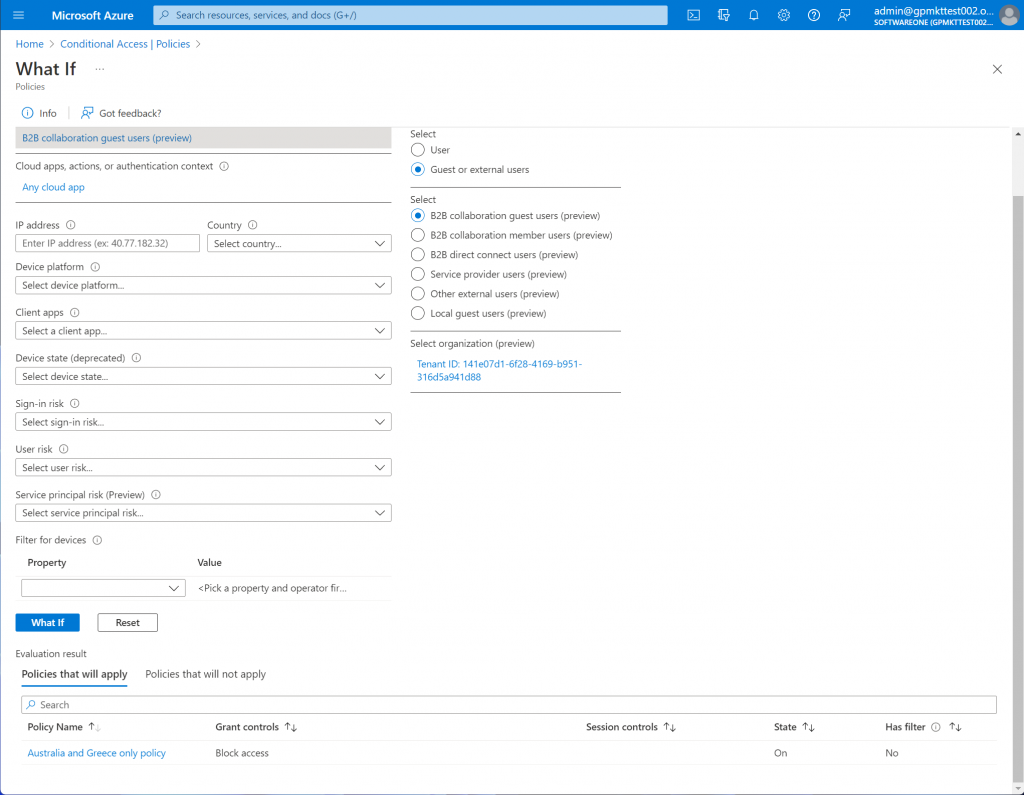
On the What If page, select No user or service principal selected and then choose the following settings:
Select identity type: User
Select: Guest or external users
Select What If.
At the bottom of the page, you will see the list of Policies that will apply. Make a note of these policies as these are the ones you will need to modify to exclude the Client Portal and SoftwareOne.
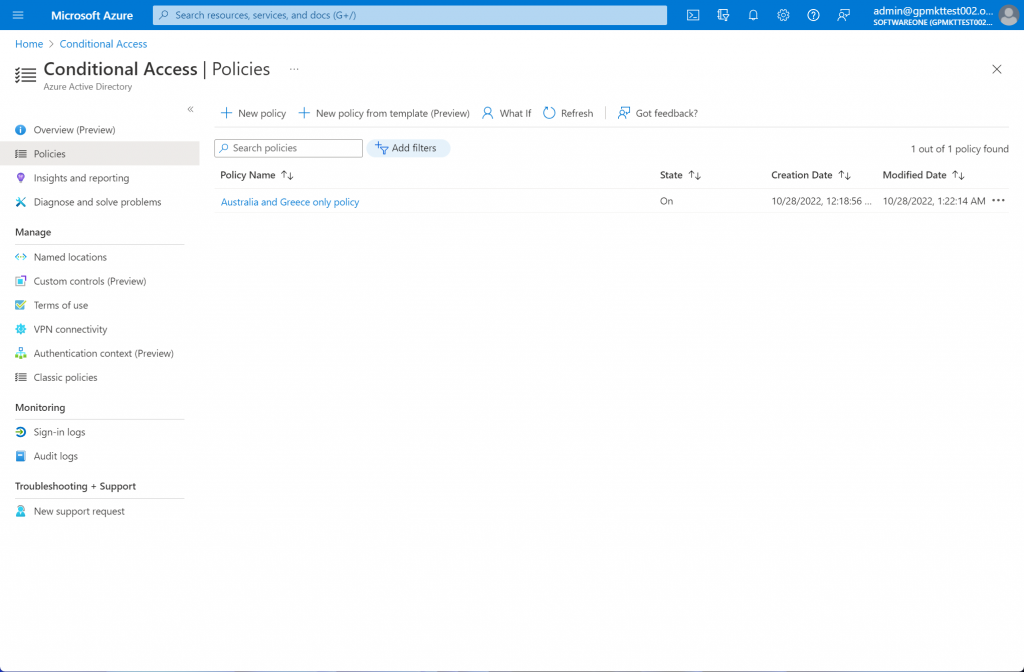
In the Azure portal, navigate to .
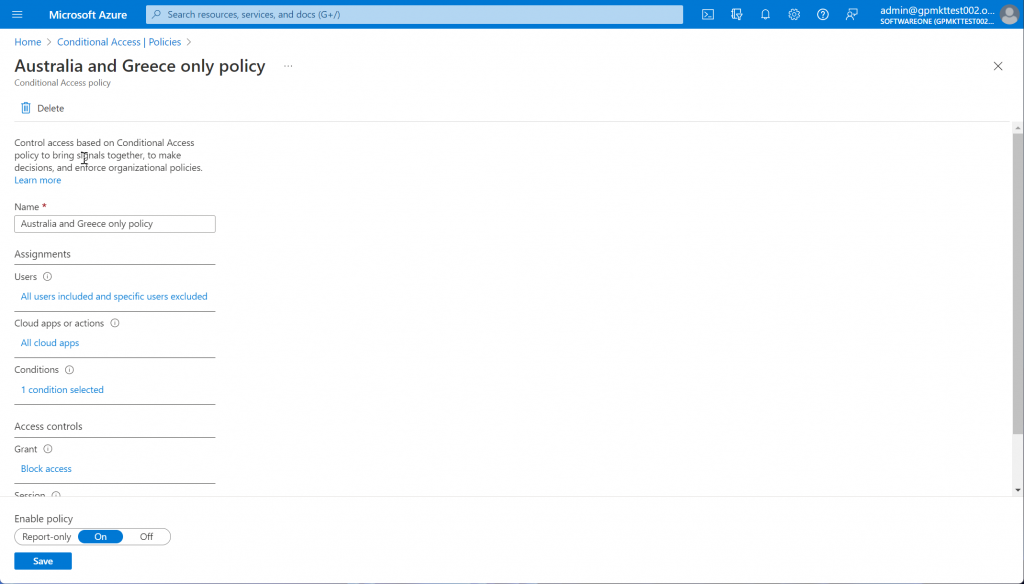
In the list of policies, select one of the policies that you applied.
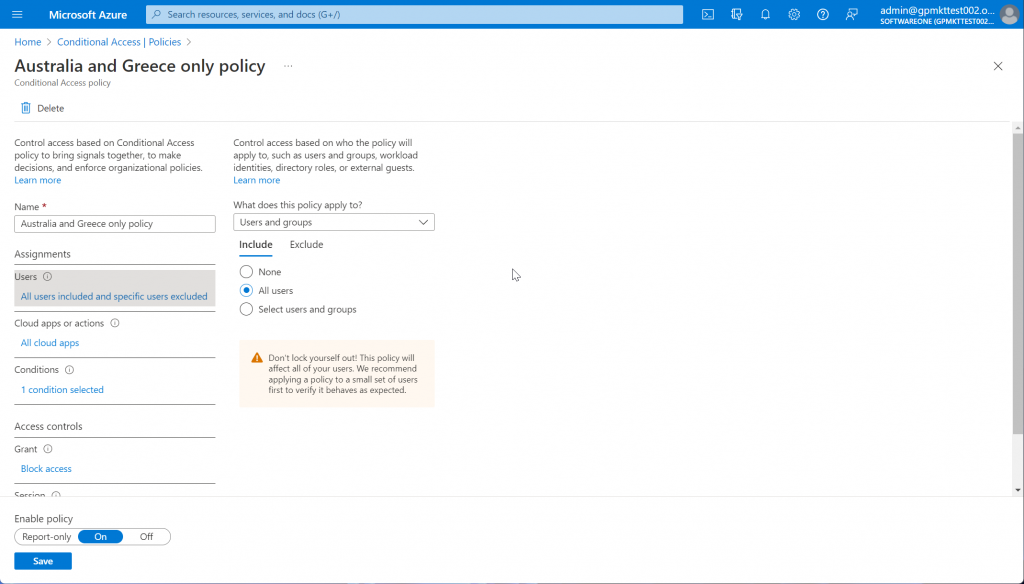
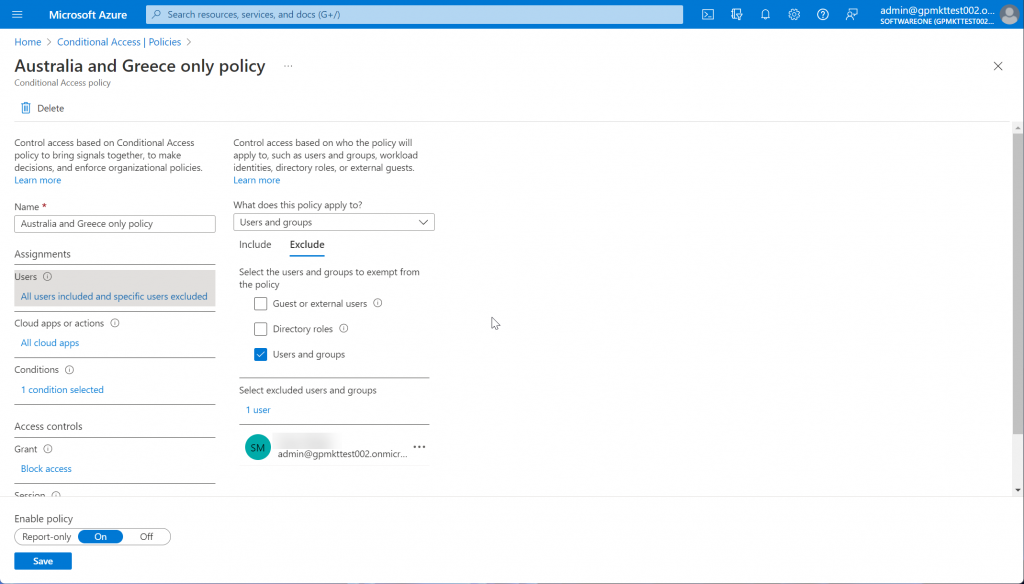
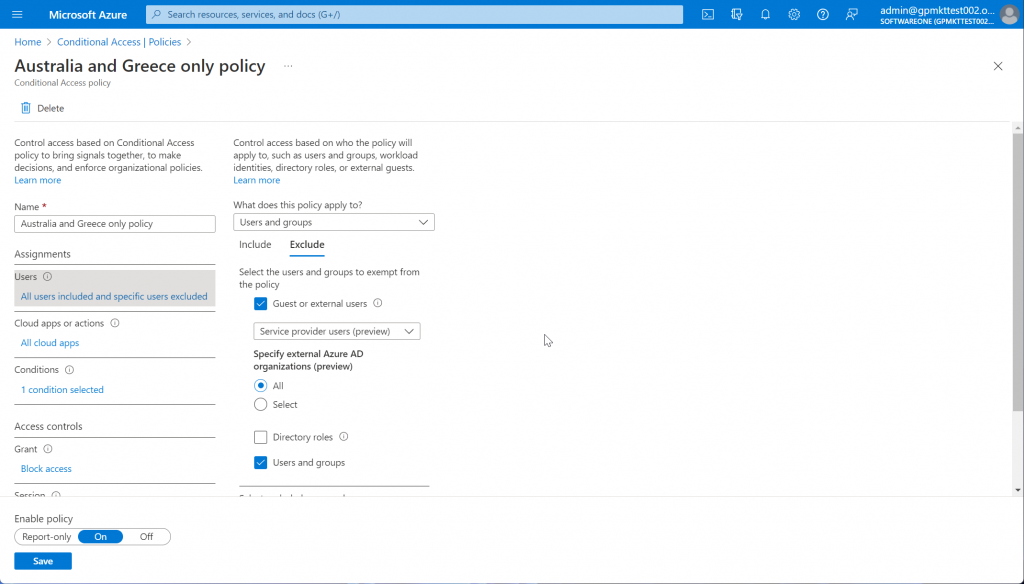
Under Assignments, select the Users section.
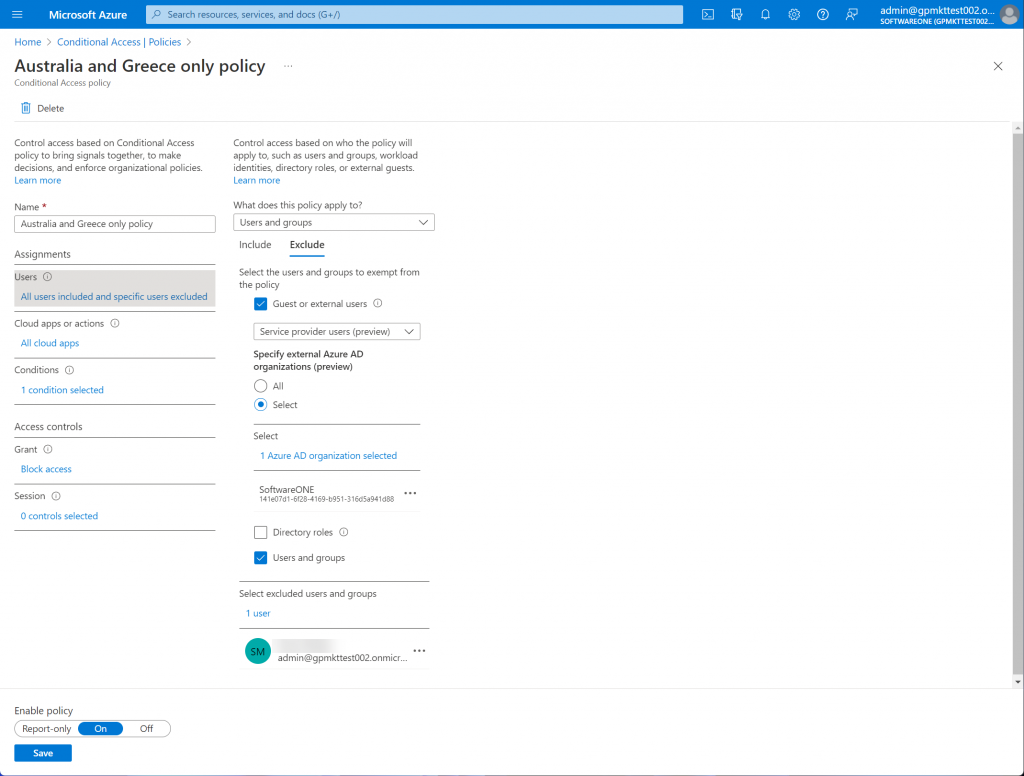
Select Exclude.
Select the Guest or external users checkbox.
Choose Select.
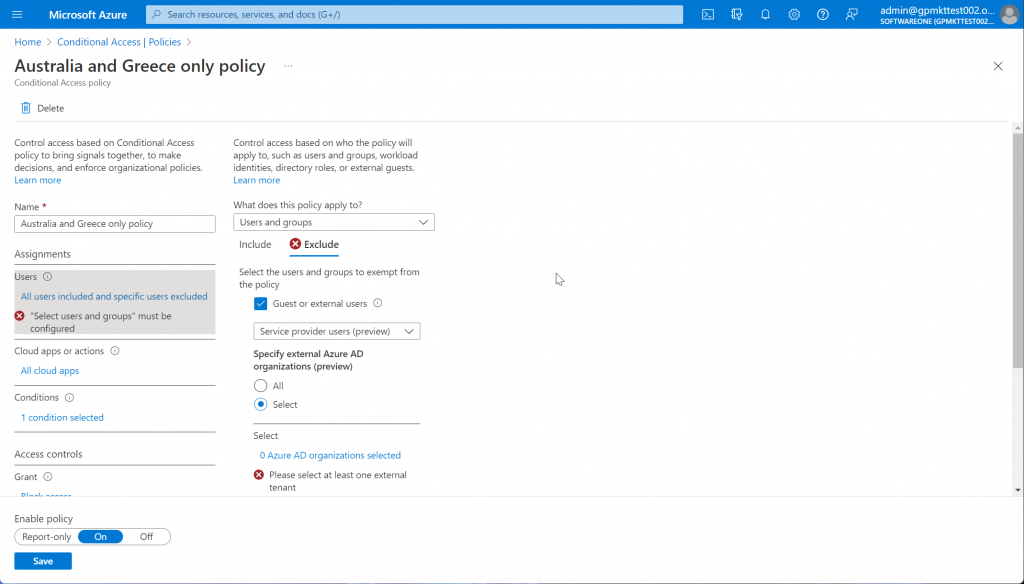
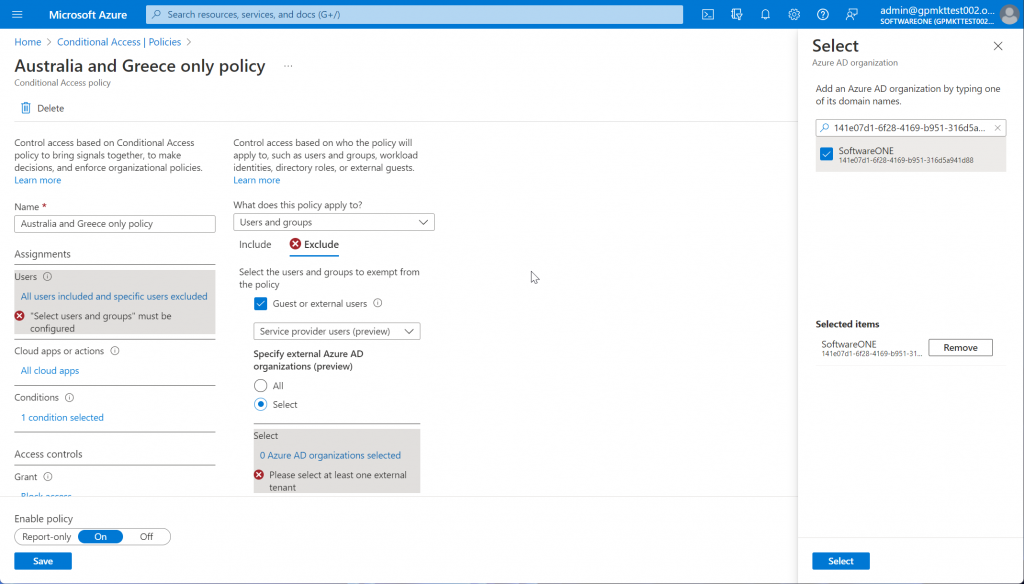
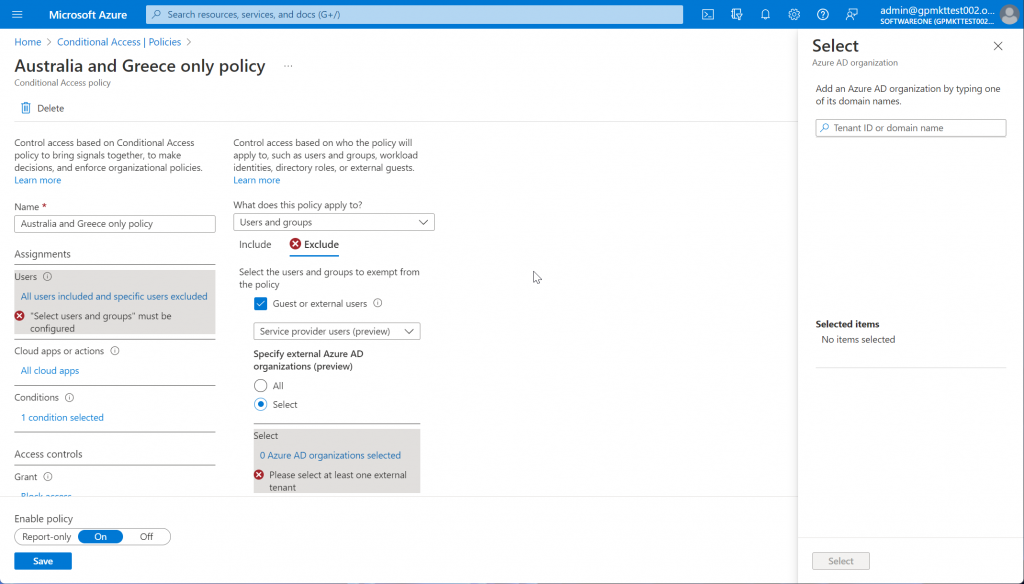
Click 0 Azure AD organizations selected.
Enter the Tenant ID you obtained from our Support team, and then select the checkbox next to the SoftwareONE reseller tenant.
Click Select and then select Save.
Repeat the steps in this section for each policy that you noted in the previous section.
Select organization (preview)
Click No Tenant selected.
Enter the Tenant ID you obtained from our Support team.
Click the tenant that is found.
Click Select.
When modifying Conditional Access policy exclusions, do not remove any of your existing excluded users, groups, or other principals. With Conditional Access, there is a very real possibility of locking yourself out of your tenant. Only attempt the following steps if you are a Conditional Access expert and you are confident configuring them.
SoftwareOne cannot be held liable for damages caused by the misconfiguration of this feature.
You can choose the preferred language for your account in your profile settings.
To change the language
Sign in to your account.
Select your profile menu, then select My profile.
On the My profile page, select Edit.
In Edit user, select Preferences, then select your preferred language from the Currency list.
Select Save.
The Client Portal downloads AWS recommendations from AWS Trusted Advisor and AWS Cost Explorer.
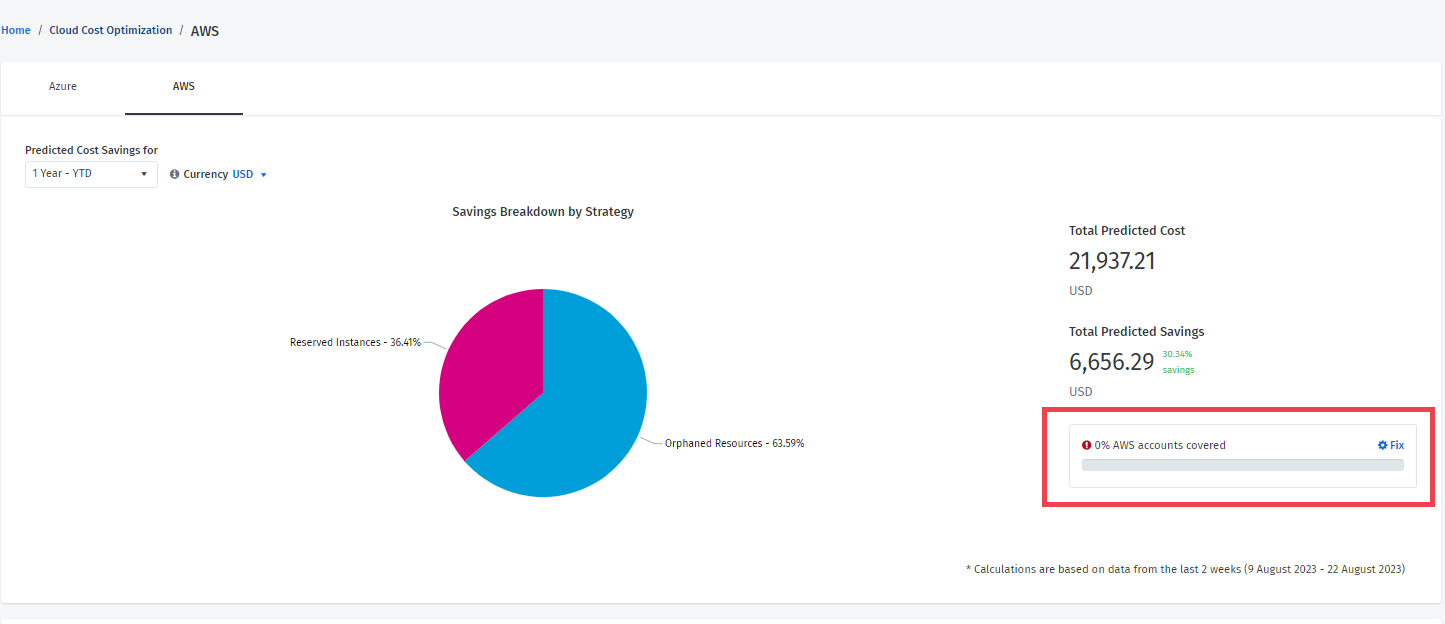
If the Client Portal is unable to download recommendations, a message is displayed in the health check for the AWS accounts on the Cloud Cost Optimization page.
The following image shows the AWS synchronization error:
This error means that the AWS Trusted Advisor or Cost Explorer is not configured correctly for at least one AWS account.
To resolve this issue:
Select Fix.
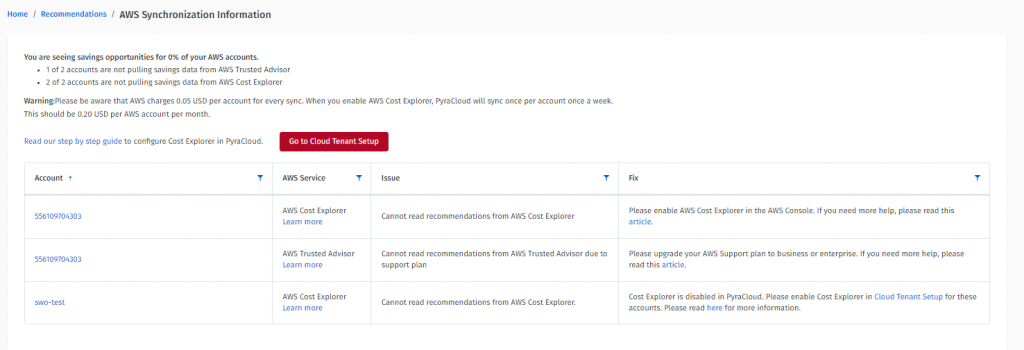
On the Synchronization Information page, review the details and follow the solution to resolve the error.
The following are the possible issues and their description:
If you've enabled the Cost Explorer and AWS permissions, but the Client Portal is still showing an error, ensure that the Amazon EC2 rightsizing recommendations are enabled. For information on how to enable rightsizing recommendations, see in AWS documentation.
Cannot read recommendations from AWS Trusted Advisor
It means that the Client Portal doesn't have the right permission to pull data from AWS Trusted Advisor.
Cannot read recommendations from AWS Cost Explorer
It means that Client Portal doesn't have the right permission to pull data from AWS Cost Explorer.
Cannot read recommendations from AWS Trusted Advisor due to support plan
It means that the AWS account has low support to download data through API for Trusted Advisor.
AWS Cost Explorer disabled in the Client Portal
It means that the synchronization of recommendations from AWS Cost Explorer is not enabled in the Client Portal.
AWS Cost Explorer disabled in AWS
It means that AWS Cost Explorer is not enabled in the AWS account.
If your report is empty and you receive the 'There is no data for this chart' message, there are a few reasons for this, including:
The data is being filtered in a way that no data is returning. You might need to edit your report and modify the filters.
The data might require access to the Security and Audit Logs that may not have been configured. Check your 365 Analytics settings.
The data has not been collected as the data collection needs to be authorized.
You may need to reauthorize your tenant. For information, see ?
If you have completed these steps and still have the notification, or the report is empty, for assistance.
This article explains how the platform connects to your Azure environment, how data is collected, and what security measures are in place.
An Access Token is used to enable the platform to collect spend details about your Azure Subscriptions. Without this Access Token, we are unable to pull this detail and provide you with the analytics necessary to make decisions about your day-to-day spending.
The customer must be assigned the “Owner” role in the Azure subscriptions you wish to add to the Client Portal.
When adding Azure subscriptions, the SoftwareOne service principal is granted “Tag Contributor” access to those subscriptions. This level of access allows full access to the Azure subscription without managing security settings.
The Client Portal uses this access to retrieve a list of your resources (Virtual machines, etc.) and the tags assigned to them. This role also provides a level of access to synchronize any user-assigned tags in the Client Portal back to the resources of the Azure subscription. Azure built-on roles reference.
Tag Contributor lets you manage tags on entities, without providing access to the entities themselves. For more information, see the Microsoft documentation.
Being established as a 'Tag Contributor' allows the platform to interact with customers' spending and resource data. Without this, we are unable to provide custom reporting and consumption views and successfully implement other workstreams within Spend Management.
When you perform consent, you are redirected to Microsoft to accept permissions required by the platform. As part of this process, the platform can “impersonate” the consenting user for a short period (1 hour).
The platform uses this impersonation to perform actions on behalf of the consenting user. This includes:
Assigning the Tag Contributor role to the platform for subscriptions owned by the consenting user during onboarding.
Assigning the Tag Contributor role to the platform for subscriptions owned by the consenting user during the addition of more subscriptions to the platform.
When the consent process is performed, a 'service principal' is created in your tenant. This is conceptually similar to adding a user dedicated to the Client Portal for the purposes of accessing your tenant and subscriptions.
Yes, the platform offers application-level rights that you can change after adding your Azure Subscriptions. Those include:
No Resources - No resources or tags will be synchronized from subscriptions marked with this setting.
No Tags – Your resources will be synchronized from your Azure Subscription, but their tags will not be synchronized in either direction.
Read Tags Only - Your resources will be synchronized from your Azure Subscription, including their Tags. Any changes to Tags in the platform will not be written back to Azure.
When the Read/Write permissions are enabled, the platform can write into a customer environment. Write permissions are restricted to Tags only.
Role-based access control (RBAC) in the platform ensures that only a level of interaction that is acceptable to you is established between the platform and your cloud provider.
Encryption
The platform makes extensive use of data encryption for data in transit:
Traffic from the platform is encrypted using HTTPS in their web browser.
API traffic between the platform and Microsoft’s services is all encrypted. Traffic is natively encrypted since it is an HTTPS request.
Partner Admin Link (PAL) enables Microsoft to identify and recognize SoftwareOne as helping customers achieve business objectives and realize value in the cloud. Customers must first provide partner access to their Azure resources. Once access is granted, the SoftwareOne Microsoft Partner ID (MPN ID) is associated.
The PAL association with existing credentials provides no new customer data to Microsoft or SoftwareOne. For more information, see the .
In the Marketplace Platform, only one order per agreement can be processed at a time.
To avoid conflicts, any orders in are deleted automatically when another order under the same agreement is processed. This ensures that no concurrent changes are made to subscription items and licenses.
If your order has been deleted by the platform, you can find confirmation of its deletion in the Audit trail tab within the . The following image shows an example:
Once an order is deleted, it cannot be recovered, and no further action can be taken on that order.

When you terminate the last active subscription in an agreement or when subscriptions expire, the agreement status changes to Terminated. This termination is irreversible.
It means you can no longer use the terminated agreement for ordering new subscriptions and must either set up a new agreement when placing the order or use an existing agreement in the Active state to attribute new subscriptions to that agreement.
365 Analytics reporting uses application consent to collect data from your Microsoft 365 tenant. Application consent is used to collect data via the Graph API.
To learn why this is important, what data is collected, and what security measures are in place, What data do you collect for 365 Analytics?
Follow these steps to connect your 365 tenant:
Browse to the URL that SoftwareOne provided. You'll either receive the URL from the SoftwareOne support team, or you'll see a banner in 365 Analytics stating that the data collector requires additional permissions.
Sign in to the Client Portal with the agreed global administrator account. Use the password that was set in Client Portal, not your Microsoft 365 account password.
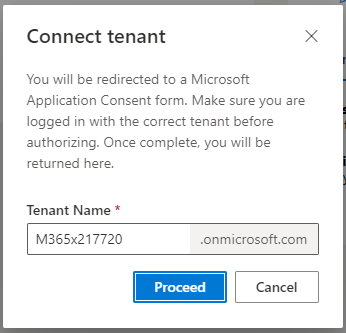
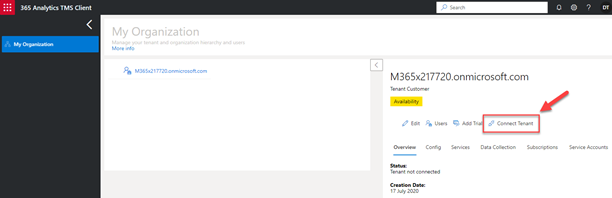
Select Connect Tenant.
Enter your Microsoft 365 Tenant ID.
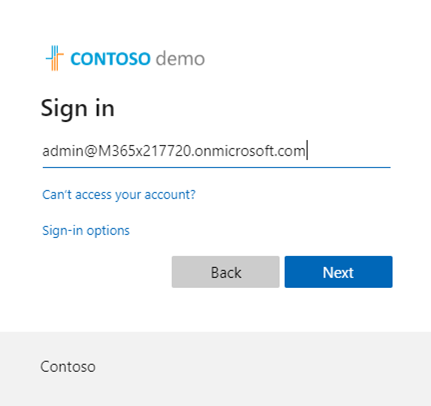
Enter your Microsoft 365 global administrator account username and password. Use your Microsoft 365 Entra ID account, not your Client Portal credentials. The user must be a Global Admin for authorization to work.
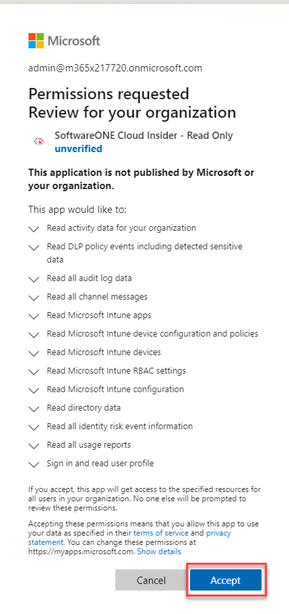
Authorize 365 Analytics access to read your Microsoft 365 Tenant. Select Accept.
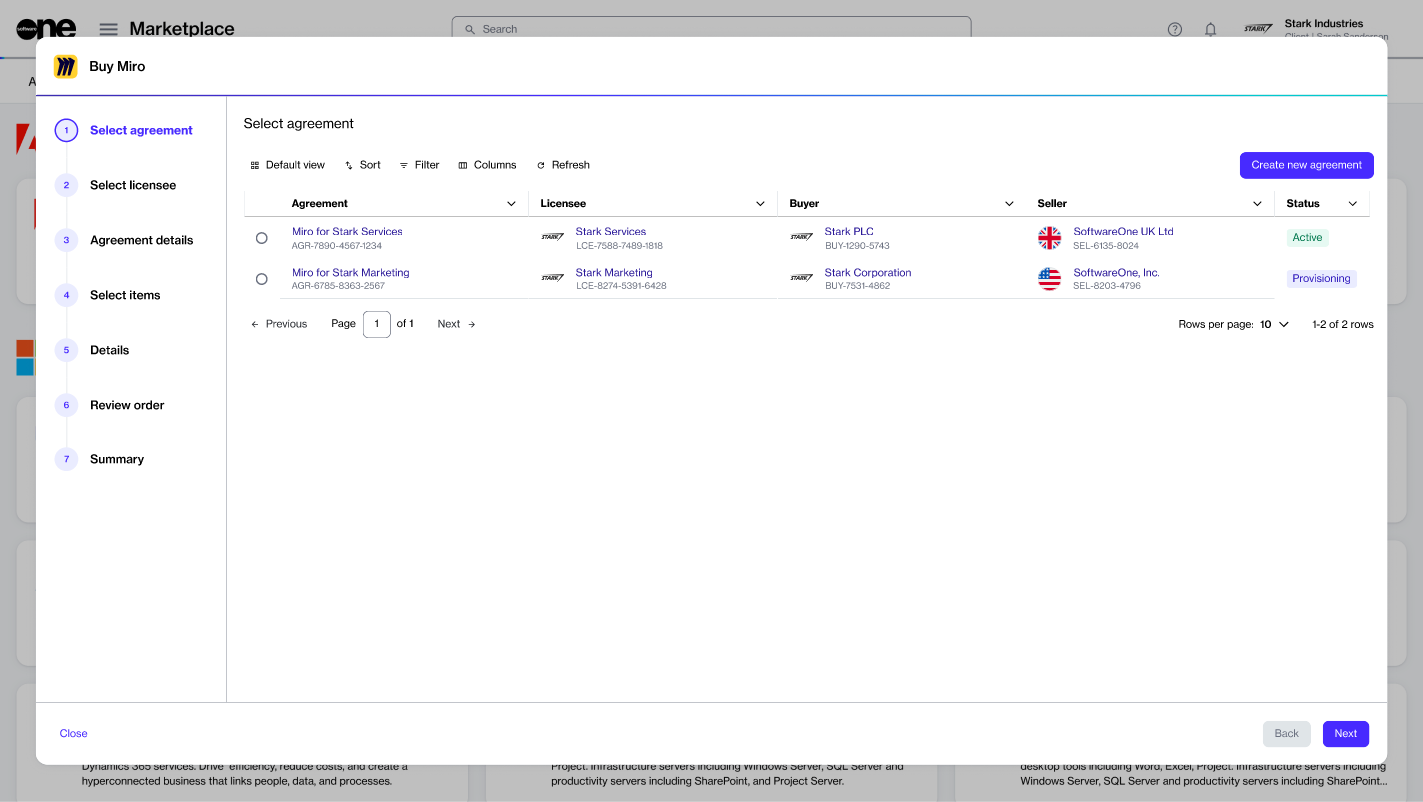
The SoftwareOne Marketplace's purchase wizard simplifies the ordering process by guiding you through each necessary step of placing an order.
There are two ways to launch the wizard, depending on whether you are creating a purchase or a change order. You can either start the wizard by selecting a product on the Products page or by selecting Buy more on the agreement details page.
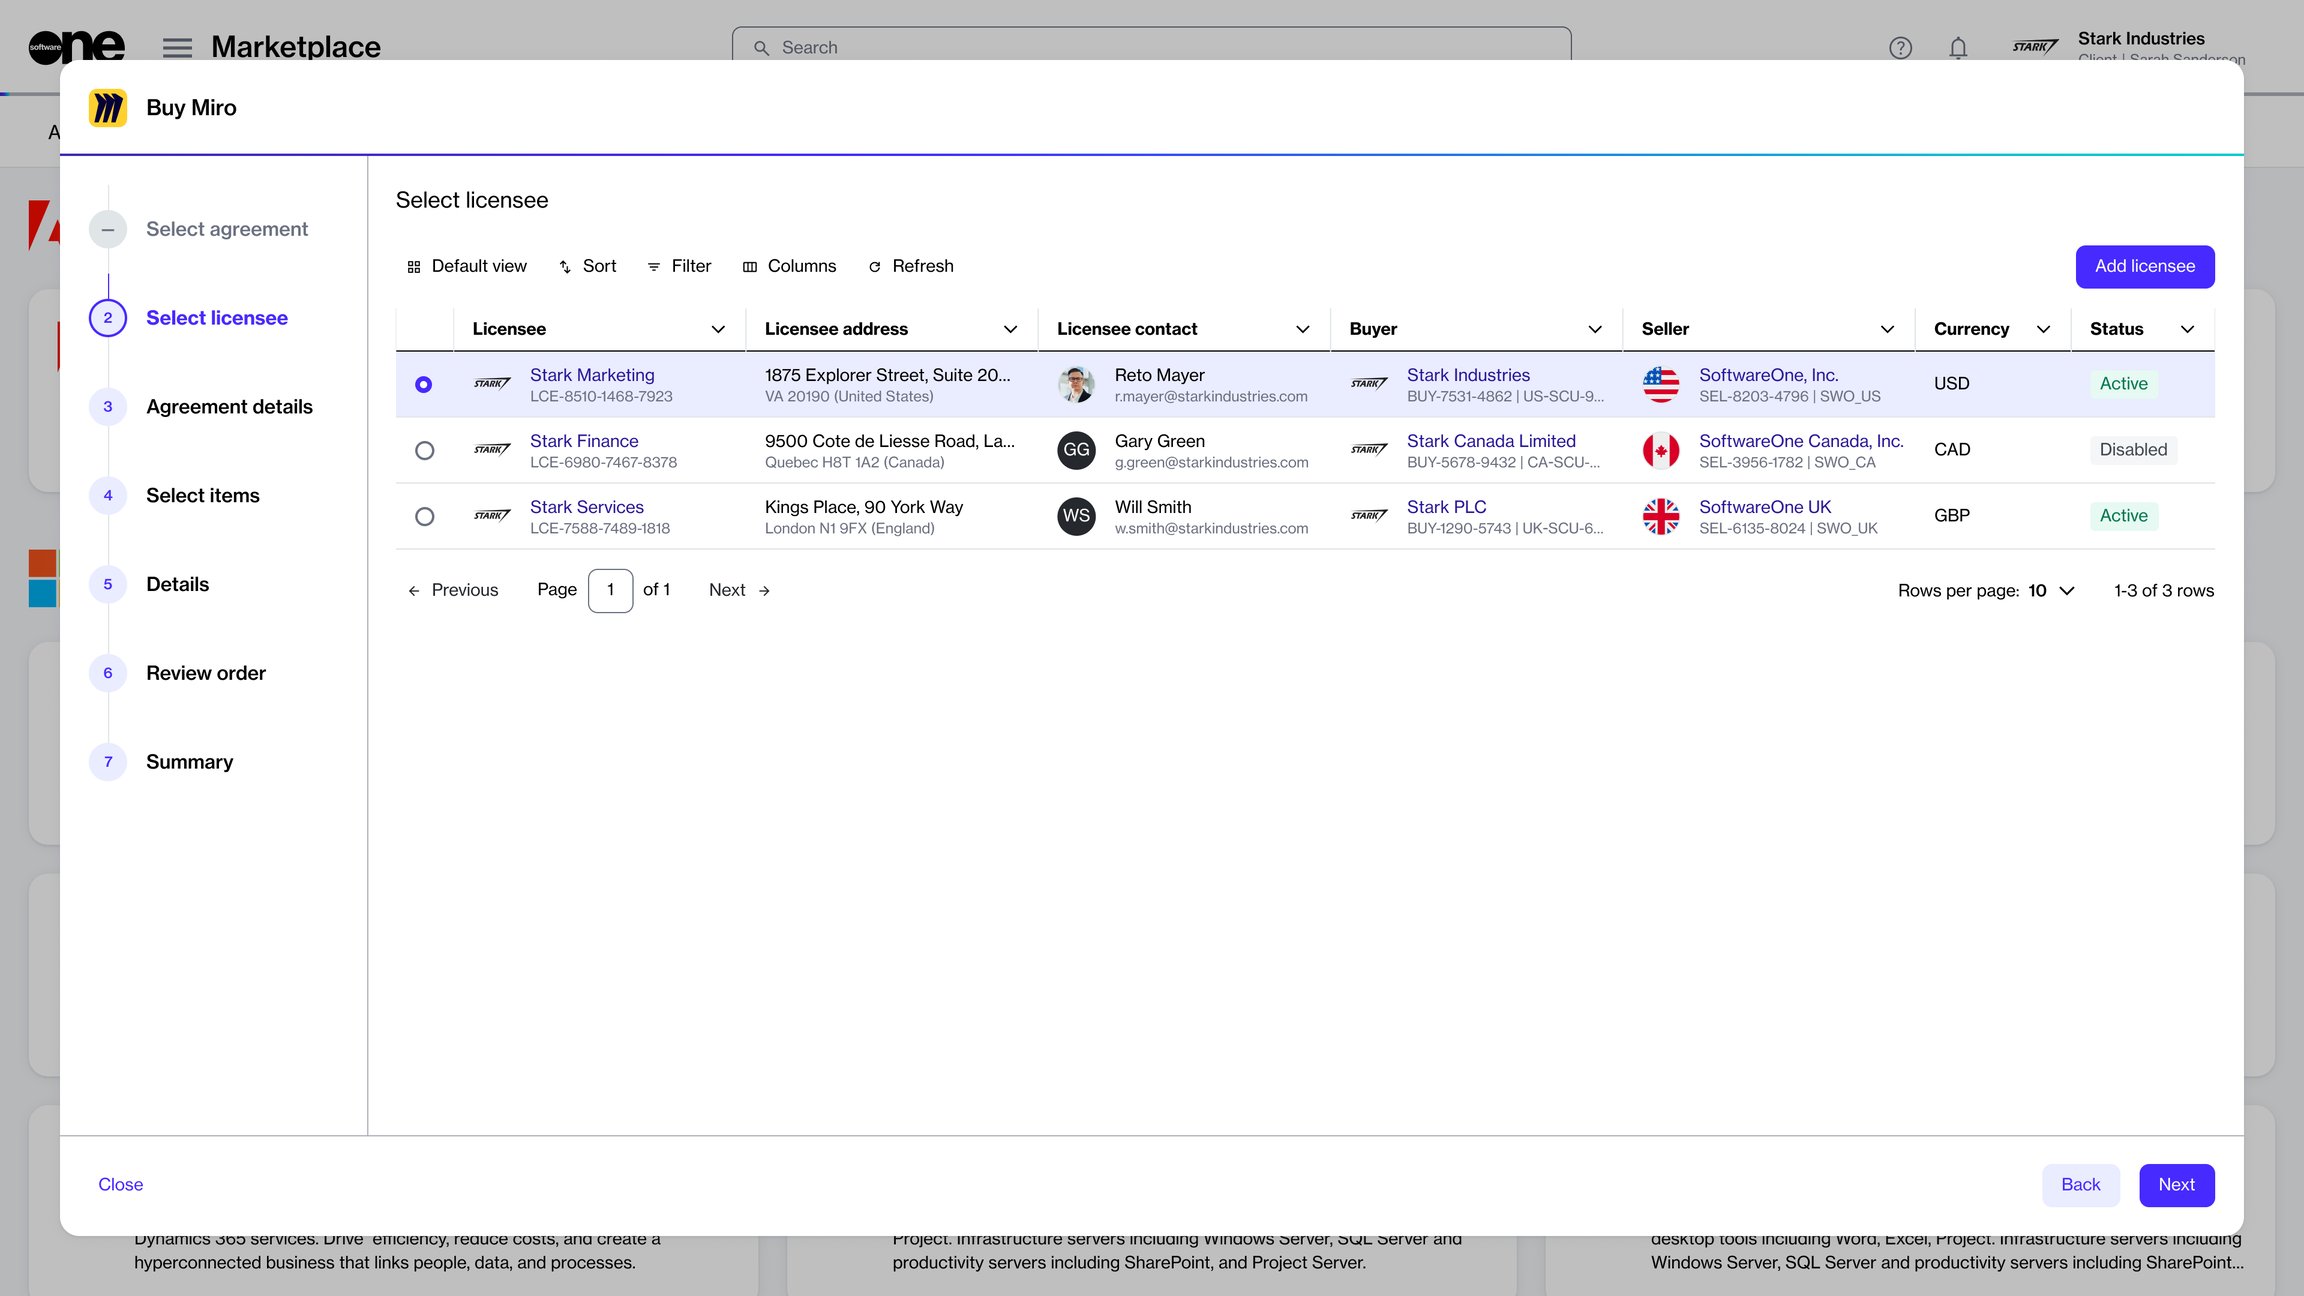
The wizard contains a vertical progress bar with step numbers and a title, data grid, and navigation buttons:
The progress bar shows how far you have progressed and how many steps remain before the order can be placed. The steps are defined by vendors and vary based on the product. You cannot use step numbers to navigate between different pages of the wizard.
The is where the main content is displayed. This is where you can select your purchasing options, choose items you want to order, containing information about item prices, enter your details, and more.
The Close, Back, and Next buttons allow you to navigate between pages or close the wizard. Some buttons might be unavailable depending on your current step in the wizard.
The purchase guide contains a series of guided steps. Some steps are common and apply to each vendor and product, and some are dynamic, vendor-specific. This section describes the common steps. For product-specific steps, see the respective tutorials.
In the Select agreement step, you can choose whether to use an existing agreement or create a new one. Agreements are essential for placing orders. Your selection in this step determines the subsequent steps in the wizard.
You can set up a new agreement if you are new to SoftwareOne or if your procurement needs differ from your existing contract. An existing agreement can be used to add new products, order new items, or adjust the license quantity.
If you select an existing agreement instead of creating a new one, you'll see the Select items section, where you can directly choose the items to order.
The Select licensee step allows you to choose a licensee for your new agreement. This step is displayed only when setting up a new agreement.
You can either choose an existing licensee or create a new one. If you select Create licensee, the wizard closes, and the Licensees page opens.
In the Items step, you can choose the items you want to order.
For each item, you can view the commitment period, quantity, and pricing details. If you see an info icon (), it means that additional pricing information is available. Hover over the icon to view a containing further contextual information.
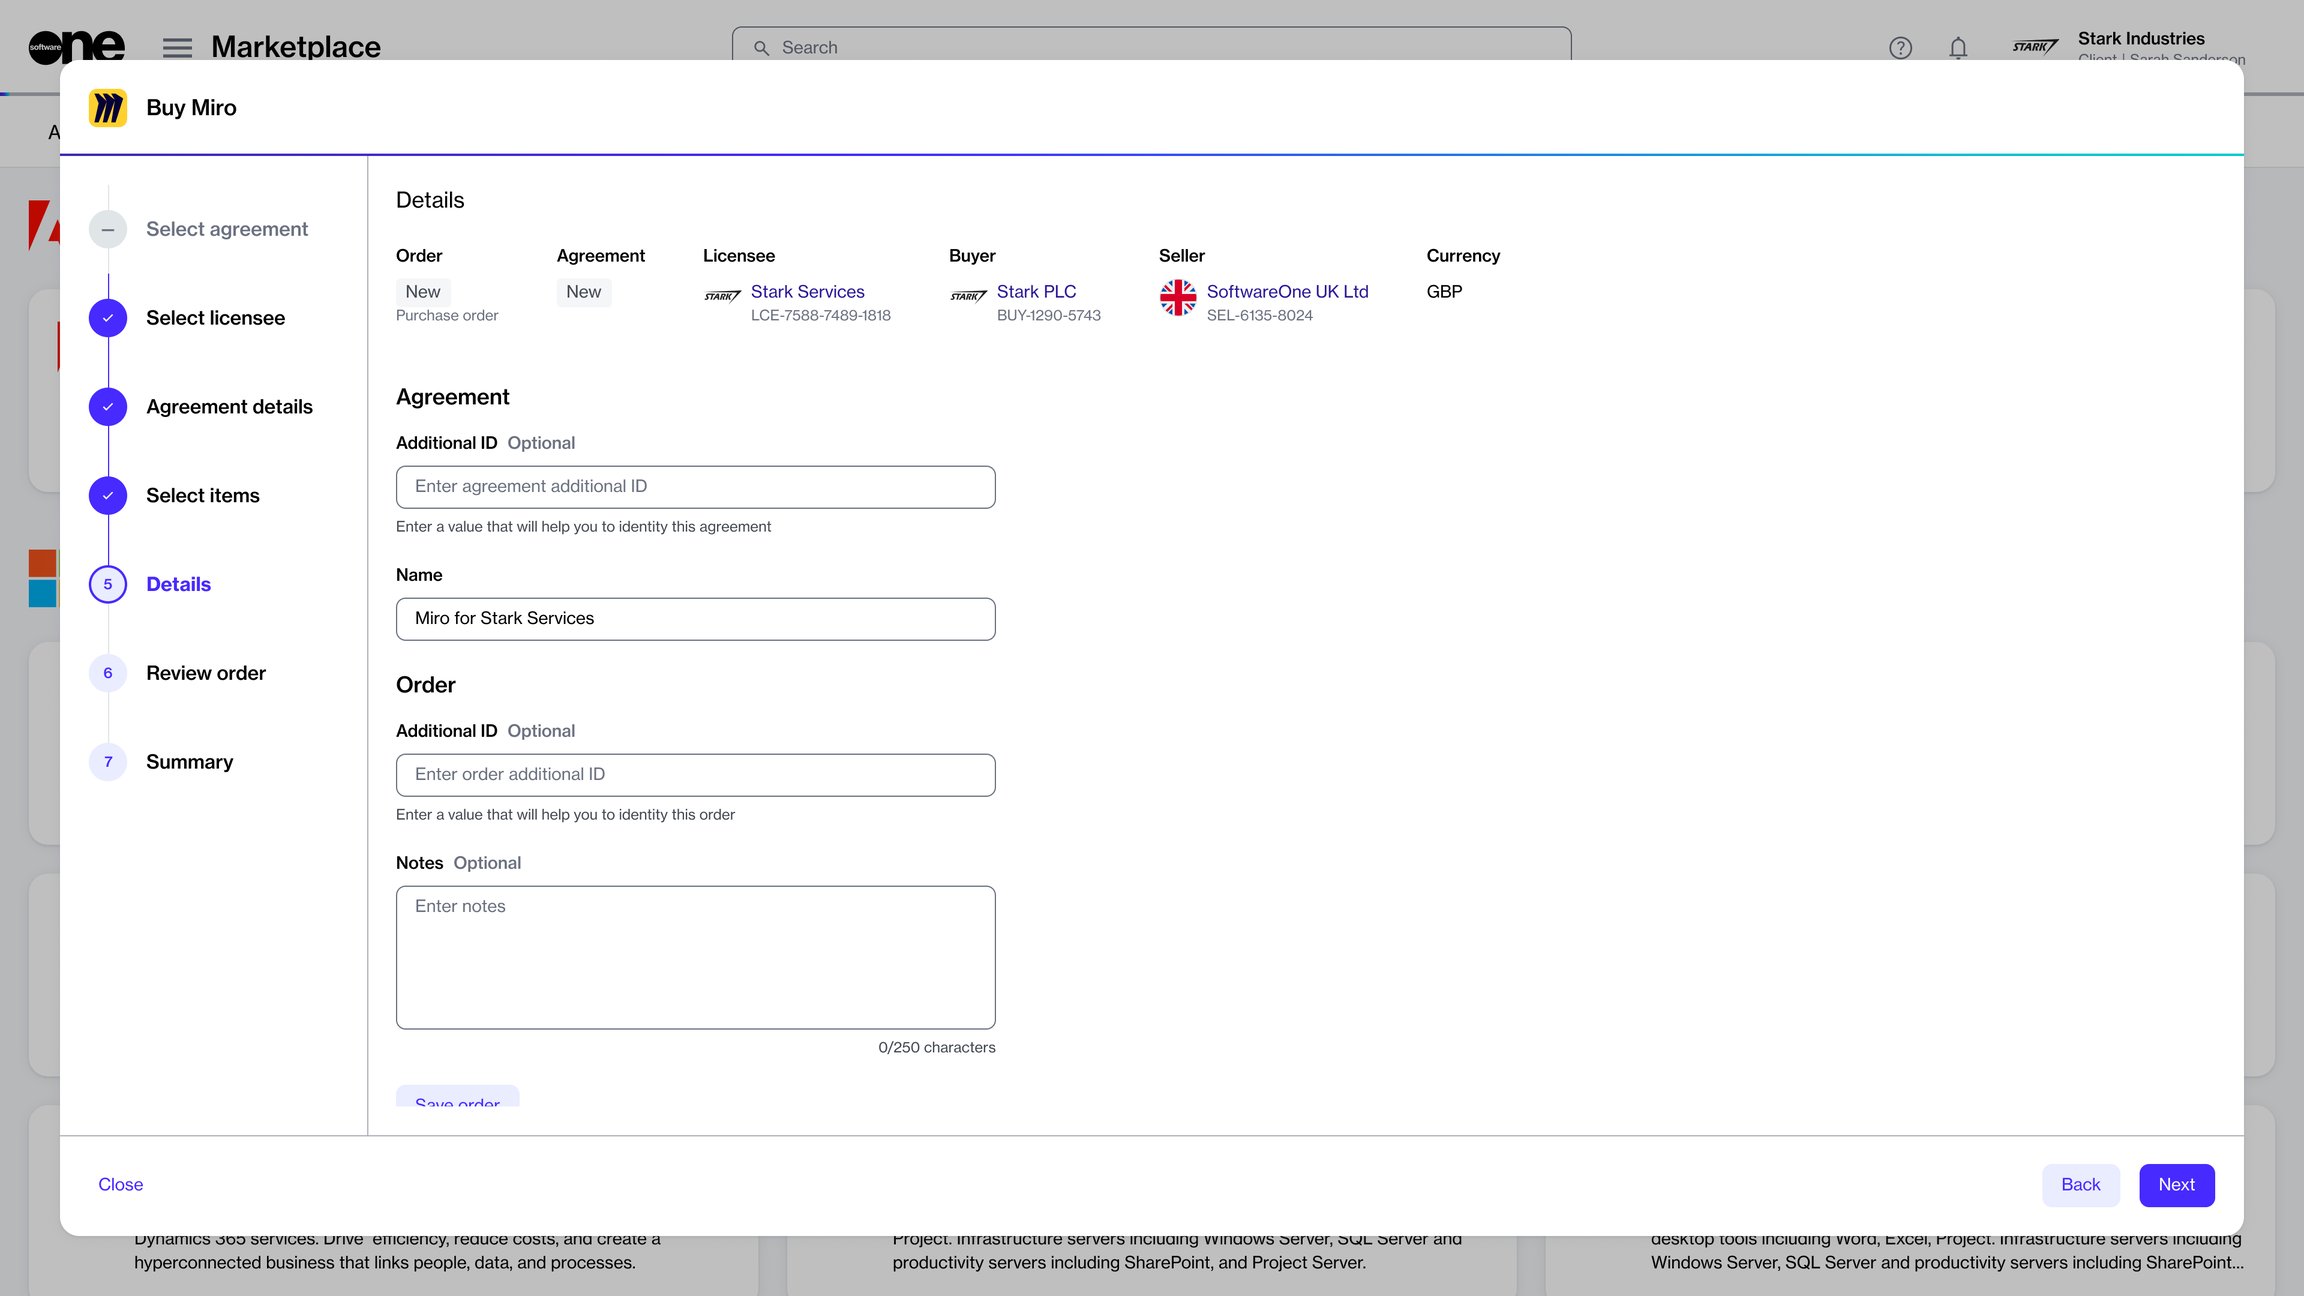
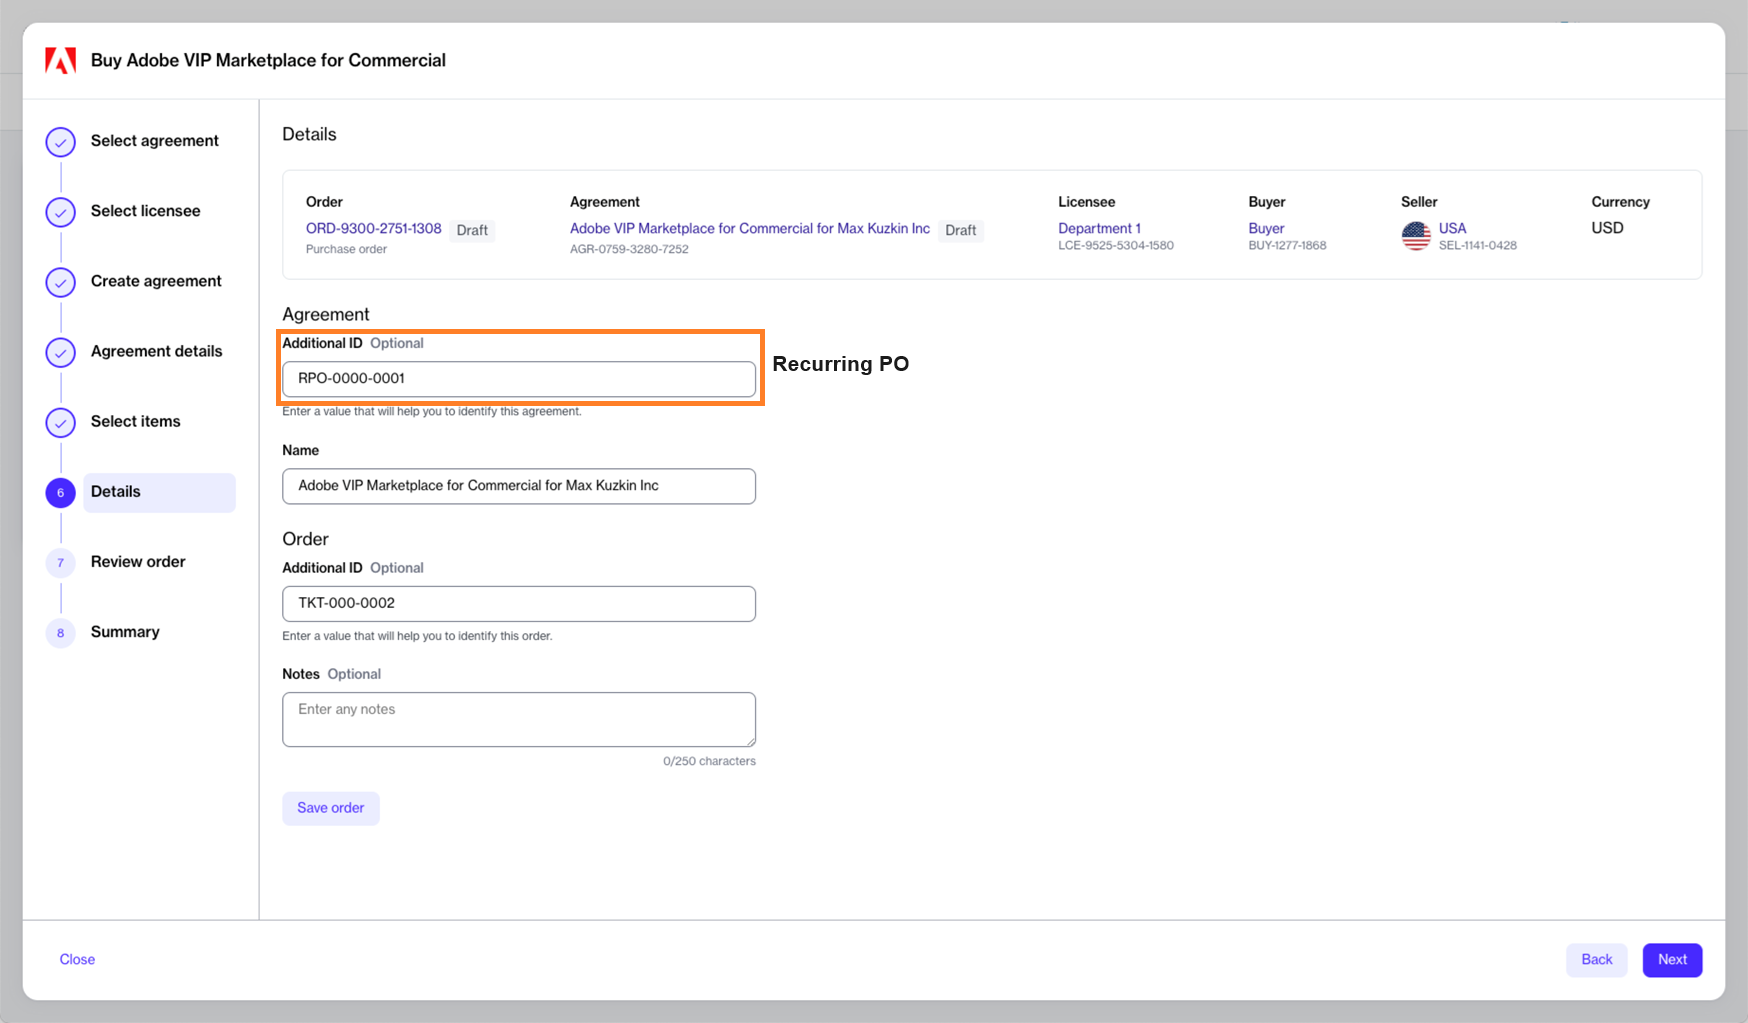
In the Details step, you can enter additional IDs related to your purchase. For example, you can enter a purchase order number in the Agreement Additional ID field for your invoice. Additionally, you can and finalize it later.
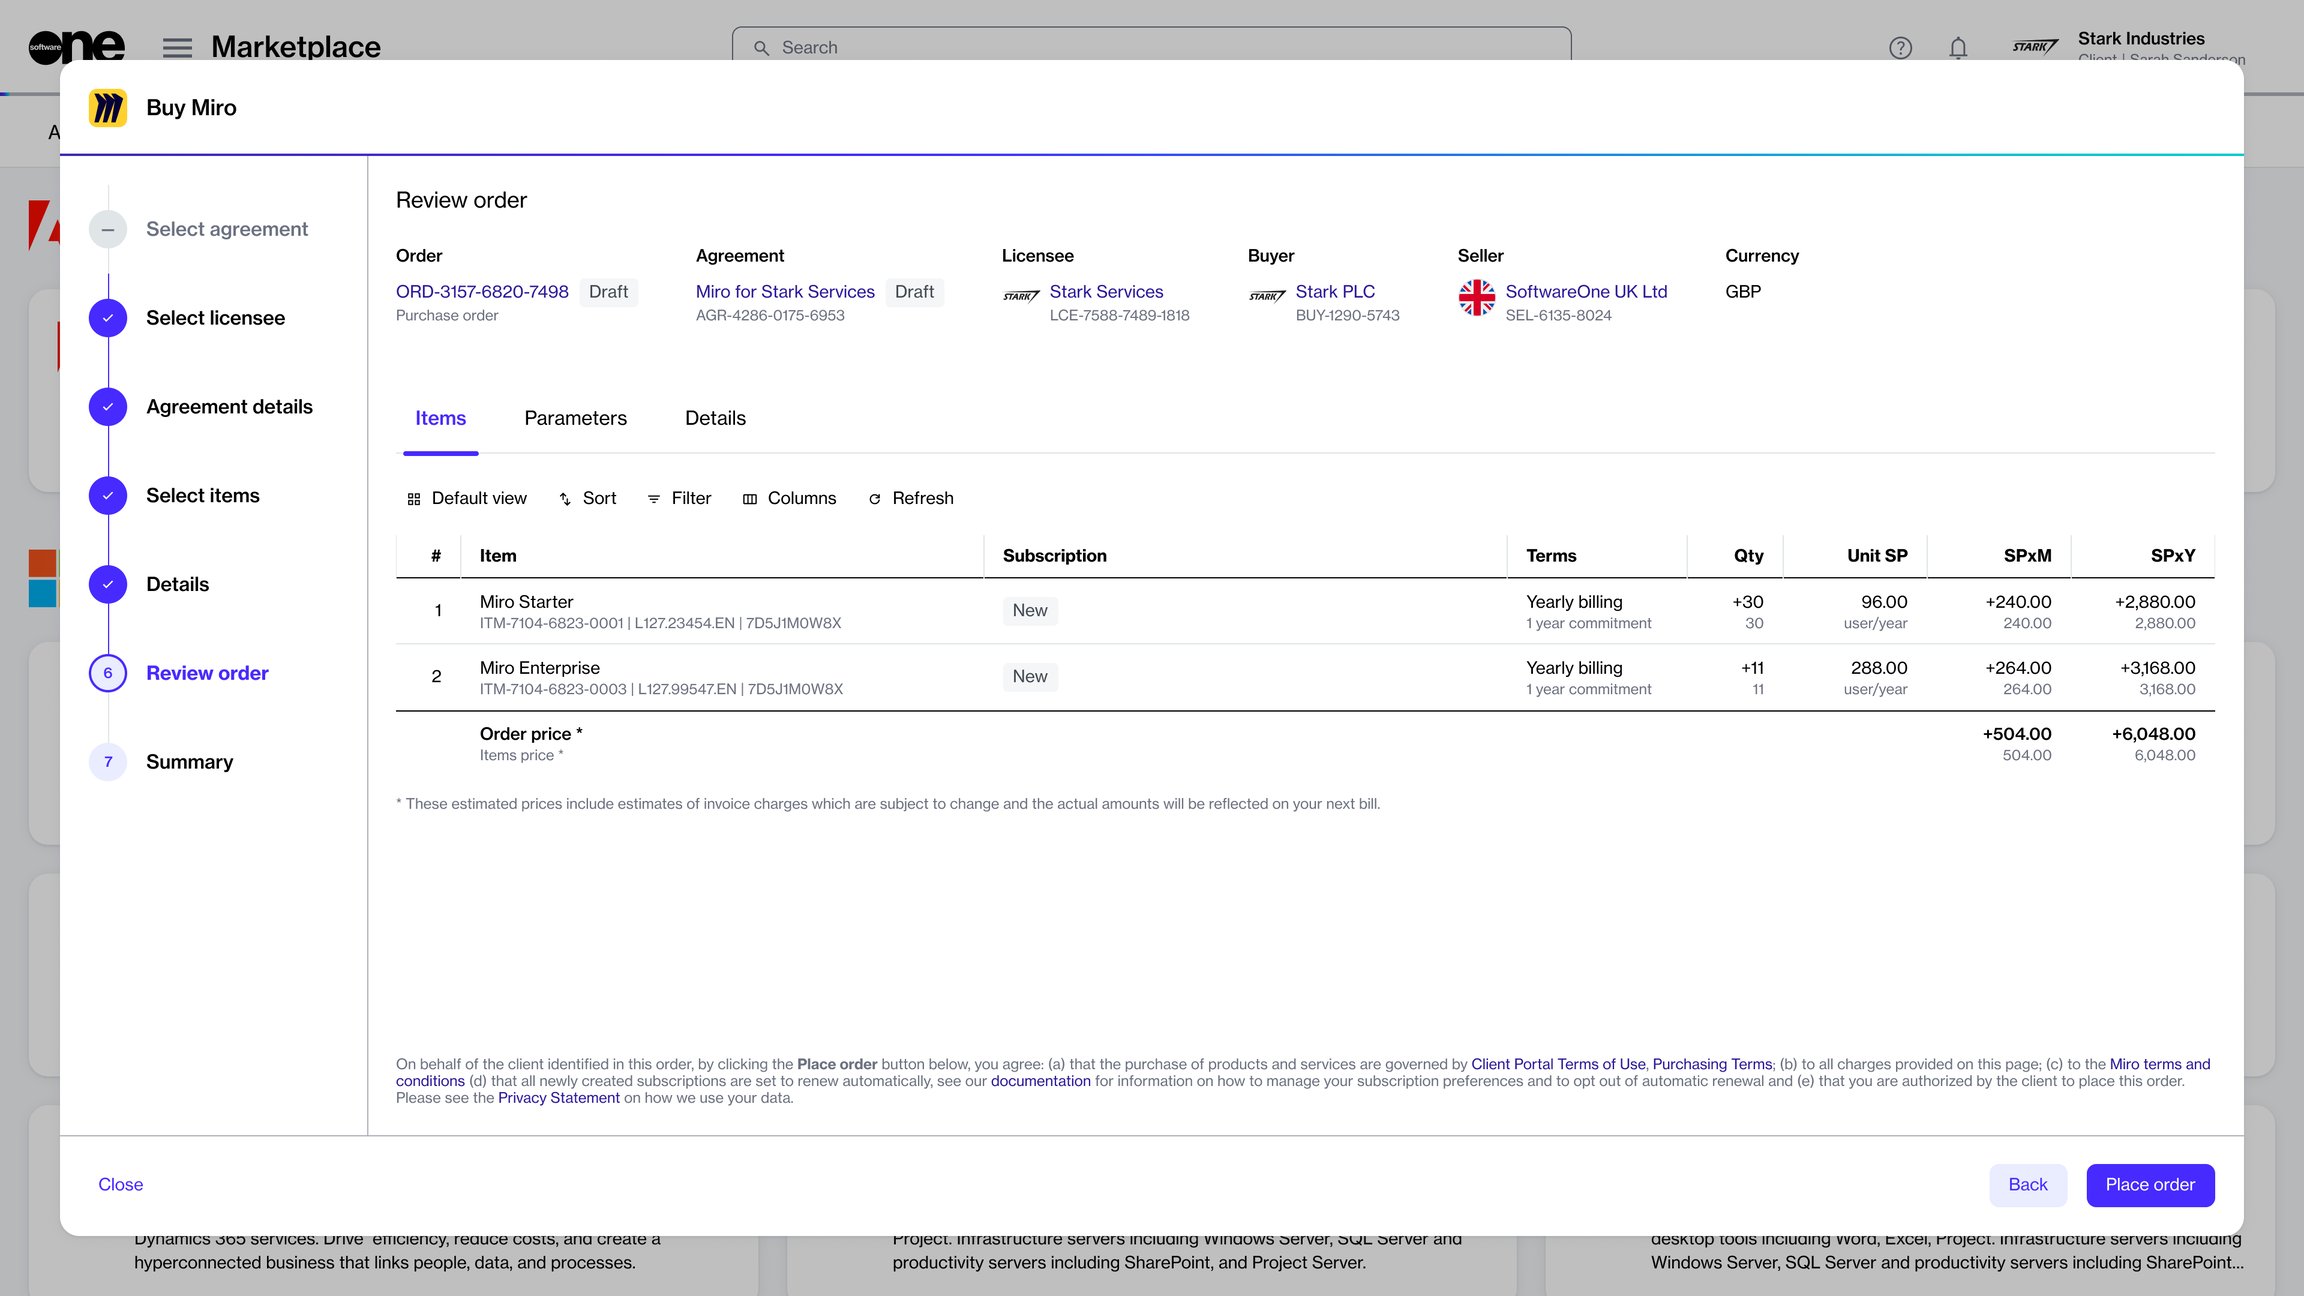
In the Review order step, you can read the terms and conditions of your order using the links in the footer, and submit your order.
After the order confirmation is displayed, you can either close the wizard or select View details to open the order details page.


The platform imports information from your Microsoft 365 tenant daily. The data is used in the following features:
Tag & Resource Manager - Used to allocate resource costs to business units (custom groups), Tag & Resource Manager (TRM) imports information about Azure AD user accounts including (but not limited to) usernames, display names, departments, managers, addresses, and extensionAttributes. This information is used to help the user allocate license costs to the correct business unit. TRM also imports information about specific Microsoft 365 licenses assigned to users.
Consumption - Used to report on resource usage and cost, Consumption imports information about overall Microsoft 365 license quantities and assignments. This includes total purchased licenses, total assigned licenses, and total unassigned licenses for each subscription.
The Marketplace platform does not access a customer's tenant on an ad-hoc basis for any reason related to Microsoft 365.
The platform uses an account called mfa.setup to access the Partner Center API for CSP customers. In some instances, the platform also 'double hops' into a customer's Microsoft tenant to get information about users and license assignments.
This account is used to access the Microsoft Graph API, specifically, the users and SubscribedSkus endpoints that provide the Client Portal with information about Azure AD users. It also provides information such as, how many licenses from each Microsoft 365 subscription are assigned and how many are free. To learn more about these APIs, see the Microsoft documentation on and .
To authenticate and consume these APIs, the platform uses app+user authentication. It means that when the platform authenticates, it uses a combination of both an Enterprise Application and a User Account (which is a service account, the aforementioned mfa.setup user).
For CSP, both these principles exist in SoftwareOne's Azure AD rather than in the customer's Microsoft tenant. For more information, see the Microsoft documentation on .
Note that even under the new secure application model, app+user authentication is still used.
Unless configured, the Conditional Access policies (CAP) don't block authentication attempts by the enterprise applications. On the other hand, user account access can be actively blocked by CAP unless an exception is configured.
Historically, it has been challenging to configure exceptions for the user accounts in partner (SoftwareOne's) Microsoft tenants because they don't exist in the customer's Microsoft tenant.
Recently, Microsoft has added functionality to CAP to allow narrow (least privilege) exceptions to be configured for partner Microsoft tenants. For information, see and .
The following fields are downloaded for each user in the customer's Azure AD and Microsoft 365 subscriptions.
DisplayName
SkuId
CompanyName
SkuPartNumber
Department
SkuPrepaidUnits (Total purchased licenses)
SkuConsumedUnits (Total assigned licenses)
GivenName
SkuServicePlans (Products associated with the subscription, for example, Office 365 includes Teams and Yammer, etc.)
Surname
JobTitle
State
PostalCode
StreetAddress
City
PreferredLanguage
UsageLocation
AssignedLicenses
UserPrincipalName
OfficeLocation
OnPremisesExtensionAttributes
Country
State
UserType
SoftwareOne Marketplace has an SSO Authentication framework that integrates with existing identity provider tools, such as Azure AD and ADFS, and SAML-based tools, such as Okta and Ping. This topic describes how you can set up SSO with these tools.
Setting up SSO with SAML involves the following steps:
Provide IdP metadata to SoftwareOne - Provide SoftwareOne with basic metadata about your IdP. If your SSO tool requires the Assertion Consumer Service URL and Entity ID, contact SoftwareOne.
SoftwareOne configures the client portal for your connection - SoftwareOne proceeds with a basic setup on the Client Portal IdP and provides you with {connection_name} to use for further configuration.
You complete your IdP configuration - Finalize the setup on your side.
Federation becomes active - All logins to the Client Portal for any of the specified IdP domains are federated out to your SAML-based IdP.
To set up SSO with SAML, SoftwareOne requires the following information:
IdP Domains (list of email domains, for example, @user.org for which authentication should be federated out to your IdP)
Sign In URL (HTTP-POST or HTTP-Redirect)
Sign out URL
The {connection_name} is a verbatim string that SoftwareOne provides after receiving your initial configuration settings.
The Client Portal requires the following attributes via specified mappings:
The attributes must satisfy at least one mapping for all properties above. If your IdP provides values for the required attributes in different claims/namespaces, provide a list of claims to be used for all attributes above.
Make sure to provide the attribute values as they are without any modifications. URLs are sometimes changed by security software, for example, Proofpoint’s Targeted Attack Protection adds urldefense.com at the beginning of links.
To set up SSO with the Client Portal via Azure AD, you must complete the following steps. Once these steps are completed, SoftwareOne will enable SSO with your Azure AD.
Setting up SSO with Azure AD involves the following steps:
Register the Client Portal with Azure AD
Sign in to the . If you have access to more than one tenant, select your account from the upper right. Set your portal session to the Azure AD tenant that you want.
Search for and select Azure Active Directory.
The Client Portal queries the following basic profile attributes from Azure AD:
upn
azure_id
given_name
Setting up SSO with ADFS involves the following steps:
Configure your ADFS server according to technical requirements.
Provide ADFS metadata and IdP domains to SoftwareOne.
SoftwareOne completes the ADFS setup.
To set up SSO with ADFS, SoftwareOne requires the following information:
ADFS Metadata Source (either the URL or the Federation Metadata file. The URL usually ends in /FederationMetadata/2007-06/FederationMetadata.xml )
IdP Domains (list of all email domains that must be authenticated through the federated ADFS server, for example, @customer.com. Usually 1 domain, but can also be multiple.)
By default, the Client Portal expects the following attributes from ADFS via the specified mappings:
Setting up SSO with PingFederate involves the following steps:
Provide sign-in certificates/IdP domains to SoftwareOne.
SoftwareOne completes the SSO setup.
To set up SSO with PingFederate, SoftwareOne requires the following information:
PingFederate Server URL.
X509 signing certificate in the .pem or .cer format.
IdP Domains, including a list of all email domains that should be authenticated through the federated ADFS server (for example, @customer.com). Usually just one, but can also be multiple.
By default, the Client Portal requires the following attributes via the specified mappings:
The provided attributes must satisfy at least one mapping for all properties above. If your IdP provides values for the required attributes in different claims/namespaces, you can provide a list of claims to be used for all attributes above.
If an email domain is federated out to the user's identity provider, the Client Portal receives sign-in attempts from users who are not set up as Client Portal users.
In such cases, if authenticated users from a federated connection are not Client Portal users, their login to Client Portal will fail with an error message stating that their account is not set up and they don't have access.
.pem or .cer format)RSA-SHA256 (default) or RSA-SHA1
Sign Request Algorithm Digest
SHA256 (default) or SHA1
Signing Certificate Strength
2048 Bit RSA
IdP-Initiated SSO
Supported, but strongly discouraged
https://login.pyracloud.com/samlp/metadata?connection={connection_name}
Single Logout URL
https://login.pyracloud.com/logout
Single Login URL
We strongly discourage using IdP-Initiated SSO flows because they are vulnerable to . If possible, let the Client Portal initiate the sign-in (and federate out) when required.
http://schemas.xmlsoap.org/ws/2005/05/identity/claims/emailaddress
given_name
http://schemas.xmlsoap.org/ws/2005/05/identity/claims/givenname
Fallback URL: http://schemas.xmlsoap.org/ws/2005/05/identity/claims/name
family_name
http://schemas.xmlsoap.org/ws/2005/05/identity/claims/surname
Select New Registration.
In Register an application, enter a meaningful application name to display to the users, for example, Client Portal.
In Supported account types, select Accounts in any organizational directory (Any Microsoft Entra directory - Multitenant).
In Redirect URI, select the Redirect URI type as Web, and enter your callback URL: https://login.pyracloud.com/login/callback.
Select Register.
Create a client secret
SoftwareOne uses the client secret to interact with your Azure subscription on behalf of the created application.
To create a secret:
From the Overview page of the app, select Certificates & secrets > Client secrets > New client secret.
Add a description for your client secret.
Set the expiration date for the secret.
Select Add.
Make a note of the client's secret value. The value won't be accessible again after you leave this page.
Add API permissions
To add permissions that allow read access to users and the user directory:
From the App Overview page, select API permissions.
Under Configured permissions, select Add a permission.
Configure permissions for the Microsoft Graph API.
After selecting the API, the Request API Permissions page is displayed.
Enable the following permissions:
Users > User.Read
Directory > Directory.Read.All
Select Add permissions to complete the process.
Send details to the Marketplace Platform Support
Gather the following details and send them to marketplace-support@softwareone.com:
Any sensitive information, such as SSO secrets or credentials, must be shared in encrypted form. Do not send sensitive data in plain text.
If you need help encrypting or securely sharing this information, before sending the data. Our team can guide you through secure sharing options.
Application Client ID
After we receive the information, we will finalize the setup. Once the setup is completed, the Client Portal automatically starts redirecting all users from the specified IdP domains to your Azure AD for federated authentication.
family_name
nickname
tenantid
oid
email
name
http://schemas.xmlsoap.org/ws/2005/05/identity/claims/name
User-Principal-Name
Name ID
http://schemas.xmlsoap.org/ws/2005/05/identity/claims/nameidentifier
Given-Name
Given Name
http://schemas.xmlsoap.org/ws/2005/05/identity/claims/givenname
Surname
Surname
http://schemas.xmlsoap.org/ws/2005/05/identity/claims/surname
http://schemas.xmlsoap.org/ws/2005/05/identity/claims/emailaddress
given_name
http://schemas.xmlsoap.org/ws/2005/05/identity/claims/givenname
Fallback URL:
http://schemas.xmlsoap.org/ws/2005/05/identity/claims/name
family_name
http://schemas.xmlsoap.org/ws/2005/05/identity/claims/surname
Supported Protocol Bindings
HTTP-POST & HTTP-Redirect
SAML Authentication Requests signed
Yes (by default)
Entity ID
urn:auth0:pyc:{connection_name}.
Example: If your connection_name is demo_company, the Entity ID on Production will be
urn:auth0:pyc:demo_company
Assertion Consumer Service URL
https://{idp_base_url}/login/callback?connection={connection_name}
Example: If your connection_name is demo_company, the Assertion Consumer Service URL on Production will be: https://login.pyracloud.com/login/callback?connection=demo_company
user_id
http://schemas.xmlsoap.org/ws/2005/05/identity/claims/nameidentifier
Fallback URL 1: http://schemas.xmlsoap.org/ws/2005/05/identity/claims/upn
Fallback URL 2: http://schemas.xmlsoap.org/ws/2005/05/identity/claims/name
name
http://schemas.xmlsoap.org/ws/2005/05/identity/claims/name
Identity API
Azure Active Directory (v1) (default) & Microsoft Identity Platform (v2).
Protocol used for federated Sign-In
OpenID Connect (default) or WS Federation.
Application type
Multitenant / Web
Redirect URI
https://{idp_base_url}/login/callback*
The redirect URI on Production will be:
https://login.pyracloud.com/login/callback
Federation Metadata Discovery (Automated Certificate Rollover)
Yes – if ADFS Metadata Source is provided as URL.
Realm Identifier
urn:auth0:{environment_name}
For example, urn:auth0:pyc in Production.
Endpoint
https://{idp_base_url}/login/callback*
The endpoint URL in Production will be: https://login.pyracloud.com/login/callback
E-Mail-Addresses
E-Mail Address
http://schemas.xmlsoap.org/ws/2005/05/identity/claims/emailaddress
Display-Name
user_id
http://schemas.xmlsoap.org/ws/2005/05/identity/claims/nameidentifier
Fallback URL 1: http://schemas.xmlsoap.org/ws/2005/05/identity/claims/upn
Fallback URL 2: http://schemas.xmlsoap.org/ws/2005/05/identity/claims/name
name
http://schemas.xmlsoap.org/ws/2005/05/identity/claims/name
Sign Request Algorithm
Metadata URL
email
Name
email
You can find the Application (client) ID on the overview page of the application created in .
Application Client Secret
Your client secret as created in .
Microsoft Azure AD Domain
Your Azure AD domain name. You can find this on your Azure AD directory's overview page in the Microsoft Azure portal.
IdP Domains
A list of all email domains that must be authenticated through the federated Azure AD, for example, @customer.com. Usually 1 domain, but can also be multiple.
365 Analytics uses the Microsoft Graph service to access your customer tenant.
This is managed through the use of an Enterprise Application provisioned in your Microsoft Entra directory and controlled through the use of security roles associated with the Enterprise Application. This enterprise application is called 'SoftwareOne Cloud Insider - Read Only' and is configured as part of the onboarding process.
365 Analytics makes extensive use of data encryption for data in transit and at rest:
Traffic from 365 Analytics users is encrypted using HTTPS in their web browsers.
API traffic between the 365 Analytics application and Microsoft’s services is all encrypted. Graph traffic is natively encrypted since it’s just HTTP requests; other protocols, such as remote PowerShell, are tunneled over HTTPS.
All 365 Analytics data is encrypted at rest.
An access token may be invalid due to the following reasons:
The token is incomplete: If your access token is incomplete, sign in to the Azure Portal and copy your access token again.
The token is complete but has expired: If your access token has expired, you must generate a new token.
The token is complete but has been revoked: If your access token has been revoked, you must generate a new token.
When you perform consent, you are redirected to Microsoft to accept permissions required by the Client Portal. As part of this process, the Client Portal is able to “impersonate” the consenting user for a short period (1 hour).
The Client Portal uses this impersonation to perform actions on behalf of the consenting user. This includes:
Assigning the Reader role to the Client Portal for subscriptions owned by the consenting user during onboarding.
Assigning the Reader role to the Client Portal for subscriptions owned by the consenting user during the addition of more subscriptions to the Client Portal. For more information, see .
Modify the default Reader role to the Tag Contributor role (and vice versa) during the Change Access process. For more information, see .
When the consent process is performed, a “service principal” is created in your tenant. This is conceptually similar to adding a user dedicated to the Client Portal for accessing your tenant and subscriptions.
When adding Azure subscriptions, the service principal is granted “Reader” access to those subscriptions. This is a built-in role in your Microsoft tenant that allows read-only access to your resources. The Client Portal uses this access to retrieve a list of your resources (virtual machines, websites) and the tags assigned to them.
If you change the level of access to a setting that allows the write-back of tags, the Client Portal requires the “Tag Contributor” role. This level of access allows full access to your subscription, with the notable exception of managing security settings in the subscription. The Client Portal uses this access to retrieve a list of your resources (virtual machines and websites) and the tags assigned to them. It also requires this level of access to synchronize the tags you assign in the Client Portal back to the resources of your Azure subscription.
For more information, see .
When adding Office 365 subscriptions, the service principal is granted permission to the Microsoft Graph API in your Microsoft tenant. Those permissions include:
Read all usage reports - Allows an app to read all service usage reports without a signed-in user. Services that provide usage reports include Office 365 and Azure Active Directory.
Read all groups - Allows the app to read memberships for all groups without a signed-in user. Note that not all group API supports access using app-only permissions.
Read all users’ full profiles - Allows the app to read the full set of profile properties, group membership, reports, and managers of other users in your organization, without a signed-in user.
For more information, see the Microsoft Graph API permissions reference.
In some cases, the consumption data for your Azure Reserved Instances might be unavailable in the Client Portal.
If you are not able to view the data, you must update your permissions and assign the Reservations reader role to each tenant through the Azure Portal.
To learn about the Reservation reader role and how to assign it, see Permissions to view and manage Azure reservations. You can also assign the role by following the steps in this topic.
You can assign the Reservations reader role only if you have the User Access Administrator or Owner role in Azure. If you need to elevate your access, see Elevate access to manage all Azure subscriptions and management groups.
To assign the role:
Sign in to the Azure Portal and search for Reservations.
Select Role Assignment.
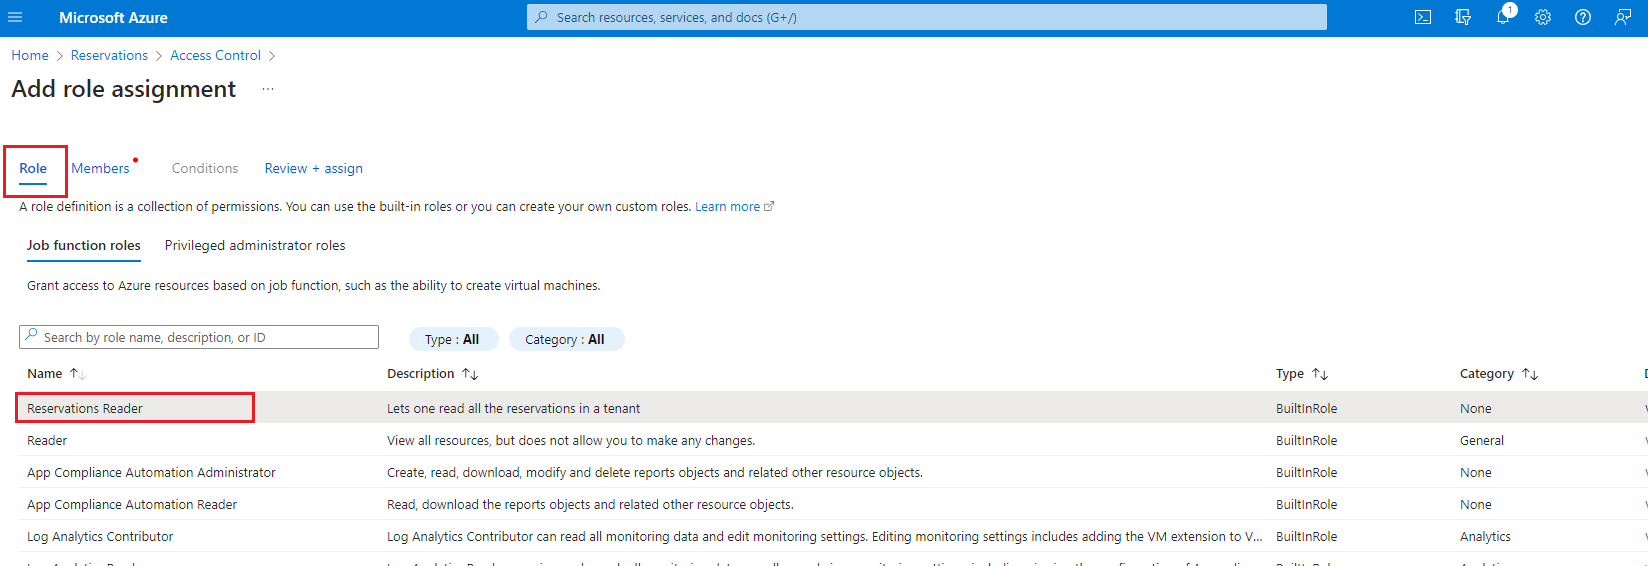
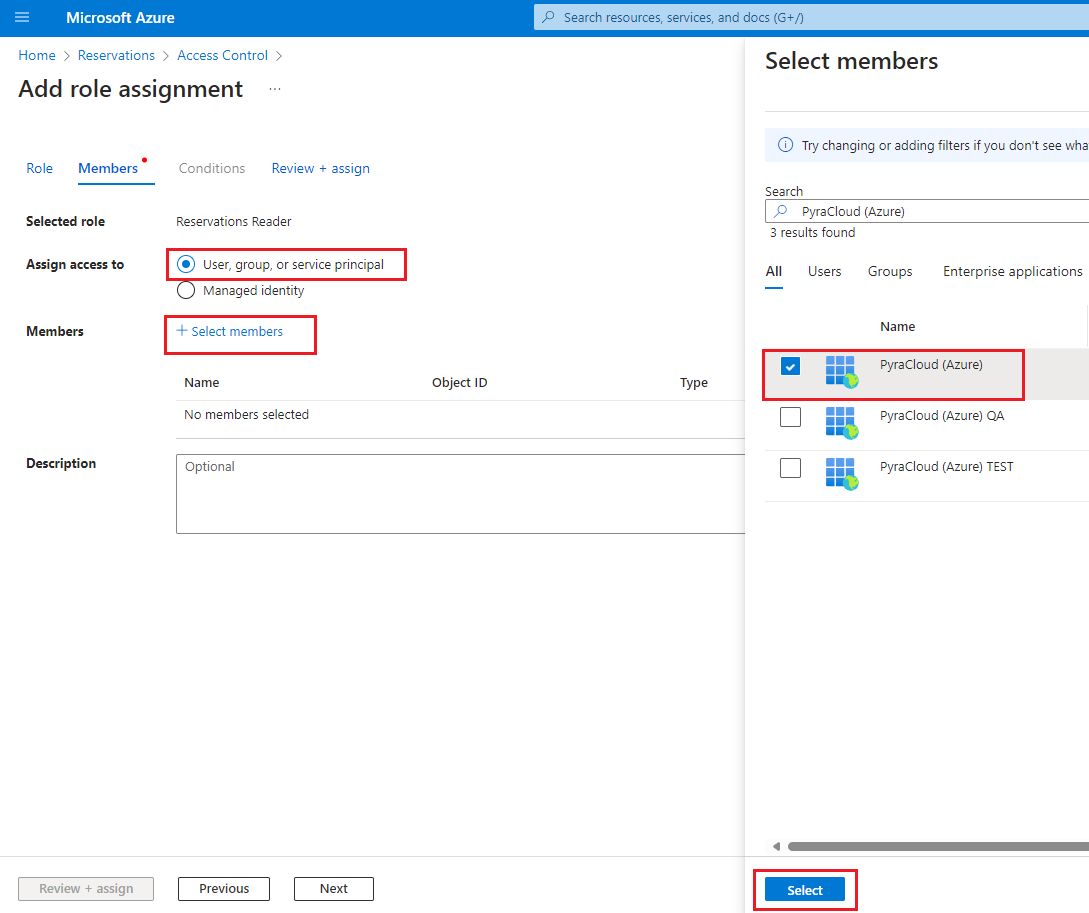
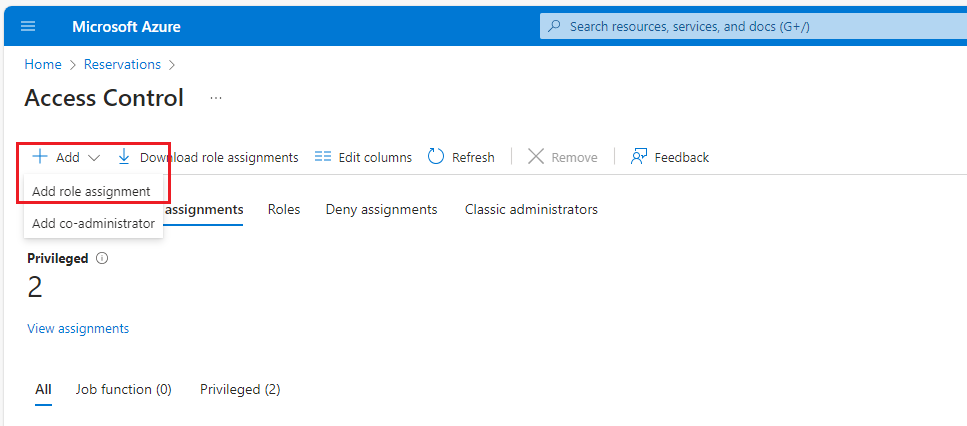
On the Access Control page, select Add > Add role assignment. The Add role assignment page opens.
On the Role tab, select Reservations Reader as the role. Then, select Next.
On the Members tab, do the following:
Select User, group, or service principal if it's not selected by default, and then select Select members.
In the Select members panel, type PyraCloud and then select PyraCloud (Azure) from the search results.
Select Review + assign.
On the Review + assign tab, review the details and click Review + assign to confirm the role assignment.
After you've completed these steps, the Reservations Reader role is assigned and displayed on the Role assignments tab.
Once the role is assigned, it might take up to 24 hours for your consumption data to become available in the Client Portal. If you are not able to view the data after 24 hours,
Find answers to some of the commonly asked questions.
The platform uses several Microsoft APIs to pull data that allows you to create Spend reports, , and . In some cases, it can take up to 24 hours for the resource cost to be accessed through the interface.
As the platform synchronizes your Azure billing data only once a day, sometimes, it might take 48 hours for the data to refresh.
Additionally, the reconciliation files are available no later than the 8th day of every month. Microsoft invoices partners based on this file. Therefore, we recommend that you send chargebacks after the 8th day of the month.
For more information, see and .
The landscape of B2B subscriptions and procurement processes is undergoing significant changes as businesses transition towards subscription-based models. As a result, there is a need to navigate the complexities of managing orders and invoices in the context of subscription-based procurement.
This topic aims to answer your questions about B2B subscriptions while providing an overview of how subscription-based models differ from traditional procurement processes. It also describes how the Marketplace Platform makes it easier for you to manage and streamline subscription-based procurement.
In a subscription-based model, you pay a certain fee to access software or a service. You commit to a term and then pay a certain amount on a monthly or yearly basis.
This model differs significantly from the traditional purchasing model, where a purchase order is placed, the vendor processes it, and then issues an invoice after the license is allocated.
In traditional transactional procurement, the procurement process is linear, which means it involves placing a purchase order, processing invoices, and reconciling them. In this model, each purchase order is directly linked to an invoice.
However, in a subscription-based model, the relationship between orders and invoices is complex. Unlike traditional procurement, where orders and invoices have a one-to-one relationship, in the subscription-based model, orders and invoices can have a many-to-many relationship.
For example, you might place multiple orders for additional licenses in a month but receive only one invoice at the end of the month. Alternatively, you might not place any order yet receive an invoice for subscription renewal. In these scenarios, orders don't directly match the invoices.
This causes an issue during reconciliation due to a mismatch between the number of orders and invoices.
Many enterprise procurement systems support subscription-based models through various mechanisms, such as recurring purchase orders, standing orders, blanket purchase orders, open purchase orders, contract management, and more.
Unlike traditional purchase orders, where each purchase order is linked to a single invoice, mechanisms (such as recurring purchase orders) represent long-term agreements, allowing multiple invoices to be associated with a single purchase order. This approach is useful in environments where regular, repeated purchases are common, such as in subscription-based billing systems.
To explain how our platform supports this process, it's important to understand the key elements of our platform.
The Marketplace Platform facilitates transactions between clients and vendors in various countries where SoftwareOne operates. We deal with objects such as orders, subscriptions, and agreements, which represent a relationship between the SoftwareOne entity and the client in specific regions.
Business transactions are represented by orders, which can be of different types, such as purchase orders, change orders, and termination orders.
Subscriptions are linked to agreements and represent the provision of service over a period of time. It's common for our clients to have multiple subscriptions within the same agreement.
To modify a subscription, an order needs to be placed. It’s not possible to modify a subscription directly without placing an order.
Placing an order establishes a relationship at the recurring purchase order level on the procurement system's side and the agreement on the marketplace platform's side. This simplifies the reconciliation process when invoices are received because each invoice has links to the agreement, recurring purchase order, and subscriptions.
You can provide your recurring purchase order number in the Additional ID field when placing your order. This number will be used for reference in all consolidated invoices in the scope of each agreement on the platform.
To provide a purchase order after your order has been placed, open the agreement and navigate to the Details tab. Select Edit and enter the value under the Additional IDs section.
After you have provided the number, it will be displayed on the invoice. To learn more about your billing documents, see .
If a recurring purchase order number needs updating or changing during the subscription term, you can do this by modifying the Additional Agreement ID in the agreement. This updated number will then be reflected in your next invoice.

You can access the Marketplace Platform on most desktop and mobile devices.
You can access the Marketplace Platform from a browser on a Windows, macOS, or Linux computer. We support the following browsers:
Google Chrome (latest version)
Microsoft Edge (Chromium) (latest version)
(latest version)
(latest version)
If you don't use a supported browser, you might not be able to access the platform or use all of its features.
If you want to access the platform on a mobile device, ensure that your mobile browser meets the following minimum requirements:
The screen resolution must be at least 1024 x 768 (when browsers are maximized).
The cookies must be enabled.
JavaScript must be enabled.
We support the following mobile browsers:
(latest version)
Android browsers (the default browser on Android 13+)
This topic describes how you can reset or update your password.
If you forget your password and can't sign in to the platform, you can reset it.
To reset your password:
On the Sign in page, enter your email address, then select Continue.
Select Forgot password?.
In Forgot Your Password?, enter your email address, then select Send Email. You'll receive an email containing a link to reset your password.
Select the link, then follow the instructions to create a new password.
If you want to change your password, you must be signed in to the platform.
To change your password:
Sign in to your account.
Select your profile menu, then choose My profile.
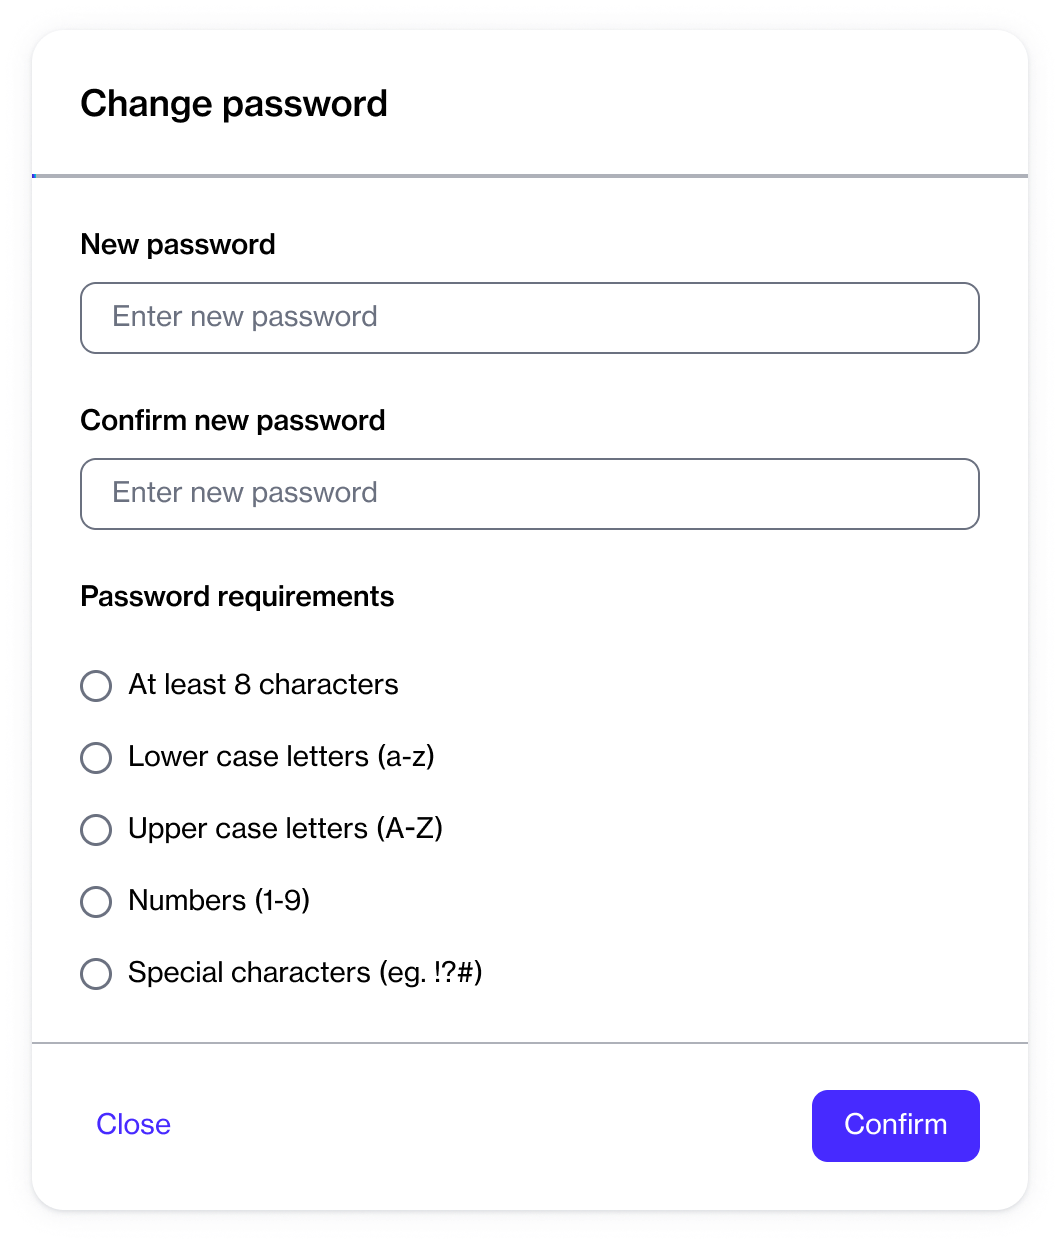
Select the arrow in the upper right, then select Change password.
Under Change password, enter and confirm the new password. As you start typing your new password, our password validation checks whether it meets the requirements.
Select Confirm.
The SoftwareOne Marketplace currently supports three billing models that determine how you are charged for an item. These include usage-based, quantity-based, and one-time billing models.
For all items in the Marketplace, the billing model is shown on the within the platform and in the Items step during a purchase order or a change order workflow.
Usage-based billing means you are charged based on actual consumption of a product or service. This model is also known as pay-as-you-go. In this model, your usage is calculated and billed at the end of your billing period or commitment term.
In the Marketplace Platform, usage‑based billing applies to consumption‑based products sold as subscriptions, such as Microsoft Azure, FinOps for Cloud, AWS, and more. Products that are usage‑based clearly indicate this model during the purchase process.
For usage-based subscriptions, you cannot change the quantity after purchase, as you are billed according to actual usage, rather than a predefined quantity.
Quantity-based billing means you are charged based on the number of licenses you purchase.
During the purchase process, you select the quantity, and at the end of your billing period or commitment term, you are billed according to the total quantity purchased.
In the Marketplace Platform, quantity-based billing applies to subscription-based products, such as Microsoft 365. This billing model is clearly displayed during the order workflow and on the page once the order completes.
For quantity-based subscriptions, you can adjust the quantity at any time by adding or removing licenses as needed.
In this model, you make a single, non-recurring payment for indefinite use of the product.
This payment grants you a perpetual license, allowing you to use the software indefinitely. Once purchased, the license doesn't require any recurring payments or renewals.
In the Marketplace Platform, perpetual licenses purchased through one-time billing are managed via .
