> For the complete documentation index, see [llms.txt](https://docs.platform.softwareone.com/llms.txt). Markdown versions of documentation pages are available by appending `.md` to page URLs; this page is available as [Markdown](https://docs.platform.softwareone.com/extensions/amazon-web-services/tutorials/sign-up-for-new-aws-account.md).
# Sign up for new AWS account
This tutorial describes how to sign up for a new AWS account through SoftwareOne Marketplace and then transfer the billing and management of that newly created account to SoftwareOne.
### Prerequisites
Before starting this tutorial, make sure you have the following:
* A unique email address for your AWS root account, a valid credit card, and your company contact details. These are required to [sign up for AWS](https://signin.aws.amazon.com/signup?request_type=register).
* Correct permissions in AWS to complete the account activation and AWS Organizations configuration tasks.
* An active licensee in the Marketplace, or permission to [create one](/modules-and-features/settings/licensees/create-licensees.md). A licensee is required to create a new agreement.
* Contact details for a technical representative within your organization who can act as the deployment point of contact.
### AWS organization requirements
Before creating your AWS account, review the [AWS Organization requirements](/extensions/amazon-web-services/aws-organizations-requirements.md) to understand the configuration that must be completed after account creation.
### Sign up for a new AWS account
{% stepper %}
{% step %}
**Start the guided Purchase workflow for AWS**
To start the purchase wizard:
1. Go to **Catalog** > **Products**.
2. Select **Amazon Web Services**.
3. Review the information, including product details, features, and more.
4. Select **Buy now**.
Select Buy now to start the guided purchase flow.
{% endstep %}
{% step %}
**Create a new agreement and AWS account**
In the guided purchase flow, follow these steps to create a new SoftwareOne Marketplace agreement and AWS account:
1. **Select agreement** – Select **Create agreement**.
2. **Select licensee** – Choose a licensee. You can also [create a new licensee](/modules-and-features/settings/licensees/create-licensees.md) and select that licensee when it appears in the list. Select **Next**.
3. **Create agreement** – Select **Create a new AWS account**, then select **Next**.
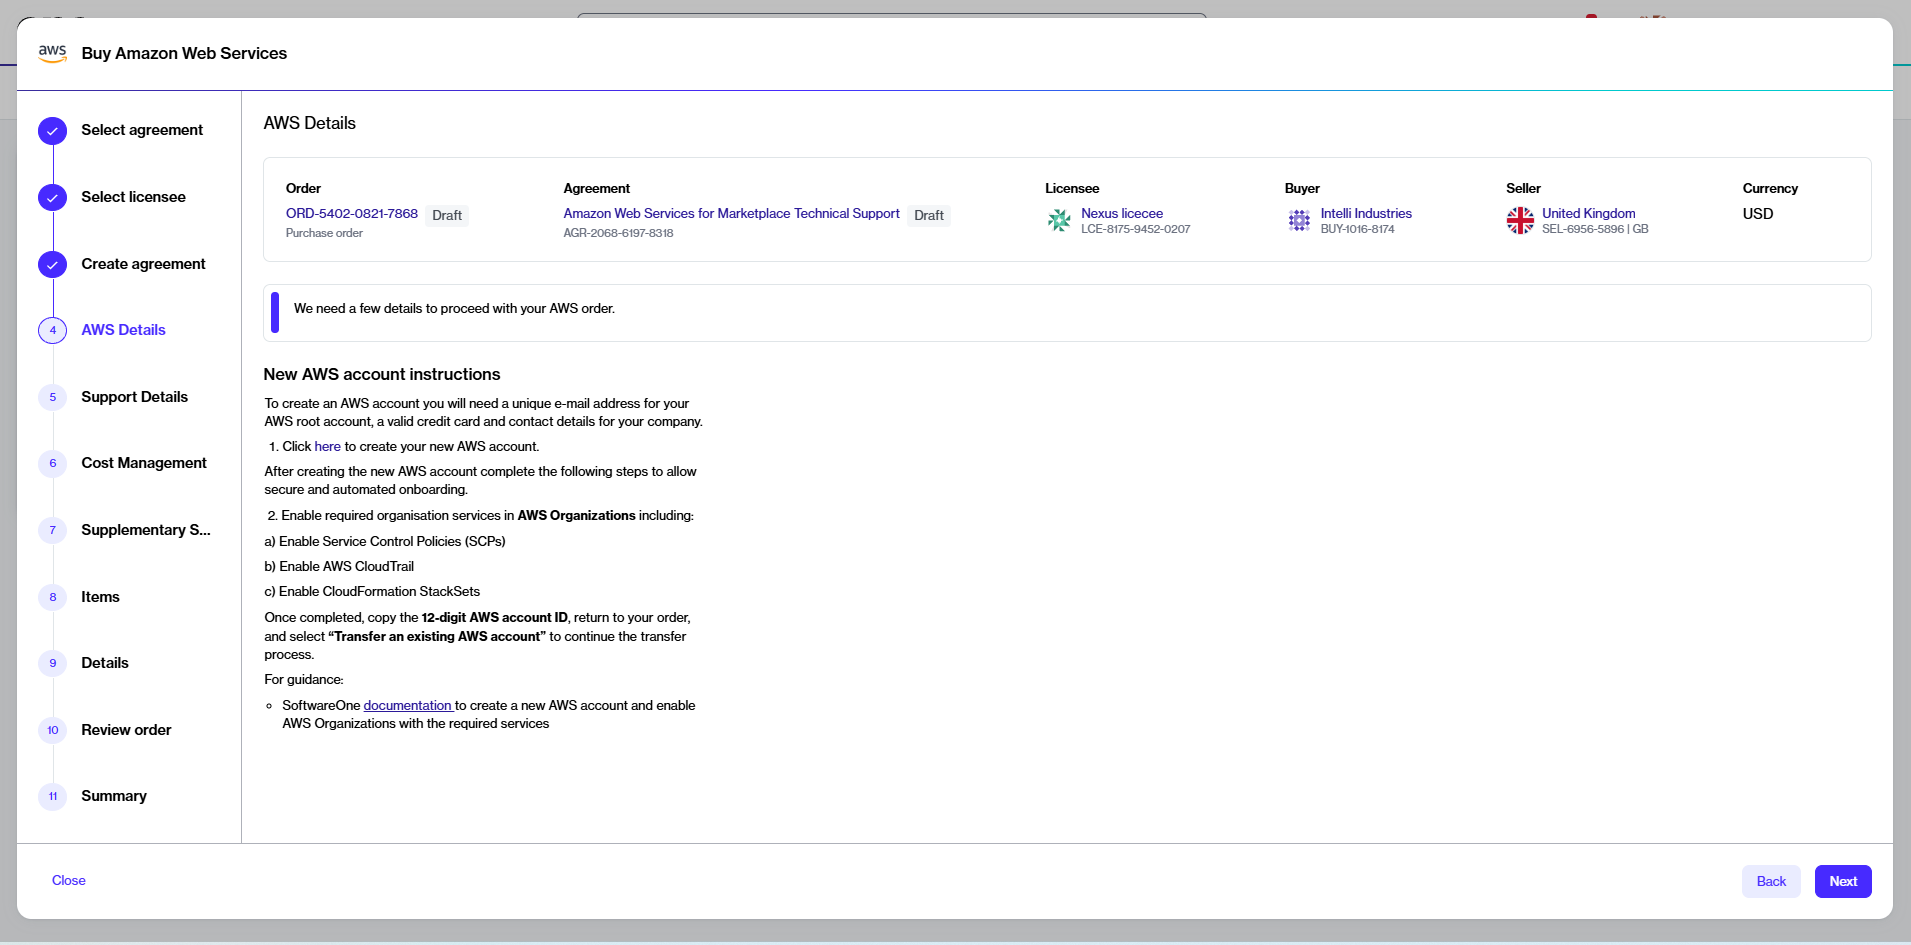
4. **AWS details** – Complete the following steps:
1. Create a new AWS account. For details, see [How to create an AWS account](https://aws.amazon.com/resources/create-account/) in the AWS documentation.
2. Sign in to the new account and complete the [AWS Organizations requirements](/extensions/amazon-web-services/aws-organizations-requirements.md).
3. Copy the 12-digit AWS Organizations management account ID.
{% endstep %}
{% step %}
**Transfer billing of your newly created AWS account to SoftwareOne**
After creating your AWS account and completing the required configuration, return to the purchase flow to continue the transfer process:
1. **AWS details** – Select **Back** to return to the step where the account transfer option is available.
Follow the instructions to create a new AWS account.
3. **AWS details** – Do the following:
1. Enter your 12-digit AWS Management Account ID.
2. Review and update the contact form as necessary.
3. Select **Next**.
4. **Support details** – Choose one of the support options, then select **Next**:
* **SoftwareOne Enterprise Support** – SoftwareOne becomes your point of contact for AWS support and assistance with your AWS environment.
* **AWS Resold Support** – Contact AWS directly for technical assistance.
5. **Cost management** – Review the Cost Management tools, including [FinOps for Cloud](/extensions/finops-for-cloud.md). Both options are selected by default and cannot be changed. Select **Next**.
6. **Supplementary services** – Choose any additional AWS services you are interested in, then select **Next**. Your selection indicates interest only; no services are provisioned at this stage. A SoftwareOne representative will contact you to provide more information.
7. **Items** – Review the AWS Service item in your agreement. Do not remove this item. Select **Next**.
8. **Details** – Provide reference details, like additional IDs or notes, and select **Next**.
9. **Review order** – Read the terms and conditions and the privacy statement. When done, select **Place order** to submit your order.
{% endstep %}
{% endstepper %}
### Next steps
After placing the order, you will receive a confirmation. Check the order details page for the next steps to complete onboarding.
1. **Accepting the AWS billing transfer invitation** – You will receive an invitation email from AWS. You must accept the invitation so we can proceed with your order.
2. **Approving the service terms** – You will receive an email from AWS, requesting you to accept the minimum service term of your agreement.
3. **Deploying the SoftwareOne Bootstrap role** – After accepting the billing transfer invitation and the service terms, you must deploy the Essentials Bootstrap Role. Deploying this role is mandatory for onboarding. For more details, see [Essentials Bootstrap Role](https://docs.softwareone.cloud/knowledge-base/essentials-bootstrap-role-customer-manual) in SoftwareOne Services documentation.
You also receive email notifications when these actions are due and require your attention.
### Related tasks
{% content-ref url="/spaces/Z5DNbniz33mXCZoO62Rm/pages/6YZyuMfxQwSumhpdnCT8" %}
[Transfer your AWS account](/extensions/amazon-web-services/tutorials/transfer-your-aws-account.md)
{% endcontent-ref %}
---
# Agent Instructions
This documentation is published with GitBook. GitBook is the documentation platform designed so that both humans and AI agents can read, navigate, and reason over technical content effectively. Learn more at gitbook.com.
## Querying This Documentation
If you need additional information that is not directly available in this page, you can query the documentation dynamically by asking a question.
Perform an HTTP GET request on the current page URL with the `ask` query parameter, and the optional `goal` query parameter:
```
GET https://docs.platform.softwareone.com/extensions/amazon-web-services/tutorials/sign-up-for-new-aws-account.md?ask=&goal=
```
`ask` is the immediate question: it should be specific, self-contained, and written in natural language.
`goal` is optional and describes the broader end goal you are ultimately trying to accomplish on behalf of the user. GitBook uses it to tailor the answer towards what is most useful for that goal.
The response will contain a direct answer to the question and relevant excerpts and sources from the documentation.
Use this mechanism when the answer is not explicitly present in the current page, you need clarification or additional context, or you want to retrieve related documentation sections.