Tags and Resources
You can create a consistent tagging structure and manage cloud resources across cloud platforms.
Was this helpful?
You can create a consistent tagging structure and manage cloud resources across cloud platforms.
Was this helpful?
Tags and Resources allow you to create a consistent tag structure across all of your Cloud Platforms (Azure and AWS) that are synchronized with the Client Portal.
Maintaining a consistent tag structure allows you to aggregate resource information from all of your Cloud Platforms to provide better governance, cost analysis, and chargeback. A consistent structure also allows you to deploy a more flexible Cloud Platform structure that fits your business.
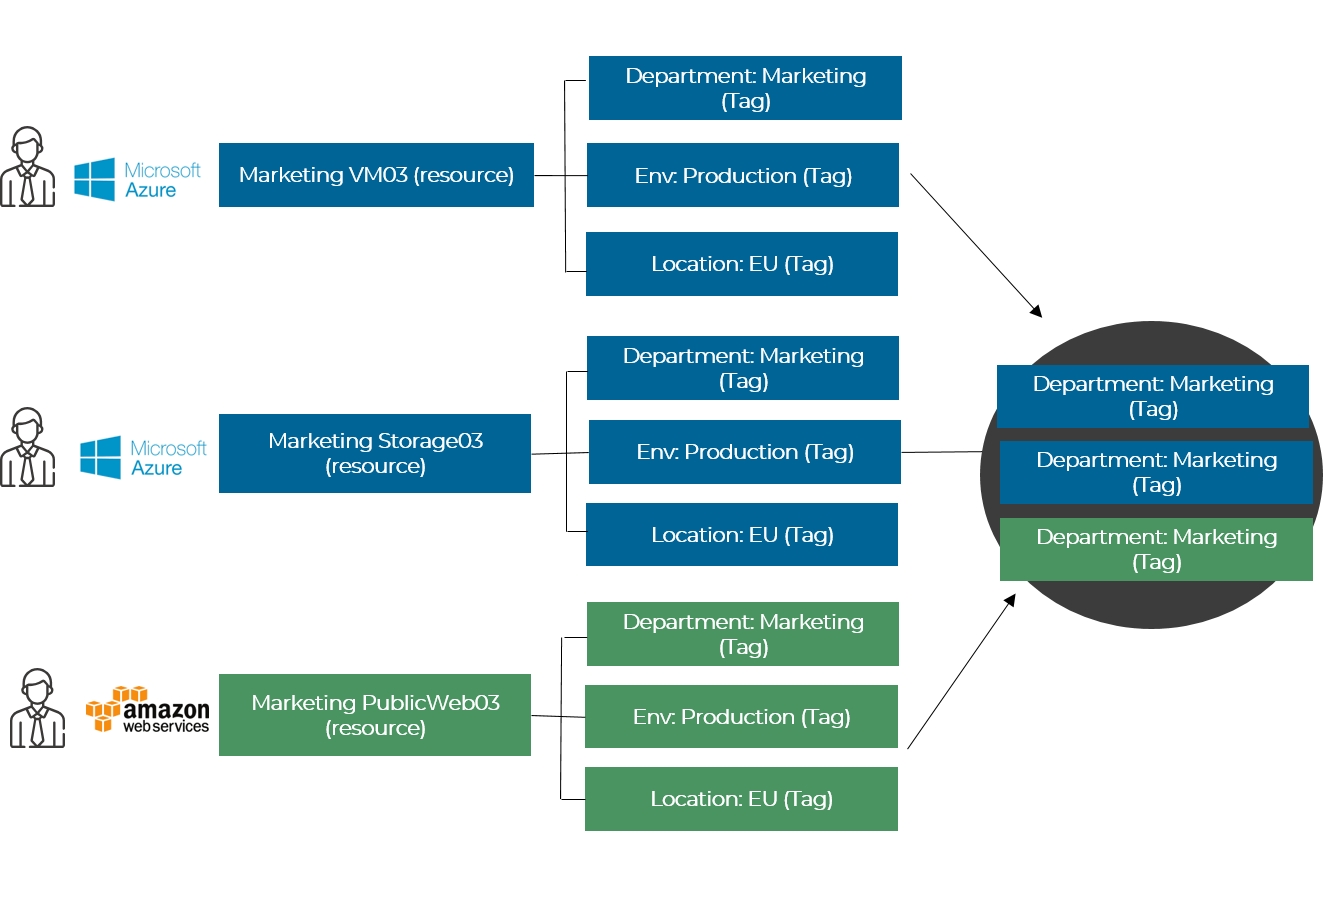
The following image shows an inconsistent tag structure:
As you can see from the three examples above, the administrators managing the different cloud platforms and subscriptions had the same intent, but did their tagging differently.
This would make aggregating information within each platform or outside each platform difficult. To solve this, you can use Tags and Resources to apply a consistent tag naming standard to all resources across all platforms. You just define the naming standard you want and add/move those resources to that new naming standard. Once done, the Tags module will allow you to clean up the old tags.
Throughout the rest of this article, we will show you how to use Tags and Resources to drive a consistent standard within your business.
To access Tags, from the navigation menu, go to Cloud tools > Tags.
To access Resources, from the navigation menu, go to Cloud tools > Resources.
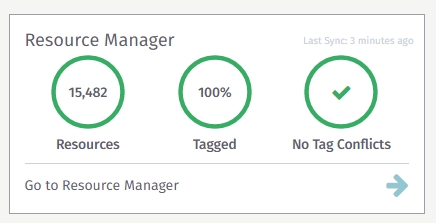
Alternatively, you can view your stats using the Resource Manager tile. These stats are pulled from Tags and Resources. Selecting this tile will direct you to Resources.
The tile displays three sets of information:
Resources: Total number of resources we are synchronizing from all of the Cloud Platforms connected to TRM.
Tagged: Percentage of resources that have at least one tag on them.
Tag Conflict: Number of open conflicts reported on the system.
Tags is a management page that allows you to view and manage the tag structure used, or to be used, by your Cloud Platforms.
Tags do not need to exist within your Cloud Platforms to create them within the Tags module. Tags will show up if they have been already applied to resources from the Cloud Platforms you are synchronizing with the platform.
Once you apply tags to resources, by default, they will synchronize back to the resource’s Cloud Platform. This functionality can be disabled.
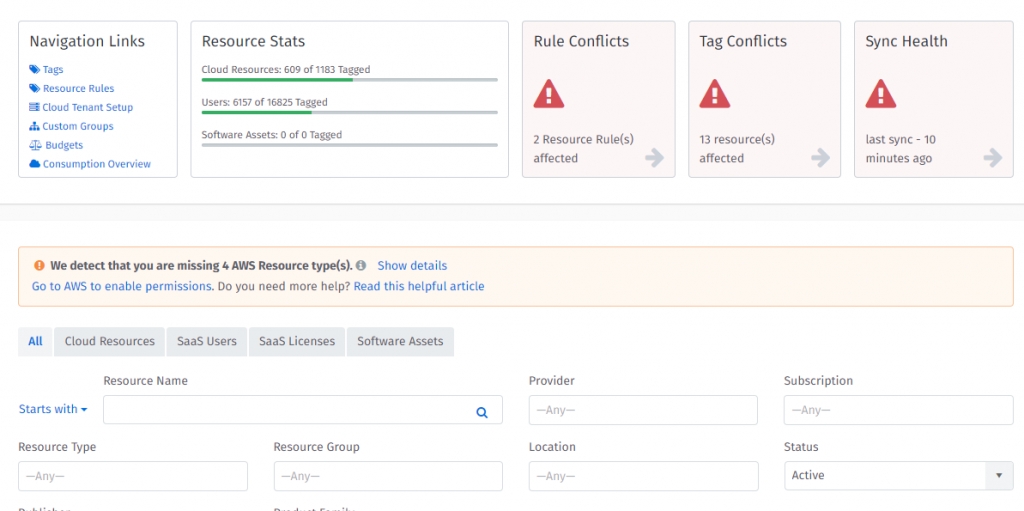
There are a number of elements on the Tags page:
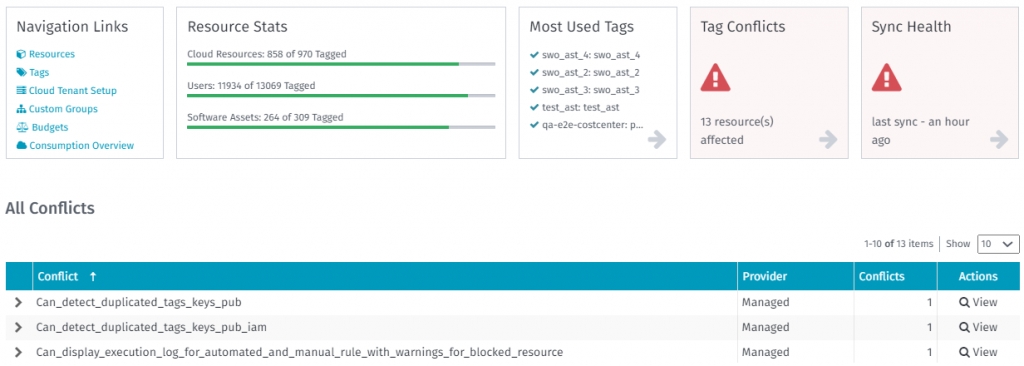
Navigation Links
Quick links to Resources, Resource Rules, Cloud Tenant Setup, Custom Groups, Budgets and Consumption Overview
Resource Stats tile
These are common stats about your synchronized resources.
Cloud Resources: The total number of cloud resources that are tagged within the Tags and Resources.
Users: The total number of cloud user resources that are tagged within the Tags and Resources.
Most Used Tags tile
This tile talks about the most actively used tags in the system, sorted in a descending manner.
Tag Conflicts tile
This tile informs about the conflicts in tagging that exist within the system.
Sync Health tile
Upon clicking, you will be presented with a window that will show you all of your Cloud Subscriptions being synchronized with Tags and Resources.
Multi-select options
When you select one or more tags in the list, you will see a couple more options appear “Clear Selection” and “Delete Tag(s). You can delete a single tag or multiple tags. If you want to start over and recreate your tag structure, select all tags and delete them. All tags will be removed from resources.
Quick Add Tag
You can create a new Tag Key and Value. You can also use an existing Key, but add a new value.
Search by Tag Key field
Quickly find the Tag Key you are looking for by typing it into this field. This field uses type-ahead, so you should start seeing results as you type.
Tags column
This column is used to display the Tag Keys and Values in a collapsed view.
Resources column
This column is used to display the number of resources, out of the total number of resources, synchronized to Resources. E.g., <#resource with key: value> (of <total resources from all subscriptions>).
Actions column
This column is a quick link column to view and edit tags.
Selecting View in the Actions column opens up the Tag Details Page. On this page, you can make edits to your tag.
There are a number of items on the Tag Details Page:
Tag
The tag key and value you are editing, for example, _department:hr.
Key
The tag key that you are on, for example, _department. This field cannot be changed.
To change the tag key for these resources, you will have to create a new tag key, select all resources in this tag key, and then assign a new Tag Key:Value to the resources.
Once complete, delete this Tag Key:Value.
Value
The Tag Value you are on, for example, ‘hr’. This field is editable.
You can change the Tag Key’s Value as long as it’s not a duplicate within the same Tag Key.
Changing the Tag Value will update all of the resources listed.
Resource Count
This is the total number of resources with this Tag, for example, 19.
Advanced Search
This allows you to filter down the resource list on this Tag, based on more properties related to the resources, so you can make quick decisions based on the results.
Result(s) found
This field will show the number of resources in the list.
If you are filtering the results through Advanced Search on item 10 or the column filter on item 11, this number will change showing the resulting number of resources based on your filtering. (In this case 19).
Single or Multi-Select Column
You can select a single resource or multiple resources to take action.
Actions column
Select View to learn more about the resources on this list.
Resources is a management page that allows you to view all of the resources that are synchronized from your Cloud Platforms Subscriptions.
You can view the properties of each resource to identify them properly. You can also apply Tags to individual or multiple resources at a time. By default, Tags will synchronize back to the Cloud Platform. You can turn this feature off.
The updated Tag information is pulled from the Resource on every synchronization cycle. The Resources page also supports search/filtering, so you can quickly find the resources you would like to address.
There are a number of items on the Resources Page:
Navigation Links
Quick links to Tags, Resource Rules, Cloud Tenant Setup, Custom Groups, Budgets, and Consumption Overview.
Resource Stats tile
These are common stats about your synchronized resources.
Cloud Resources: The total number of cloud resources that are tagged within the Tags and Resources.
Users: The total number of cloud user resources that are tagged within the Tags and Resources.
Rule Conflicts tile
This tile talks about the rule conflicts in the system, if any. If there are no rule conflicts, then this tile points you to the help article on how best to automate tagging and governance within your cloud environment.
Tag Conflicts tile
This tile informs about the conflicts in tagging that exist within the system.
Sync Health tile
Upon clicking, you will be presented with a window that will show you all of your Cloud Subscriptions being synchronized with the Tags and Resources.
Advanced Search
This allows you to filter down the resource list based on properties related to the resources, so you can make quick decisions based on the results.
Add Virtual Resource
This functionality allows you to add virtual resources, so you can visualize and track their costs.
Single or Multi-Select Column
You can select a single resource or multiple resources to take action. When you select a resource you will see the “Key” and “Value” fields appear. Enter the Tag Key: Value and click the “+ Add Tag” button to add different tags to the selected resource(s).
Resource List
This is a list of all of your resources, either in filtered or unfiltered view.
NOTE: In the unfiltered view, you will find all of the resources synchronizing from your Cloud Platform Subscriptions. If you suspect any resources are missing, check the Sync Health tile and validate all of your subscriptions exist.
Export: The Export option will start a download of the list in view, including all of the pages.
Action “View”: Select View to see more details about the resources.
A banner is displayed if you have not been granted the required permissions to read and/or tag AWS resources.
You may see the following messages for the following scenarios:
Missing read permissions
This means that the Client Portal is unable to read information about AWS Resources. For example, We detect that you are missing 79 AWS Resource types.
Missing write-back Permissions
This means that the Client Portal is unable to tag AWS Resource types. For example, We detect that you are not able to tag 15 AWS Resource types.
Missing read and write-back permissions
This means that the Client Portal is unable to read information about AWS Resources and tag AWS Resource types. For example, We detect that you are missing 79 AWS Resource types and you are not able to tag 15 AWS Resource types.
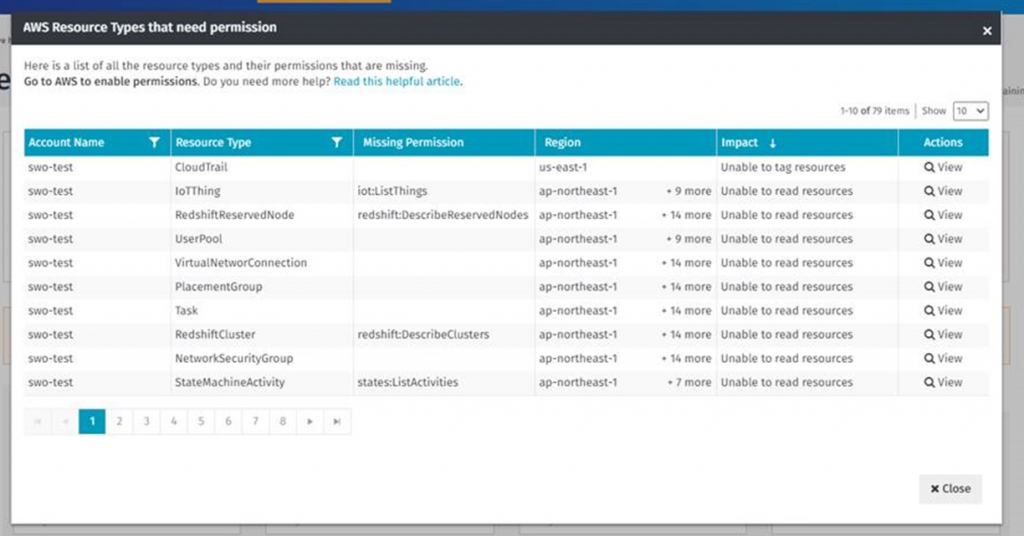
Select Show Details to view details of the resource type, AWS account, and AWS region that you are missing permissions for, and the impact on the environment.
This modal explains the permissions that are missing for each resource type within an AWS account and region. For example, in the third row, we are missing permissions for RedShiftReservedNodes in the ap-northeast region for the account swo-test.
NOTE: The link in the Actions column will navigate you to the appropriate AWS account in question. However, due to caching within the AWS UI, you may be navigated to the last visited region for that account. Therefore make sure you locate the Client Portal stack.
Resource Details Page
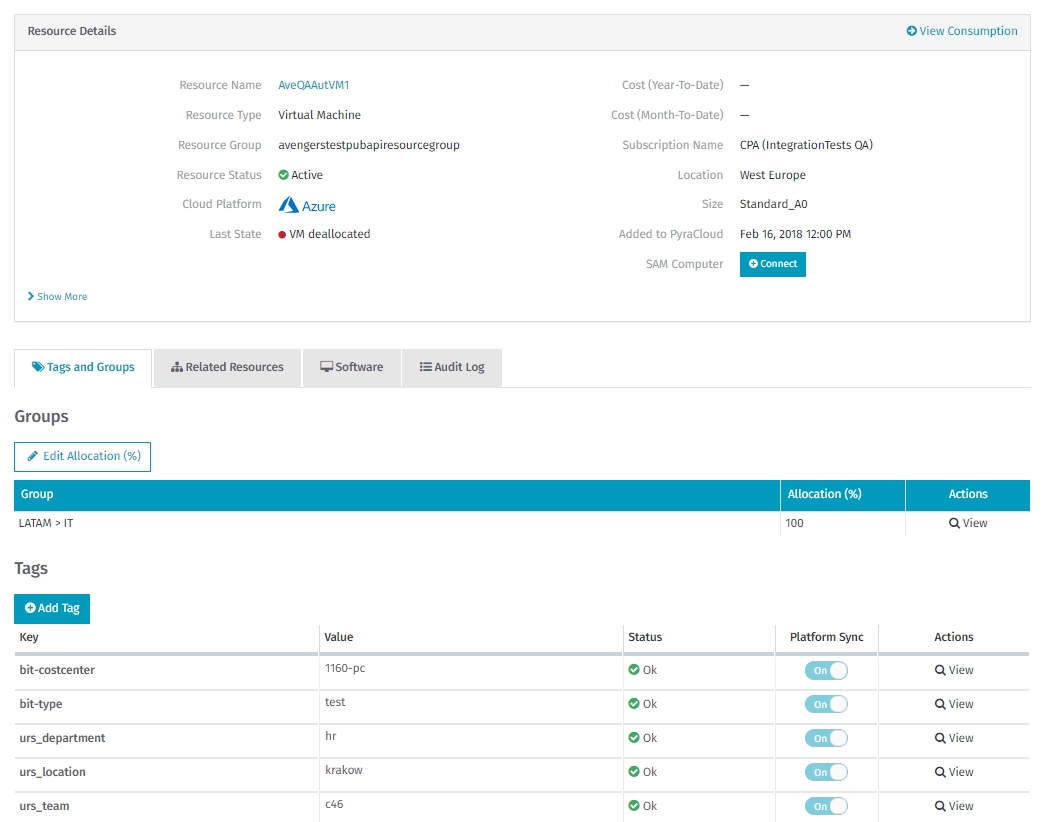
There are a number of items on the Resource Details Page as explained below:
As mentioned above, clicking on View in the Actions column will open up the Resource Details Page. Within this page, you can make edits to your resource.
Resource Details: Common properties of all resources are listed in this section. In addition, we will also display some extended properties, based on resource type. Common resource properties include Name, Cloud Platform, Subscription Name, Location, and Resource Type.
Groups: This is the list of all custom groups the resource is a part of. A resource can be part of more than one group. The table also displays the allocation of the cost of that resource across the different groups. Filtering by Custom Groups will reflect this cost allocation across costs on the Consumption and the Budget pages.
Related Resources Tab: This Section will include resources that depend on this resource as a parent. Not all dependent resources will show up on this list, as some resources can be shared. If the resource was created by the parent, it will show on this list. Child resources do not inherit Tags from the parent resource.
Software Tab: This section will include software that has been assigned to this resource.
Audit Log Tab: This section will show the history and audit trail of this resource.
Tag List: This is the list of all the Tags actively applied to this resource.
Value: This is the Tag Value that is applied to this resource. The Tag Key and Value create a unique Tag that is applied to this resource. The same value may exist multiple times on a Resource, but only if the Tag Key is unique.
Status: When adding, changing, or removing the Tag, we actively show the status of that change in this column. If you just added the Tag, you will see a “pending” status until the Tag has been applied to the Tag. The “pending” status may take longer if we are synchronizing that Tag back to the Cloud Platform Subscription’s resource.
Platform Sync: Platform Sync has two states
On – When Platform Sync is on, the Tag will synchronize back to the Cloud Platform Subscription’s Resource.
Off – When Platform Sync is off, the Tag will only exist within the Client Portal. If you actively change the sync status from On to Off, the Tag will be removed from the Cloud Platform.
NOTE: The Tags are always pulled in from the Cloud Platform, no matter what state all the existing Tags on this resource are in.
Actions: If you no longer require the Tag be applied to this resource, you can “Remove Tag” from the resource by Viewing the tag and deleting it from the Tag Details page.
Add Tag: When you would like to “+Add Tag” to a resource, click this button and add the Tag to this resource. You must specify the Tag Key, Value, and the Platform Sync state. Once complete, save the new Tag.
Virtual Resources are any resources that are not automatically discovered from your existing cloud environments like Azure, AWS, Office365, etc., but have a cost associated with them. Examples of virtual resources include full-time employees assigned to certain projects, Virtual Machines from specific providers (like Redhat, etc.), or any intangible resource that has a cost.
Virtual Resources are associated with cloud resources (that have been discovered from Azure/AWS etc.), and inherit some of their properties from the resource they are associated with. For example, they automatically inherit the tags and custom groups of the resource they are associated with. This also means that, when the tags or custom groups on the original resource change, then they are automatically updated on the child virtual resource.
Adding a virtual resource can be performed by clicking on the ‘Add Virtual Resource’ button on the Resources landing page. Clicking on this will navigate you to a screen requesting more information as shown below:
Provider
This is the name of the Virtual Provider to track the virtual resource against while measuring your costs for the virtual resource. The value entered here will appear in various searches within the Client Portal for the filter name ‘Provider’. This is a mandatory field.
Resource Name
This field describes the name of the virtual resource. The name here will appear in searches within the Client Portal for the filter name ‘Resource Name’. This is a mandatory field.
Quantity
Quantity is the amount of resources that you have for that resource name. This is a mandatory field.
Date
This is the date that you would like to track your virtual resources. This is a mandatory field.
Currency
Currency in which you would like to track the costs of your virtual resources. This is a mandatory field.
Unit Cost
This is the cost per unit of the virtual resource. The total cost of the virtual resource will be calculated by multiplying the unit cost with the quantity.
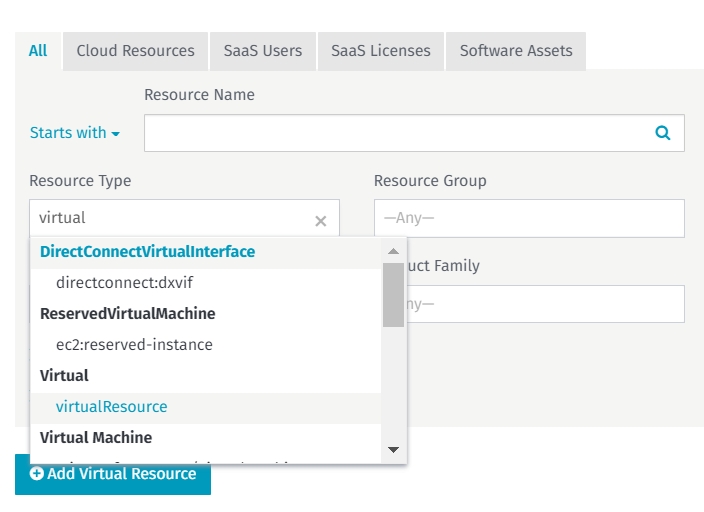
Virtual resources will appear in Resources just like any other resource. They can be searched for by using the Advanced Search filter “Resource Type” as shown below:
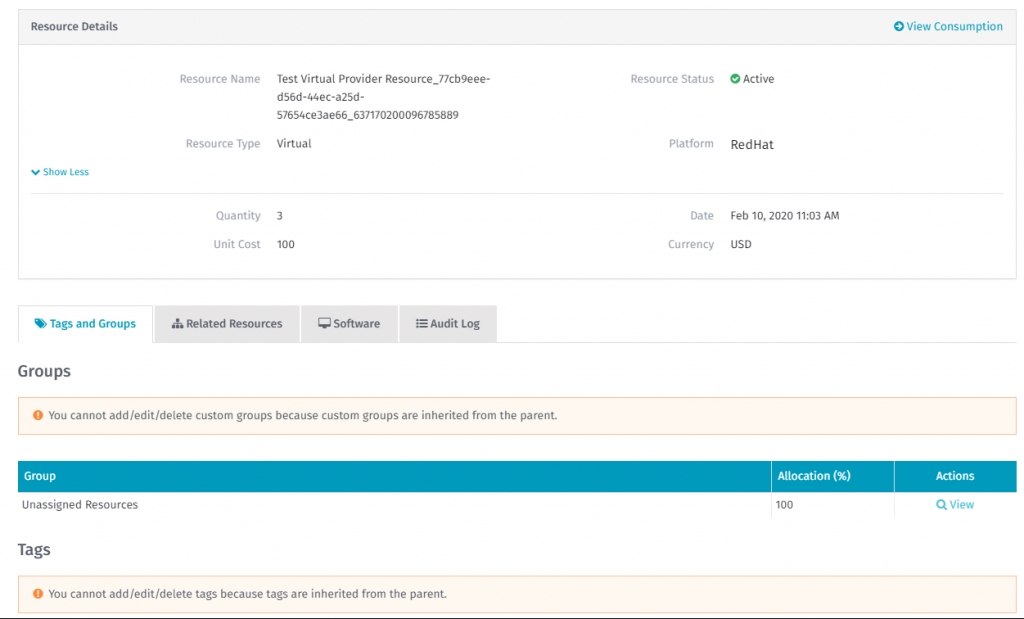
Virtual Resources inherit their tags and custom groups from the resource they are associated with (as mentioned above). Therefore their tags and custom groups cannot be modified.
The parent resource the virtual resource is attached to can be viewed within the Related Resources tab within Resource Details.
The Client Portal will synchronize with your Cloud Platform at a set interval. This means there is a chance the Tags you see within the Client Portal are out of date (by hours). We try to Synchronize often, to prevent this, but in some cases, changes will be made in Azure or AWS in between Sync cycles.
When the addition/removal/change of a Tag is made to the same Tag Key, this will cause a conflict. (Since the Cloud Platform will only allow for a single Tag Key and any value on a resource.) If the same Tag Key is added or changed on both platforms, in between sync cycles, the Client Portal Tag Key:Value will overwrite the Cloud Platform’s Tag Key:Value.
We realize the Cloud Platform Tag change may have been intentional, so we save this as a conflict. This conflict will allow you to accept the change proposed by the user from the Cloud Platform or leave in place the Client Portal change that was made.
If you ignore this conflict, the conflict notification will expire. To avoid Tag Conflicts, you can always manually run a synchronization on your subscription.
There are a number of items on the Resource Details Page:
Navigation links
Quick links to Resources, Tags, Cloud Tenant Setup, Custom Groups, Budgets and Consumption Overview
Resource Stats tile
These are common stats about your synchronized resources.
Cloud Resources: The total number of cloud resources that are tagged within the Tags and Resources.
Users: The total number of cloud user resources that are tagged within the Tags and Resources.
Most Used Tags tile
This tile talks about the most actively used tags in the system, sorted in descending order.
Tag Conflicts tile
This tile informs about the conflicts in tagging that exist within the system.
Sync Health tile
Upon clicking, you will be presented with a window that will show you all of your Cloud Subscriptions being synchronized with the Tags and Resources.
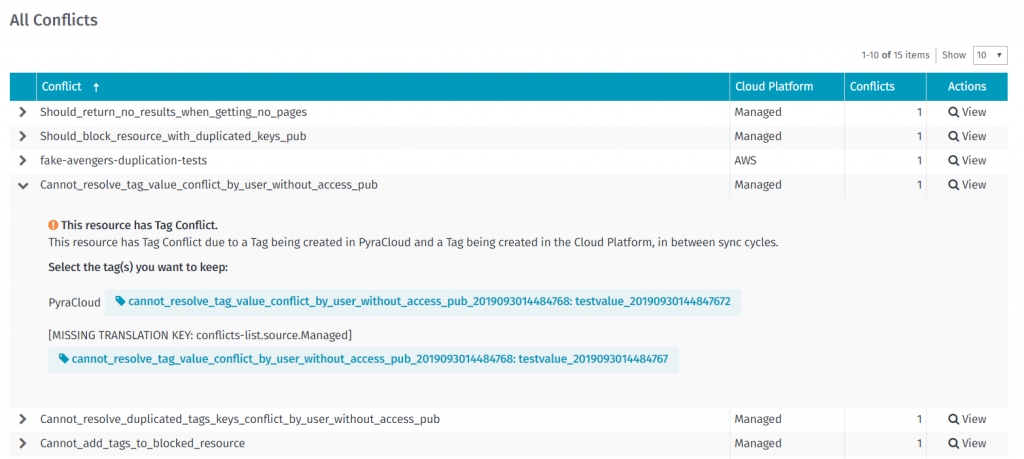
If you have conflicts, you will see a table that lists all of the Tags that are in conflict, from the Tag perspective.
Conflict column: This is the Tag that was applied and that is now in conflict with a resource. If you click on the Tag name, it will take you to the Tags page, in the Tag Edit view.
Cloud Platform column: This is the resource’s Cloud Platform impacted by the Tag Conflict.
Conflicts column: The total number of conflicts related to this Tag.
Actions column: Select View to go to the Resource Details Page.
Select the arrow icon > next to the tag to open up more details about the error.
Select the action you want to take and select Update Changes.
Resource rules are rules that enable you to tag and group resources in your software and cloud environment. Resource Rules are accessed through the Resources page by using the Resource Rules link on the top left section.
Once selected, the Resource Rules page is displayed.
It does this using a rule engine that enables users to create search criteria, which if met will create tags or organize resources into groups as configured.
Example: Company XYZ’s IT department based in EMEA manages the organization’s Office365 licenses. Such a resource rule could look like this:
When the above rule runs, any resources that have the provider Office365 will be tagged with the department – IT and Geo – EMEA.
Similarly, you can also configure resource rules to group resources based on search criteria, which include properties as well as tags. Here is an example:
The above rule looks at all resources with a tag _geo, value EMEA and groups it between the APAC and EMEA custom groups.
The order of resource rules is important, as they run in the order defined. Users can reorder resource rules by dragging and dropping a resource rule to another position within the grid. The order is also mentioned in the column right of Rule Name.
Please note that it takes up to 24 hours to refresh consumption reports after rule execution
Resource rule conflicts are conflicts that arise when resource rules try and operate on the same resources in question around tags or custom groups.
For example, when a resource rule modifies a tag on a resource to a value, and another resource rule modifies the same tag on the resource to another value, that results in a conflict.
Resource rule conflicts show up in a tile on the Resources page as shown below:
Clicking on this tile will show all the resource rules in conflict.
Alternatively, the Conflict Status column will indicate resource rules in conflict. Conflict status Unknown means that the rule hasn’t been executed since it was last modified.
Resource Rule Conflicts will show up with the Conflict Status as “Conflict”. These are the steps you should follow to resolve a resource rule conflict:
Step 1 – Expand the resource rule under conflict using the expander to the left of the rule name.
Step 2 – Identify other rules that the rule in question is in conflict with. In the example above, rule demo_117_one is in conflict with rule demo_117_two. The message will also mention the tags that the conflicted rules are operating on. In this example, the conflict is due to tag key ad_department, values do_not_remove, yevgen.
Step 3 – Understand the configuration of the resource rules in question. As you can see, both rules apply different tag values to the tag “ad_department”, therefore resulting in the conflict.
Step 4 – In this example, the resolution would be to edit one of the rules, so they don’t apply a tag value to the tag “ad_department”. Editing demo_117_two and applying a different tag would resolve the conflict.
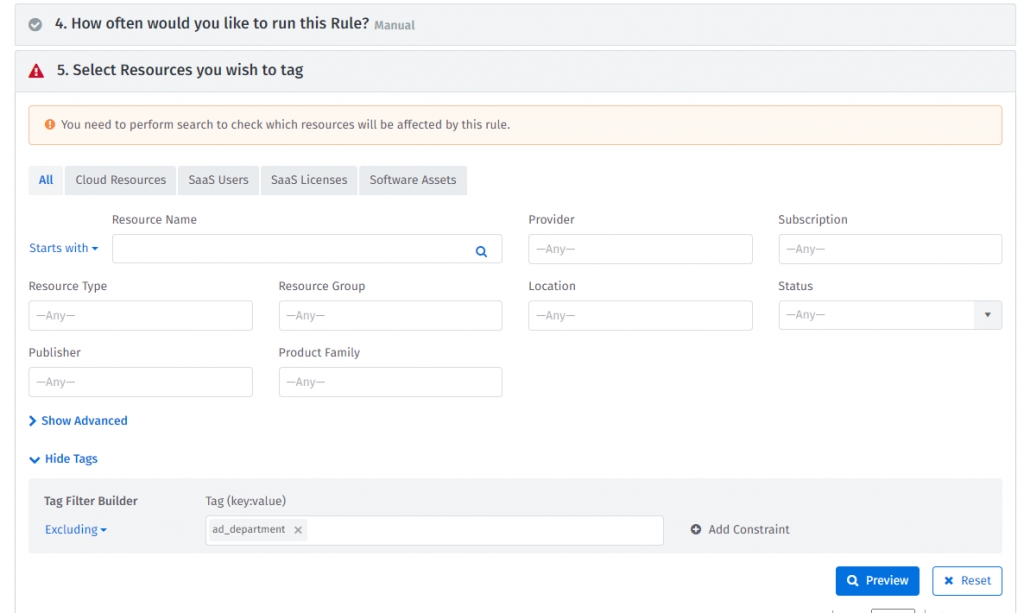
Resource rule conflicts can occur due to a number of reasons. However, most commonly, resource rule conflicts can be addressed by editing the rule to exclude applying tags to resources that already have that tag. This way the resource rule will not overwrite a tag with another value, which is the most common reason for a rule conflict.
In order to do this, edit the resource rule, and edit the search criteria of the rule to use something like this:
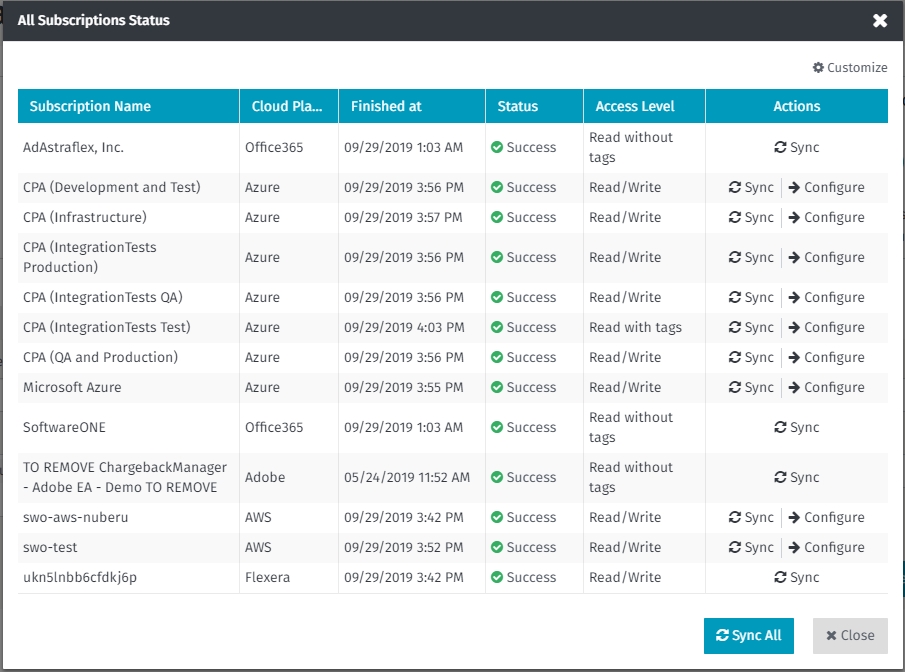
Clicking on the Sync Health tile will take you to the Sync Health window. The Sync Health window will show you all of the Cloud Platform Subscriptions you are synchronizing with the Client Portal. It will also show you the synchronization status state and allow you to run a synchronization process.
There are a number of items on the Sync Health Windows:
Subscription Name
This is a list of all the Cloud Platform Subscriptions being synchronized with the Client Portal. If you are missing any Subscriptions, contact our Support team or your SoftwareOne Account Team.
Cloud Platform
This is the cloud platform that the resource was synchronized from i.e. Microsoft Azure, Office 365 or Amazon Web Services.
Finished at
This is the time the last synchronization ran and how long the synchronization took, based on the start/stop times.
Status
This is the Subscription Synchronization Status. In normal conditions, the state should either be “Running” or “Success” If you see an error, it may be due to a number of reasons which include:
Invalid or expired credentials – Contact support if this occurs.
Expired/unused tenant – If this is the case, contact Support to have the Cloud Platform Subscription removed.
Cloud Platform is inaccessible – If the Cloud Platform API is unavailable, an error may occur. Contact Support to get a status update.
Access Level
This access level has been set for a synchronization process against a particular subscription. The following are different values:
Read with/without tags- This sync option only synchronizes resources with or without their tags from the cloud provider.
Read/Write – This sync option synchronizes all resources in read and write mode.
Actions Column
Sync: If you recently made changes in your Cloud Platform Subscription and you don’t want to wait for the next Synchronization cycle, either click to synchronize the Subscription in question or click on 5 to synchronize all Subscriptions.
Configure – This allows you to configure the subscription as part of Cloud Tenant Setup.
Sync All
This synchronizes all subscriptions.
Close
Select to return to the previous screen.
