Reports
About Reports
The Client Portal offers a large number of reports, allowing you to gain valuable insights into your software asset inventory, resource utilization, cloud consumption, renewals, and more.
You can set up a report using the Quick Reports feature or create a customized report using the available report options. You can also:
Export your reports to any of the available formats.
Run and publish reports only once, daily, weekly, or monthly.
Modify report configuration and existing schedule.
Delete reports.
Pause or resume scheduled reports.
View, search, and share reports.
Create report templates.
How to access the Reports page
You can access the Reports page by navigating to the main menu and selecting Other tools > Reports.
Quick Reports
The Quick Reports tab displays all report options that are available to you and allows you to create a new report based on predefined filters quickly. Note that by default, all quick reports are created as Run Once only.
Create a quick report
Follow these steps to create a quick report:
From the main menu, navigate to Other tools > Reports.
On the Quick Reports tab, navigate to the report group and choose the reporting template from the menu.
Select Create. The Create Quick Report page opens.
Review the report summary, name, and delivery method. Note that you can adjust the details and apply filters as needed.
Select Finish. Your report is created and a confirmation message is displayed.
Watch the following video tutorial on how to create a Software Asset Inventory quick report:
Scheduled Reports
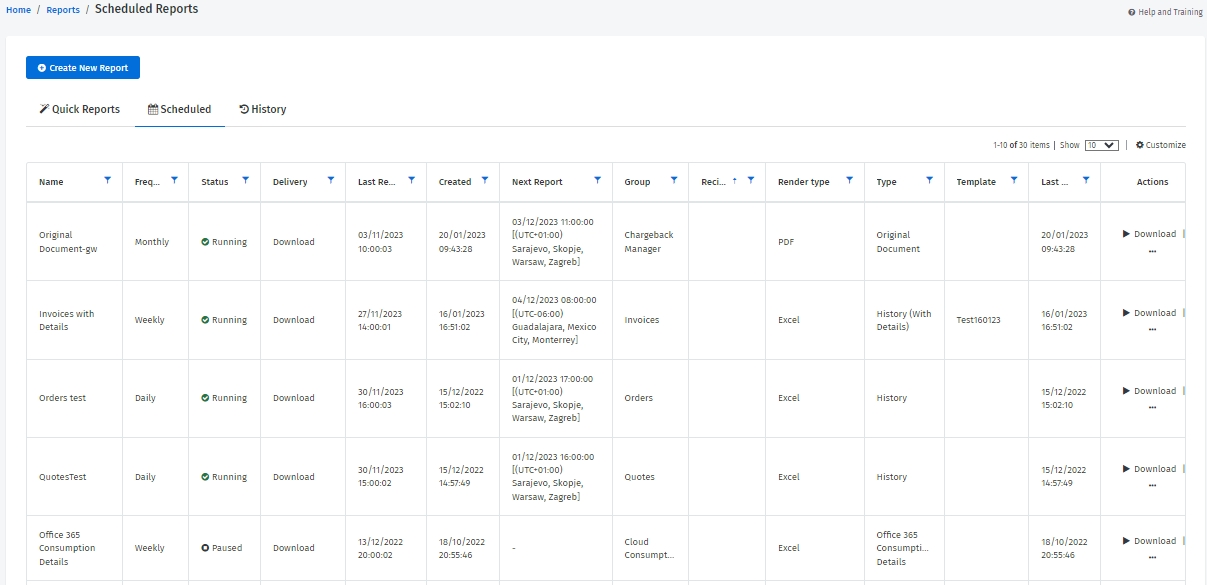
The Scheduled tab displays the scheduled report configurations and allows you to edit, run, pause, resume, preview, and delete reports.
Note that you must have the SCHEDULED_REPORTING permission to access this tab.
On this tab, you can view the following details:
Name - The name of the report.
Frequency - Indicates if this is a Daily, Weekly, or Monthly report. Off means that recurrence for the report is not yet defined (this is only possible when the report has been created using old reporting).
Status - Indicates whether the report is being generated or paused.
Delivery - The delivery format for the report.
Last Report - The time when the report was last generated.
Created - The date and time when the report was created.
Next Report - The time when the next report will be generated.
Group - The type of the report group.
Recipients - The email address of the recipient.
Render type - The format of the report.
Type - The type of report.
Template - Indicates whether any template has been selected for the report.
Last Modified - The date and time of the last update of the report configuration (in the local time zone).
Actions - The list of actions for the report.
Create a scheduled report
Follow these steps to create a new report:
Navigate to the Reports page (Other tools > Reports) and click Create New Report.
Select the report group and the type of report, and then choose the format in which you wish to generate the report. Note that the format varies depending on the report.
Choose the filters and select Next. To set additional filters (related to dates and number formatting), select Show more formatting options.
Select the schedule type. You can run the report once, daily, weekly, or monthly. Note that for the reports that can be run once only, the Run Once option is selected by default and you cannot change it. All other options are unavailable.
Select the date range for the data you want to include in the report.
Select an existing template from Saved Templates or create a new template. Note that the Saved Templates option is displayed only if the report supports templates. If the report does support templates, but you choose not to apply the template, the system will use the default template.
Provide a unique Report Name and choose the report delivery method.
Select Finish. A confirmation message is displayed.
Depending on your chosen report schedule, the Scheduled Reports page or the Reports History page is displayed. Note that all Run Once reports are triggered immediately.
Update a scheduled report
You can update the configuration of a scheduled report, except the report group and the type of report.
To update a report, select the actions icon (•••) and choose Edit. When the Edit Scheduled Report page opens, make changes as necessary and then click Finish to save your changes.
Run a scheduled report
You can trigger scheduled reports at any time. After a report is generated, it downloads automatically and is available on the History tab. To run a report, select Download in the Actions column.
Note that triggering a report manually doesn’t impact its next generation time or the last execution time in the Last Report.
Pause or resume a scheduled report
To pause or resume a report, select the actions icon (•••) and select Pause to pause the report or select Resume to reactivate the paused report.
Delete a scheduled report
To delete a scheduled report, select the actions icon (•••) and choose Delete.
Next, confirm that you want to delete the report. Note that deleted reports cannot be recovered.
Report History
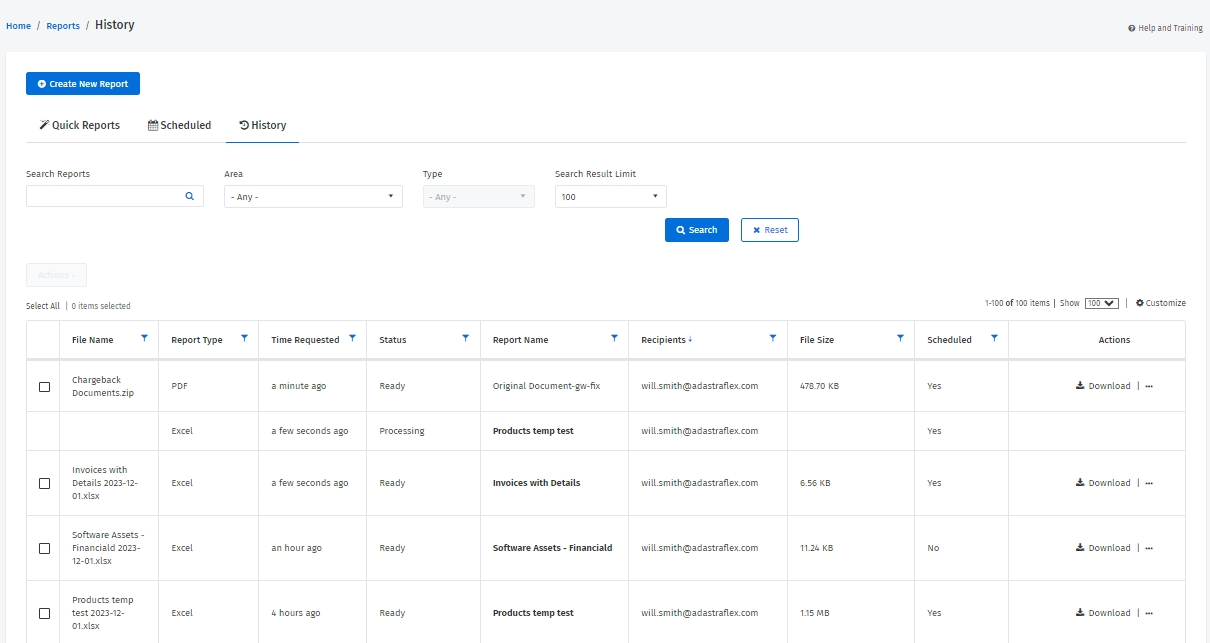
The History tab displays all reports that you've generated. The list includes scheduled and run-once reports. From the Reports History page, you can download, send, delete, or edit a report.
On this tab, you can view the following details:
File Name - The file name of the report (visible only for generated reports).
Report Type - The output format of the report.
Time Requested - The approximate time when the report has been requested.
Status - The status of the report. Possible values include:
Queued - The report is queued for creation.
Processing - The report is being generated.
Ready - The report has been generated and can be downloaded.
Report Ready - SFTP Failed - The report has been generated but there was an issue when sending it to the configured SFTP server. You can manually download the report and send it to an SFTP.
No Data - The generated report contains no data.
Error - There was an unexpected error during the report generation.
Error – Bad Configuration - There was an error in the report configuration.
No permissions - The report couldn’t be generated because the user no longer has permissions.
Report Name - The name of the report.
Recipients - The list of recipients for the Email delivery method only.
File Size - The size of the generated report file (visible only for generated reports).
Scheduled - The information whether it is Scheduled or Run Once report.
Actions - The list of actions for reports.
Download reports
You can download a single or multiple reports from the History tab.
Follow these steps to download a report:
Locate the report or select the checkbox for the report you wish to download. You can select multiple checkboxes.
Do one of the following:
In the Actions column, click Download.
From the Actions menu above the table, choose Download, Copy to ZIP file, or Move to Zip File. Note that this menu is enabled only after you select a checkbox.
Edit the report name
You can only update the name of a generated report and file name. Updating a generated report name doesn't change the scheduled report name based on which the report has been generated.
Follow these steps to update a report or file name:
Select the actions icon (•••) and choose Edit. The edit mode is enabled.
Update the report name and file name as needed. Note that the file name must include an extension, Invoices.xlsx.
Update your changes.
Email a report
If a report is bigger than 25 MB, it's always sent as a link only. Note that to download a report from the link, your email recipients must have access to the report in the Client Portal.
Follow these steps to send a report through email:
Select the actions icon (•••) and then choose Email.
Provide the email addresses (separated by a semicolon) and choose if you want to send the report as an Attachment or Link.
Send your report.
Send a report to an SFTP server
You can send a report directly to a secure FTP server. If needed, you can also add a new SFTP configuration or edit the existing configuration.
Follow these steps to send a report to an SFTP:
Select the actions icon (•••) and select SFTP.
Select an SFTP server from the list and choose Use Selected Server.
Delete a report
You can delete reports that are no longer needed. You can delete a single report or multiple reports at once. Note that once you delete a report, it can't be recovered.
Follow these steps to delete a report:
Locate the report or select the checkbox for the report you wish to delete.
Do one of the following:
Select the actions icon (•••) and then select Delete.
From the Actions menu, choose Delete. Note that this menu is enabled only after you select a checkbox.
Confirm that you want to delete the report.
Report Templates
Create a report template
You can create a new template when you are creating a report. Note that only some reports support templates.
Follow these steps to create a template:
Click Create New Report. The report wizard starts.
In the Template section, click Saved Templates > Edit Default Columns.
Make the following changes as needed and select Save as new template.
To change a column position, drag the column to the desired position. You can move columns between groups.
To move all columns from one group to another, drag the entire group to an unfolded group.
To override a column’s value, enter a new value in the Override value.
To duplicate or delete a column, select the actions icon ( ••• ) and choose Duplicate or Delete.
Provide the Template Name and choose whether the template is Personal (only you can see or edit it) or Shared (anyone in your company can see or edit it).
Select Save as new template.
Manage your report templates
You can edit or delete your report template by selecting the template and choosing Edit or Delete.
Was this helpful?


