Loading...
Loading...
Loading...
Loading...
Loading...
Loading...
Loading...
Loading...
Loading...
Loading...
Loading...
Loading...
Loading...
Loading...
Loading...
Loading...
Loading...
Loading...
Loading...
Loading...
Loading...
Loading...
Loading...
Loading...
Loading...
Loading...
Loading...
Loading...
Loading...
To get up and running with the Marketplace Platform and make the most of its functionality, it's essential to understand how the platform works and be familiar with certain key concepts and terminology.
Our Getting Started video provides the foundation for you to quickly get started with the platform. It offers a brief overview of the platform and its interface, followed by in-depth information about some of the core concepts.
Key Concepts
Understand the core concepts and terminology.
Platform Interface
Learn how to access and navigate the platform.
Marketplace for Clients
Find details on how to get started as a Client.
Marketplace for Partners
Find details on how to get started as a Partner.
Certain concepts and terms are central to the functionality and design of the Marketplace Platform. We recommend that you understand the terminology because it's often referred to in our platform and documentation. Understanding the terminology will make it easier for you to interact with the platform and maximize its use.
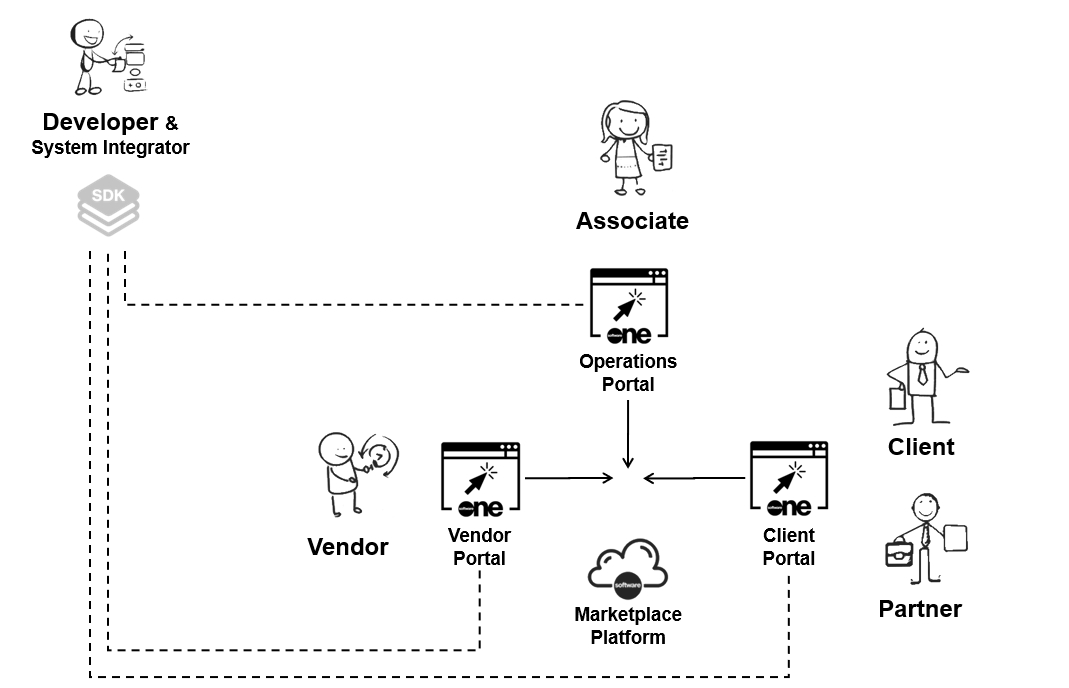
The Marketplace Platform seamlessly brings together various actors to facilitate the buying, selling, provisioning, and billing of software products.
Actors represent different entities that interact with the platform for procurement and fulfillment-related activities, as well as other operations specific to the platform.
The following are the key actors in our platform:
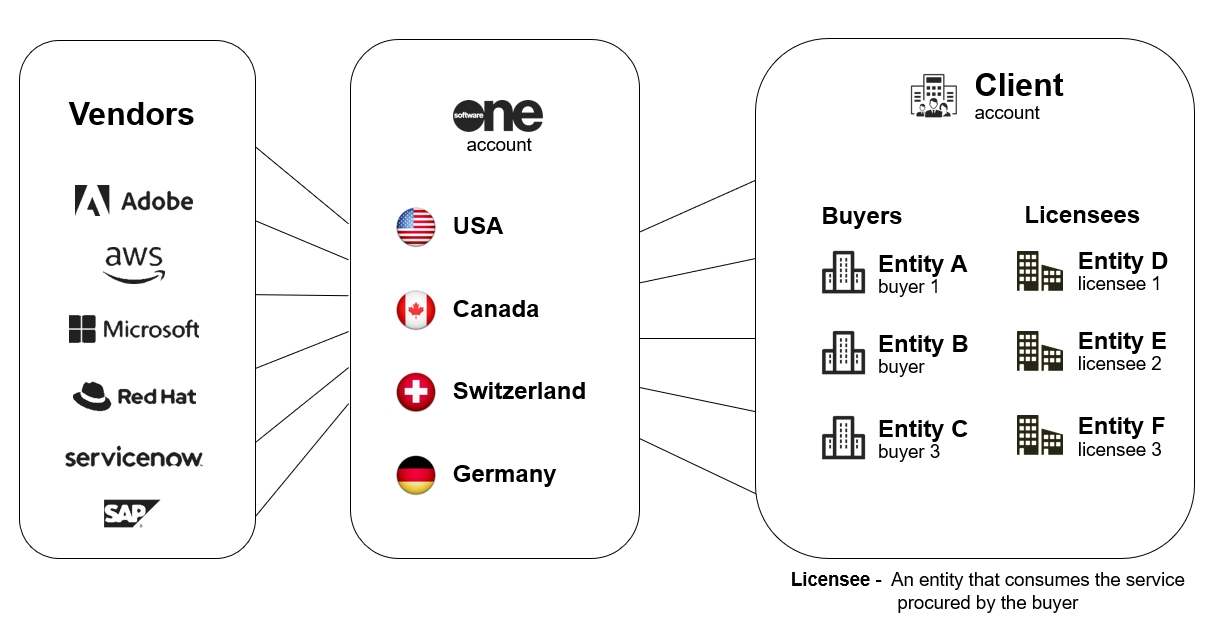
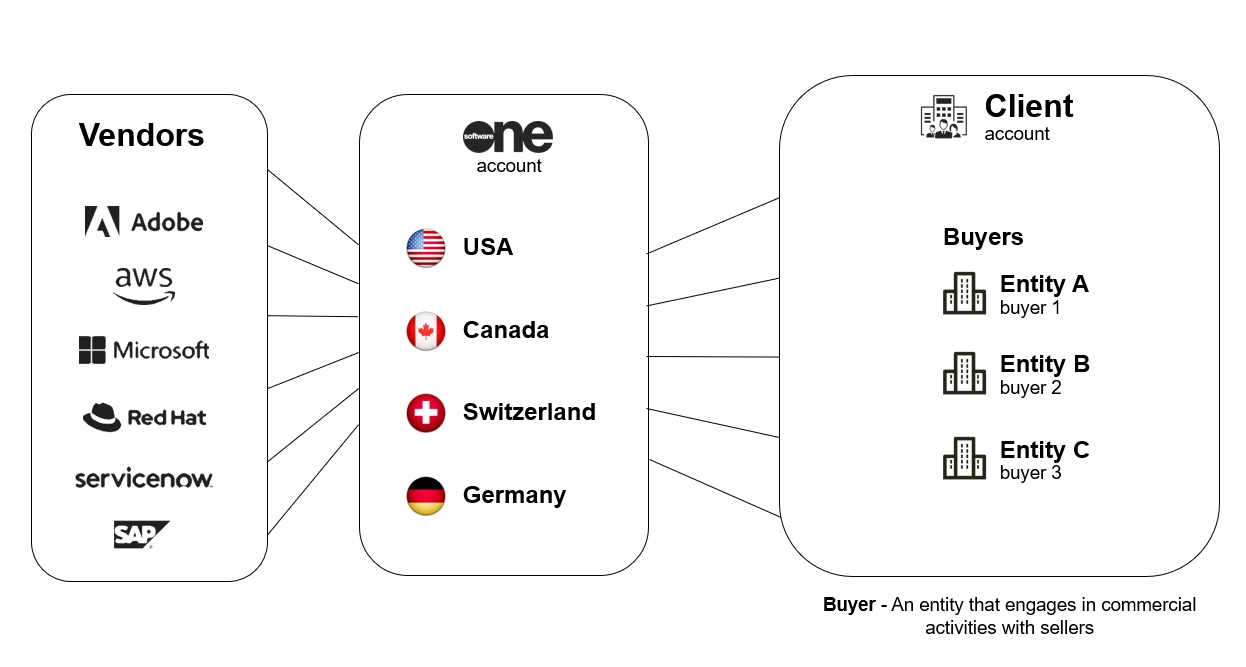
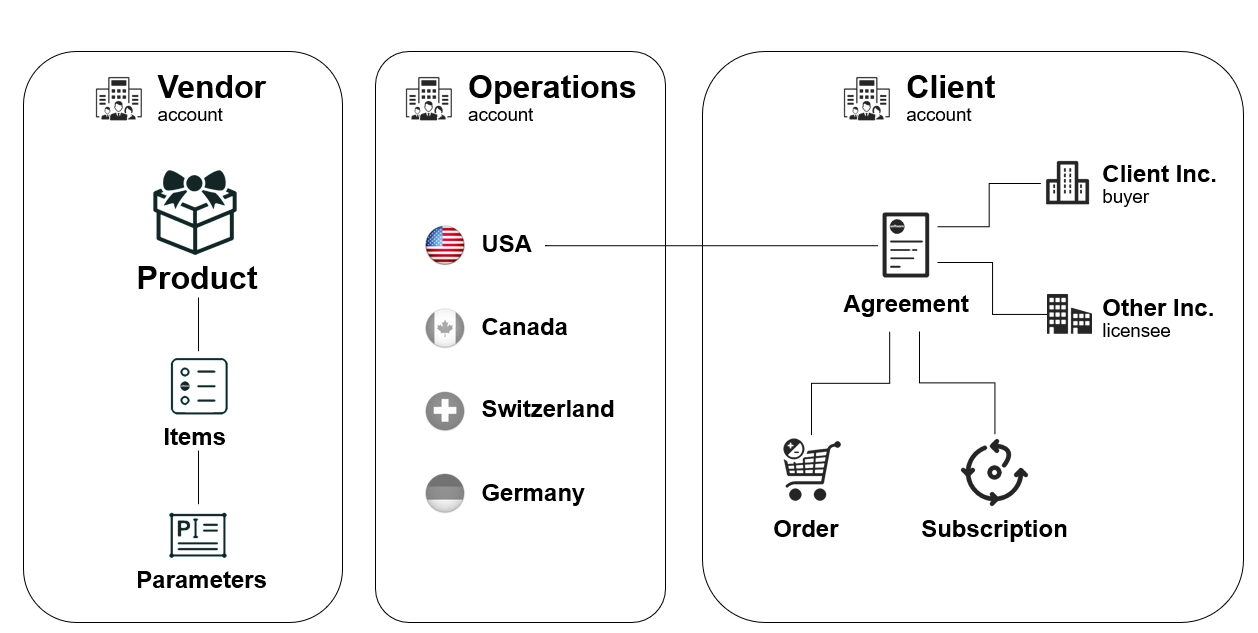
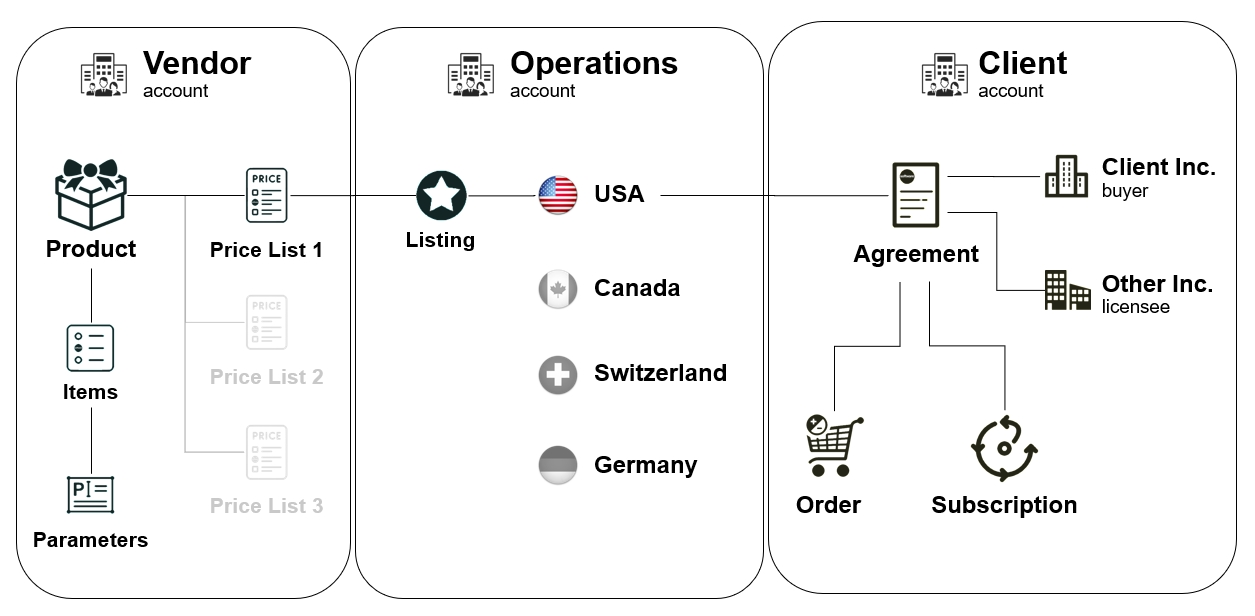
Vendors - A vendor is a company or person from whom SoftwareOne buys software solutions. Vendors develop and sell their products and services. Examples include Microsoft, Dropbox, and more.
Distributors - A distributor is an entity that resells software solutions sourced from multiple vendors to resellers. Distributors facilitate software procurement in cases where direct relationships with vendors are not feasible.
Associates - Associates are internal SoftwareOne associates who administer the business network. Our associates are involved in various processes throughout your journey with both SoftwareOne and the Marketplace Platform.
Partners - Partners represent entities or businesses that buy products or services from SoftwareOne for resale to other businesses.
Clients - A client is a company or organization that uses our platform to buy software products for their own use or direct consumption.
Developers and system integrators - Developers and system integrators represent entities involved in building integrations within the business network.
Users - Users represent individuals or persons who can sign in to the platform using their credentials and perform all operations associated with their permissions. To learn more, see .
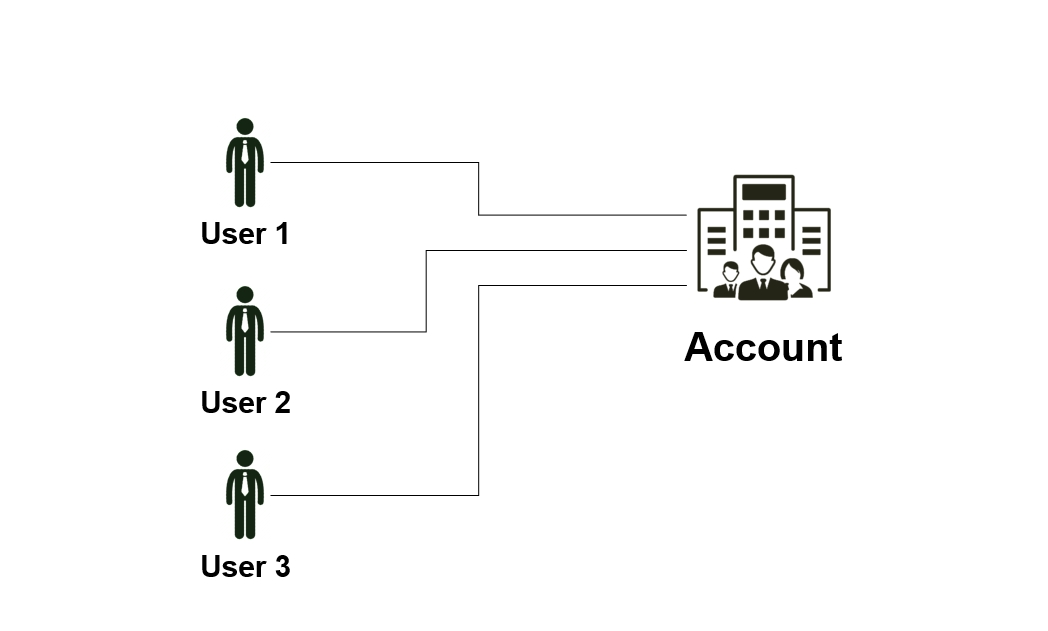
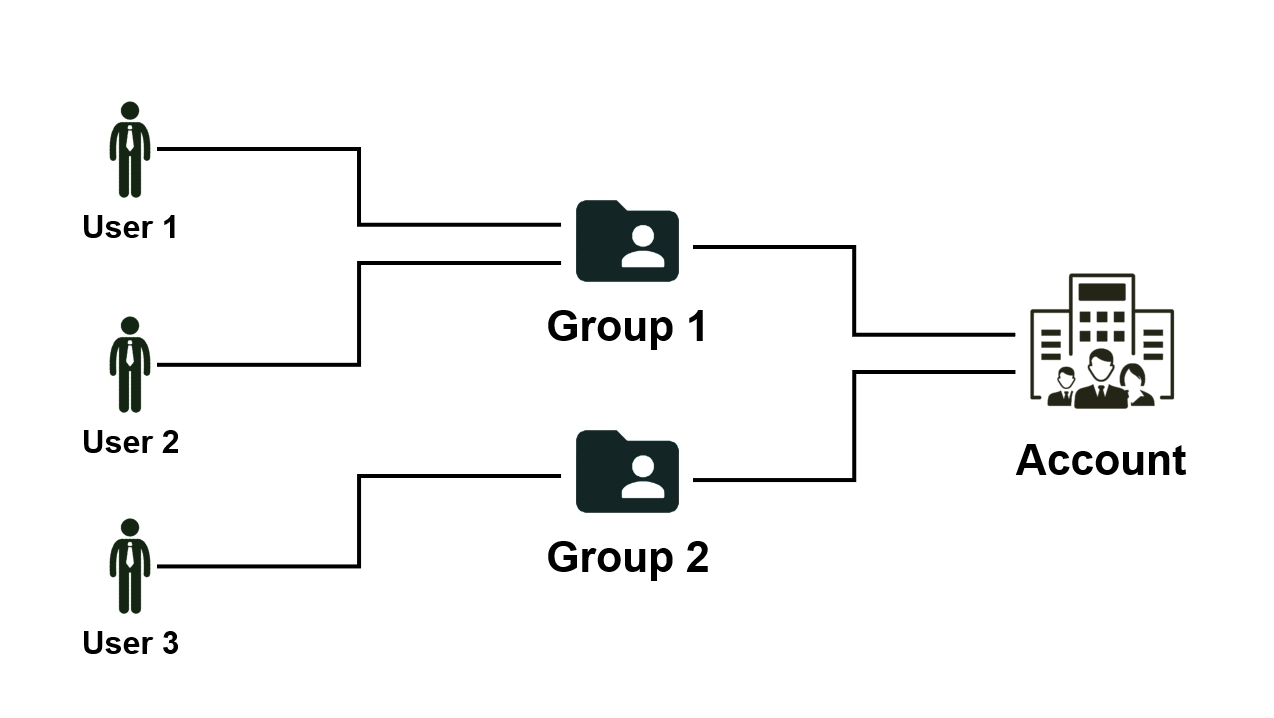
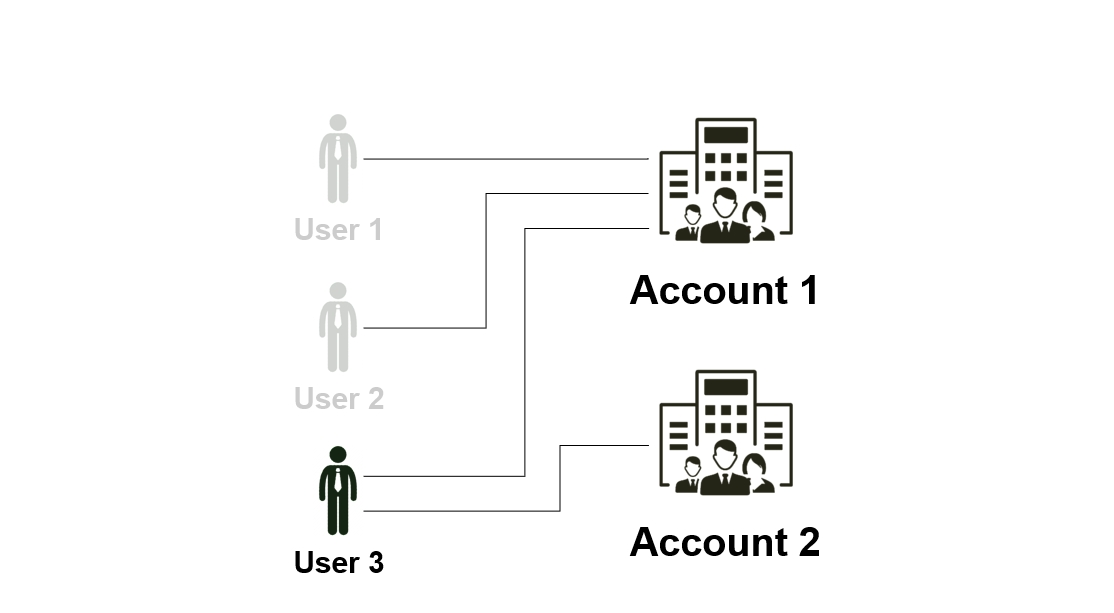
Account - An account is an object that represents a company or an organization utilizing the Marketplace Platform. Three types of accounts exist in the platform: Client account, Vendor account, and Operations account.
Client account - A client account is used by our clients and partners to establish agreements and procure software solutions for their enterprises.
Vendor account - A vendor account is used by vendors to define the product structure and make those products available for ordering through the marketplace.
Operations account - An operations account is used by SoftwareOne associates.
In the Marketplace Platform, an account can contain one or multiple users:
Additionally, users are not restricted to a single account. They can belong to multiple accounts and without signing out of the platform.
Group - A group is an object that facilitates permissions in the scope of an account. Groups contain users, and all users in the group have the same permissions. Permissions are assigned at the group level, rather than at the individual user level.
Users can also be a part of multiple groups, much like users can belong to multiple accounts. For details on how to manage groups, see .
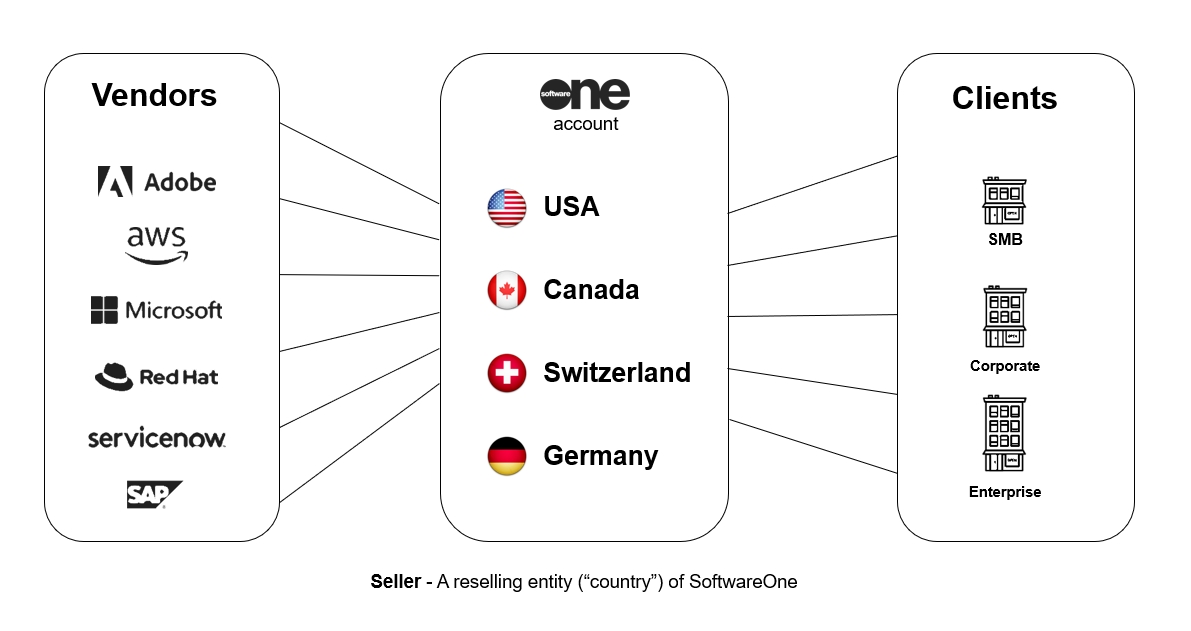
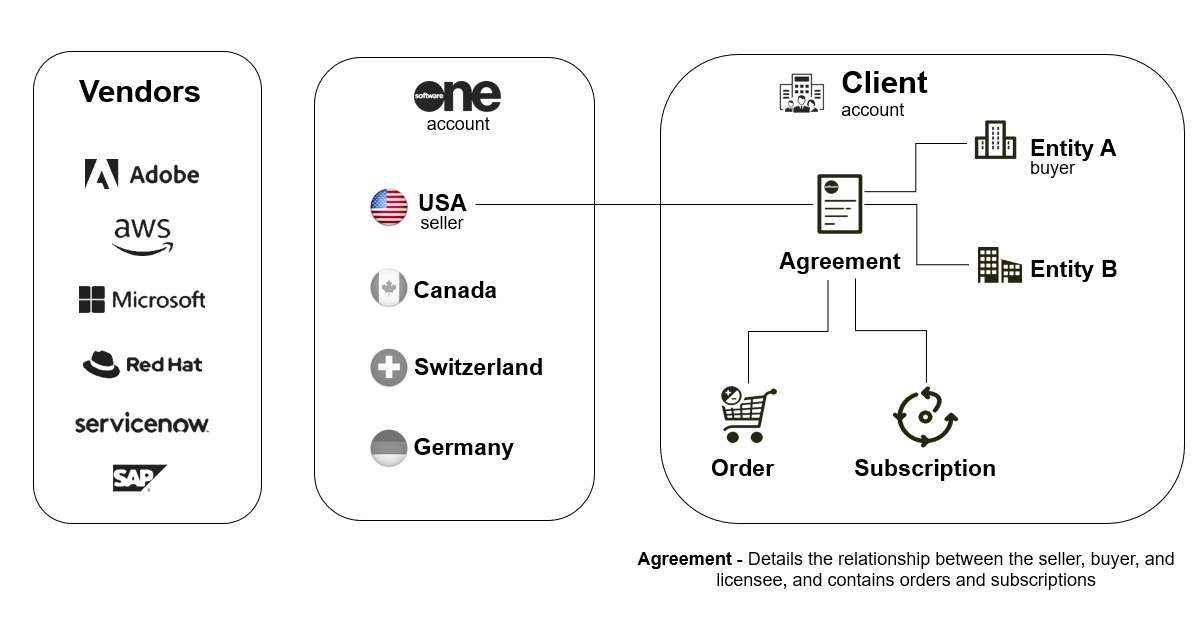
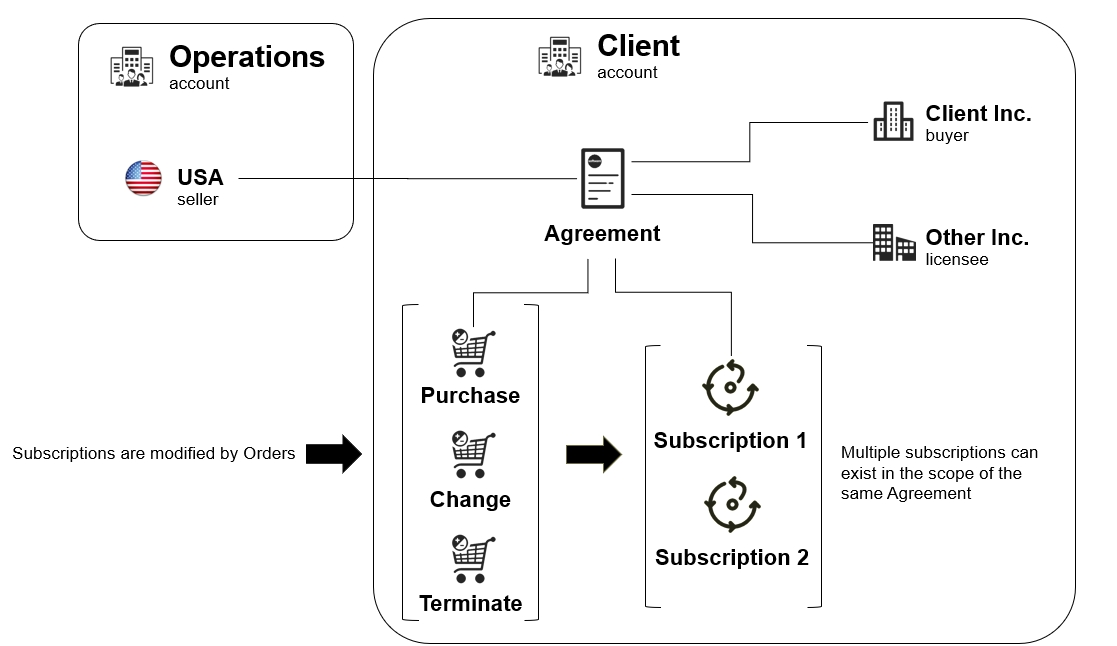
Seller - A seller is a SoftwareOne entity (for example, SoftwareOne Canada) that buys software solutions from vendors (like Microsoft) and sells those solutions to clients.
Sellers are responsible for generating issues and issuing them to the buyer entities of clients. They act as an intermediary in the transaction process.
Buyers - Buyers represent an entity that engages in commercial activities with the SoftwareOne reselling entity (known as Sellers).
Buyers are the recipients of invoices issued by SoftwareOne, and they are essential for creating orders, agreements, and subscriptions. For details on how to manage buyers, see .
Licensees - Licensees are the entities that consume the software products or services procured by the buyer. Licensees are critical in establishing agreements alongside buyers and sellers.
Client account users can view licensees and manage them through the platform. To learn more, see .
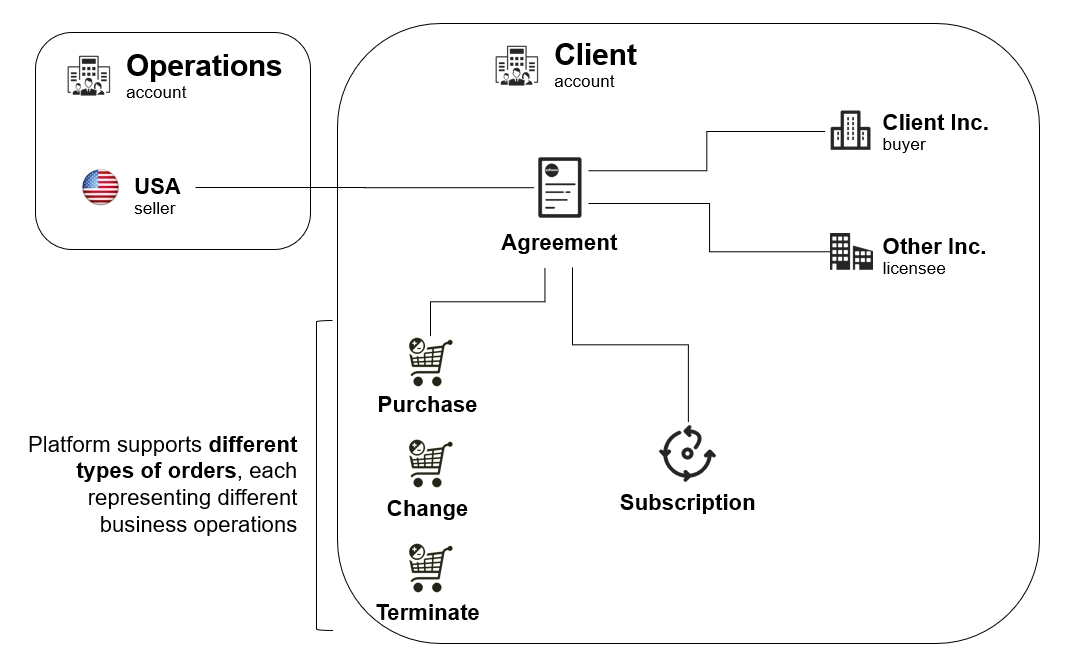
An agreement is an object outlining the relationship between the seller, buyer, and licensee. They are the foundation for placing orders and creating subscriptions in the platform.
They also establish the terms and conditions under which transactions occur. Without an agreement, orders cannot be placed through the marketplace.
For more details on agreements and how to manage them, see .
Orders - An order is an object that signifies a business transaction under the framework of an established agreement.
The Marketplace Platform supports various types of orders to support different scenarios and the requirements of our clients and partners. The following order types exist in the platform:
Purchase order - Purchase orders are created when you buy a new product or service by creating a new Marketplace agreement.
Change order - Change orders are created when you modify your agreement or change the subscription quantity, such as downsizing the license quantity or buying additional resources.
Terminate order - Terminate orders are created when you terminate your agreement or subscription with SoftwareOne.
For details on how to manage your orders, see .
Subscriptions - Subscriptions are linked to an agreement and represent service provisioned over a set period. An agreement can contain one or more subscriptions.
Subscriptions can be changed only through the order. For example, to terminate a subscription, you must place a termination order. Similarly, to add more licenses, a change order must be placed. It’s not possible to modify a subscription directly without placing an order.
For details on subscription management, see .
Products - Products are the solutions or services offered by vendors through the marketplace. They contain various items and parameters, which are also defined by vendors.
Items - Represent the individual stock-keeping units (SKUs). A product can contain one or more items, each with its specific name and price.
Parameters - Parameters represent structured data used by vendors to collect information from clients during the ordering process. Examples of this information might include contact details, address information, domain name, and more. Parameters can also be used by vendors to pass information to clients during provisioning.
A Price List is an object that holds key pricing details of each item within the product.
Vendors can define the price lists for different regions. These price lists are linked to specific sellers and are organized through an object called Listing.
The Listing object is established by SoftwareOne associates after reviewing products. It links the product price list with the seller, ultimately making the product available for our clients in the SoftwareOne Marketplace.
The Marketplace Platform is a SaaS application with three user interfaces, each catering to specific user types. These interfaces ensure that all actors can interact with the platform according to their specific business requirements.
The platform provides three distinct user interfaces, namely the Client Portal, Vendor Portal, and Operations Portal.
Client Portal - Accessed by our clients and partners for software procurement.
Vendor Portal - Used by vendors for setting up and configuring products.
Operations Portal - Used by internal SoftwareOne associates for administration-related activities.
You can access the platform from an up-to-date desktop or mobile browser. For a list of supported browsers, see .
To access the Marketplace Platform user interface (UI):
Navigate to the sign-in page: .
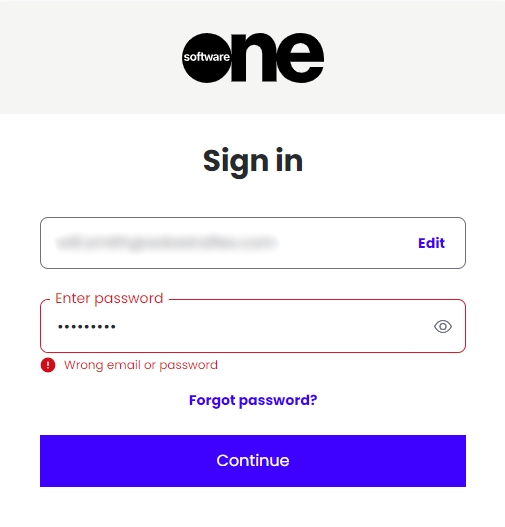
Enter the email address associated with your account and select Continue.
Enter your password and select Continue. If the sign-in is successful, the Home page is displayed.
If you provide inaccurate credentials, an error message is displayed.
If you can’t remember your password, select the Forgot password? link on the Sign-in page and then follow the instructions. For more information, see .
The platform provides a seamless and intuitive interface, allowing access to the different modules and features within those modules. This section describes how to navigate the platform.
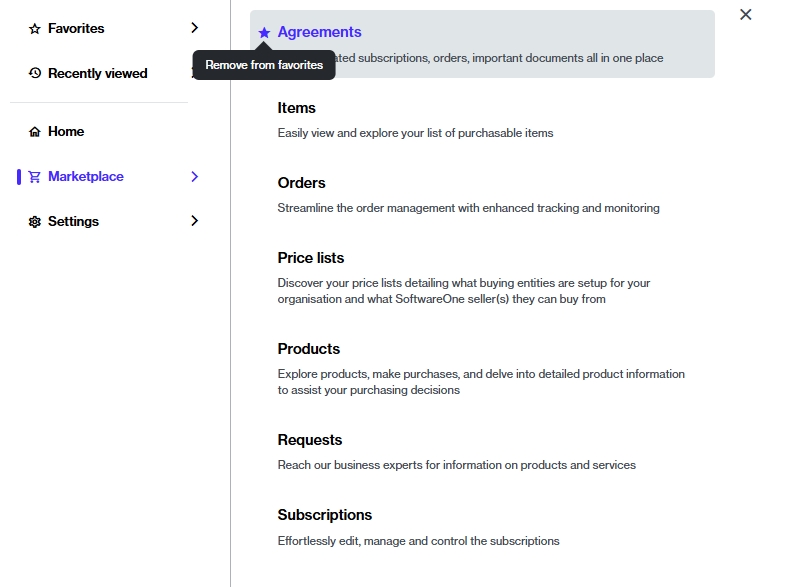
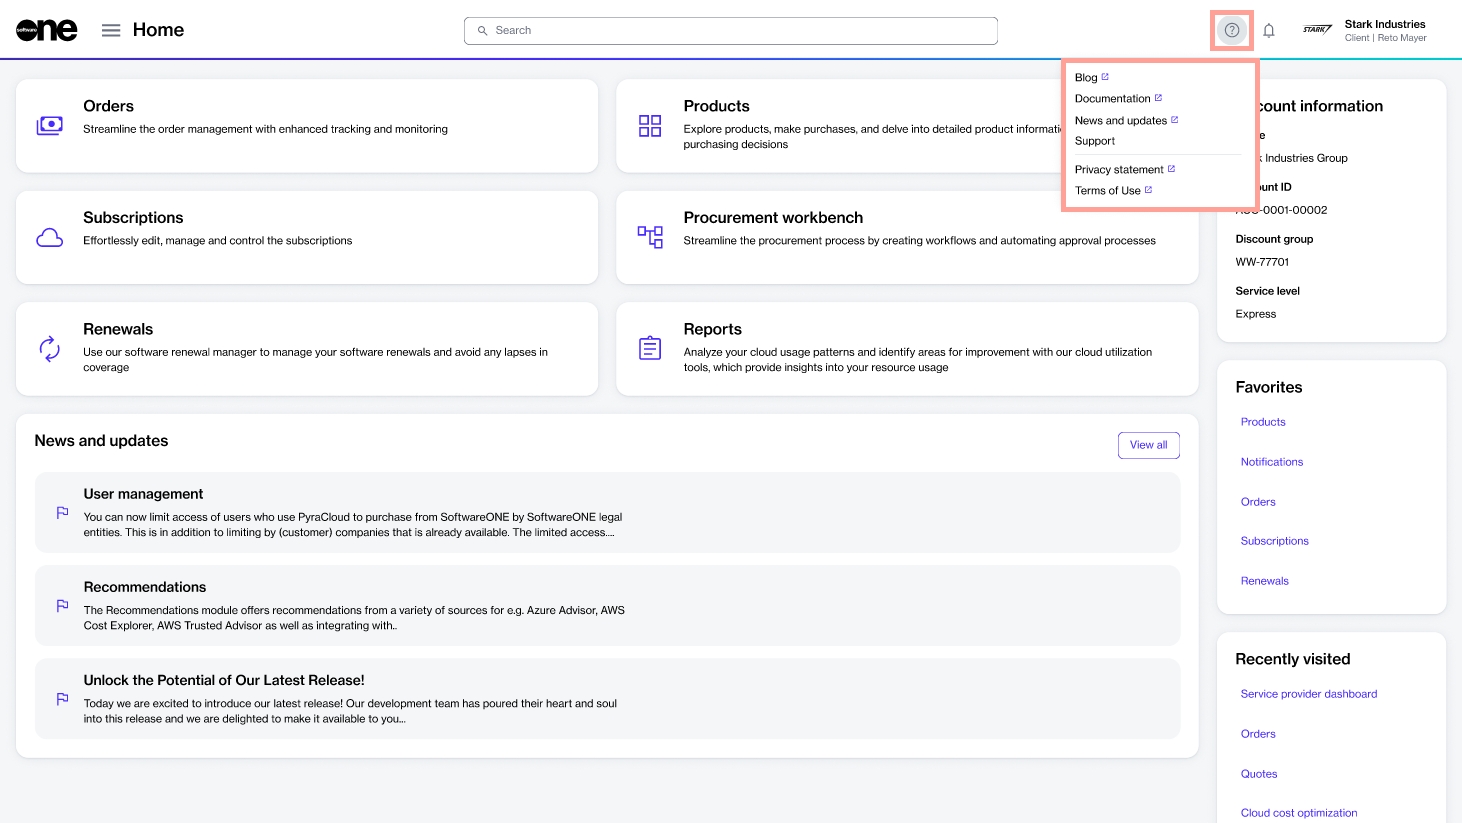
The Home menu at the top left opens the main navigation menu, provides access to all modules enabled for your account.
The Search bar lets you search for various objects in the platform, such as your orders, agreements, subscriptions, and more. You can also search for specific products and items in our catalog.
You can also use search to find user documentation. For example, you can search for "manage subscriptions" to read documentation about how to manage your subscriptions.
When performing a search, start by choosing the category you want to search across and then enter the search term. Our platform supports free text, which means you can enter all or part of the object's ID or name. For example, when searching for an agreement using its ID, select the Agreements category and then enter the full order ID (such as ‘AGR-8981-7039-6781’) or part of it (such as 6781). The platform will then display results matching your specified search term.
The Help icon contains links to various resources, including the , product documentation, , and our legal pages.
It also contains a Support option, allowing you to easily .
The Spotlight icon opens the Spotlight widget, containing all tasks requiring your attention. To learn more about this feature, see .
The profile menu lets you and . It also contains the Sign out option.
Information cards are small, interactive cards that display the key properties of an object within the platform.
These cards appear when you hover over an object's name. For instance, if you hover over an agreement, you'll notice that an information card appears and it shows you more information about that agreement.
Information cards make it easy to access information quickly. They display all the key attributes in one place, allowing you to learn more about the object without navigating to its details page.
The information displayed within a card might vary depending on the object, but each card contains general details, such as the object's name and ID, as well as the created and updated dates.
Information cards also contain quick links to the related objects. Selecting these links redirects you to the details page of the related object. For instance, if you select the licensee name, the details page of the licensee opens.
You can close a card by selecting Close in the upper right or by selecting anywhere outside the card. Alternatively, pressing the Esc key also closes the card.


Your profile contains the information associated with your account, including your name, email address, and preferences. You can edit your profile to keep your information accurate and up to date.
To update your profile:
Select your profile menu in the upper right, then choose My profile.
On your profile overview page, select Edit. The Edit user page opens.
Change the General settings as necessary:
Profile picture - Add or update your profile picture. You can add a photo of yourself, a logo, or anything that represents you and helps others identify you easily on the platform. Your image must be in PNG or JPG format. The maximum file size is 5 MB.
First name - Update your first name.
Update your Preferences as necessary:
Language - Choose your language preference.
Regional settings - Select the date format you want to use.
Select Save. A message is displayed stating your profile has been updated successfully.
The Spotlight widget on the Home page is designed to highlight key platform objects that may require your attention.
These objects include your agreements, orders, subscriptions, invoices, and more. For example, if you have any overdue invoices, they will be spotlighted so you can take the necessary action. Similarly, expiring subscriptions are also included, so you can manage the renewal on time.
The widget is displayed on the Home page by default, but you can also access it by selecting the spotlight icon in the status bar.
Within the widget, the information is organized by object type; for example, renewing and expiring subscriptions are displayed under Subscriptions, orders that may be querying for additional information are shown under Orders, and so on.
The widget also provides a total count of items for each category, so you always know how many items need your attention. By default, a maximum of five items is displayed. If there are more items in a category, you can select the view all link to view those items on the object's main page.
SoftwareOne's legacy Partner Portal is being transitioned to the Marketplace Platform.
The Marketplace Platform offers the same self-service capabilities as the Partner Portal, but also includes several additional features that enable you (our partners) to expand your service offerings. The platform provides a more unified and streamlined experience, allowing you to take advantage of features that are specifically designed for you.
This topic outlines what you can expect during the transition and details the steps you must take to continue transacting with us.
Before we begin the migration process, you'll see a message in the Partner Portal indicating that your account will be migrated.
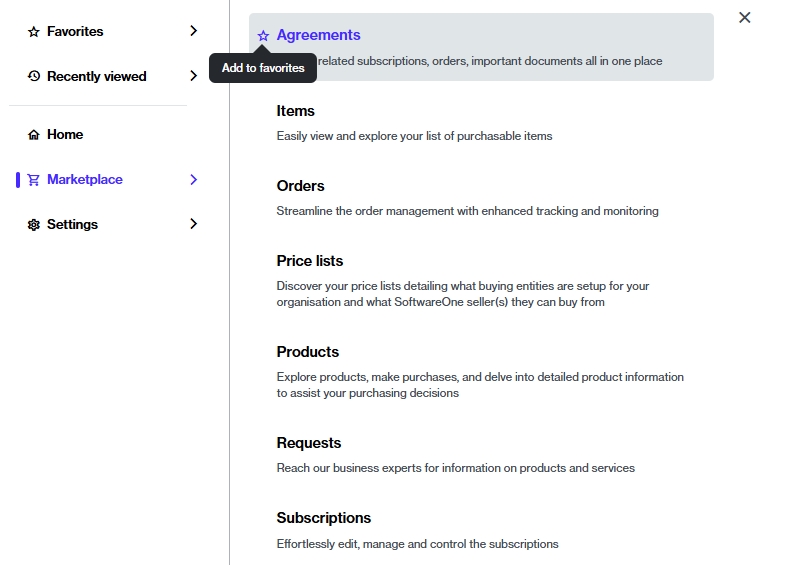
If you use certain pages very often, you can mark those pages as your favorites. This way, you can find your most-used pages easily. Once added, favorites appear in the Favorites section of the main menu.
To add a page to your favorites:
In the main navigation menu, navigate to the required page, for example, Agreements.
There are three ways to verify whether your account is configured as a partner account in the Marketplace Platform.
You can check this through the following pages, available under Settings in the main navigation menu:
Accounts - The page displays general information about your account. If you are set up as a SoftwareOne partner, you'll see a field labeled Partner program with the value Yes in the Additional Data section on the General tab. This field does not appear for client accounts.
Buyers
Country code - Select the country code for your phone number.
Phone number - Enter your phone number.
Chinese (Traditional)
Czech
Dutch
English (UK)
English (US)
French
German
Hungarian
Italian
Japanese
Korean
Norwegian
Portuguese
Polish
Russian
Spanish
Swedish
Licensees - On the Licensees page, partners can view their own organizations as well as third-party organizations. The Resale column indicates whether a licensee is procuring for self-consumption or reselling. If the value in the Resale column is Yes, it means the licensee will order products and services for resale purposes.

At this stage of the process, you don't need to take any action. However, we recommend that you become familiar with the terminology and experience of the new Marketplace:
Key Concepts - This page describes the key concepts and the terminology used within the Marketplace Platform.
Platform Interface - This page describes how to navigate and use the platform.
We plan and execute the entire migration process. It means you don't need to take any action.
When your account has been migrated, we'll send you an email.
You'll also see a message within the Partner Portal confirming that your account has been migrated.
When the migration has completed, the Partner Portal will switch to Archive mode. You'll still have access to your historical orders and invoices, but you won't be able to make new transactions.
Additionally, you'll receive an invitation to join the new Marketplace account. For details on how to accept the invitation and complete account registration, see Respond to Invitations.
After accepting the invitation, you can sign in and access your agreements, subscriptions, and customers (known as licensees).
After joining the account, you must enroll in the SoftwareOne Cloud Solution Provider Partner Program (SWO CSP Partner Program).
This enrollment is required to transact with all CSP products in the platform. For enrollment instructions, see How to enroll in the SoftwareOne CSP Partner Program.
Once you are enrolled and have your certificate, you can start transacting. If you need assistance, contact Marketplace Platform Support.
Hover over the page and select the star icon. The star icon changes from empty to filled, and the page is added to your Favorites.
You can remove a page from your favorites by selecting the same star you used to mark it as a favorite.
When the star icon changes from filled to empty, it implies that the page is removed from your favorites.
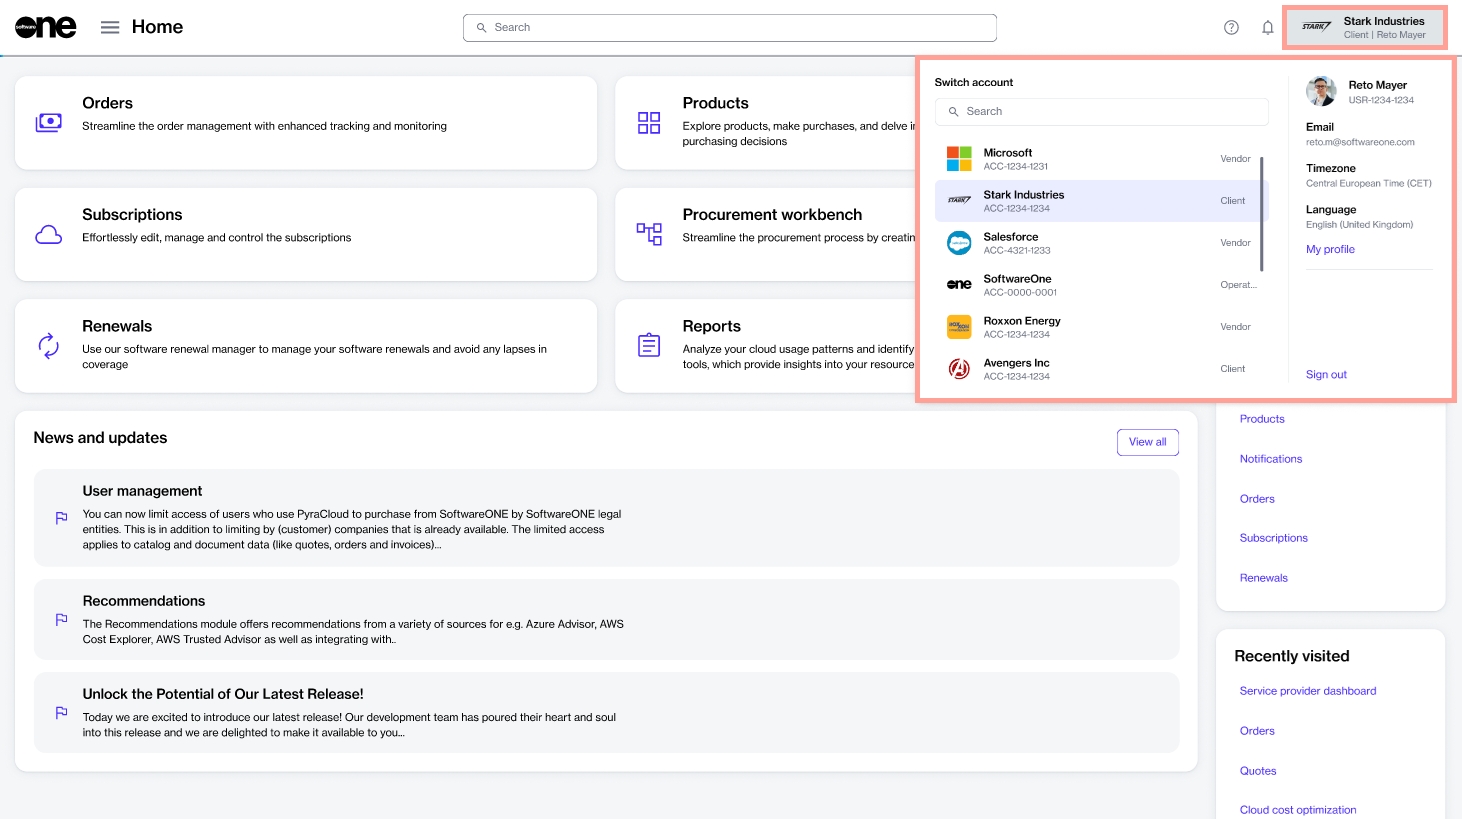
Sign in to your account, then select your profile menu in the upper right. All accounts you belong to are displayed under Switch account.
Select the account you want to switch to. Use the Search field to find the required account easily. You can search by the account name or its identifier.
Your account is switched, giving you access to the modules and settings linked to your profile.
The Marketplace Platform gives you the flexibility to upsize or downsize your licenses at any time.
If you need more licenses, you can alter the subscription to add additional licenses. You can also lower the number of licenses if you no longer require all of your ordered licenses.
When reducing the number of licenses, the following rules apply:
If your subscription contains only one item, you can't lower its quantity to zero. In this case, you must terminate the subscription.
If your subscription contains multiple items, at least one item must have a quantity greater than zero. You can't change the quantity of all items to zero.
To add or remove licenses from a subscription:
Navigate to the Subscriptions page.
Select the required subscription.
On the subscription details page, select Edit.
In the Edit subscription wizard, complete the following steps:
A change order is created in the system and sent to the vendor for processing. The new change order is also displayed in your list of orders on the Orders page.
When the change order is being processed, the status of the subscription and the agreement change to Updating. This indicates that the agreement is temporarily locked, and no further orders can be placed under this agreement until the change order is completed.
The Settings module includes functionalities that administrators can use to manage various aspects of the account. Admins can access the module from the main menu.
In your account settings, you'll find various options enabling you to review your basic account details and manage users, licensees, groups, and other properties.
Use the following links to learn about these options and how to use them:
- Update the account information for your organization, such as your account name and logo, company contact information, and address.
- Create API tokens to access the modules programmatically and manage your existing tokens as needed.
- Track all activity within your account and view the audit records.
- View a list of buyers mapped to your account and enable, disable, or edit buyer details.
- View a list of groups in your account. Add or remove groups and edit groups as needed to easily manage the access permissions for each group of users.
- Create new licensees and manage your licensees by updating the licensee information and enabling or disabling licensees.
- Configure recipients and manage notifications and categories for your account.
- View a list of SoftwareOne entities linked to your account.
- Add or remove users from the account, resend invitation links, and edit groups to which the user has access.
SoftwareOne is a global provider of software and cloud technology solutions. Our Partner Program helps companies that sell cloud-based products and services expand their businesses by accessing new markets around the world.
The program supports partners such as Value-Added Resellers (VARs), System Integrators (SIs), and Managed Service Providers (MSPs), and other businesses like Cloud Solutions Providers (CSPs), Direct Marketing Resellers (DMRs), and Retailers to grow their revenue and scale their market presence. Our program equips partners with the tools, training, and support to accelerate growth, reach new clients, and build long-term relationships while minimizing the risks associated with competitive solutions.
Marketplace Platform and Partners Management
The Marketplace Platform includes a Partner Management feature, which allows partners to access features designed to support resale activities.
Unlike clients, who procure software or services for self-use, partners can procure SaaS products for their own use and resale to their end customers.
This is managed at the licensee level within the platform. Licensees are the end-users or consumers of a license, and they are linked to agreements in the platform. Partners can create new licensees through self-service and configure them as resale licensees. When a licensee is marked for resale, it becomes available during the ordering process, indicating that the purchase is intended for resale.
Partner enrollments and certificates
Through Partners Management, partners can also enroll in various programs, complete certifications, and apply those certificates when ordering products to access the benefits associated with those programs.
To learn more, see the following links:
The Marketplace Platform is designed to simplify the complex process of software licensing and procurement. It aims to simplify your buying journey by making it easier for you to find and compare products from multiple software vendors in one place.
Ordering products from the SoftwareOne Marketplace involves a series of steps, depending on the product's vendor. This topic describes these steps at a high level.
Accessing the product catalog
The Products page contains all products available for you to order.
You can access this page by signing in to your account and selecting the main navigation menu. All products are categorized by the vendor name and displayed as cards.
To view detailed information for a product, select the product name.
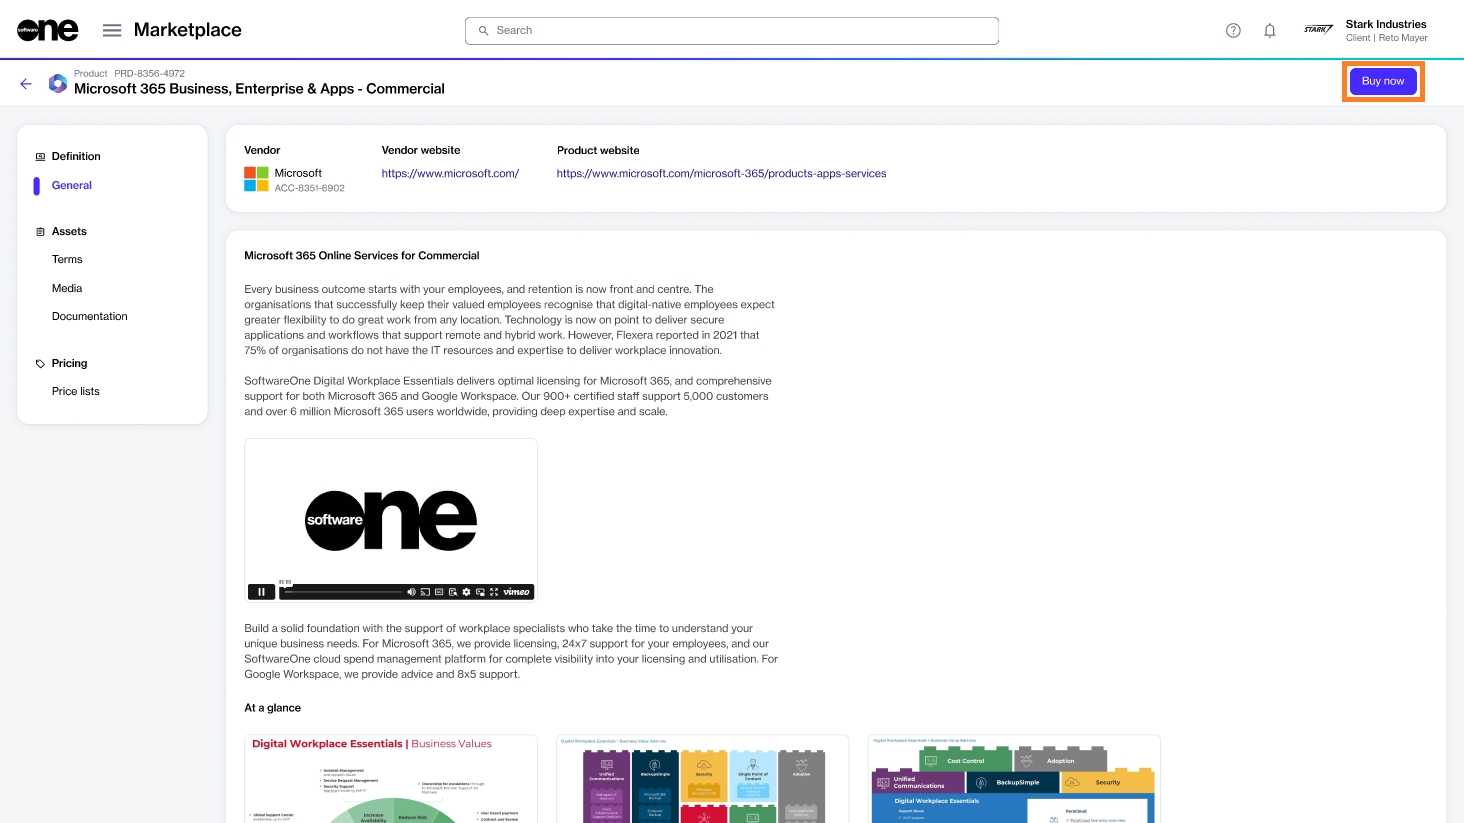
Starting the ordering process
When you are ready to order, select Buy now on the details page. The ordering process begins, containing a series of steps that must be completed to place the order.
Placing the order
The ordering steps might vary slightly depending on the product you are ordering and the information you need to provide. At a high level, the following steps are involved:
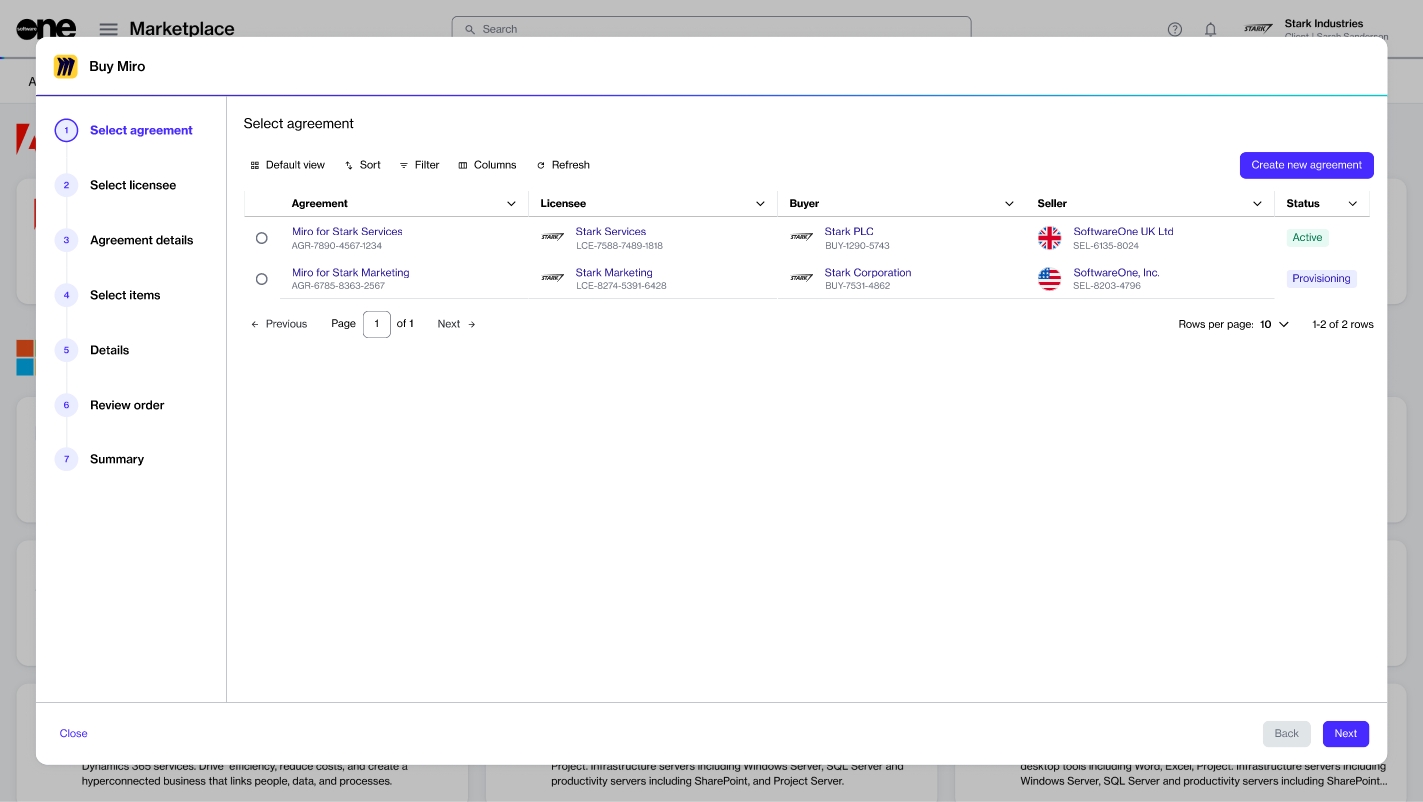
Select agreement - Select an existing agreement or create a new one. The option you select in this step determines the next step. For instance, when you create a new agreement, the Select licensee page is displayed. However, if you use an existing agreement, the Select items page opens.
Select licensee - Choose an existing licensee or create a new one.
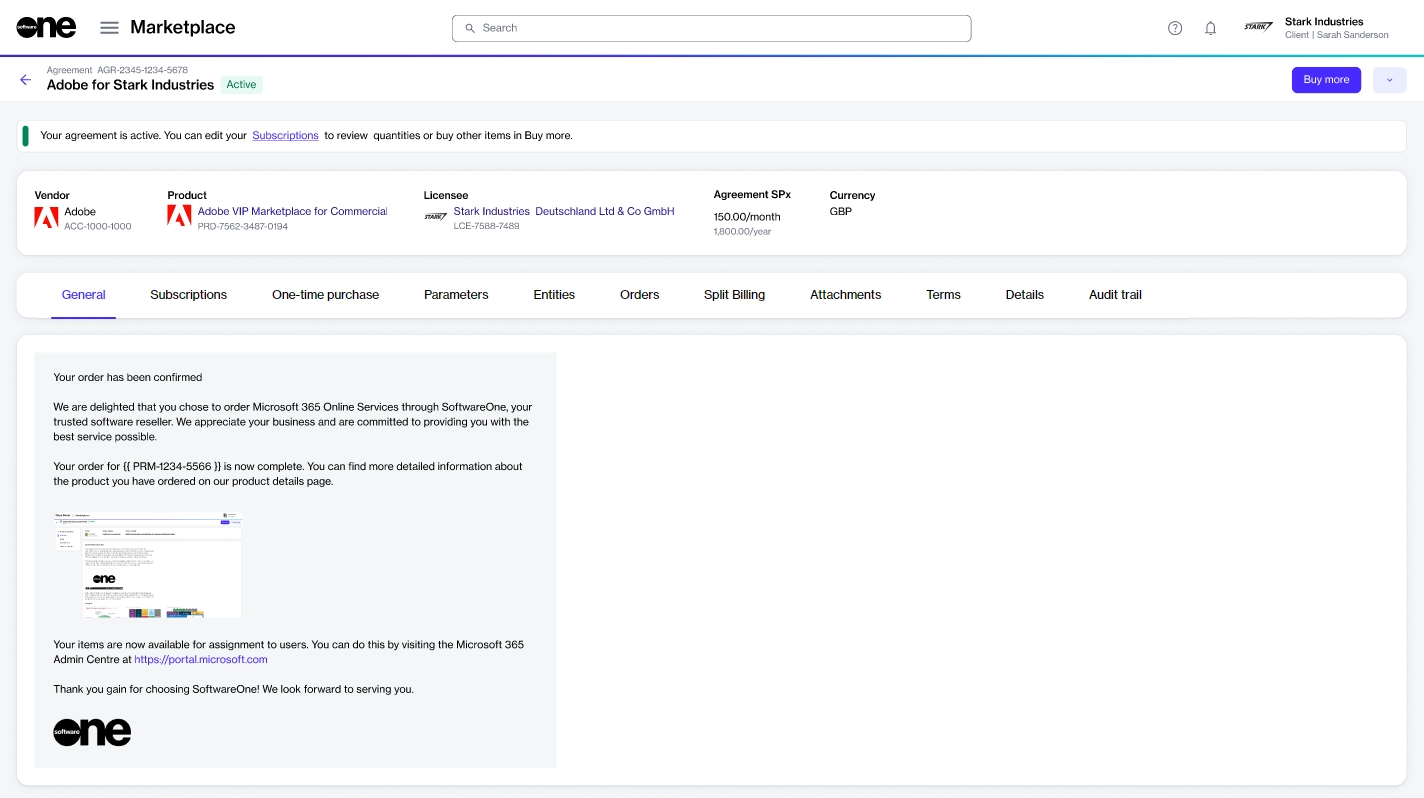
After the order is placed, we verify the details and process the order. The General tab on the displays the order's status. If there are any issues, the same details page provides information about the problem and the actions you must take so your order can be processed.
The SoftwareOne (SWO) CSP Partner Program is designed for SoftwareOne partners to ensure compliance with our established terms and conditions.
All SoftwareOne partners must enroll in this program to obtain a compliance certificate. This must be done before ordering products for resale. To learn more about this program, see Partner Programs.
You can enroll in the SWO CSP Partner Program if your account has been set up as a partner account. For details on how to check this, see How to Verify If Your Account Has Partner Capabilities.
Open the SWO CSP Partner Program details page
To open the details page:
Navigate to the Programs page.
Select SWO CSP Partner Program. The program's details page opens.
Upon successful enrollment, a certificate will be created. You'll need to select this certificate when ordering CSP products and services through the platform.
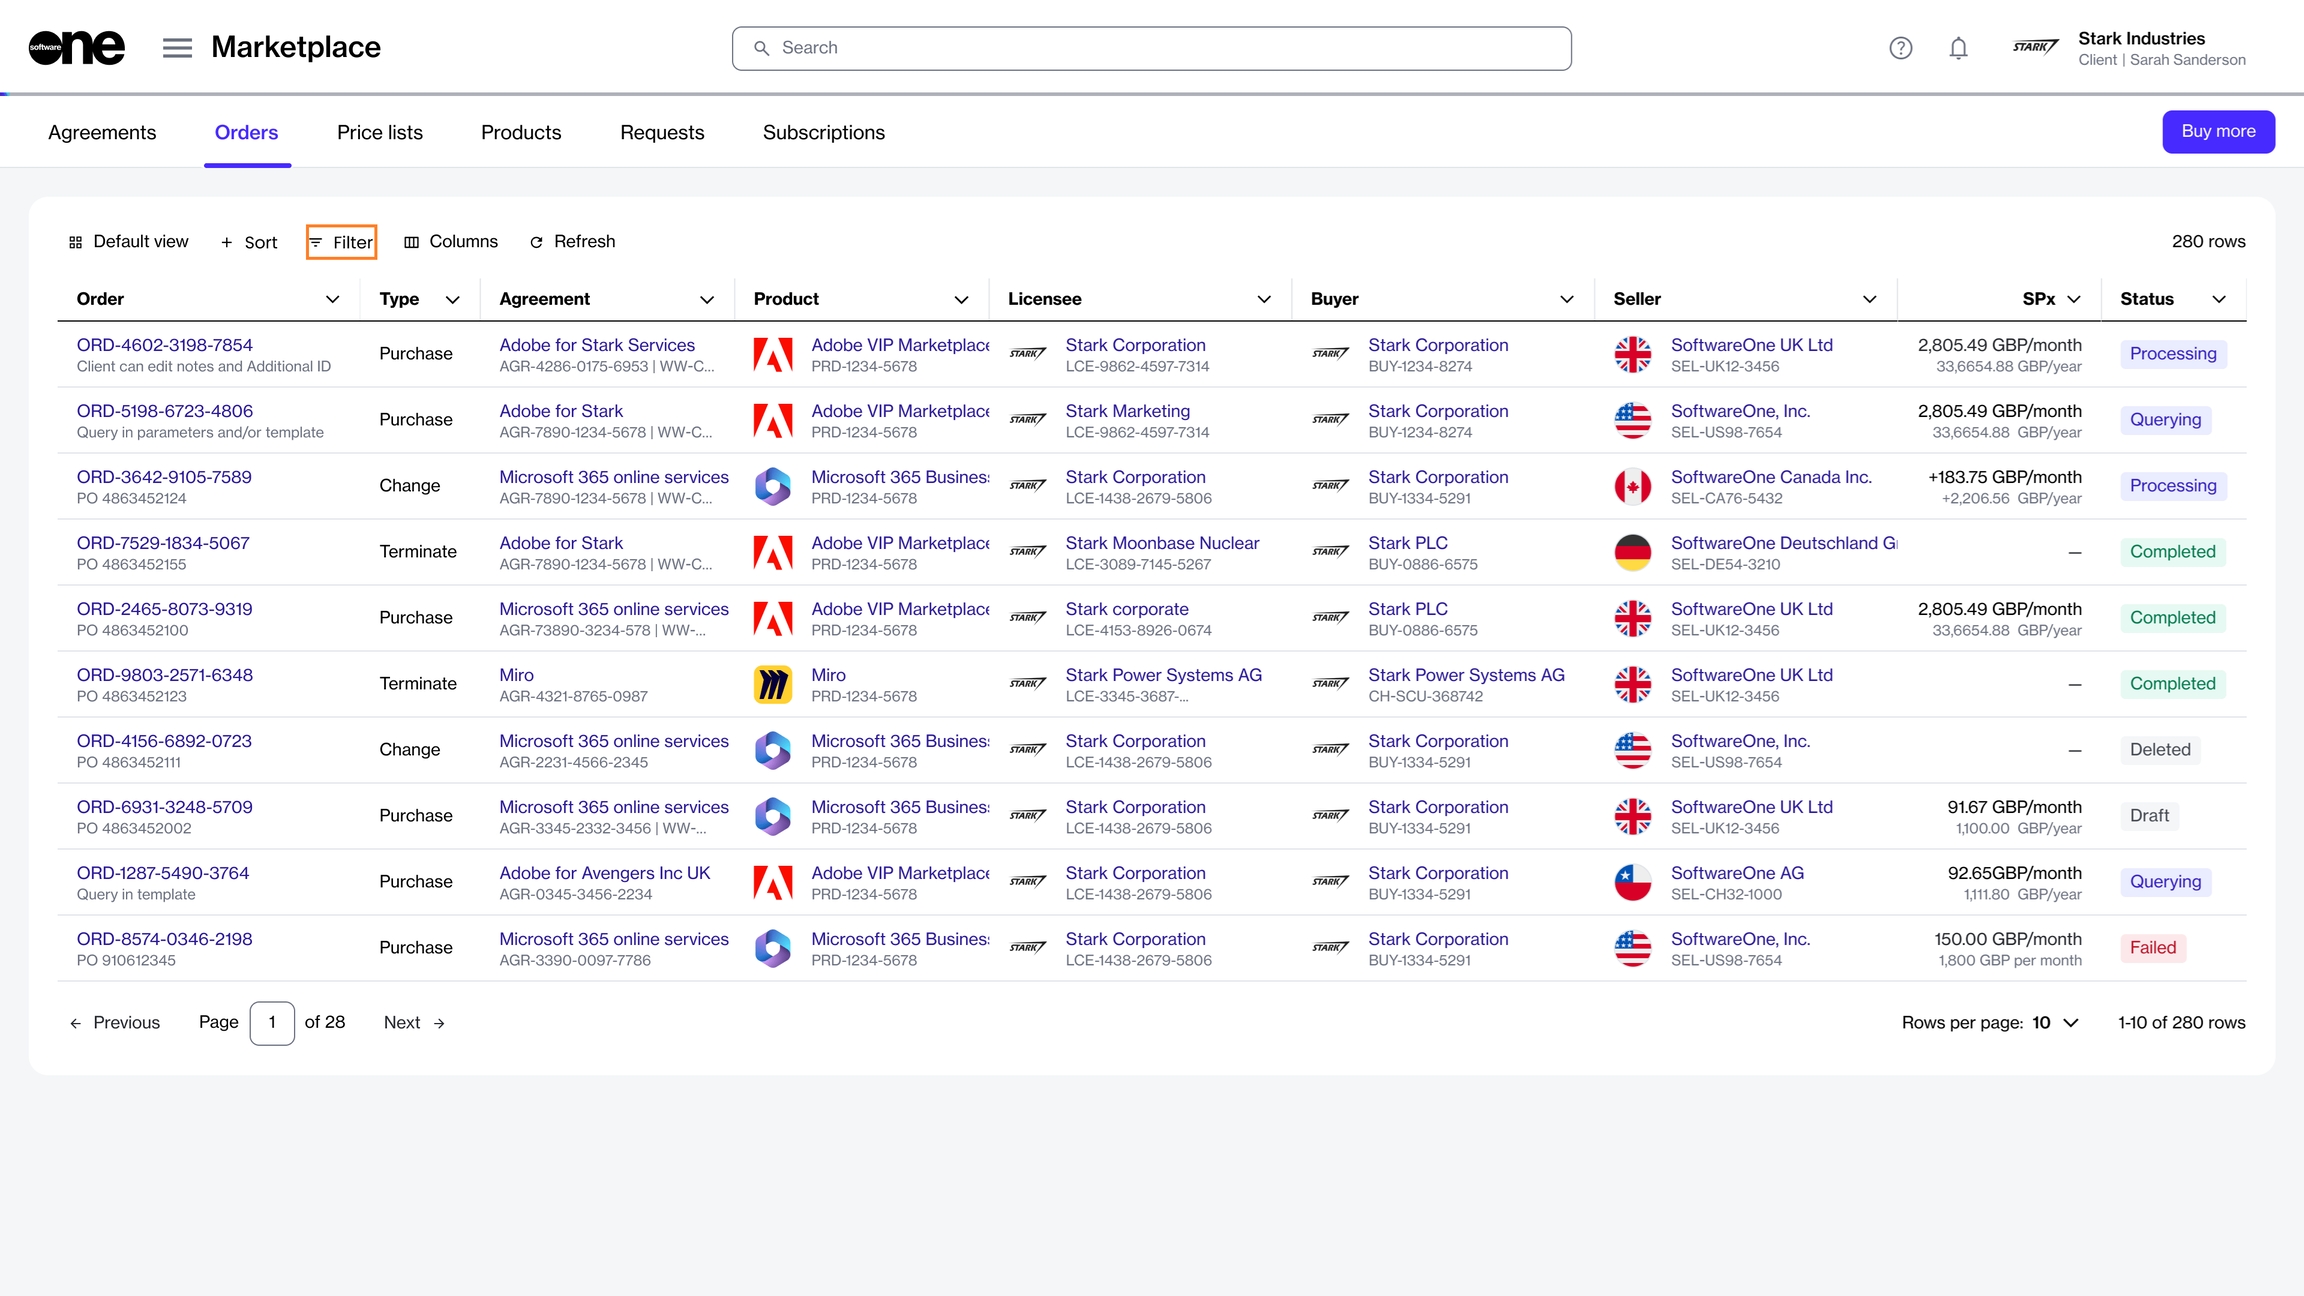
The Marketplace Platform supports various types of orders, including change, purchase, configuration, and termination orders. All orders are displayed on the Orders page.
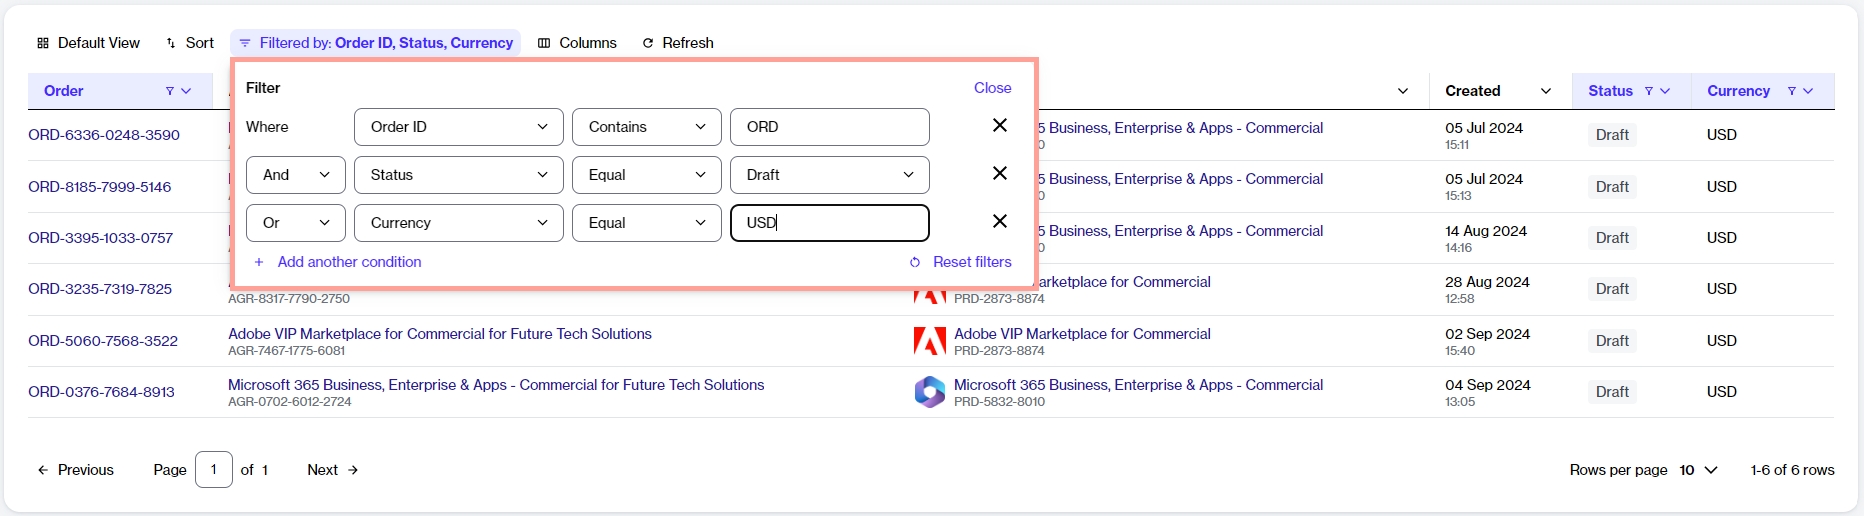
If you need to find a specific order, you can use the filter option to search for it. There are several filter options to help you narrow down the list. You can apply a single filter or create a combination of filters by selecting different fields, operators, and values. This topic describes how to use these filters.
To find an order using a filter, such as status:
Navigate to the Orders page, then select the Filter option.
Select Add another condition to open a menu of conditions.
Define the conditions:
In the first field, choose the property. For example, to filter your orders by their status, select Status.
In the second field, choose the search operator. Different operators are displayed depending on the condition you selected in the first field. For this example, leave the value set to
Your list of orders is refreshed according to the filters. To reset the filters and revert to the default view, select Reset filters in the filter box.
To view detailed information for an order, select the ID in the Order column. You can then view basic order information and specific order details such as items, subscriptions, and more.
From the order details page, you can complete these additional tasks:
.
.
.
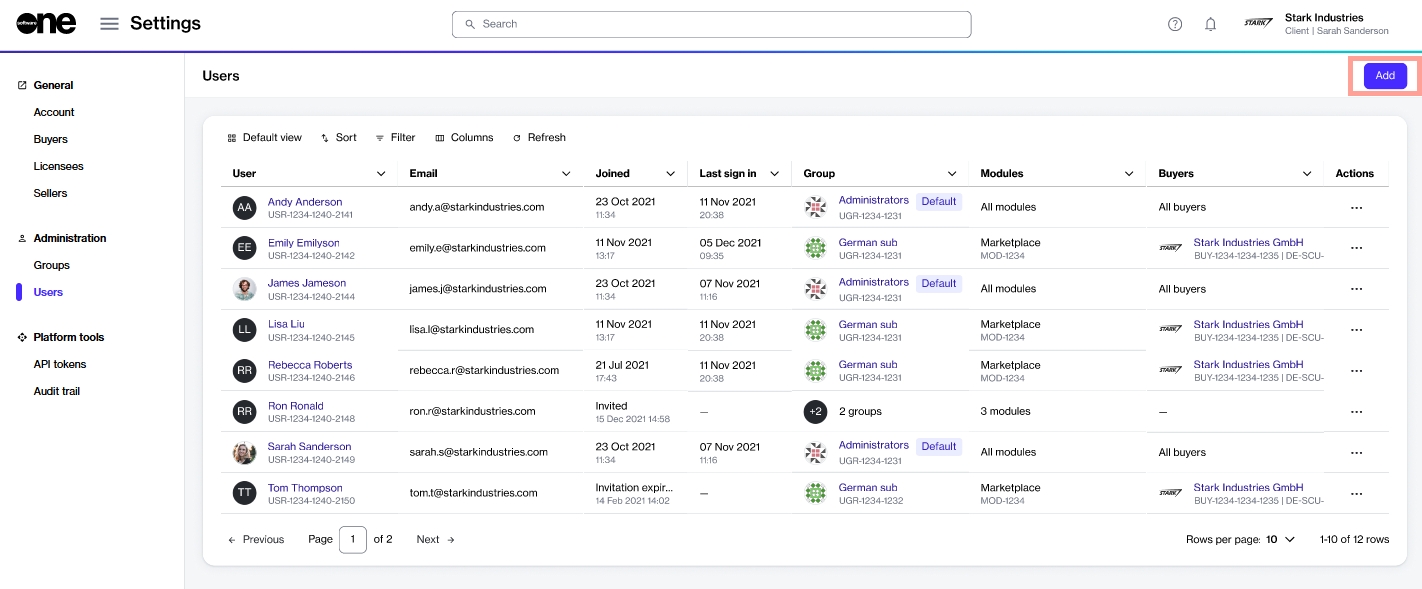
Account administrators can invite new users to the account from the Users page in the platform. The page is available under Settings in the main menu.
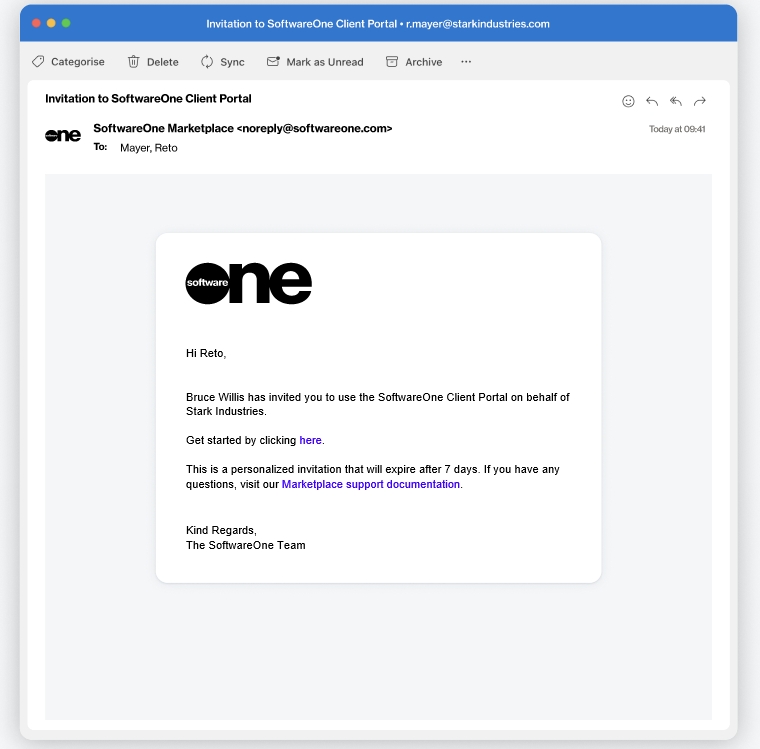
Admins can invite individuals who may already have an account, as well as individuals who don't yet have an account. When an administrator invites someone, an invitation email is sent. It's important to take action once the invitation has been emailed. Account invitations are valid for only 7 days from the send date. After 7 days, invitations expire and will need to be resent.
Administrators can invite users through the Add option on the Users page. See for instructions.
When creating the invitation, you must provide details, such as name, email address, and contact information of the individual. You'll also need to select all the groups that the individual should belong to.

This tutorial describes how SoftwareOne partners can set up resale licensees within the platform.
Licensees are the entities that use the software products or services procured by the buyer. Partners who wish to order products from the Marketplace and resell them to other organizations must configure these licensees as resale licensees.
A resale licensee is defined as a licensee that engages in resale activities, specifically ordering products for resale rather than for their self consumption.
Make sure you have permissions to create new licensees. Only account administrators can create and manage licensees in the platform.
To use the Marketplace Platform effectively as a Partner and make the most of its functionality, it's important to understand how the platform works and be familiar with its concepts.
Partner accounts include all the features and functionalities of client accounts, along with additional features to facilitate transactions and procurement within the Marketplace.
Watch the video guide for details on using the Marketplace Platform as a SoftwareOne partner, or see .
The Cloud Solution Provider Partner Program allows you to partner with SoftwareOne as your indirect CSP provider. To learn more about this program, see .
You can enroll in this program if you meet these conditions:
You have a Marketplace account with partner capabilities. For details, see
Items - Update the quantity in the New qty field. You'll notice that the sales price of the subscription changes as you adjust the quantity. When done, select Next.
Details - Add or update the reference ID and your comments. Then, select Next.
Review - Check the details and select Place Order.


Agreement details - Fill out the contact form.
Select items - Choose the items you want to order and adjust the quantity of the selected items.
Additional information - Add the additional IDs for the order and agreement.
Review order - Review the order details, read the terms and conditions, and place your order.
Summary - Review your order summary.

Start the Add Certificate wizard
To start the wizard:
On the details page, select the Certificates tab.
Select Add.
Follow the wizard to complete the enrollment
Certificant - Choose the buyer you want to enroll in the program, then select Next.
Details - Provide a name for the certificate and select Next.
Overview - Review the details and then select Add.
Summary - Select View details to open the enrollment details page. Otherwise, select Close.

In the third field, type or select a value from the list of preconfigured values. The values displayed in this field are determined by your selection in the first field. To see your draft orders, select Draft.
If needed, select Add another condition to specify additional conditions as needed.
Start the Add Licensee wizard
To start the wizard:
Navigate to the Licensees page.
On the Licensees page, select Add to start the Add Licensee wizard.
Set up your new licensee
General - Provide the following details and select Next:
Logo - (Optional) Add a logo for the licensee. You can upload an image or drag the image into the field.
After you have configured the licensee, you can order products for resale through the Products page in the platform. See How to Order Products for Reselling for details on how to start the ordering process.
You are signed up for the Microsoft Cloud Solutions Provider (CSP) program as an indirect reseller. For details on how to enroll, see Enroll as an indirect reseller.
You are signed up for the SWO CSP Partner Program. For details, see How to Enroll in the SWO CSP Partner Program.
You have the Microsoft Partner Network (MPN) ID and email address for your Microsoft partner account. To find the ID in the Microsoft Partner Center, select the Settings (gear) icon > Account settings > Organization Profile > Identifiers. Then, find the PartnerID with the Type Location that matches the country/region of this CSP account.
Open the CSP Partner Program details page
To open the details page:
Navigate to the Program page.
Select Cloud Solution Provider Partner Program. The program's details page opens.
Start the Add Certificate wizard
To start the wizard:
On the details page, select the Certificates tab.
Select Add.
Use the Add Certificate wizard to enroll
Complete the following steps in the wizard, ensuring you enter or verify all required information at each stage.
Certificant - Choose the buyer who will represent this certificate and select Next.
Partner details - Do the following, then select Next:
The enrollment takes a few minutes to complete as we verify the details. Once the enrollment is complete, a certificate is created.
When your certificate becomes active, you can use it during the ordering process. This means that when you create a new agreement using a licensee set up for resale, the certificate will be displayed. You'll need to select the certificate to associate it with your agreement.
The Marketplace Platform sends notification emails based on specific events in your account. These alerts are triggered according to the notification categories enabled for your profile.
If you want to opt out of these alerts, you can update your preferences. There are two ways to do this:
By signing in to your account and using the My profile option.
By selecting the Manage notifications link in the footer of your notification email. This option allows you to update preferences without signing in to the platform.
To update your preferences using the My profile option:
Sign in to your account, then select the profile menu in the upper right.
Select My profile.
Go to the Notifications preferences tab. All notification categories are displayed.
Select the Edit option, then in Edit notification preferences, use the checkboxes to enable or disable the category.
To update your preferences from your notification email:
Open the notification email you received.
Scroll down to the footer and select the Manage notifications link. The Manage notifications form opens in your browser.
In the Manage notifications form, use the checkboxes to enable or disable the category.
Select Save to save your preferences.
The tutorial describes how you can order products for resale through the Marketplace Platform.
When ordering products, there are two options for agreements:
If you have an existing agreement, you can use that agreement. However, you'll need to make sure that the agreement is mapped to a licensee configured as a resale licensee.
If you don't have an agreement, you can create one during the ordering process and select an existing licensee configured as a resale licensee.
Before starting this tutorial, make sure you have the following:
A resale licensee in the active state, or permission to if you don't want to use the existing one. Licensee selection is required when setting up a new agreement.
Company details of your client, like the company name, registration ID, and address. These details are required for creating a new Microsoft tenant.
The contact details of your client who will manage the Microsoft account.
To start the process:
Navigate to the Products page.
Select the required product, for example, Microsoft 365 Business, Enterprise & Apps - Commercial.
On the product details page, select
When your order has been placed, we verify the order details.
If there are issues with your order, the General tab on the will provide information about the problem and the actions you must take before your order can be processed.
You can add new items to your agreement using the Buy more option on the agreement details page.
Items can only be added to the agreements in the active state. If the agreement is not active, the Buy more option is unavailable.
When you select Buy more, the platform automatically detects the agreement and takes you directly to the Items step of the purchase wizard, where you can choose the items you want to order and place an order.
To add new items to your agreement:
Navigate to the Agreements page.
Select the required agreement. Make sure that the agreement is active.
On the agreement details page, select Buy more to start the purchase wizard.
In the Items step, do the following:
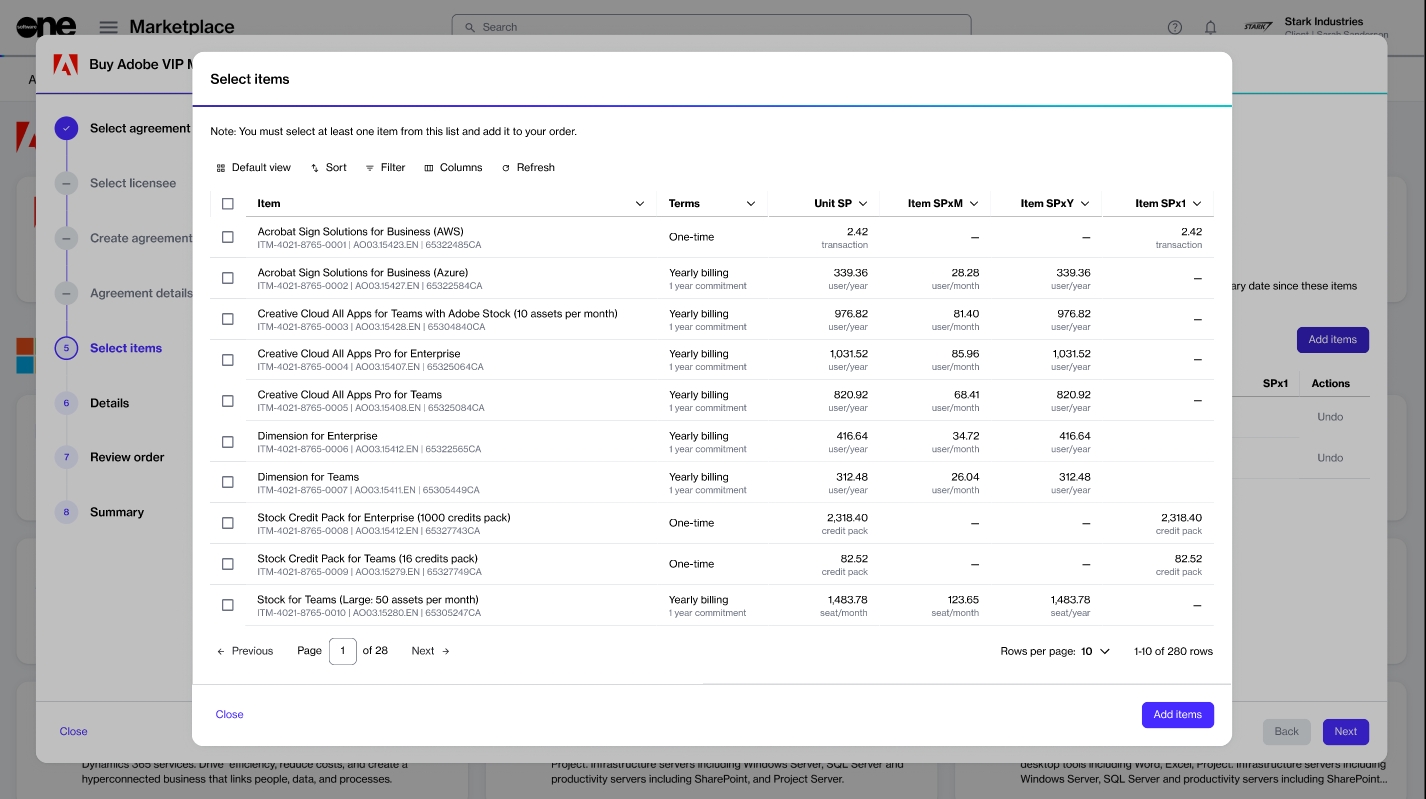
Select Add items. A new window (also called Select items) opens, displaying the products you can order under this agreement.
Select the items you want to order. You can use filters to find the items easily. When selecting items, be sure to verify the billing terms and the duration of the subscription.
In the Details step, add or update the reference ID and your comments. Then, select Next.
In the Review order step, verify the information and select Place order.
A change order is created for the agreement and sent to the vendor for fulfillment. Select View details to go to the order details page or select Close.
When your order has been placed, the agreement's status changes from Active to Updating. It means that the agreement is temporarily locked, and no further orders can be placed under this agreement until the current change order is completed. You can check the status of the order on the Orders page or within the Orders tab on the agreement details page.
To get started as a partner, you must have an account on the Marketplace Platform. This account must be set up as a partner account.
While partner accounts have the same features and functionalities as client accounts, they also provide additional features to help you procure for your end customers and transact successfully on the Marketplace.
Once you've signed in to your account, there are various ways to get started, depending on the actions you want to take. Use the following table as a guide to access the most important topics:
Use these additional resources to learn more about the platform:
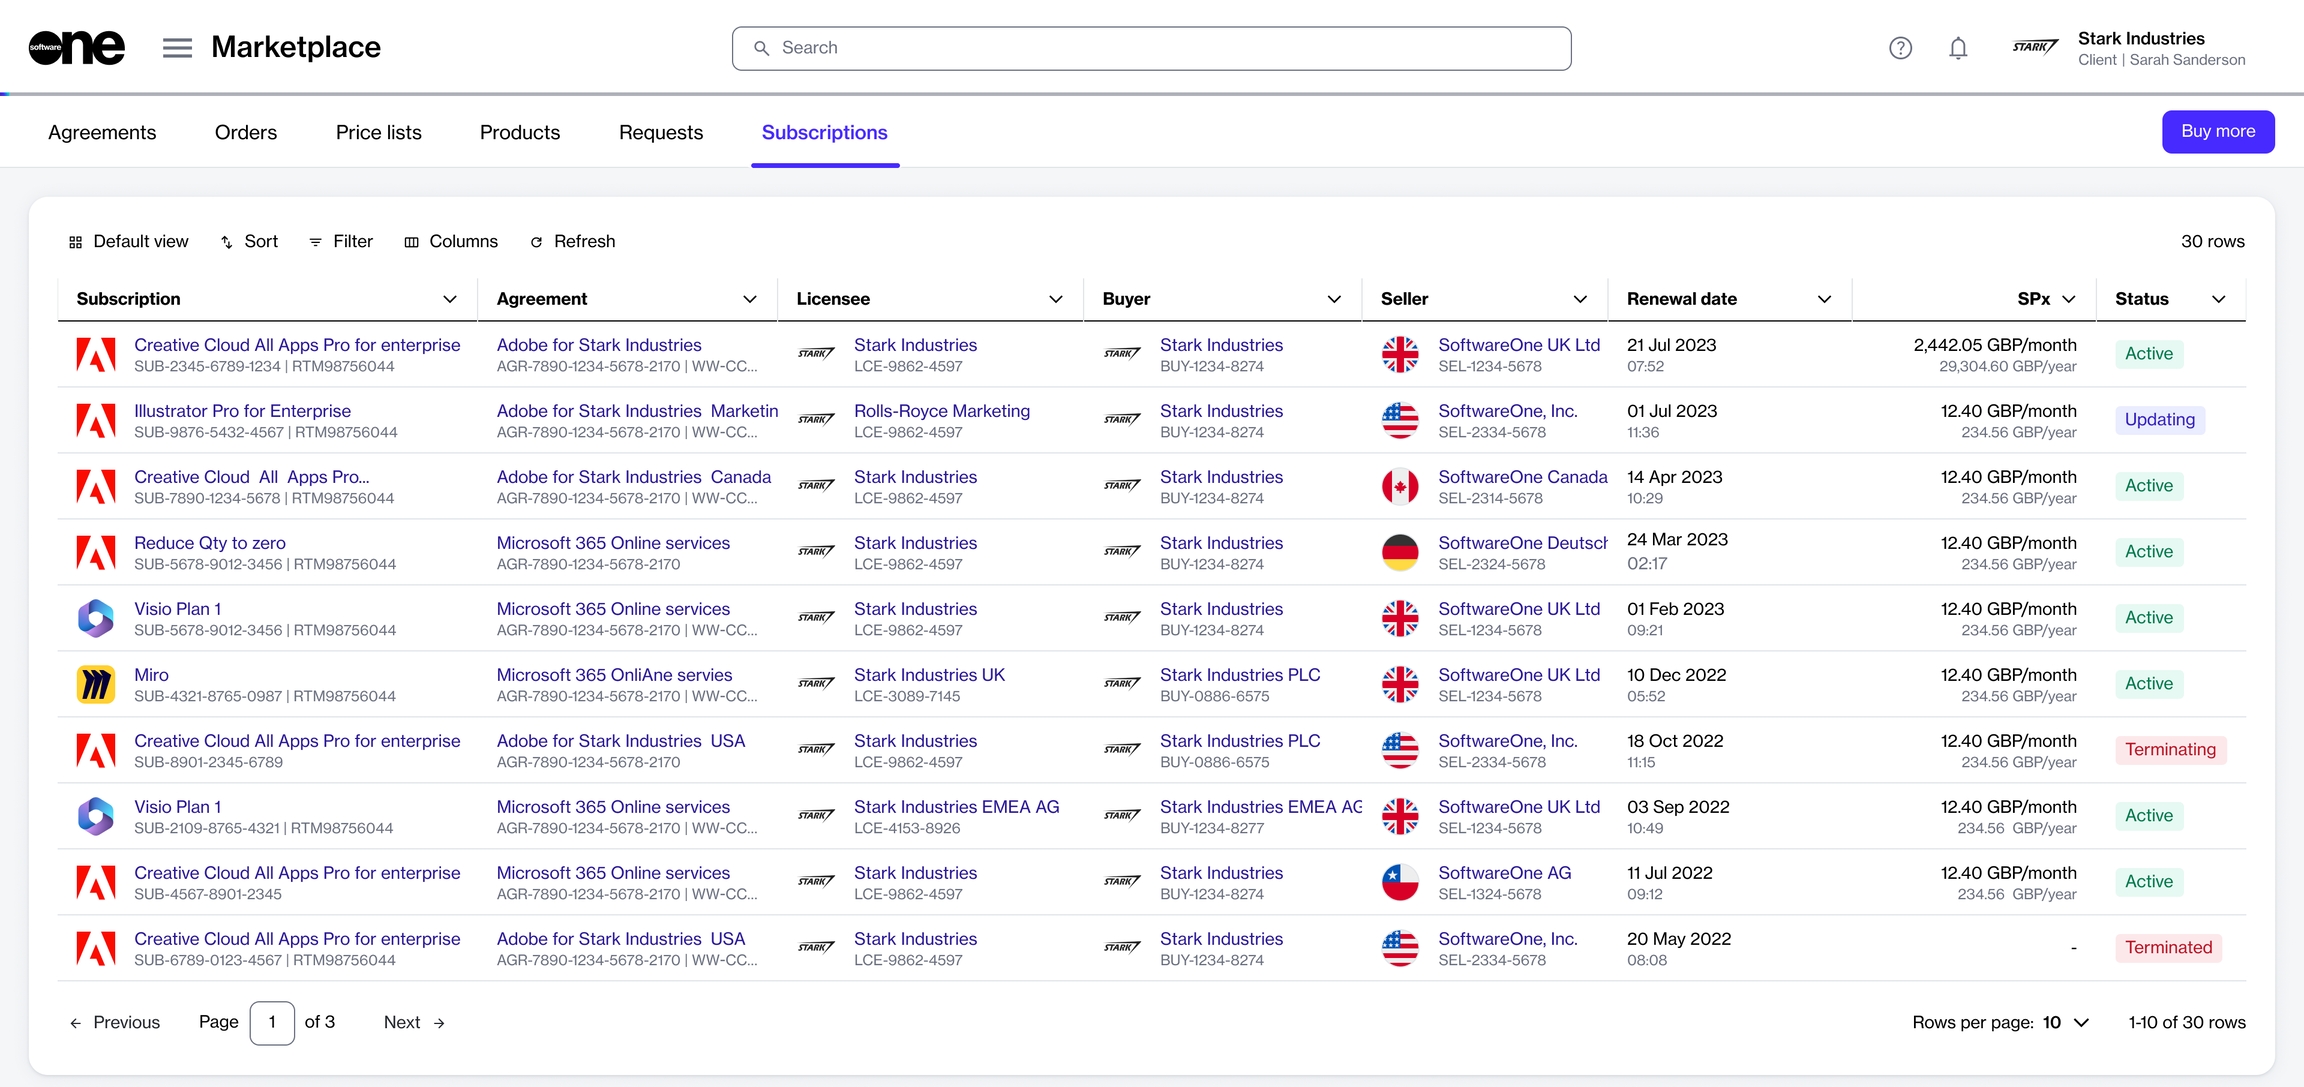
Subscription management through self-service is a key feature of the Marketplace Platform, giving you the flexibility to order new subscriptions and manage the existing ones.
You can order new subscriptions through self-service, increase or decrease the number of licenses, and cancel your subscription. You can also edit the subscription name and manage renewals.
All subscriptions are listed on the Subscriptions page. The page displays all subscriptions, regardless of their status.
To open the details page for a subscription, select the subscription name.
You can change the quantity of licenses by creating a change order through the platform.
Change orders are required if you want to order additional licenses or lower the number of your existing licenses. For instructions, see .
You can cancel a single subscription in an agreement or all subscriptions by placing a termination order. Subscriptions can't be canceled without a termination order.
To cancel a single subscription, use the Terminate option on the subscription details page. For instructions, see .
To cancel all subscriptions in an agreement, terminate the agreement. For instructions, see .
The Marketplace Platform uses data grids to display data.
A data grid is a table with rows and columns, and it contains several operations that allow you to customize the display of information.
You can sort and filter data, show or hide columns, adjust the column width, change the default rows per page, and more. This topic describes each of these tasks.
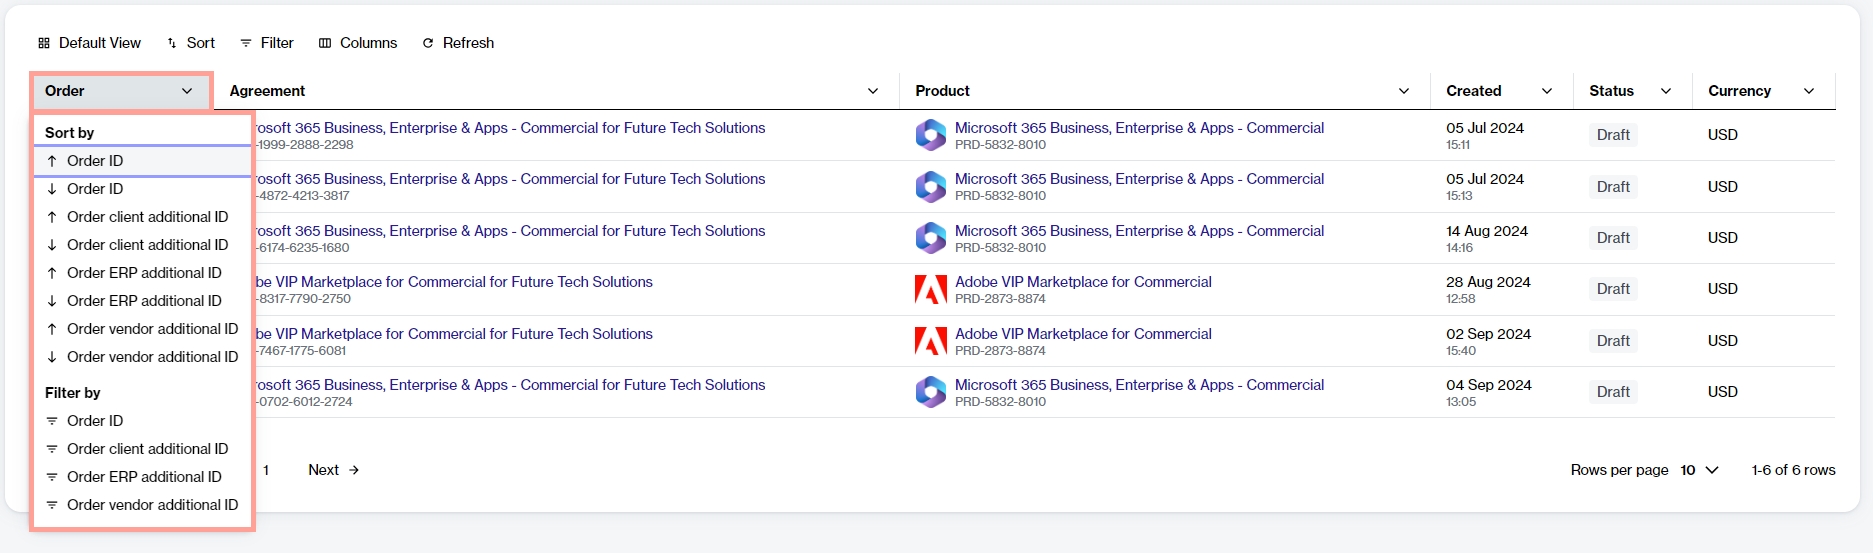
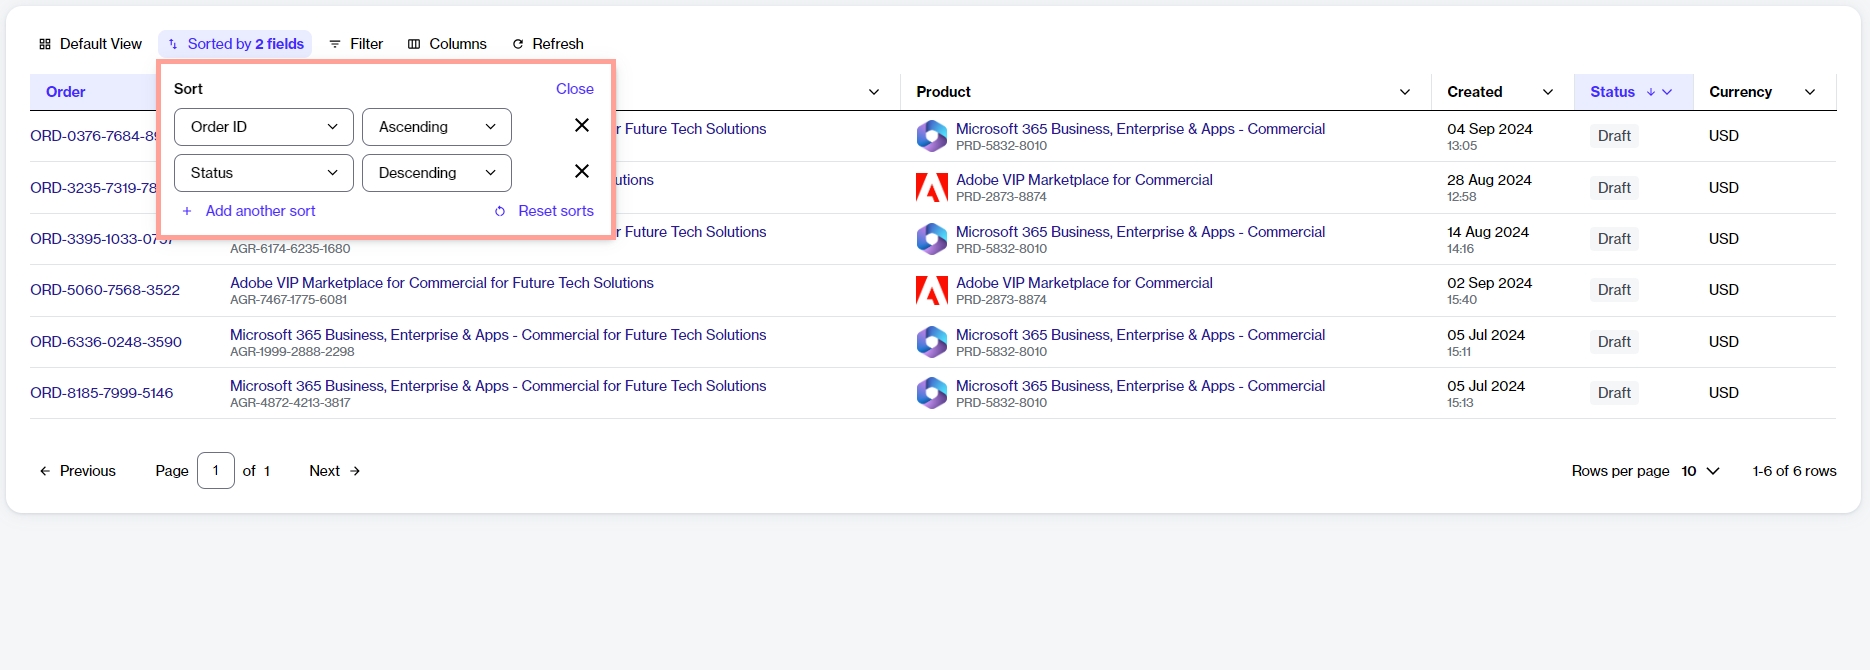
Sorting enables you to reorganize your data in ascending or descending order so you can understand and visualize it better. There are two ways to use the sort function in the grid.
Select Save to save your preferences.
Authorize SoftwareOne as your indirect provider. You must select a country that is within your region. For regional markets, see Microsoft Regions.
Enter the email address associated with your Microsoft partner account. We will use this email address to link your CSP customers with your Microsoft reseller account.
Enter the MPN ID associated with your Microsoft partner account. We'll associate your Microsoft subscriptions with the MPN ID.
Details - Enter a unique name for the certificate. When done, select Next.
Overview - Review the details and select Add.
Summary - Select View details to open the enrollment details page. Otherwise, select Close.

Resale licensee - (Optional) Select this checkbox to configure the license as a resale licensee, so they can order software products and services for resale.
External reference - (Optional) Enter a reference number or identifier for the licensee.
Licensee description - (Optional) Provide a brief description of the licensee.
Buyers - Choose the buying entity you want to link with the license, then select Next.
Sellers - Choose the SoftwareOne entity you want to order from. Only the sellers that are mapped to the buyer you've selected in the previous step are displayed. When done, select Next.
Contact person - Choose if you want to assign a contact person to the licensee, then select Next:
None (leave unassigned) - Choose this if you don't want to assign a contact person.
Select an account user - Choose this to assign an existing user within your account as the contact person.
Add contact details manually - Choose this to enter the details manually. You'll need to provide the person's name, email address, and optional contact details.
Address - Enter the address for the new licensee and select Next. Note that the Create a new licensee address option is selected by default.
Overview - Review all the details you've entered and select Add. The licensee is configured as a resale licensee in the platform.
Summary - Select View details to open the licensee details page. Otherwise, select Close.

Select agreements - Select Create agreement to start creating your new agreement.
Select licensee - Choose an existing licensee from the list. Ensure that the value in the Resale column is Yes, then select Next.
Select certificate - Select a certificate. If the certificate you want to use isn't displayed, use the Add certificate option to add it. When done, select Next.
Create agreement - Choose whether you want to create a new Microsoft tenant or connect an existing cloud account.
Microsoft details - Do the following depending on the selection in the previous step:
For a new cloud account, provide a new domain name and then fill out the contact form. You'll need to provide the following details:
Company name.
Company registration ID or tax number.
Special qualifications - Select the checkbox if your organization is a entity. Otherwise, leave it clear. A company is classified as state-owned if it is either controlled by the government or performs functions that the government considers its own.
Support contacts - Enter the contact details of your support administrator and choose your preferred support language. Select Next.
Items - Complete the following steps and select Next.
Read and understand the attestation: "By clicking Next, I confirm that my organization is acting as an indirect partner when choosing a reseller and as a direct partner in the absence of selecting a reseller".
Select Add items to choose the items you want to order.
Details - Provide reference details, like additional IDs or notes, and select Next.
Review order - Read the terms and conditions and the privacy statement. When done, select Place order to submit your order.
Summary - Select View details to go to the order details page. Otherwise, select Close.
Set the quantity of your newly added items in the New qty field. Then, select Next.
Manage your account settings, including user groups, licensees, notifications, and more.
Find answers to commonly asked questions.
Familiarize yourself with the key concepts and terminology.
Learn how to navigate the platform and use features like data grids, object spotlight, account switcher, and more.
Understand the key points to establish a GDAP or a partner relationship request with SoftwareOne.
Enroll in the SoftwareOne CSP Partner Program (mandatory for ordering products for resale).
Order products for resale to your end customers by creating a new agreement.
Order additional items using an existing agreement.
View subscriptions, add or remove licenses, and terminate subscriptions.
Add new users to your account.
You can sort the data for a column by selecting the column header. When you select the header, the preconfigured sort options are displayed. You can choose any option from the list.
Sort multiple columns
If you want to apply multiple sorts, selectSort in the grid and then follow these steps:
In the Sort box, select Add another sort.
Choose the required property and select the display order (Ascending or Descending). To add another sorting rule, select Add another sort. You can add multiple rules.
Select Close. All columns that have sort conditions applied will be highlighted in the grid.
Filters help you narrow down data based on specific attributes. Depending on the type of data you are searching for, you can use a single filter or create multiple filters using different conditions and AND/OR operators.
For instance, when ordering new items, you could create a filter to show only the items with a specific name. Similarly, if you have multiple subscriptions, you could use the AND/OR operators to view subscriptions that are active AND have auto-renewal enabled.
You can also use the Search Query filter in the grid to enter a search term to find matching records within other filter conditions, such as orders, agreements, and more.
To create filters:
Select the Filter option in the grid.
In the Filters box, select Add another condition, then define the conditions:
Choose the required property.
Select the condition, such as equal, contains, starts with, and so on.
Choose a value from the list of preconfigured values or type the keyword.
If needed, select Add another condition to add another condition and combine those conditions using the AND or OR operators.
AND - If you select this operator, the results are displayed only if both conditions are met.
OR - If you select this operator, only one of the conditions needs to be met for the results to be displayed.
As you define filters, the data in the grid refreshes automatically. If the platform doesn't find any data matching the filters, it displays a message.
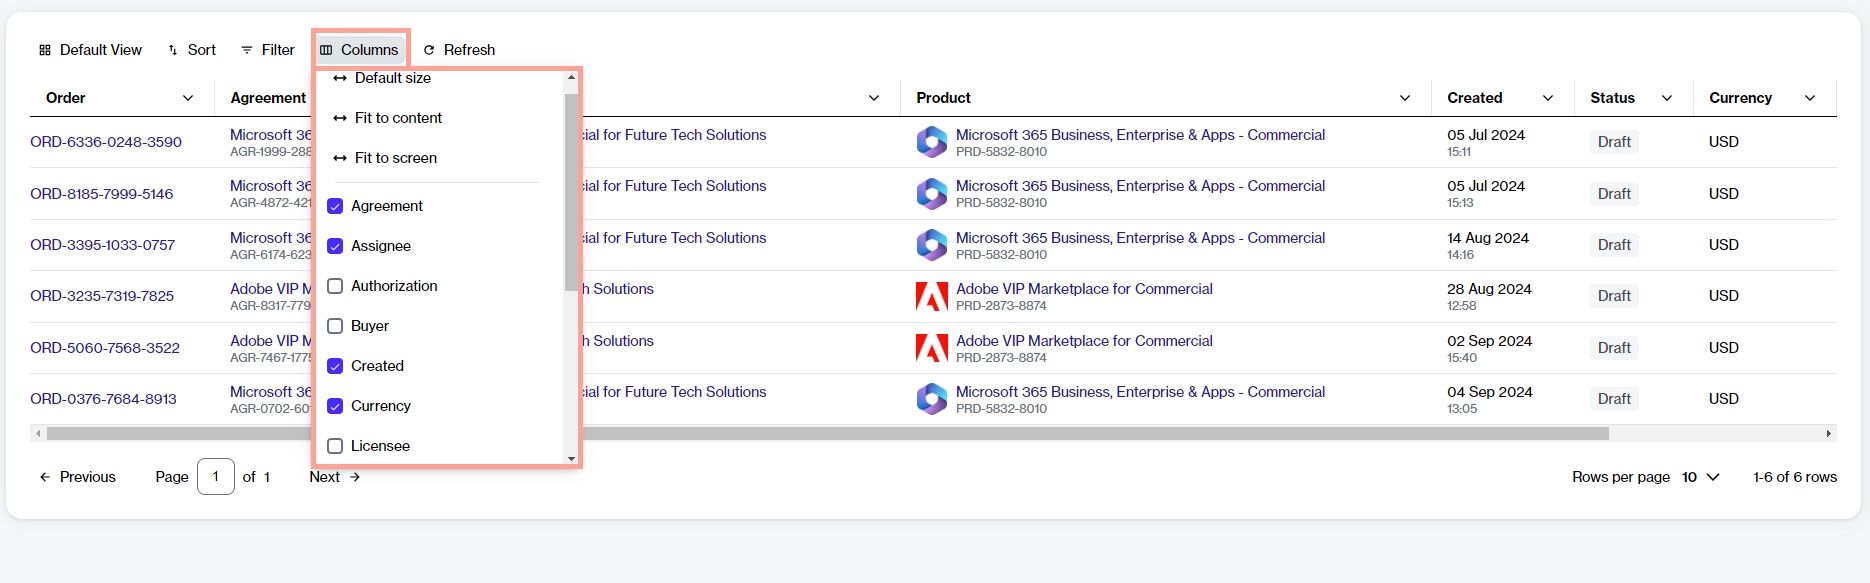
Show or hide columns
The Columns selector in the data grid lets you show or hide a column. Using this option, you can view only the information you need and hide other columns from the page.
You can use the checkbox next to each column name to hide or display a column. If you have hidden a column, you can make it visible again by selecting the same checkbox. Note that some columns are shown by default, and you cannot hide them.
Adjust column widths
The Columns selector also contains options to adjust the column width. These options include:
Default size - This option resets each column in the table to its default size. You can use this option if you've made adjustments and want to return all columns to their original state.
Fit to content - This option resizes each column in the table to fit its specific content. It means that the width is adjusted to the content within the column.
Fit to screen - This option resizes each column to make the entire table fit your screen.
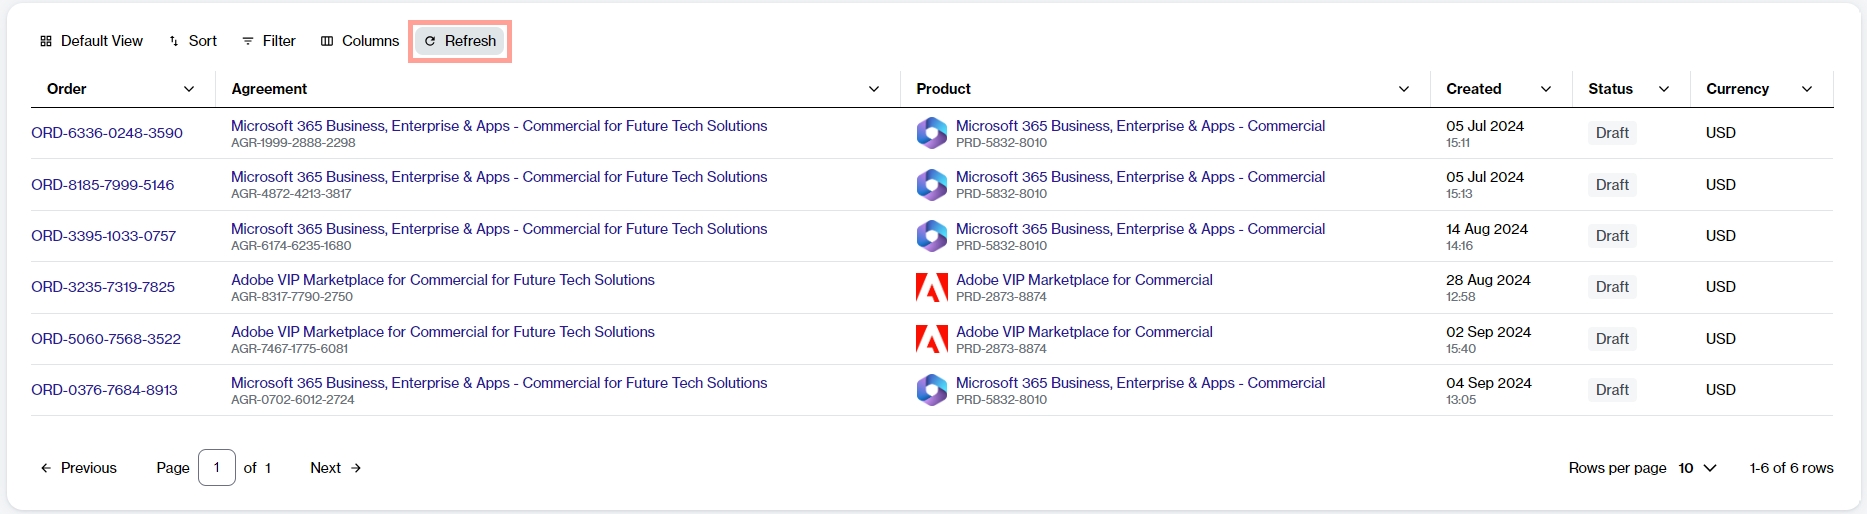
If the data in the grid has changed, you can refresh the data to make sure you are working with the latest data at all times. Use the Refresh option to fetch the latest data from the system.
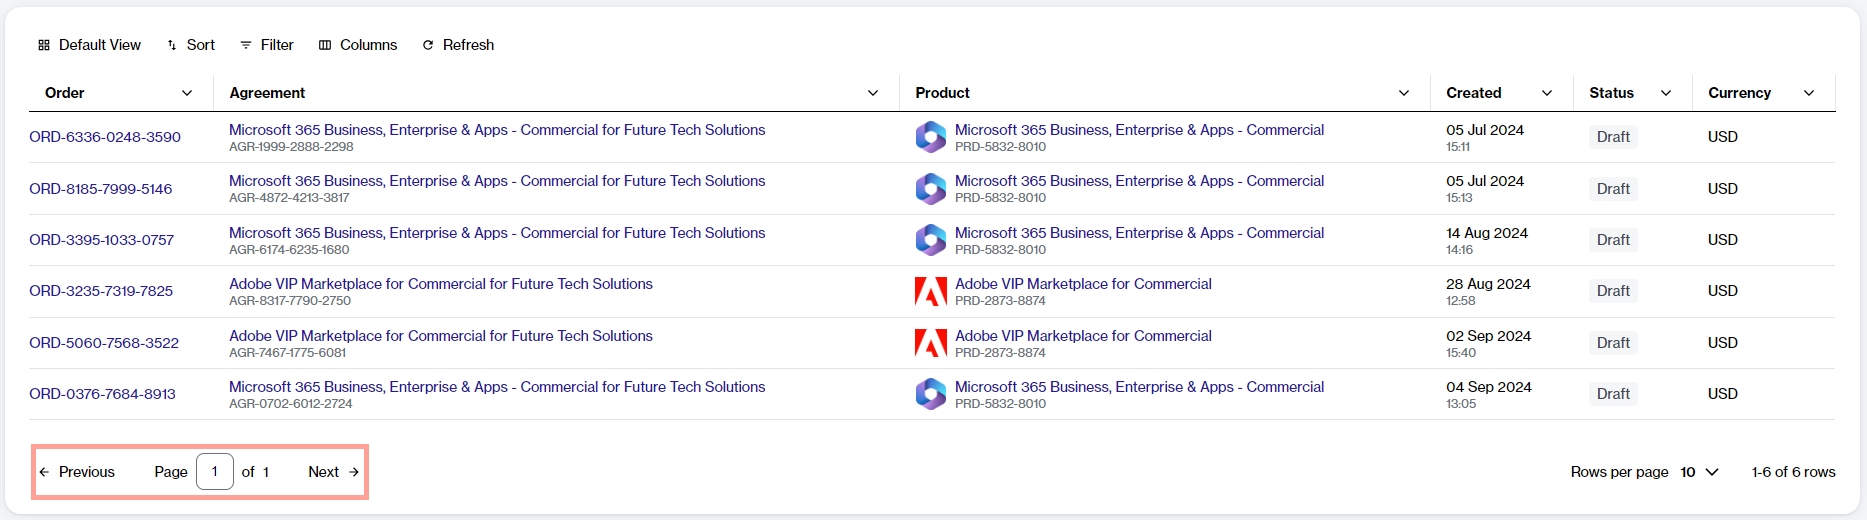
By default, the Marketplace Platform displays 10 rows of data on a page.
You can change the default value by selecting another value from the Rows per page option on the lower-right side of the grid. You can choose to show 5, 10, 25, 50, or 100 rows per page.
If the grid contains several rows, the rows are split into pages, and page numbers are displayed on the lower-left side of the table.
You can view the page number you are currently on and navigate between pages using the Next and Previous options. You can also go to a page directly by entering the number in the Page field and pressing Enter.

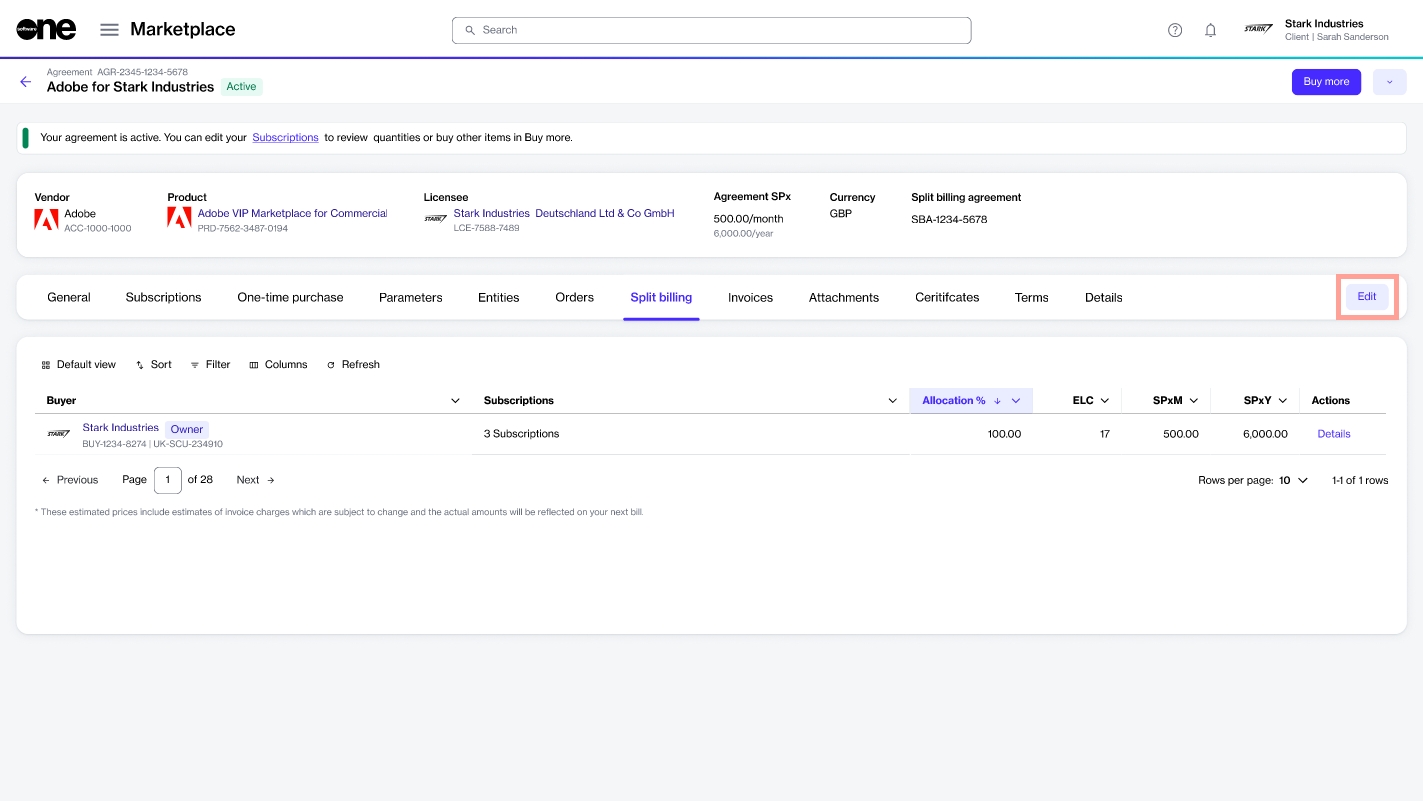
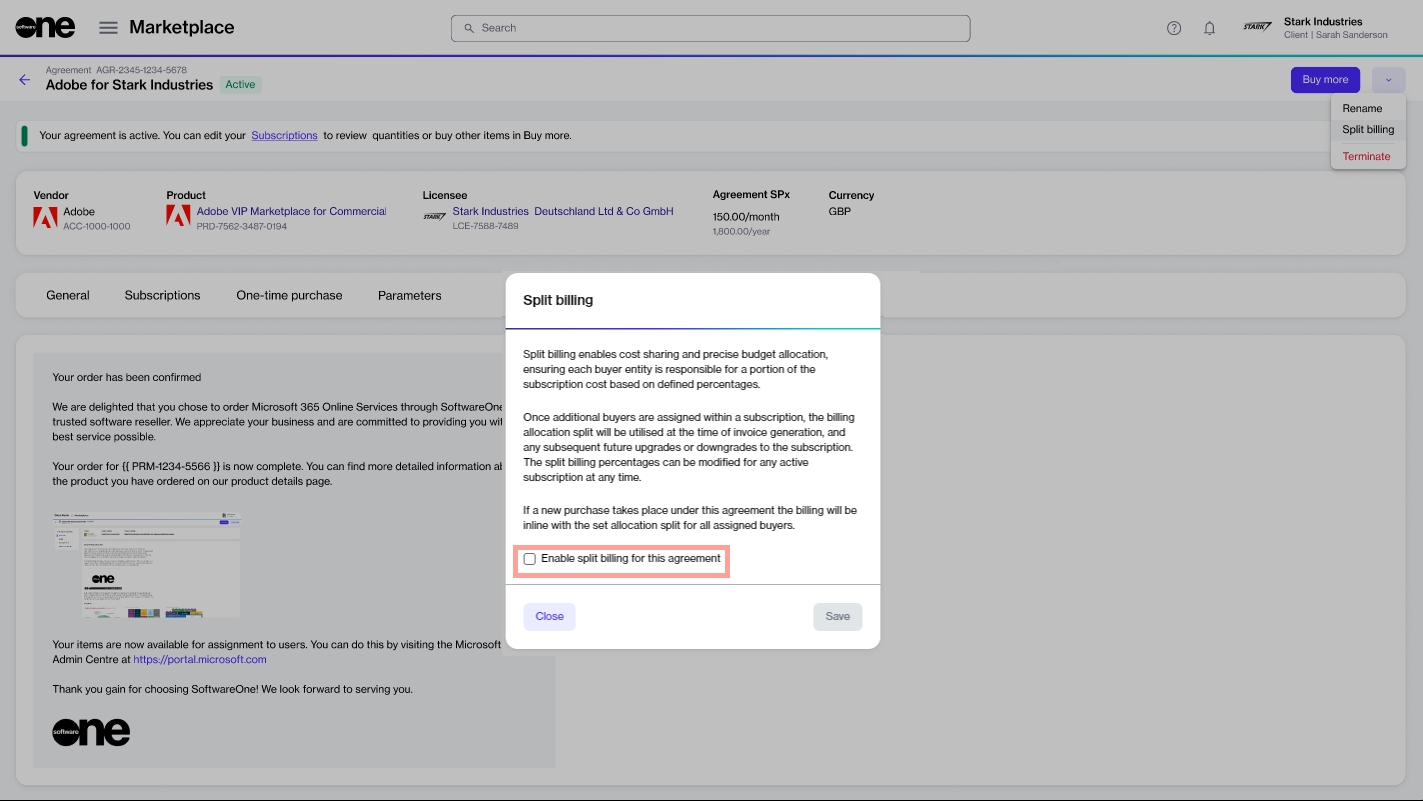
Split billing is a feature that allows you to divide the cost of a subscription across different buyers in your account. If your organization has multiple legal entities, split billing can be used to distribute costs effectively. To learn more, see Split Billing.
In the Marketplace Platform, the split billing process begins by activating the feature from the user interface (UI), selecting buyers for allocation, and then specifying each buyer's allocation percentage or license count. This tutorial describes how to complete all of these steps.
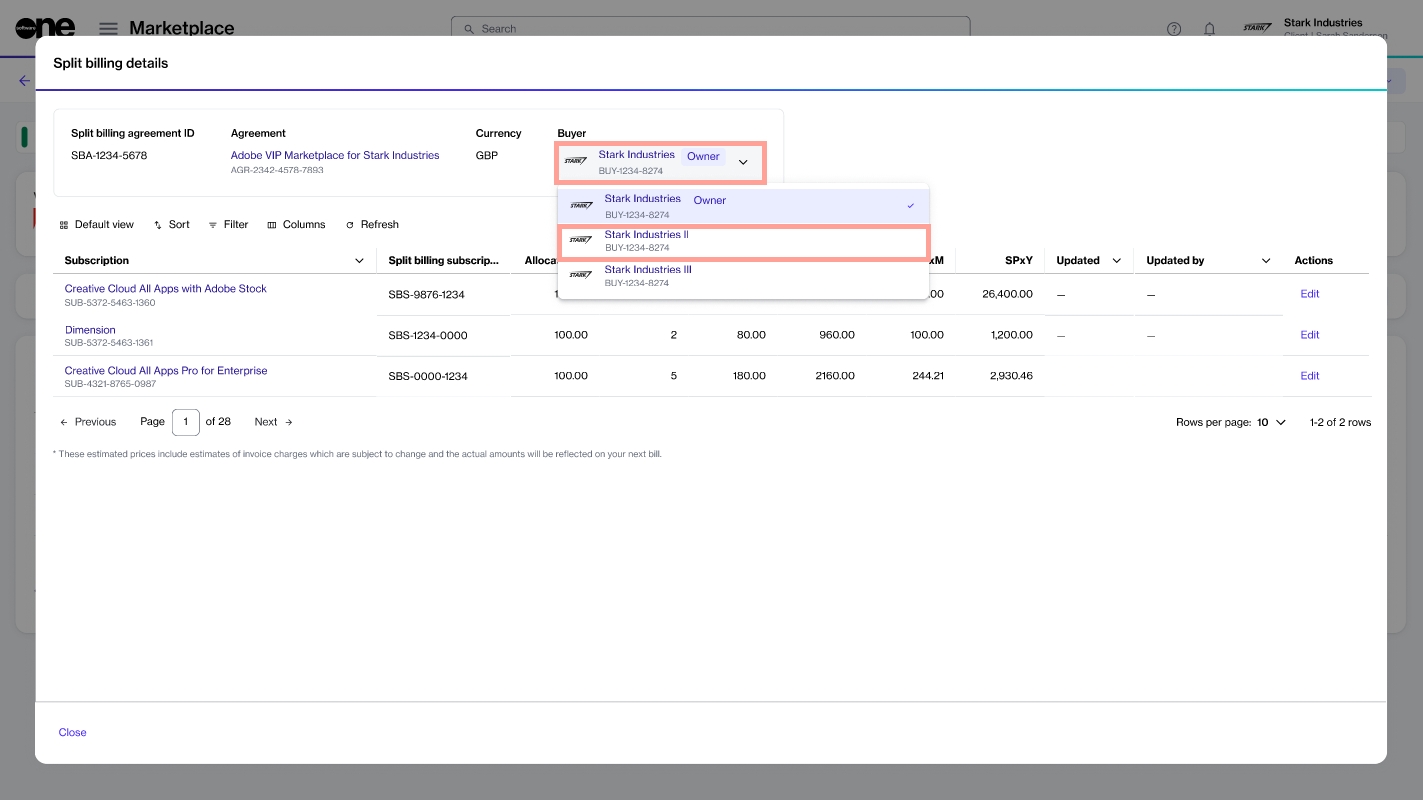
In this tutorial, an agreement named Adobe VIP Marketplace for Stark Industries contains three subscriptions. Currently, 100% of the billing for these subscriptions is assigned to a single buyer named Stark Industries. We'll activate split billing, add two new buyers named Stark Industries II and Stark Industries III, and then specify the allocation percentage for these buyers.
Before getting started with the tutorial, it's essential to have an understanding of the platform's . You must also be familiar with the platform's interface and know how to navigate it.
Activating split billing
Split billing can only be activated at the agreement level. To activate split billing:
Navigate to the Agreements page. Then, select the required agreement.
On the agreement details page, select the arrowchoose Split billing.
If you have additional subscriptions and want to split the billing, you can repeat the same steps for those subscriptions. You can also edit the split at any time. For instructions, see .
Complete the following steps, making sure to enter or verify the required information where necessary:
Complete the following steps, making sure to enter or verify the required information where necessary:
Company address, including city and zip/postal code.
Contact details of the person managing your account.
For an existing cloud account, enter your existing domain name and your Microsoft account details.
Complete the following steps, making sure to enter or verify the required information where necessary:
In the Split billing dialog, select the checkbox to enable split billing, then select Save.
Split billing is activated, and the Split billing tab appears on the agreement’s details page. You are now ready to configure the buyers to whom you want to allocate billing.
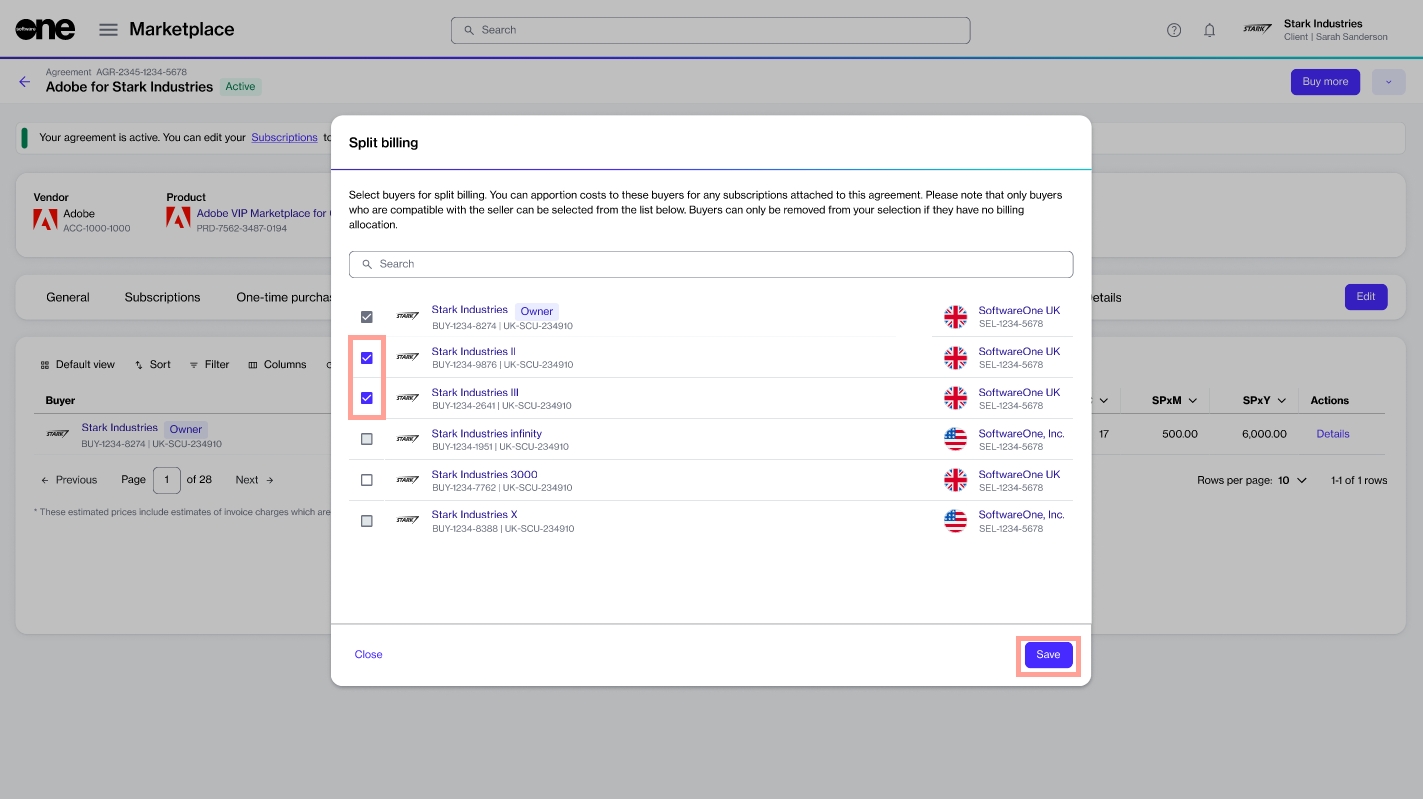
Configuring buyers
In this tutorial, Stark Industries is the Owner buyer who has been allocated 100% of the billing. We will configure Stark Industries II and Stark Industries III as additional buyers and then divide the costs across buyers.
To configure buyers:
Select the Split billing tab on the agreement details page.
Select Edit.
In the Split billing dialog, use the checkboxes to select buyers from the list of your active buyers. When done, select Save.
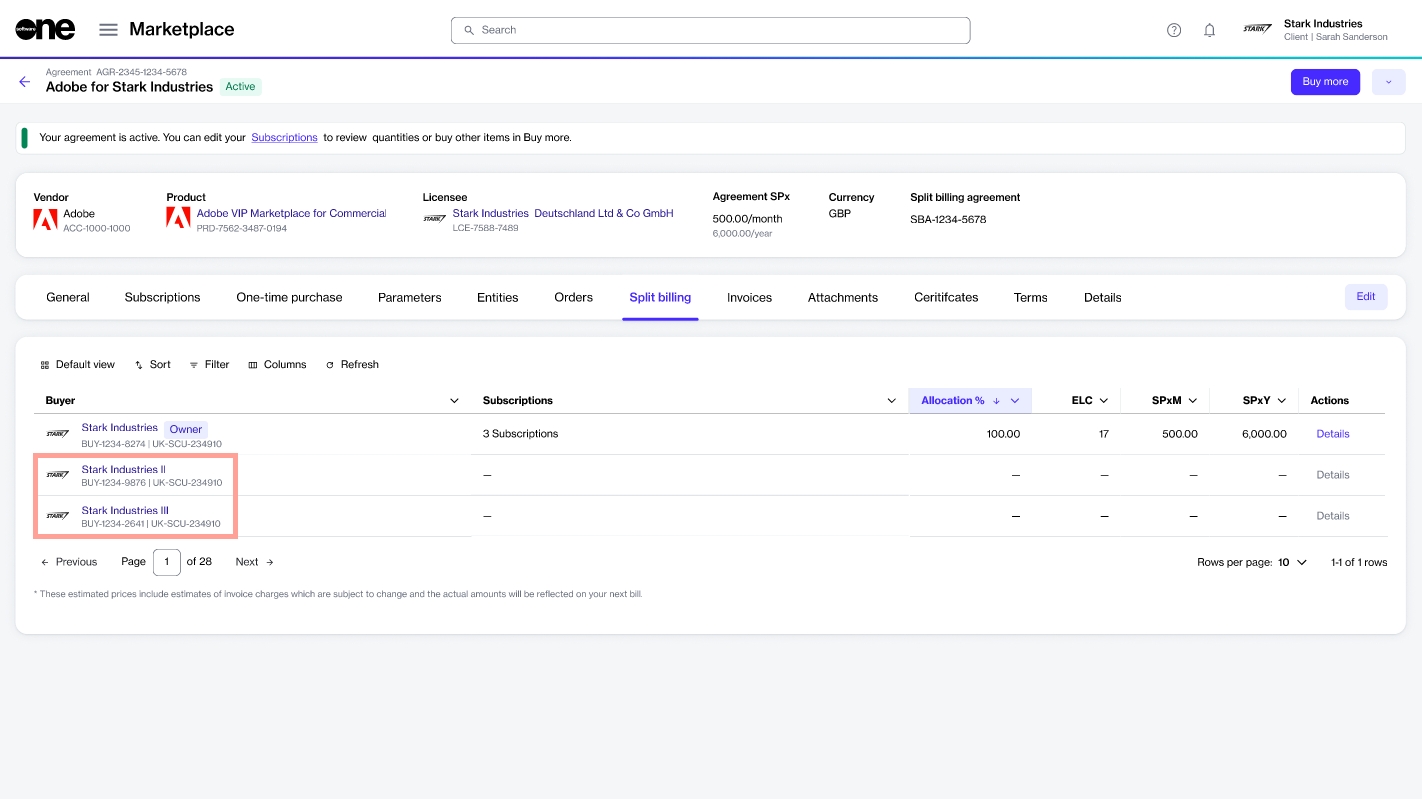
Stark Industries II and Stark Industries III are added as buyers and displayed on the Split billing tab. You are now ready to allocate billing to these buyers.
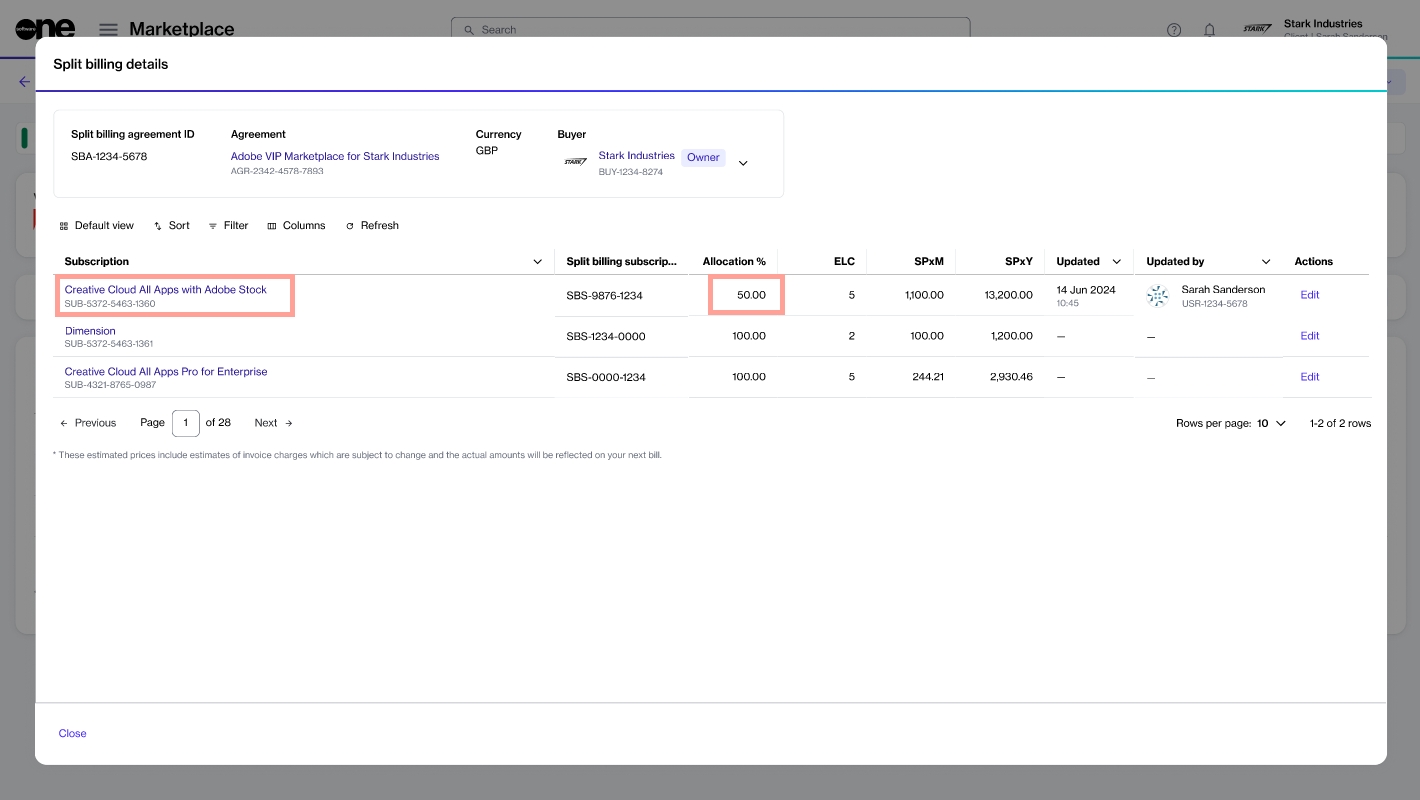
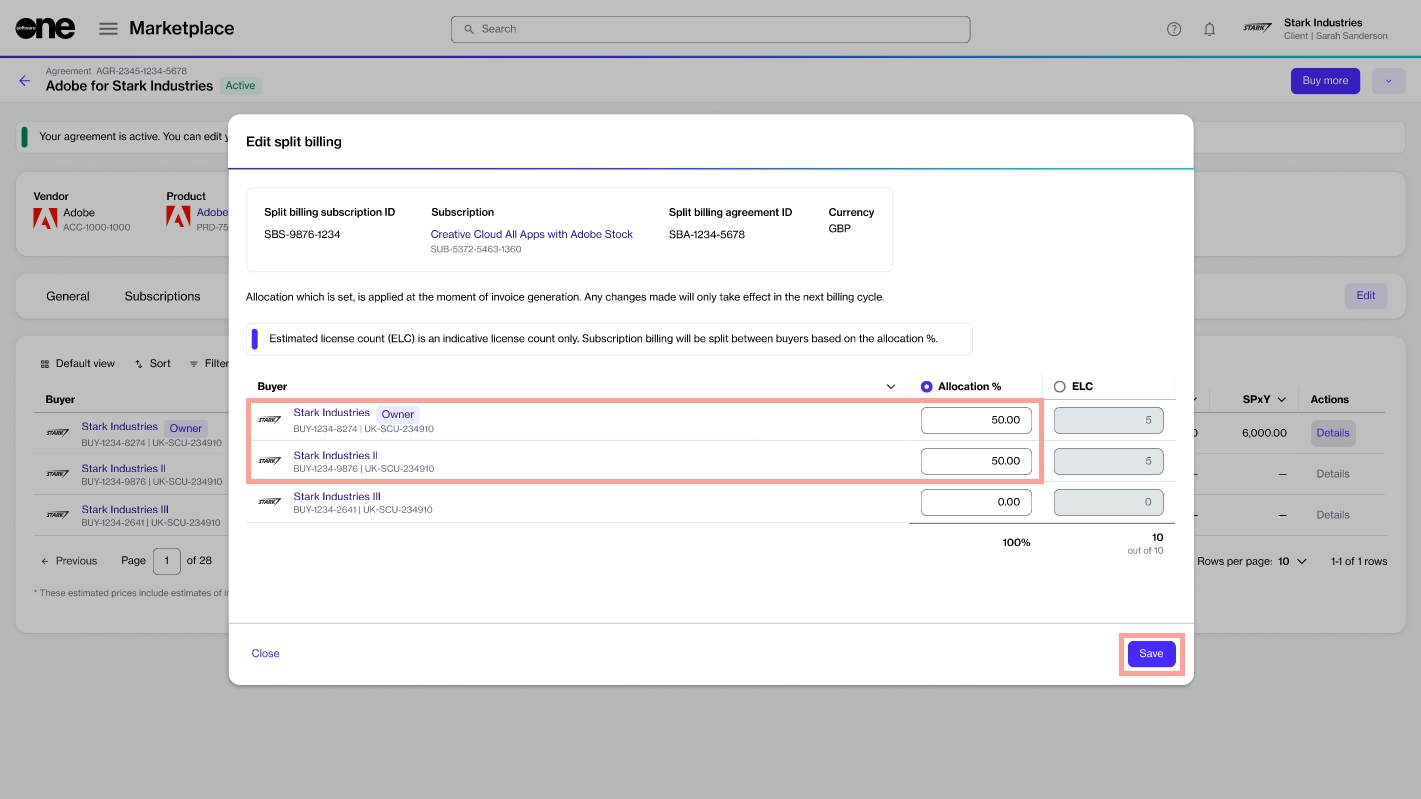
Allocating split billing
Billing can be allocated by specifying percentages for each buyer. You can also specify the estimated license count. Both of these options are linked, meaning changing one updates the other automatically, although only the allocation % is used during billing (see Split billing rules to learn more).
To start configuring the split for each buyer:
In the Actions column for the Owner buyer, select Details.
Find the required subscription and select Edit. The example agreement contains three subscriptions, but we will only configure allocation for the first subscription, called Creative Cloud All Apps with Adobe Stock.
Under Allocation%, enter the allocation percentage for each buyer. Then, select Save. In this example, 50% of the billing is allocated to Stark Industries (owner buyer) and the remaining 50% to Stark Industries II. No split billing percentage is assigned to Stark Industries III.
The allocation is updated and displayed on the Split billing details page. By default, the allocation for the owner buyer is displayed:
Use the Buyer menu at the top to view the allocation for the other buyers (Stark Industries II in this example):
Select Close. You'll be returned to the Split billing details tab.


Start the purchasing process
Follow the steps to place your order


Termination orders - An order to terminate an active subscription or an agreement.
Configuration orders - An order to enable or disable the auto-renewal of a subscription.
To learn more about marketplace orders, see Orders.
In the Ordering section, select Edit. Then, add or update the Existing domain name or Primary domain name fields as needed.
Select Save.
Select Process in the upper right to resume order processing. To learn more, see Change Your Order's Status to Processing.
On the certificate details page, select the Parameters tab.
The MPN ID is displayed under Ordering parameters, and the Indirect Reseller ID is shown under Fulfillment parameters.
Follow the steps in the purchase wizard. Make sure to create a new agreement or select an existing one, select a preconfigured resale licensee, and choose your certificate.
Complete the remaining steps in the wizard to place your order.
For detailed instructions, see How to Order Products for Resale.
Open an individual subscription to check the renewal date.
Marketplace subscriptions renew automatically unless you disable the automatic renewal.